Figure 277: Activity Showing Preference Values
Android has many different ways for you to store data for long-term use by your
activity. The simplest ones to use are SharedPreferences and simple files.
Android allows activities and applications to keep preferences, in the form of
key/value pairs (akin to a Map), that will hang around between invocations of
an activity. As the name suggests, the primary purpose is for you to store
user-specified configuration details, such as the last feed the user looked at
in your feed reader, or what sort order to use by default on a list, or
whatever. Of course, you can store in the preferences whatever you like, so
long as it is keyed by a String and has a primitive value (boolean,
String, etc.)
Preferences can either be for a single activity or shared among all activities in an application. Other components, such as services, also can work with shared preferences.
To get access to the preferences, you have three APIs to choose from:
getPreferences() from within your Activity, to access activity-specific
preferencesgetSharedPreferences() from within your Activity (or other application
Context), to access application-level preferencesgetDefaultSharedPreferences(), on PreferenceManager, to get the shared
preferences that work in concert with Android’s overall preference frameworkThe first two take a security mode parameter. The right answer here is
MODE_PRIVATE, so no other applications can access the file. The
getSharedPreferences() method also takes a name of a set of preferences;
getPreferences() effectively calls getSharedPreferences() with the
activity’s class name as the preference set name. The
getDefaultSharedPreferences() method takes the Context for the preferences
(e.g., your Activity).
All of those methods return an instance of SharedPreferences, which offers a
series of getters to access named preferences, returning a suitably-typed
result (e.g., getBoolean() to return a boolean preference). The getters also
take a default value, which is returned if there is no preference set under the
specified key.
Unless you have a good reason to do otherwise, you are best served using the
third option above — getDefaultSharedPreferences() — as that will give
you the SharedPreferences object that works with a PreferenceActivity by
default, as will be described later in this chapter.
Given the appropriate SharedPreferences object, you can use edit() to get
an “editor” for the preferences. This object has a set of setters that mirror
the getters on the parent SharedPreferences object. It also has:
remove() to get rid of a single named preferenceclear() to get rid of all preferencesapply() or commit() to persist your changes made via the editorThe last one is important — if you modify preferences via the editor and
fail to save the changes, those changes will evaporate once the editor
goes out of scope. commit() is a blocking call, while apply() works
asynchronously. Ideally, use apply() where possible, though it was only
added in Android 2.3, so it may not be available to you if you are aiming to
support earlier versions of Android than that.
Conversely, since the preferences object supports live changes, if one part of your application (say, an activity) modifies shared preferences, another part of your application (say, a service) will have access to the changed value immediately.
Some “preferences” will be collected as part of the natural use of your
user interface. For example, if you have a SeekBar to control a zoom
level, you might elect to record the SeekBar position in SharedPreferences,
so you can restore the user’s last zoom level later on.
However, in many cases, we have various settings that we would like
the user to be able to configure but are not something that the user would
configure elsewhere in our UI.
You could roll your own UI to collect preferences in bulk from the user. On the
whole, this is a bad idea. Instead, use preference XML resources and a
PreferenceFragment.
Why?
One of the common complaints about Android developers is that they lack discipline, not following any standards or conventions inherent in the platform. For other operating systems, the device manufacturer might prevent you from distributing apps that violate their human interface guidelines. With Android, that is not the case — but this is not a blanket permission to do whatever you want. Where there is a standard or convention, please follow it unless you have a clear reason not to, so that users will feel more comfortable with your app and their device.
Using a PreferenceFragment for collecting preferences is one such convention.
The linchpin to the preferences framework and PreferenceFragment is yet
another set of XML data structures. You can describe your application’s preferences in
XML files stored in your project’s res/xml/ directory. Given that, Android
can present a UI for manipulating those preferences, one which matches
what you see in the Settings app. The user’s choices are then
stored in the SharedPreferences that you get back from
getDefaultSharedPreferences().
This can be seen in the
Prefs/Fragment
sample project.
This project’s main activity hosts a TableLayout, into which we will load
the values of five preferences:
<?xml version="1.0" encoding="utf-8"?>
<TableLayout xmlns:android="http://schemas.android.com/apk/res/android"
  android:layout_width="match_parent"
  android:layout_height="match_parent">

  <TableRow>

    <TextView
      style="@style/label"
      android:text="@string/checkbox"/>

    <TextView
      android:id="@+id/checkbox"
      style="@style/value"/>
  </TableRow>

  <TableRow>

    <TextView
      style="@style/label"
      android:text="@string/ringtone"/>

    <TextView
      android:id="@+id/ringtone"
      style="@style/value"/>
  </TableRow>

  <TableRow>

    <TextView
      style="@style/label"
      android:text="@string/text"/>

    <TextView
      android:id="@+id/text"
      style="@style/value"/>
  </TableRow>

  <TableRow>

    <TextView
      style="@style/label"
      android:text="@string/list"/>

    <TextView
      android:id="@+id/list"
      style="@style/value"/>
  </TableRow>

</TableLayout>
The above layout is used by PreferenceContentsFragment, which populates
the right-hand column of TextView widgets at runtime in onResume(), pulling
the values from the default SharedPreferences for our application:
package com.commonsware.android.preffrag;

import android.app.Fragment;
import android.content.SharedPreferences;
import android.os.Bundle;
import android.preference.PreferenceManager;
import android.view.LayoutInflater;
import android.view.View;
import android.view.ViewGroup;
import android.widget.TextView;

public class PreferenceContentsFragment extends Fragment {
  private TextView checkbox=null;
  private TextView ringtone=null;
  private TextView text=null;
  private TextView list=null;

  @Override
  public View onCreateView(LayoutInflater inflater, ViewGroup parent,
                           Bundle savedInstanceState) {
    View result=inflater.inflate(R.layout.content, parent, false);

    checkbox=(TextView)result.findViewById(R.id.checkbox);
    ringtone=(TextView)result.findViewById(R.id.ringtone);
    text=(TextView)result.findViewById(R.id.text);
    list=(TextView)result.findViewById(R.id.list);

    return(result);
  }

  @Override
  public void onResume() {
    super.onResume();

    SharedPreferences prefs=
        PreferenceManager.getDefaultSharedPreferences(getActivity());

    checkbox.setText(Boolean.valueOf(prefs.getBoolean("checkbox", false)).toString());
    ringtone.setText(prefs.getString("ringtone", "<unset>"));
    text.setText(prefs.getString("text", "<unset>"));
    list.setText(prefs.getString("list", "<unset>"));
  }
}
The main activity, FragmentsDemo, simply loads res/layout/main.xml, which
contains a <fragment> element pointing at PreferenceContentsFragment. It
also defines an options menu, which we will examine later in this section.
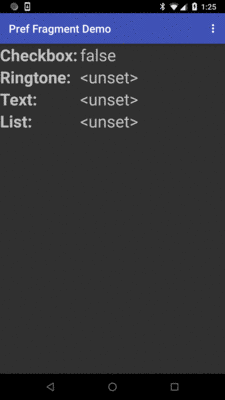
The result is an activity showing the default values of the preferences when it is first run, since we have not set any values yet:
Figure 277: Activity Showing Preference Values
First, you need to tell Android what preferences you are trying to collect from the user.
To do this, you will need to add a res/xml/ directory to your project, if
one does not already exist. Then, for your PreferenceFragment, you will
define one of these XML resource files.
The root element of this XML file will be <PreferenceScreen>, and it
will contain child elements, one per preference.
In the sample project, we have one such file, res/xml/preferences.xml:
<PreferenceScreen xmlns:android="http://schemas.android.com/apk/res/android">

  <CheckBoxPreference
    android:key="checkbox"
    android:summary="@string/pref1summary"
    android:title="@string/pref1title"/>

  <RingtonePreference
    android:key="ringtone"
    android:showDefault="true"
    android:showSilent="true"
    android:summary="@string/pref2summary"
    android:title="@string/pref2title"/>

  <EditTextPreference
    android:dialogTitle="@string/dialogtitle"
    android:key="text"
    android:summary="@string/pref3summary"
    android:title="@string/pref3title"/>

  <ListPreference
    android:dialogTitle="@string/listdialogtitle"
    android:entries="@array/cities"
    android:entryValues="@array/airport_codes"
    android:key="list"
    android:summary="@string/pref4summary"
    android:title="@string/pref4title"/>

</PreferenceScreen>Each preference element has two attributes at minimum:
android:key, which is the key you use to look up the value in the
SharedPreferences object via methods like getInt()
android:title, which is a few words identifying this preference to
the userYou may also wish to consider having android:summary, which is a
short sentence explaining what the user is to supply for this preference.
There are lots of other attributes that are common to all preference elements, and there are more types of preference elements than the ones that we used in the preference XML shown above. We will examine more preference elements later in this chapter.
Preference XML, on API Level 11 and higher, is loaded by an implementation of
PreferenceFragment. The mission of PreferenceFragment is to call
addPreferencesFromResource() in onCreate(), supplying the resource ID
of the preference XML to load (e.g., R.xml.preference2). That fragment,
in turn, can be loaded up by a simple Activity.
In fact, the fragment is so short, you could even make it be a
static class inside the activity, as is done in the sample app. The
activity that collects the preferences, EditPreferences, has a
Prefs static subclass of PreferenceFragment:
package com.commonsware.android.preffrag;

import android.app.Activity;
import android.os.Bundle;
import android.preference.PreferenceFragment;

public class EditPreferences extends Activity {
  @Override
  public void onCreate(Bundle savedInstanceState) {
    super.onCreate(savedInstanceState);

    if (getFragmentManager().findFragmentById(android.R.id.content)==null) {
      getFragmentManager().beginTransaction()
          .add(android.R.id.content,
              new Prefs()).commit();
    }
  }

  public static class Prefs extends PreferenceFragment {
    @Override
    public void onCreate(Bundle savedInstanceState) {
      super.onCreate(savedInstanceState);

      addPreferencesFromResource(R.xml.preferences);
    }
  }
}
The only thing that Prefs does is call the inherited
addPreferencesFromResource() in its onCreate() method, supplying
the ID of the preference XML. All EditPreferences does is
show the fragment, in this case using a FragmentTransaction.
An action bar item in MainActivity starts up the
EditPreferences activity. If you click that from the overflow, you
will see the UI created from your XML by means of the
PreferenceFragment:

Figure 278: Activity Collecting Preference Values
If you make a change, such as tapping on the checkbox, and press BACK to return to the original activity, you will see the resulting change in the preference values themselves:
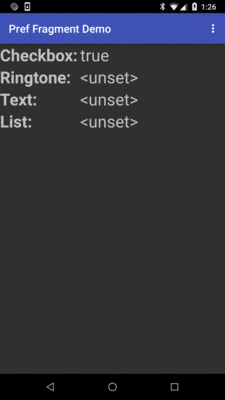
Figure 279: Original Activity, Showing Revised Preference Value
If you open up a preference XML resource in Android Studio, you will be given an editor that is reminiscent of the layout resource editor. You will have two sub-tabs: “Text” with the XML and “Design” with a drag-and-drop UI:
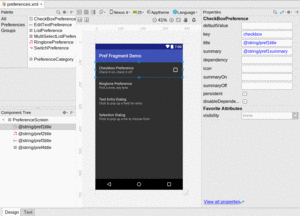
Figure 280: Android Studio Preferences Editor
The drag-and-drop editor UI works akin to its layout resource editor counterpart. You can drag a preference from the Palette into either the preview area or into the Component Tree to add it to the resource. For any selected preference, the Attributes pane allows you to modify attributes, either from the default short list of popular properties or the full list of properties that you get from clicking “View all properties”.
There are a variety of subclasses of Preference in the Android SDK for use
with PreferenceActivity. This section will outline the major ones.
Later in the book we will examine how to create
your own custom Preference classes.
The sample application shown above a CheckBoxPreference.
A CheckBoxPreference is an “inline” preference,
in that the widget the user interacts with (in this case, a CheckBox) is
part of the preference screen itself, rather than contained in a separate dialog.
SwitchPreference is functionally equivalent to CheckBoxPreference, insofar
as both collect boolean values from the user. The difference is that
SwitchPreference uses a Switch widget that the user slides left and right
to toggle between “on” and “off” states. Also note that SwitchPreference was
added in API Level 14 and therefore will not be available to older Android
versions.
EditTextPreference, when tapped by the user, pops up a dialog that contains
an EditText widget. You can configure this widget via attributes on the
<EditTextPreference> element — in addition to standard preference attributes
like android:key, you can include any attribute understood by EditText,
such as android:inputType.
The value stored in the SharedPreferences is a string.
The sample app has an EditTextPreference:
  <EditTextPreference
    android:dialogTitle="@string/dialogtitle"
    android:key="text"
    android:summary="@string/pref3summary"
    android:title="@string/pref3title"/>
When the user taps on it in the PreferenceFragment, the user will see
a dialog where they can fill in a value, or edit an existing value if they
provided one previously:
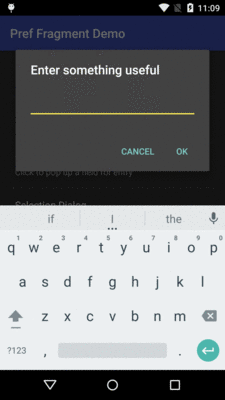
Figure 281: EditTextPreference UI
RingtonePreference pops up a dialog with a list of ringtones installed
on the device or emulator. However, bear in mind that older emulator images
may not have any pre-installed ringtones.
In addition to the standard preference attributes, you can include
android:showDefault, indicating that the list should contain a “Default ringtone”
option. If the user chooses this ringtone, they are effectively choosing
the same ringtone that they have set up for incoming phone calls.
You can also use android:showSilent, which allows the user to choose a “Silence”
pseudo-ringtone, to indicate not to play any ringtone.
The sample app has a RingtonePreference:
  <RingtonePreference
    android:key="ringtone"
    android:showDefault="true"
    android:showSilent="true"
    android:summary="@string/pref2summary"
    android:title="@string/pref2title"/>
When the user taps on it in the PreferenceFragment, the user will see
a roster of ringtones, along with “Default” and “None” options, since we
opted into those:
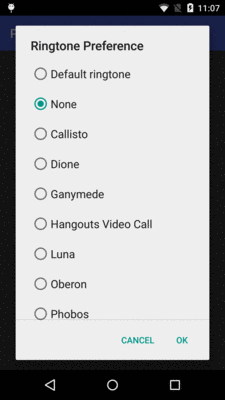
Figure 282: RingtonePreference UI
The value stored in the SharedPreferences is a string, specifically the
string representation of a Uri pointing to a ContentProvider that can
serve up the ringtone for playback. The use of ContentProvider will be
covered in a later chapter, and playing back media like ringtones will be
covered in another later chapter.
Visually, a ListPreference looks just like RingtonePreference, except that
you control what goes into the list. You do this by specifying a pair
of string-array resources in your preference XML.
String resources hold individual strings; string array resources hold a collection
of strings. Typically, you will find string array resources in res/values/arrays.xml
and related resource sets for translation. The <string-array> element has
the name attribute to identify the resource, along with child <item> elements
for the individual strings in the array.
So, our sample app has a pair of <string-array> resources in
res/values/arrays.xml:
<?xml version="1.0" encoding="utf-8"?>
<resources>
  <string-array name="cities">
    <item>Philadelphia</item>
    <item>Pittsburgh</item>
    <item>Allentown/Bethlehem</item>
    <item>Erie</item>
    <item>Reading</item>
    <item>Scranton</item>
    <item>Lancaster</item>
    <item>Altoona</item>
    <item>Harrisburg</item>
  </string-array>
  <string-array name="airport_codes">
    <item>PHL</item>
    <item>PIT</item>
    <item>ABE</item>
    <item>ERI</item>
    <item>RDG</item>
    <item>AVP</item>
    <item>LNS</item>
    <item>AOO</item>
    <item>MDT</item>
  </string-array>
</resources>
Here, the actual strings are written in-line. They could just as easily
be references to string resource (e.g., [item>@string/philly</item]). For
user-facing strings, like those in the cities array, having them as
string resources may make it easier for you to manage your translations.
The sample app then uses those arrays in a ListPreference:
  <ListPreference
    android:dialogTitle="@string/listdialogtitle"
    android:entries="@array/cities"
    android:entryValues="@array/airport_codes"
    android:key="list"
    android:summary="@string/pref4summary"
    android:title="@string/pref4title"/>
This then allows the user to choose a city, when the user taps on this
preference in the PreferenceFragment:
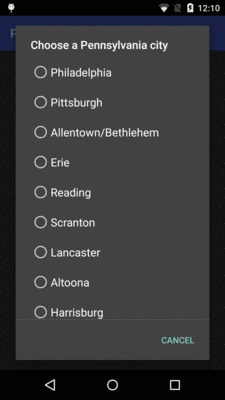
Figure 283: ListPreference UI
However, when the user chooses a city by name (e.g., Philadelphia),
what is stored in the SharedPreferences is the corresponding
airport code (e.g., PHL).
MultiSelectListPreference works much the same way, except:
SharedPreferences, retrieved
via getStringSet()
We will see MultiSelectListPreference in action
later in the book.