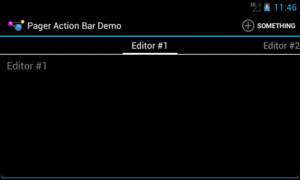
Figure 621: A ViewPager, PagerTabStrip, and Action Bar Item on Android 4.1
In earlier chapters, we saw basic uses of ViewPager.
However, there are other ways to apply ViewPager and integrate it into the rest
of your application, some of which we will examine in this chapter.
This chapter assumes that you have read the core chapters, particularly the one
showing how to use ViewPager.
If you have a ViewPager use fragments for pages and also be itself in a fragment,
you are using nested fragments: one fragment holds another fragment. This was not
originally possible with fragments, but that capability was added to the library
implementation of fragments in 2014 or so.
However, using nested fragments requires a minor modification to the way we set up
a PagerAdapter, as is illustrated in the
ViewPager/Nested
sample project. This is the same project as ViewPager/Indicator, with the
twist that the pages are fragments and the ViewPager is inside a fragment.
Our activity now implements the standard add-the-fragment-if-it-does-not-exist pattern that we have seen previously:
package com.commonsware.android.pagernested;

import android.os.Bundle;
import android.support.v4.app.FragmentActivity;

public class ViewPagerIndicatorActivity extends FragmentActivity {
  @Override
  public void onCreate(Bundle savedInstanceState) {
    super.onCreate(savedInstanceState);

    if (getSupportFragmentManager().findFragmentById(android.R.id.content) == null) {
      getSupportFragmentManager().beginTransaction()
                                 .add(android.R.id.content,
                                      new PagerFragment()).commit();
    }
  }
}This loads a PagerFragment, which contains most of the logic from our
original activity:
package com.commonsware.android.pagernested;

import android.os.Bundle;
import android.support.v4.app.Fragment;
import android.support.v4.view.PagerAdapter;
import android.support.v4.view.ViewPager;
import android.view.LayoutInflater;
import android.view.View;
import android.view.ViewGroup;

public class PagerFragment extends Fragment {
  @Override
  public View onCreateView(LayoutInflater inflater,
                           ViewGroup container,
                           Bundle savedInstanceState) {
    View result=inflater.inflate(R.layout.pager, container, false);
    ViewPager pager=(ViewPager)result.findViewById(R.id.pager);

    pager.setAdapter(buildAdapter());

    return(result);
  }

  private PagerAdapter buildAdapter() {
    return(new SampleAdapter(getActivity(), getChildFragmentManager()));
  }
}The biggest difference is that our call to the constructor of SampleAdapter
no longer uses getSupportFragmentManager(). Instead, it uses
getChildFragmentManager(). This allows SampleAdapter to use fragments
hosted by PagerFragment, rather than ones hosted by the activity as a whole.
No other code changes are required, and from the user’s standpoint, there is no visible difference.
Fragments that are pages inside a ViewPager can participate in the action bar,
supplying items to appear as toolbar buttons, in the overflow menu, etc. This
is not significantly different than
how any fragment participates in the action bar:
setHasOptionsMenu() early in the fragment lifecycle (e.g., onCreateView())
to state that the fragment wishes to contribute to the action bar contentsonCreateOptionsMenu() and onOptionsItemSelected(), much as you
would with an activityViewPager and FragmentManager will manage the contents of the action bar,
based upon the currently-visible page. That page’s contributions will appear in
the action bar, then will be removed when the user switches to some other page.
To see this in action, take a look at the
ViewPager/ActionBar
sample project. This is the same as the ViewPager/Indicator project from
before, except:
onCreateView(), for even-numbered page positions (0, 2, etc.), we call
setHasOptionsMenu(true): @Override
public View onCreateView(LayoutInflater inflater,
ViewGroup container,
Bundle savedInstanceState) {
View result=inflater.inflate(R.layout.editor, container, false);
EditText editor=(EditText)result.findViewById(R.id.editor);
position=getArguments().getInt(KEY_POSITION, -1);
editor.setHint(getTitle(getActivity(), position));
if ((position % 2)==0) {
setHasOptionsMenu(true);
}
return(result);
}
onCreateOptionsMenu(), we inflate a res/menu/actions.xml menu resource: @Override
public void onCreateOptionsMenu(Menu menu, MenuInflater inflater) {
inflater.inflate(R.menu.actions, menu);
super.onCreateOptionsMenu(menu, inflater);
}
Normally, we would also implement onOptionsItemSelected(), to find out when
the action bar item was tapped, though this is skipped in this sample.
The result is that when we have an even-numbered page position — equating to an odd-numbered title and hint — we have items in the action bar:
Figure 621: A ViewPager, PagerTabStrip, and Action Bar Item on Android 4.1
…but as soon as we swipe to an odd-numbered page position — equating to
an even-numbered title and hint — our action bar item is removed, as that
fragment did not call setHasOptionsMenu(true):
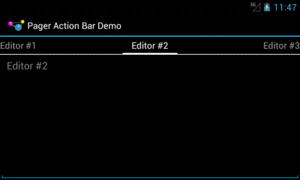
Figure 622: A ViewPager and PagerTabStrip, Sans Action Bar Item on Android 4.1
There are other things in Android that can be scrolled horizontally, besides
a ViewPager:
HorizontalScrollViewWebView, for content that is wider than the width of the screenGallery widgetThe challenge then comes in terms of dealing with horizontal swipe events. The
ideal situation is for you to be able to swipe horizontally on the material
inside the page, until you hit some edge (e.g., end of the HorizontalScrollView),
then have swipe events move you to the adjacent page.
You can assist ViewPager in handling this scenario by subclassing it and overriding
the canScroll() method. This will be called on a horizontal swipe, and it is
up to you to indicate if the contents can be scrolled (returning true) or not
(returning false). If the built-in logic is insufficient, tailoring canScroll()
to your particular needs can help.
We will see an example of this elsewhere in the book, when
we put some maps into a ViewPager.
In some cases,
when the ViewPager is on a larger screen, we simply want larger pages — a digital
book reader, for example, would simply have a larger page in a bigger font for easier
reading.
Sometimes, though, we might not be able to take advantage of the full space offered
by the large screen, particularly when our ViewPager takes up the whole screen.
In cases like this, it might be useful to allow ViewPager, in some cases, to show
more than one page at a time. Each “page” is then designed to be roughly phone-sized, and
we choose whether to show one, two, or perhaps more pages at a time based upon the
available screen space.
Mechanically, allowing ViewPager to show more than one page is fairly easy, involving
overriding one more method in our PagerAdapter: getPageWidth(). To see this in action,
take a look at the
ViewPager/MultiView1
sample project.
Each page in this sample is simply a TextView widget, using the activity’s style’s
“large appearance”, centered inside a LinearLayout:
<LinearLayout xmlns:android="http://schemas.android.com/apk/res/android"
  android:layout_width="match_parent"
  android:layout_height="match_parent"
  android:gravity="center"
  android:orientation="vertical">

  <TextView
    android:id="@+id/text"
    android:layout_width="wrap_content"
    android:layout_height="wrap_content"
    android:textAppearance="?android:attr/textAppearanceLarge"/>

</LinearLayout>The activity, in onCreate(), gets our ViewPager from the res/layout/activity_main.xml
resource, and sets its adapter to be a SampleAdapter:
  @Override
  public void onCreate(Bundle savedInstanceState) {
    super.onCreate(savedInstanceState);
    setContentView(R.layout.activity_main);

    pager=findViewById(R.id.pager);
    pager.setAdapter(new SampleAdapter());
    pager.setOffscreenPageLimit(6);
  }
In this case, SampleAdapter is not a FragmentPagerAdapter, nor a
FragmentStatePagerAdapter. Instead, it is its own implementation of the PagerAdapter
interface:
  /*
   * Inspired by
   * https://gist.github.com/8cbe094bb7a783e37ad1
   */
  private class SampleAdapter extends PagerAdapter {
    @Override
    public Object instantiateItem(ViewGroup container, int position) {
      View page=
          getLayoutInflater().inflate(R.layout.page, container, false);
      TextView tv=page.findViewById(R.id.text);
      int blue=position * 25;

      final String msg=
          String.format(getString(R.string.item), position + 1);

      tv.setText(msg);
      tv.setOnClickListener(new OnClickListener() {
        @Override
        public void onClick(View v) {
          Toast.makeText(MainActivity.this, msg, Toast.LENGTH_LONG)
               .show();
        }
      });

      page.setBackgroundColor(Color.argb(255, 0, 0, blue));
      container.addView(page);

      return(page);
    }

    @Override
    public void destroyItem(ViewGroup container, int position,
                            Object object) {
      container.removeView((View)object);
    }

    @Override
    public int getCount() {
      return(9);
    }

    @Override
    public float getPageWidth(int position) {
      return(0.5f);
    }

    @Override
    public boolean isViewFromObject(View view, Object object) {
      return(view == object);
    }
  }
To create your own PagerAdapter, the big methods that you need to implement are:
instantiateItem(), where you create the page itself and add it to the supplied
container. In this case, we inflate the page, set the text of the TextView based
on the supplied position, set the background color of the page itself to be a different
shade of blue based on the position, set up a click listener to show a Toast when
the TextView is tapped, and use that for our page. We return some object
that identifies this page; in this case, we return the inflated View itself. A
fragment-based PagerAdapter would probably return the fragment.destroyItem(), where we need to clean up a page that is being removed from the
pager, where the page is identified by the Object that we had previously returned
from instantiateItem(). In our case, we just remove it from the supplied container.isViewFromObject(), where we confirm whether some specific page in the pager
(represented by a View) is indeed tied to a specific Object returned from
instantiateItem(). In our case, since we return the View from instantiateItem(),
we merely need to confirm that the two objects are indeed one and the same.getCount(), as with the built-in PagerAdapter implementations, to return how
many total pages there are.In our case, we also override getPageWidth(). This indicates, for a given position,
how much horizontal space in the ViewPager should be given to this particular page.
In principle, each page could have its own unique size. The return value is a float,
from 0.0f to 1.0f, indicating what fraction of the pager’s width goes to this page.
In our case, we return 0.5f, to have each page take up half the pager.
The result is that we have two pages visible at a time:
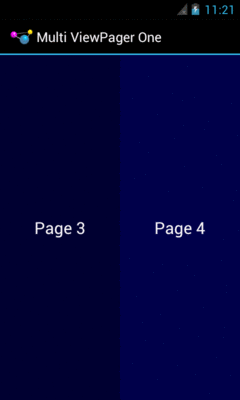
Figure 623: Two Pages in a ViewPager on Android 4.0.3
It is probably also a good idea to call setOffscreenPageLimit()
on the ViewPager, as we did in onCreate(). By default (and at minimum),
ViewPager will
cache three pages: the one presently visible, and one on either
side. However, if you are showing more than one at a time, you should
bump the limit to be 3 times the number of simultaneous pages.
For a page width of 0.5f — meaning two pages at a time –
you would want to call setOffscreenPageLimit(6), to make sure that
you had enough pages cached for both the current visible contents
and one full swipe to either side.
ViewPager even handles “partial swipes” — a careful swipe can
slide the right-hand page into the left-hand position and slide in
a new right-hand page. And ViewPager stops when you run out of pages,
so the last page will always be on the right, no matter how many
pages at a time and how many total pages you happen to have.
The biggest downside to this approach is that it will not work well
with the current crop of indicators. PagerTitleStrip and
PagerTabStrip assume that there is a
single selected page. While the indicator will adjust properly,
the visual representation shows that the left-hand page is the one
selected (e.g., the tab with the highlight), even though two or more
pages are visible. You can probably overcome this with a custom
indicator (e.g., highlight the selected tab and the one to its right).
Also note that this approach collides a bit with setPageMargin()
on ViewPager. setPageMargin() indicates an amount of whitespace
that should go in a gutter between pages. In principle, this would work
great with showing multiple simultaneous pages in a ViewPager. However,
ViewPager does not take the gutter into account when interpreting
the getPageWidth() value. For example, suppose getPageWidth()
returns 0.5f and we setPageMargin(20). On a 480-pixel-wide
ViewPager, we will actually use 500 pixels: 240 for the left page,
240 for the right page, and 20 for the gutter. As a result, 20 pixels
of our right-hand page are off the edge of the pager. Ideally, ViewPager
would subtract out the page margin before applying the page width.
One workaround is for you to derive the right getPageWidth()
value based upon the ViewPager size and gutter yourself, rather than
hard-coding a value. Or, build in your gutter into your page
contents (e.g., using android:layout_marginLeft and
android:layout_marginRight) and skip setPageMargin() entirely.
Another pattern — using pages for smaller screens and having the “pages” side-by-side in columns for larger screens — will be explored later in the book.
Yet another approach for taking advantage of larger screen sizes is to always show a full-size master and a full-size detail — perhaps using different activities — but to use a grid rather than a list for the master. This works well when the data being shown in the grid can be represented as “cards”, often dominated by some photo or other image.
The basic approach is to use fewer grid columns (e.g., 1 or 2) on smaller screen sizes
and more grid columns (e.g., 3 or 4) on larger screen sizes. This way, the application
flow is identical across screen sizes, yet the screen usage on larger screens is
more effective. This is particularly true if you use on of the “staggered” grid widgets
available from third parties, like
Etsy’s AndroidStaggeredGrid
or Maurycy Wojtowicz’s StaggeredGridView:

Figure 624: StaggeredGridView Demo (image courtesy of Maurycy Wojtowicz)
In some cases, you can take better advantage of larger screens by using ViewPager
more judiciously. In a previous chapter, we explored having
ViewPager itself display more than one page at a time. A variation on that
same theme is to only use a ViewPager on screen sizes where you lack sufficient room
for everything, and to put those same pages on the screen at the same time when you
have room for all of them.
For example, a Twitter client for Android could use the columns-or-pages support for
displaying various streams of tweets: your timeline, your @ mentions, hashtags you
follow, etc. Each stream is represented by a typical ListView, with one row per tweet. On a
phone, since screen space is at a premium, those ListView widgets are set up in
a ViewPager, with one list per page. Users can swipe between the lists, or use tabs
to navigate the available lists.
However, tablets offer more room, so the app could show three ListView widgets side-by-side
in landscape mode, so you can take in three sets of content without further
interaction with the screen.
The
ViewPager/Columns1
sample project will demonstrate how you can accomplish the same basic approach in your
own app… with some limitations.
Our main activity layout — cunningly named main — has a ViewPager-based definition
in res/layout/main.xml:
<?xml version="1.0" encoding="utf-8"?>
<android.support.v4.view.ViewPager android:id="@+id/pager"
  xmlns:android="http://schemas.android.com/apk/res/android"
  android:layout_width="match_parent"
  android:layout_height="match_parent">

  <android.support.v4.view.PagerTabStrip
    android:layout_width="match_parent"
    android:layout_height="wrap_content"
    android:layout_gravity="top"/>

</android.support.v4.view.ViewPager>
However, in res/layout-large/, for 5-inch devices on up, we have a horizontal LinearLayout
with three FrameLayout containers, each representing an equal-sized slot for one
of our “pages”:
<?xml version="1.0" encoding="utf-8"?>
<LinearLayout xmlns:android="http://schemas.android.com/apk/res/android"
  android:layout_width="match_parent"
  android:layout_height="match_parent"
  android:baselineAligned="false"
  android:orientation="horizontal">

  <FrameLayout
    android:id="@+id/editor1"
    android:layout_width="0dp"
    android:layout_height="match_parent"
    android:layout_weight="1"/>

  <FrameLayout
    android:id="@+id/editor2"
    android:layout_width="0dp"
    android:layout_height="match_parent"
    android:layout_weight="1"/>

  <FrameLayout
    android:id="@+id/editor3"
    android:layout_width="0dp"
    android:layout_height="match_parent"
    android:layout_weight="1"/>

</LinearLayout>Android will automatically inflate the proper layout when we call
setContentView(R.layout.main).
However, while Android handles the inflation for us, we obviously need to populate
the contents a bit differently. In this sample, though, we are relying upon the fact
that screen size will not change on the fly. Hence, an instance of our application
will either show a ViewPager or show the horizontal LinearLayout, and not have
to switch between those at runtime.
Our SampleAdapter, therefore, can remain unchanged, except for reducing the page
count to 3:
package com.commonsware.android.pagercolumns;

import android.content.Context;
import android.support.v4.app.Fragment;
import android.support.v4.app.FragmentManager;
import android.support.v4.app.FragmentPagerAdapter;

public class SampleAdapter extends FragmentPagerAdapter {
  Context ctxt=null;

  public SampleAdapter(Context ctxt, FragmentManager mgr) {
    super(mgr);
    this.ctxt=ctxt;
  }

  @Override
  public int getCount() {
    return(3);
  }

  @Override
  public Fragment getItem(int position) {
    return(EditorFragment.newInstance(position));
  }

  @Override
  public String getPageTitle(int position) {
    return(EditorFragment.getTitle(ctxt, position));
  }
}Our MainActivity will still use the SampleAdapter, and if we have a ViewPager,
it will use it the same way as before. However, if we do not have a ViewPager, we
must be showing three panes of content side by side, in which case we just execute a
FragmentTransaction to populate the three FrameLayout containers with the three
items created by the SampleAdapter:
package com.commonsware.android.pagercolumns;

import android.os.Bundle;
import android.support.v4.app.FragmentActivity;
import android.support.v4.app.FragmentPagerAdapter;
import android.support.v4.view.ViewPager;

public class MainActivity extends FragmentActivity {
  @Override
  public void onCreate(Bundle savedInstanceState) {
    super.onCreate(savedInstanceState);
    setContentView(R.layout.main);

    ViewPager pager=findViewById(R.id.pager);

    if (pager==null) {
      if (getSupportFragmentManager().findFragmentById(R.id.editor1)==null) {
        FragmentPagerAdapter adapter=buildAdapter();

        getSupportFragmentManager().beginTransaction()
                                   .add(R.id.editor1,
                                        adapter.getItem(0))
                                   .add(R.id.editor2,
                                        adapter.getItem(1))
                                   .add(R.id.editor3,
                                        adapter.getItem(2)).commit();
      }
    }
    else {
      pager.setAdapter(buildAdapter());
    }
  }

  private FragmentPagerAdapter buildAdapter() {
    return(new SampleAdapter(this, getSupportFragmentManager()));
  }
}Of course, we skip the FragmentTransaction if the fragments already exist, such as
due to a screen rotation configuration change.
On a phone, the ViewPager-based layout looks pretty much as it did before:
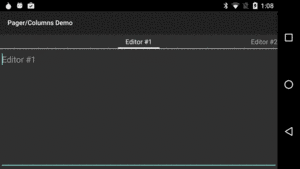
Figure 625: A ViewPager. Again.
However, on a tablet, we get our three editors side-by-side:
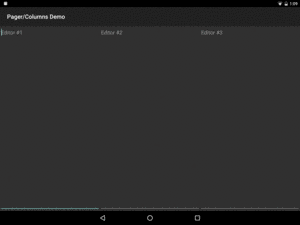
Figure 626: Same App, Large-Screen Layout with Side-By-Side Editors
The simplified large-screen layout does not contain any indicators above the three
editors. This could be added by simple changes to the res/layout-large/main.xml
layout resource, if desired.
The bigger limitation is that this only works if you want the same look in all
configurations except screen size, and if the screen size never changes.
However, it is eminently possible that you will want to have a different mix
than that, such as using the three-column approach only on large-screen landscape
layouts, using ViewPager everywhere else. In that case, our approach breaks
down, as we will have different fragments inside the pager and outside the pager,
meaning that we will lose our data on a configuration change. Addressing this issue
is covered in the next two sections.