Figure 672: Simple Drag-and-Drop Demo, As Initially Launched
Desktop applications have long offered drag-and-drop, both within and between applications. Android has supported this for quite some time, but you could only drag and drop within a single activity. As a result, this was not especially popular.
However, starting in Android 7.0, you can drag and drop between applications, so long as their windows are visible in a multi-window environment. Not only does this make drag-and-drop more compelling in general, but in a freeform multi-window environment, users will expect Android apps to behave like their desktop counterparts. Hence, users will expect drag-and-drop capabilities where it makes sense.
In this chapter, we will explore Android’s drag-and-drop facility, including how to perform it between separate applications.
Understanding this chapter requires that you have read the core chapters of this book, as well as the chapter on the clipboard.
One example uses RecyclerView, so reviewing
that chapter is a good idea. Similarly, one sample
uses StreamProvider, so you may wish to read the section on it
as well.
Since the term “drag-and-drop” means different things to different people – including different developers used to different platforms — it will help if we understand exactly what Android’s definition of “drag-and-drop” is.
In Android, the focus is on dragging and dropping content, meaning some
information identified by a Uri and an associated MIME type. We
are using the drag-and-drop process to select some piece of content
and inform something else about that content. Specifically, the
content that we are dragging and dropping is represented by a ClipData
object, the same as we could use with the clipboard.
Technically, the ClipData does not have to represent content. The
clipboard supports plain text ClipData items, and nothing is stopping
you from using drag and drop for plain text as a result. When dragging
and dropping between apps, this may cause some compatibility issues,
though the drag-and-drop framework takes steps to help deal with this.
Within an app, options like plain text allow you to “cheat” to an extent,
allowing drag-and-drop to support anything you want, so long as you can
identify the specific “anything you want” by a string ID or key.
From the user’s standpoint, the user is dragging some visual representation of this content. That can be whatever bitmap you want, and you will have a few options for specifying what this bitmap is. This bitmap is referred to as the “shadow”.
You will need to provide some UI that triggers a drag-and-drop operation, not only allowing the user to say “let’s drag this somewhere” but also “here is what ‘this’ I want to drag”.
A typical trigger for this is a long-click. So, for example, a long-click on a list row might trigger a drag-and-drop of the content identified by that row.
Usually, the trigger is tied to some view, as drag-and-drop intrinsically is a visual operation. Technically, this is not required, if you can find some other approach that users will understand and appreciate.
You will need to identify possible drop targets, in the form of views. A view can be registered as a potential drop target, then stipulate whether it is a candidate for a specific drag-and-drop operation when that operation begins. For example, if you have two lists, and you want the user to drag items between the lists, both are potential drop targets. However, you might elect to say that the user cannot drag from a list back into that same list, so if the content being dragged originated from the list, that list is not a candidate for that specific drag-and-drop operation.
As noted above, what we are really dragging and dropping is a ClipData,
which can represent whatever we want, so long as the recipient of that
ClipData knows how to work with whatever the provider of that ClipData
put in it.
However, there are a few other pieces to the drag-and-drop process.
The drag shadow is the visual representation of what the user is dragging
and dropping. Programmatically, the shadow is defined as an instance
of View.DragShadowBuilder (which, despite the name, does not implement
a builder-style API).
You have two main choices for creating this shadow: use a View, or
use a Canvas.
You can create a View.DragShadowBuilder via the constructor that takes
a View as a parameter. This tells View.DragShadowBuilder that the
drag shadow should be a translucent copy of whatever the View
is showing at the time we start the drag-and-drop operation.
This is very easy to implement, and it works well if you have a View
that makes for a likely visual representation of what is being dragged
and dropped.
On the other hand, it will not handle all scenarios. Suppose that you
want to allow the user to drag from a list. Furthermore, suppose that
you want the user to be able to multi-select items in the list and drag the
entire selection. Now you no longer have a single View that you can
use as the basis for the drag shadow.
Also, keep the drag shadow relatively small. It needs to be big enough
that the user can see it despite a finger potentially being in the way.
However, it also needs to be small enough to make it clear where the
user is dropping it. This is another reason why the multi-select list
scenario does not work well with creating a View.DragShadowBuilder
from a View — even if you chose the ListView or RecyclerView as
being the View from which to create the drag shadow, odds are that
the list will be far too large.
For cases where using a View as the basis of your drag shadow will
not work, you can create your own subclass of View.DragShadowBuilder
and define the drag shadow however you want.
To do this, you will override two methods. One is onProvideShadowMetrics(),
where you fill in a pair of Point objects. The first represents
the size of the drag shadow in pixels. The other represents the point
within the drag shadow where the touch point will be — in other words,
where is the drag shadow with respect to where the finger is touching
the screen.
The other method is onDragShadow(), where you are given an appropriately-sized
Canvas and you can draw whatever you want into that Canvas to serve
as the drag shadow. For example, you might draw a Bitmap in onDragShadow()
using the dimensions of the Bitmap and its center point in
onProvideShadowMetrics().
Technically, you can combine the two approaches. You create the
View.DragShadowBuilder using a View but then override one or both
of the aforementioned View.DragShadowBuilder methods to alter the
default behavior a bit. For example, by default, the touch point will
be the center of the View, but you might want the touch point to
be offset towards one corner — you could handle this by overriding
onProvideShadowMetrics(), chaining to the superclass, then updating
the second Point object as you see fit.
To react to drag events in a drop target View, you can call
setOnDragListener(), supplying an implementation of View.OnDragListener.
This interface has a single method, onDrag(), that you will need
to implement.
The sample apps in this chapter implement View.OnDragListener on the
activity that has the drop targets. Typically, you will implement
View.OnDragListener on whatever object in your UI handles events raised
by the widgets (e.g., a controller or presenter).
onDrag() of your View.OnDragListener is passed two objects:
the View that you called setOnDragListener() on, and a DragEvent
representing what is happening with respect to the drag-and-drop process.
The DragEvent contains an action int value, representing what the
state change is in the drag-and-drop operation. Depending on the action,
other aspects of the DragEvent may be available to you as well.
When the user begins a drag-and-drop operation, and your window is
visible (e.g., the user started the drag-and-drop within your own
activity), you will receive a DragEvent whose action is
ACTION_DRAG_STARTED.
Your primary job is to return true from onDrag() if you wish to be considered
a drop target for this drag-and-drop operation. Prior to Android 7.0,
you might always return true, since you are certain to be in control
over both the drag and the drop. Starting with Android 7.0, you might
conditionally return true, if the drag-and-drop operation looks like
it might be one that you can handle. Unfortunately, your primary
means of determining this is via getClipDescription() on the DragEvent,
which gives you a ClipDescription describing the ClipData that is the
content. This does not give you much to go on, as we will see in
upcoming samples.
If you are a valid drop target, you might also consider adjusting the
look and feel of this View to indicate to the user that this is a valid
drop target. Android does not do anything on its own for this. You might
tint the View, or add an outline, or something, to help clue the user
in that dropping over your View might have a positive result.
If you return true, you will be notified about the progress of the drag-and-drop
event through the other event actions listed below. If you return false,
you are indicating that this drag-and-drop operation does not concern
you, and you will not be given any further DragEvents for it.
You will receive a DragEvent with this action once it is possible
for the user to drop in your View. This will come when the drag
shadow enters the bounding box of the View (not necessarily only
where pixels are drawn for the view).
If you are still interested in this drag-and-drop operation, you should:
true from onDrag(), andIf precise placement within the widget is important for the drag-and-drop
operation (e.g., you wish to highlight some specific cell in a grid),
you can call getX() and getY() on the DragEvent to try to determine
where the drop point is. Unfortunately, it is not documented whether
getX() and getY() are relative to your widget, the screen, or something
else.
If you return true from the ACTION_DRAG_ENTERED DragEvent, you
may receive additional DragEvents with ACTION_DRAG_LOCATION actions,
indicating that the user has moved within the bounding box of your
widget. If you are using getX() and getY() to deal with the highlighting,
these values will have changed, and so you will want to update the
highlighting to match.
If you return true from the ACTION_DRAG_ENTERED DragEvent, you
may receive a DragEvent for ACTION_DRAG_EXITED. This indicates
that the user dragged the item outside of your widget without dropping
it. Any state changes to your widget, such as a highlight, that you
applied in ACTION_DRAG_ENTERED or ACTION_DRAG_LOCATION should be
reverted. However, the drag-and-drop operation is still proceeding, so
any highlight you use for that (e.g., in ACTION_DRAG_STARTED) should
still be used.
Of course, the fun action is ACTION_DROP, which means that the user
dropped the content over this widget as the drop target. You can call
getClipData() to get at the ClipData for this content, along
with final getX() and getY() values.
If you return true in onDrag(),
this indicates that you handled the drop request.
However, you may not be able to handle the drop request. For example,
suppose you are looking to have a Uri pointing to a video be dropped
into your app. All you can determine from the ClipDescription, in your
ACTION_DRAG_STARTED processing, is that the ClipData has a Uri.
So, you have to return true from onDrag() in your ACTION_DRAG_STARTED
logic. But, then, in ACTION_DROP processing, when you get the real Uri,
you find out that it has a different MIME type (e.g., text/html,
instead of video/*). You will need to return false from onDrag()
in your ACTION_DROP logic. Unfortunately, what happens from this
point forward is undocumented.
If you returned true from the ACTION_DRAG_STARTED DragEvent, you
should receive a DragEvent when the drag-and-drop operation is over,
with ACTION_DRAG_ENDED as the action. Any state change you made to
your widget in ACTION_DRAG_STARTED should be reverted here. If
it matters to you whether the user did a valid drop or not, call
getResult() on the DragEvent to find out
.
The classic drag-and-drop scenario, prior to Android 7.0, was to drag-and-drop between widgets in a single activity.
The
DragDrop/Simple
sample project demonstrates this scenario. It is based on the
RecyclerView/VideoList sample app from the chapter on RecyclerView.
On smaller screens, we just have the RecyclerView as before. However,
on larger screens (e.g., 9" tablets in landscape), we put a VideoView
and an ImageView alongside the RecyclerView:
<?xml version="1.0" encoding="utf-8"?>
<LinearLayout xmlns:android="http://schemas.android.com/apk/res/android"
  android:layout_width="match_parent"
  android:layout_height="match_parent"
  android:orientation="horizontal">

  <android.support.v7.widget.RecyclerView android:id="@+id/video_list"
    xmlns:android="http://schemas.android.com/apk/res/android"
    android:layout_width="0dp"
    android:layout_height="match_parent"
    android:layout_weight="1" />

  <LinearLayout
    android:layout_width="0dp"
    android:layout_height="match_parent"
    android:layout_weight="1"
    android:orientation="vertical">

    <FrameLayout
      android:id="@+id/video_frame"
      android:layout_width="match_parent"
      android:layout_height="0dp"
      android:layout_marginBottom="4dp"
      android:layout_weight="1"
      android:padding="4dp">

      <VideoView
        android:id="@+id/player"
        android:layout_width="match_parent"
        android:layout_height="match_parent"
        android:layout_gravity="center" />
    </FrameLayout>

    <FrameLayout
      android:id="@+id/thumbnail_frame"
      android:layout_width="match_parent"
      android:layout_height="0dp"
      android:layout_weight="1"
      android:padding="4dp">

      <ImageView
        android:id="@+id/thumbnail_large"
        android:layout_width="match_parent"
        android:layout_height="match_parent"
        android:scaleType="centerInside" />
    </FrameLayout>
  </LinearLayout>
</LinearLayout>The idea is that the user will be able to drag from the RecyclerView
into the other two widgets, which will play the video or show a larger
rendition of the thumbnail, respectively.
The VideoView and the ImageView are each wrapped in a FrameLayout.
Mostly, that is to give us a place to render a border around the widgets,
indicating that they are drop targets. We have a pair of <shape>
drawables for this. One is a red dashed line indicating a potential drop
target:
<?xml version="1.0" encoding="utf-8"?>
<shape xmlns:android="http://schemas.android.com/apk/res/android"
  android:shape="rectangle">
  <stroke
    android:width="2dp"
    android:dashGap="8dp"
    android:dashWidth="8dp"
    android:color="#ff0000" >
  </stroke>
</shape>The other is a solid green line indicating a “live” drop target, used to indicate that dropping the content here should work:
<?xml version="1.0" encoding="utf-8"?>
<shape xmlns:android="http://schemas.android.com/apk/res/android"
  android:shape="rectangle">
  <stroke
    android:width="4dp"
    android:color="#2e7d32" >
  </stroke>
</shape>This version of the sample app avoids the RecyclerViewActivity used
in the RecyclerView/VideoList sample app. Instead, MainActivity manages
all of its widgets directly, including the RecyclerView.
In onCreate(), after inflating the layout, we attempt to retrieve the
VideoView and ImageView. If we find them, we call setOnDragListener(),
supplying our MainActivity instance itself as the OnDragListener
implementation:
    player=findViewById(R.id.player);

    if (player!=null) {
      player.setOnDragListener(this);
    }

    thumbnailLarge=findViewById(R.id.thumbnail_large);

    if (thumbnailLarge!=null) {
      thumbnailLarge.setOnDragListener(this);
    }
We will examine the onDrag() method that OnDragListener requires shortly.
This app supports a long-click on a row in our RecyclerView to enter
drag-and-drop mode, as we call setOnLongClickListener() on the row
itself, in RowController (our RecyclerView.ViewHolder for our list rows):
  RowController(View row) {
    super(row);

    title=(TextView)row.findViewById(android.R.id.text1);
    thumbnail=(ImageView)row.findViewById(R.id.thumbnail);

    row.setOnClickListener(this);
    row.setOnLongClickListener(this);
  }
In onLongClick(), we:
ClipData based on the Uri obtained from MediaStore
for the video, plus its caption (pulled from the title TextView)View.DragShadowBuilder, with the
thumbnail ImageView as the basisstartDrag() on the row itself, accessed via the itemView
field on the ViewHolder base class @Override
public boolean onLongClick(View v) {
ClipData clip=ClipData.newRawUri(title.getText(), videoUri);
View.DragShadowBuilder shadow=new View.DragShadowBuilder(thumbnail);
itemView.startDrag(clip, shadow, Boolean.TRUE, 0);
return(true);
}
Besides the ClipData and View.DragShadowBuilder, startDrag()
takes two other parameters:
Object referred to as the “local state”, which can
provide additional information between the drag source and the drop
target, but only when both are in the same window (usually meaning the same
activity)0)For the local state, we are using Boolean.TRUE. That is a fairly
arbitrary choice, but it is a good idea to pass a non-null value here,
for reasons that we will get into
later in this chapter.
Our onDrag() method in MainActivity will handle all of the events
related to our registered drop targets:
  @Override
  public boolean onDrag(View v, DragEvent event) {
    boolean result=true;

    switch (event.getAction()) {
      case DragEvent.ACTION_DRAG_STARTED:
        if (event.getLocalState()==null) {
          result=false;
        }
        else {
          applyDropHint(v, R.drawable.droppable);
        }
        break;

      case DragEvent.ACTION_DRAG_ENTERED:
        applyDropHint(v, R.drawable.drop);
        break;

      case DragEvent.ACTION_DRAG_EXITED:
        applyDropHint(v, R.drawable.droppable);
        break;

      case DragEvent.ACTION_DRAG_ENDED:
        applyDropHint(v, -1);
        break;

      case DragEvent.ACTION_DROP:
        ClipData.Item clip=event.getClipData().getItemAt(0);
        Uri videoUri=clip.getUri();

        if (v==player) {
          player.setVideoURI(videoUri);
          player.start();
        }
        else {
          Picasso.with(thumbnailLarge.getContext())
            .load(videoUri.toString())
            .fit().centerCrop()
            .placeholder(R.drawable.ic_media_video_poster)
            .into(thumbnailLarge);
        }

        break;
    }

    return(result);
  }
For most of the actions, we apply (or remove) a drawable from the
FrameLayout containers wrapping our VideoView and ImageView widgets,
via an applyDropHint() utility method:
  private void applyDropHint(View v, int drawableId) {
    View parent=(View)v.getParent();

    if (drawableId>-1) {
      parent.setBackgroundResource(drawableId);
    }
    else {
      parent.setBackground(null);
    }
  }
Here, we use -1 as the “ID” of a resource meaning to remove any previous
background.
In onDrag(), we ignore ACTION_DRAG_LOCATION events, as we are not
using getX() and getY() and so do not care if those values change.
However, we do handle two actions a bit differently:
ACTION_DRAG_STARTED examines the local state and rejects any DragEvent
where that state is null, for reasons that we will get into
later in this chapter
ACTION_DROP retrieves the
ClipData.Item for the ClipData we set as the drag content, retrieves
the Uri of the video from the ClipData.Item, then either plays the
video or shows the thumbnail, depending on which widget the user
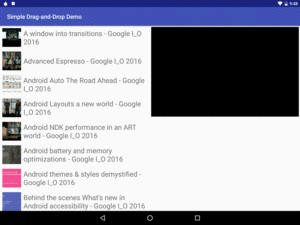
dropped the content intoIf you run the sample app on a large-enough device with a roster of videos,
you will get the list of videos on one side, and the empty VideoView
and ImageView on the other side:
Figure 672: Simple Drag-and-Drop Demo, As Initially Launched
Once the user long-taps on a list row, a shadow based on the thumbnail appears under the user’s finger, and the two drop targets show their red dashed outlines:

Figure 673: Simple Drag-and-Drop Demo, After Drag Started
If the user drags the drop shadow over one of the drop targets, it
gets the ACTION_DRAG_ENTERED event and changes its outline to
the green solid line:
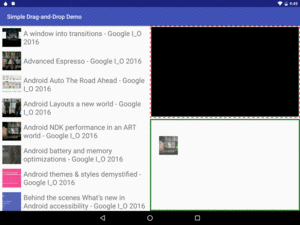
Figure 674: Simple Drag-and-Drop Demo, After Drag Enters Drop Target
Finally, if the user drops the item in one of the drop targets, it
receives the ACTION_DROP event and can actually use the content:
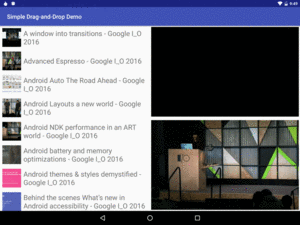
Figure 675: Simple Drag-and-Drop Demo, After Drop
Note that both widgets no longer show an outline, as they each received
ACTION_DROP_ENDED, where they removed their outlines.
Simply put, the local state does not work on Android 9.0.
getLocalState() always returns null. Reportedly, this is fixed for a future
version of Android, but it is unlikely that this fix will ever make it to
Android 9.0 devices.
As a result, you will need an alternative to the local state, at least for Android 9.0 devices.
Android 7.0’s multi-window capability ushers in a new era for drag-and-drop, where users drag-and-drop between apps. In theory, very little has to change to support drag-and-drop between apps.
However, there are challenges, the biggest one being permissions.
The app with the drop target needs permission to work with whatever
content is represented in the drag-and-drop operation. If that
content is simply some plain text or something else that can be
stuffed into a ClipData, permissions are part of drag-and-drop
processing, as only the drop target selected by the user gets the
ACTION_DROP event and can access that ClipData.
However, if the ClipData contains one or more Uri values, the app
with the drop target needs access to that underlying content, just as it
needs it for the clipboard or any other situation where a Uri is passed
between apps.
The
DragDrop/Permissions
sample project demonstrates dragging and dropping between apps. This
project has two app modules: drag and drop. As you might imagine, drag
contains an activity that allows the user to drag something (in this case,
an image), while drop contains an activity that accepts an image Uri
and displays it.
Because cross-app drag-and-drop requires Android 7.0, both modules are set
up with 7.0-compatible build settings in build.gradle — we will see
the drag/build.gradle file shortly.
The drag app has a very simple UI: a single ImageView, set to
fill the available space:
<?xml version="1.0" encoding="utf-8"?>
<ImageView android:id="@+id/asset"
  xmlns:android="http://schemas.android.com/apk/res/android"
  android:layout_width="match_parent"
  android:layout_height="match_parent"
android:scaleType="fitCenter" />The idea is that the user will long-click the ImageView to start the
drag-and-drop operation. Hence, this is reminiscent of the DragDrop/Simple
app, just with a single image, rather than one per row in a list.
One problem with using the ImageView as the way to start the drag-and-drop
operation comes with the drag shadow. In DragDrop/Simple, we used the
image as the drag shadow. This worked well, because the image was a
thumbnail, which usually is a good size for a drag shadow. In the drag
app in DragDrop/Permissions, though, the ImageView is huge, far too
large to use as the drag shadow. As a result, we cannot use the ImageView
directly as before, but instead need to create a custom View.DragShadowBuilder
subclass, named ThumbDragShadow:
  private class ThumbDragShadow extends View.DragShadowBuilder {
    @Override
    public void onProvideShadowMetrics(Point shadowSize,
                                       Point shadowTouchPoint) {
      shadowSize.set(iv.getWidth()/8, iv.getHeight()/8);
      shadowTouchPoint.set(shadowSize.x/2, shadowSize.y/2);
    }

    @Override
    public void onDrawShadow(Canvas canvas) {
      iv.draw(canvas);
    }
  }
This is a nested class inside MainActivity, and so it has access to the
fields of MainActivity, such as our ImageView, named iv.
In onProvideShadowMetrics(), we set the size of the shadow to be 1/8th
of the size of the ImageView. This is a sloppy approach and may wind
up with too small of an image on smaller-screen devices. However, it does
keep the aspect ratio of the ImageView. In addition, we set the
touch point to be in the middle of the image — based on
some Google sample code,
it appears that this is a reasonable algorithm.
In onDrawShadow(), we need to draw something on the supplied Canvas
that represents the drag shadow. In this case, we ask the ImageView
to draw itself into that Canvas. This results in a cropped image,
as the ImageView is much larger than our Canvas, which is sized
based on the Point values we populated in onProvideShadowMetrics().
A better implementation would work with a Bitmap and scale it so the
entire image would be seen in the drag shadow; this approach is used here
for simplicity.
The image itself is stored in assets/. The photo is of
One World Trade Center
(a.k.a., “Freedom Tower”) in New York City.
The reason for storing it in assets/ is that not only do we need
the image, but we need to provide other apps with access to the image.
In this app, we will handle that using StreamProvider, from the author’s
CWAC-Provider library, as described in
one of the chapters on the ContentProvider component.
To that end, we include the cwac-provider artifact in our drag/build.gradle
file:
apply plugin: 'com.android.application'

dependencies {
    compile 'com.android.support:recyclerview-v7:25.3.1'
    compile 'com.squareup.picasso:picasso:2.5.2'
}

android {
    compileSdkVersion 24
    buildToolsVersion '26.0.2'

    defaultConfig {
        applicationId "com.commonsware.android.dragdrop.drag"
        minSdkVersion 24
        targetSdkVersion 24
    }

    aaptOptions {
        noCompress 'jpg'
    }
}

repositories {
    maven {
        url "https://s3.amazonaws.com/repo.commonsware.com"
    }
}

dependencies {
    compile 'com.commonsware.cwac:provider:0.4.0'
}
Also note that we take steps to ensure that the build tools do not try to compress
the JPEG further, by excluding jpg files from aapt compression
via noCompress in aaptOptions
The manifest contains a <provider> element for our StreamProvider:
    <provider
      android:name="com.commonsware.cwac.provider.StreamProvider"
      android:authorities="${applicationId}.provider"
      android:exported="false"
      android:grantUriPermissions="true">
      <meta-data
        android:name="com.commonsware.cwac.provider.STREAM_PROVIDER_PATHS"
        android:resource="@xml/provider"/>
      <meta-data
        android:name="com.commonsware.cwac.provider.USE_LEGACY_CURSOR_WRAPPER"
        android:value="true"/>
    </provider>
That sets up the authority string to be the application ID with
.provider appended. It also points StreamProvider to some
XML metadata in res/xml/provider.xml:
<?xml version="1.0" encoding="utf-8"?>
<paths>

  <asset name="assets" />

</paths>Here, we say that we are willing to serve anything from assets/.
In onCreate(), we use Picasso to load the image out of assets/ and
display it. However, we also register a Callback to find out when
that has been completed:
  @Override
  public void onCreate(Bundle state) {
    super.onCreate(state);
    setContentView(R.layout.main);

    iv=(ImageView)findViewById(R.id.asset);

    Picasso.with(this)
      .load("file:///android_asset/FreedomTower-Morning.jpg")
      .fit().centerCrop()
      .into(iv, new Callback() {
        @Override
        public void onSuccess() {
          iv.setOnLongClickListener(MainActivity.this);
        }

        @Override
        public void onError() {
          // TODO
        }
      });
  }
We only call setOnLongClickListener() once the image has been loaded
successfully, as until then, the user would not know what she is dragging
and dropping.
Then, in onLongClick(), we start the drag-and-drop operation:
  @Override
  public boolean onLongClick(View view) {
    Uri uri=PROVIDER
      .buildUpon()
      .appendEncodedPath(StreamProvider.getUriPrefix(AUTHORITY))
      .appendEncodedPath("assets/FreedomTower-Morning.jpg")
      .build();

    ClipData clip=ClipData.newRawUri(getString(R.string.msg_photo), uri);
    View.DragShadowBuilder shadow=new ThumbDragShadow();

    iv.startDragAndDrop(clip, shadow, Boolean.TRUE,
      View.DRAG_FLAG_GLOBAL|View.DRAG_FLAG_GLOBAL_URI_READ|
        View.DRAG_FLAG_GLOBAL_PERSISTABLE_URI_PERMISSION);

    return(true);
  }
First, we need a Uri pointing to our asset. We build such a Uri
from:
PROVIDER Uri, which incorporates our authority string: private static final String AUTHORITY=
BuildConfig.APPLICATION_ID+".provider";
private static final Uri PROVIDER=
Uri.parse("content://"+AUTHORITY);
StreamProvider (via getUriPrefix())We then build a ClipData from that Uri, plus a string pulled from
a resource. Note that it is unclear where this string is used, though
accessibility options is one likely candidate.
The drag shadow is an instance of the ThumbDragShadow shown above.
To start the drag-and-drop operation, we call startDragAndDrop().
This is simply a new name for the startDrag() method. startDrag() is
marked as deprecated in Android 7.0, replaced with startDragAndDrop().
However, for older, in-app drag-and-drop, feel free to use startDrag(),
as it is your only option for Android 6.0 and older devices.
This time, we pass in some flags:
DRAG_FLAG_GLOBAL indicates that we want the drag-and-drop operation
to work between apps. If we left the flags as 0, the drag-and-drop would
be limited only to this app. In this respect, a drag is local by default,
with cross-app drag-and-drop being something you have to explicitly
opt into.DRAG_FLAG_GLOBAL_URI_READ indicates that we want the other app to be
able to read the content identified by the Uri that we are putting
into the ClipData. Without this, any app receiving the DragEvent
would be unable to display the image. Note that there is an equivalent
DRAG_FLAG_GLOBAL_URI_WRITE if you want to offer write access.DRAG_FLAG_GLOBAL_PERSISTABLE_URI_PERMISSION indicates that we want
to grant the recipient app durable rights to the content identified by
the Uri that we are putting into the ClipData. The term
“persistable”, and the documentation for this flag, suggests that this
access survives reboots. That may be excessive here. We will explore
why we are using this flag when we look at the drop app.The drop app is a version of the drop logic from
DragDrop/Simple, reduced to just handling the drop in an ImageView.
However, it does have a few wrinkles, both related to drag-and-drop
(permissions) and related to general Android development (configuration
change support).
The revised layout is simply the ImageView, wrapped in the FrameLayout
for the drop hint drawables:
<?xml version="1.0" encoding="utf-8"?>
<FrameLayout android:id="@+id/thumbnail_frame"
  xmlns:android="http://schemas.android.com/apk/res/android"
  android:layout_width="match_parent"
  android:layout_height="match_parent"
  android:layout_margin="4dp"
  android:padding="4dp">

  <ImageView
    android:id="@+id/thumbnail_large"
    android:layout_width="match_parent"
    android:layout_height="match_parent"
    android:scaleType="centerInside" />
</FrameLayout>
In onCreate() and onSaveInstanceState(), we load that layout, get
the ImageView, and populate it (via the same showThumbnail() as before)
if we have a thumbnailUri from our saved instance state Bundle:
  @Override
  public void onCreate(Bundle state) {
    super.onCreate(state);
    setContentView(R.layout.main);

    image=(ImageView)findViewById(R.id.thumbnail_large);
    image.setOnDragListener(this);

    if (state!=null) {
      imageUri=state.getParcelable(STATE_IMAGE_URI);

      if (imageUri!=null) {
        showThumbnail();
      }
    }
  }

  @Override
  protected void onSaveInstanceState(Bundle outState) {
    super.onSaveInstanceState(outState);

    outState.putParcelable(STATE_IMAGE_URI, imageUri);
  }
The onDrag() method is the same as before, except for two events:
ACTION_DRAG_STARTED and ACTION_DROP.
We are expecting to get a Uri pointing to an image from the outside
app via a drag-and-drop operation. Ideally, we would validate that
in ACTION_DRAG_STARTED, returning false if the content is something
else:
  @Override
  public boolean onDrag(View v, DragEvent event) {
    boolean result=true;

    switch (event.getAction()) {
      case DragEvent.ACTION_DRAG_STARTED:
        if (event
          .getClipDescription()
          .hasMimeType(ClipDescription.MIMETYPE_TEXT_URILIST)) {
          applyDropHint(v, R.drawable.droppable);
        }
        else {
          result=false;
        }

        break;

      case DragEvent.ACTION_DRAG_ENTERED:
        applyDropHint(v, R.drawable.drop);
        break;

      case DragEvent.ACTION_DRAG_EXITED:
        applyDropHint(v, R.drawable.droppable);
        break;

      case DragEvent.ACTION_DRAG_ENDED:
        applyDropHint(v, -1);
        break;

      case DragEvent.ACTION_DROP:
        requestDragAndDropPermissions(event);

        ClipData.Item clip=event.getClipData().getItemAt(0);

        imageUri=clip.getUri();
        showThumbnail();
        break;
    }

    return(result);
  }
Unfortunately, all we can do is determine that we are getting some
Uri. The MIME type in our ClipDescription is not the MIME type of
the content underlying our Uri, but rather will be
ClipDescription.MIMETYPE_TEXT_URILIST. This is because a ClipData
can have several items, each with Uri values. We have no way, given
just the ClipDescription to determine if we actually have an image
Uri. So, as long as we are getting a Uri value, we assume that the
drop might be meaningful and return true.
For ACTION_DROP, we first call requestDragAndDropPermissions(), to
grant our app the rights offered to us by whatever app initiated the
drag-and-drop operation:
      case DragEvent.ACTION_DROP:
        requestDragAndDropPermissions(event);

        ClipData.Item clip=event.getClipData().getItemAt(0);

        imageUri=clip.getUri();
        showThumbnail();
        break;
The requestDragAndDropPermissions() method returns a DragAndDropPermissions
object. The JavaDocs for this class point out the lifetime of our
permissions:
The life cycle of the permissions is bound to the activity used to call
requestDragAndDropPermissions(). The permissions are revoked when this activity is destroyed, or whenrelease()is called, whichever occurs first.
However, the user could destroy your activity at any point in time, via a configuration change. As a result, you have three main options here:
Uri, hopefully
before your activity gets destroyed via a configuration changeandroid:configChanges
in the manifest, and deal with all the problems that technique raisesDRAG_FLAG_GLOBAL_PERSISTABLE_URI_PERMISSION in
its startDragAndDrop() callBut, after the requestDragAndDropPermissions() call, we grab the
first Uri out of the ClipData, store that in the imageUri field,
and have showThumbnail() display that image via Picasso. A better
approach would examine each possible Uri in the ClipItem for one
that represents an image (showing that one), and returning false
from onDrag() if no such Uri is found, so the drag-and-drop operation
remains active.
If you run both apps, and have them both visible in a multi-window environment (e.g., split-screen mode on a phone or tablet), you will be able to drag and drop between them:
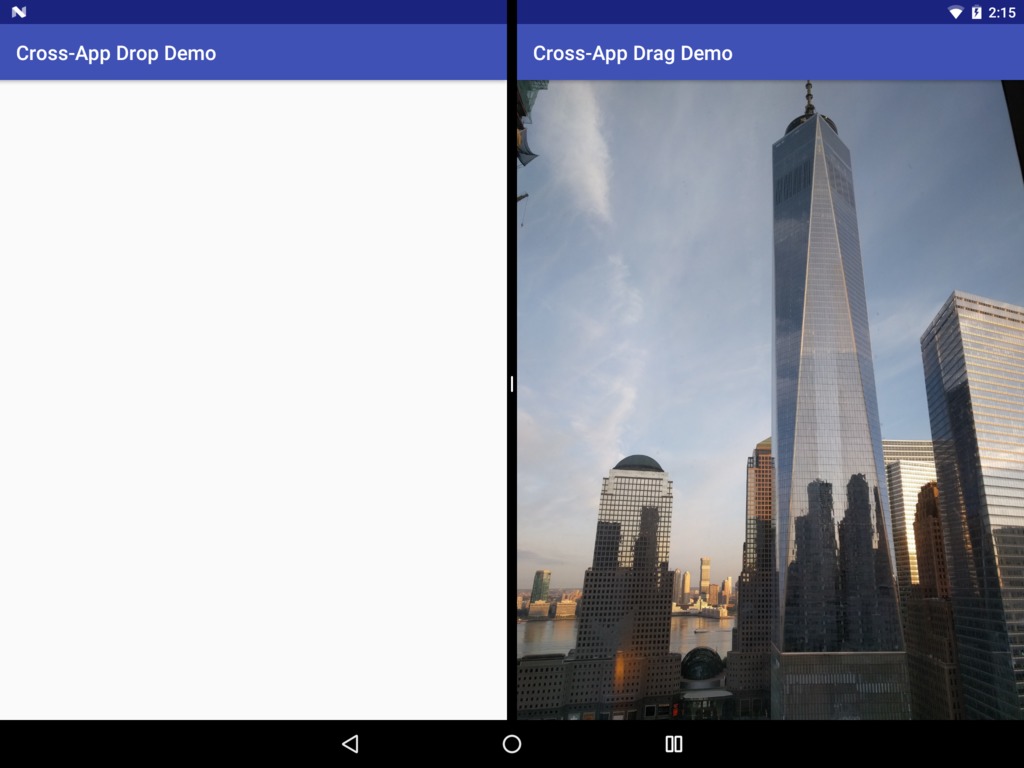
Figure 676: Cross-App Drag-And-Drop, Showing Both Activities As Initially Launched
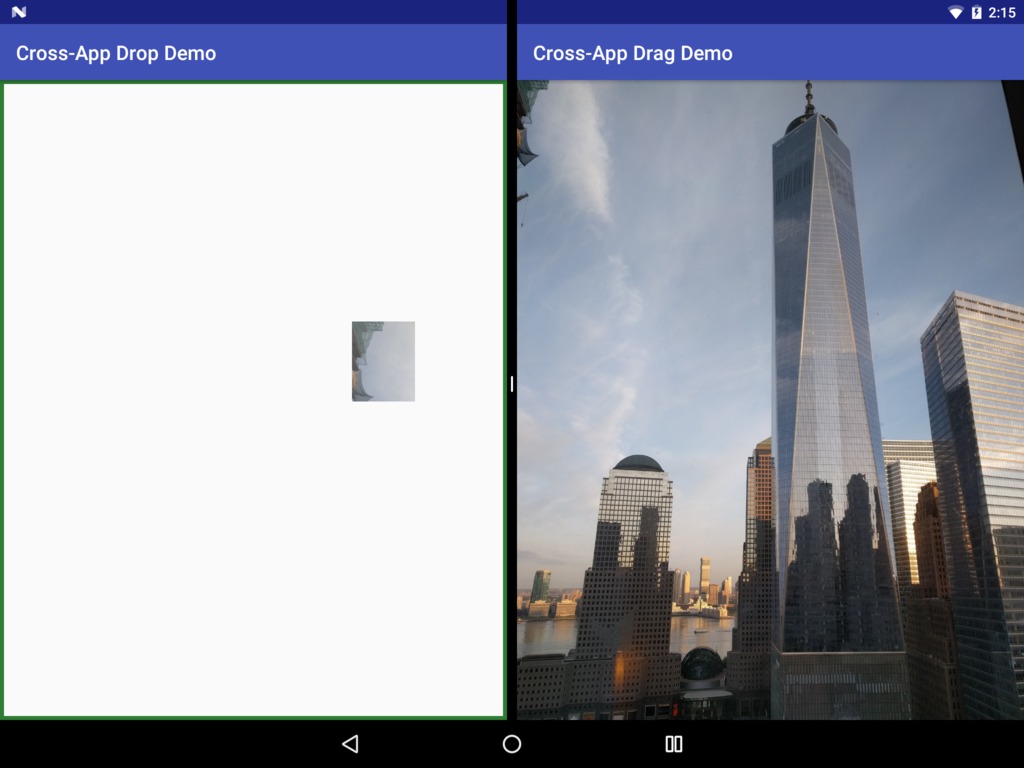
Figure 677: Cross-App Drag-And-Drop, Showing Drag Shadow
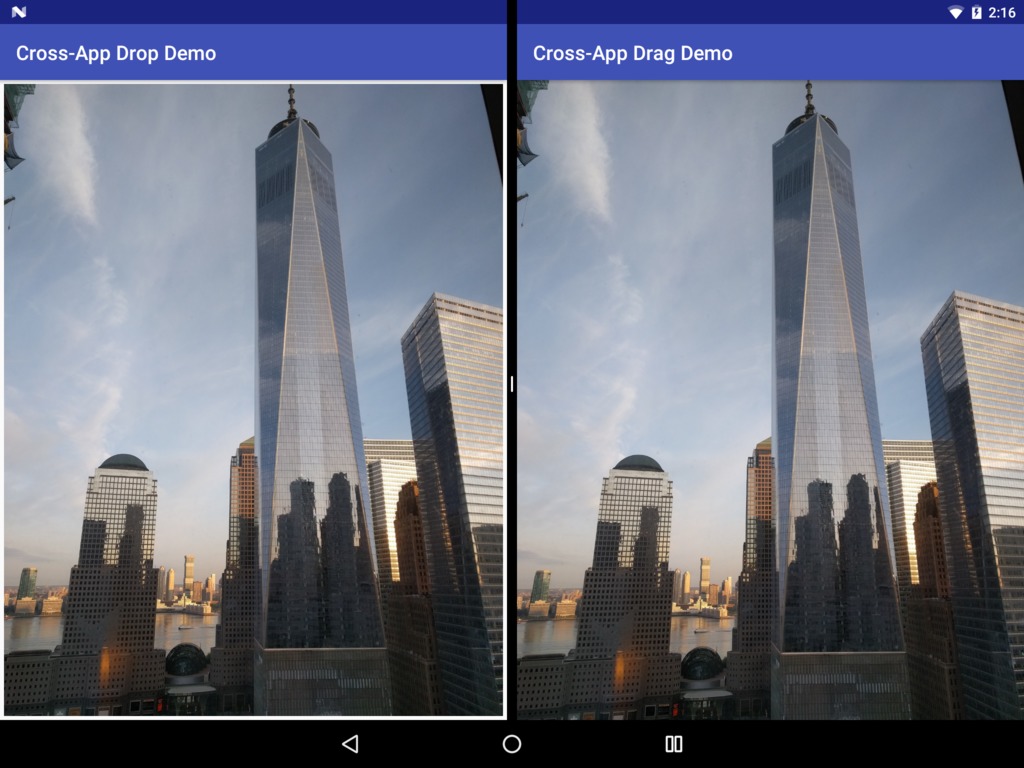
Figure 678: Cross-App Drag-And-Drop, Showing Result of Drag-and-Drop
In the DragDrop/Permissions sample,
there is nothing in our onDrag() method, or anywhere else, that indicates
that we want to allow drag events from third-party apps. That happens
by default, and there is no way to stop it. Hence, any app
implementing official drag-and-drop support has to support arbitrary
apps passing in content. With luck,
this too will get changed.
We were given this recipe for detecting cross-app drag-and-drop:
null value for the local state in the call to startDragAndDrop()
ACTION_DRAG_STARTED to see if the local state is null, in which
case, the drag-and-drop must have started from some other appHowever, this does not work well.
The local state is local to a window, not an app or process. As a result,
if your app is visible in more than one window — for example, you
used FLAG_ACTIVITY_LAUNCH_ADJACENT to start up another activity in another
window — then you will lose the local state even for in-app drag-and-drop
across these windows.
In the Simple drag-and-drop sample from earlier,
we check to see if the local state is null and reject the drag event
if it is. There, we are not expecting to have activities in multiple
windows, so all drag-and-drop work should be local.
Conversely, we do not check the local state in the Permissions
sample, where we specifically want cross-app drag-and-drop.
Drag-and-drop not only works between apps with Android 7.0’s multi-window feature — it also works for two windows within the same app.
The
DragDrop/SplitScreen
sample project is a clone of the DragDrop/Permissions project. However,
both the drag activity (MainActivity) and the drop activity
(DropActivity) are in the same app module (app/).
Also, MainActivity now has an action bar with a “launch” item that,
when tapped, will bring up the DropActivity in an adjacent window:
  @Override
  public boolean onOptionsItemSelected(MenuItem item) {
    if (item.getItemId()==R.id.launch) {
      startActivity(new Intent(this, DropActivity.class)
        .setFlags(Intent.FLAG_ACTIVITY_LAUNCH_ADJACENT |
                  Intent.FLAG_ACTIVITY_NEW_TASK |
                  Intent.FLAG_ACTIVITY_MULTIPLE_TASK));

      return(true);
    }

    return(super.onOptionsItemSelected(item));
  }
Launching MainActivity, entering multi-window mode, and launching
DropActivity gives you those two activities in separate windows,
such as in split-screen mode:

Figure 679: Split-Screen Drag Demo, With Both Activities Showing
And, as in the cross-app scenario, you can drag from one window into the other:
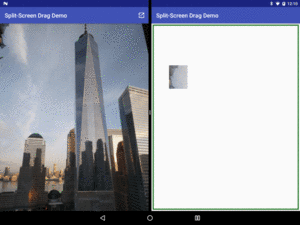
Figure 680: Split-Screen Drag Demo, Part-Way Through a Drag
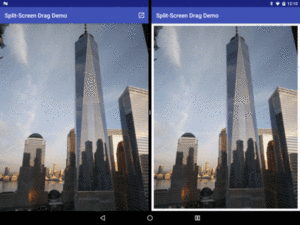
Figure 681: Split-Screen Drag Demo, After Drag-and-Drop
However, as was noted above, the local state data is lost in these cross-window drag-and-drop operations, making them indistinguishable from cross-app drag-and-drop operations.
In principle, cross-app drag-and-drop could work with Samsung’s
legacy multi-window support. However, calling
startDrag() (the pre-Android 7.0 equivalent of startDragAndDrop())
will not grant permissions to the other app to use the content
associated with any Uri. The only way to make this work would be
if the content identified by the Uri was readable by all apps, which
is not great from a security standpoint.
LG’s legacy multi-window support does not seem to support cross-app drag-and-drop.
Also, Chrome OS does not support cross-app drag-and-drop as of the August 2016 round of developer previews.
This chapter focuses on drag-and-drop of content, represented by a Uri.
That is not your only option, just as that is not your only option for
putting stuff onto, or removing stuff from, the clipboard.
A ClipData object contains one or more ClipData.Item objects.
These can be of three main forms:
CharSequence, including support for any standard
Android spans
Intent, usually designed for creating some sort of shortcut to
be able to launch an activity identified by the Intent
Uri
Outside of specialized cases (e.g., home screens), if you are not using
Uri, probably you are using text.
If you are implementing a drop target, and all you know how to do is
handle text, you can call coerceToText() on a ClipData.Item object
to get the best text representation of whatever it is. For Uri values
pointing to text content, coerceToText() will read in the content
and return it. For anything else, you get back toString() on the content,
more or less.
The previous section brings up home screens as an example of drag-and-drop. On many Android home screen implementations, if you long-click on an icon in the launcher, you can drag-and-drop that icon into the home screen itself, thereby creating a shortcut. However, in addition to that, many home screens also offer special drop targets tied to specific actions, such as “Uninstall”. If the user drops the icon over the home screen area, a shortcut gets created; if the user drops the icon over a special drop target, the action for that target is performed.
You can do this too.
Mostly, it is a matter of arranging to show those special drop targets
only during a drag-and-drop operation, then handling those drops specifically.
However, due to the nature of Android’s view hierarchy and the drag-and-drop
framework, you need to ensure that you show the special drop target’s view
before you start the drag-and-drop operation. Otherwise, the special
drop target’s view will never receive ACTION_DRAG_ENTERED or ACTION_DROP
events.
We can see how this works in practice in the
DragDrop/Action
sample project. This is a clone of the DragDrop/Simple app from earlier
in this chapter, except that we have added a special “Video Info” drop
target.
The -w800dp layout is mostly as it was in the original app, except
that we have added an info TextView above the RecyclerView:
<?xml version="1.0" encoding="utf-8"?>
<LinearLayout xmlns:android="http://schemas.android.com/apk/res/android"
  android:layout_width="match_parent"
  android:layout_height="match_parent"
  android:orientation="horizontal">

  <LinearLayout
    android:layout_width="0dp"
    android:layout_height="match_parent"
    android:layout_weight="1"
    android:orientation="vertical">

    <TextView
      android:id="@+id/info"
      android:layout_width="wrap_content"
      android:layout_height="wrap_content"
      android:layout_gravity="center_horizontal"
      android:layout_margin="8dp"
      android:padding="8dp"
      android:text="@string/label_video_info"
      android:textAppearance="?android:textAppearanceLarge"
      android:visibility="gone" />

    <android.support.v7.widget.RecyclerView
      android:id="@+id/video_list"
      android:layout_width="match_parent"
      android:layout_height="match_parent" />
  </LinearLayout>

  <LinearLayout
    android:layout_width="0dp"
    android:layout_height="match_parent"
    android:layout_weight="1"
    android:orientation="vertical">

    <FrameLayout
      android:id="@+id/video_frame"
      android:layout_width="match_parent"
      android:layout_height="0dp"
      android:layout_marginBottom="4dp"
      android:layout_weight="1"
      android:padding="4dp">

      <VideoView
        android:id="@+id/player"
        android:layout_width="match_parent"
        android:layout_height="match_parent"
        android:layout_gravity="center" />
    </FrameLayout>

    <FrameLayout
      android:id="@+id/thumbnail_frame"
      android:layout_width="match_parent"
      android:layout_height="0dp"
      android:layout_weight="1"
      android:padding="4dp">

      <ImageView
        android:id="@+id/thumbnail_large"
        android:layout_width="match_parent"
        android:layout_height="match_parent"
        android:scaleType="centerInside" />
    </FrameLayout>
  </LinearLayout>
</LinearLayout>However, this TextView has a visibility of gone at the outset, so
it will not show up for users.
onCreate() initializes an info field with the TextView, much as
it initializes the fields for the VideoView and ImageView:
    player=findViewById(R.id.player);

    if (player!=null) {
      player.setOnDragListener(this);
    }

    thumbnailLarge=findViewById(R.id.thumbnail_large);

    if (thumbnailLarge!=null) {
      thumbnailLarge.setOnDragListener(this);
    }

    info=findViewById(R.id.info);

    if (info!=null) {
      info.setOnDragListener(this);
    }
However, since info is gone, the user cannot drag anything over it.
We need to arrange to make it visible.
You might try making it visible in onDrag(), when we get the ACTION_DRAG_STARTED
event. After all, this would seem to describe what we want: when the
drag begins, show the special drop target as an option for the user.
Unfortunately, this does not work: while the user can see the info
TextView, that TextView does not get any further onDrag() events.
Instead, we are forced to arrange to make the info view visible before
starting the drag-and-drop operation. As a side effect, that requirement means
that we cannot use this technique for cross-app drag-and-drop, since we
have no idea when some other app starts the drag-and-drop operation.
In fact, it is even a bit awkward to handle in this app, as it is the
RowController that initiates the drag-and-drop operation. The RowController
knows nothing about the info view, nor should it. Instead, we need
to have the RowController let the MainActivity know that a drag-and-drop
operation is about to start, so the activity can show the view.
To that end, RowController defines an OnStartDragListener interface. It
expects to get such a listener as a constructor parameter, storing it in
a field for later use:
class RowController extends RecyclerView.ViewHolder
    implements View.OnClickListener, View.OnLongClickListener {
  interface OnStartDragListener {
    void onStartDrag();
  }

  final private TextView title;
  final private ImageView thumbnail;
  private Uri videoUri=null;
  private String videoMimeType=null;
  final private OnStartDragListener listener;

  RowController(View row, OnStartDragListener listener) {
    super(row);

    this.listener=listener;
    title=(TextView)row.findViewById(android.R.id.text1);
    thumbnail=(ImageView)row.findViewById(R.id.thumbnail);

    row.setOnClickListener(this);
    row.setOnLongClickListener(this);
  }
Then, in onLongClick(), if we have a listener, we call onStartDrag()
on it, to indicate that we are about to start a drag-and-drop operation:
  @Override
  public boolean onLongClick(View v) {
    if (listener!=null) {
      listener.onStartDrag();
    }

    ClipData clip=ClipData.newRawUri(title.getText(), videoUri);
    View.DragShadowBuilder shadow=new View.DragShadowBuilder(thumbnail);

    itemView.startDrag(clip, shadow, Boolean.TRUE, 0);

    return(true);
  }
The RowController instances are created by the VideoAdapter. Fortunately,
VideoAdapter is a nested class inside of MainActivity. So, we implement
OnStartDragListener on MainActivity and pass the activity instance
to the RowController constructor:
    @Override
    public RowController onCreateViewHolder(ViewGroup parent,
                                            int viewType) {
      return(new RowController(getLayoutInflater()
        .inflate(R.layout.row, parent, false), MainActivity.this));
    }
All the onStartDrag() method does is make the info view visible:
  public void onStartDrag() {
    info.setVisibility(View.VISIBLE);
  }
If we make it visible, clearly we need to hide it again at some
future point. That would be when the drag-and-drop operation has completed,
and it is safe for us to mark info as GONE in our handling of
ACTION_DRAG_ENDED in onDrag():
      case DragEvent.ACTION_DRAG_ENDED:
        applyDropHint(v, -1);
        info.setVisibility(View.GONE);
        break;
We still want to show the drop hint backgrounds, but in this case, we
apply them directly to the TextView, rather than going with a wrapping
FrameLayout. So, we adjust applyDropHint() to only work with the
parent of the view if this is not the info view:
  private void applyDropHint(View v, int drawableId) {
    if (v!=info) {
      v=(View)v.getParent();
    }

    if (drawableId>-1) {
      v.setBackgroundResource(drawableId);
    }
    else {
      v.setBackground(null);
    }
  }
And, in ACTION_DROP processing, if the user dropped the content over
the info view, we simply show a Toast with the text of the Uri:
      case DragEvent.ACTION_DROP:
        ClipData.Item clip=event.getClipData().getItemAt(0);
        Uri videoUri=clip.getUri();

        if (v==player) {
          player.setVideoURI(videoUri);
          player.start();
        }
        else if (v==info) {
          Toast
            .makeText(this, videoUri.toString(), Toast.LENGTH_SHORT)
            .show();
        }
        else {
          Picasso.with(thumbnailLarge.getContext())
            .load(videoUri.toString())
            .fit().centerCrop()
            .placeholder(R.drawable.ic_media_video_poster)
            .into(thumbnailLarge);
        }
Now, when you run the app on a sufficiently-wide screen, and you start
a drag-and-drop operation, the “Video Info” TextView appears and
serves as a drop target:

Figure 682: Drag-And-Drop, Showing Special Drop Target
You may have a need for nested drop targets,
where you are listening for drag
events both on some container and on some view inside of that container.
For example, if you are using the drag-and-drop APIs to support reordering
items in a LinearLayout or RecyclerView, there is a good chance that
you will need to have listeners both on that container and on existing
items in the container (e.g., to animate them out of the way to allow
the user to drop in the newly-vacant spot).
Alas, this is an area that has some undocumented behavior changes in Android 7.0, as Dan Lew uncovered in August 2016.
The
DragDrop/Nougat
sample project illustrates the old and new behavior, plus some code
to get Android 7.0 to behave more like the older versions of Android.
The behavior change is triggered by nested drop targets, which means we need a nested layout, such as this one:
<?xml version="1.0" encoding="utf-8"?>
<FrameLayout android:id="@+id/outer_container"
  xmlns:android="http://schemas.android.com/apk/res/android"
  android:layout_width="match_parent"
  android:layout_height="match_parent"
  android:background="@color/outer_normal"
  android:padding="48dp">

  <FrameLayout
    android:id="@+id/inner_container"
    android:layout_width="match_parent"
    android:layout_height="match_parent"
    android:background="@color/inner_normal"
    android:padding="48dp">

    <ImageView
      android:id="@+id/thumbnail_large"
      android:layout_width="match_parent"
      android:layout_height="match_parent"
      android:background="@color/image_normal"
      android:contentDescription="@string/icon"
      android:scaleType="centerInside" />
  </FrameLayout>

</FrameLayout>Here, we have a FrameLayout holding onto another FrameLayout, which
holds onto an ImageView, each with a different background color:
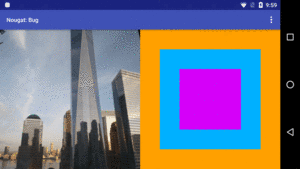
Figure 683: Garish Background Colors
Further, suppose that we are interested in drag events for all three of these,
so we call setOnDragListener() for each of them. In the code, we set
the background of a drop target to green when we get an ACTION_DRAG_ENTERED
event for the target, and we revert to the original background in
ACTION_DRAG_EXITED, ACTION_DRAG_ENDED, and ACTION_DROP.
On Android 6.0 and earlier, drag events are inclusive. In other words,
if the user has dragged an item into the inner FrameLayout, this
is also considered to be inside the outer FrameLayout. From an event
standpoint, the outer FrameLayout only gets an ACTION_DRAG_EXITED
event when the dragged item leaves its outer boundaries.
So, as the user drags an item into our nested drop targets, outer targets remain green, even as the item enters inner targets:
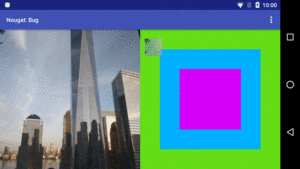
Figure 684: Dragging Over Outer Drop Target on Android 6.0
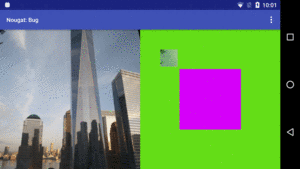
Figure 685: Dragging Over Inner Drop Target on Android 6.0
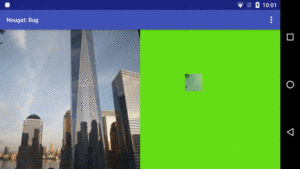
Figure 686: Dragging Over ImageView Drop Target on Android 6.0
However, on Android 7.0, drag events are exclusive. If the user drags
an item into the inner FrameLayout, the item will exit the outer
FrameLayout from a drag-and-drop perspective. So, as the user drags
the item towards the inner-most drop target, the user exits the outer
drop targets, and we restore the backgrounds along the way:
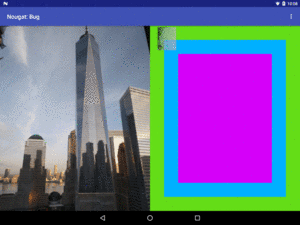
Figure 687: Dragging Over Outer Drop Target on Android 7.0
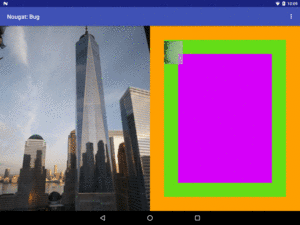
Figure 688: Dragging Over Inner Drop Target on Android 7.0

Figure 689: Dragging Over ImageView Drop Target on Android 7.0
Which approach is “correct” is somewhat immaterial, as we need consistency across Android OS versions.
The sample app offers one workaround for the discrepancy: a DropTarget
class that provides inclusive behavior on Android 7.0. Basically, it
serves as a composite OnDragListener, forwarding onDrag() calls
to widgets as appropriate. This includes forwarding events to parents
of widgets, if those parents are part of the DropTarget coverage:
package com.commonsware.android.dragdrop;

import android.os.Build;
import android.view.DragEvent;
import android.view.View;
import android.view.ViewParent;
import java.util.ArrayList;

public class DropTarget implements View.OnDragListener {
  private ArrayList<View> views=new ArrayList<>();
  private View.OnDragListener listener;

  public DropTarget on(View... views) {
    for (View v : views) {
      this.views.add(v);
      v.setOnDragListener(this);
    }

    return(this);
  }

  public void to(View.OnDragListener listener) {
    this.listener=listener;
  }

  @Override
  public boolean onDrag(View view, DragEvent dragEvent) {
    if (Build.VERSION.SDK_INT<Build.VERSION_CODES.N) {
      return(listener.onDrag(view, dragEvent));
    }

    boolean result=listener.onDrag(view, dragEvent);
    ViewParent parent=view.getParent();

    while (parent!=null && parent instanceof View) {
      View parentView=(View)parent;

      if (views.contains(parentView)) {
        listener.onDrag(parentView, dragEvent);
      }

      parent=parentView.getParent();
    }

    return(result);
  }
}
For each of the views that DropTarget is set to monitor, the
DropTarget sets itself up as the OnDragListener. In onDrag(),
if we are on a pre-7.0 version of Android, DropTarget just
forwards the event along normally. If, however, we are on Android 7.0
or higher, onDrag():
onDrag() for the listener attached to the DropTarget,
using the View originally passed into onDrag(), and holding
onto the result boolean
onDrag() on the listener
for each of those that are part of our monitored set of views
onDrag() call
on the listenerThen, instead of registering the activity as the OnDragListener
like this:
  @Override
  public void onCreate(Bundle state) {
    super.onCreate(state);

    image=(ImageView)findViewById(R.id.thumbnail_large);
    image.setOnDragListener(this);
    findViewById(R.id.outer_container).setOnDragListener(this);
    findViewById(R.id.inner_container).setOnDragListener(this);
  }
we can use DropTarget:
  @Override
  public void onCreate(Bundle state) {
    super.onCreate(state);

    image=(ImageView)findViewById(R.id.thumbnail_large);

    new DropTarget()
      .on(image,
        findViewById(R.id.outer_container),
        findViewById(R.id.inner_container))
      .to(this);
  }
The result is more inclusive behavior. In the case of this sample app,
it happens to be sufficient to allow Android 7.0 to behave as does
Android 6.0 and earlier. More sophisticated drag-and-drop implementations
may need a more sophisticated approach than DropTarget to achieve
a similar workaround.
Both bugs filed by Dan Lew have been marked as “FutureRelease”, with a comment
on one indicating that the new exclusive behavior would be restricted
to apps with a targetSdkVersion of 24 or higher. It is unclear exactly
when this change will be released. And, since many apps will have a
targetSdkVersion of 24 or higher to avoid warning messages in Android 7.0+
multi-window, the proposed fixes may not help much.
Framework-supplied drag-and-drop has not been all that popular to date. As a result, there are no common conventions for how to designate drop targets for the user. Similarly, as of mid-2016, there appears to be no recommendations for this in the Material Design guidelines from Google.
Eventually, the Android development community will start to coalesce around certain patterns, with or without Google’s assistance. Experiment now, but watch for conventions to emerge, then adopt those conventions, where they make sense for your app.
Drag-and-drop is not particularly accessible. Visually-impaired users may have difficulty discerning where one can drag from and where one can drag to. Motor-impaired users may have difficulty doing the gesture to initiate drag-and-drop or in dragging the shadow to the desired location.
As a result, while drag-and-drop is a worthy feature, ensure that it is not the only option for performing some action. There should be some other way to do that action, and perhaps more than one other way to do that action, such as: