
Figure 739: Secure Check, As Run On Secure Android 5.0 Device
Android devices have supported device authentication since the beginning. Users could lock their devices with a PIN, passphrase, or “pattern”, to help deter unauthorize use. Nowadays, fingerprint sensors are available on some Android devices as another authentication option.
For the vast majority of apps, none of this matters.
Some apps have sensitive content (e.g., password manager) or offer sensitive services (e.g., banking app). These apps may want to tie more tightly into the device authentication options, to ensure that the person working with the app right now is the device’s authorized user.
In this chapter, we will look at how to perform this sort of integration.
One of the examples in this chapter makes use of RxJava.
You cannot validate the identity of the user on a device that is not secured by something (PIN, passphrase, pattern, fingerprint, etc.). So, one of the first things you may wish to determine is whether or not such a lock has been applied to the device.
Android has two separate ways of accomplishing this, with slightly different feature sets.
In the chapter on device administration, we cover a number
of APIs for managing the lock quality. In particular, DevicePolicyManager
has the concept of “password quality”. Any app — not just designated device
admin apps — can call getPasswordQuality() on a DevicePolicyManager instance
to find out the designated minimum required quality. A value of PASSWORD_QUALITY_UNSPECIFIED
indicates that “anything goes”. PASSWORD_QUALITY_SOMETHING indicates that
the device needs some form of authentication, but does not establish any
criteria beyond that. Other values start to put restrictions on the
authentication option, such as PASSWORD_QUALITY_ALPHABETIC, indicating that
the authentication cannot be in the form of a simple PIN.
Other methods let you get minimum required password lengths, minimum required characters of certain classes (e.g., symbols), and so forth.
It is fairly likely that the current authentication option in force adheres to the password criteria exposed by those methods.
The KeyguardManager system service has a simpler API… with a couple of
wrinkles.
isDeviceSecure() returns true if the device is secured with a PIN,
pattern, or password. However, this method is new to API Level 23.isKeyguardSecure() returns true if the device is secured with a PIN,
pattern, password, or SIM card lock. A “SIM card lock” amounts to a PIN associated
with the SIM card, one that follows the SIM card around if you move it between
devices. Conversely, a device that is secured solely by a SIM card lock can
be accessed simply by removing the SIM card. This method is available on API Level
16 and higher devices.Since SIM card locks do not seem very common, the two methods will tend to return
the same result. However, since SIM card lock security is fairly weak, on
Android 6.0+, use isDeviceSecure(), so SIM card locks are not taken into account
with the result.
The
DeviceAuth/SecureCheck
sample application demonstrates the use of these methods (and of a few others that
we will see shortly).
Our activity’s UI consists of two big icons with those two KeyguardManager
method names as captions.
<?xml version="1.0" encoding="utf-8"?>
<android.support.constraint.ConstraintLayout xmlns:android="http://schemas.android.com/apk/res/android"
  xmlns:app="http://schemas.android.com/apk/res-auto"
  xmlns:tools="http://schemas.android.com/tools"
  android:layout_width="match_parent"
  android:layout_height="match_parent"
  tools:context="com.commonsware.android.auth.check.MainActivity">

  <TextView
    android:layout_width="0dp"
    android:layout_height="wrap_content"
    android:layout_marginEnd="8dp"
    android:text="@string/label_device"
    android:textAlignment="viewStart"
    android:textAppearance="?android:textAppearanceLarge"
    android:typeface="monospace"
    app:layout_constraintBottom_toBottomOf="@id/device"
    app:layout_constraintLeft_toRightOf="@id/device"
    app:layout_constraintRight_toRightOf="parent"
    app:layout_constraintTop_toTopOf="@id/device" />

  <ImageView
    android:id="@+id/device"
    android:layout_width="64dp"
    android:layout_height="64dp"
    android:layout_marginStart="8dp"
    android:layout_marginTop="8dp"
    app:layout_constraintStart_toStartOf="parent"
    app:layout_constraintTop_toTopOf="parent" />

  <TextView
    android:layout_width="0dp"
    android:layout_height="wrap_content"
    android:layout_marginEnd="8dp"
    android:text="@string/label_keyguard"
    android:textAlignment="viewStart"
    android:textAppearance="?android:textAppearanceLarge"
    android:typeface="monospace"
    app:layout_constraintBottom_toBottomOf="@id/keyguard"
    app:layout_constraintLeft_toRightOf="@id/keyguard"
    app:layout_constraintRight_toRightOf="parent"
    app:layout_constraintTop_toTopOf="@id/keyguard" />

  <ImageView
    android:id="@+id/keyguard"
    android:layout_width="64dp"
    android:layout_height="64dp"
    android:layout_marginStart="8dp"
    android:layout_marginTop="8dp"
    app:layout_constraintStart_toStartOf="parent"
    app:layout_constraintTop_toBottomOf="@id/device" />

</android.support.constraint.ConstraintLayout>
In onCreate(), we retrieve a KeyguardManager system service and set the
images on those icons based on the KeyguardManager results:
true, we show a locked iconfalse, we show an unlocked iconisDeviceSecure() on pre-Android 6.0 devices),
we show a question mark icon, indicating that we do not know the result private KeyguardManager mgr;
@Override
protected void onCreate(Bundle savedInstanceState) {
super.onCreate(savedInstanceState);
setContentView(R.layout.activity_main);
mgr=(KeyguardManager)getSystemService(KEYGUARD_SERVICE);
ImageView device=findViewById(R.id.device);
ImageView keyguard=findViewById(R.id.keyguard);
if (Build.VERSION.SDK_INT>=Build.VERSION_CODES.M) {
if (mgr.isDeviceSecure()) {
device.setImageResource(R.drawable.ic_lock_black_24dp);
}
else {
device.setImageResource(R.drawable.ic_lock_open_black_24dp);
}
}
else {
device.setImageResource(R.drawable.ic_help_black_24dp);
}
if (mgr.isKeyguardSecure()) {
keyguard.setImageResource(R.drawable.ic_lock_black_24dp);
}
else {
keyguard.setImageResource(R.drawable.ic_lock_open_black_24dp);
}
}
Running the app will show the results of those calls:
Figure 739: Secure Check, As Run On Secure Android 5.0 Device

Figure 740: Secure Check, As Run On Insecure Android 6.0 Device
Those methods are interesting, but they do not tell you much about the current user. Obviously, if the device is not secure, you have no idea who the current user is. However, even if the device has a PIN/password/pattern lock, it is possible that the real user unlocked device, but somebody else now has that unlocked device. Some apps will want a way to re-authenticate the user, to confirm that the person working with the device right now is the real user, not somebody else who has their hands on the unlocked device.
KeyguardManager has a createConfirmDeviceCredentialIntent() method that
helps with this. This method returns an Intent that can be used
with startActivityForResult(). What then appears is a system-supplied
activity that requires the user to re-authenticate the device. In onActivityResult(),
a RESULT_OK result means that the user successfully re-authenticated. Anything
else means that the user failed to re-authenticate and eventually pressed BACK
to return to your app.
The SecureCheck sample app has an action bar icon that, when tapped,
invokes an authenticate() method, one that uses createConfirmDeviceCredentialIntent():
  @TargetApi(Build.VERSION_CODES.LOLLIPOP)
  private void authenticate() {
    Intent i=mgr.createConfirmDeviceCredentialIntent("title", "description");

    if (i==null) {
      Toast.makeText(this, "No authentication required!", Toast.LENGTH_SHORT).show();
    }
    else {
      startActivityForResult(i, REQUEST_CODE);
    }
  }
createConfirmDeviceCredentialIntent() takes two parameters: a title and a
description. In principle, these should appear on the authentication activity,
to provide context to the user as to why this screen appeared. In reality,
the description may or may not appear, so do not assume that the user will be
able to see whatever you put there.
Since this Intent is designed for use with startActivityForResult(), we
cannot directly put it into a PendingIntent or anything. If for some reason
you needed to re-authenticate from a Notification or app widget or something,
you can use a Theme.Translucent.NoTitleBar-themed activity for the PendingIntent,
as such activities are effectively invisible. That activity, in turn, can call
startActivityForResult() with the Intent from createConfirmDeviceCredentialIntent().
Here, we just call startActivityForResult() directly, showing a Toast in
onActivityResult() based upon the user’s response:
  @Override
  protected void onActivityResult(int requestCode, int resultCode,
                                  Intent data) {
    if (requestCode==REQUEST_CODE) {
      if (resultCode==RESULT_OK) {
        Toast.makeText(this, "Authenticated!", Toast.LENGTH_SHORT).show();
      }
      else {
        Toast.makeText(this, "WE ARE UNDER ATTACK!", Toast.LENGTH_SHORT).show();
      }
    }
  }
On some devices (e.g., Nexus 5X running Android 8.1), the authentication activity
uses FLAG_SECURE and cannot be captured in a screenshot. Other devices have
no such restriction:
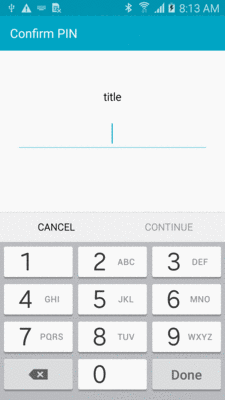
Figure 741: Re-Authentication Activity on a Samsung Galaxy Note 3
Note that only the title appears here; on the Nexus 5X with Android 8.1, both the title and the description appear.
createConfirmDeviceCredentialIntent() has a significant limitation: the Intent
that you create always triggers authentication when started. Sometimes, this
is a feature, if you absolutely want to ensure that the user is authenticated
before proceeding. Sometimes, this is a bug, if your flow keeps forcing the
user to re-authenticate. There is a way to use createConfirmDeviceCredentialIntent()
to have an authentication timeout, so a successful authentication skips future
authentication for some amount of time. This is a bit complex to set up, as
it requires custom use of the keystore, and so we will explore it in greater
detail in the next chapter.
Android 6.0 added APIs for fingerprint sensors. For most users, and for most apps, fingerprints are just another aspect of unlocking a device. However, apps can more deeply integrate with the fingerprint sensor if desired.
Note that the libraries and classes related to fingerprints are only supported on API Level 23 and higher.
One obvious use of the fingerprint sensor is to authenticate the current user, ensuring that the person holding the device is who we think it is.
There are a few options for doing this, with varying levels of complexity.
The simplest solution is to not worry about fingerprints, but instead to use the techniques shown earlier in this chapter to authenticate the user.
When a user sets up a fingerprint to use for unlocking a device, that is an
adjunct to a more traditional PIN or passphrase. When you start the
activity identified by the Intent returned by createConfirmDeviceCredentialIntent(),
you are requesting that the user authenticate by whatever means is appropriate.
If a fingerprint is an option, the user will be able to use a fingerprint
to authenticate.
This is cheap and easy, but it does not require that the user use a fingerprint. The user could type in their PIN or passphrase instead.
It is possible that you will want to use a fingerprint specifically. For example, perhaps you are using fingerprints as part of a multi-factor authentication system, where the user needs to provide some sort of passphrase for your app and authenticate with a fingerprint.
The simplest way to do this is to use one of the
many third-party libraries that exist to simplify Android’s fingerprint API.
For example, the
DeviceAuth/FingerCheck
sample application uses RxFingerprint,
which offers an RxJava-compatible API for authenticating a user via a registered
fingerprint.
The first requirement for working with fingerprints explicitly is to request
the USE_FINGERPRINT permission:
<uses-permission android:name="android.permission.USE_FINGERPRINT" />
This is not a dangerous permission, so you do not need to request it at
runtime using requestPermissions(). But, you have to have it, so that users
that investigate the full slate of permissions requested by your app will know
that you wish to work with fingerprints.
Android 9.0 introduced a new permission, USE_BIOMETRIC, to better reflect the
migration from simple fingerprints to more biometric authentication options
(e.g., iris scan). You may wish to request both USE_FINGERPRINT and
USE_BIOMETRIC, knowing that the latter will be ignored on pre-Android 9.0 devices.
RxFingerprint itself is just another artifact to request as part of
your dependencies:
dependencies {
    implementation 'com.android.support:support-vector-drawable:27.0.2'
    implementation 'com.android.support.constraint:constraint-layout:1.0.2'
    implementation 'io.reactivex.rxjava2:rxjava:2.1.7'
    implementation 'io.reactivex.rxjava2:rxandroid:2.0.1'
    implementation 'com.mtramin:rxfingerprint:2.2.1'
}
When you want to authenticate the user, you can use isAvailable()
and authenticate() static methods on the RxFingerprint class:
if (RxFingerprint.isAvailable(this)) {
  disposable=RxFingerprint.authenticate(this)
    .subscribe(this::onAuthResult,
      t -> {
        Log.e(getClass().getSimpleName(), "Exception authenticating", t);
      });
}
else {
  Toast.makeText(this, R.string.msg_not_available, Toast.LENGTH_LONG).show();
}
You need to call isAvailable() first. If this returns false, you cannot
authenticate using a fingerprint, for any number of reasons, including:
Build.VERSION.SDK_INT
hasSystemFeature(PackageManager.FEATURE_FINGERPRINT) on
a PackageManager and seeing if it returns true or false
Assuming that there is a fingerprint eligible for authentication, authenticate()
turns on the fingerprint sensor. There is no visible indication of this, and so
you will need to do something in your app to let the user know that it is time
for them to scan their fingerprint.
There are four possible outcomes. The unexpected one is some sort of crash.
In that case, your RxJava stream will contain a Throwable representing
the crash. In the code shown above, subscribe() routes that Throwable to
some code that logs the message to LogCat (and, ideally, should do other things
as well, to let the user know that something went wrong).
Everything else routes through a FingerprintAuthenticationResult object
that is the output of the RxJava stream set up by isAvailable(). You
can call getResult() on that to get an enum value that indicates what
happened:
  private void onAuthResult(FingerprintAuthenticationResult authResult) {
    String msg=getString(R.string.msg_not_possible);

    switch (authResult.getResult()) {
      case FAILED:
        msg=getString(R.string.msg_failed);
        button.setImageDrawable(off);
        unsub();
        break;
      case HELP:
        msg=authResult.getMessage();
        break;
      case AUTHENTICATED:
        msg=getString(R.string.msg_authenticated);
        button.setImageDrawable(off);
        unsub();
        break;
    }

    Toast.makeText(this, msg, Toast.LENGTH_LONG).show();
  }
If we get a HELP event, the user
can try to scan their fingerprint again. The getMessage() method on the
FingerprintAuthenticationResult provides a message to show the user to
hint at what they might do to get a better scan.
Otherwise, AUTHENTICATED means that the user successfully authenticated using
a fingerprint, and FAILED means that the user failed authentication.
In all three cases, the fingerprint sensor is still active, and will remain
so until we dispose() of the Disposable representing this RxJava subscription,
handled here by the unsub() method:
  private void unsub() {
    if (disposable!=null) {
      disposable.dispose();
      disposable=null;
    }
  }
In this sample app, the layout consists of a single ImageButton, showing
a vector drawable of a stylized fingerprint. That fingerprint will show up
in one of two colors: black normally, but blue when the fingerprint sensor
is active. In onCreate(), we set up tinted editions of the vector drawable,
plus hook up an authenticate() method to the button:
  @Override
  protected void onCreate(Bundle savedInstanceState) {
    super.onCreate(savedInstanceState);
    setContentView(R.layout.activity_main);

    off=DrawableCompat.wrap(VectorDrawableCompat.create(getResources(),
      R.drawable.ic_fingerprint_black_24dp, null));
    off.setTint(getResources().getColor(android.R.color.black, null));

    on=DrawableCompat.wrap(VectorDrawableCompat.create(getResources(),
      R.drawable.ic_fingerprint_black_24dp, null));
    on.setTint(getResources().getColor(R.color.primary, null));

    button=findViewById(R.id.fingerprint);
    button.setImageDrawable(off);
    button.setOnClickListener(view -> authenticate());
  }
authenicate() contains the RxFingerprint calls from earlier, but
with some additional manipulation of the button drawable, to toggle it blue
while the scan is going on and toggle it black if an exception occurs:
  private void authenticate() {
    unsub();

    if (RxFingerprint.isAvailable(this)) {
      button.setImageDrawable(on);
      disposable=RxFingerprint.authenticate(this)
        .subscribe(this::onAuthResult,
          t -> {
            Log.e(getClass().getSimpleName(), "Exception authenticating", t);
            button.setImageDrawable(off);
          });
    }
    else {
      Toast.makeText(this, R.string.msg_not_available, Toast.LENGTH_LONG).show();
    }
  }
The layout sets the ImageButton to be approximately one inch square:
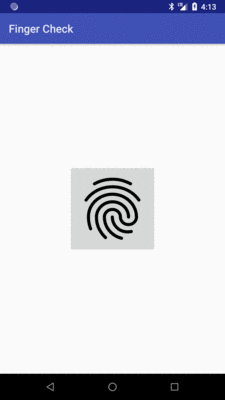
Figure 742: Finger Check Sample, As Initially Launched
When you tap that button, the fingerprint turns blue:

Figure 743: Finger Check Sample, As Initially Launched
From there, what happens depends on the user, but ideally involves a successful authentication:

Figure 744: Finger Check Sample, As Initially Launched
The FingerprintManager system service is the Android gateway to the
fingerprint-specific APIs. It has only three methods, at least as of Android 8.1.
Two of these simply indicate whether or not you can bother using the third method:
isHardwareDetected() returns true if the device has a fingerprint sensor
that is set up for use by the Android SDK, false otherwisehasEnrolledFingerprints() returns true if the user has set up one
or more fingerprints in Settings, false otherwiseIf either of those methods return false, you cannot authenticate the user
by fingerprint.
If they both return true, though, you can use the third method — authenticate() –
to authenticate the user with a fingerprint.
authenticate() takes five parameters:
CryptoObject, which for simple authentication can be null
CancellationSignal object that you can use to cancel the attempt to
authenticate0 for now)Handler, if you want the callback methods to be called on some other
thread (otherwise, pass null to be called back on the main application thread)Your AuthenticationCallback implementation can be called with four methods:
onAuthenticationSucceeded(), if the user did indeed pass the authenticationonAuthenticationFailed(), if the sensor detected a fingerprint, but it
was not one of the registered fingerprints (e.g., from some other person)onAuthenticationHelp(), when there was a problem in scanning the fingerprint,
but the user can try again (e.g., the finger moved too much)onAuthenticationError(), when something goes wrong that does not represent
a failure (i.e., mismatched fingerprint) and is not recoverableRxFingerprint simply wraps all of this in an RxJava-friendly API.
The CryptoObject that you can pass into authenticate() is tied to the
device keystore for use with digitally signing and encrypting
data securely. You do not have to use FingerprintManager to work with the
keystore, but it is one option. However, as we will see in
the chapter on the keystore, working with the keystore is
a bit complex.
RxFingerprint offers simple encrypt() and decrypt() methods. Each
return an Observable for you to be able to react to the results of the
cryptography.
Both methods have three parameters in common:
EncryptionMethod enum value, which is either AES (for AES-256
symmetric key encryption) or RSA (for public-key encryption)Activity requesting this workThe advantage of RSA is that the user only needs to scan their fingerprint
when data is decrypted. Encryption can occur at any time without a fingerprint.
With AES, a fingerprint is needed for both encryption and decryption. However,
AES should be a bit faster, particularly for larger amounts of data.
The encrypt() method takes a fourth parameter, which is a String representing
the data to be encrypted. It is your job to marshal your data into a String by
one means or another. What you get, reactively, from the encrypt() process
is another String, representing the encrypted value. It is your job to save
this somewhere, such as in a file.
The decrypt() method then works in reverse:
String
encrypt() originallythe
DeviceAuth/FingerKey
sample application illustrates the use of these two methods.
The value that we are saving is a randomly-generated passphrase, for reasons that will become
clearer later in this chapter. Specifically, it is 128
characters of random alphanumeric values, generated via a SecureRandom instance:
  private char[] generatePassphrase() {
    char[] result=new char[128];

    for (int i=0; i<result.length; i++) {
      result[i]=BASE36_SYMBOLS.charAt(rng.nextInt(BASE36_SYMBOLS.length()));
    }

    return result;
  }
Here, BASE36_SYMBOLS is simply a String of the candidate characters to
use in the random passphrase:
private static final String BASE36_SYMBOLS="abcdefghijklmnopqrstuvwxyz0123456789";
rng is a SecureRandom instance:
private final SecureRandom rng=new SecureRandom();
That passphrase is generated as part of starting up the activity and is held
onto in a passphrase field.
The UI is the same as in the FingerAuth sample shown above, with a large
fingerprint button. This time, when the user taps the button, we will
encrypt the passphrase using RSA encryption, then turn around and decrypt
the value. The decryption will require the user to scan their fingerprint.
The button is now tied to a doTheWork method, which confirms that we have
fingerprint access, then calls encrypt() on the RxFingerprint instance:
  private void doTheWork() {
    unsub();

    if (RxFingerprint.isAvailable(this)) {
      disposable=RxFingerprint.encrypt(EncryptionMethod.RSA, this, KEY_NAME,
        new String(passphrase))
        .subscribe(this::onEncResult,
          t -> {
            Log.e(getClass().getSimpleName(), "Exception authenticating", t);
            button.setImageDrawable(off);
          });
    }
    else {
      Toast.makeText(this, R.string.msg_not_available, Toast.LENGTH_LONG).show();
    }
  }
Here, KEY_NAME is just a simple constant. The passphrase is held onto
as a char array, so we need to convert that to a String before passing it to
encrypt() as the value to be encrypted.
The subscribe() call on the Observable routes control to an onEncResult()
method in normal cases, or logs an Exception to LogCat in case of a serious
failure.
There are three possible outcomes from onEncResult()… in theory. In reality,
it will depend on the encryption algorithm. AES requires fingerprint authentication
for both encryption and decryption, and so there is a chance that the user
fails the fingerprint authentication step. RSA — which this sample app uses –
does not require fingerprint authentication for encryption. This means
that everything should succeed (a result of AUTHENTICATED, or we should get a Throwable.
So, if we are AUTHENTICATED, our data has been encrypted, and so we can
get that encrypted value via getEncrypted() on the FingerprintEncryptionResult.
In a real app, you would save this somewhere for long-term use. Here, we just
turn right around and:
ImageButton, with a blue fingerprintunsub()
getEncrypted() value to RxFingerprint.decrypt() to decrypt
this value private void onEncResult(FingerprintEncryptionResult encResult) {
if (encResult.getResult()==FingerprintResult.AUTHENTICATED) {
button.setImageDrawable(on);
unsub();
String encryptedValue=encResult.getEncrypted();
disposable=RxFingerprint.decrypt(EncryptionMethod.RSA, this, KEY_NAME,
encryptedValue)
.subscribe(this::onDecResult,
t -> {
Log.e(getClass().getSimpleName(), "Exception decrypting", t);
button.setImageDrawable(off);
});
}
else {
Toast.makeText(this, "This was unexpected...", Toast.LENGTH_LONG).show();
}
}
decrypt() takes the same first three parameters as does encrypt():
EncryptionMethod enum value corresponding with how you encrypted
the valueActivity requesting this workencrypt()
The fourth parameter is the encrypted data to be decrypted.
decrypt() returns an Observable of FingerprintDecryptionResult. We
use the same pattern as before, routing the normal case to an onDecResult()
method and logging any exceptions to LogCat.
onDecResult() will need to deal with all three possible fingerprint scan outcomes
(FAILED, HELP, and AUTHENTICATED), since any decryption requires a
fingerprint scan. The first two of those scenarios we handle the same as
in FingerAuth; the third one just confirms that our decrypted data matches
the plaintext that we supplied to encrypt() back in the beginning:
  private void onDecResult(FingerprintDecryptionResult decResult) {
    String msg=getString(R.string.msg_not_possible);

    switch (decResult.getResult()) {
      case FAILED:
        msg=getString(R.string.msg_failed);
        button.setImageDrawable(off);
        unsub();
        break;
      case HELP:
        msg=decResult.getMessage();
        break;
      case AUTHENTICATED:
        button.setImageDrawable(off);
        unsub();

        if (decResult.getDecrypted().equals(new String(passphrase))) {
          msg=getString(R.string.msg_match);
        }
        else {
          msg=getString(R.string.msg_mismatch);
        }

        break;
    }

    Toast.makeText(this, msg, Toast.LENGTH_LONG).show();
  }
In a real app, of course, you would use this decrypted data for something useful.
Square — authors of a seemingly-infinite number of open source Android libraries — has their take on fingerprints and encryption, in the Whorlwind library.
This is simpler to use than RxFingerprint, if you do not need control
over the encryption algorithm that is used or the storage location
for the encrypted data. That is handled for you by Whorlwind. It uses
the RSA algorithm, which avoids the need for fingerprint authentication
for encrypting the data. And, it provides a Storage abstraction for
persisting the encrypted data in a key-value store. Whorlwind ships
with a SharedPreferencesStorage, or you can create another implementation
of the Storage interface that meets your needs.
Encrypting a random string seems to be a bit esoteric. Developers are used to encrypting things of value, and a random string would not appear to be of value.
On its own, a random string is useless.
However, there are encrypted data stores for Android that rely on a passphrase, such as SQLCipher for Android. Those data stores have no means of integrating with a fingerprint scanner directly.
The encrypted random string, therefore, serves as a bridge between the fingerprint authentication — or, as we will see, the keystore — and the passphrase-based data store:
Storage,
in a file, in SharedPreferences, etc.)Later on, to access the passphrase-based data store, we:
The net result is an encrypted data store (e.g., SQLCipher for Android) with device-based authentication, instead of (or in addition to) a user-entered passphrase.
We will explore this pattern in greater detail in the next chapter.
Under the covers, all of this winds up using the keystore for handling the encryption securely. Using the keystore has many benefits, but it also has some limitations, particularly when it comes to changes to the lockscreen. The next chapter has a section that reviews these limitations.