Figure 70: Android Studio Graphical Layout Editor
The project you created in an earlier tutorial was just the default files generated by the Android build tools — you did not write any Java code yourself. In this chapter, we will examine the basic Java code and resources that make up an Android activity.
The Java source code that you maintain will be in a standard Java-style tree of
directories based upon the Java package you chose when you created the project
(e.g., com.commonsware.android results in com/commonsware/android/).
Android Studio will have that source, by default, in app/src/main/java/ off
of the top-level project root.
If, in the new-project wizard, you elected to create an activity, you will have, in the innermost directory, a Java source file representing an activity class.
A very simple activity looks like:
package com.commonsware.empublite;

import android.app.Activity;
import android.os.Bundle;

public class EmPubLiteActivity extends Activity {

  @Override
  protected void onCreate(Bundle savedInstanceState) {
    super.onCreate(savedInstanceState);
    setContentView(R.layout.main);
  }
}
Let’s examine this Java code piece by piece:
package com.commonsware.empublite;

import android.app.Activity;
import android.os.Bundle;
By default, the package declaration is the same as the one you used when creating
the project. And, like any other Java project, you need to import any classes
you reference. Most of the Android-specific classes are in the android
package.
Remember that not every Java SE class is available to Android programs! Visit the Android class reference to see what is and is not available.
public class EmPubLiteActivity extends Activity {
Activities are public classes, inheriting from the android.app.Activity base
class (or, possibly, from some other class that itself inherits from Activity).
You can have whatever data members you decide that you need, though the initial
code has none.
  @Override
  protected void onCreate(Bundle savedInstanceState) {
    super.onCreate(savedInstanceState);
    setContentView(R.layout.main);
The onCreate() method is invoked when the activity is started. We will discuss the Bundle
parameter to onCreate() in a later chapter. For the
moment, consider it an opaque handle that all activities receive upon creation.
The first thing you normally should do in onCreate() is chain upward to the
superclass, so the stock Android
activity initialization can be done. The only other statement in our stub project’s onCreate() is a call to
setContentView(). This is where we tell Android what the user interface is
supposed to be for our activity.
This raises the question: what does R.layout.main mean? Where did this R come
from?
To explain that, we need to start thinking about layout resources and how resources are referenced from within Java code.
As noted in the previous chapter,
Android uses a series of widgets and containers to describe
your typical user interface. These all inherit from an android.view.View
base class, for things that can be rendered into a standard widget-based
activity.
While it is technically possible to create and attach widgets and containers to our activity purely through Java code, the more common approach is to use an XML-based layout file. Dynamic instantiation of widgets is reserved for more complicated scenarios, where the widgets are not known at compile-time (e.g., populating a column of radio buttons based on data retrieved off the Internet).
With that in mind, it’s time to break out the XML and learn how to lay out Android activity contents that way.
As the name suggests, an XML-based layout is a specification of its widgets’
relationships to each other — and to containers — encoded in XML
format. Specifically, Android considers XML-based layouts to be resources, and
as such layout files are stored in the res/layout/ directory inside your
Android project (or, as we will see later, other layout resource sets, like
res/layout-land/ for layouts to use when the device is held in landscape).
As has been noted elsewhere in this book, the initial location of res/
is in app/src/main/ for Android Studio.
Each XML file contains a tree of elements specifying a layout of widgets and
containers that make up one View. The attributes of the XML elements are
properties, describing how a widget should look or how a container should
behave. For example, if a Button element has an attribute value of
android:textStyle = "bold", that means that the text appearing on the face of
the button should be rendered in a boldface font style.
For example, here is a res/layout/main.xml file that could be used with
the aforementioned activity:
<?xml version="1.0" encoding="utf-8"?>
<RelativeLayout android:id="@+id/main"
  xmlns:android="http://schemas.android.com/apk/res/android"
  xmlns:tools="http://schemas.android.com/tools"
  android:layout_width="match_parent"
  android:layout_height="match_parent"
  android:paddingBottom="@dimen/activity_vertical_margin"
  android:paddingLeft="@dimen/activity_horizontal_margin"
  android:paddingRight="@dimen/activity_horizontal_margin"
  android:paddingTop="@dimen/activity_vertical_margin"
  tools:context="com.commonsware.empublite.EmPubLiteActivity">

  <TextView
    android:layout_width="wrap_content"
    android:layout_height="wrap_content"
    android:text="Hello World!" />
</RelativeLayout>
The class name of a widget or container — such as RelativeLayout or TextView
– forms the name of the XML
element. Since TextView is an Android-supplied widget, we can just use the bare
class name. If you create your own widgets as subclasses of
android.view.View, you would need to provide a full package declaration as
well (e.g., com.commonsware.android.MyWidget).
The root element needs to declare the Android XML namespace
(xmlns:android="http://schemas.android.com/apk/res/android").
All other elements will be children of the root and will inherit that namespace
declaration.
The attributes are properties of the widget or container, describing what it
should look and work like. For example, the android:layout_width and
android:layout_height
attributes on the TextView element make a request from the child (TextView) to
its parent (a RelativeLayout) for what size the child should be.
We will get into details about these attributes, their possible values, and
their uses, in upcoming chapters. Note that those attributes in the tools
namespace (e.g., tools:context) are there solely to support the Android
build tools, and do not affect the runtime execution of
your project.
Android’s SDK ships with a tool (aapt) which uses the layouts. This tool
will be automatically invoked by your Android tool chain (e.g., Android Studio).
Of particular importance to you as a developer is that
aapt generates an R.java source file, allowing you to access layouts
and widgets within those layouts
directly from your Java code. In other words, this is where that magic R
value used in setContentView() comes from. We will discuss that a bit more
later in this chapter.
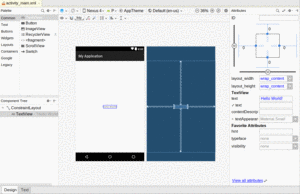
If you are using Android Studio,
and you double-click on the res/layout/main.xml file
in your project, you will not initially see that XML. Instead, you will be
taken to the graphical layout editor:
Figure 70: Android Studio Graphical Layout Editor
We will go into much more detail about using the graphical layout editor in an upcoming chapter, as we start to work more with specific widgets and containers.
Almost everything you do using XML layout files can be achieved through Java
code. For example, you could use setText() to have a button display a
certain caption, instead of using a property in an XML layout. Since XML layouts
are yet another file for you to keep track of, we need good reasons for using
such files.
Perhaps the biggest reason is to assist in the creation of tools for view definition, such as the aforementioned graphical layout editors in Android Studio. Such GUI builders could, in principle, generate Java code instead of XML. The challenge is re-reading the definition in to support edits — that is far simpler if the data is in a structured format like XML than in a programming language. Moreover, keeping the generated bits separated out from hand-written code makes it less likely that somebody’s custom-crafted source will get clobbered by accident when the generated bits get re-generated. XML forms a nice middle ground between something that is easy for tool-writers to use and easy for programmers to work with by hand as needed.
Also, XML as a GUI definition format is becoming more commonplace. Microsoft’s XAML, Adobe’s Flex, Google’s GWT, and Mozilla’s XUL all take a similar approach to that of Android: put layout details in an XML file and put programming smarts in source files (e.g., JavaScript for XUL). Many less-well-known GUI frameworks, such as ZK, also use XML for view definition. While “following the herd” is not necessarily the best policy, it does have the advantage of helping to ease the transition into Android from any other XML-centered view description language.
Given that you have painstakingly set up the widgets and containers for your
view in an XML layout file named main.xml stored in res/layout/, all you
need is one statement in your activity’s onCreate() callback to use that
layout, as we saw in our stub project’s activity:
setContentView(R.layout.main);
Here, R.layout.main tells Android to load in the layout (layout) resource
(R) named main.xml (main).