Figure 314: Build Variants View, for a Simple Project
You may think that the directory structure and files involved in an Android Studio project is a bit complicated. In truth, what you have seen so far is actually fairly simple, when you start to consider the real world of product development. Simple apps can get by with simple structures like we have seen so far, but:
In this chapter, we will explore the concept of “build variants” in Gradle and Android Studio and how you can take advantage of them for your projects.
Understanding this chapter requires that you have read the chapters the core chapters of the book.
In the beginning, Android apps tended to be pretty simple, as we only had a handful of devices, a smattering of users, one primary distribution channel (the then-Android Market) and few major investors in the Android ecosystem.
Times have changed.
Now, Android apps for public consumption can be terribly complex, let alone apps for internal enterprise use (which seem to be complex as a side effect of being developed by an enterprise). We have multiple distribution channels, such as the Amazon AppStore for Android and Yandex.Store. We have a billion devices and nearly a billion users. Brands large and small are flocking to Android, bringing with them their own challenges.
The new build system is designed to simplify creating complex Android applications, while, ideally, not making simple Android applications a lot harder. It is designed for scenarios like:
The new project structure, coupled with the Android Gradle Plugin and Gradle itself, makes all of this possible… albeit with a bit of a learning curve.
To understand what the new project structure entails, we need to define a few terms, from Gradle and the Android Gradle Plugin.
To quote the Gradle documentation: “A source set is simply a group of source files which are compiled and executed together.” Here, “source” means all the inputs that you are creating for the app, such as Java source code, Android resources and manifest files, and the like. This is in contrast to dependencies, which are inputs that you are (usually) obtaining from other developers, such as reusable libraries.
source sets, on their own, have no particular semantic meaning. You can elect to have your project use a single source set, or several source sets, for organizing your code. You might have different source sets for:
As we will see, the new project structure assumes the existence of at least
one source set, typically named main, but other features of the new build system
will involve additional source sets.
A build type is one axis of possible alternative outcomes from the build process.
By default, the Android Gradle Plugin assumes that you want two build types: release and debug. These may go through somewhat different build steps, such as applying ProGuard to the release build but skipping it for the debug build.
The Android Gradle Plugin though allows build types to have slightly
different configurations, such as adding a .debug suffix to the APK’s package
name, so that you can have a release build and a debug build of your app on the
same device at the same time. You also can create new build types for handling
different scenarios. The new build system documentation, for example, suggests a
separate “jnidebug” build type, where you can indicate that the Linux .so files for
a project should be compiled in debug mode.
As we will see, creating a new build type involves modifications to the
build.gradle file and adding a matching source set.
A build type is one axis for varying your output. A product flavor is another, independent axis for varying your output.
Product flavors are designed for scenarios where you want different release output for different cases. For example, you may want to have one version of your app built to use Google’s in-app purchasing APIs (for distribution through the Play Store) and another version of your app built to use Amazon’s in-app purchasing APIs (for distribution through the Amazon AppStore for Android). In this case, both versions of the app will be available in release form, and you may wish to have separate debug builds as well. And most of the code for the two versions of the app will be the same. However, you will have different code for the different distribution channels — not only does the right code have to run for the right channel, but there is no particular value in distributing the code for one channel through the other channel.
Another example would be an app that is branded and configured for different enterprise customers. You see this a lot with Web apps — the vendor sells a branded-and-configured version of the Web app to the customer, whether that app runs on vendor-supplied hardware or customer-supplied hardware. Similarly, the maker of an Android app for collecting employee timesheets might want to offer to its customers for their version of the timesheet app to sport the customer’s logo, tie into the customer’s specific accounting server, enable or disable features based upon how the customer uses timesheets, and so on. However, most of the code is shared between all customers, and so when the app is updated to add features or fix bugs, new builds are needed for all of the customers. In this case, each customer can be set up as an independent product flavor, sharing much of the code, but with slightly different code, resources (e.g., logo), and configuration based upon that customer’s needs.
Product flavors are optional. If you do not describe any product flavors
in your build.gradle file, it is assumed that you have a single product flavor,
referred to internally as default. Many apps will not need product flavors;
this is a feature that you will opt into as needed.
As we will see, creating a new product flavor involves modifications to the
build.gradle file and (usually) adding a matching source set.
The term “build variant” is used for the cross product of the build types and
the product flavors. So, a project with debug and release build types
and google and amazon product flavors will result in a total of four
build variants by default:
debug + google
debug + amazon
release + google
release + amazon
Sometimes, even this is insufficient flexibility, such as the
google and amazon scenario described earlier in this section. Or, you
might need separate free versus paid editions, if you want to have an
up-front fee for accessing a premium version of your app.
Product flavors are considered to be part of a “flavor dimension”. All flavors have to be a part of a flavor dimension, starting with Android Studio 3.0 — previously, they could be part of a default flavor dimension. You can have as many flavor dimensions as you need (e.g., one for free versus paid, one for distribution channel).
These then add another factor into the cross-product that determines your
build variants. Suppose we have a dist flavor dimension, consisting of free
and paid product flavors, and we have a channel flavor dimension, consisting
of google and amazon flavors. Now, we have a total of 8 possible
build variants, when we factor in the build types:
debug + google + free
debug + amazon + free
release + google + free
release + amazon + free
debug + google + paid
debug + amazon + paid
release + google + paid
release + amazon + paid
The debug and release build types are ready “out of the box” for your use, with a
reasonable set of defaults. However, you can change those defaults and make other
adjustments to how those build types work, in addition to
defining your own build types. Here, we will look
at the options for changing the behavior of any build type, focusing on the stock
debug and release build types.
Each build type can have its own associated source set. If you skip the directory for
it, that means that the build type is not contributing changes to the main source set.
For example, later in the book, we will take a look at Stetho,
a diagnostic library that you can add to your Android app to help understand
what is going on inside of it. This code is handy during development, but it is
not the sort of thing that you want to be shipping in production. Instead,
you want to use it only for debug builds.
So, in the
Diagnostics/Stetho
sample project, we have not only a main source set, but also a debug source set
alongside main. In debug, we have an AndroidManifest.xml file:
<?xml version="1.0" encoding="utf-8"?>
<manifest xmlns:android="http://schemas.android.com/apk/res/android"
  xmlns:tools="http://schemas.android.com/tools"
  package="com.commonsware.android.stetho"
  android:versionCode="1"
  android:versionName="1.0">

  <application
    android:name="com.commonsware.android.stetho.StethoApp"
    tools:replace="android:name">
  </application>

</manifest>
The com.commonsware.android.stetho.StethoApp Java class referenced in
the <application> element also resides in the debug source set.
We will see how these blend in with the contents of our main source set later
in this chapter.
We can also use the buildTypes closure in build.gradle to configure the behavior
of the debug and/or release build types.
For example, a very popular thing to use is applicationIdSuffix, to append a
value onto the application ID for builds of a particular build type. This
allows the application ID for that build type to be different than the application
ID of other build types of the same app. In other words, you can have
debug and release builds installed on the same device at the same time.
As was noted earlier in the book,
the defaultConfig closure allows us to change aspects of what is found in the
AndroidManifest.xml file, replacing anything found in the actual file from the
main source set.
Similarly, the buildTypes closure is where we configure the behavior of the build types. Each
build type to be configured gets its own closure inside of buildTypes, and in there
we can override various properties.
Notable properties that we can specify for a build type include:
debuggable (to override android:debuggable from the <application> element in the
manifest, to indicate that the app should be considered debuggable)applicationIdSuffix (to append to the package name specified by the manifest or the
defaultConfig applicationId property)versionNameSuffix (to append to the version name specified by the manifest or the
defaultConfig versionName property)So, we can have:
buildTypes {
    debug {
        applicationIdSuffix ".d"
    }
}
Our debug build type adds suffixes to the application ID
role for the package name.
Note that altering the application ID only affects the package name as seen by
Android when the app is installed and when the app is run. It does not affect
the directory in which the R class is built, which uses the package name
from the AndroidManifest.xml file. It also does not affect any of the Java
packages for our own classes, which are whatever we used when we wrote them.
Hence, much of our code will be oblivious to the package name change. However,
if you want to reference the real package name, such as for looking things up
in PackageManager or for use with constructing a ComponentName, use
getPackageName() on any Context (like an Activity), rather than some hard-coded
string, as getPackageName() returns what the runtime environment thinks the package
is, which will include any suffixes added during the build process. Or,
use BuildConfig.APPLICATION_ID, in cases where you do not have a Context
handy on which to call getPackageName().
We can also have a signingConfig property, for configuring how our
APK files are digitally signed. This will be covered
in a later chapter.
Properties defined for a build type, and the properties defined for the defaultConfig
will override their equivalents in the AndroidManifest.xml file. However, a build
type’s source set can also have its own AndroidManifest.xml file. The overall
order of precedence is:
build.gradle takes precedence over…AndroidManifest.xml file, which takes precedence over…main AndroidManifest.xml fileHowever, merging manifests in general is a complex topic, with a separate chapter later in this book.
Resources from the build type’s source set are merged into the resources from
the main source set, and if there are collisions, the build type’s resource
takes precedence. The same is true for assets.
However, the behavior of Java source is slightly different. The build type’s source
set is still merged with the main source set, but if there is a collision, the
result is a build error. Either the build type or the main source set can define
any given source file, not both. So, while debug could have one version of
your/package/name/Foo.java and release could have a different version of
your/package/name/Foo.java, main could not also have your/package/name/Foo.java.
Hence, if you define a class in a build type, you may need to define
that class in all build types, so that any references from main to that class
are satisfied for all build types.
One case where this would not be required would be for debug-only activities.
Suppose that you wanted an activity in your app to provide diagnostic
information to developers of that app regarding the state of caches and other
in-memory constructs. While you could get at that stuff via a debugger, that
is sometimes annoying, and just tapping on a launcher icon can be easier.
But you do not want, let alone need, this diagnostic activity in your release
builds. To make this work, you would put the activity’s Java class only in
the debug source set, along with its resources and manifest entry
(complete with MAIN/LAUNCHER <intent-filter>). Since the main
source set does not refer to your diagnostic activity, there is no requirement
for the release build type to have an implementation of that Java class.
Many developers will fare just fine with the debug and release build types,
perhaps with some adjustments as shown above. A few developers, though, will have
other scenarios that warrant new build types. Fortunately, adding a new build
type is rather easy.
First, pick whether you want to have the new build type start with the settings
from debug or release. Then, use initWith to create a new build type
initialized from that existing build type:
    buildTypes {
        debug {
          applicationIdSuffix ".d"
          versionNameSuffix "-debug"
        }

        dogfood.initWith(buildTypes.debug)

        dogfood {
            applicationIdSuffix ".dawg"
        }
    }
Here, we define a new dogfood build type, with its own application ID suffix.
As with the built-in build types, your new build types can have their own
source sets, by adding the appropriately-named directories underneath src/.
Now, we gain Gradle tasks with Dogfood in the name, like installDogfood, to
go along with their Debug and Release counterparts.
Many apps will not need product flavors, but some will. Adding a product flavor is similar, in many respects, to adding a build type.
This involves two steps:
flavorDimensions statement in the android closure, to define
the flavor dimension(s) that you wish to useproductFlavors closure where you define the flavors and their
properties, including what dimension they belong to
flavorDimensions "channel"

productFlavors {
    goog {
        dimension "channel"
        applicationId "com.commonsware.android.awesomeapp.goog"
    }

    amzn {
        dimension "channel"
        applicationId "com.commonsware.android.awesomeapp.amzn"
    }
}
Here, we define one flavor dimension (channel) and two product
flavors (goog and amzn), assigning a distinct applicationId
to each of those flavors.
The defaultConfig is implemented using the same object type as is used for
product flavors. Hence, we can configure the same things on a product flavor that
we can on the defaultConfig, such as applicationId, as is done in this build.gradle
file.
We could have source sets for each of these as well. For example, the goog
source set might contain code that is used only for Google Play ecosystem
devices (e.g., Play Services), while amzn might contain code used for devices
distributed by other channels.
In terms of order of precedence:
main source set and the defaultConfig
Our task names get more numerous and more complicated, to reflect the cross product
of the product flavors and build types. Now, rather than installDebug,
and installRelease, we have:
installAmznDebuginstallAmznReleaseinstallGoogDebuginstallGoogReleaseThe Android Gradle Plugin offers splits as a lightweight canned
replacement for product flavors for two scenarios:
All you as a developer do is request that a particular split
be enabled, with limited configuration. Notably, you do not
have separate Gradle configuration (e.g., applicationId) nor
source sets for splits. That allows splits to be processed more
quickly at build time, as the build tools can make some simplifying
assumptions and avoid a lot of recompiling.
A split, by default, will generate one APK per possible type
of output. For example, splitting on density will give you one
APK for ldpi, mdpi, tvdpi, hdpi, xhdpi, xxhdpi, and
xxxhdpi. Plus, in the case of density, you also get one
“universal” APK containing support for all densities by default.
That’s nice… but what if you do not need separate APKs for
all of those densities? For example, if you do not ship tvdpi
resources, there is little reason to set up an APK for it
separate from, say, the hdpi APK.
There are two basic patterns to controlling the scope of what gets built:
exclude statement to start with the defaults and
remove some optionsreset() method to wipe out the defaults, then use
an include statement to list what you wantIn other words, exclude implements a blacklist, and the
reset()/include combination implements a whitelist. All else
being equal, a whitelist is probably a better choice, so you
can explicitly line it up with what you have written in your app.
In your android closure, you can add a splits closure, containing
an abi closure, which in turn sets up the APK splits by CPU
architecture:
splits {
  abi {
    enable true
    reset()
    include 'armeabi-v7a', 'x86'
    universalApk true
  }
}
Here, we:
enable true)reset())include 'armeabi-v7a', 'x86')universalApk true)The latter would be useful for distribution channels that do not allow you to upload multiple APK files for different CPU architectures. This way, you can at least distribute your app there, even if it takes up more disk space than you like. By default, for the CPU architectures, you do not get a “universal APK”.
The same basic pattern can be implemented for densities:
splits {
  density {
    enable true
    reset()
    include 'hdpi', 'xhdpi', 'xxhdpi'
  }
}
Once again, we enable the split, reset the defaults, then opt into the densities that we want.
Note, though, that a “universal APK” is always generated for densities.
We do not need to have universalApk true, and it would appear that
universalApk false is not an option at the present time.
While most of the work involving build variants revolves around the module’s
build.gradle file, there are some things to consider when working with
build variants within Android Studio.
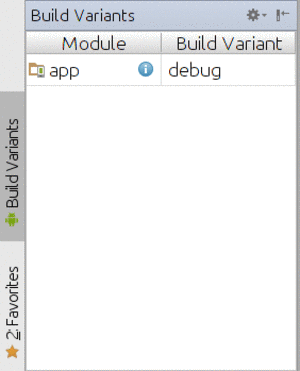
When we run our project, Android Studio does not prompt us for a build type or a product flavor. It just runs the project. This begs the question of how Android Studio is determining which build variant is the one to run.
This is handled by the Build Variants view, usually docked on the left side of the Android Studio IDE window:
Figure 314: Build Variants View, for a Simple Project
Each of your app’s modules is shown, along with the current build variant that will be used if you run that module. Tapping on the build variant will allow you to choose an alternative build variant:
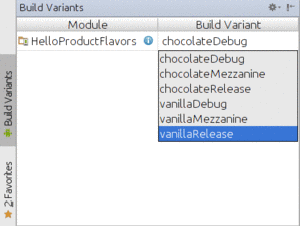
Figure 315: Build Variants View, for a Project with Custom Build Types and Product Flavors
Earlier in the book, when introducing Android Studio, we saw the Android project view. Elsewhere, we saw how the Android project view can help you manage resources across multiple resource sets.
Just as the Android project view “collapses” resource set, it also collapses source sets:

Figure 316: Android Project View, Showing Java Source
Here, we have two editions of the com.commonsware.myapplication
package. One is just the package name, while the other has “(androidTest)”
appended to it. That, as you might imagine, reflects the main
and androidTest source set, respectively:
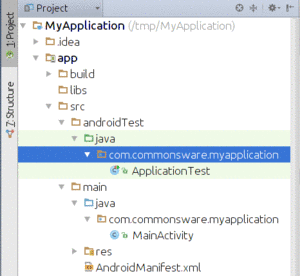
Figure 317: Classic Project View, Showing Java Source
This may be a bit useful between main and androidTest. It is likely
to be far more useful if you employ product flavors, as your classes
for the flavors will appear side-by-side… at least for the currently-selected
flavor in the Build Variants view.
You are welcome to use the Build Types and Product Flavors tabs in
the project structure dialog to
maintain these portions of your build.gradle file,
at least for simpler scenarios.