
Figure 464: ListView with Row Structure Mix (image courtesy of Google)
The humble ListView is the backbone of many an Android application. On phone-sized
screens, the screen may be dominated by a single ListView, to allow the user to choose
something to examine in more detail (e.g., pick a contact). On larger screens, the
ListView may be shown side-by-side with the details of the selected item, to minimize
the “pogo stick” effect seen on phones as users bounce back and forth between the list
and the details.
While we have covered the basics of ListView in the core chapters of this book,
there is a lot more that you can do if you so choose, to make your lists that much
more interesting — this chapter will cover some of these techniques.
Understanding this chapter requires that you have read the core chapters,
particularly
the one on Adapter and AdapterView.
When we originally looked at ListView, we had all of our rows come from a common
layout. Hence, while the data in each row would vary, the row structure itself would
be consistent for all rows. This is very easy to set up, but it is not always what
you want. Sometimes, you want a mix of row structures, such as header rows versus
detail rows, or detail rows that vary a bit in structure based on the data:
Figure 464: ListView with Row Structure Mix (image courtesy of Google)
Here, we see some header rows (e.g., “SINGLE LINE LIST”) along with detail rows. While the detail rows visually vary a bit, they might still be all inflated from the same layout, simply making some pieces (second line of text, thumbnail, etc.) visible or invisible as needed. However, the header rows are sufficiently visually distinct that they really ought to come from separate layouts.
The good news is that Android supports multiple row types. However, this comes at a cost: you will need to handle the row creation yourself, rather than chaining to the superclass.
Our sample project,
Selection/HeaderDetailList
will demonstrate this, along with showing how you can create your own custom adapter
straight from BaseAdapter, for data models that do not quite line up with what
Android supports natively.
The HeaderDetailList project is based on the ViewHolderDemo project
from the chapter on ListView. However, this time, we have our list
of 25 Latin words broken down into five groups of five, as seen in the HeaderDetailList activity:
  private static final String[][] items= {
      { "lorem", "ipsum", "dolor", "sit", "amet" },
      { "consectetuer", "adipiscing", "elit", "morbi", "vel" },
      { "ligula", "vitae", "arcu", "aliquet", "mollis" },
      { "etiam", "vel", "erat", "placerat", "ante" },
      { "porttitor", "sodales", "pellentesque", "augue", "purus" } };
We want to display a header row for each batch:
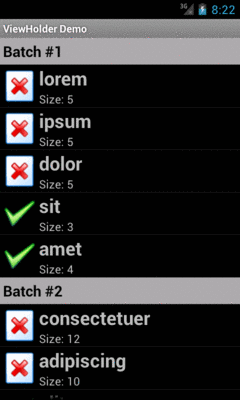
Figure 465: HeaderDetailList, on Android 4.0.3
Once again, we have a custom ListAdapter named IconicAdapter. However, this time,
instead of inheriting from ArrayAdapter, or even CursorAdapter, we are inheriting
from BaseAdapter. As the name suggests, BaseAdapter is a basic implementation of
the ListAdapter interface, with stock implementations of many of the ListAdapter
methods. However, BaseAdapter is abstract, and so there are a few methods that
we need to implement:
getCount() returns the total number of rows that would be in the list. In our
case, we total up the sizes of each of the batches, plus add one for each batch for
our header rows: @Override
public int getCount() {
int count=0;
for (String[] batch : items) {
count+=1 + batch.length;
}
return(count);
}
getItem() needs to return the data model for a given position, passed in as
the typical int index. An ArrayAdapter would return the value out of the array
at that index; a CursorAdapter would return the Cursor positioned at that
row. In our case, we will return one of two objects: either the String for rows
that are to display a Latin word, or an Integer containing our batch’s index for
rows that are to be a header: @Override
public Object getItem(int position) {
int offset=position;
int batchIndex=0;
for (String[] batch : items) {
if (offset == 0) {
return(Integer.valueOf(batchIndex));
}
offset--;
if (offset < batch.length) {
return(batch[offset]);
}
offset-=batch.length;
batchIndex++;
}
throw new IllegalArgumentException("Invalid position: "
+ String.valueOf(position));
}
getItemId() needs to return a unique long value for a given position. A
CursorAdapter would find the _id value in the Cursor for that position and return
it. In our case, lacking anything else, we simply return the position itself: @Override
public long getItemId(int position) {
return(position);
}
getView(), which returns the View to use for a given row. This is the method
that we overrode on our IconicAdapter in some previous incarnations to tailor the
way the rows were populated. Our getView() implementation will be a bit more complex
in this case, due to our multiple-row-type requirement, so we will examine it a bit
later in this section.The methods listed above are the abstract ones that you have no choice but to
implement yourself. Anything else on the ListAdapter interface that you wish to
override you can, to replace the stub implementation supplied by BaseAdapter.
If you wish to have more than one type of row, there are two such methods that you will wish to override:
getViewTypeCount() needs to return the number of distinct row types you will
use. In our case, there are just two: @Override
public int getViewTypeCount() {
return(2);
}
getItemViewType() needs to return a value from 0 to getViewTypeCount()-1,
indicating the index of the particular row type to use for a particular row position.
In our case, we need to return different values for headers (0) and detail rows
(1). To determine which is which, we use getItem() — if we get an Integer
back, we need to use a header row for that position: @Override
public int getItemViewType(int position) {
if (getItem(position) instanceof Integer) {
return(0);
}
return(1);
}
The reason for supplying this information is for row recycling. The View that is
passed into getView() is either null or a row that we had previously created that
has scrolled off the screen. By passing us this now-unused View, Android is asking
us to reuse it if possible. By specifying the row type for each position, Android
will ensure that it hands us the right type of row for recycling — we will not be
passed in a header row to recycle when we need to be returning a detail row, for
example.
Our getView() implementation, then, needs to have two key enhancements over previous
versions:
ListView
To help simplify the logic, we will have getView() focus on the detail rows,
with a separate getHeaderView() to create/recycle and populate the header rows.
Our getView() determines up front whether the row required is a header and, if so,
delegates the work to getHeaderView():
    @Override
    public View getView(int position, View convertView, ViewGroup parent) {
      if (getItemViewType(position) == 0) {
        return(getHeaderView(position, convertView, parent));
      }

      View row=convertView;

      if (row == null) {
        row=getLayoutInflater().inflate(R.layout.row, parent, false);
      }

      ViewHolder holder=(ViewHolder)row.getTag();

      if (holder == null) {
        holder=new ViewHolder(row);
        row.setTag(holder);
      }

      String word=(String)getItem(position);

      if (word.length() > 4) {
        holder.icon.setImageResource(R.drawable.delete);
      }
      else {
        holder.icon.setImageResource(R.drawable.ok);
      }

      holder.label.setText(word);
      holder.size.setText(String.format(getString(R.string.size_template),
                                        word.length()));

      return(row);
    }
Assuming that we are to create a detail row, we then check to see if we were passed
in a non-null View. If we were passed in null, we cannot recycle that row, so we
have to inflate a new one via a call to inflate() on a LayoutInflater we get via
getLayoutInflater(). But, if we were passed in an actual View to recycle, we can
skip this step.
From here, the getView() implementation is largely the way it was before, including
dealing with the ViewHolder. The only change of significance is that we have to manage
the label TextView ourselves — before, we chained to the superclass and let
ArrayAdapter handle that. So our ViewHolder now has a label data member with our
label TextView, and we fill it in along with the size and icon. Also, we use
getItem() to retrieve our Latin word, so it can find the right word for the given
position out of our various word batches.
Our getHeaderView() does much the same thing, except it uses getItem() to retrieve
our batch index, and we use that for constructing our header:
    private View getHeaderView(int position, View convertView,
                               ViewGroup parent) {
      View row=convertView;

      if (row == null) {
        row=getLayoutInflater().inflate(R.layout.header, parent, false);
      }

      Integer batchIndex=(Integer)getItem(position);
      TextView label=(TextView)row.findViewById(R.id.label);

      label.setText(String.format(getString(R.string.batch),
                                  1 + batchIndex.intValue()));

      return(row);
    }
Sometimes, our ListView is alongside other content, such as in the “master-detail”
UI pattern:
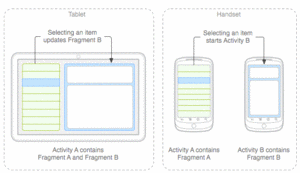
Figure 466: Master-Detail UI Pattern
In that case, the ListView should have a durable indication of what the user
last clicked on, since the detail widgets will contain details of that particular
item. A typical approach for this is to use the “activated” style for ListView
rows. In the chapter on styles, we saw an example of an “activated” style
that referred to a device-specific color to use for an activated background.
With ListView, you can show a selection by marking the selected row as “activated”,
so its style-specified “activated” background shows up.
Hence, the recipe for using activated notation for a ListView adjacent to details
on the last-clicked-upon ListView row is:
CHOICE_MODE_SINGLE (or android:choiceMode="singleChoice") on the
ListView.res/values-v11/, that references the device-specific
activated background:
<?xml version="1.0" encoding="utf-8"?>
<resources>
  <style name="activated" parent="android:Theme.Holo">
    <item name="android:background">?android:attr/activatedBackgroundIndicator</item>
  </style>
</resources>
res/values if you are supporting
pre-Honeycomb devices, where you skip the parent and the background color override,
as neither of those specific values existed before API Level 11:
<?xml version="1.0" encoding="utf-8"?>
<resources>
  <style name="activated">
  </style>
</resources>
ListView row (e.g., style="@style/activated")Android will automatically color the row background based upon the last row clicked,
instead of checking a RadioButton as you might ordinarily see with CHOICE_MODE_SINGLE
lists.
Lists with pretty icons next to them are all fine and well. But, can we create
ListView widgets whose rows contain interactive child widgets instead of
just passive widgets like TextView and ImageView? For example, there is a
RatingBar widget that allows users to assign a rating by clicking on a set of
star icons. Could we combine the RatingBar with text in order to allow
people to scroll a list of, say, songs and rate them right inside the list?
There is good news and bad news.
The good news is that interactive widgets in rows work just fine. The bad
news is that it is a little tricky, specifically when it comes to taking action
when the interactive widget’s state changes (e.g., a value is typed into a
field). We need to store that state somewhere, since our RatingBar widget
will be recycled when the ListView is scrolled. We need to be able to set the
RatingBar state based upon the actual word we are viewing as the RatingBar
is recycled, and we need to save the state when it changes so it can be
restored when this particular row is scrolled back into view.
What makes this interesting is that, by default, the RatingBar has absolutely
no idea what item in the ArrayAdapter it represents. After all, the RatingBar
is just a widget, used in a row of a ListView. We need to teach the rows
which item in the ArrayAdapter they are currently displaying, so when their
RatingBar is checked, they know which item’s state to modify.
So, let’s see how this is done, using the activity in the
Selection/RateList
sample project. We will use the same basic classes as in most of our ListView
samples, where we are showing a list of Latin words. In this case,
you can rate the words on a three-star rating. Words given a top rating are put in all caps:
package com.commonsware.android.ratelist;

import android.app.ListActivity;
import android.os.Bundle;
import android.view.View;
import android.view.ViewGroup;
import android.widget.ArrayAdapter;
import android.widget.LinearLayout;
import android.widget.RatingBar;
import android.widget.TextView;
import java.util.ArrayList;

public class RateListDemo extends ListActivity {
  private static final String[] items={"lorem", "ipsum", "dolor",
          "sit", "amet",
          "consectetuer", "adipiscing", "elit", "morbi", "vel",
          "ligula", "vitae", "arcu", "aliquet", "mollis",
          "etiam", "vel", "erat", "placerat", "ante",
          "porttitor", "sodales", "pellentesque", "augue", "purus"};

  @Override
  public void onCreate(Bundle state) {
    super.onCreate(state);

    ArrayList<RowModel> list=new ArrayList<RowModel>();

    for (String s : items) {
      list.add(new RowModel(s));
    }

    setListAdapter(new RatingAdapter(list));
  }

  private RowModel getModel(int position) {
    return(((RatingAdapter)getListAdapter()).getItem(position));
  }

  class RatingAdapter extends ArrayAdapter<RowModel> {
    RatingAdapter(ArrayList<RowModel> list) {
      super(RateListDemo.this, R.layout.row, R.id.label, list);
    }

    public View getView(int position, View convertView,
                        ViewGroup parent) {
      View row=super.getView(position, convertView, parent);
      RatingBar bar=(RatingBar)row.getTag();

      if (bar==null) {
        bar=(RatingBar)row.findViewById(R.id.rate);
        row.setTag(bar);

        RatingBar.OnRatingBarChangeListener l=
                    new RatingBar.OnRatingBarChangeListener() {
          public void onRatingChanged(RatingBar ratingBar,
                                        float rating,
                                        boolean fromTouch)  {
            Integer myPosition=(Integer)ratingBar.getTag();
            RowModel model=getModel(myPosition);

            model.rating=rating;

            LinearLayout parent=(LinearLayout)ratingBar.getParent();
            TextView label=(TextView)parent.findViewById(R.id.label);

            label.setText(model.toString());
          }
        };

        bar.setOnRatingBarChangeListener(l);
      }

      RowModel model=getModel(position);

      bar.setTag(Integer.valueOf(position));
      bar.setRating(model.rating);

      return(row);
    }
  }

  class RowModel {
    String label;
    float rating=2.0f;

    RowModel(String label) {
      this.label=label;
    }

    public String toString() {
      if (rating>=3.0) {
        return(label.toUpperCase());
      }

      return(label);
    }
  }
}
Here is what is different in this activity and getView() implementation than
in earlier, simpler samples:
String array items as the list of Latin words,
rather than pour that String array straight into an ArrayAdapter, we
turn it into a list of RowModel objects. RowModel is the mutable model:
it holds the Latin word plus the current rating. In a real
system, these might be objects populated from a database, and the
properties would have more business meaning.onListItemClick() had to be updated to reflect
the change from a pure-String model to use a RowModel.ArrayAdapter subclass (RatingAdapter), in getView(), lets
ArrayAdapter inflate and recycle the row, then checks to see if we
have a ViewHolder in the row’s tag. If not, we create a new ViewHolder
and associate it with the row. For the row’s RatingBar, we add an
anonymous onRatingChanged() listener that looks at the row’s tag
(getTag()) and converts that into an Integer, representing the
position within the ArrayAdapter that this row is displaying. Using
that, the rating bar can get the actual RowModel for the row and
update the model based upon the new state of the rating bar. It also
updates the text adjacent to the RatingBar when checked to match
the rating bar state.RatingBar has the proper contents
and has a tag (via setTag()) pointing to the position in the adapter
the row is displaying.The row layout is very simple: just a RatingBar and a TextView inside a
LinearLayout:
<?xml version="1.0" encoding="utf-8"?>
<LinearLayout xmlns:android="http://schemas.android.com/apk/res/android"
  android:layout_width="match_parent"
  android:layout_height="wrap_content"
  android:orientation="horizontal"
>
  <RatingBar
    android:id="@+id/rate"
    android:layout_width="wrap_content"
    android:layout_height="wrap_content"
    android:numStars="3"
    android:stepSize="1"
    android:rating="2" />
  <TextView
    android:id="@+id/label"
    android:padding="2dip"
    android:textSize="18sp"
    android:layout_gravity="left|center_vertical"
    android:layout_width="match_parent"
    android:layout_height="wrap_content"/>
</LinearLayout>
And the result is what you would expect, visually:
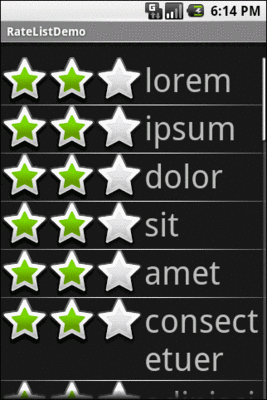
Figure 467: RateList, As Initially Shown
This includes the toggled rating bars turning their words into all caps:
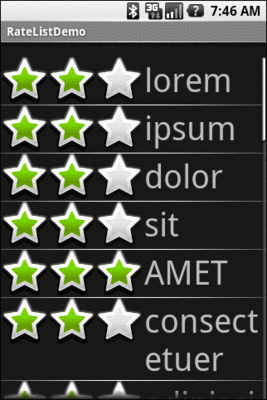
Figure 468: RateList, With a Three-Star Word
Perhaps you do not need section headers scattered throughout your list. If you only need extra “fake rows” at the beginning or end of your list, you can use header and footer views.
ListView supports addHeaderView() and addFooterView() methods
that allow you to add View objects to the beginning and end of the
list, respectively. These View objects otherwise behave like
regular rows, in that they are part of the scrolled area and will
scroll off the screen if the list is long enough. If you want fixed
headers or footers, rather than put them in the ListView itself,
put them outside the ListView, perhaps using a LinearLayout.
To demonstrate header and footer views, take a peek at the
Selection/HeaderFooter
sample project, particularly the HeaderFooterDemo class:
package com.commonsware.android.header;

import java.util.Arrays;
import java.util.Collections;
import java.util.List;
import android.app.ListActivity;
import android.os.Bundle;
import android.os.SystemClock;
import android.view.View;
import android.widget.ArrayAdapter;
import android.widget.Button;
import android.widget.TextView;

public class HeaderFooterDemo extends ListActivity {
  private static String[] items={"lorem", "ipsum", "dolor",
                                  "sit", "amet", "consectetuer",
                                  "adipiscing", "elit", "morbi",
                                  "vel", "ligula", "vitae",
                                  "arcu", "aliquet", "mollis",
                                  "etiam", "vel", "erat",
                                  "placerat", "ante",
                                  "porttitor", "sodales",
                                  "pellentesque", "augue",
                                  "purus"};
  private long startTime=SystemClock.uptimeMillis();
  private boolean areWeDeadYet=false;

  @Override
  public void onCreate(Bundle state) {
    super.onCreate(state);
    setContentView(R.layout.main);
    getListView().addHeaderView(buildHeader());
    getListView().addFooterView(buildFooter());
    setListAdapter(new ArrayAdapter<String>(this,
                        android.R.layout.simple_list_item_1,
                        items));
  }

  @Override
  public void onDestroy() {
    super.onDestroy();

    areWeDeadYet=true;
  }

  private View buildHeader() {
    Button btn=new Button(this);

    btn.setText("Randomize!");
    btn.setOnClickListener(new View.OnClickListener() {
      public void onClick(View v) {
        List<String> list=Arrays.asList(items);

        Collections.shuffle(list);

        setListAdapter(new ArrayAdapter<String>(HeaderFooterDemo.this,
                            android.R.layout.simple_list_item_1,
                            list));
      }
    });

    return(btn);
  }

  private View buildFooter() {
    TextView txt=new TextView(this);

    updateFooter(txt);

    return(txt);
  }

  private void updateFooter(final TextView txt) {
    long runtime=(SystemClock.uptimeMillis()-startTime)/1000;

    txt.setText(String.valueOf(runtime)+" seconds since activity launched");

    if (!areWeDeadYet) {
      getListView().postDelayed(new Runnable() {
        public void run() {
          updateFooter(txt);
        }
      }, 1000);
    }
  }
}Here, we add a header View built via buildHeader(), returning a
Button that, when clicked, will shuffle the contents of the list.
We also add a footer View built via buildFooter(), returning a
TextView that shows how long the activity has been running, updated
every second. The list itself is the ever-popular list of lorem ipsum words.
When initially displayed, the header is visible but the footer is not, because the list is too long:
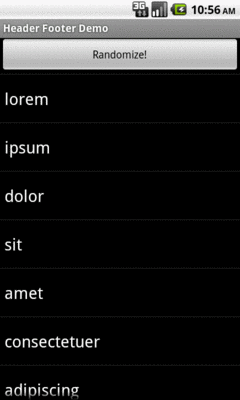
Figure 469: A ListView with a header view shown
If you scroll downward, the header will slide off the top, and eventually the footer will scroll into view:
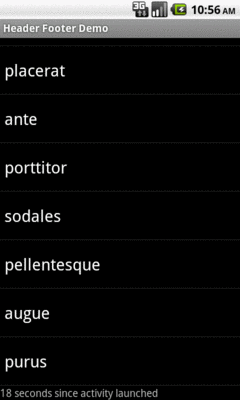
Figure 470: A ListView with a footer view shown
RecyclerView is a more powerful (and more complex) replacement for
ListView and GridView. You can read more about
what it does and how you can use it.