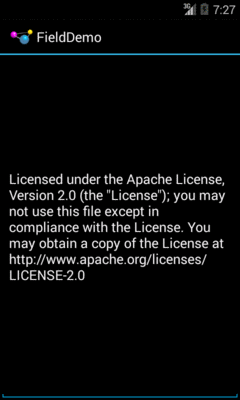
Figure 471: Regular Action Bar for Activity with EditText
If you have spent much time on an Android 3.0+ device, then you probably have run into a curious phenomenon. Sometimes, when you select an item in a list or other widget, the action bar magically transforms from its normal look:
Figure 471: Regular Action Bar for Activity with EditText
to one designed to perform operations on what you have selected:
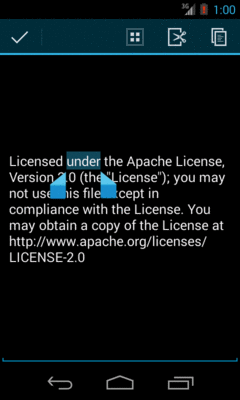
Figure 472: Action Mode, Given Selected Word in EditText
The good news is that this is not some sort of magic limited only to
built-in widgets like EditText. You too can have this effect in
your application, by triggering an “action mode”.
In this chapter, we will explore how you can set up and respond to action modes.
Understanding this chapter requires that you have read the core chapters, particularly the one on the action bar.
Most desktop operating systems have had the notion of a “context menu” for some time, typically triggered by a click of the right mouse button. In particular, a right-click over some selected item might bring up a context menu of operations to perform on that item:
Android supports context menus, driven by a long-tap on a widget rather than a right-click. You will find a few applications that offer such menus, particularly on lists of things. However, context menus are a very old UI design pattern in Android, and modern apps rarely use them.
Instead, contextual operations are raised via an action mode, so when
the user specifies a context (e.g., selects a word in an EditText),
the action bar changes to show operations relevant for the selection.
A common pattern will be to activate an action mode when the user
checks off something in a multiple-choice ListView.
If you want to go that route, there is
some built-in scaffolding to make that work, described
later in this chapter.
You can, if you wish, move the action bar into an action mode
whenever you want. This would be particularly important if your UI is
not based on a ListView. For example, tapping on an image in a
GridView might activate it and move you into an action mode for
operations upon that particular image.
In this section, we will examine the
ActionMode/ManualNative
sample project. This is another variation on the “show a list of Latin words
in a list” sample used elsewhere in this book.
As mentioned above, selecting a word or passage in an EditText (e.g., via a long-tap)
brings up an action mode for cut/copy/paste operations. Other apps
might bring up an action mode when you check an item in a checklist.
Yet others might bring up an action mode when you long-tap on an item
in a regular list. And so on.
You will need to choose, for your own UI, what trigger mechanism will bring up an action mode. It should be some trigger that makes it obvious to the user what the action mode will be acting upon. For example:
GridView, bring up an
action mode, and treat future taps on GridView items as adding or
removing items from the “selection” while that action mode is visibleView, bring up an action mode for operations on those figures
(e.g., rotate, resize)In the case of the sample project, we stick with the
classic long-tap on a ListView row to bring up an action mode:
  @Override
  public void onCreate(Bundle state) {
    super.onCreate(state);

    initAdapter();
    getListView().setLongClickable(true);
    getListView().setChoiceMode(ListView.CHOICE_MODE_SINGLE);
    getListView().setOnItemLongClickListener(new ActionModeHelper(
                                                                  this,
                                                                  getListView()));
  }
Starting an action mode is trivially easy: just call
startActionMode() on your Activity, passing in an implementation
of ActionMode.Callback, which will be called with various lifecycle
methods for the action mode itself.
In the case of the ActionMode sample project, ActionModeHelper
– our OnItemLongClickListener from the preceding section
– also is our ActionMode.Callback implementation. Hence, when
the user long-clicks on an item in the ListView, the
ActionModeHelper establishes itself as the action mode:
  @Override
  public boolean onItemLongClick(AdapterView<?> view, View row,
                                 int position, long id) {
    modeView.clearChoices();
    modeView.setItemChecked(position, true);

    if (activeMode == null) {
      activeMode=host.startActionMode(this);
    }

    return(true);
  }
Note that startActionMode() returns an ActionMode object, which
we can use later on to configure the mode’s behavior, by stashing it in
an actionMode data member.
Also, we make the long-clicked-upon item be “checked”, to show which item the action
mode will act upon. Our row layout will make a checked row show up with the
“activated” style, courtesy of Android’s simple_list_item_activated_1 stock
layout.
Also note that we only start the action mode if it is not already started.
The real logic behind the action mode lies in your
ActionMode.Callback implementation. It is in these four lifecycle
methods where you define what the action mode should look like and
what should happen when choices are made in it.
The onCreateActionMode() method will be called shortly after you
call startActionMode(). Here, you get to define what goes in the
action mode. You get the ActionMode object itself (in case you do
not already have a reference to it). More importantly, you are passed
a Menu object, just as you get in onCreateOptionsMenu(). And,
just like with onCreateOptionsMenu(), you can inflate a menu
resource into the Menu object to define the contents of the action
mode:
  @Override
  public boolean onCreateActionMode(ActionMode mode, Menu menu) {
    MenuInflater inflater=host.getMenuInflater();

    inflater.inflate(R.menu.context, menu);
    mode.setTitle(R.string.context_title);

    return(true);
  }
In addition to inflating our menu resource into the action
mode’s menu, we also set the title of the ActionMode, which shows
up to the right of the Done button:
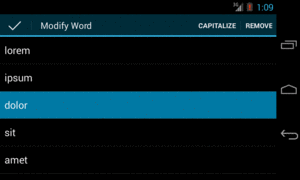
Figure 473: The ManualNative Sample App, Showing an Action Mode
If you determine that you need to change the contents of your action
mode, you can call invalidate() on the ActionMode object. That,
in turn, will trigger a call to onPrepareActionMode(), where you
once again have an opportunity to configure the Menu object. If you
do make changes, return true — otherwise, return false. In
the case of ActionModeHelper, we take the latter approach:
  @Override
  public boolean onPrepareActionMode(ActionMode mode, Menu menu) {
    return(false);
  }
Just as onCreateActionMode() is the action mode analogue to
onCreateOptionsMenu(), onActionItemClicked() is the action mode
analogue to onOptionsItemSelected(). This will be called if the
user clicks on something related to your action mode. You are passed
in the corresponding MenuItem object (plus the ActionMode
itself), and you can take whatever steps are necessary to do whatever
the work is.
On the ActionModeDemo class, we have the
business logic for handling the data-change operations in a performAction() method:
  public boolean performAction(int itemId, int position) {
    switch (itemId) {
      case R.id.cap:
        String word=words.get(position);

        word=word.toUpperCase();

        adapter.remove(words.get(position));
        adapter.insert(word, position);

        return(true);

      case R.id.remove:
        adapter.remove(words.get(position));

        return(true);
    }

    return(false);
  }
And, the onActionItemClicked() method calls performAction():
  @Override
  public boolean onActionItemClicked(ActionMode mode, MenuItem item) {
    boolean result=
        host.performAction(item.getItemId(),
                           modeView.getCheckedItemPosition());

    if (item.getItemId() == R.id.remove) {
      activeMode.finish();
    }

    return(result);
  }
onActionItemClicked() also dismisses the action mode if the user
chose the “remove” item, since the action mode is no longer needed.
You get rid of an active action mode by calling finish() on it.
The onDestroyActionMode() callback will be invoked when the action
mode goes away, for any reason, such as:
finish() on the ActionMode
Here, you can do any necessary cleanup. ActionModeHelper tries to
clean things up, notably the “checked” state of the last item
long-tapped-upon:
  @Override
  public void onDestroyActionMode(ActionMode mode) {
    activeMode=null;
    modeView.clearChoices();
    modeView.requestLayout();
  }
However, for reasons that are not yet clear, clearChoices() does
not update the UI when called from onDestroyActionMode() unless you
also call requestLayout().
For many cases, the best user experience will be for you to have a
multiple-choice ListView, where checking items in that list enables
an action mode for performing operations on the checked items. For
this scenario, API Level 11+ has a built-in ListView choice mode,
CHOICE_MODE_MULTIPLE_MODAL, that automatically sets up an
ActionMode for you as the user checks and unchecks items.
To see how this works, let’s examine the
ActionMode/ActionModeMC
sample project. This is the same project as in the preceding section, but
altered to have a multiple-choice ListView, utilizing an action
mode on API Level 11+.
Once again, in onCreate(), we need to set up the smarts for our
ListView. This time, though, we will use
CHOICE_MODE_MULTIPLE_MODAL:
 @Override
  public void onCreate(Bundle state) {
    super.onCreate(state);

    initAdapter();

    getListView().setChoiceMode(ListView.CHOICE_MODE_MULTIPLE_MODAL);
    getListView().setMultiChoiceModeListener(new HCMultiChoiceModeListener(
        this, getListView()));
  }
We enable
CHOICE_MODE_MULTIPLE_MODAL for the ListView, and register an
instance of an HCMultiChoiceModeListener object via
setMultiChoiceModeListener(). This object is an implementation of
the MultiChoiceModeListener interface that we will examine shortly.
Since we now may have multiple checked items, our performAction()
method must take this into account, capitalizing or removing all
checked words:
  public boolean performActions(MenuItem item) {
    SparseBooleanArray checked=getListView().getCheckedItemPositions();

    switch (item.getItemId()) {
      case R.id.cap:
        for (int i=0; i < checked.size(); i++) {
          if (checked.valueAt(i)) {
            int position=checked.keyAt(i);
            String word=words.get(position);

            word=word.toUpperCase(Locale.ENGLISH);

            adapter.remove(words.get(position));
            adapter.insert(word, position);
          }
        }

        return(true);

      case R.id.remove:
        ArrayList<Integer> positions=new ArrayList<Integer>();

        for (int i=0; i < checked.size(); i++) {
          if (checked.valueAt(i)) {
            positions.add(checked.keyAt(i));
          }
        }

        Collections.sort(positions, Collections.reverseOrder());

        for (int position : positions) {
          adapter.remove(words.get(position));
        }

        getListView().clearChoices();

        return(true);
    }

    return(false);
  }
MultiChoiceModeListener
extends the ActionMode.Callback interface we used with our manual
action mode earlier in this book. Hence, we need to implement all the
standard ActionMode.Callback methods, plus a new
onItemCheckedStateChanged() method introduced by
MultiChoiceModeListener:
package com.commonsware.android.actionmodemc;

import android.annotation.TargetApi;
import android.os.Build;
import android.view.ActionMode;
import android.view.Menu;
import android.view.MenuInflater;
import android.view.MenuItem;
import android.widget.AbsListView;
import android.widget.ListView;

@TargetApi(Build.VERSION_CODES.HONEYCOMB)
public class HCMultiChoiceModeListener implements
    AbsListView.MultiChoiceModeListener {
  ActionModeDemo host;
  ActionMode activeMode;
  ListView lv;

  HCMultiChoiceModeListener(ActionModeDemo host, ListView lv) {
    this.host=host;
    this.lv=lv;
  }

  @Override
  public boolean onCreateActionMode(ActionMode mode, Menu menu) {
    MenuInflater inflater=host.getMenuInflater();

    inflater.inflate(R.menu.context, menu);
    mode.setTitle(R.string.context_title);
    mode.setSubtitle("(1)");
    activeMode=mode;

    return(true);
  }

  @Override
  public boolean onPrepareActionMode(ActionMode mode, Menu menu) {
    return(false);
  }

  @Override
  public boolean onActionItemClicked(ActionMode mode, MenuItem item) {
    boolean result=host.performActions(item);

    updateSubtitle(activeMode);

    return(result);
  }

  @Override
  public void onDestroyActionMode(ActionMode mode) {
    activeMode=null;
  }

  @Override
  public void onItemCheckedStateChanged(ActionMode mode, int position,
                                        long id, boolean checked) {
    updateSubtitle(mode);
  }

  private void updateSubtitle(ActionMode mode) {
    mode.setSubtitle("(" + lv.getCheckedItemCount() + ")");
  }
}Android will automatically start our action mode for us when the user
checks the first item in the list, using our
MultiChoiceModeListener as the callback. Android will also
automatically finish the action mode if the user unchecks all
previously-checked items.
In onCreateActionMode(), we populate the menu, plus set up a title
and subtitle on the ActionMode. The subtitle appears below the
title, as you might expect. In this case, we are indicating how many
words are checked and therefore will be affected by the actions the
user chooses in the action mode:
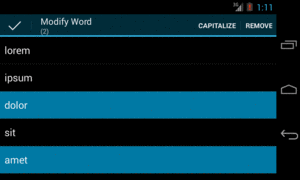
Figure 474: The ActionModeMC Sample App, Showing the Action Mode
Then, in onActionItemClicked(), we both call performActions() to
affect the desired changes, plus update the subtitle in case the user
removed words (which means they are no longer checked).
The new onItemCheckedStateChanged() will be called whenever the
user checks or unchecks an item, up until the last item is unchecked.
HCMultiChoiceModeListener simply updates the subtitle to reflect
the new count of checked items.
On the whole, using CHOICE_MODE_MULTIPLE_MODAL is simpler than
setting up your own trigger mechanism and managing the action mode
yourself. That being said, both are completely valid options, which
is particularly important for situations where a multiple-choice
ListView is not the desired user interface.
However, rather than having checkboxes or the like always in the
ListView, a more modern approach is to move into multiple-selection
mode based on a long-click. Before then, clicks on rows behave like with any
other ListView, but after a long-click, the action mode appears
and the user can tap on rows to select which of them to operate upon.
The
ActionMode/LongPress
sample project is a variation on the preceding project, with some
slight simplifications, and adopting the long-click as the means to enter
the action mode.
In onCreate(), we set up listeners for both a long click (via
setOnItemLongClickListener()) and for multiple-choice mode (via
setMultiChoiceModeListener(). Both times, we supply the activity as the
listener, as it implements the appropriate interfaces:
    getListView().setOnItemLongClickListener(this);
    getListView().setMultiChoiceModeListener(this);
By default, the ListView is in no-choice mode, where clicks on rows
simply trigger onListItemClick() or the equivalent. However, if the user
long-clicks on a row, our onItemLongClick() method will be called, and we can
both switch into multiple-choice mode and mark the long-clicked row as being
checked:
  @Override
  public boolean onItemLongClick(AdapterView<?> parent, View view,
                                 int position, long id) {
    getListView().setChoiceMode(ListView.CHOICE_MODE_MULTIPLE_MODAL);
    getListView().setItemChecked(position, true);

    return(true);
  }
At this point, the action mode will also start up, courtesy of having called
setMultiChoiceModeListener().
If we undergo a configuration change, we want:
Keeping the checked item states will be handled for us by the built-in
instance-state management of ListView and ListActivity. However,
the rest we need to handle ourselves. So, we have an onSaveInstanceState()
implementation in the activity, which saves the current choice mode, plus
the current word list:
  @Override
  public void onSaveInstanceState(Bundle state) {
    super.onSaveInstanceState(state);
    state.putInt(STATE_CHOICE_MODE, getListView().getChoiceMode());
    state.putStringArrayList(STATE_MODEL, words);
  }
Plus, in onCreate(), after setting up the listeners, we set up the choice
mode of the ListView based upon the passed in instance state Bundle, if
there is one:
  @Override
  public void onCreate(Bundle state) {
    super.onCreate(state);

    if (state == null) {
      initAdapter(null);
    }
    else {
      initAdapter(state.getStringArrayList(STATE_MODEL));
    }

    getListView().setOnItemLongClickListener(this);
    getListView().setMultiChoiceModeListener(this);

    int choiceMode=
        (state == null ? ListView.CHOICE_MODE_NONE
            : state.getInt(STATE_CHOICE_MODE));

    getListView().setChoiceMode(choiceMode);
  }
Once we call setChoiceMode() with the previous activity instance’s choice mode,
if that was CHOICE_MODE_MULTIPLE_MODAL, Android will automatically open up
the action mode again and restore our checked items.
Where things get a bit interesting is when the user dismisses the action mode, at which point we need to move back to no-choice mode.
You might think that this would merely be a matter of calling setChoiceMode()
on the ListView, asking for CHOICE_MODE_NONE. Indeed, that is part of the
solution. However, there are two problems:
onDestroyActionMode() directly, you wind up with
infinite recursion and a StackOverflowError, as changing the choice mode
while the action mode is still technically active will cause it to destroy
the action mode again.ListView that ignore the checked state of our rows. However, those rows still
already checked will show up as activated, even after calling setChoiceMode()
to return to the normal “none” mode. clearChoices() also does not have a
worthwhile effect, for whatever reason.Hence, in onDestroyActionMode(), not only do we need to call setChoiceMode(),
but we need to “smack around” the ListView enough to get it to clear our
checked rows, and the easiest way to do that is to call setAdapter() on it,
passing in its existing adapter:
  @Override
  public void onDestroyActionMode(ActionMode mode) {
    if (activeMode != null) {
      activeMode=null;
      getListView().setChoiceMode(ListView.CHOICE_MODE_NONE);
      getListView().setAdapter(getListView().getAdapter());
    }
  }
And, we only do that while our action mode is active (i.e., activeMode is not
null), to avoid the infinite recursion.
This is a bit clunky, but it works.
When initially launched, the activity looks like a simple ListActivity:

Figure 475: Action Mode Long Press Demo, As Initially Launched
Tapping on a row provides the normal momentary highlight.
However, if the user long-clicks a row, we move into the action mode and
a multiple-choice ListView:
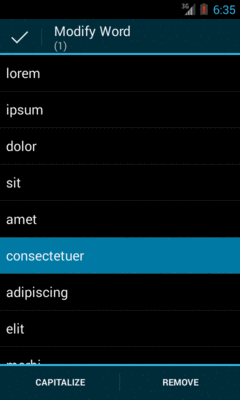
Figure 476: Action Mode Long Press Demo, with Action Mode Activated
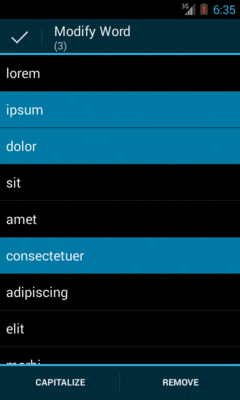
Figure 477: Action Mode Long Press Demo, with Multiple Selections
Dismissing the action mode returns the ListView to normal operation.