
Health Basics, Part 2
TREATING INJURED AND SICK CHICKENS

NO MATTER HOW ATTENTIVE WE ARE
as chicken keepers or how well our chickens are managed, health problems will arise in every flock eventually.


Serama rooster and hen, Caesar and Portia.
What to Do in a Health Crisis
Instead of rattling off a daunting list of poultry diseases and their related symptoms, I think it would be more helpful to walk you through the steps to take during a health crisis, as well as how to handle some of the more common ailments at home when visiting a veterinarian is not an option.
ISOLATE
The priority with sick or injured chickens is getting them to safety. Isolation protects the bird from flockmates and protects the flock from potentially contagious conditions. The affected chicken may be in shock, frightened, or confused when approached. Wrapping it loosely but securely in a large towel can help calm the bird and prevent injury during transport. Then move it into your specially designed infirmary (see chapter 7, “Infirmary Space”).
HYDRATE
Keep the bird hydrated throughout the crisis even if that means frequently offering water by syringe or dropper. Water is involved in every aspect of a chicken’s metabolism and if it is dehydrated, it does not stand a chance of recovering. Adding electrolytes to drinking water for a day or two can help in cases of dehydration, shock, or heat stress.
STAY THE COURSE
If the bird is eating and drinking normally, do not change its diet by offering foods or supplements it does not ordinarily take; doing so can complicate the assessment and make an unwell chicken’s condition worse, as can randomly medicating a sick chicken. Try not to panic and feel compelled to do something. Do not treat with medications or “natural remedies” of any kind, including dewormers, antibiotics, yogurt, garlic, vinegar, molasses, or herbs. If herbal or other dietary supports were not already part of a chicken’s regular routine, they should not be offered during an illness. Work on rebuilding a healthy immune system after the health crisis has passed. Offering the wrong medication to a sick bird can exacerbate the condition and create resistant strains of pathogens.
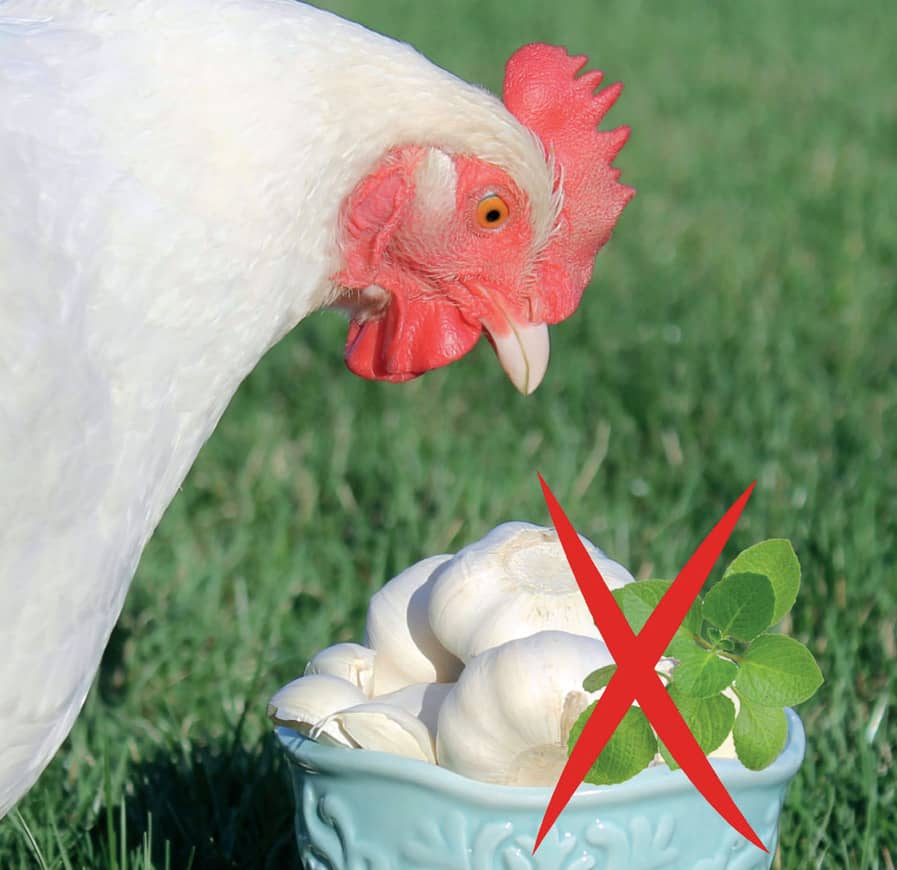
If the bird is eating and drinking normally, do not change its diet by offering foods or supplements it does not ordinarily take. Marilyn Monroe is a White Orpington hen.
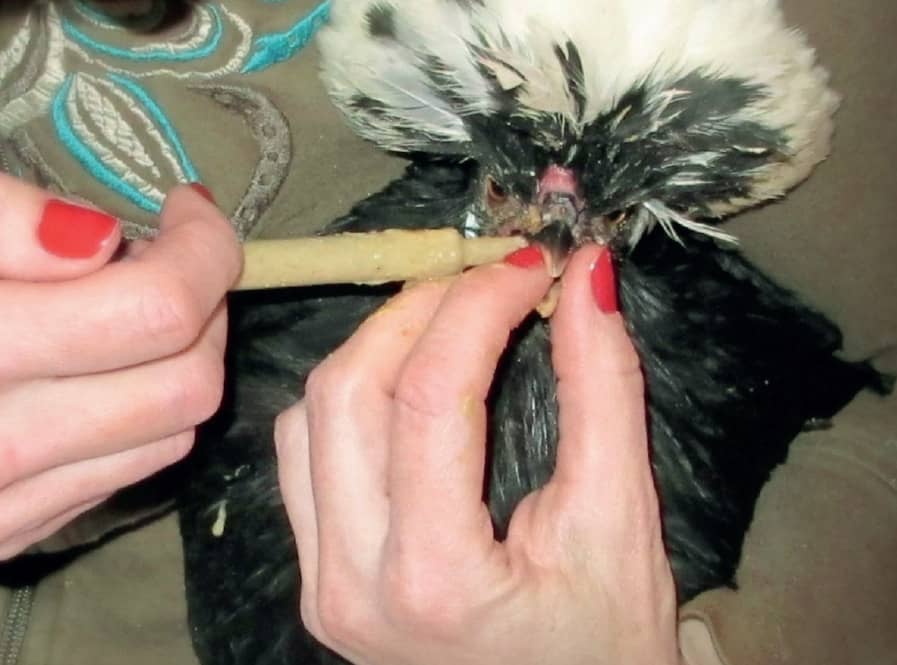
Once the bird is hydrated, if it is still not eating independently, it can be fed a liquid diet by spoon, dropper, or syringe.
Once the bird is hydrated, if it is still not eating independently, it can be fed a liquid diet by spoon, dropper, or syringe. Baby bird formula or layer feed can be mixed with warm water to make a soupy mash. Feeding directly to the crop by tube is possible, but only after proper instruction. Poultry veterinarian Dr. Annika McKillop recommends ProZyme, which aids in digestion by making the nutrients in feed more bioavailable to sick birds. Add 1/4 teaspoon per 1 cup of feed.
External Injuries and Ailments
The most common injuries occurring in backyard flocks come from chickens fighting or pecking at each other and from attacks by predators (see chapter 3) and family pets. Remaining calm when discovering an injured chicken is critical, and when you know what needs to be done, it’s easier to stay composed. Follow these steps for an external injury:
1. Control bleeding: Whenever possible, wear gloves when treating a bleeding chicken. With a clean towel, gauze, or paper towel, apply firm, even pressure to a bleeding injury until it stops. Styptic powder can be applied to superficial wounds and held in place until bleeding ceases.
2. Assess and clean: Wounds often appear much worse than they are before bleeding is controlled and the area is cleaned. Feathers often conceal wounds, and bathing the bird can make finding injuries easier. Water with betadine, a chlorhexidine 2 percent solution spray, hydrogen peroxide, or Vetericyn Poultry Care Spray can be used for cleaning. For very deep or very dirty wounds, use a syringe to irrigate with chlorhexidine 2 percent solution or freshly mixed Dakin’s solution, made by adding 1 tablespoon of bleach and 1 teaspoon of baking soda to 1 gallon of water. It should be mixed fresh daily.
Keep the wound clean while the bird recovers. I use Vetericyn spray two or three times a day until the wound is healed, but a triple antibiotic ointment can be used instead. Watch the area around the wound for signs of infection such as redness and swelling. If antibiotics appear necessary, contact your veterinarian or state agricultural extension service specialist for information.
3. Control pain: Their unfortunate position near the bottom of nature’s food chain requires chickens to behave stoically when sick or injured so as not to draw unwanted attention. Do not mistake this stoicism for a lack of pain—chickens do feel pain. If there are no internal injuries, you can offer the chicken an aspirin/drinking water solution for a maximum of 3 days at the ratio of 5 aspirin tablets (325 mg total) to 1 gallon of water. Meloxicam 1.5 mg/ml oral solution—a chicken-safe anti-inflammatory—is frequently used, but a veterinarian must prescribe it along with the dosage and any egg-withdrawal period. According to Gail Damerow, writing in The Chicken Health Handbook, a withdrawal period is the recommended minimum number of days that must pass from the time a chicken stops receiving a drug until the drug residue remaining in its body is reduced in its eggs or meat to a level determined as safe for human consumption by USDA standards.
BUMBLEFOOT
When the skin on the bottom of a chicken’s foot is compromised, bacteria can get in, causing an infection known as bumblefoot. The infected foot is usually red and swollen with a dark scab on the foot pad between the toes. It can appear as though the bird has a large marble beneath the skin.
Common Causes: Such injuries can result from splinters or repetitive, hard landings from roosts, particularly in heavy breeds and obese chickens. My humble opinion is that bumblefoot mostly results from small cuts or scrapes acquired during normal scratching and foraging. A limping chicken should be checked for bumblefoot. Left untreated, serious cases can spread to other tissues and bones.
Treatment: Regular flock foot inspections will detect infection at the earliest possible stage. Treatment is painful and time-consuming and can be difficult without a veterinarian. Make sure roosts are splinter-free and less than 18 inches from the floor. Coop litter should be kept dry and clean; sand is not as hospitable to bacterial growth as other litter types and desiccates droppings, resulting in cleaner, drier feet.
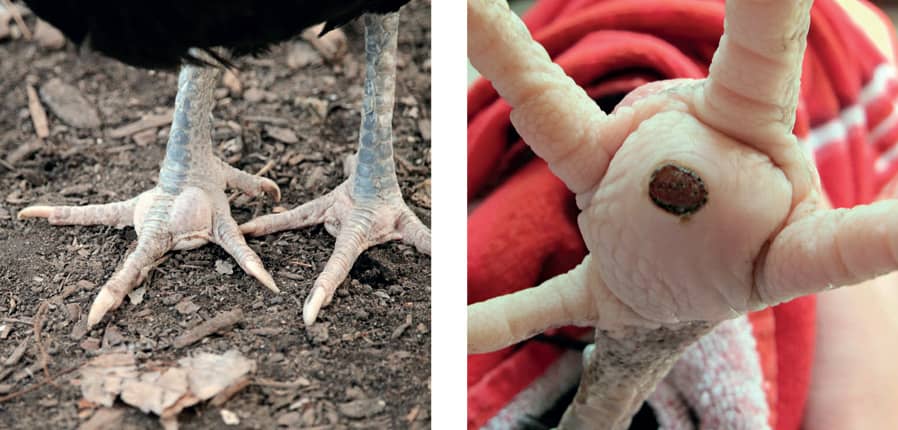
When the skin on the bottom of a chicken’s foot is compromised, bacteria can get in, causing an infection known as bumblefoot. The infected foot is usually red and swollen with a dark scab on the pad between the toes. It can appear as though the bird has a large marble beneath the skin.
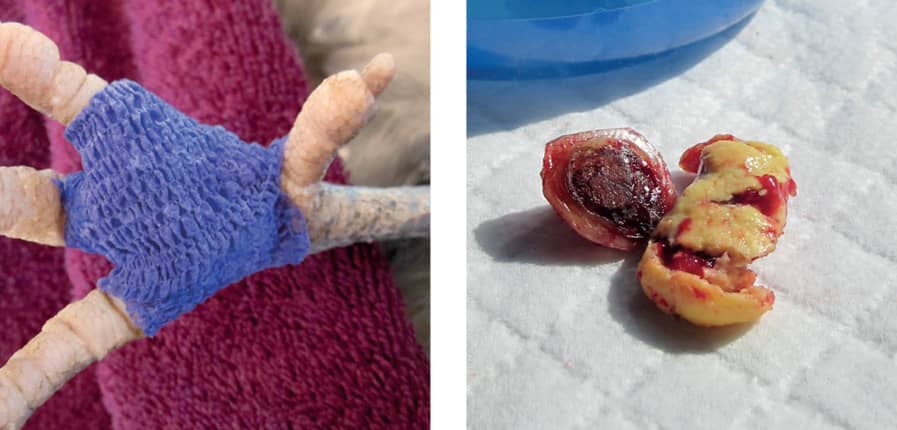
Stubborn or more advanced cases of bumblefoot will need to be surgically removed. This abscess was removed from the bandaged foot.
Very mild cases of bumblefoot may be treated by soaking the foot in warm water and Betadine, removing the scab, applying Vetericyn spray to the abscess, covering with nonstick gauze, and wrapping the foot with VetRap. Reapply Vetericyn two or three times a day and re-bandage each time until healed. Stubborn or more advanced cases will need to be surgically removed.
Note: What follows is not professional, veterinary advice. It is based on my experience as a backyard chicken keeper and is shared knowing that, without it, some pets may suffer or perish due to the unavailability of veterinary care. Ideally, a chicken with bumblefoot will be treated by a veterinarian, which usually includes surgery. While a vet would administer general anesthesia or a local nerve block, these are not at-home options. Home bumblefoot removal is indeed painful for chickens even though they typically do not exhibit pain. As unpleasant as the procedure is, I am always mindful that the alternatives are pain, a fatal infection, or euthanasia. The procedure is not complicated or technically challenging, but it can be emotionally taxing to perform. I do it near the kitchen sink where bright light, counter space, and fresh water are available. Before beginning, I administer meloxicam orally for pain and inflammation.
Before beginning, I gather several large towels, surgical gloves, Betadine, a nail brush, VetRap, a #10 scalpel, paper towels, nonstick gauze, and Vetericyn spray or a triple antibiotic ointment. I sanitize the sink with a bleach-water solution and I use sterile instruments. Humans can contract staph infections, so wear gloves!
First, I soak the affected foot in warm water and Betadine and then scrub it for a general cleaning and to soften up the foot tissue. I then apply Vetericyn to the foot surfaces. Next, I loosely wrap the bird in a towel, covering its head and eyes but ensuring ample breathing room, and lay the bird on the work surface, on its back with the affected foot facing toward me. Have a helper gently and securely hold the chicken in place. Talking to the chicken throughout the procedure can be reassuring.
The object is to locate the core of the abscess or dead tissue, commonly referred to as the “kernel” or “plug.” This consists of dehydrated pus that looks like a waxy, dried kernel of corn. Healthy tissue inside the foot will be pliable and pink. A solid kernel is not always present, in which case the infection appears as slippery bits of threadlike whitish/yellowish tissue that are very difficult to remove.
Using a scalpel, cut the foot pad around the circumference of the scab, straight down into the foot. The scab is often attached to the abscess and can be used to lift the core out of the foot using a dry paper towel. Some oozing blood is expected, but not ghastly amounts. Dabbing the blood with paper towels helps create a clearer view of the work area. Spray Vetericyn on the affected area throughout the procedure.
After a kernel is located and removed, soak the foot in a sanitized sink or bowl containing a fresh Betadine/water solution. Gently massage the foot pad and squeeze to loosen any remaining dead tissue. When the foot is dry, apply more Vetericyn to the area and rewrap the chicken. It often takes a bit of alternately digging, squeezing, and soaking to remove all the dead tissue. In cases where there is no central core or kernel, deciding when to end the procedure can be especially difficult.
Liberally apply Vetericyn or a triple antibiotic ointment to the open wound and place a 2×2-inch square of nonstick gauze over the wound. Fold the four corners of the gauze in toward the center of the square, creating a smaller square that applies a bit of pressure to the area to stem any residual bleeding or oozing. Then securely bind the foot with VetRap, being careful not to wrap so tightly as to impede circulation. One 6-inch strip of VetRap cut lengthwise into three or four smaller pieces is usually sufficient. Hold the first strip of VetRap in one hand, starting at the top of the foot, and with the other hand, pull it over the gauze, then around and between the toes. Repeat the weaving with the remaining two or three strips, ending the wrap around the ankle.
Keep the VetRap in place for 24 to 48 hours, then remove it to assess the wound. If the gauze sticks to the wound, loosen it by soaking in warm water. Examine the foot for redness, swelling, foul odor, red streaks up the foot or leg, or oozing. These symptoms may indicate a secondary infection requiring antibiotics. If the foot appears to be healing well, repeat the bandaging procedure every 48 hours for 7 to 10 days, until a new and improved scab forms.
BEAK INJURIES AND REPAIR
A normal beak comprises two halves, an upper and a lower mandible, with each consisting of bones covered by a hard layer of keratin, much like a human fingernail. The top mandible is slightly longer than the lower. Roughly two-thirds of each mandible’s length contains blood vessels and nerves beneath the hard, outer layer. This network of nerves and blood supply makes injuries to that portion of the beak acutely painful and potentially life-threatening. The tip of a chicken’s beak contains no blood supply or nerve endings. Inspect the inside of the beak to ascertain where the live tissue ends.
Common Causes: Chicken beaks continue to grow throughout the bird’s life, requiring maintenance just like fingernails. Chickens maintain their beak length and shape by wiping it on abrasive surfaces. In addition to eating and drinking, beaks grasp, explore, dig, groom, and communicate. As a result of all this activity, beak injuries are common. My flock averages one beak injury every year. Injuries can range from a simple chip to a fracture or the partial or complete removal of the beak from its underlying structures. A significant beak injury is not only incredibly painful, but it can also prevent normal eating and drinking. Minor cracks may not require intervention, but more severe injuries need to be stabilized to keep the beak properly aligned until it grows out.

Beak injuries can range from a simple chip to a fracture or the partial or complete removal of the beak from its underlying structures. A significant beak injury is not only incredibly painful, but it can also prevent normal eating and drinking. Minor cracks may not require intervention, but more severe injuries need to be stabilized to keep the beak properly aligned until it grows out.
Treatment: Broken beaks that are very dirty or infected should never be sealed closed—the contaminated tissue needs to be left exposed for cleaning, draining, and monitoring. Similarly, if the underlying tissue is injured, do not attempt to seal it.
If a beak is chipped, clean any exposed tissue with a non-stinging wound-care product such as Vetericyn spray. Then file any jagged edges and keep the bird isolated from flockmates until visible tissue has scabbed over.
Repairing a minor crack is fairly straightforward. Prepare by gathering two towels, a tea bag, scissors, Vetericyn spray, tweezers, superglue gel, a cotton swab, a nail file, and paper towels. Wrap the bird in a large towel, burrito style, with the wings comfortably secured to its side and the feet covered. Drape a second, smaller towel loosely over its eyes so the bird doesn’t flip out when the beak is approached. Clean exposed tissue gently but thoroughly with Vetericyn and allow to dry completely. Cut a patch from an empty tea bag to cover and bridge the crack. Using tweezers to hold the patch, place a tiny bit of superglue gel on it. If necessary, align the broken beak pieces in proper position and place the glue patch over the crack. Allow to dry, then apply a very thin layer of glue over the entire patch with a cotton swab. After the glue has cured, gingerly file any rough edges with a nail file. Note that superglue gel should be used sparingly, as the fumes can be irritating to birds. Never allow the glue to run or drip.
More severe injuries may require professional care. When a portion of a beak is missing, apply pressure to the area to stem blood loss until a veterinarian can be seen. Avian specialists can fashion splints and acrylic beak prosthetics, but this degree of specialty care is seldom available.
Internal Injuries and Ailments
If an injured chicken does not respond to treatment or declines in status, suspect infection and/or internal injuries. Contact a veterinarian or your state agriculture extension service specialist to discuss options.
EGG BINDING
Sick chickens conserve resources to fight illness by quitting their day jobs on the egg production line. Consequently, chickeneers often mistakenly assume that their sick hen, who hasn’t laid an egg recently, must be egg bound—in other words, has an egg stuck in her oviduct. Certainly check for egg binding when examining a sick chicken, but realize that it’s not as common as assumed.
Possible symptoms of an egg-bound hen might include a penguin-like stance, decreased activity, shaky wings, abdominal straining, frequent and uncharacteristic sitting, passing wet droppings (or none at all), a droopy and/or pale comb and wattles, or the persistent presence of an egg in the oviduct upon exam. This life-threatening condition must be addressed quickly, preferably by an experienced poultry veterinarian. An egg-bound hen is at risk for prolapsed uterus, damage to the oviduct, bleeding, infection, and death. If the egg is not passed within 24 to 48 hours, the hen won’t survive.
Common Causes: These may include a calcium or other nutritional deficiency, obesity, passing a super-sized egg, an oviduct infection, or having begun egg laying before her body was mature due to improper lighting conditions. Limit the risk of egg binding by ensuring hens enjoy at least 8 hours of total darkness each day (no nightlights in the coop!), feeding a complete layer ration to laying hens, offering oyster shell in a dedicated hopper, and limiting treats to no more than 5 percent of the daily diet, especially in hot weather.
Treatment: A vet would administer intravenous hydration and calcium to an egg-bound hen. Absent that option, offer vitamins and electrolytes in the water, or liquid calcium if you have it. If she is too weak to drink, don’t force the issue.
Bathe the hen in warm water for 15 to 20 minutes, which will give you something to do besides worry and might relax her, making it easier to pass the egg if she is capable. It can’t hurt and might help. After the bath, use a hair dryer on low heat to dry her feathers. Applying K-Y jelly to the vent can help hydrate the cloaca to facilitate passage of the egg. Do not massage the vent, abdomen, or oviduct—the egg can shatter, lacerate the oviduct, and kill her.
If the hen cannot pass the egg, she will die. It must be removed, but manual removal is super risky, even for a vet. If the egg is visible, a syringe fitted with an 18-gauge needle can be used to empty the egg’s contents followed by the very careful implosion of the shell. The objective is to remove the shell with the pieces still attached to the egg’s membrane. Any stray fragments should pass after the blockage is removed.
Continue to support the hen with hydration, warmth, and electrolytes in isolation. Provide her with no more than 8 hours of light per day to keep her out of production so the oviduct can rest.
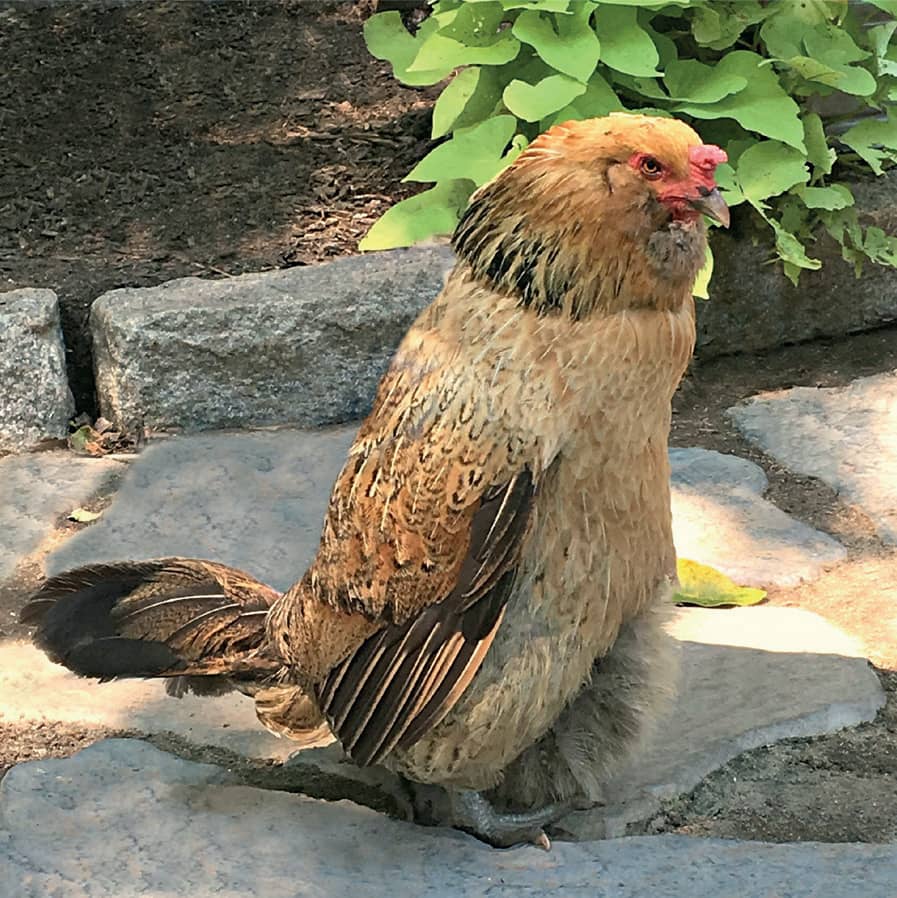
One possible symptom of an egg-bound hen is a penguin-like stance as seen in Helen, an Easter Egger hen who had an egg stuck in her vent. She passed it without assistance shortly after the photo was taken.
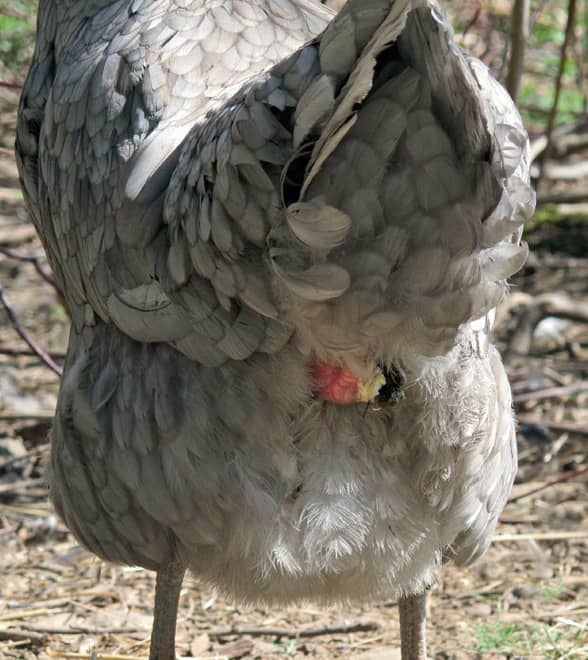
A prolapsed vent occurs when the portion of the hen’s oviduct responsible for escorting an egg out of the body fails to return to normal position inside the body after the egg is laid.
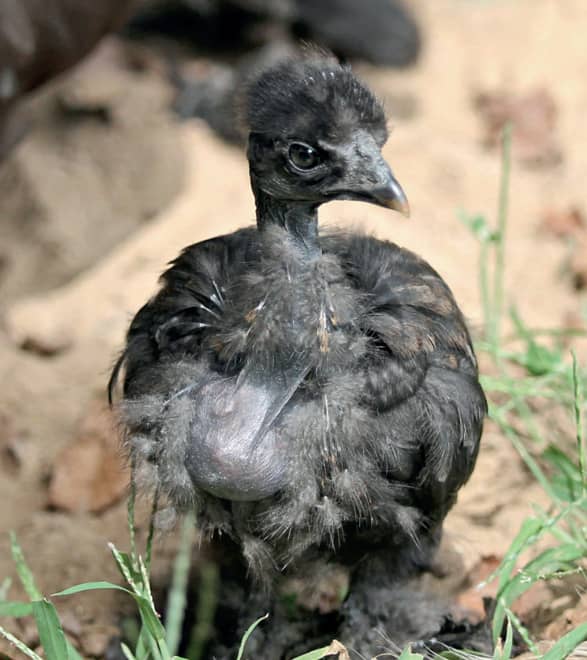
The crop is a small food storage pouch that, when full, can be felt slightly to the right of a hen’s breastbone at the bottom of its neck. The full crop of this Showgirl chick is visible as she feathers out.
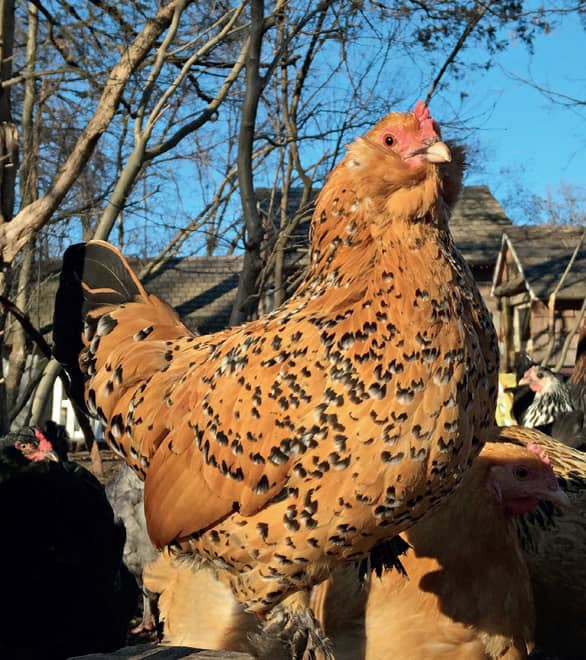
Never force the bird to regurgitate contents of a sour crop by turning it upside down. Doing so will not cure the fungal infection and the action can kill the bird.
PROLAPSED VENT
Also known as prolapsed oviduct, blow-out, or pickout, a prolapsed vent occurs when the portion of the hen’s oviduct responsible for escorting an egg out of the body fails to return to normal position inside the body. It may be treatable if caught early. Hens with prolapsed tissue are at risk of shock, recurrence after recovery, and being pecked to death by flockmates.
Common Causes: Risk factors include pullets reaching the point of lay prematurely, oversized eggs, obesity, improper diet (particularly a calcium deficiency), and retaining droppings for a long period (as broody hens do), causing stress and stretching of the cloaca.
Treatment: Isolate the bird, clean the protruding tissue well (I use Vetericyn spray), and gently replace the tissue with a gloved finger. Apply an anti-inflammatory cream such as hydrocortisone (hemorrhoid ointment was once the treatment of choice, but is no longer considered appropriate for this situation) to the vent and offer electrolytes for a couple of days to restore the uterus’s ability to contract properly. If the tissue is compromised by pecking or is especially dirty, antibiotics may be necessary. Continue to support the hen with hydration, warmth, and electrolytes. Keep her isolated from the flock and provide no more than 8 hours of light daily to keep her out of production and allow the oviduct to rest.
IMPACTED CROP
The first time I felt a chicken’s crop, I was sure my hen had a tumor. The crop is a small food storage pouch that, when full, can be felt slightly to the right of a hen’s breastbone at the bottom of its neck. When a chicken picks up food with its beak, the tongue pushes it into the esophagus. From there, it empties into the crop, where the food is moistened with saliva before passing a little at a time into the stomach (proventriculus).
Common Causes: A normal crop feels swollen and slightly firm after a bird eats, but shrinks as food is digested. If there is a question about whether the crop is emptying properly, remove food and water after sunset and check the crop first thing in the morning, when it should be empty. If it feels full or squishy, it may mean food or other fibrous material, such as straw, is stuck inside, a condition known as impacted crop.
Treatment: While mineral oil sounds like a treatment that might help, it’s not a very effective tool in treating an impacted crop. Offering a little warm water along with gentle massage of the crop several times a day may help break up the mass, however surgery is often required to remove the impacted material. Although it is possible to perform this procedure at home, it should only be attempted if a veterinarian is not available and death is the alternative.
SOUR CROP
Sour crop, also known as thrush, crop mycosis, or a yeast infection, is caused by a fungus. Never force the bird to regurgitate contents of a sour crop by turning it upside down, as doing so will not cure the fungal infection and the action can kill the bird.
Common Cause: The presence of fungal bacteria in a crop that hasn’t properly emptied.
Treatment: Gail Damerow, writing in her highly regarded The Chicken Health Handbook, recommends isolating the bird and flushing the crop with a solution of 1 teaspoon of Epsom salts mixed in 1/2 cup of water. Pour or squirt the solution down the bird’s throat twice a day for 2 to 3 days, being careful not to get the solution in the bird’s airway.
The fungal infection can be treated with 1/2 teaspoon of copper sulfate (powdered bluestone) mixed in 1 gallon of water. Provide this every other day for five days as the only source of drinking water and repeat monthly. Do not use copper sulfate in metal waterers.
Beware that an overdose of copper sulfate is toxic to chickens. To avoid overdosing, first prepare a solution by mixing 1/2 pound copper sulfate plus 1/2 cup vinegar into 1/2 gallon of water. Clearly label this container as your stock solution. To each gallon of the chicken’s drinking water, add 1 tablespoon of stock solution.
First, flush the bird’s digestive system with Epsom salts as described above. Then feed as usual while using the stock solution to treat the drinking water until the infection is under control. During this time avoid any antibiotics, which will make the condition worse. As a follow-up, nystatin oral antifungal may be helpful, as may a probiotic to restore normal crop bacteria.
PENDULOUS CROP
A crop that has lost its ability to shrink back to its resting size when emptied of food is referred to as “pendulous” because it swings back and forth in front of the bird as it walks. Birds with pendulous crop can suffer dehydration, malnutrition, weight loss, and ultimately death. Because a pendulous crop doesn’t empty fully, food and water ferment inside, causing infections, most commonly yeast (a.k.a. sour crop, thrush, or candida).
Common Causes: Genetics are widely suspected in pendulous crop; therefore, birds with pendulous crop should not be bred. Advanced age and binge eating and drinking may be predisposing factors. Further, a blockage or stricture lower in the digestive tract may be to blame. There’s not much that can be done to prevent pendulous crop, but its progression might be mitigated.
Treatment: Provide regular access to clean water and fresh feed to avoid overzealous gorging, and monitor crop size. A homemade garment can be fashioned from 4-inch strips of VetRap to provide gentle, even support. Monitor for sour crop and treat as indicated above if necessary. The chicken’s weight, droppings, and feed and water intake should be monitored closely. If the chicken continues to lose weight or if its eyes become sunken, it is dehydrated and malnourished and it’s time to consider end-of-life options (see “End-of-Life Decisions”).
External Parasites: Lice and Mites
Mites and poultry lice are a natural part of every backyard—they travel on birds, rodents, and other animals. When your chickens become affected by external parasites, it doesn’t mean you’re not keeping a clean coop—it simply means your chickens are living the good life in the great outdoors!
Being able to identify each type of external parasite isn’t essential, but it is necessary to be able to recognize an infestation and know how to treat it. Regularly inspect each chicken to catch an infestation early. Common signs of external parasites are dirty-looking vent feathers, decreased activity or listlessness, a pale comb, changes in appetite, a drop in egg production, weight loss, excessive preening, bald spots, redness or scabs on the skin, dull and ragged-looking feathers, and crawling bugs on a chicken’s skin or nits on its feathers.
Good biosecurity practices (see chapter 7), frequent flock inspections, and ample access to dry dirt or sand for dust bathing are sufficient preventive measures. I do not recommend the addition of diatomaceous earth to dust baths. Certainly enjoy fragrant herbs dispersed inside or planted outside coops, but be advised that herbs, fresh or dried, will not repel mites or lice.
MITES AND POULTRY LICE
The two most common categories of external parasites in chickens are mites and poultry lice. Mites can crawl on and bite humans, causing minor skin irritation and an urgent desire to immolate oneself, but they cannot live on humans. Poultry lice are different from human head lice (you cannot contract lice from chickens).
Mites can be gray, dark brown, or reddish in color and are often seen along feather shafts and underneath roosts after dark. A heavy infestation can lead to anemia and death. The two most common mites are red roost mites (chicken mites) and northern fowl mites. Red roost mites hide in the coop’s dark cracks and crevices, underneath roosts, and in nest boxes, venturing out at night to draw blood from chickens. Northern fowl mites live on the bird, most often surrounding the heads of crested breeds and the vent, where they cause skin damage and scabs.
Poultry lice are fast-moving, six-legged, flat, beige or straw-colored insects typically seen near the base of feather shafts surrounding the vent. Lice live on the bird, feeding on dead skin and other debris such as feather quill casings. When parting the feathers near the vent to inspect for parasites, they can be seen briefly as they scurry away. Lice eggs (nits) collect at the bases of feather shafts.
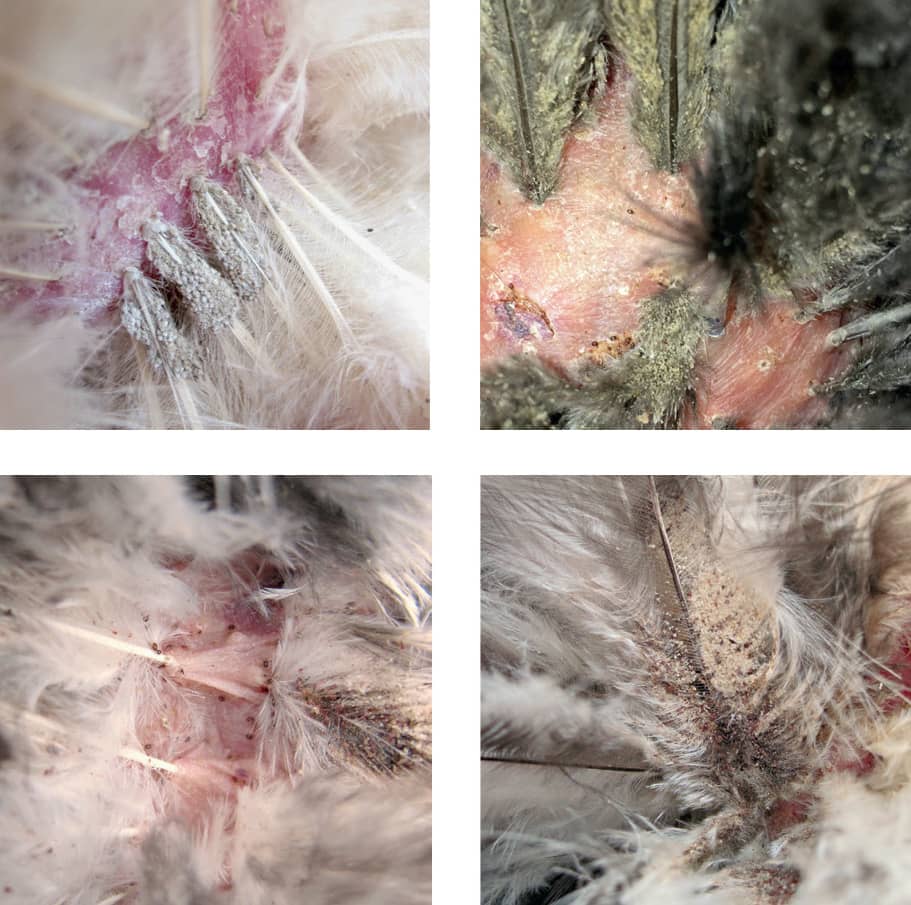
When your chickens become affected by external parasites, it doesn’t mean you’re not keeping a clean coop—it simply means your chickens are living the good life in the great outdoors!
Treatment: When mites or lice are found on one bird, the entire flock and coop must be treated. There are many different products used to eradicate external parasites with varying degrees of effectiveness and safety, including Elector PSP, garden and poultry dust with permethrin, pyrethrum dust, flea dips and shampoos for dogs, and ivermectin.
With the aid of a partner and headlamps, it is easiest to treat birds after dark when they have gone to roost. If using a powder product, wear a respirator and eye protection while dusting underneath the wings and vent area of each bird using a shaker can or a nylon stocking as a powder puff. Treatment with most products (except Elector PSP) only kills mature insects and must be repeated twice after the initial application in 7-day cycles to kill the eggs that have hatched since the initial treatment. The coop must be cleaned and treated, paying particular attention to nests and roosts. Call your poultry extension service specialist to discuss common parasites in your area, treatment recommendations, and any egg-withdrawal periods.
SCALY LEG MITES
Scaly leg mites (Knemidocoptes mutans) are microscopic insects that live beneath the scales on a chicken’s lower legs and feet. They dig tiny tunnels under the skin, eat tissue, and deposit crud in their wake. The result? Thick, scabby, crusty-looking feet and legs. The longer the mites reside under the leg scales, the more discomfort and damage they inflict. An unchecked infestation can result in pain, deformities, lameness, and loss of toes. Scaly leg mites spread easily from bird to bird, so isolate affected birds during treatment and thoroughly clean and treat the coop with an insecticide.
Treatments: One treatment for leg mites begins by soaking the feet and legs in warm water, followed by a gentle towel drying and exfoliation of loose scales. Next, dip feet and legs in linseed, mineral, olive, or vegetable oil. This will suffocate the mites. Wipe off the oil and slather the affected area with petroleum jelly. Reapply the petroleum jelly several times weekly until the affected areas return to normal. It may take several months for mild to moderate cases to resolve.
Another option, the one I prefer, is a safe, quick, and effective treatment recommended by Dr. Michael Darre, poultry professor and Department of Agriculture Extension Service specialist at the University of Connecticut. The biggest challenge in treating scaly leg mites is killing the nits that live underneath the leg scales. Treatments that can take weeks often do not kill all the nits and the problem never goes away.
Dr. Darre advises dipping the affected legs into a container of gasoline. The gasoline penetrates the scales, killing the mites and suffocating the nits. Don’t rub the gasoline in or brush it on—dip the legs into it. Allow the legs to dry, and then slather them with A&D ointment to soften the scales and promote healing. On day 2, apply only the A&D ointment. On day 3, repeat the gas dip and ointment application, which completes the course of treatment.
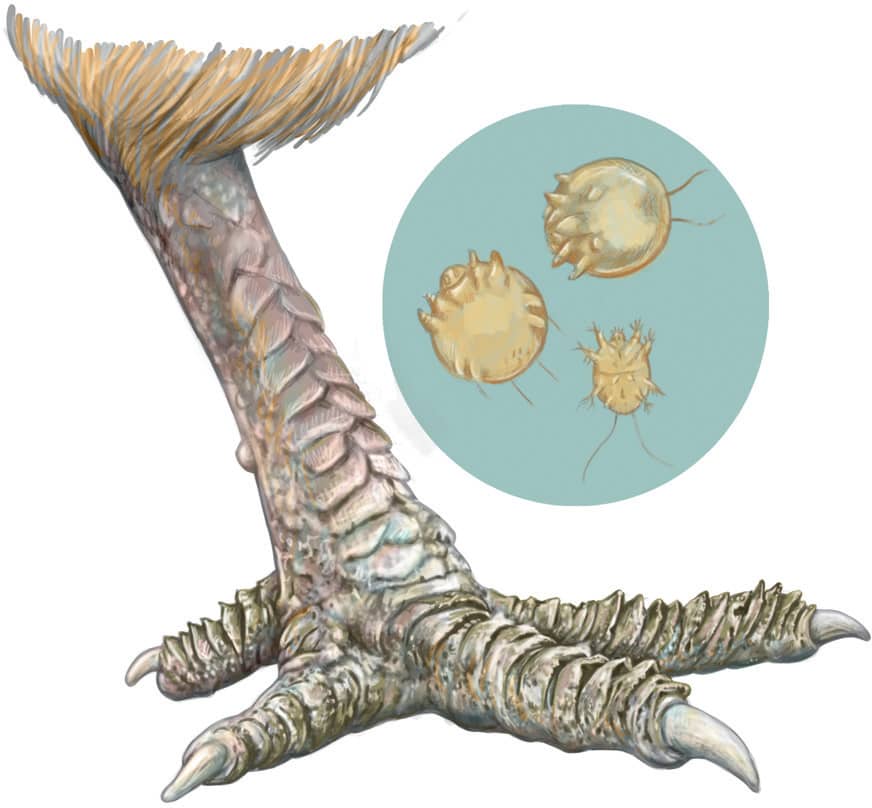
Scaly leg mites.
Internal Parasites
If the mites and lice review did not sufficiently gross you out, the information that follows on internal parasites definitely will.
WORMS
No discussion of chicken creepy-crawlies would be complete without addressing worms. Whether, when, and how to deworm backyard chickens are important issues for chicken keepers to consider. How we approach worm control in our flocks is a matter of personal philosophy, but we need a framework within which to develop one. The subject is complicated, but most of us just want to know the basics: how chickens get worms, how to control worms in our birds, how to recognize a worm problem, and how to treat chickens for worms when necessary. So, let’s talk about the basics!
Common Causes: Chickens acquire worms from something they ingest—either food or water contaminated with infected droppings from another bird or worm eggs carried in an intermediate host, such as earthworms, slugs, snails, grasshoppers, and flies. Worms inside a chicken aren’t always a problem; a healthy chicken can manage a reasonable worm load in its digestive tract, but when the immune system is taxed by stress or illness, that reasonable worm load can become an unreasonable burden that the bird can no longer manage.
Worm Detection: Symptoms and evidence of a worm infestation can include worms in eggs, abnormal droppings (diarrhea, foamy-looking, etc.), weight loss, pale comb/wattles, listlessness, dirty vent feathers, worms in droppings or throat, gasping, head-stretching and shaking, reduced egg production, and sudden death.
If birds are suspected of having a worm overload, ideally a droppings sample will be brought to a veterinarian for a fecal float test. To collect a sample, use a clean plastic bag inverted over your hand like a mitten, pick up several different specimens, then turn the bag right side out and seal it. A couple of tablespoons is sufficient. The test will reveal whether there is a problem, how serious it is, and what type of parasites are involved. The test is relatively inexpensive and all vets perform them routinely. If the test is positive for worm overload, discuss treatment options with your vet or agriculture extension service poultry specialist. Not all deworming products treat all types of worms, so it’s important to know which type of worms your chicken has.

A healthy chicken, like this Serama hen named Portia, can manage a reasonable worm load in its digestive tract, but when the immune system is taxed by stress or illness, that reasonable worm load can become an unreasonable burden the bird can no longer handle.
Treatment: When making decisions about products purported to address internal parasites, make sure you understand what the product is capable of. There’s a big difference between a product that prevents a worm overload and a product that eradicates a worm overload. A bogus preventive is less likely to hurt a healthy chicken than a bogus treatment given to a chicken sick with worm overload.
Doctors Annika McKillop, Mike Petrik, and Michael Darre all suggest controlling worms in backyard flocks at least twice per year: once in the fall and once in the spring. To keep resistance from developing, rotate two or three different products, that is, product A in the fall, product B in the spring, and product C the following spring. Any time one chicken has a worm overload or is treated for a suspected worm infestation, every member of the flock should be treated. Most deworming medications work by paralyzing adult worms in the digestive tract that are then expelled in droppings.
Types of Worms and Their Treatments: Backyard chicken keepers need concern themselves with only a few types of worms: roundworms, capillary worms, cecal worms, gapeworms, and tapeworms.
• Roundworms (Ascaridia galli): These worms can damage and block small intestines, preventing a chicken from absorbing nutrients. Roundworms might appear in droppings, or worse—inside eggs (gasp!). The treatment of choice is piperazine (brand name Wazine-17), which is not USDA-approved for laying hens producing eggs for human consumption. Dosage is 1 ounce per gallon of water as the only source of drinking water for 1 day. Repeat treatment twice more in 7-day intervals (for a total of three treatments over 21 days). The recommended egg withdrawal period is 17 days. According to Dr. Michael Darre, “You will see roundworms on the ground after deworming if there was a roundworm infestation. If you don’t see any, it doesn’t hurt the birds to deworm anyway.”
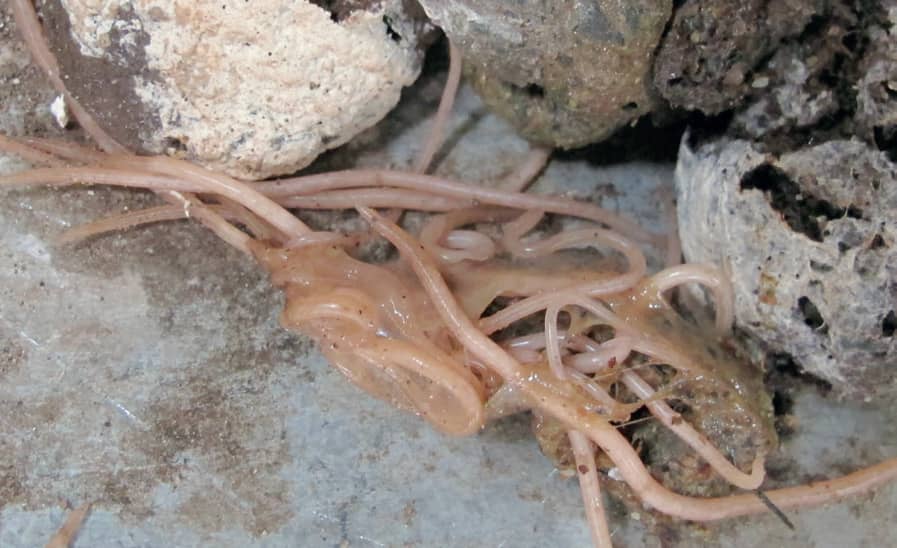
Roundworms can damage and block small intestines, preventing a chicken from absorbing nutrients.
• Capillary worms, a.k.a. hairworms or threadworms (Capillaria): These threadlike worms are less than 1/2 inch long and are most often found in the small intestine, where they rob the bird of nutrients. Not usually apparent in droppings, they cannot be transmitted from chickens to humans. An albendazole oral suspension (brand name Valbazen) is commonly recommended: using a 2cc syringe, draw up 1/4cc for bantams or 1/2cc for large birds and fill the remainder of the syringe with water. Repeat in 2 weeks. The recommended egg-withdrawal period is 14 days.
• Cecal worms (Heterakis gallinae): Very common but not usually harmful to chickens, these parasites live in the ceca (the two branches off the intestine that end in two small pockets where the super-stinky poop is made). Visible with the naked eye, they are less than 1/2 inch long. Treatment of choice is 1 pea-size dollop of fenbendazole 10 percent paste (brand name Safe-Guard) placed in the beak or a piece of bread. Repeat treatment in 10 days. The recommended egg-withdrawal period is 14 days.

Not too common in backyard chickens, gapeworms live in the trachea, causing the chicken to open its mouth repeatedly, stretch its neck, gasp, cough, or shake its head trying to dislodge the worms, a behavior that should not be confused with yawning.
• Gapeworms (Syngamus trachea): Not too common in backyard chickens, gapeworms have a red, fork-shaped appearance, are visible to the naked eye, and are transmitted by earthworms, slugs, flies, and beetles. Gapeworms live in the chicken’s trachea, causing it to open its mouth repeatedly, stretch its neck, gasp, cough, or shake its head trying to dislodge the worms, a behavior that should not be confused with yawning. Commonly recommended products for treatment are Panacur or ivermectin (brand name Ivomec). Contact your state agriculture extension service specialist to formulate a treatment plan if necessary.
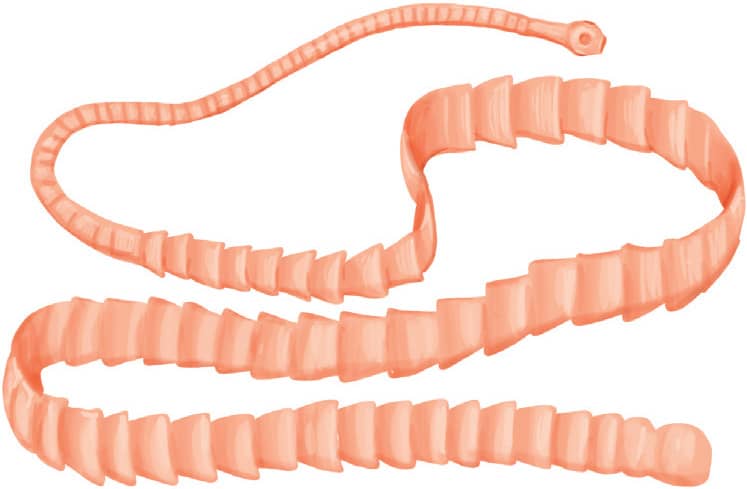
Tapeworm infestations are difficult to treat, so focus on controlling the intermediate hosts.
• Tapeworms (Cestodes): Common in chickens, tapeworms live in different areas of the intestines and are transmitted by intermediate hosts such as beetles, earthworms, flies, and slugs. Tapeworm infestations are difficult to treat, so focus on controlling the intermediate hosts. Benzimidazoles (e.g., fenbendazole or levamisole) are the drugs of choice. Tapeworms cannot be transmitted from chickens to humans. Contact your state agriculture extension service specialist to formulate a treatment plan if necessary.
COCCIDIOSIS
Coccidiosis is a common and deadly intestinal disease caused by several species of protozoa that are present wherever chickens live. Coccidiosis is especially a concern with chicks and is also discussed in chapter 5.
Coccidia parasites damage the intestinal lining, preventing chickens from absorbing nutrients from their feed. The parasites thrive in warm, moist environments and, in sufficient populations, can kill chickens. The microscopic eggs (oocysts) that cause coccidiosis are commonly transported into a chicken yard or run by wild birds, on shoes and clothing, via equipment, or in contaminated water and feed. Symptoms commonly include diarrhea, blood or mucus in droppings, inactivity, loss of appetite, pale combs and wattles, failure of chicks to grow, or weight loss in older chickens. Progression of symptoms can be gradual or rapidly result in death.
Common Causes: As with so many other threats to your flock, the risk of coccidiosis can be mitigated by following a few simple steps: provide a complete commercial ration, limit treats, offer clean water in clean containers, supply plenty of clean, dry living space, practice good biosecurity (see chapter 7), and house waterfowl separately from chickens.
Either buy chicks that have received the coccidiosis vaccine or feed chicks medicated starter ration. Chicks given the coccidiosis vaccine at the hatchery should never be fed medicated starter ration because amprolium, the medication in it, will kill the vaccine, leaving the chicks unprotected from the disease.
Finally, offer poultry probiotics in drinking water to promote competitive exclusion (fostering beneficial microflora populations in the gut to control parasite populations). Coccidiosis cannot be prevented or treated with herbs, garlic, vinegar, milk, or yogurt.
Treatment: Coccidiosis can spread like wildfire through a brooder, killing chicks very quickly. When coccidiosis is suspected in baby chicks by the presence of blood or mucus in droppings, medicate all chicks right away. The only way to confirm coccidiosis in live chickens is with a fecal float test, but test results may arrive too late and a day or two of medication won’t hurt them if test results are negative.
When one chicken has coccidiosis, all birds in the flock should be treated. Amprolium is FDA approved for use in laying hens, which means there is no egg-withdrawal period; eggs may be consumed during and after treatment with amprolium.
Amprolium works by depriving the coccidia of the vitamin B they require to flourish. Liquid amprolium can be administered at the rate of 2 teaspoons per gallon of water, mixed daily. Provide this mixture as the only source of drinking water for 5 days. For the following 14 days, mix 1/2 teaspoon per gallon as the only source of drinking water.
After the second round of treatment is completed, offer a vitamin supplement to replace the vitamin B1 lost during treatment.
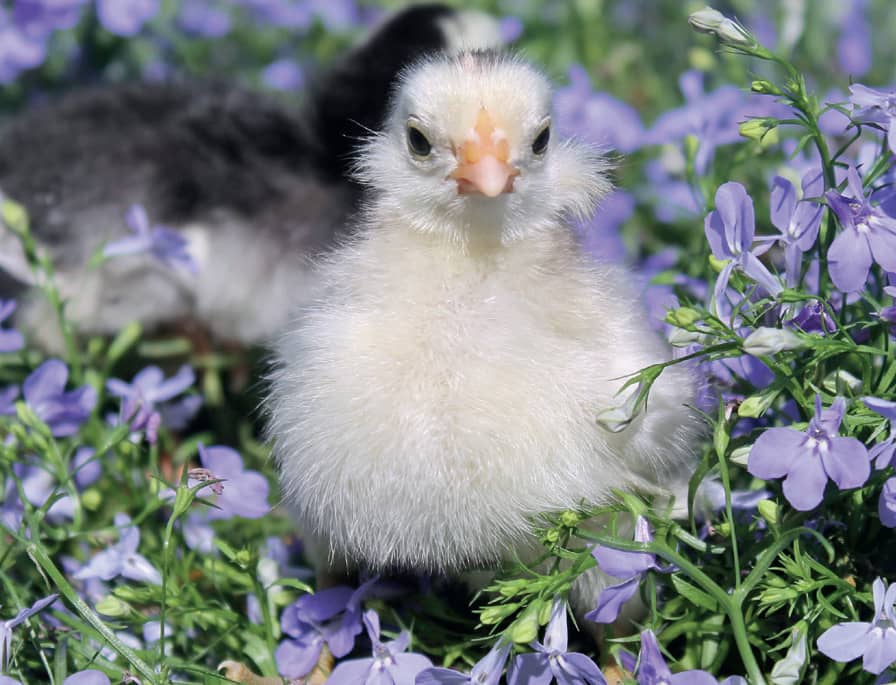
Chicks given the coccidiosis vaccine at the hatchery should never be fed medicated starter ration because amprolium, the medication in it, will kill the vaccine, leaving the chicks unprotected from the disease. Additionally, when one chicken has coccidiosis, all birds in the flock should be treated. Double-tufted White Araucana, Alfalfa.
Fowl Pox
This highly contagious viral infection causes painful sores on nonfeathered portions of a chicken’s skin. Also referred to as avian pox, sorehead, avian diphtheria, and chicken pox, it is unrelated to human chicken pox and cannot be transmitted from birds to people. As there is no cure, prevention and treatment are the courses of action.
Common Causes: The virus is transmitted to chickens by biting insects, most notably mosquitoes, and then spreads slowly to other chickens through an infected bird’s feathers, skin dander, sloughed-off scabs, scab secretions, and blood (collectively referred to hereafter as “hot debris”). The virus can persist in a flock for months, and sometimes years in the hot debris.
Symptoms: Fowl pox occurs in two forms, dry and wet pox. The dry form affects skin in nonfeathered areas, most commonly the comb, wattles, face, and eyelids. Wet fowl pox affects a bird’s upper respiratory system, eyes, mouth, and throat and can be life-threatening. Initial stages of dry fowl pox include ash-colored, raised lesions or blisters on the comb, face, and wattles. Blisters evolve into larger, yellow bumps and finally into dark wart-like scabs. The scabs eventually resolve, leaving scars. (Minor pecking injuries on combs or wattles should not be confused with fowl pox.) Chickens with fowl pox often exhibit decreased egg production, loss of appetite, and weight loss in addition to the telltale external lesions (dry fowl pox) or lesions inside the mouth and throat (wet fowl pox). Symptoms generally persist for several weeks in a bird and several months in a flock. Some chickens acquire natural immunity, but others are susceptible to recurrences in times of stress.
Prevention: Practice good biosecurity (see chapter 7) to avoid introducing fowl pox to your birds from an infected flock via your clothes, equipment, or shoes. Also work to control mosquitoes if possible.
Day-old chicks and unaffected adults can be vaccinated against fowl pox even during an outbreak in the flock. The wing-stick method is easy to do and very affordable. Consult your veterinarian or state agriculture extension service specialist for more information. Once vaccinated, chickens have permanent immunity. Following an outbreak, clean and sanitize the chicken coop with an Oxine solution weekly for a month.
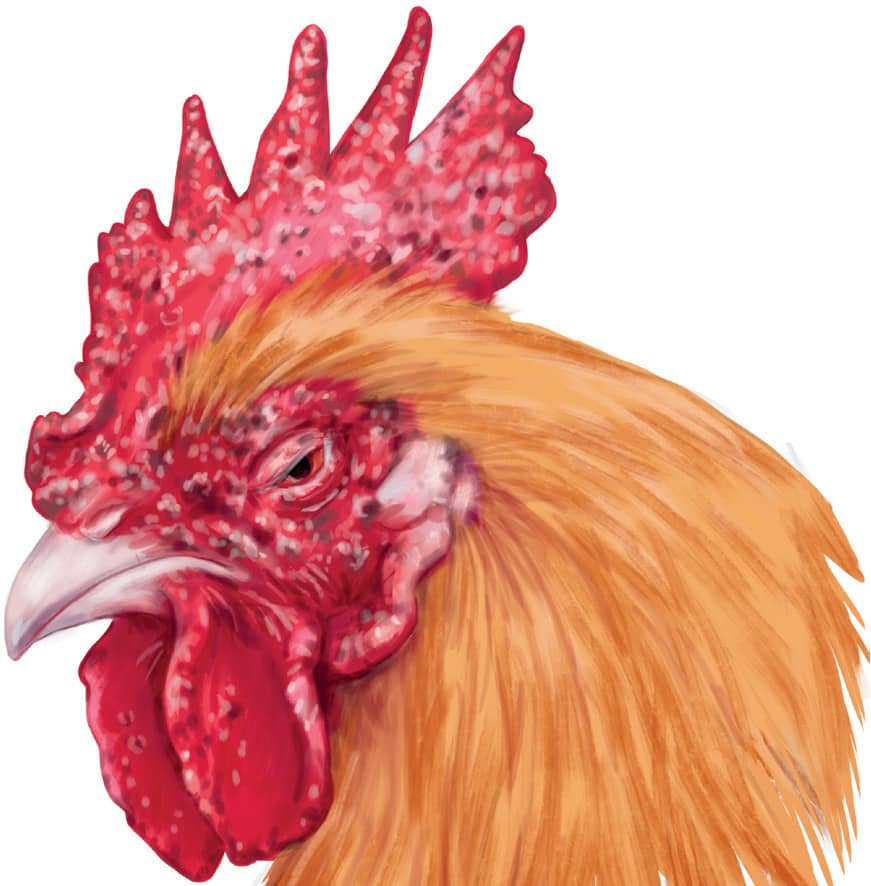
Initial stages of dry fowl pox include ash-colored, raised lesions, or blisters on the comb, face, and wattles. Blisters evolve into larger, yellow bumps and finally into dark, wart-like scabs.
Treatment: Comfort measures can be provided to affected birds and preventive measures taken to avoid secondary bacterial infections caused by the lesions.
Consult a veterinarian or your poultry extension service specialist to discuss antibiotics for controlling secondary infections. Treat scabs with a diluted iodine solution followed by sulfur ointment to soften scabs. Mix 2 tablespoons of sulfur powder with 1/2 cup of petroleum jelly and apply to affected areas daily until the lesions are healed.
Cleaning and sanitizing waterers daily will also limit the spread of the virus. Add 1/4 teaspoon of Oxine per gallon of drinking water and provide this as the only source of drinking water until the outbreak subsides. Finally, clean the coop and run to remove hot debris.
When it’s safe to return the affected chicken to the flock, it should be reintroduced as if it were a complete stranger to ensure a smooth transition and limit stress and violence. I recommend the playpen method (see chapter 9).
End-of-Life Decisions
There will come a time in every flock when care for a sick or injured bird is not enough and euthanasia becomes necessary. Sometimes the kindest thing we can do for a chicken is end its suffering humanely. Consider what you are personally capable of before it becomes necessary to facilitate a pet chicken’s passing. Please know that as awful as it is to put a pet to sleep, it is a kindness to help a suffering chicken cross over.
Factors to weigh when considering euthanasia include whether the bird is in pain, whether its condition endangers flockmates, and whether the bird cannot eat or drink independently and recovery is unlikely. Most vets will euthanize a sick or injured bird upon request even if they do not ordinarily treat chickens. Many state animal diagnostic laboratories offer euthanasia services prior to postmortem examinations. Call your state lab to find out which services they offer and keep their contact information handy in your first aid kit.
CERVICAL DISLOCATION
The least gruesome and most humane method of euthanasia is cervical dislocation, which causes instant unconsciousness and death. While holding the chicken under your nondominant arm like a football, press its body very securely against your side. Grasp the bird by the head, either between the index and middle fingers of the dominant hand or by the thumb and first finger around the neck. Tilt the bird’s head well back, so it points toward the tail of the bird (this position aligns the joints so that it is much easier to dislocate the head from the neck). Firmly push the head away from your body until you feel the head separate from the vertebrae. You will feel the joint let go and may hear a popping. The loss of central nervous system control over the muscles will cause convulsions and spasms; this is normal and expected. Continue to hold the bird securely until nerve activity stops.
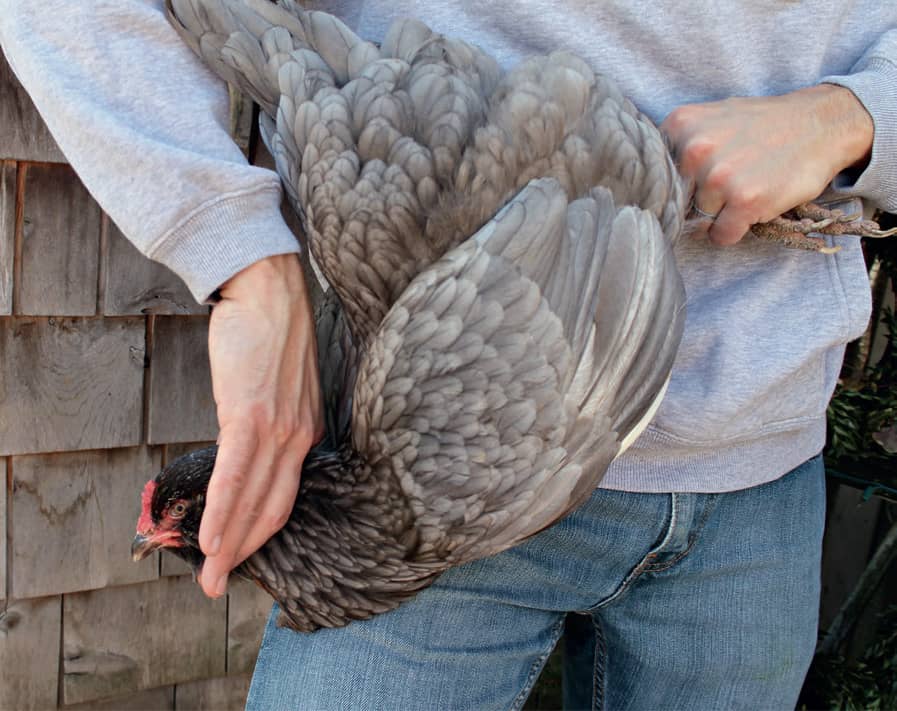
Cervical dislocation is the least gruesome and most humane form of euthanasia. (Penny was not harmed in the making of this photo.)
NECROPSY
Any time a flock member dies mysteriously, for the protection of the surviving flockmates, a postmortem exam should be performed to rule out contagious diseases. Call your state lab for necropsy submission instructions. The remains should be transported as soon as possible after death and should be stored properly until then. As a general rule, place the remains inside several plastic bags, seal, and keep refrigerated but not frozen. Some labs will send a courier to pick up the remains and required paperwork. Request a copy of the necropsy results and retain it as part of your flock’s health history. Discuss the report with a vet or poultry extension service specialist to determine whether there are any ramifications for the rest of the flock.