Now you’ve read the compelling science behind The Gut Makeover, here are the guidelines for the four-week plan to transform your gut health. On your Gut Makeover you’ll be enjoying three delicious meals a day, teeming with nutrients and with huge variety, without counting calories or going hungry. There are breakfasts that include eggs, banana nut “breads,” “creamy” nut and fruit shakes, and the odd green smoothie thrown in for good measure. Lunches and dinners include lots of variety, from lamb and Thai curries to potato salads, bologneses and Niçoise salads, roast chicken with lots of roast veggies, meatballs with almonds, roasted peppers drizzled in extra virgin olive oil, warm salads, cooked grated carrots with walnuts and brightly colored stir-frys, to name a few. Every meal includes mountains of vegetables and some fruits, cooked in delicious and enticing ways using the best of condiments, herbs, and spices to keep life interesting and satisfying.
Mouth watering now? Let’s begin.
A liquid breakfast can be very easy and welcome in the morning – particularly when you’re not terribly hungry. A breakfast in a glass can slip down more easily than food you have to chew.
Green Gunge
Phases 1 and 2
Serves 2
I’m not going to mince my words – call a green smoothie what you like, but in the end it’s basically gunge! It’s palatable gunge, of course, and has the advantage of being a practical way to get lots of fiber and a variety of plants down you in one sitting. Here, the almonds are added for protein and good fats, which will keep you feeling full for longer. The ginger and mint are anti-inflammatory. If you can’t warm to the taste of a green smoothie but want to give it a go, sipping it through a straw will hide a lot of its flavor; but personally, with the zing of ginger and lime, I like this concoction.
2 cups kale or spinach, washed
1 orange, peeled
½ cup almonds
3 fresh mint leaves
1 lime, squeezed
¾ inch fresh ginger, grated
Add all the ingredients to a blender and blend.
Tip: If you have time, soaking the almonds overnight in water makes it easier for your blender to break them up and easier for you to digest them.
Green Shake
Phases 1 and 2
Serves 2
2 handfuls of kale or spinach, washed
1 fennel bulb, chopped
2 ripe kiwis
1 apple
¼ cucumber
½ inch fresh ginger, unpeeled
½ lime, peeled
A handful of fresh mint leaves
1 cup (250ml) filtered water
Add all the ingredients to a blender and pulse until smooth. Taste for texture – if you prefer your shake a little less thick, add more water to dilute it.
Drink immediately, before the ingredients separate.
Nutty Non-Dairy Breakfast Shake
Phases 1 and 2
Serves 1
¾ cup unsweetened almond milk
½ cup frozen berries
½ banana
1 tbsp. ground flax seeds (also called linseeds)
Blend all the ingredients together in a blender until smooth and drink immediately. If left to stand, the shake will become thicker as the flax swells up, and then you’ll need to eat it with a spoon.
Follow by drinking a glass of water to aid the digestion of the flax.
Kefir and Pineapple Breakfast Shake
Phase 2
Serves 1
If you are in a hurry use the ready-chopped pineapple found in the fridge section of the supermarket.
¾ cup full-milk-fat kefir (if possible organic, from cow milk or goat)
1 cup chopped fresh pineapple
¾ inch fresh ginger, peeled
1 tbsp. chia seeds or ground flax seeds
Add all the ingredients to a blender and pulse until smooth. Drink immediately, before the ingredients separate.
Follow by drinking a large glass of water to help the digestion of the chia or flax seeds.
Tip: If you have time, soaking the chia seeds in water overnight makes it easier for your blender to break them up.
Kefir and Berries
Phase 2
Serves 1
¾ cup full-fat kefir (if possible organic, from cow or goat)
1 cup of fresh or frozen berries of your choice
½ banana
2 tsp. chia seeds or ground flaxseeds
½ inch fresh ginger
Blend all the ingredients together in a blender – drink immediately before the ingredients separate.
Tip: If you have time, soaking the chia seeds in water overnight makes it easier for your blender to break them up.
Spinach and Potato Scrambled Egg
Phases 1 and 2
Serves 1
The cold potatoes add a prebiotic to this meal, as they are a resistant starch food. Although you can still get resistant starch from reheated very gently cold new potatoes, this does not give you license to turn your Gut Makeover into a fried potato diet!
1 tbsp. olive oil
2 small new potatoes, pre-boiled and chilled and cut into small cubes (with or without skins)
A really large handful of spinach, washed
1 large egg, beaten
Sea salt
Heat the oil in a pan over a medium heat. Add the potatoes for a moment. Add the spinach to the pan and stir for a couple of minutes until it has wilted. Stir the beaten egg into the potatoes and spinach until the egg is set. Sprinkle with a little sea salt to your taste and serve.
Scrambled Eggs with Salmon
Phases 1 and 2
Serves 1
2 slices of wild Alaskan smoked salmon
1 tbsp. extra virgin olive oil (phase 1)
or
1½ tbsp. of butter or ghee (phase 2)
2 medium eggs, beaten
Cut the slices of salmon into small strips.
Heat the oil or butter in a pan over a medium heat, add the eggs and salmon, and keep stirring, until the egg is set and the salmon has changed color slightly.
Wild Salmon and Avocado
Phases 1 and 2
Serves 1
1 ripe avocado, peeled and sliced
2 slices of wild Alaskan smoked salmon
½ lemon
Freshly ground black pepper
Arrange the avocado and salmon on a plate, squeeze over the lemon juice and season with pepper, to taste.
Banana and Blueberry Breakfast Bread
Phases 1 and 2
Makes 1 loaf
Make this on the weekend and have it ready for the mornings over the next week so you have something delicious on hand when you need to conjure up breakfast quickly. A slice of this is a satisfying accompaniment to one of the shakes if you need more protein in the morning to keep you going. Blueberries are added here for an extra boost of polypenols from their dark colour to feed good bacteria in the gut.
2 tbsp. extra virgin olive oil
2 cups walnuts
1 cup ground almonds
2 tsp. gluten free baking powder
1 ripe banana
2 handfuls of blueberries
3 large eggs
2 tbsp. honey
Grease a loaf pan with a little of the olive oil with baking paper. Preheat the oven to 350°F.
Grind the walnuts in a blender. Add the ground walnuts to the ground almonds and baking powder in a mixing bowl.
Put the banana, eggs, remaining olive oil, and honey in the blender and mix until all broken down. Add the wet mixture to the dry mixture and stir with a wooden spoon. Add the blueberries and stir.
Pour the batter into the loaf pan and bake for 30 minutes, or until a skewer comes out of the mixture clean.
Remove from the oven, turn out, and allow to cool.
Phases 1 and 2
This makes a great breakfast served with fresh fruit and scattered in nuts and seeds, but it’s equally delicious as a dessert.
1 cup unsweetened almond milk (phase 1) or milk kefir (phase 2)
2 tbsp. chia seeds
Mix the ingredients together in a bowl or large glass and place in the fridge.
Every 15 minutes for 2 hours, go back to the fridge and stir the caviar. You should end up with a soft pearl-like consistency, which you can use as a delicious dessert served alongside either a portion of berries or a couple of slices of fresh mango.
This section gives ideas for making more substantial Gut Makeover meals. Some can be fixed at lunchtime, while others make good evening meals (starters or mains), which in turn can provide delicious leftovers for lunch the next day.
Chicory and Apple Salad
Phases 1 and 2
Serves 1
Chicory is a slightly bitter vegetable, so it can stimulate production of your stomach acid to help with digestion. The apples have prebiotic properties to help your gut flora flourish.
2 chicory heads, washed and sliced
1 apple, peeled, cored, and sliced
A handful of walnuts, chopped
For the dressing:
Juice of ½ lemon
2 tbsp. extra virgin olive oil
1 garlic clove, peeled and finely chopped
Combine all the salad ingredients in a bowl. Mix the dressing ingredients in a glass with a fork and drizzle over the salad.
Chicory and Pine Nut and Roquefort
Phase 1 without cheese, Phase 2 with
Serves 2
In the first two weeks, make this salad without the Roquefort. In the second half of the plan, you can add it in, to help boost gut bacteria.
3 small heads red or green chicory, washed and sliced
1½ tbsp. real butter (not low fat variety)
¼ – ½ cup pine nuts
A sprinkle of dried chili flakes, to taste (optional)
A sprinkle of sea salt flakes
2 tbsp. extra virgin olive oil
Juice of ½ lemon
Matchbox-sized piece of Roquefort (only on the second half of the plan)
Put the chicory in a bowl.
Melt the butter in a frying pan over a medium heat. Add the pine nuts and sprinkle with the chili flakes, if using, and sea salt. Move the nuts around the pan to coat them well with the butter and flavorings. Cook until the pine nuts are golden brown. Watch them carefully as they burn easily.
Sprinkle the warm nuts over the chicory and drizzle with the olive oil and lemon juice. Crumble the cheese over, if using.
Serve at once.
Phases 1 and 2
Serves 4 as a starter
My Italian friend Mario and his wife Denise invited us to their gorgeous shack on the River Thames in London recently while I was writing this book. He’s a brilliant cook – homemade pizzas in his 660°F oven being his speciality. We said we’d love to come, then dropped the gluten-free bombshell. Unfazed, Mario conjured up a superb meal and this was his Italian starter, containing the perfect ingredients to stimulate stomach acid production and help digestion. A perfect example of cultural cooking and the real Mediterranean diet that is so good for the gut. This salad was followed by a baked sea bass each.
Use Kalamata olives as they are not processed and dyed black like some other varieties.
2 large oranges, peeled, halved and sliced into half moons
1 red onion, peeled and thinly sliced into half moons
3 tbsp. extra virgin olive oil
2 tbsp. Kalamata olives, stoned and chopped
1 small can of anchovies in olive oil, chopped
Assemble all the ingredients in a salad bowl and serve immediately.
Triple Greens
Phases 1 and 2
Serves 2
It is important to get as much variety of vegetables as possible at every meal, so why include just one vegetable when without much more effort you could eat a triple whammy? This dish is great for getting prebiotic leeks into your diet.
2 tbsp. extra virgin olive oil
½ inch fresh ginger, peeled and grated or chopped
1 garlic clove, peeled and chopped
1 leek, washed and sliced
1¼ cups sugar snap peas, thick tips cut off
3½ oz. spinach, washed
A splash of tamari sauce (only if on phase 2)
Heat the oil with the ginger and garlic in a pan. Add the leek and stir until softened. Add the sugar snaps and spinach and stir until the spinach is wilted. Add a splash of tamari sauce and serve.
Butternut Squash and Sweet Potato Soup Sprinkled With Chili Walnuts
Phases 1 and 2
Serves 4
This recipe is great for boosting your vitamin A levels. It is the orange pigments in these vegetables that contain vitamin A, which is important for building a strong gut lining, as is the chicken stock, which contains collagen. If you haven’t got much fresh stock in your fridge, dilute what you have with boiled water; if you don’t have any chicken stock at all, you can just use boiled water. The more stock the better, though, not just for the collagen but also because it will make you feel more full than using just water.
For the soup:
3 tbsp. extra virgin olive oil
1 red onion, peeled and chopped
1 garlic clove, peeled and chopped
1½ pounds chopped butternut squash and sweet potato (you may buy these in bags, ready-chopped, in supermarkets if you need to save time)
2 cups fresh chicken stock or water, or a combination of both
Sea salt
Freshly ground black pepper
For the nut topping:
A pinch of sea salt and freshly ground black pepper
Shelled walnut halves (10 per person)
A sprinkle of dried chili flakes
Heat the olive oil on a medium heat in a saucepan and sweat the chopped onion and garlic until soft and slightly transparent.
Add the butternut squash and sweet potato and sweat until soft.
Add the stock/water and simmer on a low heat for 20 minutes, partially covered with a lid, until the squash and sweet potato are soft and break up easily when prodded with a fork.
Meanwhile, dry-fry the walnuts, sprinkled with a pinch each of dried chili flakes and sea salt, until the nuts are warm and fragrant.
Blitz the soup in a blender, then add salt and freshly ground pepper to taste. Sprinkle the nuts over the soup before serving.
Roast Pepper and Tomato Soup
Phases 1 and 2
Serves 4
You could serve this as a starter in the evening to get your vegetable count up, or as a main meal for lunch, with seeds scattered on top for some protein. If you are in the second phase of the plan, crumble over a matchbox-sized piece of Roquefort.
5 large tomatoes
2 red bell peppers or sweet red peppers (the long pointy ones)
2 tbsp. extra virgin olive oil
1 small onion, chopped
1 garlic clove, peeled and chopped
1¾ cups fresh chicken stock or water, heated
Sea salt and freshly ground black pepper
Heat the oven to 425°F.
Put the tomatoes and peppers on a baking tray and drizzle over 1 tbsp. extra virgin olive oil. Roast in the oven for 20–30 minutes, until the skins are blistering, then remove.
Place the peppers in a cold saucepan with a lid on and leave to cool for about 15 minutes – this helps the skin to loosen and makes them easier to peel. (Peeling the skin makes them easier for some people to digest. You could leave this stage out if you are OK with digesting skins and they don’t repeat on you.) Peel the peppers and remove the seeds and stalks.
When the tomatoes have cooled down a bit, pinch off the skins.
Heat the remaining olive oil in a pan over a medium heat. Add the onions and garlic and sweat them for about 5 minutes. Stir in the peppers and tomatoes. Add the stock (or water if you don’t have any real stock) and simmer for 5–10 minutes over a low heat.
Blitz the mixture in a powerful blender, season to taste and serve.
Phases 1 and 2
Serves 4
Cold Spanish tomato soup tastes much better than it sounds. It’s a kind of Virgin Mary that you can serve as a starter in a cup. Basically it’s a liquidized salad – easy to make and it can be stored in the fridge for a couple of days for a quick down-in-one vegetable boost on the run.
15 oz. canned tomatoes (or 4 fresh tomatoes)
½ red onion, peeled and chopped
½ medium cucumber
1 garlic clove, peeled and chopped
1 red bell pepper, deseeded and chopped
2 tbsp. extra virgin olive oil
1 tbsp. red wine vinegar
Sea salt and freshly ground black pepper, to taste
A dash of Tabasco (optional)
Blend all the ingredients in a blender and store in a jug in the fridge until ready to serve. If too thick, you can add a little water, or blend in some ice cubes, for a more soupy consistency.
German Potato Salad
Phases 1 and 2
Serves 4
If you think potato salad is all gloopy mayonnaise dressings, think again. This version from the south of Germany uses vinaigrette instead, and is naturally perfect gut food – it contains not only prebiotic fibers but also fresh chicken stock for your gut lining. It’s important you wait until the potatoes have cooled before eating them, because, when cold, potatoes form a type of fiber called resistant starch, which acts as a prebiotic to feed the beneficial bacteria in your gut. Raw onion gives the salad a nice flavor kick and it also acts as another prebiotic. The chicken stock adds collagen and makes the salad fresh and juicy.
Go easy when serving this salad. Spoon it over about a third of your plate, so that you leave room for lots of color from other vegetables.
1½ pounds new potatoes, washed and boiled with skins on until tender
½ onion, peeled and finely chopped
1 tsp. Dijon mustard
4 tbsp. extra virgin olive oil
1 tbsp. white wine vinegar
½ cup chicken stock (bring this to room temperature if it is jellified from the fridge, so it is in liquid form)
½ tsp. sea salt
Slice the potatoes into thin circles and place in a salad bowl (with/without skins), time permitting.
In another bowl, mix together the onions, mustard, oil, vinegar, stock, and salt with a fork, then add this to the potatoes and let it soak in.
This dish goes really well with pork schnitzels (see here) and a big half-plateful of steamed fresh asparagus (which also contain its own type of prebiotic fibers).
Quick Tips for Crowding Out Grains with Vegetables
A diet featuring a lot of grains can become an irritant to the gut lining in some people. Many of us eat quite a large volume of grains over the course of a week, but actually little variety of them (i.e., we limit ourselves to just two or three main ones such as wheat, oats, rice). During this month we are taking a holiday from grains to allow the gut a chance to repair. This provides a big opportunity to use the space left free on the plate, which we would normally fill with grains, with much more nutrient-dense, gut-friendly foods: vegetables that are teeming with plant chemicals, fiber, vitamins, and minerals.
1.CAULIFLOWER INSTEAD OF RICE
Wash and chop the florets and stem (which contains prebiotic fibers) into tiny pieces – really shred it, or chop in a food processor.
Sauté the shredded cauliflower in a pan with a drizzle of olive oil until soft, then serve with a pinch of salt. You can add chopped fresh herbs if you like, to make it more tasty, and push up your plant count. You could scatter pomegranate seeds on top.
2.ZUCCHINI INSTEAD OF SPAGHETTI
See zucchini bolognese here. You can either spiralize zucchinis into the shape of spaghetti, or if you don’t have a spiralizer, simply slice them into half moons, sauté them in olive oil, and top them with bolognese sauce.
3.MIXED ROAST VEGETABLES INSTEAD OF COUSCOUS
You can buy mixed ready-chopped vegetables in supermarkets, or you could chop up an array of your favorites and bake them in several trays, drizzled with olive oil, in a medium oven until soft. They are delicious eaten immediately, or at room temperature the next day or in packed lunches. Roast your favorite chopped veggies to get a good combination of colors and flavors; my ideal combination is mushrooms, carrots, cauliflower, parsnips, sweet potato, onion, and garlic. Squeeze a lemon over the top before serving with a sprinkle of sea salt for extra taste.
4.USE SWEET POTATOES INSTEAD OF GRAINS
Sweet potatoes contain vitamin A in their orange pigment, which supports your gut lining, so they provide a good nutrient boost instead of grains.
5.USE COLD POTATOES IN MODERATION
Remember, cold potatoes contain resistant starch, which isn’t digested in the upper digestive system so it keeps you feeling fuller for longer than hot potatoes. They are useful on one-third of your plate, where you might usually put your grains, but make sure you get lots of color on the rest of your plate, so there is still a variety of vegetables. We don’t want white potatoes becoming the predominant color, as your gut needs more variety than this.
Niçoise Salad
Phases 1 and 2
Serves 2
For the salad:
1 bag of washed green salad leaves of your choice
6 cherry tomatoes, halved
3 boiled eggs, quartered
1 can of tuna in olive oil
1 small bag of flat-leaf parsley, washed and finely chopped
½ red onion, peeled and thinly sliced
1 cup thin green beans, trimmed, steamed, and cooled
2 small cold potatoes
For the dressing:
3 tbsp. extra virgin olive oil
1 tbsp. freshly squeezed lemon juice or apple cider vinegar
1 garlic clove, roughly chopped
A pinch of sea salt
Toss all the salad ingredients together in a large bowl.
Combine all the dressing ingredients in a cup and stir together well. Pour the dressing over the salad ingredients and serve immediately.
Beet “Hummus"
Phases 1 and 2
This tastes delicious smeared on circles of cucumber. If you’re on the second half of the plan, it’s great spread on a slice of nut “bread” with a crumble of Roquefort on top alongside a bowl of soup.
4 large beets, washed
1 garlic clove, peeled and chopped
Juice of 1 lemon
1 tbsp. tahini
Sea salt and freshly ground black pepper, to taste
Heat the oven to 350°F.
Roast the beets in the oven for about 1 hour, or until tender. Remove from the oven and leave until cool enough to handle, then peel off the skins.
Put the beets with all the other ingredients in a blender and blend until fully combined and a smooth texture. If you prefer a chunkier texture, you can grate the beets and mix them with the other ingredients.
Chicory Stuffed with Tuna
Phases 1 and 2
Serves 2
This can make a quick self-assembly lunch at home, a great starter, or an on-the-go packed lunch (just pack the chicory leaves and the filling in separate spill-proof containers and assemble them when you’re ready to eat).
8 chicory leaves, washed
1 can of tuna or sardines in olive oil
1 tbsp. capers
1 large gherkin, chopped
Juice of ½ lime
2 globe artichokes from a can or jar
Arrange the chicory leaves on a plate.
Mash all the other ingredients together with a fork, including the olive oil from the can. Divide the mixture between the chicory leaves and serve.
Stir-Fried Sichuan Green Beans with Tempeh
Phase 2
Serves 1
Sichuan peppers have many different spellings and names (you might see them called Szechuan peppers, or Sichuan flower peppercorns). They taste lemony/peppery and give your whole mouth a really nice buzz (a bit like pins and needles – but nicer!). They are brilliant for cheering up vegetables or tempeh (the fermented soy you can buy in the fridge section or in jars from health food stores). Sichuan peppers are widely available online and in some supermarkets. I was introduced to these peppers by my Chinese sister-in-law Shuang, who comes from Cheng Du in western China where they are a staple of the local, widely acclaimed cooking.
2 cups green beans, topped and tailed
3 tbsp. extra virgin olive oil or coconut oil
1 tsp. dried chili flakes
1 tsp. Sichuan peppers (also called flower peppercorns), crushed or finely chopped
1 tsp. ground ginger
1 garlic clove, peeled and finely chopped
½ small onion, thinly sliced
1 cup of tempeh cut into small cubes
1 tbsp. tamari sauce
Wash the green beans, then lay them on a piece of paper towel and make sure they are completely dry.
Heat the oil in a wok or frying pan and cook the beans over a medium heat for about 10 minutes until they are a little crinkled and slightly charred. Remove from the pan and set aside on a plate.
Add the chili flakes, flower peppercorns, ginger, garlic, and onion to the pan and fry until the onions are melted and moist. Then add the tempeh and stir to coat with the mixture. Toss in the tamari and green beans and serve.
Stir-Fried Bok Choy with Sichuan Peppers
Phases 1 and 2
Serves 4
You could serve this as a side dish to boost your vegetable count for the day, or add a handful of cooked prawns or slices of baby squid per person near the end to make it into a main meal.
1 tsp. Sichuan peppers (also known as Sichuan flower peppercorns), crushed or finely chopped
¾ inch fresh ginger, peeled and grated
2 garlic cloves, peeled and chopped
1 tbsp. coconut oil
6 bok choy, washed, trimmed and leaves separated
4 spring onions, chopped
1 tbsp. tamari sauce (if on phase 2)
1 tbsp. fish sauce
Sauté the Sichuan peppers, ginger, and garlic in the coconut oil and cook on a gentle heat until the garlic is moist. Add the bok choy and spring onions and stir until slightly wilted. Add the optional tamari and fish sauce and serve.
Phases 1 and 2
Serves 2 as a starter or a side
Padrón peppers are readily available in supermarkets nowadays and they make a wonderful side dish or starter. Eating this dish is a little like playing Russian roulette with your food – you never know when a hot one will strike!
3 tbsp. extra virgin olive oil or 2 tbsp. coconut oil
20g Padrón peppers
¼ tsp. sea salt
Heat the oil or fat in a pan over a medium heat, add the Padrón peppers whole, and stir-fry for 5–10 minutes until they are beginning to blister. Serve with sea salt.
Carrot and Kefir Salad
Phases 1 and 2
Serves 4
I’ve adapted this recipe from a traditional Turkish dish I tasted when I visited Turkey and ate like royalty for a week. The cooked carrots make this salad delicious and nutritious – cooked carrots deliver higher levels of vitamin A than raw ones, which is good news for your gut lining. This is a really convenient salad for packed lunches.
5 large carrots, grated
3 tbsp. extra virgin olive oil
½ tsp. sea salt
1 tbsp. tahini (a paste made from sesame seeds)
A handful of chopped walnuts
2 garlic cloves, peeled and finely chopped
Sauté the grated carrots in the olive oil in a pan over a medium heat until they turn from a bright orange to a more yellowy orange color. Stir in the salt.
Wait for the mixture to cool then stir in the kefir, tahini, walnuts, and garlic and serve at room temperature.
Roasted Bell Peppers
Phases 1 and 2
Serves 2
Bell peppers are a wonderful source of vitamin C, which is needed to make energy in the body and supports good skin. Plus, if you use a variety of different colors here, you widen the diversity in your diet to help expand your gut flora. However, some individuals find peppers difficult to digest when they are raw or have the skin on. This recipe gets over these issues and the roasting brings out their sweet flavor.
3 bell peppers – red, yellow, and green
Drizzle of extra virgin olive oil
Juice of ½ lemon
A pinch of sea salt
Heat the oven to 450°F.
Put the peppers on a baking sheet and bake for 20–30 minutes until the skins are blistering and slightly charred. Remove from the oven and put them in a pan with a lid on for 15–30 minutes (this makes the skins easier to pull off).
Peel the peppers, cut out the core and seeds, and slice the flesh into medium-size strips.
Place the peppers in a bowl and drizzle with a little extra virgin olive oil, the lemon juice, and a pinch of sea salt.
Roasted Tomatoes with Basil
Phases 1 and 2
Serves 2
When I get home and I need to get my plant count up with minimal work, this is the dish I whip up!
6 tomatoes on the vine
A drizzle of extra virgin olive oil
A sprinkle of sea salt
A grind of black pepper
Bunch of fresh basil (optional)
Heat the oven to 450°F.
Put the tomatoes in a baking dish, drizzle with olive oil, salt, and pepper and cook in the oven for about 30 minutes, or until the skins are blistering and the tomatoes look juicy. About 10 minutes before the end, chuck the basil leaves on top and leave them in the oven until they go a little crispy. Whip everything out of the oven and serve.
Phase 2
We’re using fermented milk kefir as well as Roquefort cheese here, for a delicious bacteria-laden salad dressing. On the second phase of the plan, it’s worth experimenting with dairy to see: (1) if you can tolerate it at all (watch gut symptoms to confirm); (2) if cow’s milk kefir is OK if not, try goat’s (milk kefir instead). Roquefort cheese is made with sheep’s milk – and, as with dairy from goats – contains a different set of proteins than cow’s milk, which is why some people can tolerate it better than cow’s milk foods.
⅓ cup cow or goat milk kefir
Juice of 1 lemon
1 tbsp. extra virgin olive oil
A matchbox-sized crumble of Roquefort
A grind of black pepper
Combine all the ingredients in a bowl and mix gently (the cheese can remain a bit crumbled for texture). Pour over any combination of salad.
Peruvian Ceviche
Phases 1 and 2
Serves 4
When I was 19 I went to Lima, Peru, for six months to learn Spanish. At first I was repulsed by the idea of eating raw fish, then I found I craved it when I got back home. In Peru there were cevicherías – informal eateries serving nothing but ceviche – all over the place, with ceviche piled high with red onions, limes, and chilies, which “cook” the raw fish. If you like sushi or sashimi and wasabi, you will probably love ceviche.
When I got back from Peru, in 1989, I couldn’t find an English cookbook that included this dish or knew of restaurants serving it. Now ceviche is mega-popular in big cities and there are English-language cookbooks with dozens of versions. This is mine; it’s Gut Makeover-friendly and makes a brilliant dinner-party dish. A nice accompaniment to this dish, if you can get them, are boiled purple potatoes, in a drizzle of olive oil at room temperature.
4 pieces of the freshest white fish you can find (about ¼ pound each), boned and skinned (I usually use cod)
Juice of 6 limes
Juice of 2 lemons
2 Scotch bonnet peppers, deseeded (or regular fresh chilies of your choice)
1 medium red onion, finely sliced into half moons
A small bunch of coriander, roughly chopped
1 tbsp. sea salt (yes, 1 tablespoon – it gives it a frozen margarita kind of twist)
To serve:
6 sweet potatoes, roasted in their skins for about 1 hour or until soft and juicy, then peeled and chopped in half
Essential equipment: a really sharp knife
Lay the pieces of fish on plastic trays/Tupperware lids, or plates and place in the freezer for 1 hour. Bring them out when they are firm, but not frozen through – this makes it easier to cut precise thin slivers. (It’s worth planning ahead to include this step – if you don’t do this and/or your knife isn’t sharp, you can end up with fluffy, rough bits of fish rather than sashimi-style slivers.)
Slice the fish into thin wafers, put them in a bowl, and stir in all the remaining ingredients. Within 15 minutes the fish should take on a white “cooked” appearance.
Serve as soon as possible (marinating the fish for too long can make it mushy). To serve, place the bowl of ceviche in the middle of a platter surrounded with the room-temperature sweet potatoes. The sweet potatoes are the perfect antidote to the sharp, spicy, citrus flavors of the fish.
Baked Salmon With Mustard and Almond Crust
Phases 1 and 2
Serves 2
This is ultra quick and easy to make, and it is also quite an economical dish if you use frozen fish. This is delicious with a big pile of mixed greens.
2 salmon fillets (fresh, or defrosted if frozen)
2 tbsp. French mustard
2 tbsp. flaked almonds
A pinch of sea salt
A drizzle of extra virgin olive oil
Heat the oven to 400°F.
Put the salmon on a baking tray. Smear mustard on top of each fillet, scatter over the flaked almonds and salt, and drizzle over a little olive oil. (This is particularly important if you are using wild Alaskan salmon, as this can be drier than other types.) The almonds should stick on to form a nice crust when cooked. Bake in the oven for 20 minutes, or until cooked through.
Quick Steak Dinner
Phases 1 or 2
Serves 1
Choose grass-fed beef – it contains more anti-inflammatory fats than feedlot types that are fed grains. To get some color on your plate, serve this with a pile of mixed roasted vegetables, or a large heap of chicory salad.
If you have a large steak or prefer to cook more than one at the same time, you can keep any leftovers in the fridge for the Thai salad (see here) the next day.
1 tbsp. extra virgin olive oil (phase 1), ghee or butter (phase 2)
½ onion, peeled and thinly sliced
1 fillet of steak
A pinch of sea salt
A grind of black pepper
Melt the oil or fat in a frying pan. Add the onion and fry gently until soft and cooked through. Add the steak and sauté gently on both sides until cooked to your liking – you can serve it either raw in the middle or cooked through, depending on your preference. Season with salt and pepper, and serve drizzled with the onion and juices from the pan.
Thai Beef Salad
Phases 1 and 2
Serves 2
The beauty of a salad like this is that it gets a wide variety of vegetables into you in one go, including anti-inflammatory herbs, and also whacks in raw garlic and onion, too, which are prebiotic and powerful gut flora boosters. The lemons help with production of stomach acid to aid digestion and absorption of nutrients. Make sure you eat this dish slowly and chew the meat really well.
1 tbsp. extra virgin olive oil
½ pound grass-fed beef steaks (such as sirloin) sprinkled with a pinch of salt
24 cherry tomatoes, halved
½ cucumber, chopped
½ red onion, peeled and sliced
1 green chili pepper, chopped, or a red one if you like it hotter
2 garlic cloves, peeled and chopped
A large handful fresh coriander leaves and stalks washed and finely chopped
1 tbsp. fish sauce
1 tsp. tamari sauce (if on phase 2)
Juice of 2 limes
A few fresh mint leaves, torn (optional)
Heat the olive oil in a frying pan over a medium heat and sauté the steak on both sides. Try not to overcook it – leave it slightly rare in the middle if you like your meat juicy.
When it is cooked to your liking, put the steak on a cutting board and, with a sharp knife, cut off the fat and slice the steak into strips.
While the steak is cooling, put the tomatoes, cucumbers, onion, chili, garlic, and herbs into a salad bowl. Add the steak and pour over the fish sauce, optional tamari, and lime juice.
Tip the pan juices over the salad. Mmm.
Lemon and Rosemary Roasted Chicken
Phases 1 and 2
Serves 4
If you have dismissed the idea of buying a whole organic free-range chicken in the past because you think it is too expensive, think again. You get a lot more for your money if you buy a whole chicken rather than breast fillets. You can get maximum value out of one bird by cooking this and the next four recipes.
1 organic free-range chicken
A bunch of fresh rosemary
½ lemon
3 tbsp. extra virgin olive oil
A pinch of sea salt
A grind of black pepper
Heat the oven to 325°F.
Remove any elastic bands or string from the chicken. (You want to be able to get the olive oil and herbs into all the crevices to maximize flavor.) Strip the rosemary leaves off the stalks with your hands, then chop them quite finely.
Put the chicken in a roasting pan, then lightly squeeze the lemon juice over and put the squeezed lemon inside the chicken’s cavity. This is key to a juicy, delicious chicken, rather than one that is rubbery and dried out.
Add the rosemary to the olive oil in a small bowl with the salt and pepper. Now pour this over the chicken and massage it into the whole body, especially the legs and wings. This stops the chicken becoming dry when cooking.
Put the chicken in the oven to roast. After 90 minutes, test the chicken to see if it is done – pierce the thigh with the tip of a sharp knife and if the juices run clear, the chicken is cooked. When the chicken is ready, remove it from the oven, and leave it to rest for 15 minutes, covered with a piece of tinfoil.
When serving the chicken, make sure each portion comes drizzled with a generous scoop of the delicious lemon/rosemary-flavored gelatinous juices, which should have formed at the bottom of the pan.
Real Chicken Stock
Phases 1 and 2
Makes at least 1 quart
1 chicken carcass and bones, meat picked off
1 quart filtered water
1 celery stalk, washed
1 carrot, washed, topped, and tailed
2 bay leaves
Put the chicken carcass and bones in a large saucepan and add enough of the water to completely cover the chicken, but do not fill the pan too much or the stock may turn out too watery. Add the celery, carrot, onion, and bay leaves.
Bring to the boil, then simmer with the lid on for at least 3–4 hours, or cook it for one hour in a pressure cooker. Leave the stock to cool, then pour it through a sieve and discard the bones and vegetables. Pour the clear stock into several containers. (I usually divide into four/five containers’ worth from the bones of one chicken.)
You can keep the stock in the fridge for 4–5 days or freeze it and defrost when needed. If you like you can pour the stock into an ice-cube tray to give you smaller portions that you can pop out, a few at a time, when needed to go into soups, stir-frys, and potato salads.
Warm Green Chicken Salad
Phases 1 and 2
Serves 1
Pouring a warm red onion and red wine vinegar dressing over this salad gives it a delightfully sweet and sour flavor.
2 huge handfuls of baby spinach leaves, washed
A huge handful of arugula leaves, washed
½ can of anchovies in olive oil, drained and chopped
Leftover chicken picked off the leg of a roast chicken
3 tbsp. extra virgin olive oil
1 red onion, peeled and chopped
2 large garlic cloves, peeled and chopped
2 tbsp. red wine vinegar
Combine the salad leaves, anchovies, and chicken in a salad bowl.
Heat the olive oil in a pan over medium heat, add the onion and garlic, and sauté until soft and slightly transparent. Take off the heat, wait a minute, then add the red wine vinegar. Pour this mixture over the salad and serve at once.
Multi-Colored Miso Chicken Stir-Fry
Phase 2
Serves 2
Unpasteurized fermented miso – the paste, not the freeze-dried stuff – is a good alternative probiotic food if you can’t tolerate kefir.
3 tbsp. extra virgin olive oil or 2 tbsp. coconut oil
1 garlic clove, peeled and chopped
¾ inch fresh ginger, peeled and chopped
1 pound bag of vegetable stir-fry mix (available in supermarkets ready-chopped, e.g., bean sprouts, broccoli, onions, cabbage, carrots)
1 zucchini, sliced (to add bulk, remember no rice!)
Handful of chopped chicken from your leftover roast chicken
1 cup fresh chicken stock (see here)
1 tbsp. fish sauce
A sprinkle of tamari sauce
1 tbsp. unpasteurized fermented miso
Heat the oil into a frying pan and stir-fry the garlic and ginger on a medium heat for about two minutes. Add all the vegetables and stir for about five minutes. Add the chicken and chicken stock and stir in.
Cook, stirring occasionally, until the broccoli is al dente (not rock hard, but not limp).
Sprinkle on the fish sauce and tamari to taste, turn heat off. Stir in the miso (you don’t want to do this on high heat, as that could kill bacteria) and serve.
Asian-Style Gut-Healing Soup
Phase 2
Serves 1
This is good because chicken stock provides collagen that can help heal the gut lining, and the salmon contains omega-3 essential fatty acids to help reduce gut inflammation (if this is an issue). The bok choy (prebiotic) and fermented miso (probiotic) work in concert to boost gut flora. The first time you try the miso, you may like to start with a quarter teaspoon, or a half, and build up the amount as your gut gets used to it.
1½ tbsp. coconut oil
1 garlic clove, peeled and chopped
½ inch fresh ginger, peeled and chopped
2 spring onions, sliced
4 oz. salmon fillet, cubed
2 bok choy, washed and sliced
1 cup fresh chicken stock (see here)
Juice of 1 lime
1 tsp. fish sauce
1 tsp. fresh fermented miso (found in the fridge of good health food stores and Asian supermarkets)
Heat the coconut oil in a frying pan or wok on medium heat and sauté the garlic, ginger, and spring onions. Add the salmon and cook through. Add the bok choy and stir until just beginning to wilt. Add the rest of the ingredients, except the miso, and simmer for a few minutes. Turn off the heat. Stir in the miso and serve.
Lebanese Lemon Chicken Livers and Pomegranate
Phases 1 and 2
Serves 2
I’m always looking for quick, easy, and palatable ways to cook organ meats and I came across this combination in a Lebanese restaurant while on vacation in Egypt. Liver contains a form of vitamin A needed to build a strong gut lining, and this form is more absorbable than the type found in the orange pigment of vegetables such as butternut squash and pumpkins. This form is also found in egg yolks and real butter. Some supermarkets now sell organic livers and also pomegranate molasses in bottles.
4 tbsp. extra virgin olive oil
1 red onion, peeled and thinly sliced in half moons
1 garlic clove, peeled and sliced
1 pound of organic chicken livers
1½ tbsp. butter (if on second part of the program)
2 tbsp. pomegranate molasses
A sprinkle of sea salt and freshly ground black pepper, to taste
1½ cups fresh watercress
Heat the oil in a pan on a medium heat and gently sauté the onions and garlic until soft. Add the livers and sauté gently – if you want them tender and slightly pink in the middle, take them off the heat soon after they change color; if you like them cooked through, leave them slightly longer, but just a couple more minutes otherwise they can become tough. If you’re on the second part of the program, stir in the butter when the livers are cooked.
Stir in the pomegranate molasses then add the lemon juice, salt, and pepper.
Pile the watercress leaves onto a plate, top with the livers, then pour the juices over and enjoy.
Pork Schnitzels
Phases 1 and 2
Serves 4
This is great with two other gut-boosting accompaniments – the German potato salad here, and a pile of steamed asparagus. If you are buying your meat from a butcher, ask him or her to pound each fillet with a meat tenderizer hammer so they are nice and thin and the meat is tender and easy to digest. If you are buying the meat in a supermarket ready packaged, you could use the steaks as they come (about ½ inch thick), or buy a meat tenderizer (about $7) and hammer them yourself to make them less chewy.
English mustard bought as a paste normally contains gluten but the powder doesn’t, so powder is OK to use in this recipe. Arrowroot is usually found in the baking section of supermarkets.
1 cup ground almonds (you can buy ready ground)
1 tsp. English mustard powder
2 tbsp. arrowroot
1 tsp. paprika
½ tsp. cayenne pepper
1 tsp. sea salt
½ cup extra virgin olive oil
4 organic pork loin steaks (total weight 1 pound)
Heat the oven to 400°F.
Combine the ground almonds, mustard powder, arrowroot, paprika, cayenne pepper, and sea salt in a shallow bowl.
Pour the olive oil into a separate shallow bowl.
Dip each piece of pork into the oil then dip it into the almond mixture to coat it on both sides. Place on a baking tray and cook the schnitzels in the oven for 20 to 25 minutes until golden brown.
Zucchini Bolognese
Phases 1 and 2
Serves 8
I’ve been cooking this for years, first in a big pot, which would hiss and steam on the stove for hours, but more recently in a pressure cooker in just half an hour. Don’t limit yourself to beef for tradition’s sake; it’s important to use a variety of proteins in the diet to expose ourselves to a range of different nutrients, so go beyond beef in your bolognese. Ground meat should be easy to digest and absorb because not only has it been minced but also because it has been well cooked.
If you make it in bulk, like this, you can freeze leftovers in small portions for another day.
4 tbsp. extra virgin olive oil
1 large onion (or 2 small ones), peeled and finely chopped
4 garlic cloves, peeled and chopped
2 celery stalks, finely chopped
2¼ pounds grass-fed beef, buffalo, or lamb, ground
1 large (28 oz.) can whole plum tomatoes (I prefer whole to chopped as I find they retain more flavor)
1 tbsp. tomato paste
4 tbsp. fresh chicken stock
Bunch of fresh rosemary, washed and leaves chopped finely
1 tsp. sea salt
Heat the oil in a saucepan (or pressure cooker if you prefer) on a medium heat and sauté the onion, garlic, and celery. Add the ground meat and cook until browned, stirring occasionally.
Add the tomatoes and tomato paste, chicken stock, rosemary, and salt and stir, gently breaking up the plum tomatoes with a wooden spoon.
Cook on a low heat with the lid slightly ajar for 3–4 hours, or cook according to the manufacturer’s instructions for 30 minutes in a pressure cooker.
1 medium zucchini per person
2 tbsp. extra virgin olive oil
A pinch of sea salt
Top and tail the zucchinis and turn them through a spiralizer. If you don’t have a spiralizer, slice the zucchinis into half moons. Put a tablespoon of olive oil in a pan, add the zucchinis, and cook for a few minutes until softened – half-moon shapes may need a little longer. Season with a pinch of sea salt.
Serve the spaghetti on individual plates, topped with a portion of bolognese sauce.
Mediterranean Roast Vegetables
Phases 1 and 2
Serves 2
This is a good way of filling a large portion of your plate with a variety of vegetables. The combination here is just a suggestion – you probably have your own favorites. If you’re short on time, you can cheat by buying bags of ready-chopped vegetables from supermarkets and roasting them drizzled with a little olive oil and sea salt.
1 large red onion, peeled and cut into eighths
1 large zucchini, trimmed, cut into three widthways, then eighths lengthways
1 yellow pepper, seeded and cut into eighths
20 cherry tomatoes
4 tbsp. olive oil
A sprinkle of sea salt and freshly ground black pepper, to taste
Heat the oven to 325°F.
Tip all the ingredients into a roasting pan and mix together well. Slow-roast in the oven for 50 minutes until softened and juicy.
Lazy Lamb Curry
Phases 1 and 2
Serves 8
A curry like this, where the meat has been really well cooked, is important for easy digestion and the absorption of important nutrients from the meat. This dish also includes a good portion of chicken stock to provide collagen for your gut lining, as well as ginger and turmeric, which are both powerful anti-inflammatories – good for an inflamed digestive system or for post-exercise aches and pains. It is a really low-work dish.
2 tbsp. extra virgin olive oil
2¼ pounds lamb fillet, cut into cubes
2 white onions, peeled and chopped
3 large garlic cloves, peeled and chopped
1–2 chilies (depending on how spicy you like your curry), finely chopped
¾ inch fresh ginger, peeled and chopped
1 tbsp. turmeric, either freshly grated or ground, plus extra to serve
1 tbsp. garam masala
1 tbsp. ground cumin
1 large (28 oz.) can chopped tomatoes
1¼ cups fresh chicken stock
2 cups baby spinach leaves, washed
1 tsp. sea salt
Sweat and stir the first nine ingredients in a saucepan for about 5 minutes on a medium heat.
Add the tomatoes and the chicken stock, then turn the heat down and put a lid on the pan. Leave to simmer for 3–4 hours. If you prefer, you could cook this in a pressure cooker in just 30 minutes.
When the meat is tender and soft, stir in the coconut milk, baby spinach, and sea salt. The spinach should just wilt into the mixture – take the pan off the heat after a couple of minutes before the spinach becomes mushy.
Serve with cauliflower rice (see box here) sprinkled with turmeric.
Lamb Shank Tagine and Five Vegetables
Phases 1 and 2
Serves 8
If you get your hands on some lamb shanks, it’s an opportunity to cook up a feast that hopefully will last several meals and provide more for the freezer. When I went to Morocco, I loved the preserved lemon and pomegranate molasses that give dishes a sweet and sour edge, so I’ve used both in this recipe. Increasingly, supermarkets are selling Moroccan ingredients such as these, and they are also widely available online.
I’ve adopted the tradition here of serving the tagine with large pieces of steamed vegetables as a chance to load up on vegetables. Cooking this should also leave you with a jug of lamb stock, which can be used as a base for cooking soups in future.
4 lamb shanks
4 garlic cloves
A generous grind of black pepper
About 3 cups water
For the sauce:
2 tbsp. extra virgin olive oil
1 small red onion, peeled and sliced into thin moons
1 garlic clove, peeled and chopped
½ inch fresh ginger, peeled and grated
1 tsp. ras el hanout (spice mixture from northern Africa; use if available)
½ tsp. sweet paprika
½ tsp. turmeric
½ tsp. cumin
½ tsp. cinnamon
1 can (14 oz.) plum tomatoes
1 tsp. honey
2 tbsp. pomegranate molasses
3 preserved lemons, pips removed and chopped
Handful of blanched whole almonds
Handful of green olives, pitted
Sea salt (optional) and freshly ground black pepper
For the vegetables, any or all of:
1 pointy cabbage, washed and sliced into four
1 turnip/rutabaga, cubed
1 butternut squash, cubed
1 zucchini, cut into quarters
Put the shanks, meaty side down, in an ovenproof casserole dish with the garlic and black pepper. Pour in enough of the water to cover the main meaty parts, and gently simmer in the oven (325°F) with the lid on, until the meat is falling off the bone. Alternatively, cook on a low heat on the stovetop for about 3 hours, or in a pressure cooker for 35 minutes.
Remove the shanks and drain the water, which should now look like a nice golden stock, into another container and leave to cool. Pick the meat off the bones, then remove and discard any large pieces of fat.
To make the sauce, heat the oil in a saucepan on a medium heat and sauté the onion and garlic until soft. Stir in the ginger and spices. Add the tomatoes, honey, molasses, and preserved lemons and heat gently, stirring occasionally so the sauce does not stick on the bottom of the pan. Now add the tender meat, stripped from the bones, to the sauce.
Before serving, add the almonds and olives, and season with a little salt, if needed, and pepper. The lemons and olives can be quite salty already, so judge if you need extra.
Meanwhile, steam the vegetables of your choice. Serve the tagine mixture on top of, or alongside, the vegetables.
Store the lamb stock in the fridge to use in soups and stir-frys. It makes a good alternative to chicken stock, and contains many similar benefits.
Meatballs In Paprika and Cayenne Tomato Sauce
Phases 1 and 2
Serves 4
Meatballs make a hearty meal and are often good heated or eaten room temperature again the next day. If you set some meatballs aside after cooking them and don’t add sauce, you can keep these as a convenient protein addition to an easy-to-eat packed lunch.
1 pound ground meat (lamb, beef, pork, or a mixture of two of these)
Handful of fresh flat-leaf parsley, chopped
1 egg
4 garlic cloves, peeled and finely chopped
1 tsp. smoked sweet paprika
For the sauce:
2 tbsp. extra virgin olive oil
4 red onions, peeled and finely chopped
1 garlic clove, peeled and finely chopped
2 tsp. cayenne pepper
1 tsp. smoked sweet paprika
1 large (28 oz.) can whole plum tomatoes
Sea salt and freshly ground black pepper
Heat the oven to 400°F.
Mix the meat, parsley, egg, garlic, and sweet paprika in a bowl. Put spoonfuls into the palm of your hand and roll them into balls or small patties.
Place them on a baking tray in rows, slightly spaced apart, and bake for about 20 minutes, until cooked through.
Meanwhile, make the sauce. Heat the olive oil in a saucepan on a medium heat and sauté the onion and garlic for 5 minutes, then add the cayenne pepper, paprika, and plum tomatoes, breaking up the tomatoes with a spoon. Season to taste and leave to simmer for 15 minutes.
When the meatballs are done, add them to the sauce and cook for 5 minutes. Serve with a large green salad with avocados and nuts.
Spanish Meatballs in Almond Sauce
Phases 1 and 2
Serves 4
We normally think about meatballs going well with tomato sauces, but almond sauces, which are popular in Spanish cooking, are delicious, and nutritious, too.
1 pound ground pork
1 small onion, finely chopped
1 garlic clove, peeled and finely chopped
½ tsp. sea salt
Freshly ground black pepper, to taste
A powdering of grated nutmeg
1 egg
1 tbsp. ground almonds
3 tbsp. extra virgin olive oil
For the almond sauce:
3 tbsp. extra virgin olive oil
2 garlic cloves, peeled and finely chopped
4 tbsp. ground almonds
1 tsp. hot smoked paprika
½ tsp. ground black pepper
½ tsp. salt
¾ cup thick, gelatinous chicken stock (add a little water if you need to make the sauce a little thinner)
Put all the meatball ingredients, except the olive oil, in a bowl and mix well. Put spoonfuls into the palm of your hand and roll into small balls.
Heat the olive oil in a frying pan on a medium heat, add the meatballs, and sauté until they are lightly browned. Keep turning them every couple of minutes so they cook through properly. Set aside and make the almond sauce.
In a clean saucepan, heat the olive oil on a medium heat. Add the garlic and fry until golden, then add the ground almonds, hot smoked paprika, salt, and pepper. Stir in the chicken stock, then add the meatballs. Leave on a low heat for about 5 minutes while the sauce thickens. Add the meatballs and serve.
Sea Bass with Salsa Verde
Phases 1 and 2
Serves 4
This is an ultra-quick meal for after work and provides good leftovers, too! The salsa verde can be used the next day to accompany other dishes or as a dressing for a salad, thinned down with more extra virgin olive oil.
The fish:
4 sea bass fillets with skin on
1 tbsp. extra virgin olive oil
A pinch of sea salt
A grind of black pepper
The sauce:
Handful of basil
Handful of parsley
4 anchovy fillets
4 tbsp. extra virgin olive oil
1 tbsp. Dijon mustard
1 garlic clove, peeled and chopped
Place all the sauce ingredients in a blender and blend in short bursts until the main ingredients are broken down, but the mixture is still rough and textured. Set aside.
Lightly season the fish. Heat the oil in a frying pan over a medium heat then place the fish skin-side down in the pan and cook over medium heat until the skin is crispy. Turn over and cook for a couple of minutes on the other side until cooked through.
Serve the fish with a drizzle of the salsa verde on top and a large portion of green salad or steamed spinach on the side.
Bunless Burger and Sweet Potato Wedges
Phases 1 and 2
Serves 4
When it comes to burgers, I’m a great believer in simplicity and quality. That’s why the meat speaks for itself here and the condiments sing the chorus. The sweet potato wedges can be dunked in raw tomato ketchup (see here).
For the burger:
1 pound grass-fed beef or buffalo, ground
½ small white onion, finely chopped
Small handful of fresh flat-leaf parsley, finely chopped
Sea salt and freshly ground black pepper, to taste
2 tbsp. extra virgin olive oil
A small slice of Roquefort cheese per burger (phase 2)
4 slices of gherkin
1 tomato, sliced
For the wedges:
4 medium-sized sweet potatoes, peeled and cut into wedges
4 tbsp. extra virgin olive oil
Pinch of cayenne pepper
Pinch of paprika
½ tsp. sea salt
Heat the oven to 400°F.
First get the potatoes in the oven. Lay the wedges on a large roasting pan and sprinkle with the oil, cayenne pepper, paprika, and salt. Stir the wedges with your hands or a spoon so they are all coated in the mixture. Cook in the oven for 40 minutes or until golden. Halfway through the cooking time, take the potatoes out and tussle them around so the other sides are exposed and can crisp up.
While the potatoes are cooking, make the burgers. Using a wooden spoon, mix the meat with the onion, parsley, egg, and salt and pepper to taste, then split the mixture into four and form into round burger shapes with your hands.
Put the olive oil in a frying pan, cooking the burgers on medium heat for about 5 minutes, then turn over and continue cooking until they are cooked through. Near the end, put a slice of Roquefort on each paddy and let it melt into the top of the burger (phase 2 only).
Serve a burger on each plate with a slice of tomato and gherkin on top and the sweet potato wedges on the side. Serve with the raw ketchup here.
Gut Makeover “Bread”
We’re aiming for the vegetables and color to take center stage in every meal, so by all means, enjoy a slice of this as it is, or toasted, topped with a smear of miso paste, or some roasted artichokes from a jar, or some beet hummus, or with roasted peppers and a squeeze of lemon and maybe a little cayenne pepper, and a large side salad, to keep your plant count up.
3 cups walnuts, roughly chopped
2 cups almonds, roughly chopped
2 cups mixed seeds (e.g., pumpkin seeds, sunflower seeds, flax seeds)
5 eggs, beaten
⅓ cup extra virgin olive oil, plus extra for oiling the loaf pan
1 tsp. sea salt
Heat the oven to 325°F.
Mix the nuts and seeds together in a bowl. In another bowl, mix together the eggs, oil, and sea salt. Stir the wet and dry ingredients together.
Decant the mixture into a loaf pan greased with olive oil and bake in the oven for 1 hour. Remove from the oven and leave to cool in the pan before cutting into slices.
When cooled, store, wrapped in a fridge, to keep it fresh longer.
How To Assemble a Gut Makeover Packed Lunch
Many of the recipes in this book provide great leftovers for lunch the next day – anything from curry with cauliflower rice to bolognese with zucchini spaghetti. Sometimes slow-cooked foods just taste even better the next day.
If you have a microwave or oven at work you could heat up the leftovers for lunch – if you are using a microwave, empty your lunch onto a ceramic plate first and heat on this to avoid microwaved plastic leaching into your food.
I prefer my packed lunches at room temperature; in cold weather, in my experience food doesn't go off between coming out of the fridge in the morning and being eaten five hours later at lunch.
All of the following lunch ideas can be eaten cold or at room temperature. See the section below on dressings, dips, and sauces if you want to jazz up these dishes.
It’s a good idea to invest in some portable, non-spill containers to transport your lunch in. Choose a box with a lid for the main ingredients below and a separate, smaller, lidded one for sauces, dips, or dressings.
Protein |
Load up with plants |
Smoked mackerel – bought ready to eat |
Ready-cooked beets and washed chicory leaves go really well with this. Add French dressing and a small, cold white potato. |
Steak |
Bag of mixed salad leaves (the more varieties the better, e.g., lamb’s lettuce, arugula, and watercress). A small, cold white potato. A drizzle of pesto, mixed with extra virgin olive oil, over the lot. |
Roast chicken leg |
A big pile of roasted vegetables.The raw ketchup goes nicely with these and the meat. |
2 boiled eggs and ½ can of tuna and some anchovies |
Chopped tomatoes, cucumbers, red onions, Kalamata olives, and a vinaigrette dressing. |
Wild Alaskan salmon |
Sliced ripe avocado, pieces of celery and radishes, and a drizzle of extra virgin olive oil and a teaspoon of balsamic vinegar. |
Pork schnitzel |
German potato salad and a large pile of steamed green asparagus. |
Bring a piece of fruit for dessert, as this automatically bumps up your plant count for the day.
Dressings, Dips, and Sauces
Some people say they don’t eat many vegetables each day because they find them boring or not particularly tasty. The way to jazz up vegetables and make sure they taste good is to have delicious dressings, dips, and sauces on hand. They often provide the bridge to vegetables and hence a better diet. Here are three simple additions that can easily be put together to liven up most lunchbox combinations.
1.Pesto. Put into a powerful blender: a large handful of fresh basil leaves, about ⅓ cup of extra virgin olive oil, the juice of a lemon, a handful of pine nuts, and a little salt. Make it quite runny so it acts as a nice cold sauce you can drizzle over cold meats, fish, and salads or roast vegetables. This keeps in the coldest part of the fridge (e.g., the bottom compartment) for up to a week.
2.Raw ketchup. Put into a powerful blender: half a jar of sun-dried tomatoes (about ⅔ cup – you can buy them in jars, packed in oil) with two tablespoons of olive oil, two large fresh tomatoes, half a red onion, a garlic clove, a handful of fresh basil, and a little sea salt. Add enough olive oil to make the sauce the consistency of tomato ketchup. This is absolutely delicious and great for the gut flora because the onions and garlic are raw rather than cooked. You can keep this is the coldest part of the fridge for about three days.
3.Simple French dressing. Stir together three parts extra virgin olive oil to one part red wine vinegar with a teaspoon of French mustard and a little sea salt and pepper. The mustard not only tastes good but binds the other ingredients together. You can keep this in a jar in the fridge (I store it high in the fridge, the least-cold part, so that it doesn’t go thick). Just give it a shake or stir before using again.
Warning: Healthy Behaviors are Infectious
I recently worked with a company of 40 staff in London on a workplace wellness program. The CEO was proud that her staff represented 15 different nationalities, the point being that talent was recruited from all over the world, and the company was a culturally rich place to work. I noticed immediately that around 80 percent of the staff were bringing in delicious leftovers, from multi-colored, high-vegetable-count curries to bolognese, and eating them at tables in a communal kitchen. These staff members were not only saving money by doing this but supporting their health, too.
So the starting point for improving this group’s eating habits was several notches above anywhere else I have been, where the status quo is often poor-quality sandwiches eaten at desks. Infectious behaviors are important when it comes to developing healthy behaviors: if you work around others who are eating low-nutrient, beige-colored food at their desks, you are more likely to do so too. If you hang around with people who cook proper evening meals and bring in leftovers the next day and move away from their desks to eat it, you are also likely to – and others may even join you!
I recommend doing your Gut Makeover with a buddy if you can find one. You can support one another, but you may also find your new eating habits and behavior start to spread to other colleagues, too.
A Weekend – Phase 1 or 2
Saturday |
Sunday |
|
Breakfast |
Spinach scrambled egg and glass of green gunge |
Wild salmon and avocado and glass of green gunge |
Ginger tea |
Ginger tea |
|
Lunch |
Fillet of smoked cooked mackerel, cooked beets, chicory leaves, and French dressing; followed by a banana |
Roast chicken with lemon and olive oil with roasted vegetables |
Dinner |
Bowl of butternut squash/sweet potato soup with roasted walnuts followed by half a mango |
Cup of gazpacho, Mario’s orange salad and a can of sardines in olive oil followed by 1 cup of berries of your choice |
Remember at each meal: Sit down, slow down, and chew properly
On Saturday, if this plan is executed properly, you should consume 7 cups of plants – 5 as vegetables and 2 as fruit. Just so you can start to see what this looks like:
1 cup spinach (in eggs)
half an orange = half a cup, ginger, etc. (in green gunge)
1 cup beets
1 cup chicory
1 banana = 1 cup
1 cup pumpkin/butternut squash
Half a cup mango
On Sunday:
1 cup avocado
1 cup of various in green gunge plus half an orange
2 cups in roast vegetables, e.g., squash, mushrooms, cauliflower
Cup of tomatoes, cucumber, onion (gazpacho)
Half an orange per person in the salad
Cup of berries
You’ll see we have covered more than a dozen different types of vegetables and fruit in this list. We are aiming to eat 20–30 different plants a week (the wider the diversity of plants, the wider the diversity of gut flora and the better it is for your health). This weekend plan means we are more than halfway there on variety for the week already.
If you have a large appetite or are of a larger build and need more nutrition, you could even ramp up the plants to another portion or two a day, e.g., you could have 2 cups of squash on Sunday, as they will melt down when baked, and you could add in another cup of pumpkin and have more soup on Saturday. But try to keep the fruit at about 2 cups to keep your sugar intake down.
Remember at each meal: Sit down, slow down, and chew properly.
A Week in Phase 2 if You Can Tolerate Dairy
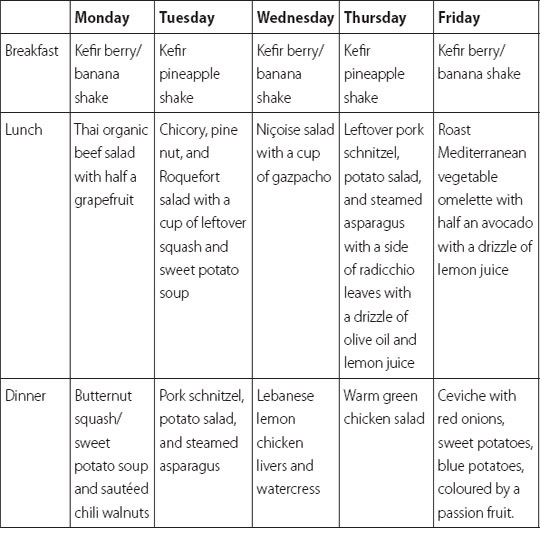
Remember at each meal: Sit down, slow down, and chew properly.
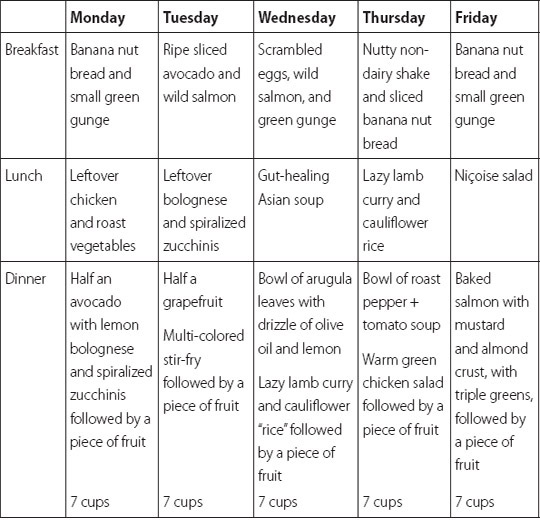
A Week in Phase 2 if You Are Non-Dairy

Remember at each meal: Sit down, slow down, and chew properly.