With the theory out of the way, we can move on to more practical matters, such as how to configure EIGRP. This chapter covers getting the protocol going, configuring summaries and summary methods, logging various state changes, and using other configuration options you might encounter. The commands and configurations discussed here are for Cisco routers (the only routers that support EIGRP). We’ll hold off on design concepts and issues in relation to these configuration options until Chapter 3.
Starting EIGRP on a Cisco router is very simple; two commands will suffice. To start EIGRP running with an AS (autonomous system) number or process ID of 100 for the 10.0.0.0/8 network, we could type
router(config)#router eigrp 100
router(config-rtr)#network 10.0.0.0
network CommandThe network command, however, is a bit deceptive and needs some further explanation. Oblivious to the keyword used in the command itself—network—the network command doesn’t determine what the router will advertise. Instead, the network command determines which interfaces EIGRP will run on. We won’t build neighbor relationships or exchange routes over an interface with an IP address that isn’t included in a network command.
How does the router determine what to advertise? The router collects the IP address and subnet masks of every interface that has an IP address included through a network command and builds a list of connected subnets that need to be advertised.
This may seem like a distinction without a difference, or just plain confusing, until you reach Cisco’s IOS version 12.0(4)T, when EIGRP begins accepting wildcard bits rather than just major networks in the network command. With the wildcard bits, you can configure EIGRP to run on a single interface or all interfaces, without any regard to the major network the interfaces are in.
To make this a little more clear, let’s use the following set of interfaces and their assigned IP addresses to work through a couple of examples:
• Ethernet 0 with an IP address of 10.1.1.1/25
• Ethernet 1 with an IP address of 10.1.1.129/25
• Ethernet 2 with an IP address of 10.2.8.65/26
• Serial 0 with an IP address of 172.16.1.1/24
• Serial 1 with an IP address of 172.16.2.1/24
Then, for each of the following configuration requirements, we could use the indicated configuration commands:
• Run EIGRP on all interfaces in the 10.0.0.0 network:
router eigrp 100
network 10.0.0.0
• Run EIGRP only on interface Ethernet 0:
router eigrp 100
network 10.1.1.1 0.0.0.0
• Run EIGRP on interfaces in the 10.1.1.0/24 range of addresses:
router eigrp 100
network 10.1.1.0 0.0.0.255
• Run EIGRP on Ethernet 0 and serial 0 only:
router eigrp 100
network 10.1.1.1 0.0.0.0
network 172.16.1.1 0.0.0.0
• Run EIGRP on all the interfaces on the router:
router eigrp 100
network 0.0.0.0 0.0.0.0
The wildcard bits don’t act like a subnet mask at all. They don’t need to be contiguous; nor do they indicate the subnet of any IP address anyplace on the router. They simply mark out a range of addresses to be included, similar to the wildcard bits used in building access lists on Cisco routers. The addition of wildcard bits in the network command provides a great deal more flexibility in configuring EIGRP, including the ability to support a supernetted IP address—a CIDR (classless interdomain routing) block on a single interface.
The number required after the router EIGRP command is the AS number and/or the process ID. EIGRP routers configured with different ASs will not form neighbor relationships or exchange routes. To exchange routes between routers in different ASs, you must redistribute between them. Although we will talk about the commands to perform redistribution between different ASs here, we wouldn’t recommend that you design a network with multiple EIGRP ASs, for reasons we discuss in Chapter 3.
Redistribution into and out of EIGRP is also straightforward to configure. The redistribution must be configured, and then the EIGRP process has to be told what metric to use when advertising the routes it has learned from the external source. The redistributed metric can be configured in two ways: as part of the redistribution command itself or in a separate default-metric command.
For instance, suppose that we wanted to redistribute routes being learned from another routing protocol running on a router. Using RIP as an example, we could configure
router eigrp 100
redistribute rip metric 10000 100 255 1 1500
The five number elements listed after the metric keyword are the bandwidth, delay, reliability, load, and maximum transmission unit (MTU). Even though only the bandwidth and the delay are used when calculating the metrics, all five are required for redistribution to work properly.
Another option is to enter the metric separately:
router eigrp 100
redistribute rip
default-metric 10000 100 255 1 1500
Here, the default-metric command is used to configure the metrics EIGRP should use for all routes redistributed into AS 100, regardless of their source.
Routes that have been redistributed into EIGRP are considered external routes. The AD (administrative distance) of these routes is different from that of internal EIGRP routes; internal EIGRP routes will always be preferred over external EIGRP routes. EIGRP externals carry a large amount of information in the route, such as the originating router ID, the originating protocol, the originating protocol’s metric, and an administrative tag.
The administrative tag is set and checked, using route maps, while in the process of redistributing a route. For example, to set an administrative tag, you could use
route-map set-tag permit 10
set tag 100
!
router eigrp 100
redistribute rip route-map set-tag
Then, to check for the existence of a given tag, you could use
route-map check-tag permit 10
match tag 10
Administrative tags will prove useful in handling externals when we discuss redistribution design (Chapter 3).
• Redistribution on Cisco routers is always done from the routing table. A route that isn’t the routing table cannot be redistributed. This is important, because changing the administrative distance on EIGRP externals can have disasterous effects on redistribution by introducing routing loops into the network.
• Metrics don’t always need to be supplied when redistributing into EIGRP. If the protocol that is being redistributed into EIGRP uses metrics that are comparable to EIGRP metrics, the metrics will be accepted from the other protocol. The only protocol that uses metrics comparable to EIGRP’s metrics is IGRP. So, to shorten the rule, if you are redistributing from EIGRP into EIGRP or from IGRP into EIGRP, you don’t need to configure redistribution metrics.
• Any directly connected route will be advertised as an internal if there is a network statement that includes the route. For example, consider the following configuration:
router eigrp 100
network 10.1.1.0 0.0.0.255
!
ip route 10.1.1.0 255.255.255.0 ethernet0
The route 10.1.1.0/24 will be advertised as an internal EIGRP route as long as the Ethernet 0 interface is up. This may seem odd when you first look at it, but it’s because the router places static routes to interfaces in the routing table as connected destinations.
EIGRP has two types of summarization: manual and automatic. The two are configured in completely different ways.
Autosummarization is an EIGRP feature that makes migration from fully classful protocols, such as RIP or IGRP, easier and that also provides a base level of summarization in your network. Autosummarization summarizes to classful boundaries each time a major network boundary is crossed, with one exception.
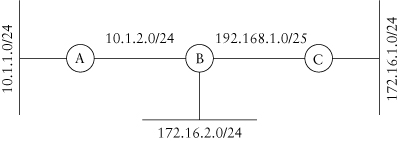
For example, in the network shown in Figure 2.1, autosummarization would take place at two points. Here, given that all these routes are internal:
• B will summarize the 10.1.1.0/24 and 10.1.2.0/24 networks to 10.0.0.0/8 toward C and the 192.168.1.0/25 network into 192.168.1.0/24 toward A.
• C will summarize the 172.16.1.0/24 network into 172.16.0.0/16 toward B.
In each of these cases, EIGRP will also create a summary route in its topology table, pointing to NULL0, and will install that route into the routing table with an administrative distance of 5. This effectively emulates classful routing behavior: Any packets destined to a subnet within a major network for which the router has no path will be dropped.
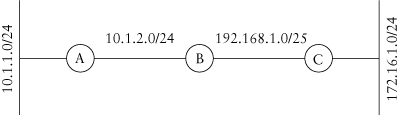
One important exception is that external routes are not autosummarized. Going back to the network in Figure 2.1, let’s assume that C has a redistribute connected statement configured rather than a network
Figure 2.1. Autosummarization in EIGRP
statement for the Ethernet interface on 172.16.1.0/24. Because it is redistributed into EIGRP, 172.16.1.0/24 will be an external, and externals are not autosummarized. C will not build a summary for the 172.16.0.0/16 major network; it will advertise the 172.16.1.0/24 external component instead.
To further confuse matters, if autosummarization is taking place for another internal component of a given network, externals within the same major network will be included within the summary. Let’s look at Figure 2.2 for an example of this. Here, let’s assume that C is redistributing 172.16.1.0/24 into EIGRP, whereas B has a network statement for its interface on the 172.16.2.0/24 network. C will not build a summary for the 172.16.0.0/16 network, but B will, and it will advertise that summary toward both A and C. To support discontiguous subnets, you will need to turn autosummarization off by configuring no auto-summary within the EIGRP routing process.
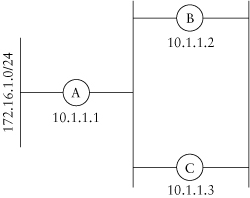
EIGRP also allows you to summarize at any point in the network to any prefix length, using the ip summary-address command on individual interfaces. This feature is extremely useful in truly hierarchical network designs with good addressing, because you can cut down on routing table sizes dramatically. Let’s use the network in Figure 2.3 to see how EIGRP can be configured to summarize routes.
Let’s assume that you would like to configure a summary so that the only route advertised from B toward C is 10.1.0.0/16. The configuration would look something like this:
interface Serial0
ip summary-address eigrp 100 10.1.0.0 255.255.0.0
!
router eigrp 100
network 10.0.0.0
This would cause B to create a route to 10.1.0.0/16 via Null0:
router#show ip route
. . . .
D 10.1.0.0/16 is a summary, 00:00:03, Null0
. . . .
Figure 2.2. Autosummarization with mixed internals and externals
We could also see this by looking at the EIGRP topology table:
router#show ip eigrp topology 10.1.0.0 255.255.0.0
IP-EIGRP topology entry for 10.1.0.0/16
State is Passive, Query origin flag is 1, 1 Successor(s), FD
is 128256
Routing Descriptor Blocks:
0.0.0.0 (Null0), from 0.0.0.0, Send flag is 0x0
Composite metric is (128256/0), Route is Internal
Vector metric:
Minimum bandwidth is 10000000 Kbit
Total delay is 5000 microseconds
Reliability is 255/255
Load is 1/255
Minimum MTU is 1514
Hop count is 0
The summary route created by EIGRP has, by default, an administrative distance of 5. If this route overlaps with another route you wanted to leave intact, you can set the administrative distance for the
Figure 2.3. Manual summarization in EIGRP

summary route using the administrative distance option at the end of the ip summary-address command.
For instance, if we wanted to advertise a default route from B toward A without overriding any default route that B may already be learning from elsewhere, we could configure
interface Serial1
ip summary-address eigrp 100 0.0.0.0 0.0.0.0 200
Unlike autosummarization, manual summaries will summarize all internal and external destinations that fall into the range of addresses configured.
Another important capability in any routing protocol is the ability to block the distribution of routes beyond a certain point. EIGRP allows you to block routes by using distribution lists at any point in the network. Two forms of access lists can be used as distibution lists: standard IP access lists and extended IP access lists. Let’s use Figure 2.4 to work through examples, using both of these types of access lists.
In Figure 2.4, we want to prevent either B or C from learning about the 172.16.1.0/24 network. The configuration required is relatively easy:
Figure 2.4. Distribution lists
hostname A
!
access-list 10 deny 172.16.0.0 0.0.255.255
access-list 10 permit any
!
router eigrp 100
network 10.1.1.1 0.0.0.0
network 172.16.1.0 0.0.0.255
distribute-list 10 out
There is also an option to block the advertisement of the route out one interface only.
hostname A
!
access-list 10 deny 172.16.0.0 0.0.255.255
access-list 10 permit any
!
interface Ethernet0
ip address 10.1.1.1 255.255.255.0
!
router eigrp 100
network 10.1.1.1 0.0.0.0
network 172.16.1.0 0.0.0.255
distribute-list 10 out ethernet0
This configuration allows the 172.16.0.0/16 network to be advertised to every other interface except Ethernet 0.
It’s also possible to use extended access lists as distribution lists within EIGRP. It’s a little puzzling when you first approach it, as an extended access list has two IP addresses and two wildcard masks: one that is normally used for the source and one that is normally used for the destination. The first network address and wildcard are used to specify the networks affected by the list. But what are the second IP address and wildcard mask used for? They are used to indicate the source of the advertisement.
For example, if we wanted B to learn about the 172.16.0.0/16 network through A but didn’t want C to learn about this network through A, we could configure
hostname C
!
access-list 150 deny ip 10.1.1.1 172.16.1.0 0.0.0.255 host
10.1.1.1
access-list 150 permit ip any any
!
router eigrp 100
network 10.1.1.0 0.0.0.255
distribute-list 150 in
Now C would accept all advertisements for networks within the 172.16.0.0 range except those from A. (Note that it will learn of this network through B across their shared Ethernet, anyway.) This type of configuration would be useful, perhaps, in enforcing a policy that traffic to a certain destination shouldn’t pass between two given routers or, perhaps, in some firewall situations.
It’s sometimes useful to be able to set the hello and hold timers on a given interface running EIGRP; in fact, there is one situation in which we would recommend that you set these timers to something other than the default values, which we will cover in Chapter 3. Configuring these timers is straightforward, with one small side note: Configuring one timer will not affect the other. Setting the hello timer to 10 seconds won’t automatically set the hold timer to 30 seconds; nor will setting the hold timer have any effect on the hello timer. These two timers must be set independently to values that make sense for the network and the design requirements at hand.
To configure these timers, use the ip hold-time and ip hello-time configuration commands. For instance, to configure the hello timer to 10 seconds and the hold timer to 30 seconds, you could use
router(config)#interface serial 0
router(config-int)#ip hello-time eigrp 100 10
router(config-int)#ip hold-time eigrp 100 30
By default, EIGRP gives you little to no information about changes in neighbor status. Because this status is so important to judging the health of a network running EIGRP and is crucial for troubleshooting a network failure after the dust has settled, we would highly recommend that all routers in your network be configured to log their neighbor changes to the console or other logging facility.
The configuration needed to log these status changes is very simple:
router eigrp 100
eigrp log-neighbor-changes
Configure this on each and every router running EIGRP in your network!
You may want to configure a network statement that includes a given interface but then not run EIGRP on that interface. This is true, for instance, when you want a given destination to be included as an internal route within the EIGRP routing domain but you don’t want EIGRP to send hellos or other packets on the interface. For instance, looking back at Figure 2.4, if we wanted A to advertise the 172.16.1.0 network but not run EIGRP on that interface, we could configure
router eigrp 100
network 172.16.1.0 0.0.0.255
passive-interface ethernet0
It’s also possible to mark all interfaces passive and then specify which interface to run EIGRP on. Again going back to Figure 2.4, we could configure all interfaces passive and then specifically instruct EIGRP to run on the serial interface:
router eigrp 100
network 0.0.0.0 0.0.0.0
passive-interface default
no passive-interface serial0
The ability to configure a neighbor as a stub has only recently been added to EIGRP. This feature is very useful when trying to reduce the query range in a network with a lot of dual-homed remotes (see Chapter 3 for more information). Configuring a stub router is simple; on the router you don’t want to receive queries (the remote router), configure
router eigrp 100
network 0.0.0.0 0.0.0.0
neighbor x.x.x.x stub <connected|summary|external>
The options at the end of the command allow you to determine what types of routes this router will advertise to the neighbor specified.
• The connected option causes only routes derived from interfaces directly connected to this interface to be advertised.
• The summary option causes only summary routes created on this router to be advertised.
• The external option causes routes redistributed into EIGRP on this router to be advertised.
These options may be used in combination; the default is to specify connected and summary.