Condiments, Toppings, and Side Dishes
At the first thought of street food, my mind is filled with visions of colorful, vibrant, and texturally interesting food. For me, an integral aspect of street food and what makes it so exciting to eat is the vast collection of condiments, toppings, and side dishes that are available for the taking.
Take the humblest of all tacos: a tortilla simply filled with a piece of grilled chicken and sprinkled with salt. It’s okay, but if we’re honest, it’s not that exciting. However, pile it up with shredded lettuce, chopped red onions, and some minced tomatoes, and I bet your mouth will start watering. Of course, if we truly wanted to elevate it to another level, we could add a dollop of crema here, a squirt of lime there, a drizzle of avocado salsa over the top, and a splash of hot sauce for good measure. Now we’re talking!
Condiments and toppings are all about raising the bar just a bit, kicking it up a good notch, and jazzing up a humble recipe so it can become a gastronomic masterpiece. Every day, there are countless options of extras that we can slather, pile, sprinkle, and drizzle on an equally dizzying array of possible street offerings. The combinations are endless.
But toppings don’t just take a dish to a new level of deliciousness; they’re also a means of self-expression. I can say with some certainty that the condiments you choose to put on your taco will look and taste completely different from those I, or anyone else for that matter, choose. Street food brings the cook out of the passerby—regardless of culinary prowess—at the precise moment when that person embellishes a dish with a condiment.
The way I see it, garnishing dishes gives customers the ability to participate in the crafting of their food and to make it taste exactly the way they like it. This is what distinguishes the street food movement from any other culinary trend. It makes eaters active participants in creating a dish that they don’t have to cook themselves.
In my opinion, one of the few requirements for a great topping—even if it’s just one ingredient—is that it packs a punch, so even if you add only a little bit of any one topping, its flavor will always be noticeable. Condiments and toppings must also complement all of the other ingredients in a particular dish, and they must also play nice with each other. On the streets, garnishes are not used just as a decorative accent; they’re there for their taste. Yes, street foods are composed of a lot of visual contrasts, but the ingredients must always work in unison to create better flavor. When it comes to toppings and condiments, the word to think of is “balance.”
To help you create exciting new dishes, I’ve come up with a select compendium of recipes that will come in handy whenever you’re putting together the street foods you’ll find in this book. And in each recipe, I’ll suggest the dishes that the toppings and condiments will best complement, so that you can customize each recipe to your palate.
Street food vendors also offer lots of side dishes. From Mexico all the way to Brazil, many platters are embellished with rice, beans, and plantains, which together make up what is widely known as the Latin trilogy. Side dishes are usually not very elaborate because they’re meant to complement each other and not to compete with the main component of a meal. On the streets of Peru, a side dish can be comprised simply of a few boiled potatoes; in Colombia, it can be a small arepa; in Bolivia, it can be a homemade roll; and in Mexico, it can be as humble an offering as a corn tortilla sprinkled with salt and rolled up or a whole serrano chile.
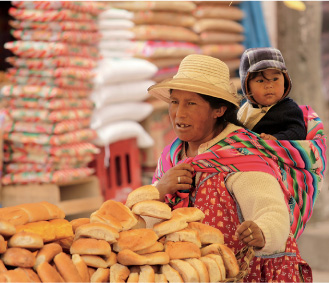
A woman with her baby in tow sells bread in Laja, La Paz, Bolivia.
Sometimes a side salad consisting of shredded lettuce, onions, and tomatoes will be added to a luncheon platter. Most often, a couple of slices of avocado or a mélange of pickled peppers and vegetables will become a garnish. French fries and fried yuca and plantain chips are always a common sight on the streets (find those recipes in my “Fried and True” chapter).
On very rare occasions, you’ll find more complex side dishes. Among them are llapingachos, the little potato cakes so beloved in Ecuador, that are served on breakfast platters alongside eggs and sausages, as well as on lunch plates featuring grilled meats.
In this chapter, you’ll find recipes for both simple and complex side dishes. Included here is one of my favorite rice dishes sold on Mexican streets. I also included two very different bean recipes that are classics on the streets of Mesoamerica. My ground beef picadillo here, chock full of vegetables, is similar to the one I used to get at my favorite pupusa cart in Guatemala City, where it was always served as a side, along with mounds of cabbage slaw. You’ll be able to use that recipe for picadillo also as a component for many of the other recipes in this book.
The condiments and toppings people choose to put on their food can say a lot about them: whether they’re daring or cautious, fun loving or tentative, or open to new possibilities or set in their ways, and whether they’re neat-freaks or whether they delight in making a mess. Me, I’m a little bit of all of these, depending on what day of the week you catch me ladling, sprinkling, and drizzling toppings on some of my favorite things. Discover more about yourself as you taste your way through the condiments, toppings, and side dishes in this chapter.
Charring vegetables prior to making sauces imparts a smoky flavor that was ubiquitous in the foods of ancient Mesoamerican civilizations and is still present in the flavor profile of indigenous foods today. This step imparts simple ingredients with a rich and exotic flavor. Most cooks have been taught not to burn garlic, but in Latin cuisines, charring it is desired for depth of flavor. Because the garlic is roasted while it’s still unpeeled, it develops a smoky and sweet flavor without turning bitter. This only goes to show that no one way is the absolute right way and that it all depends on the school of thought you follow. This is a great sauce to have on hand for incorporating into recipes like the Guatemalan tamales called chuchitos (page 253) and Grilled Beef Tacos (page 101). This sauce keeps in the refrigerator for up to four days. It also freezes well, although it will turn a bit watery, so after you thaw it, cook it over high heat for about 5 minutes. I love it on tacos and on tostadas, ladled over eggs, or stirred into soups.
Makes 3 cups
12 plum tomatoes
1 large red bell pepper
2 large garlic cloves, unpeeled
1 1/2 cups roughly chopped onion
3 guajillo, pasilla, or Nuevo Mexico dried chiles, seeded and chopped
1/4 cup vegetable oil
Salt and freshly ground black pepper, to taste
Place the tomatoes, bell pepper, and garlic on a dry skillet over high heat (or on a hot grill). Turn them until their skins are charred and blackened, about 4–5 minutes. Remove the garlic and peel it.
In a blender with a good motor, and working in batches, combine the charred vegetables, onions, and chiles. Blend until smooth.
In a large pot, heat the oil over medium-high heat. Pour the sauce into the hot oil so that it sizzles; stir vigorously until it stops splattering and continue stirring for 5 minutes. Reduce the heat and simmer the sauce for 30 minutes or until it has begun to thicken; season with salt and pepper. Allow it to cool and refrigerate until ready to use.
Jalapeños, Onions, and Carrots in Escabeche
In the summertime when my jalapeño plants get heavy with plump chiles, I pickle them in large quantities. Most markets in Mesoamerica feature chiles like these and exhibit them in huge glass containers. These chiles are to tacos what pickles are to sandwiches, and that’s why many street vendors favor serving them as a condiment. Once chilled, if properly covered, they’ll keep in the refrigerator for up to three months.
Makes 12 servings
3/4 cup extra-virgin olive oil
3 cups thinly sliced white onion
2 cups peeled and thinly sliced carrots (see note)
24 large whole jalapeños, washed and dried
3 large garlic cloves, peeled and left whole
4 sprigs fresh thyme (or 1 teaspoon dry)
2 bay leaves
5 black peppercorns
1 1/4 cups white vinegar
In a large pot, combine the oil, onions, and carrots, over medium heat. Cook, stirring, until the onions are softened but have not changed color, about 2–3 minutes. Add the jalapeños, garlic, thyme, bay leaves, and peppercorns; cook, stirring, for 2–3 minutes. Add the vinegar and bring to a boil; cover, reduce the heat, and simmer, stirring occasionally, just until the jalapeños have softened, about 15 minutes. Remove from the heat; cool to room temperature. Transfer to a clean glass container; cover and chill.
NOTE: Other vegetables, for example cauliflower florets and diced zucchini, lend themselves nicely to this treatment. Add a cup of each when you add the carrots.
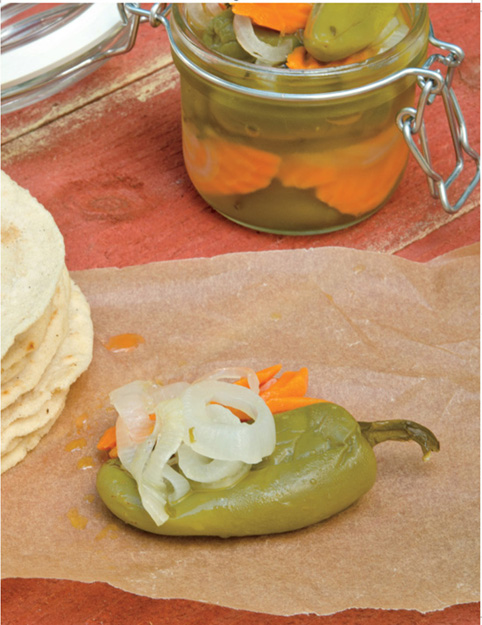
Jalapeños, Onions, and Carrots in Escabeche
All-Purpose Tomato Sauce (Salsa Casera)
With a clean and straightforward tomato flavor, this is an all-purpose sauce. Serve it over pupusas (pages 68 and 71), or use it to top Tricolor Tostadas (page 79) or Beet Salad Tostadas (page 81). Ladle it over poached eggs or grilled vegetables, or use it in place of the sauce in the chilaquiles recipes in this book. Every cook should have at least one basic tomato sauce recipe in their repertoire. This one will serve you well. It can be frozen for up to two months.
Makes 1 1/2 cups
1 (14-ounce) can whole tomatoes
2 garlic cloves, roughly chopped
1 teaspoon salt
1/4 teaspoon freshly ground black pepper
2 tablespoons vegetable oil
In a blender, combine the tomatoes, garlic, salt, pepper and oil; blend until smooth. Transfer the sauce to a medium saucepan and bring it to a boil over medium-high heat. Cover, reduce the heat, and simmer for 15 minutes. (If you prefer a thicker sauce, remove the cover and cook for a few minutes more or until it has reduced to your liking.) Keep warm and covered until ready to use or refrigerate for up to 4 days; reheat when ready to use.
In Guatemala, this is the specialty sauce used to top hot dogs, whether they’re served up in a bun (page 153) or wrapped in tortillas (page 89). It also makes a fun topping for tacos, quesadillas, and tostones (page 186). The addition of sour cream has a dual purpose. First, it keeps the avocado green and fresh for a long period of time. Vendors compete for business, and the better the food looks the more customers will want to buy it. Second, it’s cheaper to produce than if it were made with only avocados, and this allows street vendors to charge customers a bit less. Covered well, the sauce will keep in the refrigerator for up to 12 hours.
Makes 1 3/4–2 cups (enough for 8 hot dogs or 12 mixtas)
1/2 cup finely grated white onion
1 large garlic clove, minced
1/4 teaspoon oregano
2 tablespoons sour cream
Lime juice, to taste
Salt and freshly ground black pepper, to taste
Slice the avocados in half. Remove and discard the pits and remove the flesh to a small bowl. Mash together the avocados, onions, garlic, and oregano. Stir in the sour cream; season with lime juice, salt, and pepper. Cover with plastic wrap and chill until ready to use.
This salsa is tart and refreshing, and since its sour undertones lend a sharp contrast to the creaminess of cheese, I often use it to top quesadillas. Tomatillos resemble miniature green tomatoes but are members of the gooseberry family and, as such, are wrapped in a papery husk. I rub off the husks under cold running water, and then give the tomatillos a gentle rub with my fingers to remove the sticky residue. There is no need to peel tomatillos because their skins are thin and edible. Try to get the smallest possible tomatillos since they begin to turn bitter if allowed to grow too much. This raw salsa is also delicious as a condiment for tacos, huaraches, sopes, and tostadas. It’ll keep in the refrigerator for up to three days.
Makes approximately 1 1/2 cups
10 medium tomatillos, husks removed, and rinsed and quartered
3 large garlic cloves, roughly chopped
2 jalapeño peppers, roughly chopped (do not seed)
1 cup packed cilantro (leaves and tender stems), chopped
1/4 cup cold water
Salt and freshly ground black pepper, to taste
In a blender, combine the tomatillos, garlic, jalapeños, cilantro, and water; blend until smooth (if needed to get the motor running, add a bit more water, one tablespoon at a time). Transfer the sauce to a bowl and season with salt and pepper. Chill until ready to serve.
Avocado-Tomatillo Taco Truck Sauce
This is perhaps the most popular avocado sauce used by taco truck vendors in Mexico. A little sour and very creamy, it’s used to top everything from totopos (fried tortilla chips) to tacos and chilaquiles. The acidity of the tomatillos keeps the avocado fresh and vibrantly green for up to three days, if properly refrigerated. You can put it in a squirt bottle or spoon it directly onto your food. This recipe has a spicy kick, so if you desire a milder flavor, seed and devein the chiles. My daughter Nikki, who doesn’t care much for avocados, eats this sauce by the spoonful. Try saying the name of this sauce quickly and you’ll see how catchy it is.
Makes 2 1/2 cups
4–5 medium tomatillos, husks removed, rinsed and chopped (you should have 1 cup)
2 serrano chiles, stems removed (seeded and deveined if less heat is desired)
1 cup packed cilantro (leaves and tender stems), chopped
1/4 cup minced white onion
1/4 cup water
1 Hass avocado
Lime juice, to taste
Salt and freshly ground black pepper, to taste
In a blender, combine the tomatillos, chiles, cilantro, onions, and water; blend until smooth. Slice the avocado in half and remove and discard the pit. Scoop out the flesh of the avocado and add it to the blender; blend until smooth. Transfer the sauce to a large bowl; season with lime juice, salt, and pepper.
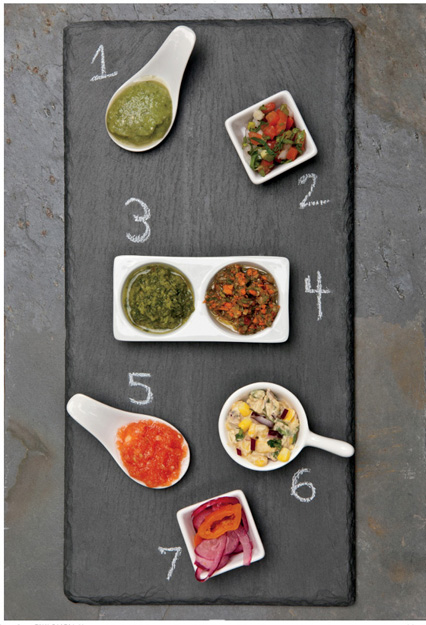
Assorted condiments: (1) Avocado-Tomatillo Taco Truck Sauce, (2) Colombian Hot Sauce (Ají Colombiano) (page 279), (3) Classic Chimichurri (page 183), (4) Francisco’s Chimichurri (page 272), (5) Red Garlic Sauce (page 274), (6) Corn and Avocado Salsa (page 277), (7) Peruvian Spicy Onion Salsa (Salsa Criolla) (page 275)
There are many versions of this Argentinean condiment, but this one developed by my friend Francisco Fumagalli is one of the best I’ve ever had. Although most recipes for chimichurri call for parsley as the main component, here it shares center stage with the other ingredients. This chimichurri is speckled with carrots for a hint of sweetness, garlic for a surge of pungency, pepper flakes for a whisper of heat, and vinegar for a kiss of acidity. Francisco, who was born and raised in Argentina, descends from a line of restaurant owners and is a magnificent cook. This is a slight adaptation of his recipe, which was handed down to him by his family. He recommends using a food processor, but the ingredients can also be minced finely with a sharp knife. Chimichurri is the traditional accoutrement for asados (grilled meats), and it makes a great topping for sausage in buns called choripanes (page 154). Best of all, it tastes even better a day or two after it’s made, and keeps for up to one week in the refrigerator; before serving, bring it to room temperature. For another rendition of this herb sauce, see the recipe for Yuca Fries with Classic Chimichurri (page 183).
Makes 2 cups
1 cup firmly packed flat-leaf or Italian parsley (leaves and tender stems)
1 cup thinly sliced celery
1 cup minced carrots
3–4 large garlic cloves, minced
1/4 cup apple cider vinegar
1 teaspoon salt, or to taste
1/2 teaspoon red pepper flakes
3/4 cup canola or grape seed oil
In the bowl of a food processor fitted with a metal blade, combine the parsley, celery, carrots, and garlic. Pulse for 10–12 one-second intervals (stopping to scrape the sides of the bowl as needed) or until the mixture is very finely chopped (being careful not to turn it into a paste). Transfer to a bowl and stir in the vinegar, salt, and red pepper flakes. Whisk in the oil; cover and chill until ready to serve.
Ecuadorian Peanut Sauce (Salsa de Maní)
This peanut sauce is used to dress several kinds of the street food in Ecuador, particularly those made with yuca or potatoes, including the potato pancakes called llapingachos (page 282). It’s also used as an all-purpose sauce and is often spooned over grilled kabobs. Try it with Chicken on a Stick (page 208). This sauce is meant to be served warm and is easily reheated on the stove or in the microwave.
Makes 1 1/4 cups
2 tablespoons extra-virgin olive oil
1/2 cup minced white onion
1 teaspoon annatto (achiote) powder
1/2 teaspoon ground cumin
1/2 cup unsalted smooth peanut butter
3/4 cup whole milk
Salt, to taste
In a small saucepan, heat the oil over medium heat; add the onions, annatto, and cumin and cook until the onions are soft, about 1–2 minutes. In a small bowl, whisk together the peanut butter and the milk until smooth and add it to the onion mixture. Reduce the heat to medium-low and cook for 2–3 minutes or until heated through; season with salt and serve.
NOTE: I like my sauce on the thick side, but if you prefer it thinner, add a bit more milk at the end of the recipe and warm it through.
Peruvians use this ultra garlicky sauce liberally on everything from French fries to their famous rotisserie chicken. In Peru and Panama, it’s often served over boiled meat stews called sancochos (see page 124). This sauce is traditionally prepared in an oval-shaped stone mortar and pestle called a batán, but it turns out beautifully in a food processor. It’s vital that you peel the tomatoes before processing the sauce (see note) or the texture will be ruined. The sauce is also delicious spooned over poached chicken, fried eggs, or baked potatoes. It even makes a great salsa to eat with tortilla chips or fried plantain chips (pages 182 and 186). Rocotos are large, spicy red peppers with black seeds and are native to Peru. You can find them frozen whole or preserved in jars or cans in most Latin stores. If you can’t find them, substitute two hot chiles of your choice. It won’t be the same without the rocotos, but it will still be delicious.
Makes 1 1/2 cups
5 large plum tomatoes, peeled and roughly chopped (see note)
2 rocoto peppers, seeded and roughly chopped
5 large garlic cloves, minced
1/2 teaspoon salt, or to taste
Place the tomatoes, peppers, garlic, and salt in the bowl of a food processor; process until smooth.
NOTE: To peel tomatoes, bring 2 cups of water to a rolling boil in a small pot. Fill a medium bowl with iced water. Cut a small X with a sharp knife in the bottom of each tomato. Working in batches, place the tomatoes in the boiling water for 1 minute; immediately remove them with a slotted spoon and place them in the iced water for 1 minute. Their skin should peel off easily.
Peruvian Spicy Onion Salsa (Salsa Criolla)
The month our daughter Alessandra was born was one of the hottest on record, and I remember having very little time to cook and even less energy. Back then, I made many ceviches because they took no time to put together. While the baby napped, Luis and I would sit and enjoy a refreshing and healthy lunch. We ate ceviches so often that the only other person we saw more than our child was our fishmonger. Here, pungent onions are pickled and spiced up in this ubiquitous accoutrement on Peruvian streets. It’s used to flavor my Fried Squid Ceviche (page 52), but it also goes on top of sandwiches like the butifarras on page 140 and Peruvian Tamales (page 249). It’s also great spooned over poached or grilled seafood or on steaks. Beware! It’s highly addictive.
Serves 4–6
3 cups very thinly sliced red onion (sliced on the bias)
1–2 ají amarillo peppers, seeded, deveined, and very thinly sliced
1/3 cup fresh lime juice
1 teaspoon red wine vinegar
Salt and freshly ground black pepper, to taste
2 tablespoons extra-virgin olive oil
1/4 cup chopped cilantro (leaves and tender stems) (optional)
Place the onions in a medium bowl, cover with cold water, and let them soak for 20 minutes. Drain the onions and return them to the bowl; stir in the ají, lime juice, and vinegar; season with salt and pepper. Stir in the olive oil and let it sit at room temperature for at least 10 minutes (up to 3 hours) before serving. Store the salsa in the refrigerator for up to 5 days. Stir in the cilantro (if using) just before serving.
Similar to a thousand island dressing but without the lumps, this sweet and savory sauce became a popular condiment at many golf clubs in Latin America in the mid-1900s. Later on, it trickled onto the streets, where it’s now used as a topping for items like Costa Rican Tacos Ticos (page 93) and Sausage and French Fry Toss (page 179). Latin Americans put it on hot dogs, French fries, and simple salads called ensaladas mixtas. I use it in my recipe for Shrimp Cocktail (page 56). Street vendors often provide this sauce in squirt bottles so that customers can add it liberally to their food. Since I was a little girl, I’ve found it creamy and addictive. Kept well covered, this sauce will last for up to one week in your refrigerator.
Makes 1 1/3 cups
3/4 cup mayonnaise
1/2 cup ketchup
2 teaspoons Worcestershire sauce
2 teaspoons yellow mustard
Salt and freshly ground black pepper, to taste
In a small bowl, whisk together the mayonnaise, ketchup, Worcestershire sauce, and mustard; season liberally with salt and pepper. Cover and chill until ready to use.
Street carts in Peru often feature this mayonnaise in squirt bottles to drizzle over French fries (page 175), salchipapas (page 179), and the beef kabobs known as anticuchos (page 206). It also happens to make an unorthodox but delicious addition to sandwiches like my “Goat” Sandwich (page 139). If properly covered, it will keep in your refrigerator for up to one week. Ají panca is a long, reddish-brown pepper from Peru. It can be found in paste form in most Latin stores; if you can’t find it, use Sriracha sauce instead.
Makes 1 1/2 cups
1/2 cup plain yogurt
1 teaspoon Dijon mustard
1/2 teaspoon ají panca paste or Sriracha sauce, or to taste
1/2 teaspoon Worcestershire sauce
1/2 teaspoon minced garlic
Fresh lime juice, to taste
Salt and freshly ground black pepper, to taste
In a medium bowl, combine the mayonnaise, yogurt, mustard, ají, Worcestershire sauce and garlic; season with lime juice, salt, and pepper; chill until ready to serve.
This is a very pretty salsa filled with colors that remind me of the paper wreaths that adorned Guatemalan streets during the fairs I would go to as a child. Buttery avocado meets crispy onion, and the sweetness of the corn plays off the spicy hint of smoky chiles. This is a great salsa to top tacos, empanadas, and tortas. Try it with Shrimp and Masa Empanadas (page 230), as a topping for sopes, or with chips.
Makes about 3 1/2 cups
3 Hass avocados
3/4 cup sour cream
1/2 cup minced red onion
1/2 cup fresh (or frozen and thawed) corn kernels
1 chipotle chile in adobo, puréed to a paste
1 teaspoon adobo sauce (from the canned chipotles)
1/2 cup minced cilantro (leaves and tender stems)
Fresh lime juice, to taste
Salt and freshly ground black pepper, to taste
Slice the avocados in half, remove and discard the pits, and scoop out the flesh into a medium bowl; mash the avocados. Add the sour cream, onions, corn, chipotle, adobo sauce, and cilantro; season with lime juice, salt, and pepper.
Toppings are meant to be fun, vibrant, and delicious—just like this sauce. A little bit of this mild and subtly sweet condiment is enough to kick any recipe up a notch. Like many Latin American kids, I started eating chiles almost as soon as I could tie my own shoelaces. However, I wasn’t exposed to the variety of dried chiles with chocolate-and raisinlike nuances until I was in my teens and had become interested in cooking. I loved to grind them until they were a fine powder that I could sprinkle on everything. Use this sauce to top huaraches, tacos, sopes, and tostadas. I’ll even drizzle it on grilled chicken breasts or fish and use it in place of mayonnaise for many of my sandwiches. This sauce is so delicious that you’ll want to eat it with a spoon.
Makes about 2 1/2 cups
2 ancho chiles
2 guajillo chiles
2 cups chicken broth, hot
2 teaspoons extra-virgin olive oil
1 cup minced onion
2 large garlic cloves, roughly chopped
1 teaspoon dried thyme
1/2 teaspoon ground cumin
1/2 teaspoon ground coriander
1/2 teaspoon ground cinnamon
2 tablespoons brown sugar
1/4 cup honey
1/2 cup whipping cream
1 teaspoon salt, or to taste
1/4 teaspoon freshly ground black pepper, or to taste
Place the chiles in a large bowl and cover with the chicken broth. Let them stand for 10 minutes to reconstitute (use a plate to keep them submerged). Drain the chiles, reserving the broth; seed and devein the chiles and set aside.
In a large skillet with high sides, heat the olive oil over medium-high heat; add the onions and cook until softened, about 2–3 minutes; add the garlic, thyme, cumin, coriander, and cinnamon and cook until fragrant, about 30 seconds. Add the chiles along with the broth and bring the liquid to a boil over high heat; reduce the heat, cover, and simmer for 10 minutes. Cool slightly and transfer to a blender; add the brown sugar, honey, whipping cream, salt and pepper and blend until smooth. Keep warm until ready to use or cover and refrigerate for up to 2 days. Freeze for up to 2 months.
Colombian Hot Sauce (Ají Colombiano)
This is the typical hot sauce served all over Colombia, where it’s known as ají. At first sight, it may remind you of Mexican pico de gallo, but the addition of green onions and a hefty splash of vinegar give it a completely different flavor. Some cooks like their ají chunky; others like it smooth. I like mine somewhere in the middle, so I make sure to chop everything very finely. Ají is served on everything from arepitas to empanadas, like my Beef and Potato Empanadas (page 228). It’s also great with stews, like my Potato, Chicken, and Corn Stew (page 126); and kabobs, like my Beef Kabobs in Beer Marinade (page 203) and Chicken on a Stick (page 208). I make it often and put it on everything I can. It keeps well in the refrigerator for up to one week. Although I prefer not to, some cooks add chopped hard-boiled eggs to this sauce. If you add them, make sure to eat the sauce within a day.
Makes 2 cups
1 1/2 cups seeded and minced plum tomatoes
1/3 cup minced white onion
1/3 cup thinly sliced green onions
1/4 cup minced flat-leaf or Italian parsley (leaves and tender stems)
1/4 cup minced cilantro (leaves and tender stems)
1/4 cup minced serrano chiles or jalapeños (with seeds), or to taste
1/4 cup white wine vinegar
1/4 cup fresh lime juice
Salt, to taste
In a nonreactive bowl, combine the tomatoes, white and green onions, parsley, cilantro, chiles, vinegar, and lime juice; season with salt. Let it sit at room temperature for 1 hour in order for the flavors to blend. Refrigerate until ready to serve.
Dense, sweet, and savory rolls like these are sold street-side in most Colombian cities. They’re popular at breakfast time when they’re enjoyed with coffee or hot chocolate. The name pandebono is said to have originated many years ago when an Italian baker visiting the Valle del Cauca discovered bread so delicious he called it “pan del bono” or “good bread.” You’ll need two different kinds of flours to make the dough, a yuca starch called almidón de yuca, yuca harina, or tapioca starch and the same precooked cornmeal used to make arepas. The two flours combined produce a chewy roll. Pandebono dough is sometimes shaped into wreaths, but it’s easier to slather sweet butter on rolls. I like to serve them with soups or stews, like the ones in this book.
Makes 12 rolls
1 cup yuca flour
1 cup harina pan or masarepa (precooked cornmeal)
2 tablespoons sugar
1/2 teaspoon salt
3 cups queso fresco or queso blanco
2 large eggs, well beaten
1/2 cup milk
Preheat the oven to 425°F and line a baking sheet with parchment paper. In the bowl of a food processor fitted with a metal blade, combine the yuca flour, harina pan, sugar, and salt; pulse for 10 seconds, just to combine. Add the cheese, eggs, and milk and pulse until the dough comes together (because brands of precooked cornmeal may vary slightly, you may have to add a bit more milk to make this hold together. In this case, add it one tablespoon at a time).
Turn the dough out onto a clean surface and knead it just until it forms a ball, about 30 seconds. Transfer the dough to a bowl, cover it with a towel, and let it rest for 10 minutes.
Turn the dough onto a lightly floured surface and form it into a 12×1 1/2-inch log. Slice the log into 12 pieces (each roughly 1 inch thick). Roll each piece of dough into a ball (you may have to press it together a bit to help the dough hold its shape). Place the balls 3 inches apart on the prepared baking sheet and flatten them slightly with your hand (they’ll still be round but the tops will be tapered a bit). Bake them for approximately 20–25 minutes or until slightly golden and cooked through (the bottoms should be crispy and slightly browned). Serve immediately.
NOTE: You can make the dough and shape the rolls up to 2 hours before they’re baked. After placing them on the prepared baking sheets, cover lightly with plastic wrap, and refrigerate; add about 5–8 minutes to the baking time. Serve immediately.
Yucatán Pickled Onions (Cebollas Encurtidas Yucatecas)
This is the refreshing accoutrement of choice for spicy chicken, called tinga (page 76), and cochinita pibil, a slow-roasted pork dish. The sour intonations of the onions counteract the heat in any dish. This is a very pretty condiment because the onions become a light lilac color as they macerate. When refrigerated, it keeps for up to a week, but since you can use it as a topping for sopes, tacos, or tostadas or spicy grilled chicken, shrimp, or scallops, you’ll find that it won’t last that long.
Makes 2 cups
3 cups very thinly sliced red onion
1 large garlic clove, peeled and left whole
1/2 cup fresh orange juice
1/3 cup apple cider vinegar
1/4 cup fresh lemon juice
1 teaspoon salt
2 sprigs fresh thyme (or 1/2 teaspoon dried)
1/4 teaspoon allspice berries
1/4 teaspoon black peppercorns
Fill a large bowl with iced water. Place the onions in a bowl and cover them with boiling water. Let them sit for 1 minute; drain. Plunge them into the iced water; let them sit for 3 minutes; drain. In a medium bowl, combine the onions, garlic, orange juice, vinegar, lemon juice, salt, thyme, allspice, and peppercorns; cover well and chill for at least 8 hours or overnight.
Ecuadorian Potato, Annatto, and Cheese Cakes (Llapingachos) with Onion Relish
Molten cheese oozes from the centers of these potato cakes like hot lava. Sold at marketplaces and from roadside eateries in Ecuador, they’re traditionally served with an onion relish and a peanut sauce. The result is a striking collision of contrasts—soft and crisp and savory, sweet, and sour—that land deliciously on the palate. Llapingachos are often part of a main course platter that includes avocados, tomatoes, fried eggs, and sausages. They pair very nicely with grilled meats and with my Beef Skewers Bathed in Orange and Annatto (page 202). These delicate cakes must be sautéed in very little oil; if you use too much, they’ll fall apart. Chilling them before cooking helps them hold their shape.
Makes 10
2 tablespoons plus 2 teaspoons vegetable oil, divided
1/2 cup minced white onion
1 teaspoon annatto (achiote) powder
2 pounds russet potatoes, boiled until tender, peeled and mashed until smooth
1 teaspoon salt, or more to taste
4 ounces grated Muenster cheese
2 cups very thinly sliced red onion
4 plum tomatoes, seeded and cut lengthwise into thin strips (about 1 cup)
2 tablespoons minced cilantro (leaves and tender stems)
Fresh lemon juice, to taste
2 Hass avocados
Ecuadorian Peanut Sauce (page 273)
Line a baking sheet with parchment paper. In a small skillet, heat 2 table spoons of the oil over medium heat; add the onions and the annatto powder and cook, stirring, until the onions are softened, about 3 minutes; set aside to cool.
In a large bowl, combine the onions, salt, and potatoes and knead until the potatoes have a uniform, golden color. Divide the mixture into 10 equal pieces (a bit over 1/3 cup each); roll each into a ball. Working with one ball at a time, make an indentation in the center of the ball with your thumb and place about 1 tablespoon of the cheese in it; roll the potatoes back into a ball and flatten it into a patty roughly 2 1/2 inches wide by 1/2 inch tall, making sure the cheese is secure in the middle (or it will seep and burn as the potatoes cook); place it on the prepared baking sheet. Repeat with the remaining ingredients and chill, uncovered in the refrigerator for at least 1 hour (but no more than 2).
In the meantime, make the onion relish: in a medium bowl, combine the red onion, tomatoes, cilantro, and lemon juice; season with salt, to taste and chill until ready to use.
Heat a nonstick pan over medium to medium-high heat and brush it very lightly with some of the remaining oil. Working in batches, add the patties and cook on each side for 2–3 minutes or until golden (flip them carefully; they can break easily); transfer to a serving platter. Brush the pan with another light coating of oil and cook the rest of the patties, as directed above.
Slice the avocados in half and remove and discard the pits. Scoop out the flesh, chop it up, and stir it into the relish. Serve immediately or keep them warm in a 250°F oven for up to 30 minutes before serving. Top with the relish. Serve with the peanut sauce on the side.
Refried Black Beans (Frijoles Negros y Volteados)
While at college in Massachusetts, I introduced my friends to this Central American version of refried beans, in which black bean purée is first strained to remove the skins of the beans, and then cooked until thickened. I would spread the beans on baguette slices with a little bit of cream cheese, and they’d gobble them up. Unlike the Traditional Mexican Refried Beans on page 286, these are always lump free. They’re used to stuff pupusas, baleadas, quesadillas, and the Plantain and Bean Fritters on page 178. In Guatemala, volteados means “tossed,” and it refers to the fact that if allowed to thicken even further, the beans become a paste that can be tossed easily into a pan to form a loaf, called a maleta. I’ve provide instructions on how to make the loaf below. You can always use canned refried beans for any of the recipes that call for beans in this book, but these are truly worth the time and effort that goes into making them.
Makes 3 1/2 cups (serves 6–8)
1 pound black beans, soaked for at least 8 hours or overnight (or use the quick-soaking method on page 22)
3 large garlic cloves, peeled and left whole
1 medium white onion, peeled and halved
1 bay leaf
2 teaspoons salt, or to taste
1/4 cup lard or vegetable oil (plus 1 tablespoon if making frijoles volteados)
Drain the presoaked beans and combine them with the garlic, onion, and bay leaf in a large pot. Add cold water to cover the beans by 2 inches (about 8 cups—but the size of your pot will dictate how much water you need). Bring the beans to a boil over medium-high heat; cover, reduce the heat to low, and simmer very slowly for 1–1 1/2 hours or until the beans are fork-tender, adding more water as needed. Add the salt and allow the beans to cool slightly, about 20 minutes; drain the beans, reserve the cooking liquid, and discard the bay leaf.
Working in batches, purée the beans, garlic, and onion in a blender until smooth, adding as much of the reserved cooking liquid as needed to help the motor run (the texture will be like that of a thick soup or very loose mashed potatoes). Strain the beans through a sieve into a bowl pressing them down, and discard the solids.
Heat the 1/4 cup of lard in a large nonstick pan over medium heat; add the puréed bean mixture all at once(careful, it will spatter) and cook, stirring, until they come to a boil, about 3–4 minutes. Reduce the heat and simmer (the beans should bubble gently), stirring occasionally, until they thicken into a paste with the consistency of thick mashed potatoes (anywhere from 30 to 40 minutes, depending on how much liquid you added during the blending process). Cool, cover, and chill until you’re ready to use (they’ll keep for up to 3 days in the refrigerator). Reheat them before using.
To make frijoles volteados: Place the remaining tablespoon of the lard into a large nonstick pan (see note) set over medium heat. Add the refried beans and cook, stirring, until they are very thick (like playdough) and slide easily from the bottom of the pan (anywhere from 5 to 10 minutes). Hold the pan by the handle with both hands. Flip the beans over a few times in the frying pan—much in the same manner that you would flip a pancake without a spatula—until the beans form an oblong loaf (you can also divide the beans into portions and flip them into smaller mounds). Slide the bean loaf onto a plate and serve. If you’re not comfortable flipping the beans in the pan, press the beans together with a rubber spatula against the side of the pan until you form an oblong loaf.
NOTE: Don’t attempt to make volteados in other than a nonstick pan or they’ll stick and burn.
Traditional Mexican Refried Beans
These are classic refried beans: simple, comforting, absolutely delicious, and the accoutrement of choice for many Mexican street foods. I like mine on the thicker side, in a spreadable consistency that lends itself to be slathered with crema on steaming-hot tortillas. If desired, thin them by adding a bit more liquid. If you’ve only ever had canned refried beans or those served in chain restaurants, you’ll be pleasantly surprised by the intense flavor and deep succulence that the real version has to offer. Beans can be bland if not seasoned properly, so be sure to season the beans with a generous amount of salt while they’re frying. Use these beans to top tostadas and sopes and to fill quesadillas. I love to top these beans with cheese, crema, cilantro, and Jalapeños, Onions, and Carrots in Escabeche (page 266) and eat them with tortilla chips.
Serves 8
1 pound pinto beans, picked over for stones or other debris
1/4 large white onion plus 1/2 cup minced onion
1 bay leaf
1 large garlic clove, peeled and left whole
1/4 cup lard or vegetable oil
1 1/2 teaspoons salt, or to taste
Place the beans in a large bowl; cover with cold water. Soak them for 8 hours or overnight (or use the quick-soaking method on page 22). Drain the beans and place them in a large Dutch oven. Add the onion quarter, bay leaf, and garlic; cover with cold water by 2 1/2 inches (about 8 cups, but it will depend on the size of your pot). Bring the beans to a boil over medium-high heat; cover, reduce the heat, and simmer for 1–1 1/2 hours or until beans are tender (adding more water if needed). Remove from the heat; reserve 2 cups of the cooking liquid and drain the beans (see note). Discard the bay leaf and reserve the onions and garlic.
In a large skillet, heat the lard over medium-high heat. Add the minced onions and cook until they begin to turn a golden color, about 2 minutes. Add the beans, the reserved onions and garlic, and the salt; using a potato masher, mash the beans to a consistency of lumpy mashed potatoes, adding the reserved liquid a little bit at a time as needed to help you mash them. Heat well and serve.
NOTE: If you’re making the beans ahead of time, reserve an additional cup of cooking liquid to thin them out when you reheat them (or add water).
Picadillo means “minced mixture,” and versions of this ground beef mélange are found all over Latin America. This one is similar to one I learned to make as a newlywed, and it features sweet and spicy undertones. It’s what I use to fill my Beef Taquitos (page 97), but you can also use it to stuff Chiles Rellenos (page 165) and Stuffed Potato Balls (page 168), or to top sopes (page 65). The ingredient list is long but the recipe is easy. Resist the urge to drain the fat from the ground beef here; it solidifies when chilled and when used as a filling for tortillas or chiles will prevent the filling from falling apart during frying. (Also, if you drain the fat, you’ll drain off the spices with it.) Be sure to prepare the ground beef at least two hours before you plan to use it. It can be frozen for up to two months. Thaw it in the refrigerator overnight and reheat it on the stove or in the microwave on high until it’s hot. Leftovers are delicious over steamed rice or simply wrapped in warm tortillas.
Makes 3 cups
2 tablespoons extra-virgin olive oil
2 tablespoons unsalted butter
1 pound ground chuck
1 cup minced yellow onion
1 cup minced cabbage
1/2 cup minced carrot
1/2 cup minced green beans
1/2 cup minced red bell pepper
2 bay leaves
2 teaspoons dried thyme
1 1/2 teaspoons salt
1/4 teaspoon freshly ground black pepper
1/2 cup minced plum tomatoes
1/4 cup ketchup
1/4 cup tomato paste
In a large skillet, heat the oil and butter over medium-high heat; add the beef, onions, cabbage, carrot, green beans, and bell pepper; cook for 2 minutes, stirring to combine and breaking down the beef with a spoon. Add the bay leaves, thyme, salt, and pepper; cook until the beef is no longer pink, about 2–3 minutes. Add the tomatoes, ketchup, and tomato paste; stir well and bring to a boil; cover, reduce the heat to a simmer, and cook for 15–20 minutes or until all of the vegetables are tender. Uncover and cook until the liquid has reduced and thickened, about 2–3 minutes (the mixture will appear almost dry). Discard the bay leaves. Serve hot if you’re eating it immediately; or if you’re using it as part of another recipe, chill it for at least 2 hours or up to overnight.
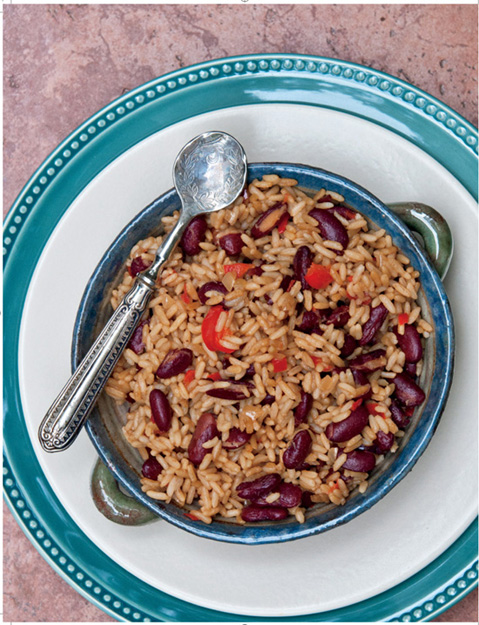
Central American Red Beans and Rice (Gallo Pinto)
Central American Red Beans and Rice (Gallo Pinto)
Gallo pinto, a popular side dish sold on Nicaraguan and Costa Rican streets, means “red rooster.” Tey, my Nicaraguan sister-in-law, taught me to sauté the beans until they begin to pop and get slightly toasted, giving the dish a nutty flavor. Worcestershire sauce is a very popular ingredient in Latin America, but it’s so difficult to pronounce that it’s simply called salsa inglesa, or English sauce. Here, it’s used to provide a tangy sweetness, a piquant touch, and a burst of color. This is a great dish to make with leftover white rice from previous meals.
Serves 6–8
2 1/2 tablespoons vegetable oil
1/2 cup minced white onion
1/2 cup minced red bell pepper
2 large garlic cloves, minced
3 cups cooked dark red kidney beans (or two 16-ounce cans, drained)
3 1/2 cups cooked white rice
1/3 cup plus 2 tablespoons Worcestershire Sauce
1/2 cup chicken broth or water
Salt and freshly ground black pepper, to taste
In a large skillet with high sides, heat the oil over medium-high heat; add the onions and bell peppers and sauté until soft, about 2–3 minutes. Stir in the garlic and cook until fragrant, about 30 seconds. Reduce the heat to medium and add the beans, tossing them as they cook for 5–6 minutes—the beans will split open. Add the rice, Worcestershire sauce, and broth; stir to coat the rice well until it’s uniformly colored (you shouldn’t have any white grains remaining). Season with salt and pepper; reduce the heat and cook for 2–3 minutes. Serve hot.
Mexican Rice (Sopa Seca de Arroz)
This is perhaps the most recognizable Latin American side dish in the United States, and it’s a favorite way to make rice throughout Mexico. Truth be told, it’s name in Spanish, literally translates into “dry soup” and it’s so given because it’s flavored with exactly the same ingredients as rice soup would be, but here, the grains are allowed to absorb all of the liquid. This is a very easy recipe to follow and one of my favorites to pair with most of the food in this book. Recipes for pilaf-style rice dishes were brought over by the Spaniards, who learned the technique from the Persians. Today, rice pilafs abound in Latin America. To make a pilaf, the rice is always sautéed in some kind of fat before any liquid is added. The end result is a tasty, fluffy rice. I use lard, but feel free to use butter or vegetable oil if you prefer. Here the rice should turn a golden color, which adds a toasty flavor to the finished dish. But watch it carefully so it doesn’t burn during this stage. The liquid used here is a mixture of broth and spicy sofrito that adds flavor and spiciness to the finished dish. I like this so much that I often make a whole meal of it by serving it in bowls with slightly runny fried eggs on top. It can be prepared ahead of time and reheated easily in the microwave.
Serves 6–8
1 (14.5-ounce) can whole fire-roasted tomatoes
2 large garlic cloves, peeled and left whole
1/2 teaspoon ground coriander
1/2 teaspoon ground cumin
1 serrano chile (seeded and deveined, if less heat is desired), roughly chopped
1 teaspoon salt
1/4 teaspoon freshly ground black pepper
2 tablespoons melted lard (or vegetable oil)
1 cup minced yellow onion
1 cup minced celery
1 1/2 cups converted long-grain rice
2 roasted poblano peppers, peeled, seeded, deveined, and chopped into 1/2-inch pieces
1 1/2 cups chicken broth
1/4 cup sliced green onions
In a blender, combine the tomatoes, garlic, coriander, cumin, serrano chile, salt, and pepper; blend for 1 minute or until smooth.
In a medium skillet with high sides and a tight-fitting lid, melt the lard over medium-high heat; add the onions and celery and cook, stirring often, until soft, about 2–3 minutes. Add the rice and stir to coat with the lard; continue stirring and toasting until the rice turns golden, about 2–3 minutes. Add the poblanos and the blended vegetables (the mixture will splatter a little bit) and continue stirring for 2 minutes. Add the chicken broth and stir briefly. Bring the liquid to a boil; cover, reduce the heat to low, and simmer until all the liquid has been absorbed, about 20 minutes. Fluff the rice with a fork, transfer to a platter, and garnish with green onions; serve immediately.