
Birds on a Wire was inspired by the view from my back veranda. I live ten minutes from the center of a large city, and yet we have a wide range of birds that live in the big trees that surround my home. I am always fascinated by the number of birds that rest on the overhead power lines when there are so many beautiful trees to choose from.
Seeing the birds from a distance in my yard, I can just see the silhouettes of the birds and all the crazy poses they make. Looking at the finished quilt, I can almost hear their singing and squawking conversations as they hang on the lines.
For this quilt, I chose newsprint for the background, which in hindsight seems to represent the daily conversation between the birds. The black silhouettes contrast nicely with the background, though it would work equally well with other small prints. You may like to make your birds in bright colors to represent your local wildlife. Either way, it is a bit of fun. The garden at the bottom is worked with long stems and leaves that reach up to the birds up above. The contrast in line adds interest to the finished composition.
The border for this quilt frames the scene with an instant splash of color. I used scraps from my basket for the Nine-Patch blocks. However, this is a great opportunity to treat yourself and buy a nice, bright selection of fabrics from your local store. Always good for the soul!
MATERIALS
Yardage is based on 44˝ (112cm) wide fabric, unless otherwise noted.
Cream newsprint (or similar): 1⅛ yards (1.1m) for main background
Black newsprint (or similar): ¼ yard (25cm) for Border 1
Polka dots: ¾ yard (70cm) for Nine-Patch border blocks
Bright prints: ⅛ yard (12cm) of 10 different fabrics for Nine-Patch border blocks
Black iron-on bias tape: ¼˝-wide 3½ yards (3.2m)
Black wool felt: 1 piece 8˝ × 25˝ (20cm × 65cm) for birds
Bright wool felt: 10 squares 8˝ × 8˝ (20cm × 20cm) of different colors for flowers
Green wool felt: 5 pieces 6˝ × 16˝ (15cm × 40cm) of different greens
Flower and circle prints: 20 different motifs for flower centers
Paisley prints: scraps of 2 different prints for leaves
Backing: 2¾ yards (2.5m)
Binding: ½ yard (45cm)
Batting: 49˝ × 58˝ (125cm × 147cm)
Perle cotton thread: size 8 in a variety of colors, including black and yellow
CUTTING
Cream newsprint fabric
Cut 1 piece 34˝ × 43˝.
Polka dots
Cut 10 strips 2˝ × width of fabric; subcut each strip into 3 strips 2˝ × 13˝.
Bright prints
Cut 10 strips 2˝ × width of fabric; subcut each strip into 3 strips 2˝ × 13˝.
Black newsprint fabric
Cut 4 strips 2˝ × width of fabric; subcut 2 strips 2˝ × 42½˝ and 2 strips 2˝ × 36½˝.
Note: Piece as needed if your fabric is not at least 42½˝ wide.
Binding
Cut binding as needed for your preferred binding style.
Appliqué pieces
Copy the Birds on a Wire appliqué patterns (pages 84–88) at 100%. The patterns give you the shapes to cut, and the pattern pieces show suggested stitching. I don’t always specify the exact number of pieces to cut, as this is your opportunity to make the project your own.
Note: For cotton fabrics, trace around the freezer paper and cut out with a ¼˝ seam allowance, then see the technique in Needle-Turn Appliqué (page 7). For wool felt, there is no need to trace around the pattern or leave a seam allowance.
1.Trace the appliqué patterns onto the dull (paper) side of freezer paper and cut on the drawn lines.
2.Press the freezer-paper templates onto the right side of the appropriate felt or fabric. Refer as needed to Appliqué Basics (page 5) for specific information on suggested fabrics for the appliqué pieces.
3.For stems: Cut 8 strips ⅜˝ × 16˝ from lime green, 5 strips ½˝ × 16˝ from dark green, and about 2 strips ⅜˝ × 16˝ from medium green. You may want to use more stems, maybe fewer.
4.Cut out the bird shapes from black wool felt. I used 19 birds.
5.From the flower and circle prints, fussy cut the shapes, allowing a ¼˝ seam allowance for needle-turning.
6.From the paisley prints, fussy cut the shapes, allowing a ¼˝ seam allowance for needle-turning.
Appliqué
Note: I like to stitch as much of the appliqué as I can before I apply it to the background. Refer to Appliqué Basics (page 5) and Embroidery Stitches (page 9) as needed.
Flowers
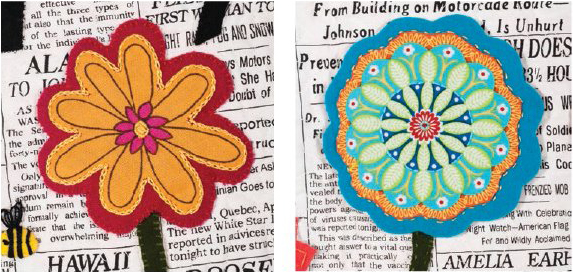
1.Needle-turn the fussy-cut circles and flowers to a piece of felt large enough for the flower.
2.After the fabric is attached, cut the flower, using either the patterned fabric as a guide or the flower patterns provided.
Leaves
1.Needle-turn the fussy-cut paisleys to a piece of green felt large enough for the leaf.
2.After the fabric is attached, cut the leaves, using either the patterned fabric as a guide or the leaf patterns provided.

Make the Background
1.Pin and press the black iron-on bias tape to the cream print 34˝ × 43˝ piece, as shown in the diagram.
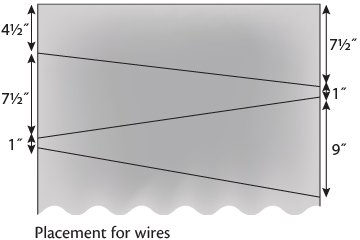
2.Using black thread, machine stitch on both sides of the tape close to the edges.
3.Trim the background piece to 33½˝ × 42½˝.
4.Sew the black print 2˝ × 42½˝ strips to the sides of the background piece. Press the seams toward the black print.
5.Sew the black print 2˝ × 36½˝ strips to the top and bottom. Press the seams toward the black print.
Add All the Shapes to the Background
To arrange all the appliqué pieces on the background, it is helpful to use a design wall (page 8). If you don’t have access to one, you can use a table or even the floor. Use the project photo (page 21) as a guide for placement.
When appliquéing the wool, you can use a vast array of embroidery stitches (page 9), including whipstitch, backstitch, running stitch, chain stitch, stem stitch, and zigzag. All stitches are done with perle cotton or similar.
Remember that there is a ½˝ margin around the background outside edge to allow for trimming and a seam allowance. Allow for this when placing your shapes.
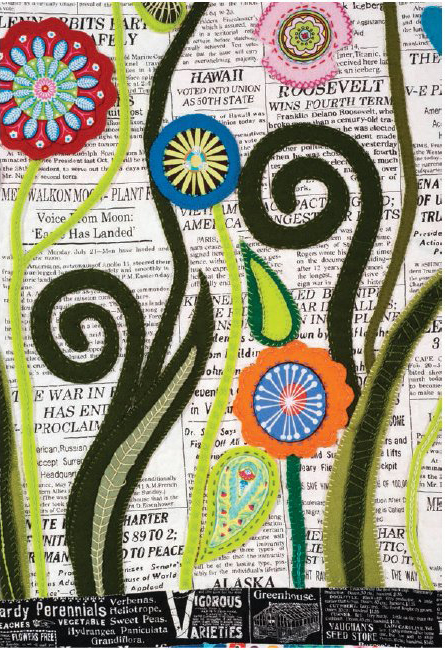
1.Place the stems on the lower edge of the background fabric. (The stems can extend into the seam allowance.) Then add the leaves and flowers. Move them around until you are happy with the layout in terms of balance and color.
2.Use appliqué pins to pin the wool to the background.
3.Stitch the stems, leaves, and flowers to the background using either matching or contrasting thread.
4.Place the birds on the wires, moving them around until you are happy with the layout. Pin the wool to the background using appliqué pins. Then whipstitch the birds in place with black cotton.
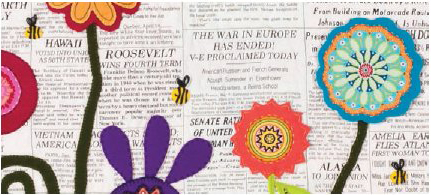
5.Pin and stitch 3 yellow circles to the background for the bees. Use black cotton and large whipstitches to add the stripes. Use large chain stitches to stitch the wings.
Seam allowances are ¼˝.
You need a total of 40 Nine-Patch blocks—20 of Block A and 20 of Block B.
1.Make 10 strip sets using 1 polka dot 2˝ × 13˝ strip between 2 matching bright print 2˝ × 13˝ strips. Press the seams toward the outside.

2.Make 10 strip sets using 1 bright print 2˝ × 13˝ strip between 2 polka dot 2˝ × 13˝ strips. Press the seams toward the center strip.
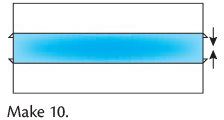
3.Crosscut all of the strip sets into 2˝ sections, disregarding any leftover bits at the end of the strip. You will have a total of 120 sections.
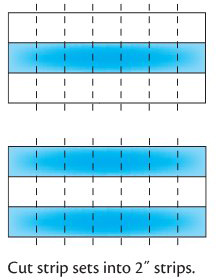
4.Arrange the sections into Nine-Patch blocks. Arrange 20 of Block A with a polka dot center patch and matching bright print patches. Arrange 20 of Block B with a bright print center patch and matching corner patches. You will have a total of 4 Nine-Patch blocks in each of 10 color combinations. Sew each block together.

Assemble the Quilt
Seam allowances are ¼˝.
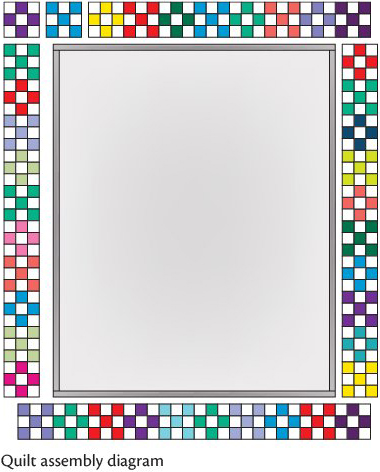
1.Using a design wall (page 8) or table, arrange the Nine-Patch blocks around the quilt center alternating A and B blocks as shown. Refer to the quilt assembly diagram for guidance. You will need 10 blocks along each side and 10 blocks across the top and bottom. Spread out the different combinations of fabrics evenly and ensure that you keep the checkerboard pattern correct.
2.Stitch the 10 blocks together for each side. Press. Sew each border section to the sides of the quilt. Press the seams toward the black border.
3.Stitch the 10 blocks together for the top and bottom of the quilt. Press. Sew these border sections to the quilt. Press the seams toward the black border.
Finish
1.Layer, baste, and quilt as desired. I machine-quilted using stippling on the background, and then I outlined around all of the appliqué. I used a walking foot to stitch close to the seam on either side of the black border. I did a more open machine quilting on the Nine-Patch border.
2.Use your preferred method to bind the edges.