My Flowering Tree Runner is a great little project that can easily be adapted to a larger quilt, a bed topper, or a pillow. The tree can be made using a small print in cotton as an alternative to the wool. Play around with backgrounds until you find one that suits your style. Remember that with the bright colors of the felt, you need to choose a background that allows the color to sing.
Yardage is based on 44˝ (112cm) wide fabric, unless otherwise noted.
White with small black dots: ½ yard (50cm) for background
Green mottled wool: ⅜ yard (35cm) for treetop
Black with large white dots: 1 fat quarter (18˝ × 22˝ or 46cm × 56cm) for tree trunk
Black print with green leaves: ⅜ yard (35cm) for Border 1
Bright prints: 25–28 strips 3˝ × 10˝–12˝ (7.5cm × 25cm–30cm) lengths for Border 2 (These can be pieces from your scrap basket.)
Dotted print: ⅛ yard (12cm) for the tree flower centers
Circle prints: 10 motifs for flower garden centers
Small dotted print: 1 square 4˝ × 4˝ (10cm × 10cm) for bird’s wing
Variety of wool felt: 12 squares 8˝ × 8˝ (20cm × 20cm) in a variety of bright colors, including blue for the bird
Green wool felt: 3 squares 8˝ × 8˝ (20cm × 20cm) of different greens
Black wool felt: 1 square 10˝ × 10˝ (25cm × 25cm)
White wool felt: 1 square 4˝ × 4˝ (10cm × 10cm) for bird’s body
Binding: ⅜ yard (35cm)
Backing: 1¾ yards (1.6m)
Batting: 28˝ × 57˝ (71cm × 145cm)
Perle cotton threads: size 8 in a variety of colors, including black and green
CUTTING
White with dots
Cut 1 piece 43˝ × 16˝.
Green mottled wool
Cut 1 piece 12˝ × 39˝.
Black with white dots
Cut several tapering bias strips from the fat quarter as shown. Cut the strips wide enough that you can press under a ¼˝ seam allowance on both sides of each strip. There is no need to be too accurate—trees have bumps and uneven branches. Refer to the project photo for reference. These bias strips will be intertwined together to form the tree trunk and then spread out for the tree branches.

Border 1
Cut 2 strips 2½˝ × width of fabric; subcut 2 strips 2½˝ × 42½˝.
Cut 1 strip 3½˝ × width of fabric; subcut 2 strips 3½˝ × 19½˝.
Border 2
Cut approximately 90 pieces varying in sizes: 2˝ × 3˝, 2½˝ × 3˝, and 3˝ × 3˝.
Binding
Cut binding as needed for your preferred binding style.
Appliqué pieces
Copy the Flowering Tree Runner appliqué patterns (page 106) at 100%. The patterns give you the shapes to cut, and the pattern pieces show suggested stitching. I don’t always specify the exact number of pieces to cut, as this is your opportunity to make the project your own.
Note: For cotton fabrics, trace around the freezer paper and cut out with a ¼˝ seam allowance, then see the technique in Needle-Turn Appliqué (page 7). For wool felt, there is no need to trace around the pattern or leave a seam allowance.
1.Trace the appliqué patterns onto the dull (paper) side of the freezer paper and cut on the drawn lines.
2.Press the freezer-paper templates onto the right side of the appropriate felt or fabric.
3.Cut all the appliqué pieces. Refer as needed to the following suggestions for fabric for the appliqué pieces:
Dotted print: Cut approximately 33 circles, allowing ¼˝ seam allowances for flower centers.
Small dotted print: Cut the wing, allowing a ¼˝ seam allowance.
Green felt: Cut a number of leaves (mine has 46) from the 3 different colors of green. Use the pattern as a guide or simply cut them freehand.
Blue and white felt: Cut the bird body pieces.
Circle prints: Cut 10 flowers (circles), allowing a ¼˝ seam allowance.
Black felt: Use a rotary cutter to cut a few ¼˝-wide strips for the stems. Using the patterns provided, cut approximately 7 large leaves.
Appliqué
Note: I like to stitch as much of the appliqué as I can before I apply it to the background. Refer to Appliqué Basics (page 5) and Embroidery Stitches (page 9) as needed.
Green Treetop
1.See the green treetop in the project photo (page 35). Working on a flat surface, place the green mottled treetop 39˝ × 12˝ piece on top of the background 43˝ × 16˝ piece so that the top edges are aligned and both pieces are right side up. Center the treetop fabric right to left on the background.
2.Use a chalk pencil to draw the tree shape onto the fabric, using soft, deep curved edges. Refer to the photo as a guide. The green mottled treetop should come down just over halfway onto the background and should curve off to approximately 2˝ from the top corners.
3.Cut out the treetop. If you are using cotton instead of wool, add a ¼˝ seam allowance to needle-turn the edge.
4.Pin the treetop to the background and whipstitch it in place.
Tree Trunk
Pin the bias strips, entwining them below the treetop and spread them on top of the treetop. Needle-turn them in place on the background and treetop.
Flowers for the Tree
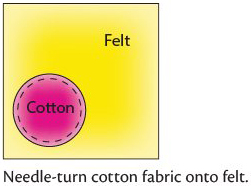
1.Needle-turn the dotted fabric circles to a piece of bright wool felt, stitching with perle cotton thread and small running stitches close to the folded edge.

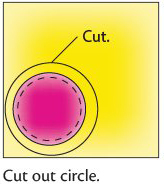
2.Cut out the felt circles, keeping a ⅜˝ edge around the dotted fabric. (The circles don’t need to be perfect; in fact, I think they look more organic if they are slightly uneven and not perfect.)

3.Place a circle from Step 2 onto another piece of felt and stitch again with perle cotton thread and a running stitch close to the edge. Cut again with a ⅜˝ edge around the stitched circle.

4.These are the flowers for the treetop. Set them aside for now.
Bird
1.Whipstitch the 2 pieces of the bird together, overlapping as indicated on the pattern.
2.Use a running stitch to needle-turn the wing to the bird.
3.Set the bird aside.
Flower Garden
1.Pin the flower garden centers to pieces of felt and needle-turn in place with a running stitch as in Step 1 of the flowers.
2.Cut the felt to echo the shape of the flower center, leaving at least ⅜˝–½˝ of the felt around the edge, depending on how large or small you want the flowers to be.
Add All the Shapes to the Background
To arrange all the appliqué pieces on the background, it is helpful to use a design wall (page 8). If you don’t have access to one, you can use a table or even the floor. Use the project photo (page 35) as a guide for placement. When placing your shapes, keep in mind there is a ½˝ margin around the outside edges of the background to allow for trimming and a ¼˝ seam allowance.
1.On the background 43˝ × 16˝ section, arrange the treetop flowers, bird, and leaves on the tree until you are happy with the color placement. Keep a few leaves and flowers aside to overlap onto the border later.
2.When you are happy with the placement, pin everything in place with appliqué pins.
3.Stitch the leaves in place with small whipstitches in perle cotton.
4.Stitch the bird in place with small whipstitches.
5.Stitch the flowers in place with small running stitches and a variety of colors of perle cotton.
6.When the leaves and flowers are completed, scatter some small circles into the spaces and stitch them in place with 2 opposing crosses and a colonial knot in the center.
7.When the treetop is complete, arrange the garden flowers on the ground under the tree, playing with color and position. When you are happy with the placement, arrange the stems so that they gently curve from the flower head to the base, trimming the length of the stems as you go.
8.To complete the arrangement, scatter some leaves and pin them in place with appliqué pins.
9.Attach the flowers with a running stitch and perle cotton.
10.Stitch the leaves and stems with a running stitch in black perle cotton.
Add the Borders
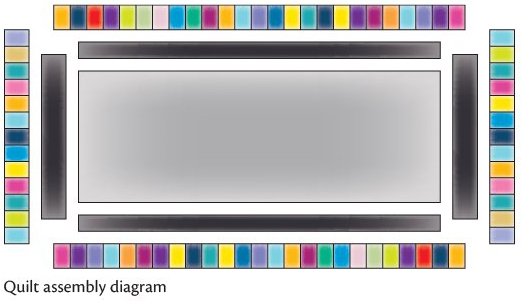
Seam allowances are ¼˝. Refer to the quilt assembly diagram.
Border 1
1.Trim the background center to measure 42½˝ × 15½˝, including seam allowances.
2.Stitch the black with green 2½˝ × 42½˝ Border 1 strips to the top and bottom of the runner. Press the seams toward the border.
3.Stitch the black with green 3½˝ × 19½˝ Border 1 strips to each side. Press the seams toward the border.
4.Stitch the extra flowers and leaves over the seam of the border.
Border 2
1.Randomly stitch the bright print 2˝ × 3˝, 2½˝ × 3˝, and 3˝ × 3˝ Border 2 pieces together into a strip at least 146˝ long. Press the seams.
2.Cut the long pieced strip into 2 strips 3˝ × 48½˝ and 2 strips 3˝ × 24½˝.
3.Stitch the 3˝ × 48½˝ strips to the top and bottom edges and press the seams toward the center.
4.Stitch the 3˝ × 24½˝ strips to each side. Press the seams toward the center.

Finish
1.Layer, baste, and quilt as desired. I machine-quilted my quilt, outlining around all of the shapes and stippling the background and bright print border. I stitched in-the-ditch on the straight lines of the borders.
2.Use your preferred method to bind the edges.