
Bishop against Knight and Pawn(s)
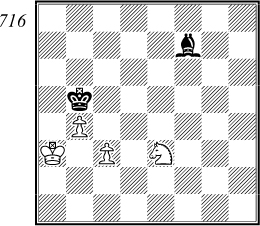
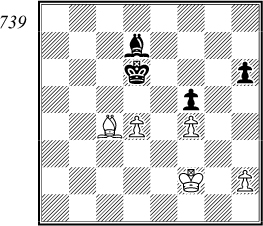
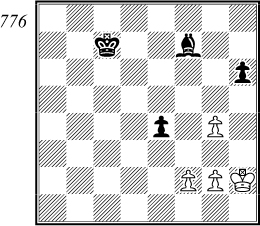
In fighting against pawns the bishop is usually much more effective than the knight, which means that bishop versus knight and pawn normally draws. The side with the knight has chances only if the pawn is well advanced and the enemy king is far enough away. Even in this case the bishop can defend against a centre pawn, because he then has two good diagonals at his disposal. Consider our next example:
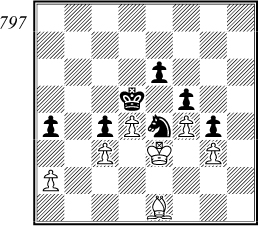
White cannot win, even though Black’s king takes no part in the play. The bishop can control the vital d7 by using both the e8-a4 and c8-h3 diagonals. Play might go:
1 |
♔e6 |
♗b5 |
2 |
♔e7 |
♗c6 |
3 |
♔d8 |
The only chance, as the knight alone cannot guard the a4-e8 diagonal.
3 |
... |
♗b5 |
4 |
♔c7 |
♔g1 |
5 |
♘d3 |
♔h1 |
6 |
♘e5 |

6 |
… |
♗e8! |
Forced, as White was threatening 7 ♘c6 winning.
7 |
♘d7 |
♔g1 |
8 |
♔d8 |
♗g6 |
The bishop must momentarily leave both critical diagonals but heads straight for f5.
9 |
♔e7 |
♗f5 |
The threat was 10 ♘f8 ♗f5 11 ♘e6 winning.
10 |
♘c5 |
♗c8! |
Using the same defensive method on a different diagonal. White can make no progress, e.g. 11 ♔d8 ♗f5, or 11 ♘d7 ♔h1 12 ♔d8 ♗a6 13 ♔c7 ♗b5 14 ♘e5 ♗e8! etc.
Grandmaster Averbakh has indicated the zone that the pawn must be in, if it is to be stopped by the bishop without the help of the king (see diagram 706). This is valid for a white-squared bishop controlling the square in front of the pawn. In the case of a black squared bishop, as symmetrical zone applies bounded by the squares b3, c4, d5, e6, f5 and g4. The bishop cannot stop a rook’s pawn without the help of the king.
However, if the white pawn is over the critical line, the win depends upon how far away Black’s is. Analysts have even indicated a zone for Black’s king, within which he must be in order to draw against various positions of the pawn. We have no space here to analyse such possibilities but advise any interested reader to refer to more specialized works on the endgame. Meanwhile here is one example of this type of ending.

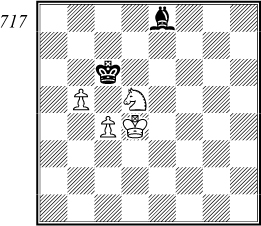
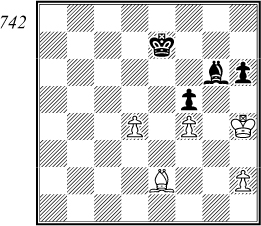
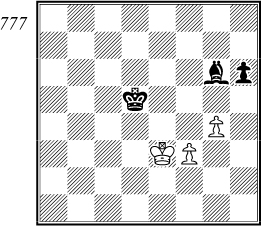
V. Kosek 1921
White’s pawn has crossed the critical f5 square, which means that the result depends upon the position of Black’s king. We shall see that Black’s king is too far away to control f4 in time, as the following analysis shows:
1 |
♘g5 |
♗g8 |
Forced, as White was of course threatening 2 ♘e6.
2 |
♘f7 |
♔d2 |
Heading for f4, but he is too late. After 2 ... ♗h7 3 ♘h6 ♗g6 4 ♘f5 ♔d2 5 ♘h4 ♗h5 6 ♘g2! wins for White, as Black’s king cannot prevent the decisive threat of 7 ♘f4. We can now see why this square is so important; White’s knight controls g6 and h5, and as White’s king guards f7 and e8, the black bishop is driven from the diagonal.
3 |
♔f8 |
♗h7 |
4 |
♘g5 |

4 |
… |
♗d3 |
If 4 ... ♗g6 5 ♔g7 ♗h5 6 ♔h6 ♗e8 7 ♘e4+ and 8 ♘d6 wins, or here 5 ... ♗e8 6 ♘e4+ ♔e3 7 ♘d6 ♗h5 8 ♔h6 wins.
5 |
♘e6 |
♗g6 |
Or 5 ... ♗f5 6 ♔e7 ♗g6 7 ♘f4 wins.
6 |
♘f4 |
♗c2 |
7 |
♔e7 |
♗b3 |
8 |
♘e6 wins. |
|
This analysis shows us that Black only loses because his king cannot defend f4 in time. If, for example, in the original position Black’s king is placed on d1 instead of c1, White cannot win, e.g. 1 ♘g5 ♗g8 2 ♘f7 ♗h7! 3 ♘h6 ♗g6 4 ♘f5 ♔e2 5 ♘h4 ♗h5 6 ♘g2 ♔f3! draws.
The nearer the pawn is to the side of the board, the more difficult is the defence. The reason for this is clear: the bishop has virtually only one diagonal for defence, so the knight can easily cut it off. A successful defence is possible only if Black’s king can support his bishop.
The rook’s pawn allows the defence new possibilities. Firstly, it means that the bishop can sometimes be exchanged for the knight, because of drawing chances in the pawn ending. Secondly, there is sometimes the opportunity for a bishop sacrifice in order to force White’s king to block the pawn. Our next example illustrates these points.

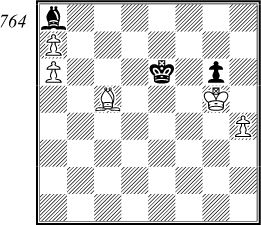
B. Horwitz 1885
It is clear that White’s only plan is to play his king to b8 and knight to b7, to cut off the bishop from the long diagonal. This plan fails, however, if Black’s king reaches b6 or a6, preventing ♘b7. White’s aim, therefore, is to keep Black’s king away, whilst improving the position of his knight.
1 |
♔b6! |
White gets nowhere with the immediate 1 ♘a6+ ♔b5 2 ♔b8 ♗g2 3 ♘c7+ ♔b6 etc drawing as White’s knight can never play to b7.
1 |
... |
♔c4 |
Passive defence would be hopeless, as White would play his knight to d6, force Black’s bishop to a8 because of the threat of ♘b7, then win by ♘b7 followed by ♔c7-b8. Black intends to defend against this manoeuvre, which is why his king needs to reach the d8-d6 squares.
2 |
♘a6 |
♔d4 |
3 |
♘c7 |
♗f3 |
4 |
♘e6+ |
♔e5 |
5 |
♘d8 |
♗a8 |
The threat was 6 ♘b7. It now seems that White still wins with this move, followed by ♔c7-b8, but matters are not so simple.
6 |
♔c7 |
♔d5 |
Any bishop move would allow 7 ♘b7.

7 |
♘b7! |
Apparently, White can also win by 7 ♔b8 when the bishop cannot move, but Black’s defensive plan is 7 ... ♔d6! 8 ♔xa8 ♔c7! forcing a draw. This drawing position is characterized by the stalemate situation of White’s king in front of the pawn, and by Black’s king being placed on the same coloured square as the knight, with White to move. It is a well-known fact that the knight can never lose a tempo (i.e. hand the move over to Black), so Black’s king can never be driven away from the c8 or c7 squares. A most surprising draw!
Now that we know the position, the following play is easier to understand. White intends to capture the bishop only when Black cannot bring about the above drawing position.
7 |
... |
♔e6 |
The only move, as Black must be prepared to answer 8 ♔b8 with 8 ... ♔d7.
8 |
♘a5! |
As already seen, White only draws after 8 ♔b8 ♔d7 9 ♔xa8 ♔c8! etc, so he plans a subtle knight manoeuvre.
8 |
... |
♔e7 |

9 |
♔c8! |
After 9 ♔b8 Black cannot play 9 ... ♔d7? 10 ♘b7! ♔c6 11 ♔xa8 ♔c7 12 ♘d6! winning, but he draws by 9 ... ♔d8! 10 ♘b7+ ♔d7, or here 10 ♔xa8 ♔c7! etc.
9 |
... |
♔e8 |
The bishop cannot move because of ♘b7, and if 9 ... ♔d6 10 ♔b8 ♔d7 11 ♘b7! again zugzwangs Black.
10 |
♘c4! |
♔e7 |
Again forced, as bishop moves allow 11 ♘d6+ and 12 ♘b7.
11 |
♔b8 |

11 |
… |
♔d8 |
The king has to go to the ‘wrong’ square, as 11 ... ♔d7 fails to 12 ♘b6+ winning the bishop, and 11 ... ♗f3 allows 12 ♘a5 etc.
12 |
♘d6 |
♔d7 |
13 |
♘b7! |

…and wins after 13 ... ♔c6 14 ♔xa8 ♔c7 (the correct square is c8!) 15 ♘d6! etc. A neat ending.
There are many more interesting endings of knight and pawn against bishop which will not concern us here. Instead, we turn at once to positions in which the bishop is fighting against a knight and two pawns. Whereas a bishop and two pawns almost always win against a knight, the weaker side has greater drawing chances with a bishop against knight and two pawns. If the pawns are connected, the stronger side usually wins, but even here there are exceptions, especially when one of the pawns is a rook’s pawn and the bishop and king have managed to set up a successful blockade. Let us first turn to diagram 715 to see how the win is normally brought about.

White must clearly advance a pawn sooner or later if he is to win, but must be careful to avoid certain drawing positions. First of all, he must not allow Black to give up his bishop for both pawns, and secondly he must not allow them to be blockaded after, for example, 1 b4+ ♔c4. With methodical preparation, however, the win is not difficult:
1 |
♔b2 |
In order to advance the pawns, the king is best placed on a3, with the knight guarding c4.
1 |
... |
♗g8 |
2 |
♘c2 |
♗f7 |
Or 2 ... ♔d5 3 c4+ and 4 ♔c3 winning.
3 |
♘e3 |
♗g8 |
4 |
♔a3 |
♗f7 |
Black can only remain passive whilst White completes his preparations for advancing the pawns.
5 |
b4+ |
♔b5 |
6 |
c4+! |
Driving Black’s pieces further back, as the pawn ending is lost after 6 ... ♗xc4 7 ♘xc4 ♔xc4 8 ♔a4.
6 |
... |
♔b6 |
7 |
♔b3 |
Also good was 7 ♘d5+, but the text move is the most logical. The king is brought to d5, after which the c-pawn can advance.
7 |
... |
♗e6 |
8 |
♔c3 |
♗f7 |
9 |
♔d4 |
♗e8 |
Black can do nothing but wait.
10 |
♘d5+ |
♔c6 |
11 |
b5+ |
The most methodical plan is 11 ♘c3 followed by 12 c5 and 13 b5+, but the text move leads to a slightly quicker finish.
11 |
... |
♔b7 |
12 |
♔c5 |
♗f7 |
13 |
♔b4 |
♗e6 |
14 |
♘e7 |
♗g4 |
15 |
c5 |
♗f3 |
16 |
♔a5 wins. |
|
Black has no defence against the threat of 17 b6 followed by 18 c6+ winning easily.
Matters are far more complex, however, if the pawns are advanced prematurely and have become partially blockaded. Diagram 718 offers us an interesting and instructive example of this.

B. Horwitz 1880
This position has been known for almost a century as an unusual draw. Its composer made a few mistakes in his original analysis, but later analysts have nevertheless demonstrated that White can draw with the best defence. The following variations are very instructive, and illustrate the defensive possibilities in such positions:
1 |
♗b5! |
The only move. King moves would clearly allow the g-pawn to advance, as would 1 ♗h5 ♘f3!, bringing about a zugzwang position, whereas 1 ♗a4 fails to 1 ... g4+ 2 ♔xh4 ♘f3+ 3 ♔h5 g3 and 4 ... g2 winning,
1 |
... |
♘g4 |
The best chance. If 1 ... g4+ 2 ♔xh4 ♘f3+ 3 ♔h5 g3 White plays 4 ♗f1 ♔e3 5 ♔g4 ♔f2 6 ♗h3! (not 6 ♔h3? ♘e1! 7 ♔g4 ♘g2 8 ♔h3 ♘e3 winning) 6 ... ♘g1 7 ♗f1! and Black can make no progress.
If Black tries the alternative 1 ... ♘g6

…threatening 2 ... g4+ in order to answer 2 ♗d7? with 2 ... ♔f3! 3 ♗c6+ ♔f2 4 ♔g4 ♘e5+ etc, reaching a winning position from the main line, White replies 2 ♗e2! ♔e3 3 ♗a6! e.g. 3 ... ♔f2 Or 3 ... ♔f3 4 ♗b7+ ♔f2 5 ♔g4 etc. 4 ♔g4 ♘e5+

5 ♔xg5! But not 5 ♔h3 g4+! 6 ♔xh4 g3 7 ♗f1 ♘f3+ 8 ♔h3 ♘e1! winning as shown above. 5 ... ♔g3 Or 5 ... h3 6 ♔f4 h2 7 ♗b7 ♘d3+ 8 ♔g4 ♘e1 9 ♔h3 draws. 6 ♗c8 and White draws comfortably.
Finally, we must mention that after 1 ... ♘f3 2 ♗d7 ♘d4 (threatening 3 ... ♘f5) 3 ♗g4 ♘f5 4 ♗e2 Black has obtained nothing, and after 1 ... ♔f3 2 ♗a6 White’s bishop can again reach the correct squares.

2 |
♗a6! |
Again the only move to draw. The bishop must be ready to prevent the advance of the pawns by playing to c8 and b7, and must keep as far away as possible from the kingside to avoid forks by the knight.
Horwitz thought that 2 ♗d7 was the correct move here, but Karstedt later pointed out that Black then wins as follows: 2 ... ♘f2+ 3 ♔g2 ♘d3! 4 ♔h3 Or 4 ♗b5 ♔e3 5 ♔h3 ♘f2+ and 6 ... g4 wins. 4 ... ♔f3!

5 ♗c6+ or 5 ♗g4+ ♔f2 6 ♗c8 ♘f4+ when both 7 ♔g4 h3 8 ♔xg5 h2 9 ♗b7 ♘g2 and 7 ♔h2 ♔f3 8 ♗b7+ ♔g4 win for Black. 5 ... ♔f2 6 ♔g4 ♘e5+ 7 ♔xg5 ♔g3! Not 7 ... h3? 8 ♔h4 h2 9 ♔h3 drawing. 8 ♗g2! ♘g4 9 ♔h5 ♘e3 10 ♗h1 h3 11 ♔g5 h2 wins. An interesting piece of analysis which can occur later also.
2 |
… |
♘f2+ |
3 |
♔g2 |
♔e3 |

4 |
♗c8! |
Preventing 4 ... g4 because of 5 ♗xg4! ♘xg4 6 ♔h3 drawing.
4 |
... |
♘d3 |
5 |
♔h3 |
♘f4+ |
Or 5 ... ♔f3 6 ♗b7+ ♔f2 7 ♔g4, and after 7 ... ♘e5+ 8 ♔xg5 ♔g3 the bishop is not attacked, so that 9 ♗c8 draws easily.
6 |
♔g4 |
h3 |

7 |
♔g3 |
The simplest, although 7 ♔xg5 h2 8 ♗b7! and 9 ♔g4 was also playable. Black can now do nothing to strengthen his position, as White maintains his bishop on the h3-c8 diagonal and simply captures the h-pawn if Black’s king gives up control of f4 or f3. The position is drawn.
With isolated pawns White usually wins, if they cannot be effectively blockaded or one of them captured, but here again there can sometimes be great technical difficulties if one is a rook’s pawn. Rather than concern ourselves with such positions, let us conclude with an example of knight and two pawns against bishop and pawn.

All the pawns are on one wing, with White having a protected passed pawn. Such an ending could not be won with bishops only, but the knight gives White a definite advantage. This is mainly because the bishop can only control squares of one colour whereas the knight can attack all squares. For example, in the diagram the bishop can do nothing to drive White’s king from its dominating position, whereas the knight can switch squares and create problems for the defender.
It is clear why the knight is at its best when all the pawns are on the same wing. For instance, if Black’s pawn were on b5 instead of f5, he would draw easily, as this pawn would tie down one of White’s pieces while Black’s king and bishop hold up the pawns. The diagrammed position is a variation from the game P. Romanovsky – B. Verlinsky Moscow 1925, and the following instructive analysis is the work of Grandmaster Y. Averbakh:
1 |
♘d7+ |
White must proceed methodically if he is to win. It is clear that his king must advance via e5 or g5, which means that Black’s king must be driven away from f6 without it being possible for him to return immediately. To bring this about, White has to play h5, but to do so at once allows 1 ... ♗e6! followed by 2 ... ♗f7, capturing the h-pawn, once the knight has moved. White first improves the position of his knight.
1 |
... |
♔e6 |
If 1 ... ♔g6 2 h5+! wins the pawn immediately.
2 |
♘c5+ |
♔f6 |
3 |
h5! |

3 |
… |
♗h7! |
The best defence. Black cannot prevent the knight check on d7, and if 3 ... ♗f7(a2) 4 ♘d7+ ♔e6 5 h6! wins, or here 4 ... ♔e7 5 h6 ♗g8 6 ♔xf5! ♗h7+ 7 ♔g5 ♔xd7 8 ♔f6 wins.
Note that after the text move, Black would lose if he had the move, e.g. 4 ... ♗g8 5 ♘d7+ ♔e7 (or 5 ... ♔e6 6 h6! ♔xd7 7 ♔xf5 ♔e7 8 ♔g6 etc) 6 ♔xf5 ♗h7+ 7 ♔g5 ♔xd7 8 ♔f6! wins, as the pawns cannot be stopped. However, as we know, the knight cannot lose a tempo, and 4 h6 would give Black’s king the use of g6. So further preparation is required.
4 |
♘d7+ |
♔e7 |
5 |
♘e5 |
♔f6 |
Or 5 ... ♔e6 6 ♘f3 ♔f6 7 ♘d4 wins the pawn.

6 |
h6! |
Now that the knight has a strong central post, this pawn advance is decisive, as Black is in zugzwang. Averbakh points out that 6 ♘f3 ♗g8 7 ♘h4 fails to 7 ... ♗e6! 8 h6 ♗c8! etc, but not here 7 ... ♗f7? 8 h6 ♗e6 9 h7 ♔g7 10 ♘g6! ♔xh7 11 ♘f8+ and 12 ♘xe6 winning.
6 |
... |
♗g8 |
Or 6 ... ♔e6 7 ♘f3 ♔f6 8 ♘d4 wins the pawn.
The text move leads to a beautiful finish.
7 |
♘d7+ |
♔g6 |
If 7 ... ♔e6 8 h7 wins, or 7 ... ♔e7 8 ♔xf5 wins, as we saw in the note to Black’s third move.

8 |
h7! |
This surprising move wins at once, as capture by either piece allows a knight fork, exchanging pieces and bringing about an easily won pawn ending.
This example concludes our theoretical discussion of bishop endings. We have seen that in many cases it is impossible to lay down general rules. It is best for the reader to recognize certain key positions on which he can base his analysis. We now give a selection of endings from practical play to show how these principles are applied.
The reader may feel that our basic positions are of limited practical value, as they hardly ever occur as such in actual games. This is faulty reasoning; although many endings never reach this stage, these key positions are a vital part in any analysis, and a player must know them thoroughly before he can even begin to understand more complex endgames. Our next example shows us that even leading masters are not above reproach in this respect.

This ending occurred in the game J. Capablanca – D. Janowski, New York, 1916. White has an extra pawn but has great difficulties in converting this advantage to a win. The g-pawn cannot be queened, so White must devote his attention to the capture of Black’s pawn in the best possible circumstances. Black cannot guard this pawn but he can force the white bishop to leave the a1-h8 diagonal, when ... ♔g7 is possible. Clearly a bishop ending will then arise in which White will try to force his b-pawn through.
It is now that our basic positions come in. We must think back to which positions are won and drawn in bishop endings with a knight’s pawn! In our notes to diagram 640 we indicated the zone within which the pawn must be if Black is to draw, with black-squared bishops. This means that the pawn must be stopped before it reaches b6. All this will help us to understand the following analysis:
1 |
♔e4 |
A typical waiting manoeuvre, designed with the practical purpose of allowing Black to go wrong. Capablanca was no doubt aware that his only winning chances lay in 1 ♔c5 b4 2 ♔c4 ♗e1 3 ♗c5 ♔g7 4 ♗xb4 (diagram 730) but he does not play this at once. He first waits to see if Black defends correctly; only then will he come back to the main plan.

Let us see how the game would proceed if White goes at once for the win of the pawn. We follow Averbakh’s analysis. After 4 ♗xb4 Black has three bishop moves giving three different variations:
1) 4…♗h4? leads surprisingly to a loss after 5 ♗c3+ ♔xg6 6 b4 ♔f7 Black’s king must help, and 6 ... ♔f5 7 ♔d5 ♔f4 8 b5 ♗d8 9 ♗e5+ ♔e3 10 ♔c6 and 11 ♗c7 wins for White. 7 b5 ♗d8 The pawn must be stopped before it reaches b6; if 7 ... ♔e6 8 b6 ♔d7 9 ♔b5 ♗g3 10 ♔a6 wins. 8 ♔d5 ♔e8 9 ♔c6 and there is no defence to the threat of 10 ♗e5 and 11 ♗c7.
2) 4...♗g3! The best defence. 5 ♗c3+ ♔xg6 6 b4 ♔f7 7 b5 ♗c7! 8 ♔d5 ♔e7 9 ♔c6 ♔d8

We now see the difference, as in the first variation Black’s bishop blocked its own king. 10 ♔b7 Otherwise 10 ... ♔c8 draws at once. 10 ... ♔d7 11 ♗d4 ♗d8 12 ♗b6 ♗g5 13 ♗a5 ♗e3 14 ♔a6 ♔c8 15 ♗b6 ♗g5 16 ♗d4 ♗d8 17 ♗c3 ♗c7 and White can make no progress as 18 ♗a5 ♗xa5 gives a drawn pawn ending.
3) 4 ... ♗f2 Weaker than 4 … ♗g3, but playable. 5 ♗c3+ ♔xg6 6 b4 ♔f7 7 ♗d4 ♗g3 8 b5 ♗c7! 9 ♔d5 ♔e7 10 ♔c6 ♔d8! and after 11 ♗b6 ♔c8! stalemate saves Black.

1 |
... |
b4 |
2 |
♗e3 |
♗c3 |
3 |
♔d3 |
♗e1 |
4 |
♗d2 |
♗f2 |
Clearly the pawn ending would be lost, whereas now 5 ♗xb4 ♔g7 6 ♗c3+ ♔xg6 7 b4 ♔f5 8 ♗d4 ♗g3 etc gives White no winning chances. So Capablanca tries another plan.
5 |
♔e4 |
♗c5? |
A success for White’s crafty waiting policy! This move gives White a decisive tempo. White threatened 6 ♗xb4, but Black should have interposed 5 ... ♔g7 6 ♔f5 and only then 6 ... ♗c5. Capablanca would have had to revert to the original plan after driving Black’s king away from the g-pawn (see note to move 1).

6 |
♔d5! |
Gaining the all-important tempo, as shown in the line 6 ... ♗f2 7 ♗xb4 ♔g7 8 ♗c3+ ♔xg6 9 b4 ♔f7 when Black’s king arrives too late, e.g. 10 ♗d4 ♗g3 (or 10 ... ♗e1 11 b5 ♗a5 12 ♔c6 ♔e8 13 ♗f6! ♔f7 14 ♗e5 etc) 11 b5 ♗c7 12 ♔c6 ♗a5 13 ♗e5 and 14 ♗c7 winning easily.
6 |
... |
♗e7 |
The only chance, as 6 ... ♗f8 leads to the exchange of bishop after 7 ♔c4 ♔g7 8 ♗xb4.
7 |
♔c4 |
♔g7 |
8 |
♗xb4 |
♗d8 |
Janowski does his best, but his bishop has been driven to the wrong diagonal. If, for example, 8 ... ♗h4 9 ♗c3+ ♔xg6 10 b4 we have the winning variation 1 given in our note to move 1.

9 |
♗c3+? |
Averbakh has demonstrated, in the following subtle analysis, that this natural move throws away the win. We can see why this is so if we turn to diagrams 634 and 635. We saw there that the bishop alone cannot defend against the pawn, and that the help of the king is required. We also saw from diagram 635 that Black’s king must not support the bishop from the side but from behind. In the present case this means that, with White’s king on c6, the black king must reach c4 in time, and with White’s king on a6 the black king has to occupy a4. Capablanca’s move does nothing to stop Black’s king reaching c4. If he had remembered the basic positions, he would have found the correct 9 ♗d2! giving two variations:
1) 9 ... ♔xg6 10 b4 ♔f5 10 ... ♔f7 11 ♔d5 ♔e8 12 ♔c6 etc. 11 ♔d5 ♔g4 Here is the point; Black’s king cannot go to f4 in this variation. 12 b5 ♔f3 13 ♔c6 ♔e4 Or 13 ... ♔e2 14 ♗f4 and 15 ♗c7 wins.

14 ♔b7! Or else Black’s king would reach c4 in time, whereas now a4 is too far away for him. 14 ... ♔d3 15 ♗e1 ♔c4 16 ♔a6 and there is no defence to the threat of 17 ♗a5 and 18 b6.
2) 9 ... ♗e7 to stop White’s pawn 10 ♗e3 ♔xg6 11 ♗c5 ♗d8 12 b4 ♔f5 13 ♔d5 ♔f4 14 b5 and Black’s king arrives too late.
9 |
... |
♔xg6 |
10 |
b4 |
♔f5 |
11 |
♔d5 |

In this position Janowski resigned, one of the countless such incidents in international chess! As Grandmaster Averbakh has shown, however, Black can draw in the following instructive way.
11 |
... |
♔f4! |
At first sight pointless, but our basic positions tell us that the king must head for c4! Incredible though it may seem, the king arrives there just in time.
12 |
♗d4 |
The last try. We already know from diagram 635 that the game is drawn after 12 b5 ♔e3 13 ♗e5 ♔d3 14 ♔c6 ♔c4.
12 |
... |
♔f3 |
13 |
b5 |
Or 13 ♗c5 ♔e2 14 ♔c6 ♔d3 15 ♔d7 ♗h4 16 b5 ♔c4 17 ♔c6 drawing.
13 |
… |
♔e2! |
The diagonal route is just as short as the horizontal.
14 |
♔c6 |
♔d3 |
15 |
♗b6 |
♗g5 |
16 |
♔b7 |
Still trying. The king heads for a6 so that he can carry out the manoeuvre ♗f2-e1-a5. If 16 ♗c7 ♗e3 17 ♗d6 ♔c4! the draw is clear.
16 |
... |
♔c4 |
17 |
♔a6 |
♔b3! |
The king must reach a4! The reader can see for himself that there is no other defence against 18 ♗f2.
18 |
♗f2 |
♗d8 |
19 |
♗e1 |
♔a4! |
And the black king’s long journey is crowned with success.
White can make no progress, so the game is drawn. This instructive example is yet a further proof of the need to play endings with the utmost precision.
Now let us consider a position in which White again has an extra pawn, but all the play takes place on the kingside.
This position comes from the game P. Keres – A. Lilienthal, Tallinn 1945.
We know that bishops lose in strength when the field of action is limited, so White has relatively few winning chances despite his extra pawn. It is clear that his d-pawns effectively blockaded, so his only chance is to penetrate with his king down the h-file. However, as only a few squares are available for the king, this manoeuvre offers few prospects of success.
1 |
♔g3 |
♗e8 |
Black dare not allow White’s king to reach h5, as this would tie his own king down to g7 and free White’s d-pawn.
2 |
♔h4 |
♔c6 |
3 |
♗e6! |
To make any progress, White’s bishop must reach h5, but if immediately 3 ♗e2 ♔d5 4 ♗h5 ♗b5 5 ♗f7+ ♔xd4 6 ♔h5 ♔e4 Black draws. Black’s bishop must first be driven to g6.

3 |
... |
♗g6 |
At first sight, it appears that 3 ... ♔d6 4 ♗xf5 ♔d5 is the simplest defence, for neither 5 ♗h7 ♔xd4 6 f5 ♔e5 7 ♗g6 ♗d7, nor 5 ♗g4 ♔xd4 6 ♗h5 ♗c6 7 ♗g6 ♗f3 8 ♗f5 ♔e3 gives White anything. However, 5 ♔g4 ♔xd4 6 ♗c2 and 7 ♔f5 would cause Black difficulties.
In such endgames, Black’s trouble is that he has a number of continuations, none of which directly loses, but which do not give a clear draw. Practice tells us that in such situations it is easy to make a mistake, and our example is good proof of this.
4 |
♗b3 |
♔d6 |
5 |
♗d1 |

5 |
… |
♔e7 |
Already Black misses a simpler defence by 5 ... ♗e8! 6 ♗h5 ♗b5 with a cunning idea 7 ♗g6 Or 7 ♗f7 ♗e2 etc. 7 ... ♔d5 8 ♔h5 Or 8 ♗xf5 ♔xd4 9 ♔h5 ♔e3. 8 ... ♔e4! 9 ♔xh6 ♔xf4 10 h4 ♗e2! and it is difficult to see how White can do anything. However, as we stated above, it is by no means easy to select the best of several plausible lines.
6 |
♗e2! |
White’s logical move would be 6 ♗h5, transposing into the main variation, but as we saw in the Capablanca – Janowski game, it is sometimes useful to tack about before proceeding with the main plan. Assuming, of course, that there is no danger and that your opponent has chances of going wrong. The waiting move 6 ♗e2! forces Black to defend with great care, and Lilienthal is equal to the situation.
6 |
... |
♔f8! |
The only correct defence. Black’s king protects the two critical squares e8 and f7, the importance of which is seen in the following line: 6 ... ♔f6(d6) 7 ♗h5 ♗h7 8 ♗e8 ♔e7 9 ♔h5! ♔xe8 10 ♔xh6 ♗g8 11 ♔g6 and White wins the other pawn, as 11 ... ♗e6 12 ♔f6 ♗c8 13 h4 is even worse for Black. White should have good chances with three pawns against a bishop.
It is interesting to note that Black also loses if he moves his bishop from the h7-g6 diagonal, e.g. 6 ... ♗f7 7 ♗h5 ♗e6 8 ♗g6 ♔f6 9 ♔h5 ♔g7 10 h3 ♗c8 11 d5 wins.
7 |
♗h5 |
♗h7 |

8 |
♔h3 |
It is difficult to make any progress. The bishop has no squares on the h5-e8 diagonal, and if it retreats, Black plays …♗g6. The only remaining chance is to play d5 to lure Black’s king away from the critical squares on the diagonal. However, an immediate 8 d5 is premature and after 8 ... ♔e7 White is in zugzwang. This is why he first triangulates with his king, so that Black’s king will be on e7 when d5 is played.
8 |
... |
♔e7 |
9 |
♔g3 |
♔f8 |
As we saw on the fifth move, 9 ... ♔d6 loses to 10 ♔h4 ♔d5? 11 ♗f7+ ♔xd4 12 ♔h5 winning the bishop.
10 |
♔h4 |
♔e7 |
11 |
♗d1 |
The next few moves were only played to take White past the time control. The situation remains unchanged.
11 |
... |
♗g6 |
12 |
♗e2 |
♔f8 |
13 |
♗f3 |
♔e7 |
14 |
♗h5 |
♗h7 |
15 |
d5! |
At last White plays his trump card.

15 |
... |
♗g8? |
…and Black immediately makes a decisive error, after which the game is lost. He could draw by 15 ... ♔d6! with the following possibilities:
1) 16 ♗e8 ♔e7! (not 16 ... ♔xd5? 17 ♔h5 ♔e4 18 ♔xh6 ♔xf4 19 h4 and 20 h5 winning) 17 ♔h5 (the only chance) 17 ... ♔xe8 18 ♔xh6 ♗g8 19 d6 ♔d7 20 h4 ♗f7 draws.
2) 16 ♗f7 ♔e7 17 ♔h5 (after 17 ♗e6 ♗g6 18 ♔g3 ♔d6 19 ♔f2 Black can calmly play 19 ... ♗e8 20 ♗xf5 ♔xd5 with a clear draw) 17 ... ♔xf7 18 ♔xh6 ♗g8 19 d6 ♔f6 draws.
16 |
♗g6 |
♗xd5 |
Or 16 ... ♔f6 17 ♔h5 ♔g7 18 d6 ♗e6 19 ♗e8 wins.
17 |
♔h5! |
♔f6 |
18 |
♔xh6 |
♗e6 |
White has made definite progress but still has problems, because his king is in the way of the powerful h-pawn. The whole question is whether the king can escape from the h-file. Apparently he cannot do so because Black’s bishop controls the exit square on g8, but a little combination comes to his aid.
19 |
♔h7 |
♗d5 |
20 |
h4 |
♗c4 |
21 |
h5 |
♗d5 |
Black could try 21 ... ♗b5 to prevent 22 ♗e8, when White would continue 22 h6 (but not 22 ♔g8 ♗c4+ 23 ♔f8? ♗f7! drawing, as 24 ♗xf7 gives stalemate) 22 ... ♗d7 23 ♗h5 ♗e6 24 ♗e8, as in the game.

22 |
♗e8! |
White must be careful not to throw away the win. After 22 h6? ♗f7! Black clearly draws, but play is much more subtle after the other winning attempt 22 ♔h8 with the intention of playing ♗h7-g8 etc.
Black defends by 22 ... ♗c6! 23 ♗h7 We already know the defensive point in 23 ♔g8 ♗d5+ 24 ♔f8? ♗f7!, but White can still revert to the game continuation by playing 23 ♔h7. 23 ... ♗e8! 24 h6

24 … ♗f7! Or 24 ... ♗g6 25 ♗g8 ♗e8 as below, or here 25 ♗xg6 ♔xg6 26 ♔g8 ♔xh6 27 ♔f7 ♔h7! 28 ♔f6 ♔g8 etc. 25 ♗g8 ♗e8! 26 ♗c4 if 26 h7 ♗f7, or 26 ♔h7 ♗g6+. 26 ... ♔g6 27 h7 ♗f7 28 ♗d3 ♗e6! and White’s king is shut in permanently. An interesting variation.

22 |
... |
♗e6 |
The waiting move 22 ... ♗c4 resists a little longer, but a simple winning plan then is 23 ♗d7 ♗b3 24 h6 ♗f7 (the threat was 25 ♗xf5! ♔xf5 26 ♔g7, and if 24 ... ♗c2 25 ♗e6! wins) 25 ♗c8 ♗g6+ (if 25 ... ♗e8 or 25 ... ♗h5 26 ♔g8 wins) 26 ♔g8 ♗f7+ 27 ♔f8 ♗g6 28 ♗d7 ♗h7 29 ♗e8 ♗g6 and now White wins with either 30 ♗xg6 ♔xg6 31 ♔e7 or 30 ♗f7 ♗h7 31 ♗g8 etc.
23 |
h6 |
♗f7 |
Or 23 ... ♗d5 24 ♗d7 ♗f7 25 ♗c8 etc wins.
24 |
♗d7! |
♗c4 |

25 |
♗xf5! |
The point! Black cannot play 25 ... ♔xf5 because of 26 ♔g7 followed by 27 h7, but with two pawns down Black is now lost.
25 |
... |
♔f7 |
26 |
♗d7 |
♗d3+ |
27 |
f5 |
♔f8 |
Hoping for 28 ♔g6? ♔g8 followed by 29 ... ♗xf5 drawing against the ‘wrong’ rook’s pawn.
28 |
♗e6 |
1-0 |
|
Our last two examples have shown us the difficulties that can arise when little material is left on the board or when all material is placed on one side of the board. In general, with bishops of the same colour, the extra pawn guarantees the win.
However, we may have a positional advantage which is often no less important than a material one. Such advantages as the better pawn position, a more effectively placed bishop or king, a strong passed pawn, enemy pawns or squares which are weak, are often sufficient to ensure the win. We have no time here to illustrate all these positional elements, but diagram 749 shows a number of them.

This position occurred in the game V. Smyslov – P. Keres, USSR Championship 1951. Both sides have equal material, but Black has several important positional advantages. Firstly, White’s pawns on the queenside are badly placed on the same colour as his bishop. Let us explain this point further: although such pawns can of course be defended more easily by the bishop, a grave disadvantage is that all the squares of opposite colour are seriously weakened. This allows the penetration of the enemy king who can be stopped only by the opposing king. This is why it is usually advisable to place one’s pawns on squares of opposite colour to one’s own bishop.
Secondly, Black’s king can reach the unassailable post on e5. From here he controls the centre and can penetrate via d4 or f4 after playing ... g5 and ... f5-f4. As White must use his bishop to defend his queenside pawns, he is soon in zugzwang and compelled to give way to the black king.
We can see Black’s winning plan already, and can easily understand the game continuation:
1 |
... |
♗b1 |
Gaining a tempo by attacking the a-pawn.
2 |
a3 |
a5! |
A vital move, preventing b4 once and for all and threatening to win the b-pawn after 3 ... ♗c2.

3 |
♗d1 |
Bitter necessity. The white bishop remains here for the rest of the game, tied down to the defence of the b-pawn. The black bishop, on the other hand, is free to move along the h7-b1 diagonal whilst maintaining the threat of ... ♗c2. In other words White is practically playing minus a piece, so can hardly avoid an eventual zugzwang.
3 |
... |
♔g6 |
4 |
♔g2 |
♔f5 |
5 |
♔f3 |
♔e5 |
Making his task more difficult. The immediate 5 ... g5! would have prevented White’s counterchance of 6 h4, when Black would exchange and prepare ... f5-f4 followed by an attack on the h-pawn or on the queenside. It is important that the pawns are left on the h-file, as we shall see.

6 |
a4 |
White neglects the opportunity to play 6 h4!, placing this pawn on a black square and making Black’s task extremely difficult. The main reason for this is that, if Black then plays 6 ... g5 followed by the advance of his f-pawn to f4, all the kingside pawns are exchanged, giving White good drawing chances. If instead Black plays 6 ... g5 7 hxg5 fxg5, then 8 g4! blocks the kingside pawns.
Nevertheless, even 6 h4 should not be sufficient to draw the game if Black pursues a logical plan. He plays 6 ... ♗d3 forcing 7 a4 because of the threatened 7 … a4, then continues 7 ... g6!.

The idea is to play ... ♗f5 and … h5, taking away the e2 and f3 squares from White’s king and allowing Black’s king to penetrate via e4. However, with White’s king on f2, he can answer … ♔e4 with ♗c2+, so Black must bring about this position with White to move. It is then zugzwang, as the bishop cannot move and the king must leave the defence of his e-pawn (the pawn ending is lost after ♔e2 and the exchange of bishops). For instance, if White plays ♔e1 Black plays his king to e4 and, if ♔d2, ... ♗g4 winning.
The plan is clear but its execution is fraught with technical problems. The point is that after, for example, 8 ♔f2 h5 9 ♔f3 ♗f5 10 ♔f2! it is Black who is in zugzwang and 10 ... g5 does not lead to a clear win. Black must therefore manoeuvre with more subtlety to bring about the same position with White to move. Play might go: 8 ♔f2 8 g4 only helps Black after 8 ... g5! 9 hxg5 hxg5 and 10 ... f5, creating an outside passed pawn. 8 ... ♔e4! 9 ♗f3+ ♔f5! 10 ♗d1 ♔e5 11 ♔f3 Or 11 ♔e1 ♗f5! 12 ♔f2 h5, or here 12 ♔d2 ♔e4 threatening 13 ... h5 and 14 ... ♗g4. 11 ... ♗f5! If 11 ... h5 12 ♔g2! can be played. 12 ♔f2 h5

The required position. 13 ♔e1 ♔e4 14 ♔d2 ♗g4! and Black wins after both 15 ♗c2+ ♔f3 and 15 ♗xg4 hxg4 16 ♔e2 f5 etc.
After the text move, anticipating the threat of ... ♗d3 and ... a4, Black’s task is far easier.
6 |
... |
g5! |

7 |
♔e2 |
Now 7 h4 is too late, as 7 ... gxh4 8 gxh4 f5 9 ♔f2 ♔e4 10 ♔e2 f4 wins easily. If instead 7 ♔f2 Black’s simplest plan is to play ... f5-f4.
7 |
... |
♗f5! |
Forcing White to advance the g-pawn, as 8 h4 allows Black to exchange bishops.
8 |
g4 |
♗b1 |
9 |
♔f3 |
f5 |
10 |
gxf5 |
Or 10 ♔e2 f4 11 ♔f3 fxe3 12 ♔xe3 ♗e4 and Black’s king reaches d4 or f4.
10 |
... |
♔xf5 |
After 10 ... ♗xf5 11 ♔g3 Black cannot play 11 ... ♔e4 because of 12 ♗c2+.
11 |
♔f2 |

11 |
… |
♗e4 |
11 ... ♔e4 would be pointless after 12 ♗h5. The text move restricts the activity of White’s king and prepares the decisive advance of the h-pawn.
12 |
♔g3 |
♔g6 |
13 |
♔f2 |
If 13 h4 h5! 14 ♔h3 ♗d3 15 ♔g3 ♗f5! forces the exchange of pawns, when the h-pawn wins quickly.
13 |
... |
h5 |
14 |
♔g3 |
h4+ |
15 |
♔f2 |
♗f5 |
White’s new weakness on h3 ties his king down and gives Black’s king a way through the centre.
16 |
♔g2 |
♔f6 |
17 |
♔h2 |

17 |
… |
♔e6! |
The final point. If at once 17 ... ♔e5 18 ♔g2 Black is in zugzwang (18 ... ♔e4 19 ♗c2+), whereas now the opposite is the case. 0-1, for after 18 ♔g2 ♔e5 19 ♔h2 ♗b1 20 ♔g2 ♔e4 21 ♔f2 ♔d3 22 ♔f3 ♔d2 23 ♗e2 ♗f5 Black wins easily.
Let us now consider a few examples of endings with bishops of opposite colour. As we have already mentioned there is a strong drawing tendency here, mainly because the bishops can never challenge each other. If the weaker side manages to blockade the enemy pawns, he can draw even with a great material deficit. Take the following position:

White can do nothing, as Black’s bishop guards the queenside pawns, and the kingside pawns are permanently blockaded. The extra material is useless.
However, if we now place the black king on g8, White wins easily after 1 ... ♗d3 2 f5! etc. Or if Black’s a-pawn is on a6 and White’s on a5, the black bishop cannot defend his backward pawn.
Our first example comes from the game A. Nimzowitsch – S. Tarrasch, Bad Kissingen 1928.

White has an extra pawn but the win is still a long way off. He has no passed pawn yet and the few weaknesses in Black’s position seem difficult to exploit because the bishop can guard the kingside pawns. One might imagine that Black has little to fear if he uses his bishop to protect his kingside pawns while his king holds up the eventual passed pawn on the queenside.
However, matters are not so simple, as the instructive game continuation shows us. The reason for this is that Black’s bishop finds difficulty in defending without the help of the king, precisely because of the weak pawn position. For instance, if his e-pawn were on g7, he would have no trouble at all. Let us see what dangers are lurking in this position:
1 |
♔h2 |
c4? |
It is understandable that Black wishes to place his queenside pawns on the same colour as his bishop, so that his king can cross over to the kingside. (As we shall see later, the bishop cannot guard his weak f- and h-pawns without the help of the king.) However, the disadvantage of marching the king over to the kingside is that White can create a passed pawn on the queenside. There are admittedly some technical problems to overcome, but once White has a passed pawn, Black’s defence crumbles.
Apparently Tarrasch did not recognize the danger in time, or else he would have taken specific measures against it. Of course, he could not play 1 ... f4 2 ♗g5 f3 3 g4! and White can eventually create a passed pawn on both wings. Grandmaster Averbakh pointed out the correct defence: 1 ... ♗b5! 2 ♔g3 ♗f1 preventing the advance of White’s king. After 3 h4 h5 4 ♔f4 ♗xg2 5 ♔xf5 ♗f3 Black’s bishop protects both his kingside pawns. The same happens after 2 g4 fxg4 3 hxg4 ♗e2 etc. After missing this chance, Black has a lost position.
2 |
♔g3 |
♔c8 |
3 |
♔f4 |
♔d7 |
4 |
♗b4 |
♔e6 |
5 |
♗c3 |

5 |
… |
♗d7 |
If Black tries 5 ... ♗g6, then the advance of White’s h-pawn soon brings him into difficulties. Fine gives the following interesting continuation: 6 ♔g5 ♔d5 7 g3 b5 8 h4 (if 8 ♔h6 Averbakh gives 8 ... f4! 9 gxf4 e3 10 fxe3 ♗xc2 etc) 8 ... ♔c6 9 b3! cxb3 (or 9 ... ♔c5 10 a4 and White still obtains a passed pawn) 10 cxb3 ♔b6 11 a4 bxa4 12 bxa4 ♔a6 13 a5 ♔b5 14 h5 ♗e8 15 ♔xf5 ♗xh5 16 ♔xe4 and White wins by advancing his f-pawn.
This variation clearly shows us why Black’s bishop cannot defend the kingside pawns on its own. Black has decided to switch the roles of his king and bishop, but this plan too proves unavailing.
6 |
g3 |
b5 |
7 |
♔g5 |
♔f7 |
Forced, as 8 ♔h6 was threatened.
8 |
h4 |
♗c8 |
9 |
♔h6 |
♔g8 |
Black is now holding everything on the kingside, so White turns his attention to the queenside where he creates a passed pawn.
10 |
b3! |
cxb3 |
Or 10 ... ♗e6 11 a4! and White still obtains a passed pawn.
11 |
cxb3 |

11 |
... |
f4 |
Despair, but there was no defence. After 11 ... ♗d7 12 ♗e5 Black is in zugzwang, e.g. 12 ... ♗e6 13 a4! bxa4 14 bxa4 ♗d7 15 a5 ♗c8 16 ♗d4 ♗a6 17 ♔g5 ♗c8 18 ♔f6 wins. Or 12 ... ♗e8 13 ♔g5 ♗d7 14 ♔f6 ♔f8 15 ♗d6+ ♔g8 16 ♔e7 ♗c6 (or 16 ... ♗c8 17 a4 etc) 17 ♔e6 and Black’s f-pawn falls. Tarrasch’s move doubles White’s pawns but the passed f-pawn is now decisive.
12 |
gxf4 |
♗d7 |
13 |
♔g5 |
♔f7 |
14 |
f5 |
♗c6 |
15 |
♔f4 |
♔e7 |
16 |
♔e5 |
♗e8 |
He cannot hold the e-pawn, e.g. 16 ... ♔f7 17 ♔d6 ♗e8 18 ♔d5 wins, or here 17 ... ♗b7 18 ♔c5 etc.

17 |
♔xe4 |
This virtually ends resistance. The game finished: 17 ... ♗c6+ 18 ♔e5 ♗e8 19 ♔d5 ♗f7+ 20 ♔c5 ♗e8 21 ♗e5 ♗d7 22 ♔b6 ♔f7 23 f6 ♗e8 24 f4 ♔e6 25 ♔a6 ♔f7 26 b4 ♔e6 27 a4 bxa4 28 b5 1-0. A very interesting and instructive ending.
In such endings, passed pawns play a vital part, and surprising sacrifices of material are often necessary to create these passed pawns, even if it means giving some to the enemy. Connected pawns or pawns standing on the same diagonal can be held by the bishop, so it is much better to have passed pawns which are far apart. Our next beautiful example shows how this works out in practice.

Y. Averbakh 1951
This position occurred in a variation of the game Smyslov – Averbakh, Moscow 1950. In the actual game Smyslov only drew, but Averbakh pointed out afterwards that White could have obtained the diagrammed position which is won for him. White has two extra pawns, but they are doubled. He can undertake nothing on the kingside and Black’s king bars the way to the queenside. No wonder that Smyslov felt he could make no progress and gave up the game as drawn, after a few unsuccessful attempts at a win.
Nevertheless, there is a surprising way to win, as we see in the following analysis by Averbakh:
1 |
♔g5 |
♔f7 |
If 1 ... ♗xf3 2 ♔xg6 ♔e5 3 ♗e3 ♔e6 4 ♗f4 White wins another pawn. Black now threatens 2 ... ♗xf3.

2 |
f4!! |
A bizarre-looking move, blocking in his own king, but it is the only way to win. After 2 g4 Black draws by 2 ... fxg4!. If 2 ... ♗xf3 3 gxf5 gxf5 4 a8♕ ♗xa8 5 ♔xh5 f4 6 ♔g5 f3 7 ♔f5 and 8 ♗f2 followed by the transfer of the king to the queenside, winning. 3 fxg4 hxg4 4 ♔xg4 ♔e6 5 ♔g5
5 … ♗e4! Not 5 ... ♔f7 6 ♗d4 ♗h1 7 ♗f6 threatening 8 h5 and 9 ♔f5 etc. 6 a8♕ ♗xa8 7 ♔xg6 ♔d7 8 h5 ♔c7 and Black draws by giving up his bishop for the h-pawn.
The idea of White’s move is to break through with g4, creating another passed pawn on the kingside, even though this means giving Black two connected passed pawns. These will be held by the bishop, as the following exciting play shows.
2 |
... |
♗e4 |

Guarding the f-pawn, so that after 3 g4 hxg4 4 h5 gxh5 White would have to give up one of his doubled pawns in order to win the f-pawn. At all events, White must make preparations before he can break through.
3 |
♗f2 |
This is the best square for the bishop in the coming fight against Black’s future passed pawns. After, for example, 3 ♗d4 ♗f3 4 g4 hxg4 5 h5 gxh5 6 ♔xf5 h4 Black draws.
3 |
... |
♔g7 |
Or 3 ... ♗f3 4 g4! hxg4 (4 ... fxg4 5 ♗g3! ♔g7 6 f5 gxf5 7 ♔xh5 f4 8 ♗xf4 g3+ 9 ♔g5 g2 10 ♗e3 wins, as the white king heads for the queenside) 5 h5 gxh5 6 ♔xf5 winning even more easily than in the main line.

4 |
g4! |
The key move of the whole plan. Black cannot prevent the creation of another passed pawn.
4 |
... |
hxg4 |
Giving White more problems than 4 ... fxg4 5 f5 gxf5 6 ♔xh5, e.g. 6 ... ♔f6 7 ♗g3 ♗f3 8 ♔h6 ♗e4 9 h5 ♗f3 10 ♗h4+ ♔f7 (or 10 ... ♔e5 11 ♔g5 f4 12 h6 etc) 11 ♔g5 ♗e4 12 ♗g3 ♔g7 13 ♗e5+ ♔h7 14 h6 ♗a8 15 ♔xf5 ♔xh6 16 ♔e6 wins easily.
5 |
h5 |
gxh5 |

6 |
a8♕! |
White has no time for 6 ♔xh5 ♔f6 7 ♗h4+ ♔e6 8 ♔g6 ♗a8 9 ♔g7 ♗c6 10 ♔f8 ♔d5! 11 ♔e7 ♔c5 12 ♗f2+ ♔b5 13 ♔d6 ♗e4 14 ♔c7 ♔xa6 15 ♔b8 ♔b5 drawing, as given by Averbakh.
6 |
... |
♗xa8 |
7 |
♔xf5 |

White has now given up his two extra pawns but has reached a very favourable ending with his passed pawns far apart and effective, whilst Black’s pawns are easily held by the bishop.
7 |
... |
♔f7 |
White was threatening 8 ♔e6 followed by the advance of his f-pawn.
8 |
♔g5 |
8 |
… |
♗f3 |
Black could draw if only his king could reach the queenside and his bishop be sacrificed for White’s f-pawn. But he has no time for this, e.g. 8 ... ♔e7 9 f5 ♔d7 10 f6 ♗d5 11 a7 wins.
9 |
a7 |
♗d5 |
10 |
♗h4 |
Not 10 ♔xh5 ♔e6! 11 ♔xg4 ♔d7 12 f5 ♔c7 13 f6 ♔b7 and Black’s king arrives in time to draw.
10 |
... |
♗f3 |

11 |
f5 |
If 11 ♔xh5 g3+ 12 ♔g5 g2 13 ♗f2 ♗e4 Black draws, for if White’s king heads for the queenside, his bishop cannot maintain a guard on the f-pawn.
11 |
... |
♔g7 |
12 |
♗g3 |
♔f7 |
13 |
♗e5 |
♗e4 |
Or 13 ... ♔f8 14 ♔f6 h4 15 ♗d6+ ♔e8 (if 15 ... ♔g8 16 ♔e7) 16 ♔g7 wins. Or 13 ... ♔e7 14 ♔g6 wins. Black is in zugzwang.
14 |
♔xh5 |
Apparently allowing Black to win the f-pawn.
14 |
… |
g3 |
15 |
♗xg3 |
♔f6 |

16 |
♔g4! |
♗xf5+ |
17 |
♔f4 wins. |
|
White’s a-pawn queens. An attractive finish, the whole play being typical of the subtleties involved in endings with bishops of opposite colour.
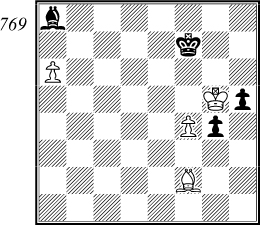
And now, to conclude this section on practical endgames let us analyse a few very useful examples of the struggle between knight and bishop. We have already mentioned that the bishop is superior to the knight when the centre is open and there are pawns on both wings. The advantage of the bishop is also clear when the knight has strayed into the enemy camp and is threatened with capture. Our next example shows us that a win is even possible with limited material on the board and all the pawns on the same wing.

This position occurred in the game F. Marshall – A. Nimzowitsch, Berlin 1928. Although material is even, and a black victory would normally be out of the question, the position of White’s knight is a serious handicap to him. It has no way of getting back into the game and could even be lost. Nimzowitsch skilfully uses this factor to win as follows:
1 |
... |
♔d5! |
Cutting out the knight’s retreat to c5 and threatening to capture it by 2 ... ♗a2 and 3 ... ♔c6.
2 |
♔h2 |
Why does White choose to ignore the threat? The following analysis shows that if White tries to save his knight he still loses the ending: 2 ♘d8 ♔d6 3 ♘b7+ ♔c6! 4 ♘a5+

4 … ♔d5 If 4 ... ♔b5 5 ♘b7 and the threat of 6 ♘d6 forces the king to go back. 5 ♘xc4 Or 5 ♔h2 ♗a2! and White has insufficient compensation for his piece after both 6 g4 ♔c5 7 ♔g3 ♔b6 8 ♔f4 ♔xa5 9 ♔xe4 ♔b4 10 ♔f5 ♔c3, and 6 ♔h3 ♔c5 7 ♔g4 ♔b5 8 ♔h5 ♔xa5 9 ♔xh6 ♔b4. 5 ... ♔xc4 6 ♔f1 Or 6 f3 e3 7 ♔f1 ♔d3 8 ♔e1 f5 followed by 9 ... e2 and 10 ... ♔e3 winning easily. 6 ... ♔d3 7 ♔e1 h5 8 ♔d1

8 … e3! 9 fxe3 or 9 f3 f5 wins 9 ... ♔xe3 10 ♔e1 ♔e4 11 ♔e2 ♔f5 12 ♔f3 ♔g5 13 ♔e3 ♔g4 14 ♔f2 f6 and Black wins by capturing the g-pawn then advancing his h-pawn.
Marshall is hoping to exchange all the pawns while Black is using time to capture the knight.

2 |
... |
♗a2 |
3 |
g4 |
f6 |
Winning more easily than after 3 ... ♔c6 4 ♘d8+ ♔c7 5 ♘xf7 ♗xf7. However, as this position could have arisen if Marshall had played 2 ♘d8 ♔d6 3 ♘b7+ ♔c6 4 ♘a5+ ♔d5 5 ♔h2 ♗a2 6 g4 ♔c5 7 ♘b7+ ♔c6 8 ♘d8+ ♔c7 9 ♘xf7 ♗xf7, let us examine it more closely:
White must of course continue with 6 ♔g3 ♔d6 7 ♔f4 attacking the e-pawn. Black guards it by 7 ... ♗g6 and play goes 8 f3 8 g5 h5 only helps Black. 8 ... exf3 If 8 ... ♔d5 9 fxe4+ ♗xe4 10 g5 h5 11 g6! ♗xg6 12 ♔g5 and 13 g4 draws. Or 8 ... ♔e6 9 g5! h5 10 fxe4 ♔d6 11 ♔g3! ♔e5 12 ♔h4 ♔f4 13 g3+ ♔f3 14 e5 ♗e8 15 e6 ♗g6 16 ♔h3! draws. 9 gxf3 when Black still has several technical problems to overcome. The winning method is as follows: 9 ... ♔d5 10 ♔e3 or 10 ♔g3 ♔e5 11 f4+ ♔e4 wins. 10 ... ♗c2 11 ♔f4 Or 11 f4 ♗d1 12 g5 h5 etc. 11 ... ♗b1 Waiting. 12 ♔e3 Or 12 ♔g3. 12 ... ♗g6!
…and White is in zugzwang, giving us two variations:
1) 13 ♔f4 ♔d4 14 ♔g3 Easier for Black is 14 g5 h5. 14 ... ♔e3 15 f4 ♔e4! 16 f5 ♗e8! 17 g5 h5 18 f6 ♔f5 wins.
2) 13 f4 ♗e8! So that 14 f5 is not played with gain of time. 14 ♔f3 Or 14 g5 h5 15 f5 ♔e5 winning the pawns. 14 ... ♔d4 15 ♔g3 ♔e4 16 f5 ♔e5 wins, or here 15 g5 h5 16 f5 ♔e5 wins.
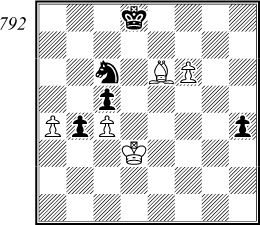
Returning to the actual game, Black’s last move preserves his f-pawn. His task is thus made a little easier, but the finish is still interesting.

4 |
♔g3 |
♔c6 |
5 |
♘a5+ |
As the knight is lost anyway, it is best to drive Black’s king as far away as possible from the kingside.
5 |
... |
♔b6 |
6 |
♔f4 |
♔xa5 |

7 |
♔xe4 |
White dare not let Black keep the strong e-pawn. For example, after 7 ♔f5 Black wins by 7 ... ♔b4 8 ♔xf6 ♔c3 9 g5 hxg5 10 ♔xg5 ♔d2 11 ♔f4 ♗b1! 12 g4 ♔e2 13 ♔g3 ♗a2 14 g5 ♗f7 15 ♔g2 ♗g6 and Black’s king comes in decisively at f1 or f3.
7 |
... |
♗e6 |
8 |
♔f4 |
♔b4 |
9 |
♔g3 |
♔c5 |
10 |
♔h4 |
♗f7 |
Black must not allow White’s king to reach h5. White now manages to exchange one of his pawns.
11 |
f4 |
♔d6 |
12 |
g5 |
hxg5+ |
Not of course 12 ... fxg5+ 13 fxg5 h5 14 g4 etc.
13 |
fxg5 |
f5 |
14 |
g6! |
♗e6 |
Again White draws after 14 ....♗xg6 15 ♔g5 and 16 g4.
15 |
♔g5 |
♔e5 |
16 |
♔h6 |
♔f6 |
The more active 16 ... ♔f4 only leads to a draw after 17 ♔h5 ♔g3? 18 ♔g5 f4 19 g7 ♗g8 20 ♔f5 ♗h7+ 21 ♔g5 etc.
17 |
g3 |
Sooner or later White is compelled to make this disadvantageous move, e.g. after 17 ♔h5 ♗d5 etc White loses at once after 17 ♔h7 ♔g5 18 g7 f4.
17 |
... |
♗d7 |
18 |
♔h5 |
If 18 ♔h7 ♔g5 19 g7 ♗e6, or 18 g7 ♗e6, as given in the last note.

18 |
... |
♔g7 |
A little quicker is 18 ... ♗e8 19 ♔h6 ♗xg6 20 g4 f4 21 g5+ ♔f5 etc.
19 |
♔g5 |
♗e6 |
20 |
♔h5 |
♗c8 |
21 |
♔g5 |
♗d7! |
Black has now lost a tempo and White is forced to give way.
22 |
♔h5 |
♔f6 |
Not of course 22 ... ♗e8 23 ♔g5 ♗xg6 24 g4 drawing.
23 |
♔h6 |
♗e8 |
24 |
g7 |
♗f7 |

And White resigned in view of the continuation 25 ♔h7 ♔g5 26 g8♕+ ♗xg8 27 ♔xg8 ♔g4 winning. A remarkable ending whose outcome one could hardly suspect from looking at the original diagram.
Our next example illustrates most clearly the advantage of the bishop in positions with play on both wings.

V. Chekhover – Em. Lasker
Moscow 1935
Again material is even. White has little to fear on the kingside at the moment, but his queenside pawns could easily become weak. Not in the sense that they can be captured, but that they cannot prevent the entry of Black’s king. So White must try to strengthen his queenside. If his a-pawn were on a4, for example, he could play 1 ♘c1 and 2 ♘d3, covering all points of entry, with a reasonable position. However, he has no time for 1 a4 because of 1 ... ♔c6 2 ♘c1 ♔c5 penetrating via b4 or d4. White’s only chance is to bring his king over a quickly as possible to the queenside.
1 |
♔f1 |
b5! |
With the idea of creating a weak white pawn on a4. 1 ... ♗b2 loses time, as after 2 a4 ♔c6 3 ♔e1 ♔c5 4 ♔d2 ♔b4 5 ♔c2 White guards his weak b-pawn.
2 |
♔e1 |
♗b2 |
3 |
a4 |
bxa4 |
4 |
bxa4 |

4 |
… |
♔c6! |
Or, of course, 4 ... ♔b6, but after 5 ♔d2 Black must not play 5 ... ♔a5? 6 ♔c2 ♗e5 7 f4 ♗d6 8 ♔b3 with a perfectly acceptable position for White, instead, 5 ... ♔c5! transposes to our main line. Lasker’s deep positional understanding tells him that it is not enough to attack a single weakness, so he plans to centralize his king, aiming also at White’s e-pawn.
5 |
♔d2 |
♔c5! |

6 |
♘c3 |
Lasker’s idea would be clearly seen in the variation 6 ♔c2 ♗d4 7 f3 ♔c4! when Black’s pieces dominate the whole board and White must lose material, e.g. 8 ♘c1 ♗e5 9 h4 ♔b4 winning a pawn. Or 8 ♘xd4 ♔xd4 9 ♔b3 a5 with an easily won pawn ending.
With the text move White seeks counterplay, but in so doing he plays his knight too far away from the queenside and allows Black a powerful passed a-pawn.
6 |
... |
♔b4 |
Lasker does not need to calculate whether the pawn ending could be won after 6 ... ♗xc3+ etc. In endings one should always choose the most clear-cut plan, and there is no doubt that the safest way to win lies in the capture of the a-pawn.
7 |
♘b5 |
a5 |
8 |
♘d6 |
♔xa4 |

9 |
♔c2 |
After 9 ♘xf7 ♔b3 the a-pawn costs at least the knight, e.g. 10 ♘d8 a4 11 ♘xe6 a3 12 ♘c5+ ♔c4 etc. The text move on the other hand loses the h-pawn.
9 |
... |
♗e5 |
10 |
♘xf7 |
♗xh2 |
Black must now win with his extra passed a-pawn, and Lasker faultlessly solves the technical problems.
11 |
♘d8 |
e5 |
12 |
♘c6 |
♗g1 |
13 |
f3 |

13 |
… |
♗c5 |
Restricting the activity of White’s knight.
14 |
♘b8 |
♔b5 |
15 |
g4 |
♗e7 |
16 |
g5 |
The knight was already threatened with capture.
16 |
... |
fxg5 |
17 |
♘d7 |
♗d6 |
18 |
♘f6 |

18 |
… |
♔c4 |
...and White resigned, as 19 ♘xh7 fails to 19 ... ♗e7. A beautiful example of the strength of a bishop in an open position with play on both wings.
Let us now examine the other side of the coin. The knight is often superior to the bishop when the position is of a more closed nature or when the bishop is restricted by its own pawns. It is here that the knight can exploit its ability to control squares of either colour, as our next example shows.

This position occurred in the game I. Kan – P. Keres, USSR Championship, Moscow 1955. At first sight it may seem that White’s passed pawns, backed by his centralized bishop, give him a good game. However, on closer examination certain disadvantages appear. Firstly, both passed pawns are effectively blockaded and can be supported only by the bishop, as White’s king is tied to the defence of the c-pawn. Secondly, the weakness of the black squares means that Black’s king is threatening to occupy e5, when White’s f-pawn is lost. If we add to all this the fact that Black also has two possible passed pawns, then the good points of White’s position dwindle in importance.
We can conclude that Black’s prospects are better, but is White’s position lost? Although the situation is difficult, White’s long-ranging bishop ensures him good defensive chances, but only if he plays with the utmost precision. The game continued as follows:
1 |
♗d5? |
This obvious move, protecting the c-pawn and freeing White’s king, leads to the loss of the game. It is clear that White use his passed f-pawn as a. counter-threat to the advance of Black’s h-pawn. Once this pawn reaches h2 it will completely tie the bishop down, so White must play 1 ♗f3! h4 2 gxh4 gxh4 3 ♗g4! stopping the h-pawn and threatening f6, with the following variations:

1) 3 … ♔d6 if 3 ... ♘c6 4 f6 ♘e5+ 5 ♔c2, Black’s knight dare not capture the bishop or the c-pawn. 4 f6! White must not allow this pawn to be blockaded, e.g. 4 ♗h3? ♔e5 5 ♗g4 ♔f6 6 ♗h3 ♔g5 with zugzwang. 4 ... ♘c6 5 ♔c2 Only this problem move saves White, as 5 ... ♘e5+ was threatened, winning the c-pawn. 5 ... ♘e5 6 a5!

6 … ♘xc4 Not of course 6 ... ♘xg4 7 f7 ♔e7 8 a6 winning, or 6 ... ♔c7 7 ♗e6 ♔b7 8 ♔b3 etc. 7 a6 ♘b6 8 ♔b3 and if anyone has the advantage, it is not Black.
2) 3 ... ♔d8 In order to attack the f-pawn via e8 and f7. 4 f6 ♘c6 If 4 ... ♔e8 5 ♗e6. 5 ♗e6!
…and it is difficult to see how Black can make any progress. Any attempt to attack the f-pawn or advance the h-pawn would allow White’s a-pawn to advance.
This defensive plan may appear simple enough, but in practice it was not so easy to find, when one considers that 1 ♗d5? was the first move played after the time control. Despite long thought during the adjournment, Master Kan failed to grasp all the subtleties of the position. It is interesting and instructive to see how the text move leads to a loss.
1 |
... |
♔d6 |
2 |
f6 |
h4 |
3 |
gxh4 |
gxh4 |
There is not much difference between this position and the one we examined above, except that the bishop is posted less effectively. Unless White wants to lose his f-pawn he has to allow Black’s h-pawn to reach h2. The white king is still tied to the queenside because of Black’s passed b-pawn.

4 |
f7 |
Passive defence is no good either. After 4 ♔d2 h3 5 ♔c2 h2 6 ♔d3 ♔d7! White is in zugzwang, as bishop moves lose the f-pawn. Nor would 4 ♔e4 save White, because Black’s b-pawn then becomes too dangerous, e.g. 4 ... h3 5 ♔f3 (or 5 ♔f5 h2 when White loses after both 6 f7 ♔e7 7 ♔g6 ♔f8 and 6 ♔g6 ♘xc4 7 f7 ♘e5+) 5 ... b3 6 ♔g3 b2 7 ♗e4 ♔e6! 8 ♔xh2 ♔xf6 9 ♔g3 ♔e5 winning easily.
4 |
... |
♔e7 |
5 |
♗e6 |
So White has managed to hold up the h-pawn, but at the cost of an insecure position for his bishop. Black now wins the f-pawn.

5 |
... |
♘c6! |
Threatening both 6 ... ♘e5+ and 6 ... ♘d8.
6 |
♗d5 |
Or 6 ♔e4 b3 7 ♔d3 b2 8 ♔c2 ♘d4+ winning the bishop.
6 |
... |
♘e5+ |
7 |
♔c2 |
♘xf7 |
The beginning of the end, for if White exchanges pieces, Black’s h-pawn queens first, stopping the a-pawn.
8 |
a5 |
♘d6 |

9 |
a6 |
The attractive idea 9 ♗b7 ♘xb7? 10 a6 fails to 9 ... ♔d7 10 a6 ♔c7 etc.
9 |
... |
♘c8 |
10 |
♗g2 |
♔d6 |
11 |
♔b3 |
♔c7 |
White’s a-pawn is now harmless and Black wins easily.
12 |
♗b7 |
h3 |
13 |
♔a4 |
h2 |
0-1 |
||
However, the knight is really seen at its best in blocked positions, when the bishop can find no scope for its long-ranging movement. This is especially the case when there are no points of attack in the enemy position. Diagram 301 offers us a good example of this.

This position comes from the encounter M. Henneberger – A. Nimzowitsch, Winterthur 1931. White has the so called ‘bad’ bishop, restricted by its own pawns and unable to attack the enemy pawns. It must remain on e1 permanently to guard his c- and g-pawns against the threat of ... ♘e4. Contrast the complete freedom of Black’s knight which can attack from various positions.
Nevertheless, despite all this, coupled with a grave weakness on the white squares, it is not easy for Black to exploit his positional advantages. The main reasons for this are that White is for the time being holding all his weak points and can use his king to prevent the entry of Black’s king. Black must therefore think of a way of strengthening his position. The usual weapon in such situations is zugzwang. White’s bishop can easily be tied down by ... ♘e4 but this knight then blocks the square needed for Black’s king.
Careful consideration of the position produces a winning plan: if Black plays his knight to b1 via a3 then places his king on d5, White is in zugzwang, and the pawn ending is lost after ... ♗d2 because of the tempo move ... a3!. This is the plan, then, but how can it be executed? The first moves are simple enough to understand:
1 |
... |
♘e4 |
2 |
♔e2 |
♔d5 |
Apparently Nimzowitsch has not yet seen the winning idea, or else he would play 2 ... ♔d6! 3 ♔e3 ♔d5 with a quicker win.
3 |
♔e3 |
3 |
… |
♔d6! |
He now realizes that there are problems if he immediately plays 3 ... ♘d6. After 4 ♗d2 ♘b5 5 ♗e1 ♘a3 6 ♗d2 ♘b1 (or 6 ... ♘c2+ 7 ♔e2 ♔e4 8 ♗e1 and the knight has no retreat) 7 ♗e1 Black is in zugzwang. If then 7 ... a3 8 ♗d2 ♘xd2 9 ♔xd2 ♔e4 10 ♔e2 draws, as Black no longer has the tempo move ... a3. Black must therefore bring about the same position with White to move. In other words he must lose a move by triangulating with his king (we already know that a knight cannot lose a move).
4 |
♔e2 |
♔c6 |
5 |
♔e3 |
♔d5! |
6 |
♔e2 |
♘d6 |
7 |
♔e3 |
♘b5 |
8 |
♗d2 |
♘a3 |

9 |
♗c1 |
If 9 ♗e1 Black has a choice between 9 ... ♘b1 10 ♗d2 ♘xd2 and 11 ... ♔e4, or 9 ... ♘c2+ and 10 ... ♘xe1, winning as we have already seen. So White has no alternative.
9 |
... |
♘b1 |
10 |
♗b2 |
a3 |
Although this completely blocks in his own knight, the fact that White’s bishop is immobilized in the corner is more than enough compensation. We now have a curious position which is almost a pawn ending and won by Black without great difficulty.
11 |
♗a1 |
Or 11 ♗c1 ♘xc3 12 ♗xa3 ♘xa2 winning easily.

11 |
… |
♔d6! |
Black again manoeuvres to lose a move. White’s king cannot do the same without allowing the knight in at d2, e.g. 12 ♔f2 ♘d2 13 ♔g2 ♘b3! etc.
12 |
♔e2 |
♔c6 |
13 |
♔d1 |
The best chance. If 13 ♔e3 ♔d5 White is in zugzwang and loses at once after 14 ♔f2 (14 ♔e2 ♔e4) 14 ... ♘d2 and 15 ... ♘b3 or 15 ... ♘e4. The text move wins the knight, but allows the entry of Black’s king.
13 |
… |
♔d5 |
14 |
♔c2 |
♔e4 |
15 |
♔xb1 |
♔f3 |

16 |
♗b2! |
The only way to keep the game alive, creating a passed a-pawn.
16 |
... |
axb2! |
The bishop must be captured, as after 16 ... ♔xg3 17 ♗xa3 White could even win.
17 |
a4 |
♔xg3 |
18 |
a5 |
♔h2! |
Black wants an easily won pawn ending, not the queen ending he would reach after 18 ... ♔xf4 19 a6 etc.
19 |
a6 |
g3 |
20 |
a7 |
g2 |
21 |
a8♕ |
g1♕+ |
22 |
♔xb2 |

22 |
… |
♕g2+! |
All of which had to be exactly calculated when Black blocked in his knight on b1.
23 |
♕xg2+ |
♔xg2 |
24 |
♔a3 |
♔f3 |
25 |
♔b4 |
♔xf4 |
26 |
♔xc4 |
♔e3 |
27 |
d5 |
exd5+ |
28 |
♔xd5 |
f4 |
0-1 |
||
White’s pawn reaches c7 but his king is wrongly placed for the draw. An excellent example of the strength of a knight in blocked positions.
This concludes our practical examples. We have obviously only shown the reader a small amount of the available material, but hope that he has now acquired the basic knowledge required for handling such endings with some confidence.