
1
If you can’t explain it simply, you don’t understand it well enough.
—ALBERT EINSTEIN
I’m not often surprised when eating pizza. Sure, there is good pizza, and there is great pizza, along with shitty pizza, interesting pizza, and totally out-of-the box pizza. But for the most part, I’ve seen and eaten almost every style of pizza out there. Then I met Stefano Callegari at Sbanco in Rome.
Katie Parla, my friend and colleague who lives in Rome, introduced us. Katie knows pretty much everything about Roman history, culture, and food, including how to give Roman Uber drivers who try to scam her a serious verbal ass kicking—in both Italian and English! She said Sbanco was a can’t-miss restaurant on our Rome itinerary, and I trusted her. It was our last day of a pretty intense research trip, and the four of us (including my collaborator David Joachim and photographer Ed Anderson) had already eaten forty-five different pizzas in three days.
We had set aside a good chunk of that afternoon to just talk and make pizza with Stefano at his pizzeria. I was curious because at most of the other places, we had talked with the chefs during service, gazed in their ovens, taken pictures, and eaten tons of pizza, but we hadn’t spent hours just making pizza and talking with them while the restaurant was closed. Once Stefano and I started chatting, I understood Katie’s motives immediately. There is an authenticity to Stefano that is not easy to find in these days of nonstop self-promotion. He is humble and passionate, and he knows his craft. He’s also a big bear of a guy who loves to eat pizza. We chatted about our lives, our obsessions, and what had brought us to where we are in life, all while pressing out pizzas together, first Stefano, followed by me, both of us making simple Neapolitan-style pies and eating, drinking, and talking without a care in the world. Then he showed me the unthinkable.
He put ice on the raw dough. Ice? How does that make sense? Stefano proceeded to load the pizza into his wood-fired oven. My mind started racing, not only with the anticipation of tasting this pizza but also with the infinite possibilities that could be fabricated from such a simple exercise.
It’s genius. Ice on pizza…the ice melts in the oven, mixes with starch from the dough, and creates a thickening agent right on the dough. When you pull out the pizza, it has a thin layer of starchy water on top, and you can make a kind of sauce on it, the same way you would make a pasta sauce, mixing the starchy liquid with cheese, butter, or whatever you want. I wanted to kiss him! Stefano mixed some pecorino by hand into the starchy water, ground some black pepper over the top, and drizzled on a little olive oil. Boom! Cacio e pepe pizza.
It was amazing. The sauce was creamy, the pecorino was sharp, the pepper tingly, the olive oil aromatic, and the dough chewy in the middle. It tasted like cacio e pepe pasta. All of Stefano’s toppings were simple, thoughtful, and slightly edgy for a traditional Neapolitan-style pizzeria. But the cacio e pepe pizza stood out. It truly stretched the parameters of the age-old question: tradition or innovation? This pizza perfectly married the two by juxtaposing a classic Roman pasta dish with a classic Neapolitan pizza.
This is what starts my creative juices flowing. If cacio e pepe can successfully become a pizza, what else can?
BAKING TEMPERATURE AND DOUGH HYDRATION
Stefano’s dough turned out to be one of the most alluring representations of Naples-style dough that we ate on that trip—with perfect leopard spotting on the rim, a chewy crust, and a subtle crunch. Two key things made that happen: (1) the high, dry heat of his wood-fired oven and (2) the amount of water in his dough or, the dough’s hydration. Yes, the flour makes a huge difference, too, but we’ll get to that later. Stefano’s dough is almost 70% water (relative to the flour), which is pretty high for Naples-style dough. That amount of water, gives the dough a lot of bubbles and a big lift, which makes Stefano’s crust light and airy. His pizza oven is about 800°F (427°C) on the floor, which puffs up the dough pretty fast and makes the bottom crust nice and crisp. His crust is a little crisper than most of the pizzas you find in Naples, and I kinda like it that way.
That brings us to one of the most important points of this book: to get the kind of texture you’re looking for in a pizza crust, it helps to balance the heat of your oven with the water in your dough. Think about it. Classic Neapolitan pizza (Vera Pizza Napoletana) is baked at about 900°F (482°C), the dough is pretty low in water (55 to 59% hydration), and the pizza cooks for only 90 seconds (for more on Vera Pizza Napoletana [VPN] standards, see this page). If you cooked that same dough at only 500°F (260°C), by the time the pizza was done cooking, it would be drier and crisper. To get that same soft and foldable crust on classic Neopolitan pizza when you’re baking at 500°F (260°C), it helps to have more water in the dough because the dough takes longer to bake.
That’s why we organized the dough recipes in this book by the amount of water in them. Sure, we have sourdoughs and whole grain doughs, cold-fermented doughs and warm-fermented doughs, and even doughs with fresh-milled flour—my favorite! But first, it’s important to pick the dough that bakes best in your oven and results in the kind of pizza you’re trying to make. Maybe you want a classic Neapolitan pizza, and you’re baking in a blazing wood-fired oven with a cooking surface at 900°F (482°C). You got it. Check out my basic Naples Dough at 60% Hydration (this page), the one I use most at Pizzeria Vetri. Or, let’s say you’re making Naples-style pizzas in a home oven on a pizza stone or baking steel at 500°F (260°C). Then try the Old School Naples Dough at 70% Hydration (this page). The extra water in that dough will help you get the right texture for that pizza when you’re baking it at a lower temperature. Or maybe you want to make a thicker, airier, Sicilian-style pizza on a sheet pan in your home oven. Then try the Al Taglio Dough at 80% Hydration (this page). That pizza is thicker, and the dough has so much water that it’s actually easier to bake that kind of dough in the lower temperature of a home oven than in a blazing-hot wood oven. The home oven’s lower temp helps the thicker, wetter pizza dough bake completely through before burning on the outside.
Does this mean that all wet pizza doughs above 75% hydration should always be baked at lower temperatures? And that all dry doughs below 60% hydration should always be baked at higher temperatures? Of course not. It all depends on the type of pizza you want to make. If you want a thin, crispy pizza like a cracker, you can roll Old School Naples Dough at 60% Hydration (this page) very thinly and bake it at a relatively low temperature of 400°F (204°C) for a relatively long amount of time…say, 10 to 15 minutes. The low temp and long baking time will definitely dry out the dough. The pizza you end up with just won’t be a classic soft and foldable pizza Napoletana. It will be a thin, crisp pizza. When it comes to pizza, there are no hard-and-fast rules. It just helps to know the relationship between baking temperature and dough hydration so you can achieve your overall goals. Hotter ovens cook dough more quickly, giving water less time to evaporate, resulting in a softer overall texture in pizza. Cooler ovens cook dough more slowly, giving water more time to evaporate, resulting in a crisper overall texture in pizza.

A wood fire is lit near the center of the oven floor and then pushed to one side.
Air enters the oven through the mouth, supplying the fire with oxygen, which keeps the fire burning.
Heat and smoke exit the oven through the vent or chimney.
The oven’s masonry construction absorbs heat from the fire.
Heat retained in the oven floor is conducted to the bottom of the pizza, crisping up the bottom crust.
Heat retained in the oven dome is radiated directly to the top and sides of the pizza, cooking the toppings and rim.
Convection currents and rolling flames speed heat transfer to the top of the pizza.
Working your oven and perfecting your dough are what really step up your pizza game. The toppings are simple. They change with the seasons, and you can choose what you like. But playing around with different doughs and baking temperatures to fit your particular situation, and tweaking the variables to get the results exactly the way you want them—from a thick puffy crust that’s chewy and moist to a thin crunchy crust that’s crisp and dry—that’s the real magic of mastering pizza.
OVENS
The bottom line in all this is that your oven is one of the most important factors determining how your pizza turns out. Hotter ovens cook pizza faster and puff up the dough more, giving it more char. Cooler ovens cook pizza more slowly, and you get less puff, less char, and a more golden brown crust. Simple; right? A lot of it comes down to baking temperature. That alone makes a huge difference in what your pizza is going to look like and taste like when it’s cooked.
But the size and shape of your oven—and the materials used to construct it—also make a difference. The size of your oven determines how long it takes for it to heat up, how much fuel it needs to stay hot, and how many pizzas you can bake at once. Big ovens take longer to get hot and need more fuel to stay hot. The shape influences how the heat moves through the oven. Rounded or domed ovens get these rolling convection currents that deliver heat very efficiently to food, making it cook faster. In square ovens, convection currents move more slowly because they bump into the corners, so square ovens cook a little more slowly. And what is the oven actually made of? Is it ceramic? Stone? Metal? They all heat differently! And how thick is the material? That determines how much heat the oven can hold and how fast it sends heat to your pizza. Ceramics hold heat really well, especially thick ceramics, but they don’t give up their heat as fast as metals like steel. Ceramics have another useful characteristic, though. Unlike metals, unglazed ceramics are porous, which helps water vaporize quickly. That’s a big plus for getting things nice and crisp in the oven. When you bake pizza in a ceramic (or brick) oven, the ceramic helps moisture from the crust evaporate. Along with the high heat, that crisps up the pizza. That’s one reason why pizza stones help to make better pizza in a home oven. Which brings us to the actual cooking surface. Sometimes it’s made of a different material than the oven itself. In some ovens, like wood ovens and deck ovens, the pizza goes right on the oven floor, which is usually firebrick or ceramic stone. In others, like home ovens, your cooking surface could be a baking stone or baking steel, or a baking sheet—and they all heat a little differently, affecting how crisp and brown your pizza will get.
And then there’s the small matter of where the heat is coming from. Is it a wood-fired oven? Coal? Charcoal? Gas? Electric? They all heat differently, too! So much to consider. But let’s make it easy. Let’s look at the most common ovens used to bake pizza, what to expect from each, and how to get the best pizza you can from your oven.

Ovens that burn wood are actually part of a larger category called masonry ovens. In fact, the very first ovens were masonry ovens. Going way back, they were clay pots with lids that were put over a wood fire. Today’s Dutch ovens are direct descendants of those original primitive ovens. A lot of today’s wood-burning masonry ovens are still made of clay, but it’s a special type of fire clay that you can heat up and cool down day in and day out without the clay cracking. Clay isn’t the only material. Masonry ovens can be made of firebrick, concrete, stone, or even cob, a kind of dense, fireproof soil. They can be heated with wood, coal, gas, electricity, or a combination. The building materials and the fuel all make a difference in how the oven cooks. Some coal-fired pizza ovens have a separate firebox from the cooking chamber. Coal ovens can also be three times as big as wood-burning ovens. They get hotter, too—upward of 1000°F (538°C). But square coal ovens don’t get the high, rolling flame and convection heat currents of a domed wood-fired oven, so pizzas bake a little differently in them.
Most wood ovens have a classic dome or igloo shape, and that’s the type I’ll be discussing here. Back in 1991, my very first experience baking pizzas was on this type of oven at Wolfgang Puck’s Granita in Los Angeles. It was the restaurant’s showpiece—a domed wood-fired oven right in the center of the room. Everyone would watch us loading pizzas in and out of the oven. I have to admit: it was pretty awesome. And talk about an education in heat control. A domed wood oven is radically different from a square electric oven or gas oven. I learned how to stoke the fire, rotate the pizzas, use the hot spots, and cook different foods when the oven was at different temperatures. It was a great foundation for a young cook to build on.
GET TO KNOW YOUR OVEN
These days, a lot of people have wood-fired pizza ovens in the backyard or right in the kitchen. Every wood oven is a little different in size, shape, and the materials used to construct it. Each one has its own idiosyncrasies, so if you have a wood oven, get to know it. Bake different foods in it at different temperatures. Getting a feel for your oven is the single most important thing you can do to make better pizza. Wood ovens are very traditional and considered by many to be the best for pizza. But like everything else—it depends. If you’re making pizza in a sheet pan, such as pizza al taglio, wood ovens are trickier to work with. I prefer an electric oven for that kind of pizza, because it heats more evenly. But you can make it work in a wood oven. And, yes, for Naples-style pizza, a wood oven is the bomb. The high heat, the round shape, the dry heat of the wood, and the masonry itself all combine to cook a fantastic round pizza Napoletana. You see the most “leopard spotting” on pies baked in wood ovens because the initial blast of high, dry heat forces steam out of the dough so quickly, leaving behind tiny spots of char.
At Pizzeria Vetri, we use a wood oven with a gas burner on the side. The wood heat is mostly what cooks the pizza, but it’s nice to have the gas to keep the temperature steady. It’s a domed brick oven with the traditional igloo shape, and that sends flames from the wood fire right up the dome and over the pizza, where it licks the top of the pie. We use oak in our oven because it burns hot and lasts longer. The wood is split and seasoned (dried) to about 20% moisture. A lot of American brick-oven pizzerias use ash wood. You can also use beech or maple or fruitwoods like cherry and apple. Some places even use compressed bricks of sawdust. Any hardwood will work.
ADVANTAGES OF WOOD OVENS
Some people think smoke and smoke flavor are the reasons to use wood as fuel. I’ve had countless arguments with chefs about wood vs. gas vs. sawdust. The fact is that smoke rises to the dome in a wood-fired oven and sits way above the pizza. You hardly get any smoke flavor at all in wood-oven pizza. The best thing about a wood oven is the high, dry heat and the oven’s ceramic material and round shape. Those are primarily what give you a nice, crisp pizza crust. When you load pizza into a hot wood oven, the masonry (both the walls and the firebrick floor) transfer heat to the pizza so fast that the dough immediately starts to puff up; this is known as oven spring. The instant heat causes bubbles in the dough to expand right away, giving you a nice, airy crust with some big holes in the rim. The oven’s shape also helps speed along the baking process. The low dome and round shape make the fire creep up the dome, rolling the heat around the entire pie and helping to cook the whole pizza—especially the top—superfast. That’s part of what creates the big, puffy rim on pizza Napoletana. Neapolitans love that rim so much they call it the cornicione, or the cornice, the “crown molding” of your well-crafted masterpiece.

For Naples-style pizzas, there’s no doubt that wood heat and masonry construction are a slam-dunk combination. But I gotta say, this idea that every pizza has to cook at a blistering 900° or 1000°F (482° or 538°C) is nonsense. It depends on what you’re trying to achieve. I was doing a Neapolitan pizza pop-up dinner recently in Boulder, Colorado, and I had to actually lower the heat in their wood oven. They keep the oven at 950° to 1000°F (510° to 538°C), which is traditional for Vera Pizza Napoletana (see this page). But I prefer to bake Naples-style pizzas at 650° to 700°F (343° to 371°C). It might surprise some people, but that’s the sweet spot for my Naples dough. Any hotter, and the dough cooks too fast. Well, after I brought the oven heat down, it got a little too low. How did I know the heat was too low? No leopard spots on the crust. The first one came out with a browned rim and bottom crust but no little spots of char. I love those. So I stoked the fire to bring up the temp a bit. It’s pretty cool to see how even a slight change in temperature makes a big difference in how pizza dough cooks. You’ll have to experiment to find your own sweet spot with your oven.
GETTING THE MOST FROM YOUR WOOD OVEN
Now, let’s say I were baking a calzone instead of a pizza in that same wood oven. I would have started it out in a hot part of the oven and then looked for a cooler spot. That first blast of heat is great for puffing up the crust. But calzones are thicker and need a little more time to cook through before they burn on the outside, so it’s good to move them to a cooler spot after the initial puff. The same goes for rotolos, which are like big pizza rolls. The dough is thicker, so it takes even longer for the heat to get to the center. But you want that initial blast of heat. The point is—you should adjust the heat of your oven to match whatever it is you’re baking. Basic; right?
Simply put, a wood oven is a tool. Get a feel for this particular tool. Once you get a sense of what it can do, then use it in different ways to achieve the results you want. For Neapolitan-style pizza, my basic method is to build a wood fire in the center of the oven, and when it’s going strong, I shove the fire to one side. I feed the fire with more logs until the ambient temperature in the oven is between 650° and 700°F (343° and 371°C). Then I brush the oven floor clean. The floor and dome are usually a bit hotter than the ambient temperature. If you want to check the floor and dome temperature, you can use a laser thermometer (see this page). Right before sliding a pizza onto the floor, I usually toss an extra piece of wood on the fire to stoke it up. That gives the pizza an initial blast of heat and helps puff it up quickly. In a wood oven, most of the heat comes from the wood fire to the side of the pizza, so you have to watch the pizza and spin it around with a long metal pizza peel, moving it toward or away from the fire, making sure the pizza cooks evenly. If you need to cook the toppings or the rim a little more, you “dome” the pizza or lift it closer to the oven’s dome, where it’s also a little hotter. My Naples-style pizzas cook in about 3 minutes. The crust gets beautiful leopard spots of char, and the bottom is nice and crisp, yet the pizza is still soft enough to fold.
If you’re baking pizza in a wood oven—and I hope you are—the recipes in this book take you through the whole process step by step. See the recipes for Wood Oven Neapolitan Pizza (this page) and Wood Oven Pizza Romana (this page). But I can’t stress enough how important it is to know your particular oven and how to work it. Wood ovens are very hands-on, but that’s also exactly what gives them the most potential for turning out mind-blowing pizzas.
Deck Ovens and Convection Ovens
Certified “true” pizza Napoletana or Vera Pizza Napoletana (see this page) must be baked in a wood oven. But you see some very good Neapolitan-style pizza coming out of other types of ovens—such as coal. And commercial pizzerias use a variety of different ovens, depending on their goals. The most common pizza oven you see in America is the deck oven. These relatively shallow ovens are stacked in a deck so they take up less space and allow you to cook more pizzas at once. A lot of Roman pizzerias bake in deep deck ovens, too. These ovens are usually powered by gas or electricity, and you bake the pizza directly on the floor of the deck, which is made of ceramic baking stone or sometimes steel. The oven heats pretty evenly and predictably, so you don’t have to watch the pizza as much as you do in a wood oven. Most deck ovens run at about 550°F (288°C), so the pizzas bake in about 6 to 8 minutes, a little longer than it takes in a hot wood oven. The lower temperature and longer bake time mean you don’t often get that nice leopard spotting you see on wood-oven pizzas. The rim comes out more browned than charred, like the crust on your typical New York-style pizza.

Other pizzerias use convection ovens. These cook boxes are similar to home ovens but with more sophisticated fans for blowing hot air throughout the oven. The convection itself allows you to lower the baking temperature because the hot air delivers heat to the pizza more efficiently than in a deck oven. Convection ovens usually have a bunch of oven racks, each fitting a couple pizzas, depending on the oven’s size. You load the pizza on a pizza pan or screen and bake it on the rack with the convection heat constantly circulating all around it. These ovens typically aren’t meant for turning out a high volume of pies. But when you add a conveyor belt to a convection oven, then you can speed up production. That’s the kind of oven the big commercial pizza companies use—the Domino’s and Papa John’s of the world. With a convection conveyor oven, you basically set and forget it. Put the pizza on a pizza pan or screen, lay it on the conveyor, and it cooks in 4 to 5 minutes with absolutely zero attention required. You can hire cheap labor and automate your whole pizza-making process, cranking out dozens of pies in no time. That sounds like heaven to some pizza makers. To me, it defeats the whole purpose. I prefer the taste and look of handcrafted food. I want someone fussing over my pizza.
The good news is that you can bake some amazing handcrafted pizzas without a wood oven or any other commercial pizza-making equipment. You just need a home oven or even a grill.
Home Ovens
Modern home ovens are typically square boxes made of steel. The standard 30-inch (76 cm) model is pretty small, so it heats up quickly. As far as materials go, steel is a better heat conductor than ceramic, providing quicker, more precise temperature control, which is important for baking different foods at different temperatures, as you do in a home oven. But the superior heat transference of steel means that the oven uses up more fuel. Why? Because the walls of the oven are constantly giving up their heat. That’s why your home oven makes your kitchen so hot. A square oven also heats less efficiently than a round one because the convection currents are not as robust. Sure, you can turn on the convection fan in a home oven, but it doesn’t get nearly as good at delivering heat all around the pizza as a domed, wood-fired oven.
In a home oven, the heat itself comes from gas or electricity. Gas releases some moisture as it heats, so gas ovens tend to be a bit more humid inside than electric ovens. Gas ovens also have to be vented to allow combustion gases like carbon dioxide to escape. Even though gas is popular on cooktops (and for good reason: instant heat control), among ovens, electric outsells gas by two to one. I’m not sure why, really. Maybe people think it’s safer to have electric coils inside the cook box instead of burning flames. Yes, electric heat is drier than gas, but otherwise, gas and electric ovens both heat pretty evenly and offer decent control. You can thank your thermostat for that. Make sure it’s calibrated!
COOKING SURFACES
Now let’s take a look at what you are actually cooking your pizza on in a home oven. The floor is most likely made of thin steel, but it’s not meant to be baked on directly. So what’s the best cooking surface for home oven pizza? A baking stone? A baking steel? A baking sheet? It depends on what kind of pizza you’re making. For pizza al taglio, a baking sheet is perfect. It helps to create the square pizza shape, and you can put the baking sheet right on the oven rack. It’s even better if you put the baking sheet on a hot baking stone or baking steel. A stone or steel will deliver more heat through the baking sheet to the bottom of the pizza, helping to crisp up the bottom crust.
And what about a Naples-style pizza? What cooking surface is best for that? You might think a stone is best because it’s closest to the cooking surface of the wood oven used for traditional pizza Napoletana. It’s true that a baking stone retains heat really well, gives it up to the pizza crust nice and steady, and helps water vaporize from the dough, all of which create a pretty crisp crust. But you have to take into account the fact that a home oven maxes out at 500° to 550°F (260° to 288°C). There just isn’t as much heat in the oven for the stone to deliver to the pizza. When testing recipes for this book, we found that a baking steel actually gives you a better bottom crust. Steel delivers heat to the pizza faster, helping it get hotter in less time. We tested dozens of pies on ¼-inch (0.6 cm)-thick steel, and they all had darker bottom crusts than the same pies baked on various ½-inch (1.3 cm)-thick baking stones.
But you know what? We found something even better: a cast-iron skillet. Cast-iron is well known for its searing ability. It heats very evenly and conducts heat even better than steel. The key is using thick cast-iron because thicker metals have more total heat capacity. Some cast-iron “pizza pans” are too thin and end up being less effective at transferring heat than ¼-inch (0.6 cm)-thick baking steel. But a regular old cast-iron skillet works great. Side by side, a ¼-inch (0.6 cm)-thick cast-iron skillet consistently gave us faster baking, deeper browning, and a crisper crust than a ¼-inch (0.6 cm)-thick baking steel. The only downside, of course, is that cast-iron is heavy. But if you really want an amazing bottom crust on a Naples-style pie baked in a home oven, give it a try. See the recipe for Cast-Iron Neapolitan Pizza (this page).

And what about the top crust? Here’s where home ovens have an ace up the sleeve. They have their own sort of “dome”—the broiler. With a stone, steel, or cast-iron cooking surface on the bottom and the oven’s broiler on top, your home oven can do a decent job of re-creating the intense bottom and top heat of a domed wood-fired oven. Just make sure your broiler is clean! When testing recipes in my home ovens, we used an oven one day that hadn’t been heated up in a while. We preheated the oven, turned on the broiler, then loaded in the pizza, and closed the oven door. Well, guess what? We came back to a blazing fire! I must have broiled some steaks or something in there because whatever fat was on the broiler ignited, and I had to pull out the fire extinguisher to keep the house from burning down. Word to the wise: keep your broiler clean. And keep a fire extinguisher on hand just in case!
Anyway, here’s the basic procedure I recommend for a kick-ass Naples-style pizza in a home oven. Preheat your oven to its max, usually 500° to 550°F (260° to 288°C). Set a baking steel or stone on the upper rack of the oven, about 4 to 6 inches (10 to 15 cm) below the broiler for electric ovens or 6 to 8 inches (15 to 20 cm) below the broiler for gas ovens. If you’re using a cast-iron skillet, skip the steel or stone. And if your broiler is separate from the oven itself, you’ll love this cast-iron method. You can preheat the skillet on a burner right on your stovetop instead of in the oven. Get the cast-iron pan smoking hot just as you would when searing a steak.
Either way, you want your oven fully preheated, especially if a steel or stone is in there. Make sure that your cooking surface is superhot. If you shoot a laser thermometer on the cooking surface, it should read somewhere around 500°F (260°C).
Then, just before you shape and top your pizza, switch on the broiler. For some electric ovens, you may have to crack open the oven door for 10 seconds or so. Some ovens won’t turn on the broiler if the oven is already at max temperature. Cracking open the door lets some heat escape and lowers the oven temperature slightly. If you have one of these “smart” ovens, you might have to sort of trick it into turning on the broiler.
After you get the broiler preheating, shape your pizza dough. For the cast-iron skillet method, slide the shaped dough round into the hot skillet, cut the burner heat to low under the pan, quickly add your toppings, and then put the pan under the broiler. For the baking steel or stone method, add your toppings to the dough round and then slide the topped pizza onto the hot cooking surface under the broiler. Close the oven door and cook the pizza until the rim is puffed, the dough blisters and chars in spots, and the bottom is crisp. With the hot cooking surface below and the broiler above, the effect is the closest you’ll come to the top and bottom heat in a traditional wood-fired pizza oven.
If you want a little extra poof in the crust, add a splash of water to the oven floor then quickly close the oven door. Water transfers heat faster than air, so the steam helps bring heat to the pizza faster, improving the initial “oven spring” and puff in the crust.
The one drawback we found with these broiler methods is that soft cheeses like fresh mozzarella can overcook and separate from the long cooking time under the broiler. The fat in the cheese starts to leak out from the milk protein. Depending on your total bake time and how far your pizza is from the broiler, you may want to add soft cheeses halfway through the bake time. No big deal, really. You need to open the oven at least once to check the pizza anyway. Just try not to keep the oven door open too long, or you’ll lose a lot of heat. That’s another reason why I love the skillet method. If you need to, you can just pull the skillet from the oven, close the oven door, quickly add the cheese to the pizza, and then slide the skillet back under the broiler.
Since the baking steel/stone method and the cast-iron skillet method are a little different from each other, we wrote separate recipes for each. See the recipes themselves for complete step-by-step details, beginning on this page.
And what if you have no broiler at all? No problem. Make your own top heat. Preheat two baking stones or steels on separate racks in your oven—one below as your cooking surface and one 4 to 6 inches (10 to 15 cm) above as your “dome.” Load the pizza onto the bottom stone or steel (or just on the oven rack if you’re baking in a cast-iron skillet), and heat will radiate from the top steel or stone to cook the top of the pizza. Easy! Two stones or steels are also useful if you want a little extra crispness on your bottom crust when you use the broiler method. After the first stone or steel gives up its heat to the pizza, move the pie to the second stone or steel to give it an extra blast of heat.
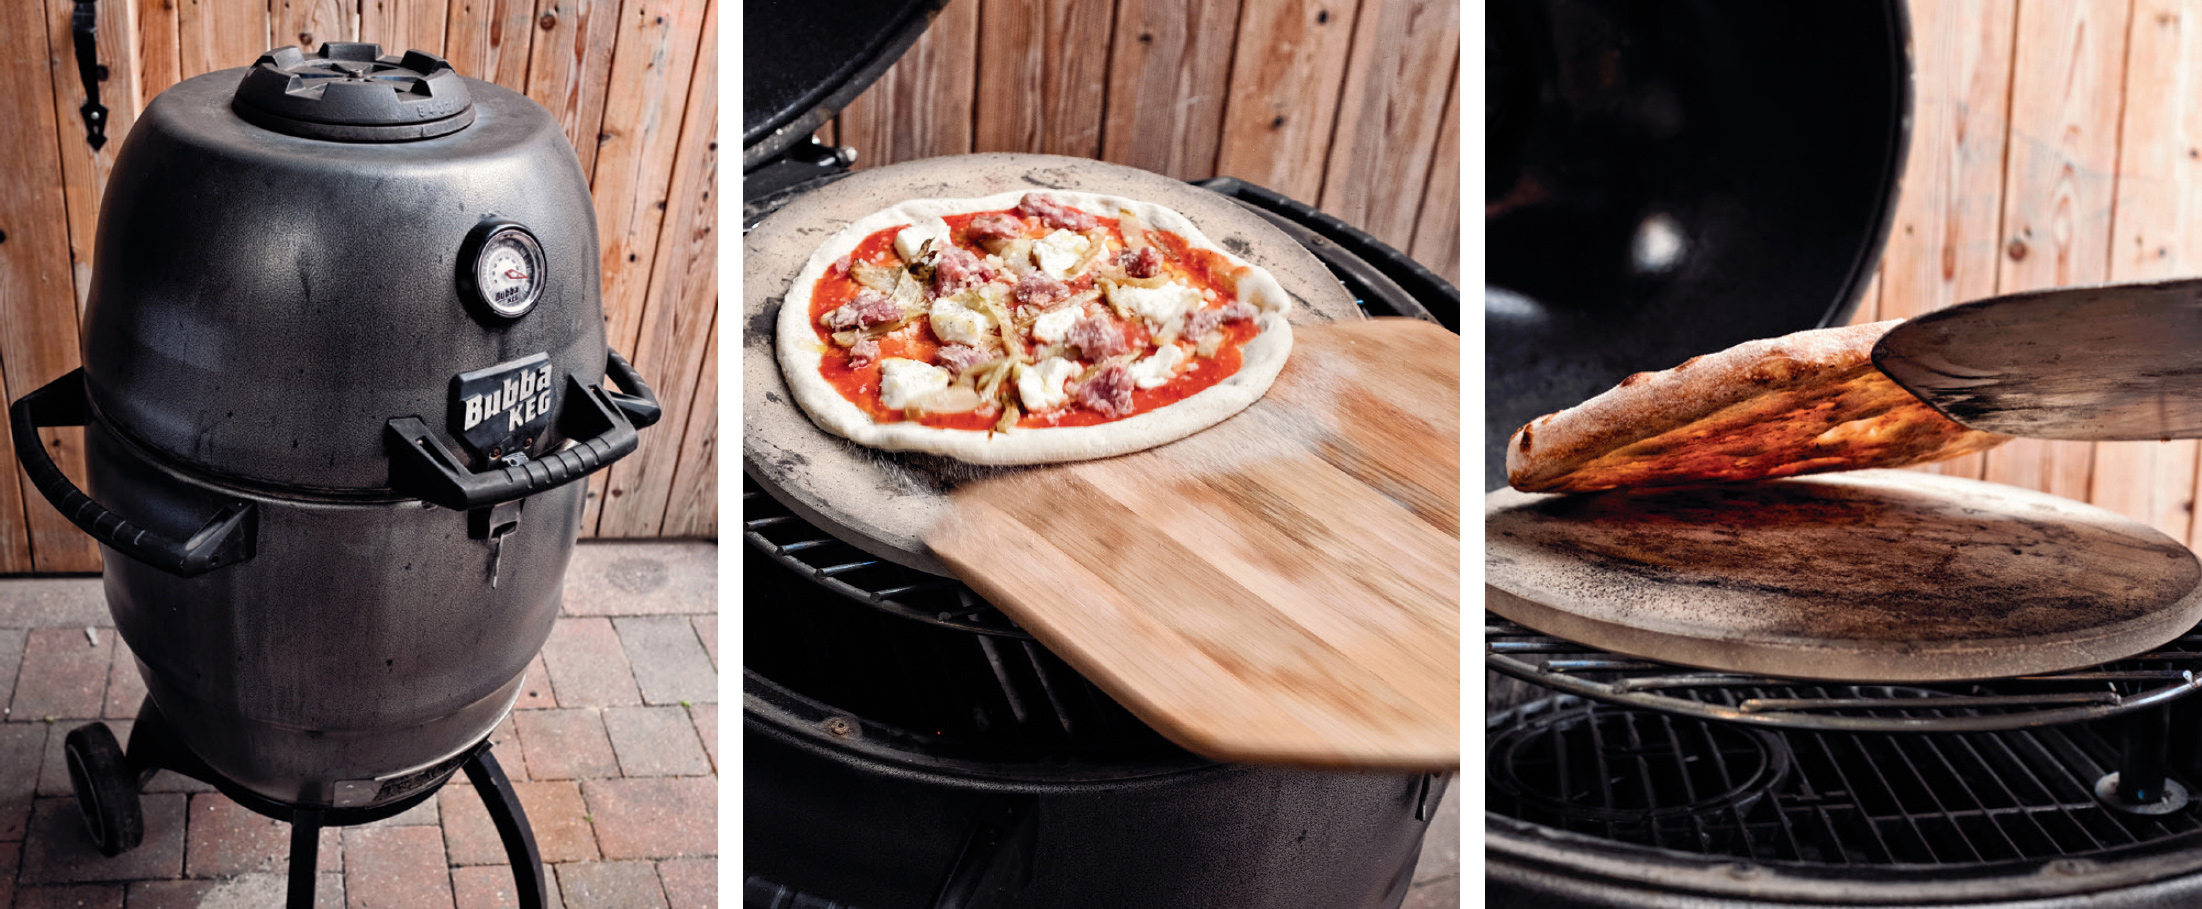
If you want pizza in the summertime, a grill makes a great option. Who wants to heat up the kitchen when it’s 90°F (32°C) outside? Grills offer some distinct advantages, too. If you have a big grill area, you can grill a big pizza, like Gas-Grilled Pizza al Metro (this page). That’s something you can’t really do in a small home oven with a small baking steel or stone. And if you have a charcoal grill, you’ll get a nice crisp crust from the high, dry heat of the charcoal. Better yet, if you have a kamado-style grill, like a Big Green Egg, you’ll also get the advantage of baking in a superhot ceramic oven with top heat that radiates from the oven dome to cook your toppings. Depending on your grill, the baking technique for each type of grilled pizza is slightly different.
KAMADO-STYLE GRILL
These grills are modeled on the ancient Japanese kamado and the Indian tandoor. They are essentially ceramic ovens that you can also use for grilling directly over the heat source, which is typically charcoal. Big Green Egg, Primo, Broil King, and Komodo Kamado all make this type of grill. They are very fuel-efficient because ceramic retains heat so well. Once you get the grill up to temp, you don’t need to add much charcoal to maintain the temperature, so they’re pretty cheap to run. Plus, they get really hot. You can get the ambient temperature in most ceramic kamados over 700°F (371°C). That’s pretty much where I keep my wood-fired pizza oven. Modern versions of these grills are rounded or egg-shaped, which also provides those efficient rolling convection heat currents. And the ceramic lid stores up heat and sends it to the top of the pizza like the dome in a wood oven. With a ceramic baking stone in there as your cooking surface, a kamado is basically as close as you’re gonna get to a wood-fired pizza oven. It’s just smaller. And one other big difference: the heat comes from below. For that reason, you need some kind of heat diffuser to redirect the heat around the pizza so it doesn’t just hit the bottom. Most heat diffusers are ceramic or metal plates that sit between the fire and the food. Most kamados come with a heat diffuser for this type of cooking, which is often called indirect grilling. Once you fire it up, baking pizza in a kamado is pretty similar to baking pizza in a wood oven. You preheat the oven (with the heat diffuser and baking stone in place). Shape and top the dough, and then load the pizza onto the hot stone. One advantage here is that you don’t even need to rotate the pizza during baking because the oven disperses the heat so evenly. Plus, the grill’s dome blisters the rim of the pizza and cooks the toppings in just a few minutes.
You might be thinking, “Why not use a baking steel instead of a stone in there?” Steel holds and transfers more heat than ceramic, and more heat = crisper crust; right? Well, the temperature difference matters! Steels are great for baking at 500° to 550°F (260° to 288°C). But when you’re baking at 700° or 800°F (371° or 427°C), you’ve got a lot more heat overall, and steel is transferring all that heat to the pizza faster. It turns out that a ¼-inch (0.6 cm)-thick piece of steel in a Big Green Egg blazing away at 700°F (371°C) burns the shit out of whatever you put on it. It’s like sticking a piece of steel in your raging hot wood oven. It’s overkill. When you’re baking at temperatures over 650°F (343°C), stick with a baking stone. The ceramic holds on to the heat a bit longer and delivers it more gradually to the pizza, crisping it up perfectly. For a fully detailed recipe, see Kamado-Grilled Neapolitan Pizza on this page.
CHARCOAL GRILL
Like kamados, these grills also get heat from hot coals below, but the grill itself is usually constructed of metal, not ceramic. That makes a huge difference because the metal is constantly transferring heat away from the grill. A metal grill won’t hold as much heat inside. And even though most backyard charcoal grills have a lid to trap heat, it’s still not enough heat to cook the top of the pizza. You can buy inserts like KettlePizza that have a baking stone and sometimes a cover assembly to trap heat and help cook the toppings. But then you’re retrofitting your metal grill to make it more like a ceramic oven. What you end up with is not really grilled pizza. It’s pizza baked on a grill.
Honestly, if I’m working with a grill, I prefer to just grill the dough right on the grate. Grilled pizza is a very different animal than baked pizza. You grill both sides of the dough instead of just one. That makes the crust nice and crisp on the bottom and the top, but the pizza toppings don’t seep into the dough as the pizza cooks. The overall texture ends up being crunchier. If you like a crisp crust, you might like this kind of pizza better. The method is dead easy. Just light up your coals and preheat the grill with the grate in place for 20 minutes or so. When you’re ready to grill the pizza, adjust the coals and the vents (if you have them) for medium heat in the grill. Brush the grates clean and then rub an oily paper towel over the grates. You want clean, hot, well-lubricated grill grates to transfer heat efficiently to the dough. Then slide the shaped pizza dough—without any toppings—right onto the grates and close the lid. It helps to use slightly stiffer dough, so it doesn’t slump into the gaps between the grill grates. I usually use Old School Naples Dough at 60% Hydration (this page). With the dough on the hot grates and the lid down, the crust starts firming up in seconds. It also gets grill marks on the bottom. To keep the marks from getting too dark, rotate the dough about 45 degrees after it’s firm enough to move, maybe a minute or two into the cooking. Just use tongs and a large spatula to grab and rotate the dough. Then close the lid and grill the dough until the bottom is crisp and the top of the dough is almost dry, another minute or two. Grab the pizza crust with tongs, transfer it to your pizza peel, and close the lid to keep the heat in the grill. Then flip the dough over on the pizza peel. You want the grilled side facing up. Quickly add your toppings to the grilled side, and then slide the topped pizza back onto the grill. Close the lid and close the vents a little to bring down the heat in the grill. You want to lower the heat a little so there’s time for the heat to reach the toppings and cook the top before the crust burns on the bottom. It also helps to rotate the pizza again for even browning on what is now the bottom crust. After a few minutes with the lid down, the toppings cook through, and the bottom crust gets nice and crispy. Boom! Grilled pizza. See the recipe for Charcoal-Grilled Neapolitan Pizza (this page).
GAS GRILL
The method here is essentially the same as for charcoal-grilled pizza. The big difference is the fuel. It’s much easier to control the temperature in a gas grill—just turn the knobs up or down. Gas does release some moisture as it burns, so your pizza crust may not come out quite as crisp as it does in the drier heat of a charcoal grill. Size matters, too. If you have one of those big backyard gas grills, you can put a couple dough balls together, shape them into a big rectangle, and grill a big pizza al metro for a party. Check out the recipe for Gas-Grilled Pizza al Metro (this page).
As you can see, your oven is critical—no matter what kind you have. Each is a little different, so get to know yours. Other tools are important, too. Every carpenter I know tells me to “buy good tools.” It’s good advice. To smooth out the entire process of making pizza, it’s important to have reliable tools that feel good when you use them. Here are some of my preferences in order of use from dough making to pizza baking—but try different tools to find out what works best for you.
Digital scale. For any kind of dough making, there is just no getting around an accurate scale. This is a definite necessity! Volume measurements are too imprecise. Pick up a digital scale that can handle a few pounds of flour and be easily reset to zero (tare) when you’re weighing ingredients. Also, I call for some very small amounts of dry yeast in a few dough recipes. For these, it’s helpful to have a second, smaller, pocket- or palm-sized scale that measures to the hundredth of a gram (0.01 grams). Let’s say you want to make only a single dough ball for pizza tonight. Then you only need about 0.03 grams of dry yeast, which is impossible to measure by volume. It comes out to something like 1⁄128 of a teaspoon. Digital scales are pretty inexpensive. Consider them essential for any kind of baking.
Mixing bowls. I use a variety of mixing bowls. At home, glass and stainless steel bowls are great for mixing up starters and doughs. They’re easy to clean, and it’s helpful to see starters working their magic through the side of a glass bowl. I keep a few different sizes on hand. But when I’m going old school and mixing up dough by hand, there’s nothing better than a wooden mixing bowl. Wood is porous and lets the dough “breathe.” It seems to encourage more robust fermentation. A lot of old-school pizzaiolos like Franco Pepe mix their dough in wood. When I mix and ferment dough in wooden bowls, I feel a deeper connection to the entire history of pizza making, and that alone means something to me.
Stand mixer. This piece of equipment isn’t absolutely necessary. Pizza dough was originally mixed by hand. But it’s nice to have a stand mixer if you make a lot of Naples Dough (this page and this page). If you don’t have one, use your hands and my recipes for Old School Naples Dough (this page and this page) and no-knead Al Taglio Dough (this page).
Bench knife. You’ll find yourself using this baker’s tool for all kinds of tasks: scooping up flour, cutting and portioning dough, even shaping loose, wet doughs into balls on your work surface. A straightedge metal bench knife or dough cutter is a workhorse, and restaurant supply stores sell them cheaply. You could even use a large spackle knife or putty knife from the hardware store.
Dough scraper. Pick up a round-edge plastic dough scraper, too. The round edge and flexible material make it easy to scrape dough from a proofing bowl to your work surface. You can also use it to help fold no-knead doughs like Al Taglio Dough (this page) right in the bowl.
Proofing boxes. A lot of people ferment their dough on half-sheet pans with parchment paper underneath and plastic wrap over the top. But the plastic always sticks to the dough, and when you try to pull it off, the dough tears. If you make a fair amount of pizza, pick up a dough proofing box from a restaurant supply store. They’re cheap. You can also use a deep glass dish or a plastic tray with a lid. To take it to the next level, find an old wooden proofing box at an antique store—or have one made for you by a local carpenter. I found a wooden proofing box years ago and use it all the time for fermenting dough balls. The wood seems to help the dough reach its full potential.
Rolling pins. When it comes to dough, I’m a rolling pin fanatic. They are my favorite baker’s tool to buy. I like wood rolling pins that have a uniform diameter and don’t taper at the end. They’re like big logs that roll out big pieces of dough. For me, the longer, the better. I have superlong ones for rolling out pasta, too…but that’s another book. For rolling out a single ball of pizza dough (about 8.8 ounces/250 grams), a 12-inch (30 cm) rolling pin works just fine.
Dough docker. This thing looks like a medieval torture tool. It’s like a little log with spikes all over it and has a short handle. You roll it over your pressed-out dough to “dock” it, or poke holes all over the dough. Docking helps air escape and keeps the dough from puffing up too much in the oven, if that’s what you’re going for. I use a docker to make Home Oven Stuffed Pizza (this page). Just buy a cheap one from a restaurant supply store or baker’s supply store, or use a fork to poke the holes by hand.

Pizza peels. This may sound hokey, but wood makes me happy. When I make risotto, I love using olive wood spoons. And when I make pizza, I prefer using wooden pizza peels. Build your pizza on the peel and then shake it into the oven. I even like the swoosh sound you get when pizza slides off the wood. It connects me to the pizza more! You can get wooden peels in all different sizes. Look for one that’s at least 14 to 16 inches (35 to 40 cm) in diameter. For handle length, go by the depth of your oven. Short handles are best for home ovens, and longer ones are essential for wood ovens. If you have a wood oven, pick up a metal peel as well. This tool is like a round spatula you use to rotate the pizza toward or away from the fire so the pizza cooks evenly. You can also use a metal peel to move embers or logs that roll from the fire to your cooking area.
Baking steels and stones. As I mentioned previously, a ¼-inch (0.6 cm)-thick baking steel delivers heat to your pizza really fast in a home oven. Half-inch-thick steel works even better because it can hold and deliver more heat. But it’s super heavy and expensive. A ¼-inch-thick steel is more practical. One that’s at least 16 by 14 inches (40 by 35 cm) in size will easily accommodate a 12-inch (30 cm)-diameter pizza. If you’re planning on making Home Oven Personal Pizza al Metro (this page), get one that’s a bit bigger, about 22 by 14 inches (56 by 35 cm). Baking stones come in the same sizes, but they are usually about ½ inch (1.3 cm) thick. Even so, a baking stone is less durable than a baking steel. After repeated thermal cycling (constant heating and cooling), the stone weakens and becomes more prone to cracking. If you already have a functional baking stone and you’re considering buying a steel, I highly recommend it. It’s actually useful to have both—especially if you don’t have a broiler or if you want to get your bottom crust even crisper. For details on using both stones and steels in a home oven, see this page.
Cast-iron skillet. This was a nice surprise during the recipe testing for this book. Cast-iron wins again! Cast-iron conducts heat better than either steel or ceramic. It makes a nice, dark pizza crust. Plus, cast-iron is cheap and durable—and will get lots of use beyond just making pizza. Look for your standard, heavy cast-iron skillets or griddles. These are thicker than some cast-iron pans sold as “pizza pans.” That thickness makes all the difference in the amount of heat that gets to your pizza. Cast-iron skillets and griddles average about ¼ inch (0.6 cm) in thickness. A pan that’s 12 inches (30 cm) in diameter is good if you already have one, but a 14 incher (35 cm) is even better so you have more room for a slightly bigger pizza. You can also use a rectangular cast-iron griddle (about 16 by 8 inches/40 by 20 cm) to make an oval-shaped Home Oven Personal Pizza al Metro (this page).
Sheet pans. If you like square pie, sheet pans are the way to go. Look for half-sheet pans (18 by 13 inches/45 by 33 cm) so you can make Home Oven Pizza al Taglio (this page). You’ll love how easy it is to make this kind of pizza. You shape the dough right in the pan and then bake it. Most sheet pans are aluminum, which transfers heat pretty well, but they tend to be kinda thin, so the heat capacity is low. Thin pans also warp more easily. Look for thicker-gauge aluminum sheet pans—at least 18 gauge. Remember: as the gauge number goes down, the thickness goes up. So 13-gauge aluminum is thicker (about 1⁄16 inch/1.5 mm thick). At Pizzeria Vetri, we use “blue” steel sheet pans instead of aluminum. They’re about 1⁄32 inch (0.8 mm) thick and are more durable than aluminum, so they warp less. But thick-gauge aluminum works just fine.
Parchment paper. I like loading pizzas directly onto the hot cooking surface. But shaking a pizza—especially a big one—off a pizza peel can be tricky. If you’re nervous about sliding the pizza into the oven, a piece of parchment will help it along. Build the pizza on the parchment and then slide both the parchment and pizza onto your cooking surface. It’s like training wheels. Start there if you need to. Eventually, you should be able to shake the pizza off the peel with a quick jerk of your hand.

Pizza cutter. I love cutting pizza with a pizza wheel. Wood-handled ones with metal wheels are my favorites. Some people use these big pizza cutting knives, but that’s not my style. If it’s yours, though, go for it. I’ll stick with old-fashioned pizza wheels. And scissors. In Rome, it’s traditional to cut pizza al taglio (which means “by the cut”) with scissors. Just pick up a pair of offset scissors so you can cut into a 3-inch (7.6 cm)-deep square pie. Once you add the toppings, that’s how deep some al taglio pies get!
Thermometers. If you don’t have an infrared (IR) thermometer, you might want one. They’re fun! They’re like a laser gun that you point and shoot into your oven. Although they’re not 100% accurate, you’ll get a good sense of the temperature of your cooking surface, whether it’s the floor of your wood oven or the steel, stone, or cast-iron pan in your home oven. If you have a wood oven, look for an IR thermometer that goes to at least 900°F (482°C). For home ovens, you might not have to spring for an IR thermometer, but it helps to have a good thermometer inside it. Home ovens are not always calibrated correctly, and the temperature readout on your dial or screen is probably not 100% accurate. Bi-metal dial thermometers are not very reliable. Have your oven calibrated and stick a decent digital oven thermometer inside to get a more accurate reading of the oven’s ambient temperature.
Cooling rack. To keep your bottom crust really crisp, slide the baked pizza onto a cooling rack. The pizza will be steaming hot, and cutting boards or pizza pans will trap the steam and soften the crust. It’s not absolutely necessary, but most people already own one of these. I like to let the pizza cool off for a minute or two on the cooling rack and then cut it on a cutting board or pan.
Mandolines. These cutting tools are so handy for slicing vegetables and garlic paper thin really fast. You don’t need a giant metal French-style mandoline—although they are very versatile if you cook a lot. Just buy an inexpensive handheld model. If you don’t have one, a thin-bladed knife and a very steady hand also work.
Tongs. Now here’s something most chefs can’t live without. Need to grab something hot without getting burned? Grab the tongs! They’re useful for pulling hot pizzas from the oven, flipping vegetables on a sheet pan, and so many other tasks. Get a pair of spring-loaded tongs with scalloped edges; about 12 inches (30 cm) is a good length for most cooks.
PRACTICE
As I said earlier, the number one thing you can do to bake better pizza is to get to know your oven. That means practice. Like doing yoga or handling a bike, making good pizza takes some time. At first, you will mess up a few. Don’t worry. Keep at it. Failure is a stepping-stone on the road to success. Or as chefs say, “When you burn things, you learn things!” Once you have a good feel for your oven and how it delivers heat to the pizza, then you can start experimenting with the pizza itself. That’s exactly what led Stefano Callegari to toss a handful of ice cubes on his raw dough. He knew what would happen in his wood-fired oven. He knew the ice would melt, and the water would mix with starch from the dough and create a creamy sauce so he could make something like cacio e pepe pasta, but as pizza right inside his oven. That’s the kind of experimentation I love. I hope the rest of this book gives you everything you need to experiment and create your own signature pizzas.