
5
NAPLES DOUGH PIZZAS
“L’allegria e un ingredient importante a Napoli…non si fanno piatti senza buon umore,” the guy said. (Cheerfulness is an important ingredient in Naples…one doesn’t make a dish without a good mood.) I had just told him I was a chef looking for L’antica Pizzeria da Michele and needed a place to park my car. If you’ve ever been to Naples, you know that the parking rules are as follows: every man for himself!
“Lascia la macchina qua—ci penso io,” he continued. (Leave your car here—I’ll watch it). Chiudo io? I asked. (Should I lock it?) No, no, dammi le chiave! (No, no, just leave the keys with me.) Haha! Pensi che sono nato ieri? Trovo altro parcheggio…ciao! (Haha! You think I was born yesterday? I’ll find other parking…later dude!)
He gestured with his hand and said, “Ma va!!!” (Loosely translated…“Go fuck yourself!!!”)
This was my introduction to Naples. It was a pretty good indication of what was to come as I traveled around this historic city. My first experience with pizza Napoletana was similar. Don’t get me wrong…I have had some of the best pizza ever in Naples. 50 Kalò, Da Attilio, and Pizzaria La Notizia are fantastic. And in nearby Caiazzo, Pepe in Grani takes things to another level entirely—a rarefied expression of the art that’s hard to comprehend unless you are deep in the pizza matrix. Even in the United States, chefs like Anthony Mangieri of Pizza Napoletana make incredible representations of true Naples-style pizza. Many traditionalists live and die by the VPN (Vera Pizza Napoletana) rules and certifications (see this page for details), and some of these pizzas are among the best I have ever eaten.
But my first experience definitely took a few years to get over. The truth is, traditional Naples-style pizza can be downright soupy. It’s cooked in blazing-hot ovens that can leave the mozzarella barely melted and the sauce pooling around the cheese in the middle of the pizza. Sometimes, it’s more like tomato soup with lukewarm bits of mozzarella held in a pizza shell with burnt edges. After tasting this kind of “true” Napoletana pizza, my first thought was, “No wonder they don’t cut pizza here—the sauce would spill all over the place.” As I stood outside and ate it, I was confused about all the fuss over pizza Napoletana.
Since that day, I have eaten many, many more pizzas in Naples and come to understand it in much more depth, including what it means to respect Italian traditions—in spite of almost losing my car! What we serve now at Pizzeria Vetri is mostly Naples-style pizza, but it’s not VPN pizza. That isn’t really what I like best, so I don’t try to replicate it. VPN pizza is baked at 800° to 900°F (427° to 482°C). Our ovens are closer to 700°F (371°C) because I like the sauce to seep into the dough a little. VPN pizza also uses very fine tipo 00 flour, which makes the crust supersilky. We use bread flour. What can I say? I like a little more texture and chew in my pizza.
Other than that, my naples dough is pretty traditional: just flour, water, salt, and yeast. I respect the simplicity of Naples-style pizza—and Italian cooking in general. Sure, I push the boundaries here and there, but the principles of Italian cooking are always rooted in two basic things: a minimal amount of the best-quality ingredients and a firm grasp of what goes with what.
I also know that Italians—and Americans—get very picky about all the fine points of pizza. Some want pizza baked in a wood oven or nothing else. Others—especially home bakers—have discovered the baking stone or the baking steel, and they won’t make pizza any other way. Still others swear by pizza made on a Big Green Egg or kamado-style grill. Well, guess what? I give you recipes using all these cooking methods. I want everyone to enjoy a good Naples-style pizza no matter what kind of oven it’s baked in.
I also want you play around with the shapes. If you’re only making round pizzas, branch out! Pizza al metro (pizza cut by the meter) is a long, rectangular shape that supposedly got its start in the 1930s in Vico Equense, a little coastal town south of Naples. Now, pizza al metro is more common in Rome. Go figure! These superlong pizzas are loaded into deep wood ovens, but I show you how to make a similar rectangular shape directly on the hot grates of a big gas grill or on a big baking stone in a home oven.
One of the cool things about pizza al metro is that you can put different toppings on different sections of the rectangle. It’s like getting a few different pizzas in one. Speaking of toppings, pick and choose your favorites for any of the Neapolitan pizzas in this chapter. The main recipes for “Pizza Style” show you how to shape and bake the dough using various cooking methods and ovens. The toppings themselves are interchangeable. That’s why the toppings are in their own section. You could even use toppings from the chapter Roman Dough Pizzas (this page). Top your pizza with whatever you like!
PIZZA
STYLES
A pizzeria used to be the only place you could get a pizza with a leopard spotted crust—a sure sign that it was baked in a very hot oven. Nowadays, they make home models of everything, and pizza ovens are no exception. If you have a wood-burning pizza oven in your home or backyard (or in your restaurant!), this is really the best way to get that type of crust. I like to keep the ambient temperature of my wood ovens at about 650° to 700°F (343° to 371°C). Any hotter, and my crust burns too fast. Any cooler, and it just browns without those beautiful charred spots. I’ve found that a dough hydration of 60% is perfect for baking in this temperature range.
MAKES ONE 10- TO 12-INCH (25 TO 30 CM) ROUND PIZZA
1 dough ball, preferably Naples Dough at 60% Hydration (this page), about 250 grams/8.8 ounces
Toppings of your choice (this page)
Flour, for dusting
Light a wood fire on the oven floor directly where you will be cooking the pizza (for details on starting a fire, see this page). Feed the fire until the ambient temperature in the oven is around 700°F (371°C), 1 to 2 hours. Quickly rake the fire to one side of the oven, containing it in a neat pile near the edge. Brush the cooking surface clean.
Let the dough warm up at room temperature for at least 1 hour or up to 4 hours. As it warms up, the dough will relax and become easier to shape.
Have your toppings ready to go.
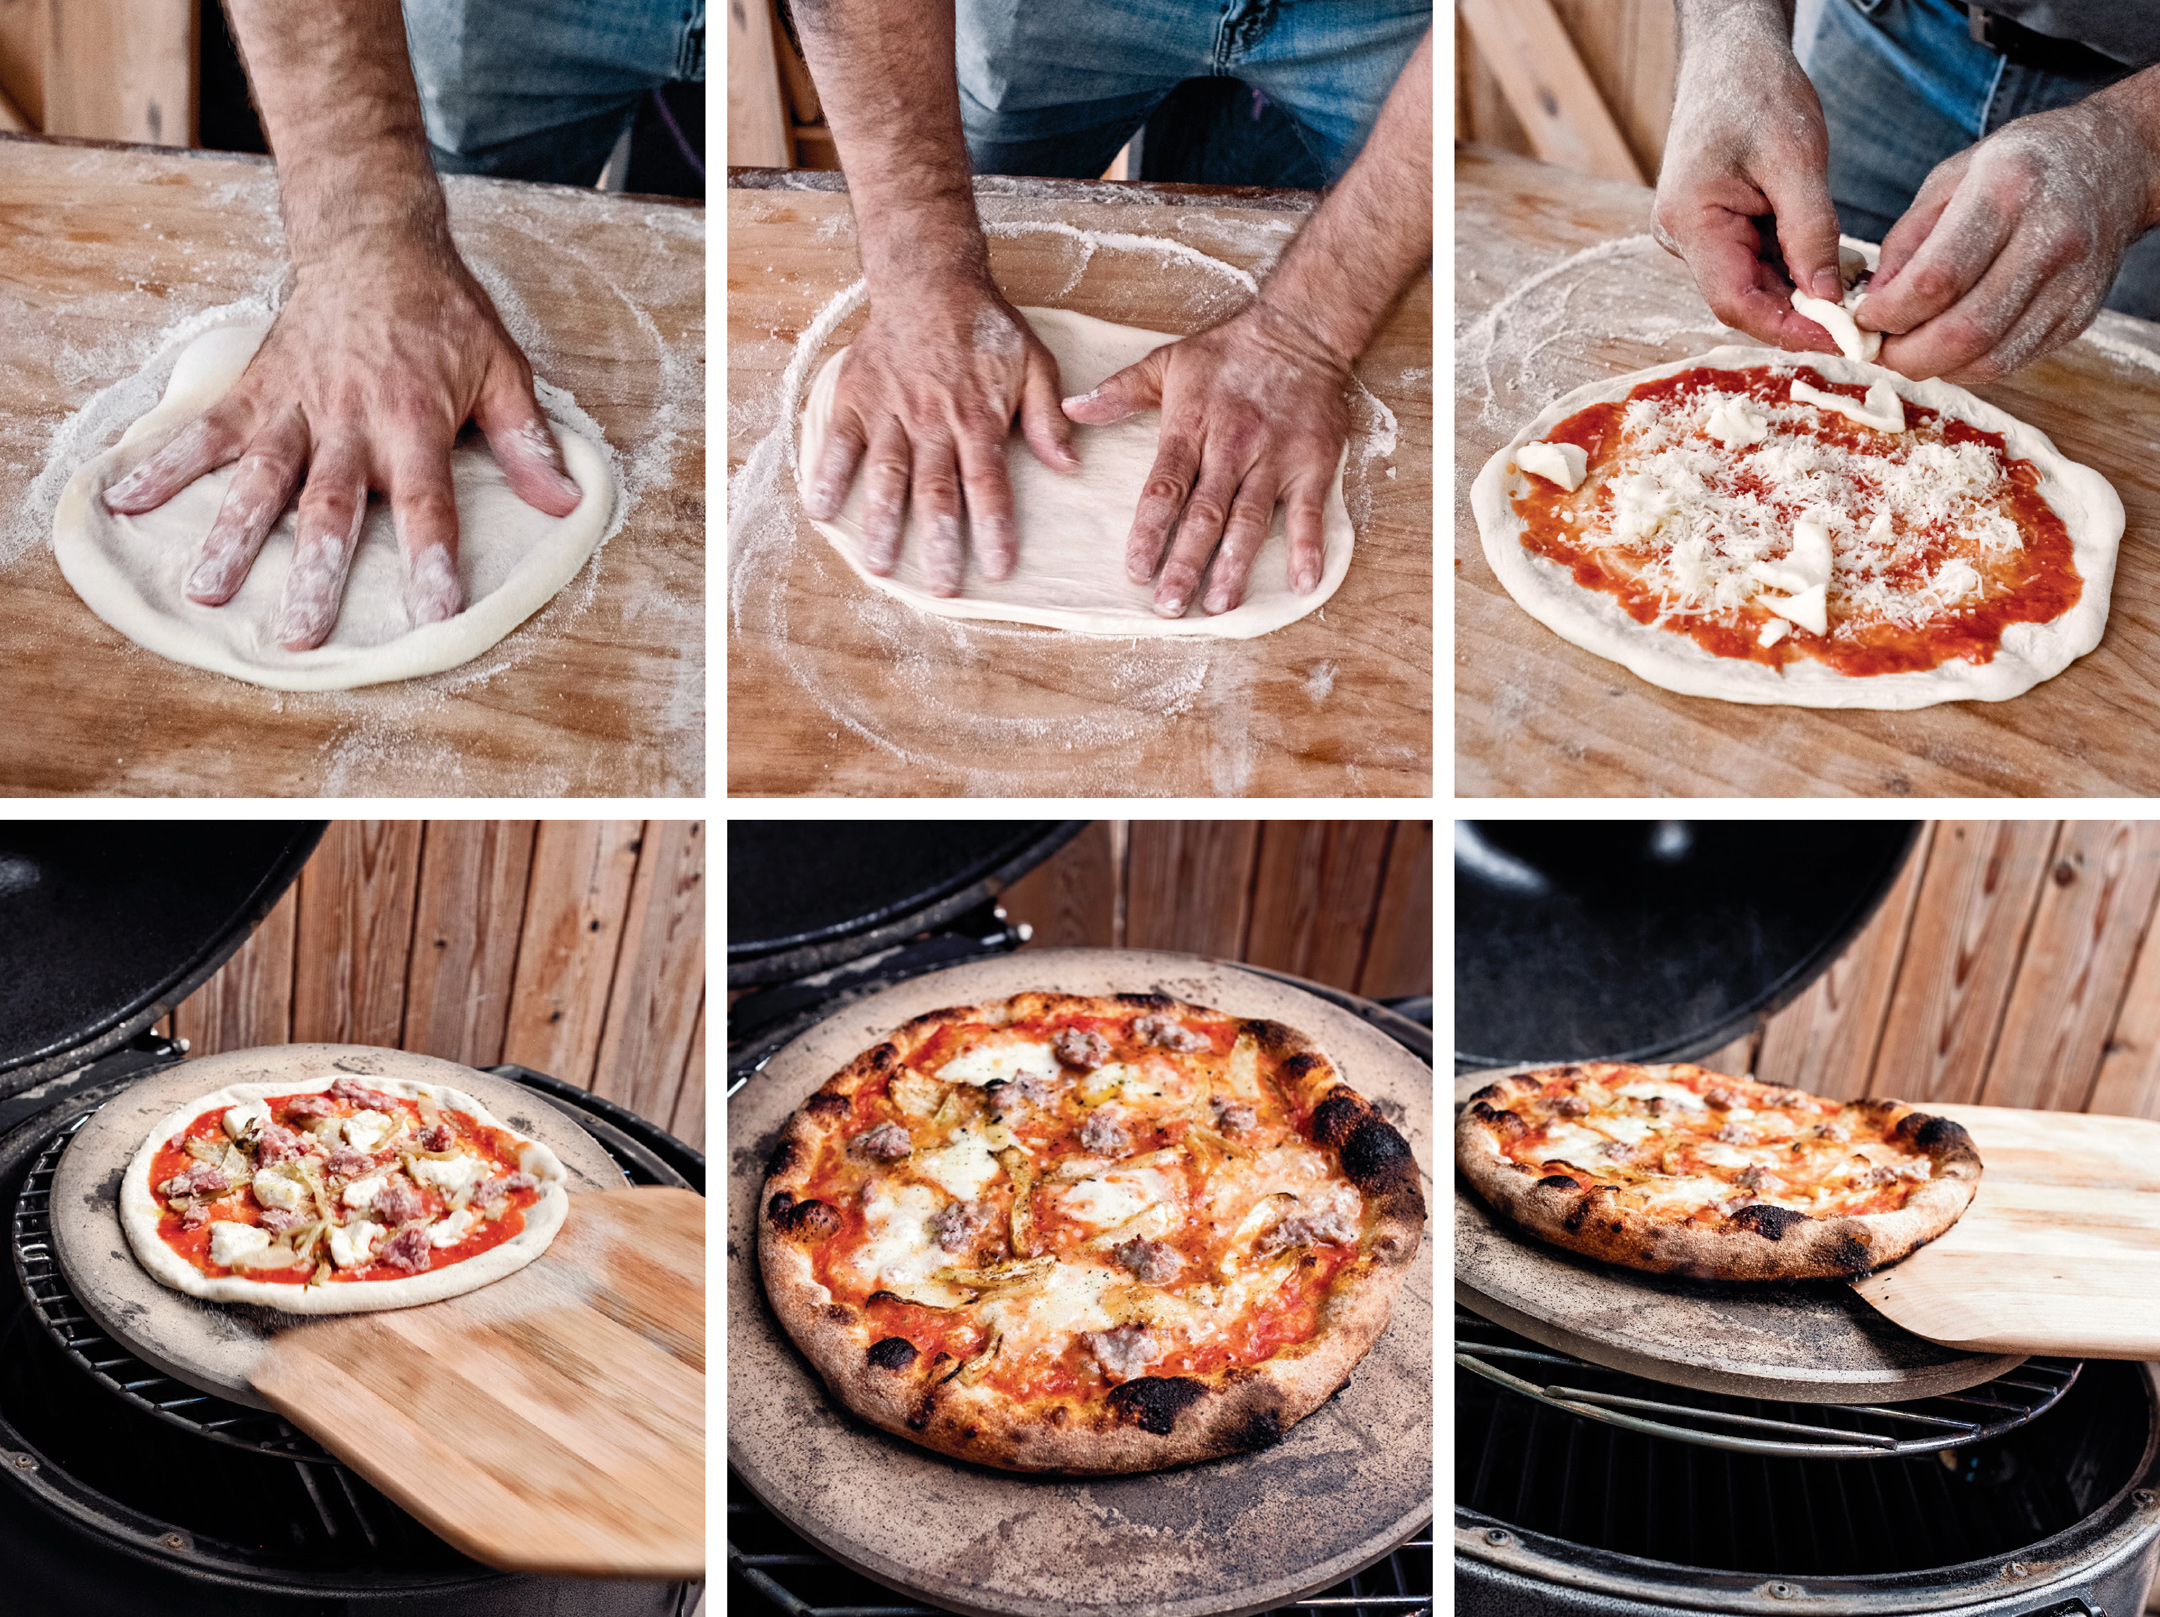
TO SHAPE THE DOUGH: The goal is to stretch the dough to a 10- to 12-inch (25 to 30 cm) circle with an even thickness across the middle and a thicker rim around the edge. There are lots of ways. Here’s how I usually do it. Lightly flour a work surface and a wooden pizza peel. Use a dough scraper to scrape the dough ball from the tray to the floured surface. Gently poke your fingers about ½ inch (1.3 cm) from the edge of the dough ball all around it to begin forming the rim. The center should look thicker like a hat. Leave the rim alone and press your fingers and palm gently into the center of the hat, moving your fingers and thumb outward to begin stretching the dough away from the center (see the photos on this page). At this point, you should have a disk of dough about 5 inches (12 cm) in diameter. Slip one hand under the disk and quickly flip it over. Repeat the poking and pressing process on the other side, poking your fingers around the edge first to make the rim, and then placing your palm on the center and gently stretching your fingers and thumb outward to stretch the dough from the center outward. As you work, gradually rotate the dough and keep your thumb against the rim to make the rim thick and round.
For stiffer dough like this, it’s easiest to pick up the dough to stretch it. Transfer the dough from the work surface to the backs of your hands: just quickly grab the far edge of the rim and flip the dough onto the opposite hand and then slip your other hand under the dough. Keep both hands loosely closed as fists under the dough near the center. With the dough on the backs of your hands, essentially repeat the process of stretching the dough from the center outward: move your hands gently away from the center while rotating the dough around the backs of your fists. It helps to angle the dough downward slightly so it’s not perfectly horizontal, which causes it to drape too quickly around the backs of your fists. Carefully and gently continue to stretch the dough until it is an evenly thin 10- to 12-inch (25 to 30 cm) circle with a rim about ½ inch (1.3 cm) thick. For the most even crust, I like to stretch both sides of the dough in my hands. To do that, flip the dough over on the backs of your hands by flipping it over much the same way you did when flipping it from the work surface to your hands. Of course, there are other ways to stretch the dough. Some people twirl it up in the air. Use whatever method works best for you to create an evenly stretched 10- to 12-inch (25 to 30 cm) circle with a nice thick rim. If the dough tears a hole, patch it by pulling a little dough from one side of the hole and pressing it over the hole with your thumb.
Lay the stretched dough onto the floured peel. The easiest way is to simply drape it over the peel and then remove your hands from beneath the dough. Reshape the dough round as necessary, keeping the rim thick. Give the peel a quick shake to make sure the dough can slide easily.
Add your toppings. Give the peel another quick shake to make sure the dough slides easily.
TO BAKE THE PIZZA: Throw another piece of wood on the fire to stoke it up and give the pizza an initial blast of heat. Slide and shake the pizza from the peel onto the clean cooking surface. Cook until the rim is puffed, the dough blisters and chars in spots, and the bottom is crisp, 2 to 3 minutes, depending on your oven’s temperature. Use a metal pizza peel to rotate the dough as necessary for even cooking.
Remove the pizza from the oven to a wire rack to cool for a minute or so, just to keep the steam from making the crust soggy. Transfer the pizza to a pizza pan or cutting board, slice, and add any finishing ingredients. I like 6 slices for this size pizza.
You can make a damn good pizza in a home oven. This method is pretty common now. It uses a hot baking steel or baking stone and your oven’s broiler to replicate the bottom heat and top heat of a wood-fired oven. A little more water in the dough helps the crust come out right when you’re baking at 500° or 550°F (260° or 288°C).
MAKES ONE 10- TO 12-INCH (25 TO 30 CM) ROUND PIZZA
1 dough ball, preferably Naples Dough at 70% Hydration (this page), about 270 grams/9.5 ounces
Toppings of your choice (this page)
Flour, for dusting
Let the dough warm up at room temperature for at least 1 hour or up to 4 hours. As it warms up, the dough will relax and become easier to shape.
Place a baking steel or stone on the upper rack of the oven 4 to 6 inches (10 to 15 cm) beneath the broiler for an electric oven or 6 to 8 inches (15 to 20 cm) beneath the broiler for a gas oven. Preheat the oven to its highest setting (usually 500° to 550°F/260° to 288°C) for 45 minutes.
Have your toppings ready to go.
When the oven is preheated and you are ready to bake pizza, open the oven door for 10 seconds if you have an electric oven. This step lets some heat escape to make sure the electric broiler will actually turn on even though the oven has reached its maximum temperature. Reset the oven to broil, and preheat the broiler for 5 to 10 minutes. The next steps of shaping and topping the pizza should take only 5 to 10 minutes if your toppings are ready to go.
TO SHAPE THE DOUGH: The goal is to stretch the dough to a 10- to 12-inch (25 to 30 cm) circle with an even thickness across the middle and a thicker rim around the edge. There are lots of ways. For 70% hydration dough, you’ll need a bit more flour and a gentler hand, since the dough is softer. It’s best to shape it completely on your work surface. The dough should be soft enough to stretch while it’s flat. If you try to pick it up, it may tear a hole. Generously flour a work surface and a wooden pizza peel. Use a dough scraper to scrape the dough ball from the tray to the floured surface. Gently poke your fingers about ½ inch (1.3 cm) from the edge of the dough ball all around it to begin forming the rim. The center should look thicker like a hat. Leave the rim alone and press your fingers and palm gently into the center of the hat, moving your fingers and thumb outward to begin stretching the dough away from the center (see the photos on this page). At this point, you should have a disk of dough about 5 inches (12 cm) in diameter. Slip one hand under the disk and quickly flip it over. Repeat the poking and pressing process on the other side, poking your fingers around the edge first to make the rim, and then placing your palm on the center and gently stretching your fingers and thumb outward to stretch the dough from the center outward. As you work, gradually rotate the dough on the flour and keep your thumb against the rim to make the rim thick and round. The dough should be soft enough to continue this process until it is stretched to a 10- to 12-inch (25 to 30 cm) circle with an even thickness across the middle and a rim about ½ inch (1.3 cm) thick. If the dough tears a hole, patch it by pulling a little dough from one side of the hole and pressing it over the hole with your thumb.
Lay the stretched dough onto the floured peel. The easiest way is to simply drape it over the peel and then remove your hands from beneath the dough. Reshape the dough round as necessary, keeping the rim thick. Give the peel a quick shake to make sure the dough can slide easily.
Add your toppings. If using soft cheese, such as fresh mozzarella, you may need to add it halfway through the baking time to keep it from overcooking. Give the peel another quick shake to make sure the dough slides easily.
TO BAKE THE PIZZA: At this point, your oven should be on broil. Slide and shake the pizza from the peel onto the cooking surface. Cook until the rim is puffed, the dough blisters and chars in spots, and the bottom is crisp, 6 to 8 minutes. Use your hands or a long spatula to rotate the dough as necessary for even cooking.
Remove the pizza from the oven to a wire rack to cool for a minute or so, just to keep the steam from making the crust soggy. If you will be baking another pizza, reset the oven to its maximum temperature. Transfer the pizza to a pizza pan or cutting board, slice, and add any finishing ingredients. I like 6 slices for this size pizza.
Vera Pizza Napoletana (VPN, or true Neapolitan pizza) is limited to two types: marinara (tomato, oil, oregano, and garlic) and margherita (tomato, oil, mozzarella or fior di latte, grated cheese, and basil). But the association “reserves the right to accept variations of the product and recognize their authenticity if they are informed by the Neapolitan tradition of pizzas and are not in contrast with the rules of gastronomy.”
The finished pizza: should be soft, elastic, and easy to manipulate and fold.
The dough: must use only finely milled white type 00 wheat flour, although up to 20% of slightly coarser type 0 flour is allowed. The hydration is 55 to 59%. The dough must also use sea salt and compressed fresh yeast (or natural yeast in sourdough). No dry yeast is allowed. No fat is permitted in the dough. The dough must be mixed by hand or in a low-speed mixer with fork or spiral beaters. No vertical or planetary mixers are allowed. The dough should ferment entirely at warm room temperature (77°F/25°C). The dough balls must be completely shaped by hand. No rolling pins or mechanical dough presses are allowed.
The toppings: must be good quality, including DOP (Denominazione di Origine Protetta or protected designation of origin) fresh or canned San Marzano, Roma, or piennolo tomatoes; thinly sliced fresh garlic; DOP mozzarella, buffalo mozzarella, or fior di latte cheese; hard cheese such as Parmigiano-Reggiano, Grana Padano, or Pecorino Romano; extra-virgin olive oil; fresh basil; and sea salt.
The oven: must be wood fired only. No coal, gas, electric, or other fuel may be used.
Baking temperature: must be 800° to 900°F (427° to 482°C) on the dome and floor.
Baking time: should not exceed 90 seconds.
Surprisingly, this method is one of the easiest and most effective for making a pizza at home. A cast-iron skillet gets rip-roaring hot, and when you run the pizza under the broiler, the effect is similar to the top and bottom heat of a wood-fired oven. The pizza cooks in just a couple minutes. All you need is a large cast-iron skillet (at least 12 inch/30 cm diameter) and a broiler. I like dough with 60% hydration here because it’s a little firmer and easier to slide into the hot skillet.
MAKES ONE 10- TO 12-INCH (25 TO 30 CM) ROUND PIZZA
1 dough ball, preferably Naples Dough at 60% Hydration (this page), about 250 grams/8.8 ounces
Toppings of your choice (this page)
Flour, for dusting
Let the dough warm up at room temperature for at least 1 hour or up to 4 hours. As it warms up, the dough will relax and become easier to shape.
Set an oven rack 4 to 6 inches (10 to 15 cm) beneath the broiler for an electric oven or 6 to 8 inches (15 to 20 cm) beneath the broiler for a gas oven. Preheat the oven to its highest setting (usually 500° to 550°F/260° to 288°C) for 45 minutes.
Have your toppings ready to go.
When the oven is preheated and you are ready to bake pizza, open the oven door for 10 seconds if you have an electric oven. This step lets some heat escape to make sure the electric broiler will actually turn on even though the oven has reached its maximum temperature. Reset the oven to broil, and preheat the broiler for 5 to 10 minutes. The next steps of shaping and topping the pizza should take only 5 to 10 minutes if your toppings are ready to go.
Heat a large cast-iron skillet (12 to 14 inches/30 to 35 cm) on the stovetop over medium-high heat until very hot, 3 to 5 minutes.
TO SHAPE THE DOUGH: The goal is to stretch the dough to a 10- to 12-inch (25 to 30 cm) circle with an even thickness across the middle and a thicker rim around the edge. There are lots of ways. Here’s how I usually do it. Lightly flour a work surface and a wooden pizza peel. Use a dough scraper to scrape the dough ball from the tray to the floured surface. Gently poke your fingers about ½ inch (1.3 cm) from the edge of the dough ball all around it to begin forming the rim. The center should look thicker like a hat. Leave the rim alone and press your fingers and palm gently into the center of the hat, moving your fingers and thumb outward to begin stretching the dough away from the center (see the photos on this page). At this point, you should have a disk of dough about 5 inches (12 cm) in diameter. Slip one hand under the disk and quickly flip it over. Repeat the poking and pressing process on the other side, poking your fingers around the edge first to make the rim and then placing your palm on the center and gently stretching your fingers and thumb outward to stretch the dough from the center outward. As you work, gradually rotate the dough and keep your thumb against the rim to make the rim thick and round.
For stiffer dough like this, it’s easiest to pick up the dough to stretch it. Transfer the dough from the work surface to the backs of your hands: just quickly grab the far edge of the rim and flip the dough onto the opposite hand and then slip your other hand under the dough. Keep both hands loosely closed as fists under the dough near the center. With the dough on the backs of your hands, essentially repeat the process of stretching the dough from the center outward: move your hands gently away from the center while rotating the dough around the backs of your fists. It helps to angle the dough downward slightly so it’s not perfectly horizontal, which causes it to drape too quickly around the backs of your fists. Carefully and gently continue to stretch the dough until it is an evenly thin 10- to 12-inch (25 to 30 cm) circle with a rim about ½ inch (1.3 cm) thick. For the most even crust, I like to stretch both sides of the dough in my hands. To do that, flip the dough over on the backs of your hands by flipping it over much the same way you did when flipping it from the work surface to your hands. Of course, there are other ways to stretch the dough. Some people twirl it up in the air. Use whatever method works best for you to create an evenly stretched 10- to 12-inch (25 to 30 cm) circle with a nice thick rim. If the dough tears a hole, patch it by pulling a little dough from one side of the hole and pressing it over the hole with your thumb.
Lay the stretched dough onto the floured peel. The easiest way is to simply drape it over the peel, and then remove your hands from beneath the dough. Reshape the dough round as necessary, keeping the rim thick. Give the peel a quick shake to make sure the dough can slide easily.
TO BAKE THE PIZZA: At this point, your oven should be on broil, and your cast-iron skillet should be smoking hot on the stovetop. Slide and shake the pizza from the peel into the hot skillet. Use a folded towel or oven mitt to quickly shake the pan and center the pizza inside the pan. Turn the heat to low and quickly add your toppings. Put the pan of pizza in the hot oven right under the broiler and cook until the rim puffs, browns, and chars in spots, 2 to 4 minutes. Rotate the pan as necessary for even cooking.
Transfer the pan to the stovetop and use a large spatula to transfer the pizza to a wire rack to cool for a minute or so, just to keep the steam from making the crust soggy. Transfer the pizza to a pizza pan or cutting board, slice, and add any finishing ingredients. I like 6 slices for this size pizza.


The Big Green Egg and other kamado-style grills get superhot, up to 800°F (427°C). They’re typically made of ceramic, which is similar to the firebricks in a wood oven, so all in all, they make great pizza. Just be careful not to get them too hot or your crust will burn, especially on the bottom. With the high temperature and short bake time, Naples-style dough at 60% hydration works well, but I like the extra puff you get from a little more water in the dough, so I use Naples-style dough at 70% hydration.
MAKES ONE 10- TO 12-INCH (25 TO 30 CM) ROUND PIZZA
1 dough ball, preferably Naples Dough at 70% Hydration (this page), about 270 grams/9.5 ounces
Toppings of your choice (this page)
Flour, for dusting
Let the dough warm up at room temperature for at least 1 hour or up to 4 hours. As it warms up, the dough will relax and become easier to shape.
Light the charcoal until it starts to glow red. Everyone has their favorite method. The fastest way is to use two chimney starters, each filled with 2½ pounds (1.1 kg) of charcoal. Place wadded-up newspaper in the bottom, charcoal in the top, and then light the paper and the perforated cans will feed the fire with oxygen so the charcoal lights quickly.
Dump the glowing coals onto the coal grate of the cooker. Place the heat diffuser over the coals, then place the grill grate and/or upper rack in the cooker and a baking stone on the upper rack. A baking stone is preferred here over a baking steel. Steel tends to burn the bottom of the pizza due to the grill’s high heat and the steel’s ability to transfer heat so quickly. Close the lid and preheat the grill with the top and bottom vents open for 50 to 60 minutes. The ambient temperature (on the grill’s thermometer) should be 650° to 750°F (343° to 399°C). The cooking surface temperature should be about 600°F (316°C) when checked with an infrared thermometer through the top vent (to avoid opening the grill and losing heat).
Have your toppings ready to go.
TO SHAPE THE DOUGH: The goal is to stretch the dough to a 10- to 12-inch (25 to 30 cm) circle with an even thickness across the middle and a thicker rim around the edge. There are lots of ways. For 70% hydration dough, you’ll need a bit more flour and a gentler hand, since the dough is softer. It’s best to shape it completely on your work surface. The dough should be soft enough to stretch while it’s flat. If you try to pick it up, it may tear a hole. Generously flour a work surface and a wooden pizza peel. Use a dough scraper to scrape the dough ball from the tray to the floured surface. Gently poke your fingers about ½ inch (1.3 cm) from the edge of the dough ball all around it to begin forming the rim. The center should look thicker like a hat. Leave the rim alone and press your fingers and palm gently into the center of the hat, moving your fingers and thumb outward to begin stretching the dough away from the center (see the photos on this page). At this point, you should have a disk of dough about 5 inches (12 cm) in diameter. Slip one hand under the disk and quickly flip it over. Repeat the poking and pressing process on the other side, poking your fingers around the edge first to make the rim and then placing your palm on the center and gently stretching your fingers and thumb outward to stretch the dough from the center outward. As you work, gradually rotate the dough on the flour and keep your thumb against the rim to make the rim thick and round. The dough should be soft enough to continue this process until it is stretched to a 10- to 12-inch (25 to 30 cm) circle with an even thickness across the middle and a rim about ½ inch (1.3 cm) thick. If the dough tears a hole, patch it by pulling a little dough from one side of the hole and pressing it over the hole with your thumb.
Lay the stretched dough onto the floured peel. The easiest way is to simply drape it over the peel and then remove your hands from beneath the dough. Reshape the dough round as necessary, keeping the rim thick. Give the peel a quick shake to make sure the dough can slide easily.
Add your toppings. Give the peel another quick shake to make sure the dough slides easily.
TO GRILL THE PIZZA: Open the grill and quickly brush or blow off any ash from the cooking surface. Quickly shake and load the pizza onto the cooking surface and close the lid. Close the top vents to trap heat and send it to the top of the pizza. Keep the bottom vents fully open to feed the fire oxygen and keep it burning hot. Cook until the rim is puffed, the dough blisters and chars in spots, and the bottom is crisp, 4 to 6 minutes. The pizza should cook evenly so there is no need to rotate it. Check the doneness by shining a light (a cell phone light works well) through the top vent to avoid opening the grill during cooking.
Remove the pizza from the grill to a wire rack to cool for a minute or so, just to keep the steam from making the crust soggy. If you will be baking another pizza, quickly close the lid, reopen the top vents, and let the cooking surface recover its heat for 15 to 20 minutes. Transfer the pizza to a pizza pan or cutting board, slice, and add any finishing ingredients. I like 6 slices for this size pizza.
If you have a big grill, you’re in luck. You can grill a big pizza. Put 2 dough balls end to end, press them into a long rectangle, and boom! You have pizza al metro. This recipe makes a rectangular pie that fits on most 3- or 4-burner gas grills. Or if you have a big charcoal grill, grill it there. Or, better yet, if you have a big pizza oven, make the same pizza without flipping it. Either way, you’ll need twice the amount of toppings, since this pizza is essentially 2 smaller pies made into 1 big rectangular one.
MAKES 1 LARGE RECTANGULAR PIZZA, ABOUT 22 INCHES LONG BY 10 INCHES WIDE (56 BY 25 CM)
2 dough balls, preferably Naples Dough at 60% Hydration (this page), about 500 grams/17.6 ounces total
Toppings of your choice (this page)
Flour, for dusting
Let the dough warm up at room temperature for at least 1 hour or up to 4 hours. As it warms up, the dough will relax and become easier to shape.
Preheat a 3- or 4-burner (or larger) gas grill to medium heat for 20 to 30 minutes. You’ll need a grill space that’s at least 22 inches long and 10 inches wide (56 by 25 cm).
Have your toppings ready to go.
TO SHAPE THE DOUGH: The goal is to stretch the dough to a large rectangle, about 22 inches long by 10 inches wide with an even thickness across the middle and a thicker rim around the edge. There are lots of ways. Here’s how I usually do it for a pizza al metro. Lightly flour a large work surface and a large wooden pizza peel or cutting board (a board big enough to fit the stretched-out dough). Use a dough scraper to scrape the dough balls from the tray to the floured surface. Position the dough balls end to end and press the ends together, pinching them and reshaping the dough balls to make one larger piece of dough in a rough rectangular shape. Gently poke your fingers about ½ inch (1.3 cm) from the edge of the dough all around it to begin forming the rim. The center should look a bit thicker. Leave the rim alone and press your fingers and palms gently around the center portion to begin stretching the dough away from the center. Keep stretching to make a rectangle of dough about 12 inches long by 4 inches wide (30 by 10 cm). Slip one hand under the rectangle and quickly flip it over. Repeat the poking and pressing process on the other side, poking your fingers around the edge first to make the rim, and then placing your palms on the center and gently stretching your fingers and thumb outward to stretch the dough from the center outward into a larger rectangle about 22 inches long by 10 inches wide. You may need to use both hands to stretch the dough. As you work, keep the rim thick. If the dough is difficult to stretch, let it relax for 5 minutes or so and then stretch it again. If the dough tears a hole, patch it by pulling a little dough from one side of the hole and pressing it over the hole with your thumb.
Lay the stretched dough onto the floured peel or cutting board. The easiest way is to slide it onto the peel or board, one end at a time, removing your hands from beneath the dough each time. Reshape the rectangle as necessary on the peel or board and then give the peel or board a quick shake to make sure the dough can slide easily.
TO GRILL THE PIZZA: Brush the grill grate clean and coat it with oil. An oily paper towel held with tongs works well. Shake and slide the pizza from the peel or board onto the grill. Close the lid and cook until the dough is nicely browned on the bottom and almost dry on top, 1 to 2 minutes total. After about a minute, use tongs and a large spatula to rotate the dough 45 degrees or so for even browning. Do not flip the dough.
When the dough is evenly browned on the bottom, use tongs to slide the dough back onto the peel or board. Close the grill lid. Flip the pizza on the peel or board. Add your toppings to the grilled side of the pizza off the heat.
Carefully slide the topped pizza back onto the grill and cover the grill. Cut the grill heat to medium low and cook until the bottom browns and the toppings cook, about 5 minutes, rotating the pizza 45 degrees once or twice for even browning.
Remove the pizza from the grill to a large cutting board. Slice and add any finishing ingredients. For this pizza, I like to make 12 rectangular slices by cutting the pizza in half lengthwise and then making 5 crosswise cuts.
WOOD OVEN PIZZA AL METRO: Shape the dough the same way but add the toppings to the raw, pressed-out dough. Bake in a wood-fired oven at 700° to 800°F (371° to 427°C), rotating the pizza for even browning.
HOME OVEN PIZZA AL METRO: Use 1½ dough balls (about 400 grams/14 oz total), preferably Naples Dough at 70% Hydration (this page). When shaping the dough, make the rectangle slightly smaller, about 21 inches long by 10 inches wide (53 by 25 cm). Preheat a large 22-inch (56 cm) baking stone or steel in the oven at 500° to 550°F (260° to 288°C), 4 to 6 inches (10 to 15 cm) beneath the broiler for 45 minutes. Bake on the hot stone or steel with the broiler on, the same way as for Home Oven Neapolitan Pizza (this page). Don’t throw away the remaining half dough ball! You can divide it and fry it up to make an appetizer of Parmesan Fried Dough (this page) or a dessert of Fried Dough with Fennel Lemon Sugar (this page).

“When life gives you lemons, make lemonade.” And if all you have is a charcoal grill, you can still make good pizza! Just grill the dough right on the hot grate, flip it, top it, and grill the other side with the lid down to cook the toppings. The end result is more like flatbread, but it works. I like dough with about 60% hydration here because wetter dough can slump into the gaps between the grill grates.
MAKES ONE 10- TO 12-INCH (25 TO 30 CM) ROUND PIZZA
1 dough ball, preferably Naples Dough at 60% Hydration (this page), about 250 grams/8.8 ounces
Toppings of your choice (this page)
Flour, for dusting
Let the dough warm up at room temperature for at least 1 hour or up to 4 hours. As it warms up, the dough will relax and become easier to shape.
Light the charcoal until it starts to glow red. Everyone has their favorite method. The fastest way is to use two chimney starters, each filled with 2½ pounds (1.1 kg) of charcoal. Place wadded-up newspaper in the bottom, charcoal in the top, and then light the paper and the perforated cans will feed the fire with oxygen so the charcoal lights quickly.
Dump the glowing coals onto the coal grate of the grill. Insert the grill rack, close the lid, and preheat the grill for 20 to 30 minutes.
Have your toppings ready to go.
TO SHAPE THE DOUGH: The goal is to stretch the dough to a 10- to 12-inch (25 to 30 cm) circle with an even thickness across the middle and a thicker rim around the edge. There are lots of ways. Here’s how I usually do it. Lightly flour a work surface and a wooden pizza peel. Use a dough scraper to scrape the dough ball from the tray to the floured surface. Gently poke your fingers about ½ inch (1.3 cm) from the edge of the dough ball all around it to begin forming the rim. The center should look thicker like a hat. Leave the rim alone and press your fingers and palm gently into the center of the hat, moving your fingers and thumb outward to begin stretching the dough away from the center (see the photos on this page). At this point, you should have a disk of dough about 5 inches (12 cm) in diameter. Slip one hand under the disk and quickly flip it over. Repeat the poking and pressing process on the other side, poking your fingers around the edge first to make the rim, and then placing your palm on the center and gently stretching your fingers and thumb outward to stretch the dough from the center outward. As you work, gradually rotate the dough and keep your thumb against the rim to make the rim thick and round.
For stiffer dough like this, it’s easiest to pick up the dough to stretch it. Transfer the dough from the work surface to the backs of your hands: just quickly grab the far edge of the rim and flip the dough onto the opposite hand, and then slip your other hand under the dough. Keep both hands loosely closed as fists under the dough near the center. With the dough on the backs of your hands, essentially repeat the process of stretching the dough from the center outward: move your hands gently away from the center while rotating the dough around the backs of your fists. It helps to angle the dough downward slightly so it’s not perfectly horizontal, which causes it to drape too quickly around the backs of your fists. Carefully and gently continue to stretch the dough until it is an evenly thin 10- to 12-inch (25 to 30 cm) circle with a rim about ½ inch (1.3 cm) thick. For the most even crust, I like to stretch both sides of the dough in my hands. To do that, flip the dough over on the backs of your hands by flipping it over much the same way you did when flipping it from the work surface to your hands. Of course, there are other ways to stretch the dough. Some people twirl it up in the air. Use whatever method works best for you to create an evenly stretched 10- to 12-inch (25 to 30 cm) circle with a nice thick rim. If the dough tears a hole, patch it by pulling a little dough from one side of the hole and pressing it over the hole with your thumb.
Lay the stretched dough onto the floured peel. The easiest way is to simply drape it over the peel and then remove your hands from beneath the dough. Reshape the dough round as necessary, keeping the rim thick. Give the peel a quick shake to make sure the dough can slide easily.
TO GRILL THE PIZZA: Adjust the top and bottom vents for medium heat in the grill. Brush the grill grate clean and coat it with oil. An oily paper towel held with tongs works well. Shake and slide the naked pizza from the peel onto the grill. Close the lid and cook until the dough is nicely browned on the bottom and almost dry on top, 1 to 2 minutes total. After about a minute, use tongs and a large spatula to rotate the dough about 45 degrees for even browning. Do not flip the dough.
When the dough is evenly browned on the bottom, use tongs to slide the dough back onto the peel. Close the grill lid and then close the grill vents on the top and bottom about 75% closed to lower the grill heat to medium low. Flip the pizza on the peel. Add your toppings to the grilled side of the pizza off the heat.
Carefully slide the topped pizza back onto the grill and cover the grill. Grill over medium-low heat until the bottom browns and the toppings cook, about 5 minutes, rotating the pizza 45 degrees once or twice for even browning.
Remove the pizza from the oven to a wire rack to cool for a minute or so, just to keep the steam from making the crust soggy. Transfer the pizza to a pizza pan or cutting board, slice, and add any finishing ingredients. I like 6 slices for this size pizza.
You can add a pizza stone here to make your grill more like an oven. You won’t really get grilled pizza that way. It’ll be more like pizza baked on a grill. But some manufacturers such as KettlePizza make baking stones that have a cover assembly to trap heat and help cook the top of the pizza. Either way, preheat the stone and/or assembly directly on the grill over medium heat for at least 30 minutes. Then cook the pizza on the hot stone according to the manufacturer’s directions, which usually means cooking the pizza as you would on any other baking stone, for 4 to 6 minutes without flipping it over.
When I visited Pepe in Grani—Franco Pepe’s hilltop shrine to Naples-style pizza—this is the first pizza he served. The dough was light, airy, crisp, and topped simply with paper-thin mortadella, buffalo ricotta, and lemon zest. It was perfect. The frying method couldn’t be easier. Instead of baking the pressed-out dough in an oven, you fry it on the stovetop in a frying pan. If you prefer, you can use the Roman dough with this method. It just won’t puff up quite as much. This pizza has its own special toppings because you add the toppings after the dough is completely cooked.
MAKES 1 ROUND 10- TO 11-INCH (25 TO 28 CM) FRIED PIZZA
Vegetable oil, for frying
1 dough ball, preferably Naples Dough at 60% Hydration (this page), about 250 grams/8.8 ounces
Toppings of your choice (see “Options,” this page)
Flour, for dusting
Pour enough oil into a large frying pan or wok (at least 12-inch/30 cm diameter) so that the oil is at least 1 inch (2.5 cm) deep. Heat the oil to 350°F (177°C).
Let the dough warm up at room temperature for at least 1 hour or up to 4 hours. As it warms up, the dough will relax and become easier to shape.
Meanwhile, get your toppings prepped and ready to go (see “Options,” this page).
TO SHAPE THE DOUGH: The goal is to stretch the dough to a 10- to 11-inch (25 to 28 cm) circle with an even thickness across the entire surface. There are lots of ways. Here’s how I usually do it. Lightly flour a work surface and a wooden pizza peel. Use a dough scraper to scrape the dough ball from the tray to the floured surface. Gently poke your fingers around the edge of the dough ball to begin forming a modest rim. The center should look thicker like a hat. Leave the rim alone and press your palm gently into the center of the hat, moving your fingers and thumb outward to begin stretching the dough away from the center (see the photos on this page). At this point, you should have a disk of dough about 5 inches (12 cm) in diameter. Slip one hand under the disk and quickly flip it over. Repeat the poking and pressing process on the other side, poking your fingers around the edge first to make the rim and then stretching outward with your fingers and thumb to stretch the dough from the center outward. As you work, keep your thumb against the rim.
The dough should stretch easily on the work surface. If you need to stretch it more, transfer the dough from the work surface to the backs of your hands: just quickly grab the far edge of the rim and flip the dough onto the opposite hand, and then flip it again on the back of the other hand. Keep both hands loosely closed as fists under the dough near the center. With the dough on the backs of your hands, essentially repeat the process of stretching the dough from the center outward: move your hands gently away from the center while rotating the dough around the backs of your fists. It helps to angle the dough downward slightly so it’s not perfectly horizontal, which causes it to drape too quickly around the backs of your fists. Carefully and gently continue to stretch the dough until it is an evenly thin 10- to 11-inch (25 to 28 cm) circle with a modest rim. For the most even crust, I like to stretch both sides of the dough in my hands. To do that, flip the dough over on the backs of your hands by flipping it over much the same way you did when flipping it from the work surface to your hands. Of course, there are other ways to stretch the dough. Some people twirl it up in the air. Use whatever method works best for you to create an evenly stretched circle with a modest rim. If the dough tears a hole, patch it by pulling a little dough from one side of the hole and pressing it over the hole with your thumb.
Lay the stretched dough onto the floured peel. The easiest way is to simply drape it over the peel and then remove your hands from beneath the dough. Reshape the dough round as necessary and then give the peel a quick shake to make sure the dough can slide easily.
TO FRY THE PIZZA: Slide and shake the pizza from the peel into the hot oil. Fry until golden brown on each side, 2 to 3 minutes per side, and turn with tongs. It will puff up. Use the tongs to lift the edges and make sure it cooks evenly. Adjust the heat to maintain a steady oil temperature of 350°F (177°C). When the dough is browned and firm, transfer the fried pizza shell to paper towels to drain briefly. Transfer again to a cutting board and cut into 6 pieces. Quickly divide the toppings among the pieces and serve.

MORTADELLA RICOTTA: On each slice, place some thinly sliced mortadella (about 6 oz total), a dollop of ricotta, some finely grated lemon zest, chopped fresh parsley, freshly ground black pepper, and a drizzle of olive oil.
MELON AND SPECK: On each slice, layer on thinly sliced speck (about 6 oz total), finely chopped cantaloupe, shaved red onion, and olive oil.
CAPRESE: On each slice, layer on a few pieces of fresh hand-torn buffalo mozzarella (about 2 oz total), a slice of fresh tomato, a fresh basil leaf, sea salt, freshly ground black pepper, and a drizzle of olive oil.
CAESAR: Make a bagna cauda dressing by steeping 2 large garlic cloves and 5 oil-packed anchovy fillets in a small saucepan with ¾ cup extra-virgin olive oil, and ¾ cup grapeseed oil. Let it steep over medium-low heat until the garlic begins to brown lightly, about 15 minutes. Remove from the heat and let the mixture cool slightly. Discard 1 garlic clove and then pour the mixture into a blender and blend until smooth. With the blender running, gradually stream in ¾ cup whole milk. Then blend in 1 egg yolk until the mixture thickens slightly. Season with about 1½ teaspoons sherry vinegar, some sea salt, and freshly ground black pepper. Top each slice of fried pizza with julienned strips of fresh romaine lettuce, a drizzle of the bagna cauda dressing, an oil-packed anchovy fillet, a quarter of a soft-boiled egg, and some freshly grated Parmigiano-Reggiano. Delicious! You’ll have some bagna cauda dressing left over. Use it as a warm dip for croutons or crudités. It keeps for several days in the fridge. Just warm it up a little before using.
PIZZA
TOPPINGS
Tomatoes, olive oil, basil and salt. What more do you need? You can blend up this sauce right in a tall 1-quart container.
MAKES 1 QUART
1 can (28 oz) whole peeled plum tomatoes, such as La Valle, with liquid
3 tablespoons (44 ml) extra-virgin olive oil
¼ cup (21 g) packed fresh basil leaves
1 teaspoon (6 g) kosher salt
Pour everything into a blender jar or deep 1-quart container. Use a blender (stick blender or countertop) to blend everything just until a bit chunky. Short pulses are best because overblending can make this sauce thin. Use immediately or refrigerate for 4 to 5 days.
For a more uniform texture without the seeds, pass the tomatoes through a food mill. In that case, chop the basil.
MUSSELS RAGU: Pour the blended sauce into a medium saucepan. Wash and debeard 1 pound (454 g) mussels (we use Prince Edward Island mussels, which are responsibly aquacultured on ropes). Toss any mussels that are already open or cracked. Add the mussels to the pizza sauce along with a pinch of salt and a generous amount of freshly ground black pepper. Cook over medium heat until the mussels open and release their juices into the sauce, 10 to 15 minutes. When the sauce smells nice and briny, de-shell the mussels, discarding the shells and reserving the mussels to top the pizza. A melon baller makes quick work of scooping a mussel from its shell. You’ll have enough sauce for about six 10 to 12-inch (25 to 30 cm) pizzas. If you have leftover ragu after making pizza, toss it with cooked pasta. It keeps refrigerated for a day or two.

TOMATO, MOZZARELLA, AND BASIL
If you live in Naples, grabbing a margherita may be a daily activity like stopping at the coffee shop for an espresso and brioche. Elsewhere, making this pizza with its simple condiments of mozzarella and tomato, and doing it right, could be one of life’s greatest endeavors.
MAKES ENOUGH FOR ONE 10- TO 12-INCH (25 TO 30 CM) PIZZA
⅓ cup (79 ml) Pizza Sauce (this page)
2 ounces (57 g) fresh mozzarella cheese, torn in bits
5 fresh basil leaves
Sea salt and freshly ground black pepper
Extra-virgin olive oil
After shaping the pizza dough, spread the sauce on the dough in an even layer all the way to the rim. Scatter on the mozzarella and cook the pizza. After slicing, finish it with the basil leaves, a sprinkle of salt and pepper, and a drizzle of olive oil.
CHERRY TOMATO MARGHERITA: As shown in the photo on this page, halve 6 cherry tomatoes and place them cut side up over the sauce. Bake the pizza without any cheese, and then after slicing, finish it with 2 ounces fresh buffalo mozzarella cheese, the basil leaves, salt, pepper, and oil.


HAND-CRUSHED TOMATO AND PARMIGIANO-REGGIANO
Marinara is my go-to pizza, but I like to add some grated Parmigiano-Reggiano before baking it. Everyone makes fun of me, saying it’s not real marinara. So I came up with a name for it—The King (Il Re)—because Parmigiano-Reggiano is the king of cheeses. Sometimes, I’ll even shave a little more Parm on top after the pizza comes out of the oven.
MAKES ENOUGH FOR ONE 10- TO 12-INCH (25 TO 30 CM) PIZZA
1 large clove garlic
2 tablespoons (30 ml) extra-virgin olive oil
½ cup (118 ml) Marinara Sauce (this page)
¼ cup (25 g) freshly grated Parmigiano-Reggiano cheese
Shave the garlic paper thin on a mandoline—an inexpensive handheld one or even a truffle shaver works well. You can also use a sharp thin-bladed knife and a very steady hand. Place the shaved garlic slices in a small bowl or cup and pour in the olive oil, shaking the bowl to evenly coat the slices. Let sit at room temperature for at least 45 minutes (while the oven heats up), or up to 2 days.
After shaping the pizza dough, spread the sauce on the dough in an even layer all the way to the rim. Scatter on the garlic, and drizzle on a little of the garlic oil. Scatter on the cheese and cook the pizza.
Instead of grating on the Parm before baking, just add a few basil leaves. When the pizza comes out of the oven, immediately shave the Parm over the top and let the cheese sweat and soften for a couple minutes. So good!
MOZZARELLA, PARMIGIANO-REGGIANO, ROSEMARY, AND SEA SALT
This pizza was originally called the Renato after Renato Riccio, the man who supplied us with the oven at our first Pizzeria Vetri. At the opening, he showed us this pizza, and we named it after him. Truth be told, he pissed me off so much on a few other jobs that we stopped using him. This pizza was my son Maurice’s favorite, so I changed the name to the Maurizio. I still love ya, Renato. Thanks for the pizza!!
MAKES ENOUGH FOR ONE 10- TO 12-INCH (25 TO 30 CM) PIZZA
2 ounces (57 g) fresh mozzarella cheese, torn in bits
2 teaspoons (4 g) freshly grated Parmigiano-Reggiano cheese
Leaves from 2 sprigs rosemary
Extra-virgin olive oil, for drizzling
Sea salt and freshly ground black pepper
After shaping the pizza dough, scatter on the mozzarella, Parmigiano, and rosemary in an even layer all the way to the rim. Drizzle on some oil and cook the pizza. After slicing, finish it with salt and pepper.

MUSSELS AND FENNEL SAUSAGE
Meat and seafood sometimes make perfect partners. A little sausage perks up the flavor of mild-tasting mussels. For a cool look, use this topping on the Black Naples Dough at 60% Hydration (this page) to contrast the red sauce and orange mussels.
MAKES ENOUGH FOR ONE 10- TO 12-INCH (25 TO 30 CM) PIZZA
⅓ cup (79 ml) Mussels Ragu (this page)
2 teaspoons (4 g) freshly grated Parmigiano-Reggiano cheese
⅓ cup (79 ml) cooked mussels from Mussels Ragu (this page)
1½ ounces (42.5 g) loose, raw, Italian pork fennel sausage, torn in bits
Extra-virgin olive oil
Sea salt and freshly ground black pepper
1 teaspoon (1.25 g) chopped fresh Italian parsley
After shaping the pizza dough, spread the ragu on the dough in an even layer all the way to the rim. Scatter on the Parmigiano, mussels, and sausage. Cook the pizza until the sausage is no longer pink. After slicing, finish it with the oil, salt, pepper, and parsley.
OCTOPUS, SMOKED MOZZARELLA, AND CHILI FLAKES
This pizza was on the original menu at Osteria and remains a best seller. Smoky mozzarella and crispy octopus make a killer combination.
MAKES ENOUGH FOR ONE 10- TO 12-INCH (25 TO 30 CM) PIZZA
12 ounces (340 g) baby octopus, cleaned
⅔ cup (158 ml) extra-virgin olive oil, plus some for drizzling
About ⅓ cup (79 ml) sparkling mineral water, such as San Pellegrino
1 small clove garlic, smashed
⅓ cup (79 ml) Pizza Sauce (this page)
Pinch of red pepper flakes
2 ounces (57 g) smoked mozzarella cheese, torn in bits
Place the octopus in a small pot just big enough to hold it. Add the oil, water, and garlic, adding a little more water if necessary to cover the octopus. Bring the liquid to 180°F (82°C) over medium-high heat and then lower the heat to maintain a steady 180°F (82°C) temperature. Braise uncovered at 180°F (82°C) until the octopus is tender, about 1½ hours. Remove from the heat and let cool in the liquid. When cool, remove the octopus from the liquid and pat it dry.
Heat a heavy pan such as cast-iron over medium-high heat. When smoking hot, add the octopus and sear until both sides are darkly browned, about 1 minute per side. To get a really good sear, it helps to lay another heavy pan on top to weight down the octopus and press it into the pan. When seared, remove the octopus to a cutting board, let it cool a few minutes, and cut it into bite-size pieces.
After shaping the pizza dough, spread the sauce on the dough in an even layer all the way to the rim. Scatter on the pepper flakes and mozzarella and cook the pizza. After slicing, scatter the pieces of octopus evenly over the top and drizzle on a little oil.
If your octo isn’t cleaned, here’s how to do it yourself: insert your fingers into the body and turn the octopus inside out. Scrape away and discard the ink sac and other innards and then rinse the body well. Turn the body right side out. Remove the eyes and black mouth, or beak, located at the center where the tentacles meet the body. Scrub the tentacles very well with rock salt, rinse, and repeat until you are sure the tentacles are clean. This process breaks down the muscle fibers a bit so the octopus becomes more tender. Set the cleaned octopus aside and discard the beak.
To make the octopus ahead of time, leave the octopus whole in the braising liquid and refrigerate it for up to 1 day. Remove the octopus from the liquid while preheating the oven and continue with the recipe.

PROSCIUTTO, BUFFALO MOZZARELLA, AND PARMIGIANO-REGGIANO
When you lay paper-thin slices of prosciutto over a hot, cheesy pizza, the meat warms up, and the fat almost melts into the crust. I love that. For something even richer, try another crudo (cured uncooked meat) instead of prosciutto, such as thin slices of lardo.
MAKES ENOUGH FOR ONE 10- TO 12-INCH (25 TO 30 CM) PIZZA
2 ounces (57 g) fresh mozzarella cheese, torn in bits
1 tablespoon (6.25 g) freshly grated Parmigiano-Reggiano cheese
Extra-virgin olive oil, for drizzling
2 ounces (57 g) buffalo mozzarella cheese, torn in bits
3 ounces (85 g) paper-thin slices Prosciutto di Parma
Flake salt, such as Maldon
Freshly ground black pepper
After shaping the pizza dough, scatter the fresh mozzarella and Parmigiano evenly over the top. Drizzle with some oil and cook the pizza. As soon as it comes out of the oven, scatter on the buffalo mozzarella. If you’re starting with cold bufala, put the pizza back in the oven to take the chill off it. Or use room-temperature bufala and it should soften from the heat of the pizza. After slicing, drape the prosciutto artfully over the softening bufala. Finish it with salt, pepper, and another drizzle of oil.
PEPPERONI AND TOMATO SAUCE
At the pizzeria, we use Hormel Rosa Grande pepperoni. It’s not a great eating pepperoni when raw, but when cooked, it crisps up and tastes amazing!
MAKES ENOUGH FOR ONE 10- TO 12-INCH (25 TO 30 CM) PIZZA
⅓ cup (79 ml) Pizza Sauce (this page)
2 ounces (57 g) fresh mozzarella cheese, torn in bits
2 ounces (57 g) thinly sliced pepperoni
Leaves from a few sprigs oregano
Sea salt and freshly ground black pepper
Extra-virgin olive oil, for drizzling
After shaping the pizza dough, spread the sauce on the dough in an even layer all the way to the rim. Scatter on the mozzarella and then the pepperoni and cook the pizza. After slicing, finish it with the oregano, salt, pepper, and oil.


FENNEL SAUSAGE, ROASTED FENNEL, AND TOMATO SAUCE
I love adding a little roasted fennel to sausage pizza. It gives you the taste of fennel two different ways. For a third way, sprinkle on some fennel pollen, a citrus- and licorice-scented “dust” collected from wild fennel. It’s available online and in gourmet stores.
MAKES ENOUGH FOR ONE 10- TO 12-INCH (25 TO 30 CM) PIZZA
⅓ cup (79 ml) Pizza Sauce (this page)
⅓ cup Roasted Fennel (below)
2 ounces (57 g) fresh mozzarella cheese, torn in bits
2 ounces (57 g) loose, raw, Italian pork fennel sausage, torn in bits
1 teaspoon (2 g) freshly grated Parmigiano-Reggiano cheese
Sea salt and freshly ground black pepper
Small fennel fronds, for garnish (optional)
After shaping the pizza dough, spread the sauce on the dough in an even layer all the way to the rim. Scatter on the fennel, mozzarella, sausage, and Parmigiano. Cook the pizza until the sausage is no longer pink. After slicing, finish it with salt and pepper and garnish with a few small fennel fronds.
ROASTED FENNEL
MAKES ABOUT 2 CUPS
1½ pounds (680 g) fennel bulbs
½ lemon
¼ cup (59 ml) extra-virgin olive oil
1 teaspoon (1.25 g) fresh thyme or oregano leaves
½ teaspoon (3 g) fine sea salt
⅛ teaspoon (0.25 g) freshly ground black pepper
⅛ teaspoon (0.25 g) red pepper flakes
Heat the oven to 500°F (260°C). Cut the fennel bulbs into quarters lengthwise, then cut out the cores from each piece. With the cores gone, cut each piece of fennel lengthwise into slices about ⅛ inch (0.3 cm) thick. You’ll end up with a bunch of short fennel strips. Reserve the fennel fronds to top the pizza.
Move the fennel into a medium bowl and squeeze in the juice from the lemon (through your other hand to catch the seeds). Cut the lemon rind into 4 pieces and drop them in the bowl. Add the oil, thyme, salt, pepper, and pepper flakes. Mix well to coat everything. Taste a piece of fennel and add any seasoning if you think it needs it.
Lay the seasoned fennel on a sheet pan in a single layer. Place in the oven and cook until the fennel is tender and lightly browned at the tips, 25 to 30 minutes, stirring now and then to prevent burning. When done, let the fennel cool on the pan. Use immediately or refrigerate in an airtight container for up to 4 days. Reheat any leftover fennel as a vegetable side dish or mix it into pasta.
SHAVED ZUCCHINI, STRACCIATELLA, AND MINT
This pizza is all about the details. The zucchini must be shaved right before baking so it doesn’t lose water and get limp. And the fresh mint leaves take this pizza from zero to sixty in a millisecond! All in all, the taste is like a fresh spring garden.
MAKES ENOUGH FOR ONE 10- TO 12-INCH (25 TO 30 CM) PIZZA
1 small zucchini, finely grated (about ¾ cup)
½ cup (50 g) freshly grated Parmigiano-Reggiano cheese, plus some for sprinkling
1 tablespoon (15 ml) extra-virgin olive oil, plus some for finishing
Sea salt and freshly ground black pepper
2 ounces (57 g) stracciatella or burrata cheese
5 or 6 fresh mint leaves
Just before baking the pizza, grate the zucchini and mix it with the Parmigiano and oil in a small bowl. Season with salt and pepper until it tastes good to you. Quickly shape your pizza dough so that water doesn’t leak out of the zucchini and make the pizza soggy.
After shaping the pizza dough, quickly spread the zucchini mixture over the pizza in an even layer all the way to the rim. Sprinkle with a little more Parmigiano. Cook the pizza until it is slightly darker than usual to help drive some of the water out of the zucchini. After slicing, finish it with dollops of the stracciatella. Scatter on the mint leaves and drizzle on a little oil.


FRESH CRAB AND ROASTED PEPPERS
When we opened a pizzeria in Washington, DC, we wanted a signature pizza that used local ingredients. The Chesapeake Bay came to mind right away. Boom! The Granchio pizza was born.
MAKES ENOUGH FOR ONE 10- TO 12-INCH (25 TO 30 CM) PIZZA
2 ounces (57 g) jumbo lump crabmeat
½ cup (170 g) finely chopped mixed roasted bell peppers (red, yellow, and green)
¼ teaspoon (0.75 g) seeded and minced Serrano chile pepper
1 tablespoon (7 g) capers (minced if large)
4 oil-packed anchovy fillets, minced
½ teaspoon (0.6 g) each minced fresh dill, tarragon, parsley, chives, and chervil
2½ tablespoons (37 ml) extra-virgin olive oil, plus some for drizzling
Juice and zest of ½ lemon
Sea salt and freshly ground black pepper
2 ounces (57 g) fresh mozzarella cheese, torn in bits
In a small bowl, mix together the crabmeat, roasted peppers, Serrano pepper, capers, anchovies, herbs, 2½ tablespoons oil, and the lemon juice and zest. Season with salt and pepper until it tastes good to you.
After shaping the pizza dough, scatter on the mozzarella. Drizzle with a little oil and cook the pizza. When the pizza comes out of the oven, let it rest for a minute before slicing. Slice and then top with the crab mixture.
To roast whole bell peppers yourself, just put a few peppers of various colors in a pan under the heat of a wood oven or under a broiler, turning them so the skins blacken all over. When the peppers are black all over and start to slump, put them in a bowl, cover tightly, and let them steam for 15 minutes. When cool enough to handle, peel off and discard the skins, then pull out and discard the cores and seeds.
PECORINO CHEESE AND BLACK PEPPER
This is a very special pizza. Thanks to Roman chef Stefano Callegari for showing me the ice technique (read more about Stefano on this page). The whole concept of using starchy water to make a sauce on pizza—just as you would with pasta—epitomizes the perfect marriage of tradition and innovation.
MAKES ENOUGH FOR ONE 10-INCH (25 CM) PIZZA
½ cup (70 g) coarsely crushed ice
About ¾ cup (75 g) grated Pecorino Romano cheese
Freshly ground black pepper
Extra-virgin olive oil, for drizzling
This pizza is best made with Naples Dough at 60% Hydration (this page) because it holds a nice thick rim, which helps keep the water in the cooked pizza shell. Follow me here. Shape your pizza dough into a 10-inch (25 cm) circle with a thick rim at least ½ inch (1.3 cm) high. Shape the dough completely on your work surface because picking it up could make the dough too thin. You want the dough a little thicker across the middle than you would for a typical Naples-style pizza; hence, the smaller diameter. Spread the ice evenly across the dough and cook the pizza until it is fully baked, rotating it for even cooking. The ice will melt, leaving a shallow pool of water on the fully cooked pizza shell.
When the pizza comes out of the oven, scatter on ½ cup Pecorino Romano and shake the pizza to mix the cheese into the hot water. Some of the cheese will melt and create a creamy sauce. After slicing, finish with a little more Pecorino Romano, a generous amount of pepper, and a generous drizzle of oil.


EGGS, PECORINO CHEESE, AND GUANCIALE
If this book had come out a year later, I would have tried every traditional Roman pasta dish on a pizza! This technique and topping is essentially the same as the Cacio e Pepe (this page) but made like pasta carbonara.
MAKES ENOUGH FOR ONE 10-INCH (25 CM) PIZZA
2 small eggs (or 1 large egg plus 1 large egg yolk)
¼ cup (25 g) grated Pecorino Romano cheese
¼ cup (25 g) freshly grated Parmigiano-Reggiano cheese, plus some for garnish
Sea salt and freshly ground black pepper
½ cup (70 g) coarsely crushed ice
2 ounces (57 g) thinly chopped guanciale, pancetta, or other cured bacon
Extra-virgin olive oil, for drizzling
In a small bowl, use a fork to beat together the eggs, Pecorino, and Parmigiano and then season with salt and pepper. Beat well and set aside.
This pizza is best made with Naples Dough at 60% Hydration (this page) because it holds a nice thick rim, which helps keep the water in the cooked pizza shell. Follow me here. Shape your pizza dough into a 10-inch (25 cm) circle with a thick rim at least ½ inch (1.3 cm) high. Shape the dough completely on your work surface because picking it up could make the dough too thin. You want the dough a little thicker across the middle than you would for a typical Naples-style pizza; hence, the smaller diameter. Spread the ice evenly across the dough and cook the pizza until it is fully baked, rotating it for even cooking. The ice will melt, leaving a shallow pool of water on the fully cooked pizza shell.
When the pizza comes out of the oven, pour the egg mixture into the pizza shell, and then quickly mix the egg into the hot water with a fork until creamy. Scatter on the guanciale and return the pizza to the oven. In a wood oven, keep the pizza at the mouth of the oven where the temperature is a bit lower to avoid overcooking the eggs. In a home oven, watch it carefully. Bake gently until the guanciale is cooked through and the eggs are custardy, about 2 minutes more, rotating and shaking the pizza every 30 seconds to make sure the eggs cook slowly and get custardy rather than forming firm curds in any one spot. When the eggs are custardy and barely set, remove the pizza to a cutting board. After slicing, finish with some more Parmigiano, a little salt and pepper, and a little drizzle of oil.