Chapter 3. Mechanics Of Light
TAKING COLOR’S TEMPERATURE
WHITE BALANCE
INCIDENCE INCIDENTALLY
SOFT LIGHT PROVES THAT SIZE IS RELATIVE
FALLING OFF, OR HOW TO LOVE THE INVERSE SQUARE LAW
THINKING ABOUT FLASH-TO-SUBJECT DISTANCE AS STOPS
The Short Version
Light follows some pretty specific rules about how it flies and bounces around the universe. Speedliters don’t need to be physicists, but understanding a few basic principles will help you understand why your Speedliting looks or doesn’t look how you want it to.
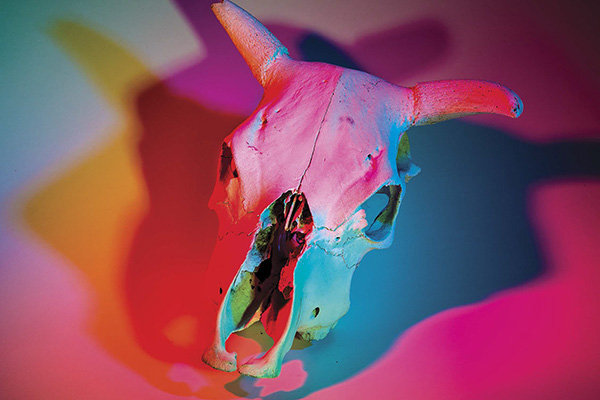
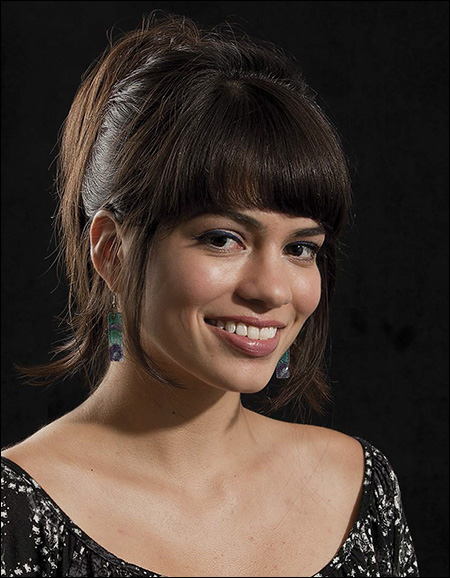
Figure 3.1
I created this crazy photo by positioning three primary-colored lights around the skull. The red light was on the left. The blue light was slightly to the right of center. The green light was on the right. You see the secondary colors—cyan, magenta, and yellow—where the skull blocked one of the primary colors; this creates a shadow filled by the light of the other two primaries.
Taking Color’s Temperature
A white piece of paper, the way that you and I see it, looks white regardless of whether we are viewing it under tungsten light, fluorescent light, noon sun, or in open shade. Yet the sensor in your digital camera would record the white of the paper differently in each of these situations. Making white appear white has to do with the color temperature
of the light source, and how that color temperature is recorded by your camera—which is controlled by the camera’s white balance
setting.
Color Temperature Is A Matter Of Degrees
Color temperature is measured on a precise scale that describes the warmth or coolness of the light produced by a given source. The increments of color temperature are Kelvins
, the abbreviation of which is K.
A tip: Do not use “degrees” in the same sentence with “Kelvin.” The notation 5000K is pronouced “five thousand Kelvin,” not “five thousand degrees Kelvin.”
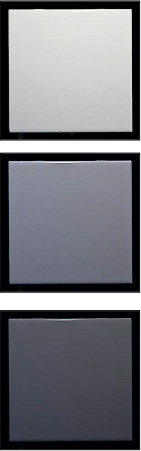
Lower numbers—those below 5000K—represent warmer (orange) colors. Higher numbers—those above 5000K—represent cooler (blue) colors. The farther below or the higher above 5000K you go, the more intense the warmth or coolness becomes. Light in the middle of the scale is not particularly warm or cool.
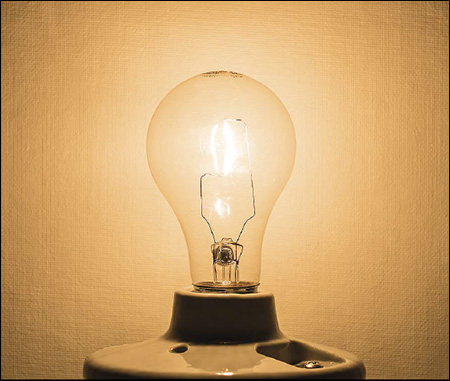
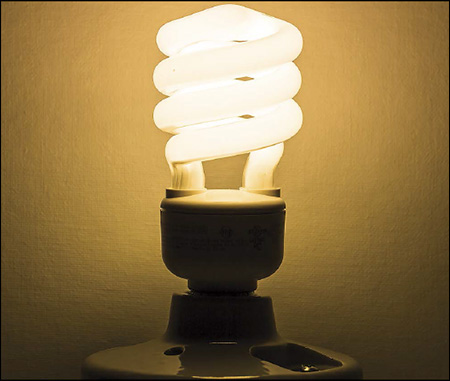
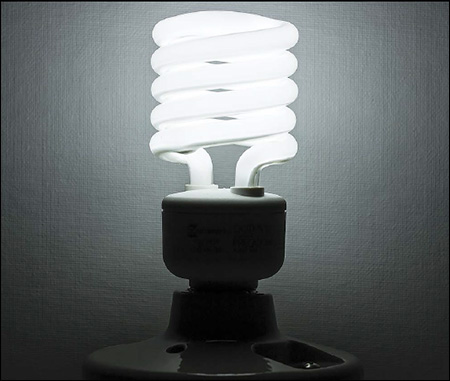
Note in Figures 3.2
and 3.3
how similar the warm tones of the incandescent bulb and the tungsten-balanced CFL appear to the camera when its white balance is set to Daylight. Now, compare the color cast of these two bulbs to the neutral white of the daylight-balanced CFL shown in Figure 3.4
(also shot with the camera’s white balance dialed to Daylight.)
Figure 3.2
Incandescent (tungsten) light bulb.
Figure 3.3
Warm (tungsten-balanced) CFL.
Figure 3.4
Cool (daylight-balanced) CFL.
White Balance
As Speedliters we’ll spend a lot of time talking about white balance
. What we’re really talking about is matching our camera settings to the color temperature of our light sources.
White balance is not a direct component of exposure in the same manner as ISO, shutter speed, or aperture. Yet, it is a critical part of making a digital capture.
White Balance Settings
Here’s a quick look at the white balance settings available on most Canon DSLRs.
Auto:
An easy way to start. AWB will change the WB from shot to shot.
Daylight:
My most-used WB setting, for sunlight and cool CFLs. 5200K
Shade:
Adds a warm cast. 7000K
Cloudy:
Adds a slight warm cast. 6000K
Tungsten:
The setting to use for incandescent lightbulbs and warm CFLs. 3200K
White Fluorescent:
An approximation of what fluorescent used to look like—does not blend with today’s CFLs. 4000K
Flash:
Daylight + magenta. 5400K
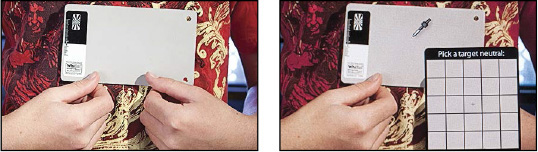
Custom:
Create a white balance by shooting a white target.
Specific:
Allows you to set a specific color temperature; used by pros.
White Balance In Action
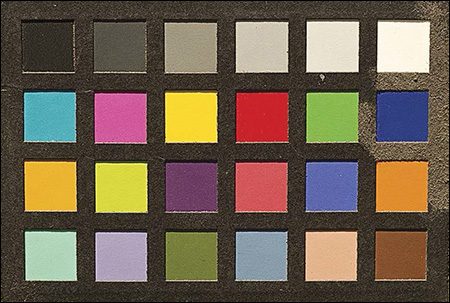
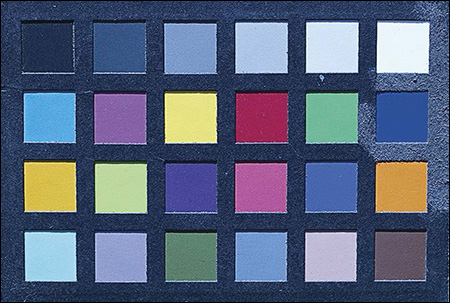
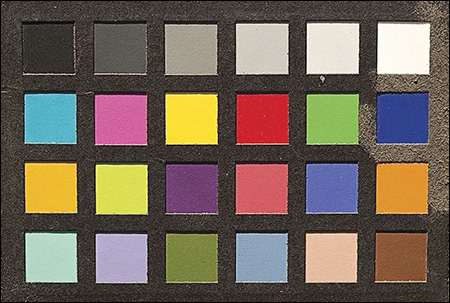
If the white balance in the camera does not match the color temperature of the light being photographed, you will see a color cast. Here I shot the X-Rite ColorChecker under full sun with four different white balance settings. Notice how the colors shift.
Figure 3.5
Daylight white balance in daylight. Note that the colors appear true.
Figure 3.6
Shade white balance in daylight. Note how warm the colors appear.
Figure 3.7
Tungsten white balance in daylight. Note how cool the colors appear.
Figure 3.8
Flash white balance in daylight. Note the similarity to Daylight above.
Which White Balance Setting To Use?
Over the years, my White Balance philosophy has evolved. Early on, I shot Auto White Balance as my standard WB setting. Now I’ve switched to the other end of the pendulum and seldom use AWB. If you are starting out, AWB is fine—but you will find the following helpful.
The key to my WB strategy is that I always shoot in RAW—which means that white balance remains flexible after the shoot. Even if I use the wrong WB setting on my camera, I can easily make a correction with just a couple of clicks in Lightroom.
JPEG, on the other hand, necessitates that you dial in the correct white balance because the camera literally throws the extra data away to make the file size smaller.
My current preference is to set my WB setting to either Daylight or Tungsten. My idea is to match the WB setting to the general nature of my ambient light. This provides a consistent look throughout my shoot, which is helpful when I’m using the images on my camera’s LCD to make lighting decisions.
I also strongly believe in making my photo workflows as simple as possible. I strive to eliminate non-vital options when I can. Here are the other reasons that I find Daylight WB and Tungsten WB the most useful for my work:
 There is such a small difference between Flash WB and Daylight WB that I never use Flash WB. (Technically the difference is a bit of extra magenta in the Flash WB.)
Likewise, I skip right over the Cloudy and Shade WB settings. Both of these settings add a bit of warmth to the file—Shade more so than Cloudy. These days, I shoot Daylight WB in both situations and add the warmth I want in Lightroom.
I never use the Fluorescent WB setting because it assumes that fluorescent lights have a green cast—which they did before the era of CFLs. Now I use the Daylight WB for cool fluorescent light and the Tungsten WB for warm fluorescent light. How do you tell the difference? Look at the light fixture for several seconds and you will see a cool or warm cast.
Custom WB and Specific WB are essential when shooting video on a DSLR because a video frame is like a super-low quality JPEG. For still photos, I skip right over these settings, too.
Incidence Incidentally
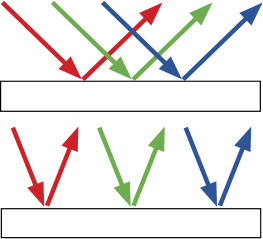
As long as you think like a photographer and not a physicist, light always travels in straight lines. This is a valuable insight for Speedliters. It will help us create or avoid reflections of light sources in our photos.
Light On The Straight And Narrow
The handy thing about light always traveling in a straight line is that it’s easy to predict. When light bounces off an object, it does so at the same angle that it came in at, as shown in Figure 3.11
. Technically stated, the angle of reflection
equals the angle of incidence.
Mirror, Mirror...
An easy way to understand this is to stand in front of a mirror. When you are exactly in front of it, what—actually, who—do you see in the mirror? Now, step a little bit to the side and what do you see in the mirror? Now, step farther to the side and what do you see? The change of what you see in the mirror is a clear demonstration of how the angle of incidence (the light heading in) is the same as the angle of reflection (the light heading out).
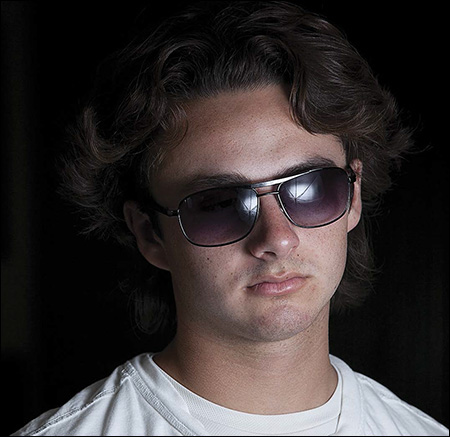
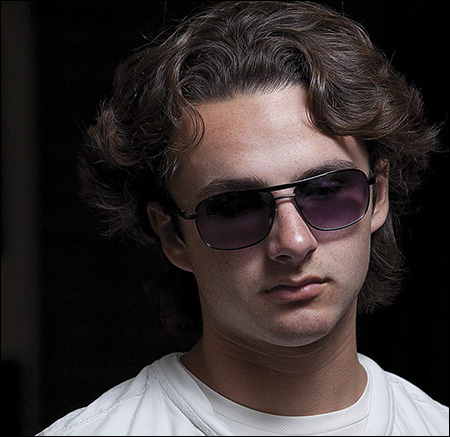
Here is a real-world example you will experience again and again as a Speedliter: eyeglasses. If you’re doing a headshot and the eyeglasses fill with glare, then you need to change the angle of incidence to remove the reflection. You can move the light source, tilt the head or glasses just a bit, or move the camera so that it does not see the reflection. In the case of Figures 3.9
and 3.10
, I pushed the umbrella up a bit, which changed the path of the reflection so that the lens no longer saw it in the sunglasses.
Figure 3.9
The umbrella reflects in Tom’s glasses because the angle between it and Tom is the same as the angle between Tom and the lens.
Figure 3.10
By raising the umbrella a small bit, I changed the angle of approach and sent the reflection below the lens—which eliminated it from the shot.
Figure 3.11
Light bounces off objects at the same angle from which it arrived.
Direct vs. Diffuse Reflection
It’s easy to understand how light bounces off a reflective surface like a mirror. What about a matte surface, like a piece of paper? Does the angle of reflection still equal the angle of incidence? More specifically, why are you not blinded when reading a newspaper outdoors in full sun?
The answer lies in the surface of the paper. If you look at it microscopically, you would see that it is rough. The light is still reflecting off at an angle equal to the angle of incidence. It’s just that the text of the paper gives it surfaces that face many directions.
Figures 3.12
and 3.13
provide a good example of the difference between direct reflection
and diffuse reflection
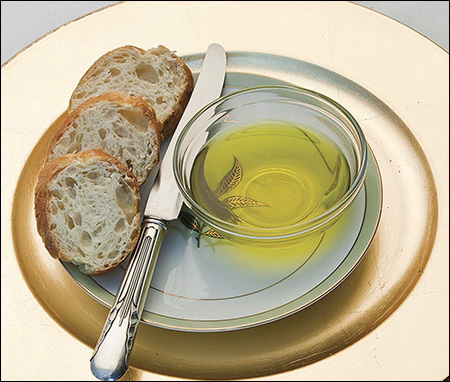
. Figure 3.12
was lit directly by an incandescent bulb in a silver reflector. In fact, you can see it reflecting in the surface of the olive oil. The liquid surface of the oil and the metallic surfaces of the knife and plate all create direct reflections.
Figure 3.12
Direct reflection creates glare in the surface of the liquid and metallic surfaces.
Figure 3.13
By inserting a diffusion panel in front of the light, the direct reflection has been tamed. Notice also in both shots that the tone of the tablecloth remains the same. Even when lit directly, the fabric provided a diffuse reflection.
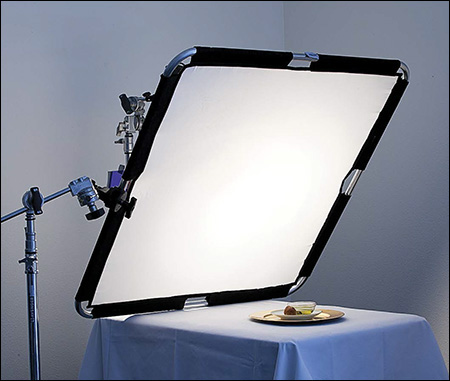
Figure 3.13
is the exact same shot with the addition of a Lastolite Skylite panel between the light and the plate (as shown in Figure 3.14
). Note that the glare on the olive oil, silver knife, and gold plate is no longer a problem. The 42″ diffusion panel replaced the 6″ reflector as the light source, sending light from multiple angles rather than just one.
Figure 3.14
The placement of the 42″ Lastolite Skylite panel with diffusion fabric.
Just as important, did you also notice in the upper corners of the photos that the brightness of the tablecloth did not change? It remains the same tone of medium-gray. This is because the textured surface of the fabric provides a diffuse reflection, even when lit directly.
Soft Light Proves that Size is Relative
When it comes to controlling the look of light you create, the size of your light source should be your first consideration. It’s possible to make small sources seem large, which creates softer shadows, as shown at left in Figures 3.15
and 3.16
. Remember that size is relative; it changes as the distance between the source and the subject changes. Push the source in and it appears larger/softer. Pull the source out and it appears smaller/harder.
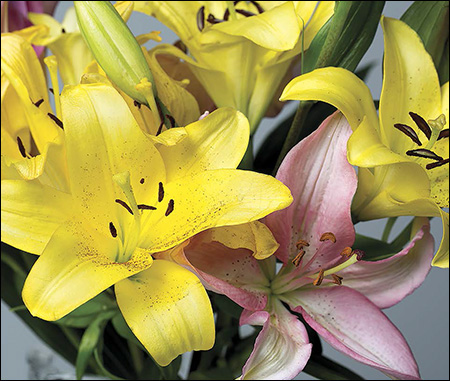
Figure 3.15
The direct flash of a Speedlite creates hard light—meaning that the shadow edges have distinctive edges. Note in this photo how the shadows of the yellow lily on the left are cast across the pink lily on the right.
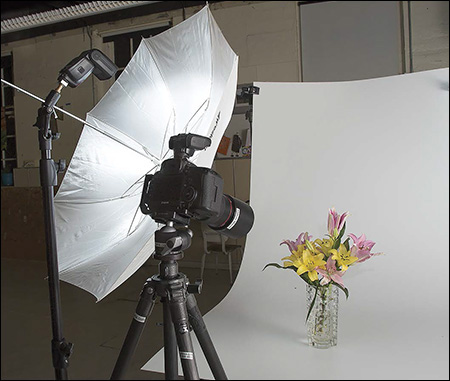
Figure 3.16
Placing a shoot-through umbrella (shown in Figure 3.17
) between the Speedlite and the flowers increases the apparent size of the light source and softens the shadows. Note how the pink lilly is no longer buried in the hard shadows of the yellow lily.
Consider Your Shadow’s Edge
The sun is the largest object in our solar system, yet Earth’s distance from it makes it appear relatively small in our sky. On a sunny day, your shadow has a hard edge. That defined edge to your shadow is created because the sunlight hitting you is coming from a single direction. Another way to say this is that you have a hard shadow because the sun’s rays are parallel when they hit you.
What happens to your shadow on a cloudy day? It gets fuzzy or disappears completely. Why? When a layer of clouds moves across the sun, the sunlight hits the clouds and they effectively become your light source. Since they are much bigger—relative to your size—the light hits you from many angles. A shadow created by light coming from one angle is filled by light coming from another angle. The more angles of approach, the softer the shadows become.
Figure 3.17
The shoot-through umbrella used to shoot Figure 3.16
increases the apparent size of the Speedlite’s flash, making the shadow edges softer.
Big Is Not Always Big
If you are familiar with a softbox, you know that it is a big light source. When you use it up close, it creates soft light. What happens if you move a softbox far away? Its apparent size relative to the subject becomes smaller.
As the apparent size of a light source gets smaller, the directionality of its light increases. Move a large source far enough away and it will eventually become a small light source. Again, the sun is an example of how distance from a large source can make its apparent size become much smaller.
Making Speedlites Appear Larger Is A Big Part Of Speedliting
Don’t fret. Despite the fact that the face of a Speedlite is just a few square inches, there are many ways to make it seem bigger. Here are a few:
Bounce your Speedlite into a reflective umbrella.
Fire your Speedlite through a satin umbrella.
Shoot your Speedlite through a softbox.
Fire it through a diffusion panel.
Bounce it off your hand, a wall, or a ceiling.
Fire several Speedlites together from different angles.
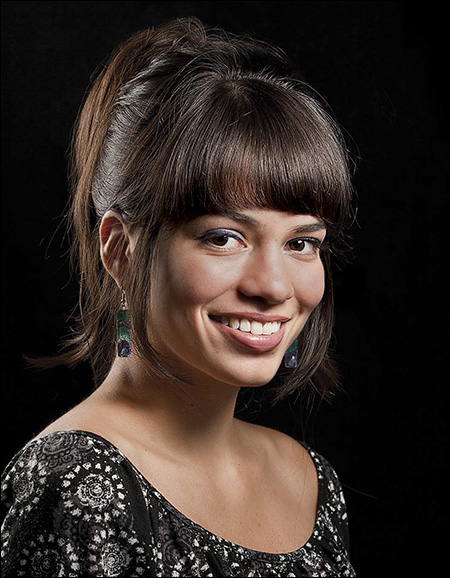
Figure 3.18
In this shot, the Lastolite Ezybox Speed-Lite was actually just inside the frame. (You don’t see it because it was black.) Notice that the neck shadows are extremely soft.
Figure 3.19
Moving the softbox out to about 12′ reduces its apparent size and increases the hardness of the light slightly. Notice that the shadows on the neck are sharper.
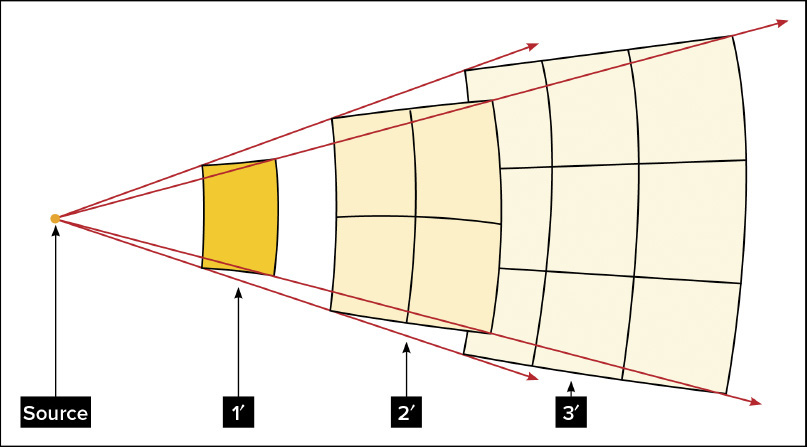
Falling Off, or How to Love the Inverse Square Law
Do not repeat after me: “The intensity of light from a point source falling upon a subject is inversely proportional to the square of the distance from the source.”
The Inverse Square Law has intimidated and befuddled more photographers than any other aspect of our craft. You do not have to understand the math. You do, however, need to know what it means.
A Way To Visualize The Inverse Square Law In Action
Put yourself in this image. You are in a huge, empty room. No. Bigger than that. I mean really huge. There is no light, except for a lone light bulb magically shining in the middle of this huge space. Equally magical is your ability to move anywhere in this room you want with ease. Yes, I mean you can fly.
So, fly up to the bulb and pull out that handy 12″-square white tile you’ve been carrying around in your pocket. Take a look at how bright the tile is when you are close to the bulb. Now, fly a good distance away. You can barely see the tile.
Being the curious sort that you are, you fly towards and away from the bulb in all directions. You discover that the phenomenon is the same no matter what direction you head.
What happened to the light? You’ve just witnessed the Inverse Square Law in action.
The funny thing is, because of the way our eyes are wired to our brain, we don’t always see the loss in brightness because our
pupils dilate as the light dims—the appearance of brightness remains. Your camera works differently. Unless you open up the aperture, slow the shutter, or increase the ISO, your camera will record the light as being dimmer.
The Inverse Square Law Is Trying To Tell Us Something
What happened to the light from the magic bulb? As you moved away, it spread out. As it spread out, the photons got farther and farther apart. When there were fewer photons hitting your tile, it looked darker and darker as you moved away from the light source.
The Inverse Square Law tells us how much darker the tile will be as you move away. Here we go with a little math. If you think of the math as a shot at the doctor’s office, it won’t hurt that much. You know, “just a little prick.”
Specifically, if you look at the 12″ × 12″ white tile when it is one foot from the light and then look at it when it’s 2′ from the light, you will see that it is one-fourth as bright. Move the tile out to 3′, and you’ll see that it is one-ninth as bright as it was at 1′. (I know, the numbers sound crazy.)
There’s a reason that the difference from 1′ to 2′ away is one-fourth as bright and not one-half as bright, as you’d expect: The light has to spread vertically as well as horizontally at the same time. You can see this happening in Figure 3.20
.
Figure 3.20
The Inverse Square Law, as intimidating as it may sound, helps photographers understand why light gets dimmer as it gets farther from the source. In the illustration above, the intensity of the light at 2′ is  as bright as it is at 1′. Likewise, the intensity of the light at 3′ is
  as bright as it is at 1′.
So the photons that were hitting your 12″ x 12″ tile 1′ from the light spread out to a 24″ x 24″ square when they are 2′ from the source. As they moved another foot away, the photons spread out to a 36″ x 36″ square. At every step of the way, the photons spread farther apart. As photons spread apart, light gets dimmer.
Thinking About Flash-to-Subject Distance as Stops
Here is the Inverse Square Law in action: When you double the distance between the light and the subject, the illumination is one-fourth as bright. So, in terms of stops, what is the difference in brightness when a light is 3′ versus 6′ away? It’s two stops.
Did you say one stop? Remember, every time the light is cut in half, that is a one-stop change. One-fourth as bright is a two-stop difference because the brightness is cut in half twice. Full power x 50% =  power (first stop of reduction). Moving on,
power x 50% =
power (second stop of reduction).
power (first stop of reduction). Moving on,
power x 50% =
power (second stop of reduction).
1.4—The Photographer’s Magic Number
Since you’ve hung in this far, would you like to know how far you have to move a light to get a one-stop reduction in light? The quick answer is 1.4 times your current distance. Huh? It has to do with the square root of 2, which is 1.41421356237.... If you’re not a math fan, just remember the 1.4 part.
So, if you measure the light 1′ from the source, then at 1.4′, it will be one stop dimmer. Using the round numbers that photographers are so fond of, you’ll be at the next full-stop reduction at 1.4′ x 1.4, which is 2′, then 2.8′, then 4′, then 5.6′, then 8′, then 11′.... Have you picked up on the pattern? They are the same intervals as full-stop apertures on your camera. I’ve laid it out to scale for you in Figure 3.21
.
Figure 3.21
Your white tile with the magic light bulb 1′, 2′, and 3′ away.
My F-Stop Measuring Stick
Here is another reason to memorize the whole-stop increments listed in Figure 2.5
—you can used them as a measuring stick. Memorize the whole F-stops and apply them to any increment you want—inches, feet, or meters. You will have a lighting tool for making decisions.
My F-Stop Measuring Stick, shown in Figure 3.22
, will help you visualize how quickly or slowly light falls off. You can see that if your subject’s cheek is 1′ from the light, then at 1.4′ (about 17″), the light will be one stop darker—that’s a change in distance of only 5″. Conversely, if your subject is 11′ from the light, then it takes another 5′ for the light to fall off one stop.
Figure 3.22
The F-Stop Measuring Stick will help you visualize how quickly or slowly light falls off. For instance, if your subject’s cheek is 1′ from the light, then at 1.4′ (about 17″), the light will be one stop darker. At 2′ the light will be two stops darker.
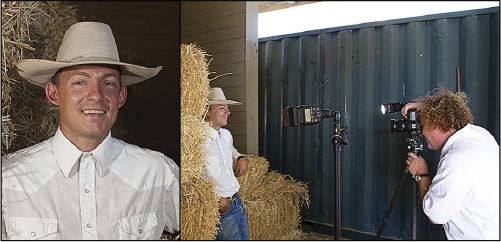
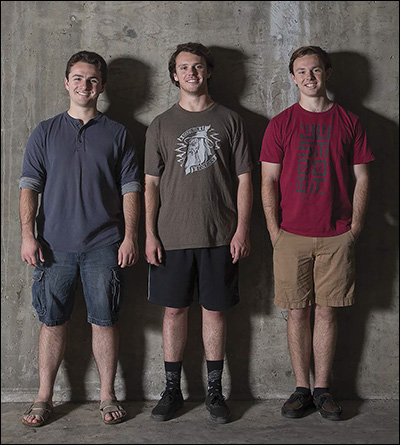
In Figure 3.23
, my three sons—Tom, Vin, and Tony—make an encore appearance (five years older) to again demonstrate my F-Stop Measuring Stick. In this shot, the lone Speedlite (firing into a white umbrella) is 4′ from Tom on the left. As you can see, when the light finally gets to Tony on the right, it has dimmed. If you check the F-Stop Measuring Stick in Figure 3.22
, you can see that the falloff from 4′ to 9′—the width of the lads—is more than two stops.
Figure 3.23
Speedlite into white umbrella 4′ from Tom on the left.
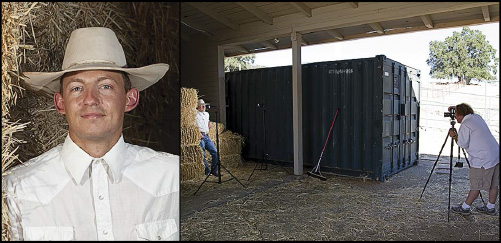
In Figure 3.24
, I pulled the Speedlite out to 16′ from Tom, which reduced the falloff to less than a stop across the faces of my three lads. To create equivalent lighting on Tom, I had to increase the power of my Speedlite by four stops to accommodate for the dimming effect imposed by the additional distance (4′ → 5.6′ → 8′ → 11′ → 16′ = 4 stops of light loss).
Figure 3.24
Speedlite into white umbrella 16′ from Tom on the left.
Here’s a lighting tip to remember:
The closer your light source is to your subject, the more dramatic the shadow falloff will be. Likewise, the farther you place your light from the subject, the more even the light will be across greater distances.