Chapter 0. Quick Start Guide to Speedliting
ESSENTIAL CONCEPTS FOR SPEEDLITERS
CONTROL YOUR SPEEDLITE VIA THE LCD ON YOUR CAMERA
THE TWO KINDS OF LIGHT IN A FLASH PHOTOGRAPH
MANAGE THE AMBIENT LIGHT FIRST
CONTROLLING THE BRIGHTNESS OF THE FLASH
A SIMPLE FOUR-STEP WORKFLOW
THE LIMITATIONS OF ON-CAMERA FLASH
E-TTL FILL FLASH: A GREAT USE FOR AN ON-CAMERA SPEEDLITE
The Short Version
When you’re starting out, it can be hard to know where to begin. If you hardly know the difference between your Speedlite’s power switch and Mode button, then this is the first chapter you should read.
I promise that all of the concepts and topics will be expanded upon in the 400+ pages that follow. There’s so much I want to share with you. For now, let’s get started with the essentials.
Reading Tip:
If you are a novice, after reading this chapter, jump to Chapter 18
: Getting The Most Out of On-Camera Flash
. After digesting that information, jump back to Chapter 1
: Learn To See Light
and continue on.
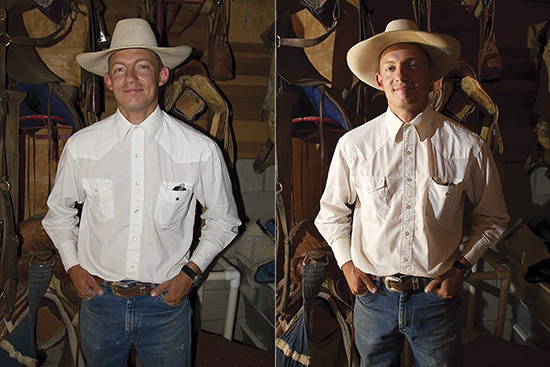
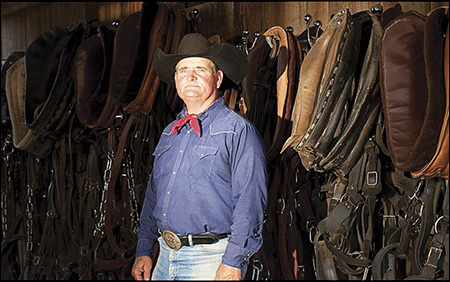
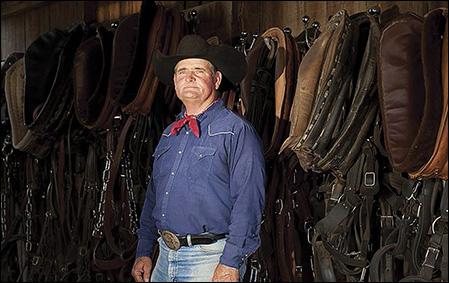
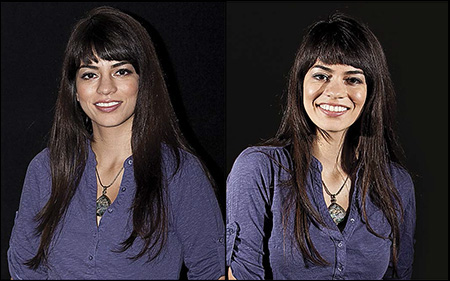
Figure 0.1
Modern camera and flash technologies are built largely on the premise that the photographer does not know what he is doing—so there is an emphasis on automatic features. The shot at left was made in Program (P) mode with the 7D’s pop-up flash. For the shot at right, I used a 430EX II off-camera.
Essential Concepts for Speedliters
If your immediate goal is to make better photographs with flash, here are what I consider to be the most important ideas as you start your Speedliting journey.
Control Your Speedlite On Your Camera’s LCD
The easiest place to control your Canon Speedlite is on the LCD of your camera. This takes away the frustration of learning how to navigate small icons on the Speedlite’s LCD. Virtually every Speedlite and EOS camera introduced since 2007 has this capability. We’ll cover the details in just a bit.
Think About The Ambient Light Before You Turn On Your Flash
Throughout the Handbook
, we will discuss the difference between ambient light (the light that is already in your shot) and the light that you create with your flash. Even if you are taking your first steps as a Speedliter, it is important that you begin thinking about the ambient light before you turn your flash on.
Establish Workflows And Stick To Them
Develop a particular order in which you do things—like manage the ambient light before you turn your flash on—and stick to that order. I will present a simple Speedliting workflow shortly. It will get you started. Then, as your Speedliting skills grow, you can expand upon this simple workflow with your own steps.
A Pop-Up Flash Is Not A Speedlite
The pop-up flash cannot replace the versatility of a Speedlite. The Handbook
is a book about Speedliting, not “pop-up-ing.” Two good uses for a pop-up flash are to add a bit of fill flash when the light around you is already very bright—such as when you are shooting outdoors in full sun—and to control an off-camera Speedlite as a slave when you are starting out as a Speedliter.
Your Camera’s Hotshoe Is Not The Best Place To Put Your Speedlite
The hotshoe is a convenient place to put a Speedlite, but limits the type of lighting you can do. I am not saying “never use your Speedlite in the hotshoe.” Rather, I’m saying that you should explore off-camera flash as quickly as you can so that you know the range of options you have as a Speedliter.
Use Manual: Automatic Modes Limit Your Understanding Of What’s Going On
Automatic modes on your camera (P, Av, Tv, etc.) and on your Speedlite (E-TTL) may seem easy to use...until your results do not match your expectations. If you are going to use automatic camera modes, then you must master Exposure Compensation. If you are going to use your Speedlite in E-TTL, then you must master Flash Exposure Compensation. I strongly suggest that you work both your camera and Speedlite in Manual mode until you have mastered the fundamentals of exposure and flash power. See
Chapter 2
: Exposure Exposed
and
Chapter 8
: Flashing Manually
for the details.
Always Take Behind-The-Scenes Shots
As you work your way through the Handbook
, you will eventually sort out that often there are many ways to create the same type of light. Months after a shoot, your photo might not reveal whether you used an umbrella or a softbox. These details matter over time. So, always take a couple of big steps backwards during your shoot and record everything—the position of the subject, the position of the lights, and the modifiers that you used.
Take The Shot And Make The Mistake
I am often asked by students, “How do you know what the flash is going to look like beforehand?” Honestly, sometimes I have an idea of what will happen and sometimes I have no clue. In today’s digital world, just take the shot and see for yourself. I believe that the amount you learn is proportional to the number of mistakes you make along the way.
Control your Speedlite via the LCD on your Camera
One of the best features of the Canon Speedlite system is that every Speedlite model and EOS camera model introduced since 2007 has the ability to display the entire Speedlite menu on the back LCD of the camera. To make this work, you have to have a compatible Speedlite and camera.
Speedlites That Can Display Their Menu On A Camera LCD
 600EX-RT, 600EX
580EX II
430EX II
320EX
270EX II
Macro Ring Light MR-14EX II
EOS Cameras That Can Display Speedlite Menu
1Dx , 1D Mark IV, 1Ds Mark III, 1D Mark III
5DS
, 5DS R
, 5D Mark III
, 5D Mark II
6D
7D Mark II
 , 7D
, 7D
70D
 , 60D
, 50D, 40D
, 60D
, 50D, 40D
Rebel SL1
, T6i
, T5i
, T5
, T4i
, T4
, T3i
, T2i, T1i, XSi, XS
M3
, M2
, M1
Models that can display the Flash Function Quick Menu
Models with touch-screen control
Models with pop-up flashes that can work as an optical master (“transmitter”)
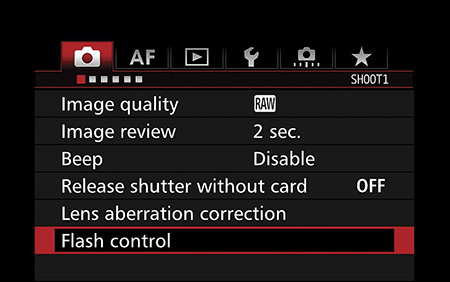
Figure 0.2
On cameras with a pop-up flash, look for “Flash Control” > “External Flash Func. Setting.”
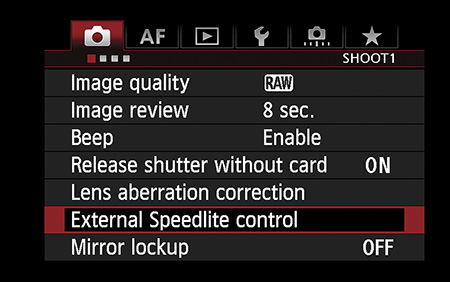
Figure 0.3
On cameras that do not have a pop-up flash, look for “External Speedlite Control” > “Flash function settings.”
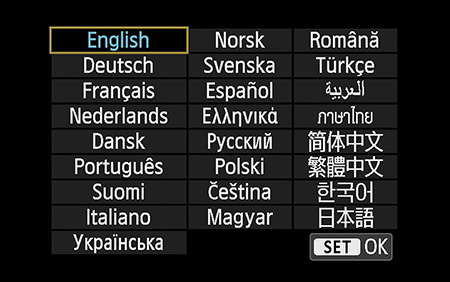
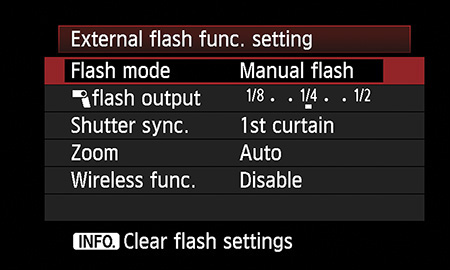
Figure 0.4
EOS cameras can be set to display their menus in a wide range of languages.
Figure 0.5
Camera models introduced 2007–2011 have a text-based menu of Speedlite options.
Use Your Camera’s My Menu Screen
For quick access, add Flash Control (or External Speedlite Control) to your camera’s My Menu screen (Figure 0.6
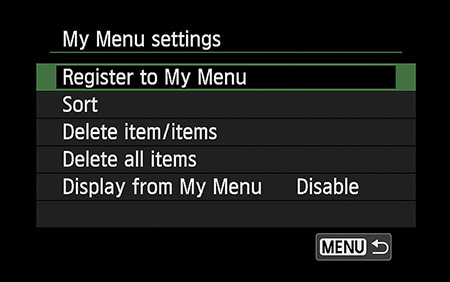
). Check your camera’s user manual for the specifics on how to record My Menu selections. Generally, you follow My Menu settings > Register to My Menu (Figure 0.7
) and then scroll to select the item(s) you want to add to the screen. You can then sort them to put the flash menu at the top.
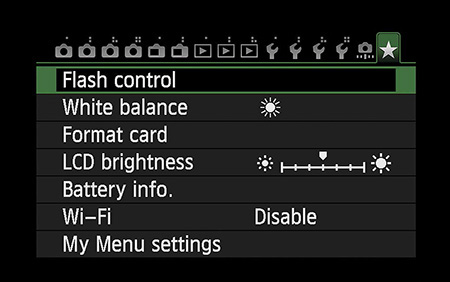
Figure 0.6
Add “Flash Control” or “External Speedlite Control” to your camera’s My Menu screen to make it easier to find. Shown here: my 70D’s My Menu.
Figure 0.7
Check the user manual for your camera on how to record My Menu selections.
The New External Flash Function Quick Menu
Camera models introduced from 2012 on (listed with
on the preceding page) have a new icon-based External Flash Function Quick Menu that shows all the Speedlite settings on one screen. This is an extremely fast way to check your Speedlite settings and make desired changes.
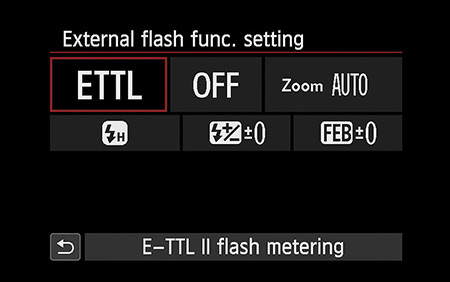
The menu options change as the Speedlite mode and wireless settings change. Figure 0.8
shows the menu when the Speedlite is set E-TTL and the wireless system is off. Figure 0.9
shows the menu when the Speedlite is in Manual mode and activated as a radio master.
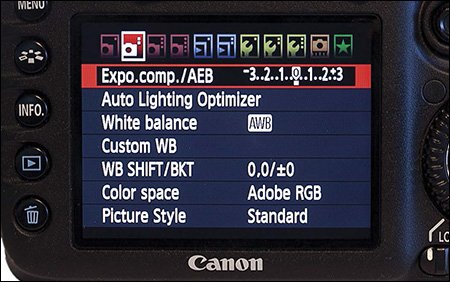
Figure 0.8
The new icon-based External Flash Function Quick Menu that shows all the Speedlite settings on one screen. Shown here: ETTL mode with wireless turned off.
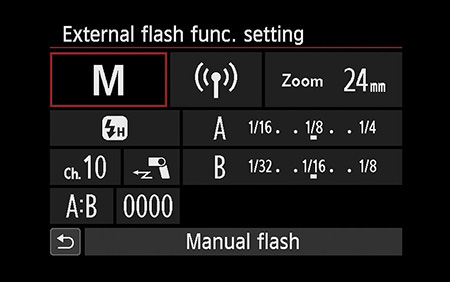
Figure 0.9
The External Flash Function Quick Menu in Manual mode with the Speedlite activated as a radio master.
The Two Kinds of Light in a Flash Photograph
When you are starting out as a Speedliter, it is important to understand that there are two types of light in your flash photographs: ambient and flash. As we will discuss again and again throughout the Handbook
, if you think about and manage the ambient light separately from the flash, you will have more creative control.
Ambient Light—The Light That Is Already There
Ambient light is the light that it already there—from the sun, room lights, etc. In many of your flash photographs, the background will be lit only with ambient light.
Often, there is nothing you can do to adjust the ambient light directly. However, as you will learn later in this chapter, shutter speed allows you to control how the camera records ambient light independently of how it records the light from your flash.
Flash—The Light You Create
In the vast majority of your flash photos, you will use the Speedlite to illuminate your subject in some way—either as the main light, as a light that makes it easier to see into shadowed areas, or as a light that creates an edge of highlight that separates your subject from a dark background.
If your subject is close to a background, then your flash will light your subject and the background. If your subject is separated from the background, then the flash that flies past the subject may not be recorded by the camera.
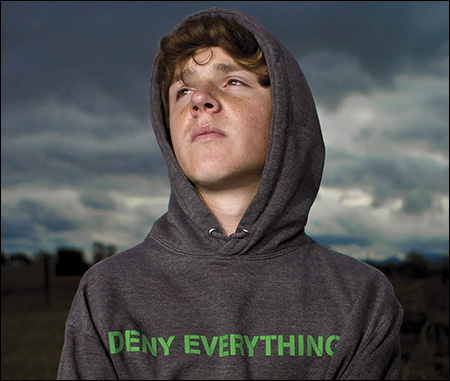
Figure 0.10
As shot, this photo of my son Vin has both ambient light and flash.
Figure 0.11
This is the portion of the photo that is lit by ambient light. If the background is not close to the subject, it is only lit by ambient light.
Figure 0.12
This is the portion of the photo that is lit by flash. The flash that flies past Vin, has nothing to bounce off—so it does not return to the camera.
Manage the Ambient Light First
As a Speedliter, I want you to think about and manage ambient light before you turn your flash on. This way, you can toggle between two shots on your camera—one lit with ambient only and one lit with ambient+flash—to see exactly what the flash is contributing to the shot.
You Can’t Dim The Sun...Or Can You?
Typically, ambient light cannot be changed or modified to any great extent. For instance, there is no dimmer switch for the sun.
That said, you don’t have to accept ambient light as it comes from the source. Here’s an essential truth about Speedliting:
Even though you may not be able to control an ambient light source directly, you can use your camera’s shutter speed to control how bright or dark it appears in the photograph.
Take a look at Figure 0.13
and then another look at Figure 0.10
. Figure 0.13
is an ambient-only study shot I did at the beginning of the shoot. There is no flash in this shot. Notice how the sky lacks drama. Notice also how the details in the field draw your eye away from Vin. To create the dramatic ambient light in Figure 0.10
, I increased the shutter speed from  ″ to
″ to  ″, a change of minus 4-stops.
Figure 0.13
I start my shoots with a series of ambient-only study shots. Then I change the shutter speed to adjust the appearance of the ambient light.
How To Get The Ambient Light You Want
For reasons that we will go deep into later, know that the camera meters the world differently than you see it. Further, the camera has no idea what is actually in front of the lens. Nor does it have any idea about your visual intentions. I often disagree with how the camera wants to expose the scene. Feel free to be disagreeable, too, and make the ambient light appear brighter or dimmer.
If the scene is brightly lit, often I will underexpose the ambient—making the portion of the picture not lit by the Speedlite a bit dark—because I want to direct the viewer’s eye to the subject.
If the scene is dimly lit, I might want to brighten the ambient light by using a slower shutter speed. (Note: A camera operating in Aperture-Priority Av mode will typically overexpose the background by using a long exposure to gather what it thinks is enough ambient light.)
The first thing that I want to know when I’m making a new photograph is how the camera sees the ambient light. Further, I want to settle on an ambient exposure before I start dealing with flash.
Before turning the Speedlite on, I will do the following:
1.
Set my camera’s mode into M (Manual).
2.
Dial in the aperture I need based on the depth of field that I want (see
Chapter 2
: Exposure Exposed
for details).
3.
Adjust the shutter speed until the needle in the center of the viewfinder is centered.
4.
Fire off a test shot.
5.
Dial the shutter speed one whole stop faster to dim the ambient (i.e.  ″ >
″ >  ″) or one whole stop slower to brighten the ambient (i.e.
″ >
″) or one whole stop slower to brighten the ambient (i.e.
″ >  ″) and take another test shot.
6.
Repeat steps 4 and 5 a few more times so that I have a wide range of exposures.
7.
Select the test shot I like best and set that shutter speed.
In Av Mode, Use Exposure Compensation To Brighten Or Darken The Ambient Light
When you shoot in Aperture-Priority (Av) mode, you pick the aperture and the camera picks the shutter speed. To adjust the ambient light in Av, you need to use Exposure Compensation (EC).
The specific steps for adjusting EC vary by camera model. So, check your camera manual for the exact details. The following generic steps will get you started for most models*:
1.
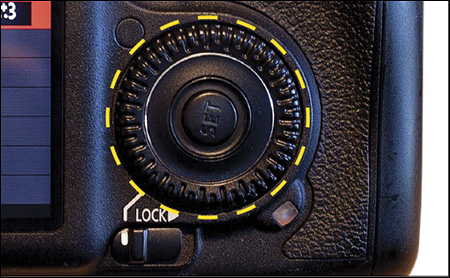
Switch on the Quick Control Dial (the big wheel on the back—Figure 0.14
). If there is an angled line on the back of your camera that points to the big wheel, turn the switch to that angled line.
Figure 0.14
The Quick Control Dial on the back of the camera, shown here on a 7D, is used to adjust EC.
2.
Turn the Quick Control Dial left to adjust the EC down and right to adjust it up.
3.
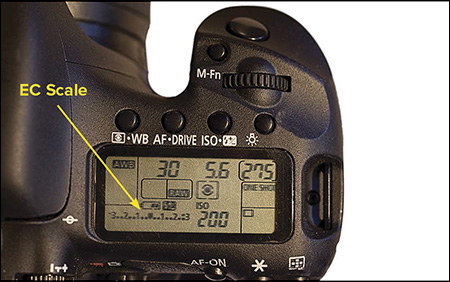
In the viewfinder the EC scale appears between the aperture and the ISO display. Push the shutter button halfway to see it. You can also see the EC scale on the top LCD panel (Figure 0.15
) and the rear LCD panel (Figure 0.16
).
Figure 0.15
One place to see the EC scale is at the bottom-left corner of the camera’s top LCD panel.
Figure 0.16
Another place to see the EC scale is on the main LCD panel.
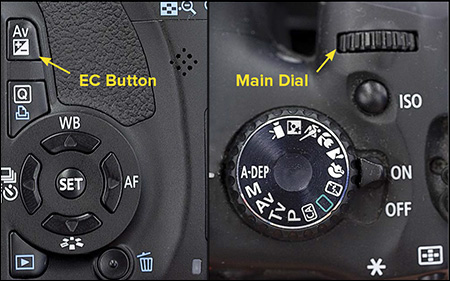
*On Rebel/xxxD cameras, press the Av ± button and simultaneously turn the Main Dial as shown in Figure 0.17
.
Figure 0.17
On Rebels (aka xxxD cameras outside the U.S.), you hold down the Av ± button on the back with your thumb and simultaneously turn the Main Dial with your index finger to adjust EC.
What about EC in other exposure modes? Avoid shooting Shutter-Priority (Tv) when using flash because the EC moves you make in Tv to control the ambient will change the aperture, which also changes the depth of field. There is no exposure compensation in the fully automatic modes—Green Box or CA. Nor is there exposure compensation in Manual mode. Instead, you adjust the ambient exposure in Manual mode directly by dialing the shutter speed to be faster or slower.
Controlling the Brightness of the Flash
My Speedlite workflow is a continuation of my ambient workflow. After determining the proper exposure for the ambient light, I start firing the Speedlite(s) and resume the exploration. Just as I want to determine how much ambient light I need to fit my vision, I have to determine how much flash is needed for the same goal.
Speedlite Mode—Controlling The Power
There are many factors to determining the power level at which a Speedlite should fire. The main two are the flash-to-subject distance and the reflectivity of the subject.
E-TTL (Evaluative Through The Lens) is Canon’s proprietary system where the camera and flash work together automatically to set the power level on the flash. It’s fantastic technology in the right circumstances. E-TTL can also provide a source of great frustration when the camera makes decisions that you don’t understand or agree with.
In Manual mode, you turn the power level up or down via controls on the back of the Speedlite. The 430-series go from  (full power) down to
  power. The 580-series and 600-series run from
down to
power. The 580-series and 600-series run from
down to  .
.
Manual Flash ≠ Manual Exposure
Manual flash is not the same as Manual (M) exposure on your camera. You can shoot your camera in Av and control the power of your Speedlite manually. Conversely, you can set the exposure on your camera manually and fire your Speedlite automatically in E-TTL. You’ll learn reasons to do both later in the Handbook
. Just remember for now that they are not the same—nor is there a direct link between the two.
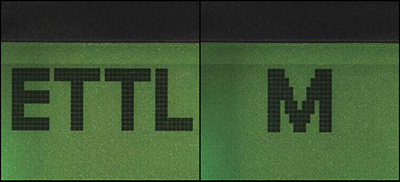
Figure 0.18
Left: The ETTL icon indicates that the Speedlite is in E-TTL mode. Right: The M icon indicates that the Speedlite is in Manual mode.
E-TTL And Manual Modes—Both Have Their Strengths
E-TTL mode automatically meters and sets flash power. I use it anytime the distance between the subject and the Speedlite(s) is dynamic. I also use it when I need a bit of fill flash outdoors in bright sunlight (see the end of this chapter).
The biggest downside to E-TTL is that the flash power changes automatically when you change what the camera is seeing—such as shifting from vertical to horizontal or zooming from a wide shot to a tight shot. You may not think that you’ve made a change, but the camera meters the scene differently and may increase or decrease the flash power.
Manual is great for situations where the distance between your Speedlite and subject does not change. I use Manual mode when I’m shooting portraits with my Speedlites on stands and for tabletop photography (still-life, food, product, etc.). Manual is also the best mode to learn the mechanics of controlling and shaping flash.
For now, just to get you out the door, feel free to use your Speedlite in E-TTL—provided that you work on your Flash Exposure Compensation techniques. Then, as you gain some momentum with Speedliting, switch your Speedlite to Manual so that you can learn the fundamentals of controlling light. Eventually, you will get to the point where you jump freely between the two modes as I do.
Fine-Tuning E-TTL With Flash Exposure Compensation
The camera, as smart as its little circuits are, has no more idea about your vision as a photographer when a Speedlite is fired than it does with straight ambient light. So, when shooting in E-TTL, you will sometimes disagree with the amount of flash. Don’t sweat it.
Just as you can use Exposure Compensation to increase or decrease the amount of ambient light in your shot, you can use Flash Exposure Compensation (FEC) to increase or decrease the amount of flash in your shot.
There are three ways to set FEC:
on the Speedlite itself
through the camera viewfinder
on the camera LCD
The fastest place to set FEC is on the Speedlite.
Setting FEC On A 600EX-RT
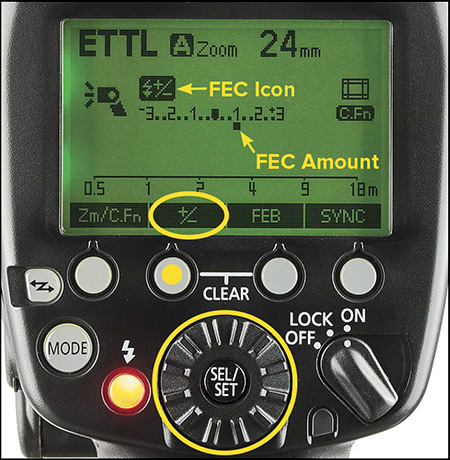
Figure 0.19
Setting FEC on the 600EX-RT is easy. Here, the FEC has been dialed to +1-stop.
1.
Confirm that the Speedlite is set to E-TTL.
2.
Push the +/– button to activate the FEC scale.
3.
Turn the Select Dial until the marker appears below the FEC amount you want.
4.
Push the Set button to confirm FEC.
Setting FEC On A 580EX Or EX II
Figure 0.20
Setting FEC at – stop on the 580EX II.
1.
Confirm that the Speedlite is set to E-TTL.
2.
Push the Set button at the center of the wheel on the back of the Speedlite. You will see the FEC icon and +0 flash on the left side of the LCD.
3.
Turn the wheel to set the FEC.
4.
Push the Set button to confirm FEC.
Setting FEC On A 430EX Or EX II
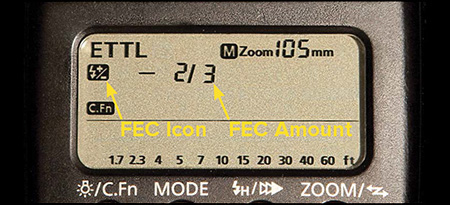
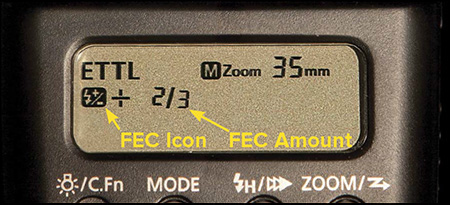
Figure 0.21
Setting FEC at +
stop on the 430EX II.
1.
Confirm that the Speedlite is set to E-TTL.
2.
Push the Set button at the center of the half-moon buttons on the back of the Speedlite. You will see the FEC icon and +0 flash on the left side of the LCD.
3.
Push the left half-moon button to decrease FEC. Push the right button to increase FEC.
4.
Push the Set button to confirm FEC.
A Simple Four-Step Workflow
The greatest challenge you will have as a photographer is learning how to prioritize what you do. No matter what type of photography you do, I encourage you to develop consistent habits sooner rather than later.
A Simple Four-Step Speedlite Workflow
Here’s a simple way to prioritize your Speedliting workflow as you learn the fundamentals. Steps 2 and 4 may require several adjustments and test shots to fine-tune the settings.
1.
Take an ambient-only test shot
—Either use Aperture-Priority (Av) mode on your camera or use Manual (M) mode and center the exposure needle in the viewfinder.
2.
Adjust the ambient exposure to suit your vision
—If the camera is an Av, then use Exposure Compensation. If the camera is in M, then adjust the shutter speed directly.
3.
Turn your Speedlite on and take a test shot
—Use Manual (M) if the distance between the flash and subject is fixed (in which case start at  power). If the distance is variable, use E-TTL mode on your Speedlite.
4.
Fine-tune the amount of flash to suit your vision
—If the Speedlite is in Manual mode, dial the flash power up or down directly. If in E-TTL mode, use Flash Exposure Compensation to adjust the flash.
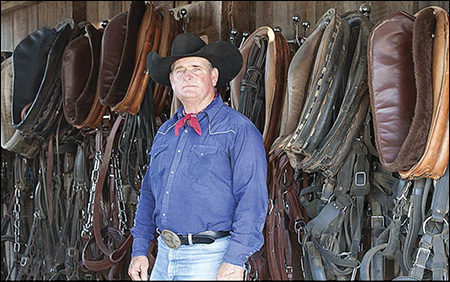
Figure 0.22
The ambient light as my camera captured it in Aperture-priority mode.
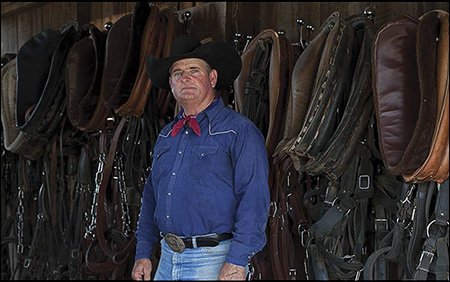
Figure 0.23
To focus the viewer’s eye on the subject, I dialed in minus 1-stop of Exposure Compensation (EC) to dim the ambient. The EC setting made the camera fire the shutter one stop faster than calculated by the meter.
Figure 0.24
Now I turn the Speedlite on. To create the effect of a beam of sunlight, I covered my Speedlite with an amber gel (CTO). In this test shot, Tom’s face is overexposed by the power of the flash.
Figure 0.25
By dialing the flash power down one stop, Tom’s face is no longer blown out. I have the shot that I want. It was only a coincidence that both ambient light (shutter speed) and flash power were reduced by one stop.
The Limitations of On-Camera Flash
A fundamental concept of Speedliting is the difference between on-camera flash and off-camera flash. You create on-camera flash with your camera’s pop-up or a Speedlite attached to the hotshoe—the flash is literally on your camera. You create off-camera flash when you fire a Speedlite that is not attached to your camera—which we will talk about quite a bit throughout the Handbook
.
Why Off-Camera Flash Looks Better
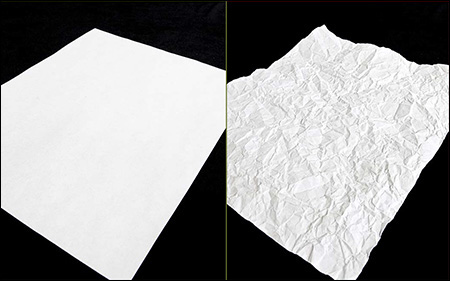
Light by itself has no depth. Stare at a blank piece of paper and tell me what you see. You see an even field of white. Now crumple the paper into a ball and then unfold it as smooth as you can. What do you see? You now see the texture of the paper because you now see shadows. So, remember this—light enables you to see an object, shadows enable you to see its depth and texture.
Here is another essential truth about lighting:
To create interesting light, you have to create interesting shadows.
From your camera’s perspective, shadows that go straight back are invisible. That’s what happens with the pop-up flash or a Speedlite in the hotshoe: The shadows go straight back. Making shadows that the camera can see means that they have to go across the photo—your Speedlite needs to be somewhere to the side of your camera and not right on top. We’ll get into how to do this shortly.
Another important truth about lighting is that:
If everything in your photo is lit evenly, then nothing will stand out.
This is what happens with on-camera flash—light is thrown at both sides of your subject equally, so nothing stands out. Using a Speedlite rather than pop-up flash and moving it off-camera means that you can angle the flash so that it lights your subject and creates depth-revealing shadows.
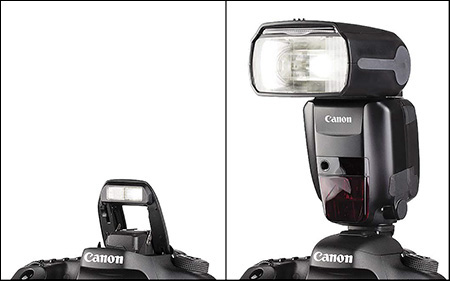
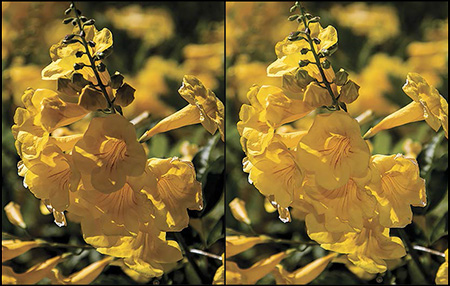
Figure 0.26
Left: A pop-up flash may be convenient, but it lacks both power and versatility. Right: A Speedlite provides greater power and options.
Figure 0.27
Left: There is no depth or shape to see in a flat piece of paper. Right: It is the shadows that enable you to see the crumpled texture of the paper.
Figure 0.28
The light from a 580EX in my camera’s hotshoe flies straight forward and creates an image with little depth (left). Moving it off-camera adds depth by throwing shadows across the face (right).
E-TTL Fill Flash: A Great Use for an On-Camera Speedlite
On-camera flash is not always a shadow killer. When your subject is lit by the sun, on-camera flash can be very useful as a shadow filler.
In Bright Sun, Shoot E-TTL Fill Flash
You’ve likely created photos outdoors where the faces were lost in shadows. This happened because the contrast between the brightest brights and the darkest darks was too great for the camera to record. As Speedliters, these difficult shots are easy to remedy.
Slide your Speedlite into the hotshoe and turn it on in E-TTL mode with high-speed sync activated.* The camera will sense that the Speedlite is available and automatically adjust the flash power so that the shadows are not a problem.** If you want more or less fill flash, use Flash Exposure Compensation.
The reason that on-camera fill flash looks good when other uses of on-camera flash do not look so good is that fill flash opens up the shadows, but does not overpower them. When the on-camera flash is bright enough to be the main light on your subject, then it literally kills the shadows by lighting both sides of the subject equally.
*To learn how High-Speed Sync works, read
Chapter 7
: Control Your Speedlite
.
**To learn how E-TTL works, read
Chapter 9
: E Is For Evaluative
.
Figure 0.29
Left: Ambient light only. Right: Ambient light plus E-TTL fill flash.