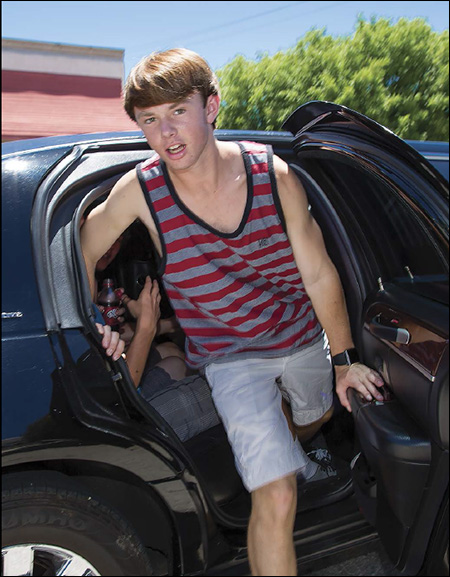
Figure 9.1 E-TTL is the perfect flash mode when the distance between the subject and the Speedlite changes constantly—such as when photographing this inquisitive hummingbird while he investigates my red hair.
DECIDING WHEN TO SET YOUR SPEEDLITE TO E-TTL
FEC—FLASH EXPOSURE COMPENSATION
Figure 9.1 E-TTL is the perfect flash mode when the distance between the subject and the Speedlite changes constantly—such as when photographing this inquisitive hummingbird while he investigates my red hair.
Canon’s Evaluative Through-The-Lens (E-TTL) flash metering system is an automatic flash mode that is simple enough to serve the novice and robust enough to serve the professional. To be successful with E-TTL flash, you must know when to use it and when Manual mode is a better choice. You must also learn how to use Flash Exposure Compensation (FEC) so that you can fine-tune the amount of E-TTL flash in your shots.
Canon’s Evaluative Through-The-Lens (E-TTL) flash metering system automatically calculates the flash exposure and then sets the Speedlite at the appropriate power level. Many photographers argue the benefits of E-TTL over Manual mode, and vice versa. For me, they are both tools with specific uses. I use whichever mode is best suited for the moment.
There are several great reasons to use E-TTL:
 You are a novice and do not yet know how to operate your Speedlite in Manual mode.
You are shooting in bright sunlight and want a bit of fill flash from your on-camera Speedlite or pop-up flash.
You’re shooting in a situation where the distance between the subject and flash changes constantly—either because the subject is in motion or the camera is moving around, such as at an event.
There are several downsides to E-TTL that should also be understood:
Every time you change the composition of the shot, even by just a bit—by zooming the lens, moving the camera from horizontal to vertical, etc.—E-TTL will remeter the scene and potentially change the flash power. This creates confusion about why the flash power is not consistent from shot to shot.
In E-TTL, it is impossible to know what flash power was used for a shot. There is no metadata provided other than “Flash did fire.”
Figure 9.2 From Little League to limos, E-TTL will help you capture family moments that you will want to remember for years to come. Here, my on-camera Speedlite added fill flash to offset the harsh shadows on the left side of Tony’s face.
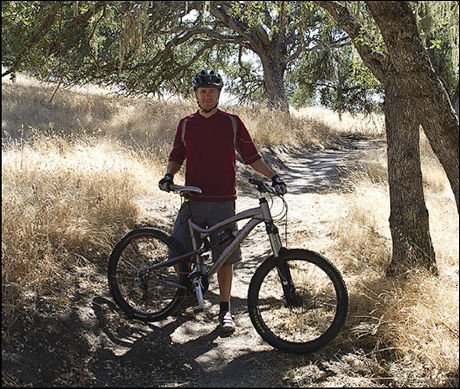
Figure 9.3 E-TTL is the mode to use when the subject-to-flash distance is dynamic—such as when your son pops out of a limo on a sunny afternoon.
E-TTL flash metering relies upon a pre-flash that can prematurely set off other units triggered by optical slave eyes. See the Optical Slave Eye
sidebar in Chapter 8
: Flashing Manually
.
The preflash will also make it difficult to photograph people with super-fast blinking reflexes—as discussed later in this chapter.
Since E-TTL is automatic technology, it is not critical that you know how E-TTL works. However, an awareness of what E-TTL is doing will help you maximize its benefits.
One of the unique features of Canon’s E-TTL technology is that the camera meters ambient and flash separately. Every time you push the shutter button halfway, your camera makes an exposure reading of the ambient light. Then, when you press the button completely, the E-TTL system meters the preflash, meters the ambient again, evaluates the meter readings, and sets the flash power—all in an instant.
The key to automatic flash metering is to measure the return of light from the subject. E-TTL does this by having the Speedlite fire a preflash at  power. (This can be set to full power in custom functions, but I’ve never found the need to do so.) Since the camera knows how much light the Speedlite sent out, the camera uses the preflash to measure the reflectivity of what the lens sees.
This happens so fast that normally you will not see it separately from the main flash. If you want to see the preflash, just to be sure it’s there, check out the sidebar, Seeing The Preflash .
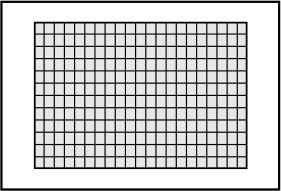
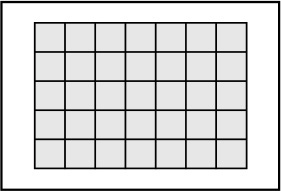
Your Canon DSLR measures ambient light and flash with a metering sensor that has either 252, 63, or 35 metering zones. It varies by camera model as described below.
Figure 9.4 The 252-zone meter used by the 1D X, 5DS, 5DS R, and 7D Mark II cameras. Unlike earlier cameras that only measure luminance (brightness), both of these cameras have RGB technology.
Figure 9.5 The 63-zone meter used by the 1D Mark III, 1Ds Mark III, 1D Mark IV, 5D Mark III, 6D, 7D, 60D, 70D, Rebel T2i, T3/T3i, T4i, T5/T5i, T6i, and SL1.
Figure 9.6 The 35-zone meter used by the 5D, 5D Mark II, 10D, 20D, 30D, 40D, 50D, and all Rebels not listed above in Figure 9.5 .
As you push the shutter button halfway, your camera makes an exposure reading of the ambient light. When the shutter button goes all the way down, the preflash fires and the camera measures the flash coming back—both in terms of how much and where. Then, for accuracy, the camera takes a second ambient meter reading before the evaluation begins.
Geek Speak: —Canon’s New Color-based E-TTL Flash Metering—
Geek Speak: —ETTL vs. E-TTL II Camera Bodies—
Rebel XS, XSi, XT, XTi, T1i–T6i, SL1
20D–70D
5D–5D Mk III, 5DS/SR, 6D, 7D–7D Mk II
1D Mk II–Mk IV, 1Ds Mk II–Mk III, 1D X
M, M2, M3 (mirrorless)
Since the camera knows the power level of the preflash, by comparing the two ambient meter readings to the preflash meter reading, the camera knows where and how much flash returned through the lens.
From the meter readings, the camera also has a sense of how bright the ambient light is in the scene. As we will explore shortly, when the ambient light is bright, the E-TTL algorithm relegates the role of the Speedlite to being a low-power fill flash that enables the camera to record details in shadowy areas.
When the camera determines that the ambient light is dim, the E-TTL algorithm shifts the role of the Speedlite to that of main (key) light on the subject. The camera prioritizes lighting the subject over the background.
In both cases (bright and dim ambient light), E-TTL evaluates the differences between the ambient and flash readings. Metering zones that do not show a return of the preflash are assumed to be distant background, so the camera does not try to light them with flash.
If your EX Speedlite is on-camera and you’re shooting with a compatible lens (typically a Canon USM lens), then an E-TTL II camera (see sidebar) will also factor in the camera-to-subject distance. This distance information is used by the camera to more precisely calculate the appropriate power level for the Speedlite.
However, there are three instances where the camera ignores the camera-to-subject distance:
The head of the Speedlite is tilted up or panned to the side for bounce flash.
Wireless flash (either radio or optical) is activated.
Macro flash.
These exceptions make sense. When you tilt or pan the head, E-TTL disregards the distance data because it does not know the geometry of your bounce shot. When your Speedlite is a wireless master, E-TTL disregards the camera-to-subject distance because it does not know the distance of the subject to the slave(s). When your subjects are very close to the camera, as is the case in macro photography, distance matters less than reflectivity of the subject so, again, E-TTL ignores this data.
Given that most of my E-TTL Speedliting is done either with an on-camera Speedlite angled for bounce or with the wireless system activated, I long ago stopped worrying about whether the E-TTL algorithm knows how far my camera is from the subject. In my experience, E-TTL does just fine without this information.
One of the scenarios that E-TTL handles quite well is that of backlighting. As you will recall from Chapter 1 : Learn To See Light , your camera cannot record the same range of brights and darks that you can see.
If your subject is backlit and the exposure is held so that the background details do not blow out to white, then the side of your subject seen by the camera will be recorded as deep shadows. Essentially, the photo of your children at the beach becomes a photo of three silhouettes standing in front of the ocean.
When the camera sees the scene as mostly bright, it will anticipate that the role of the Speedlite is to provide fill flash on the subject. In doing so, E-TTL reduces the power of the Speedlite so that the role of the flash is to fill the shadows rather than provide the main light on the subject. The effect is that the lighting looks more natural because the fill flash on the subject is balanced with the ambient light on the background.
If you think that the amount of fill flash is too little or too much, you can dial in an adjustment via Flash Exposure Compensation (discussed later in this chapter).
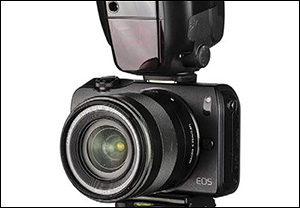
Figure 9.9 The fill flash from the 600EX-RT is fuller because the flash is a bit bigger than the pop-up.
E-TTL is a powerful tool that can produce amazing images. It’s important to know about the limitations of the E-TTL system and what to do about them.
One key thing to remember is that as good as E-TTL is, it does not replace the laws of physics. So, if your Speedlite is on-camera, you are going to get on-camera light.
In the case of simple, on-camera fill flash for backlit subjects, E-TTL flash will provide a significant improvement over the loss of detail in shadows. But if you’re trying to create a sense of depth or shape by creating shadows with your Speedlite, you still have to bounce your Speedlite or move it off-camera.
In E-TTL, your camera and Speedlite work together to determine the proper amount of flash power. That is to say, “proper” as defined by a computer algorithm.
Your camera does not know what your visual intent is. Fortunately, as you’ll read later in this chapter, you can adjust the E-TTL calculations via Flash Exposure Compensation so that the system delivers light that fits your vision.
Some people are hyper-fast blinkers. You’ll know who they are when you see that their eyes are always closed in your E-TTL shots. What’s happening is that they are blinking at the preflash.
The best way to deal with this is to push the FEL button (described later in this chapter). When you push the FEL button, the preflash fires and the blinker blinks. Wait a brief moment, and then trigger the shutter. Chances are that you’ll get the blinker with her eyes open.
Studio strobes and some brands of small flash have an optical slave eye that fires the flash when it sees a burst of light. This enables different brands of gear to be fired simultaneously without add-on trigger mechanisms. E-TTL confuses these optical slave eyes because they trigger when they see the preflash.
If you are doing multi-Speedlite work, you do not need external triggers. Activate the radio or optical wireless system that is built into your Speedlites.
If you are using optical slave eyes because some of the units you are trying to fire are non-Canon speedlights or studio strobes, use non-wireless, Manual mode to eliminate the preflash (or the 600EX-RT in radio Manual).
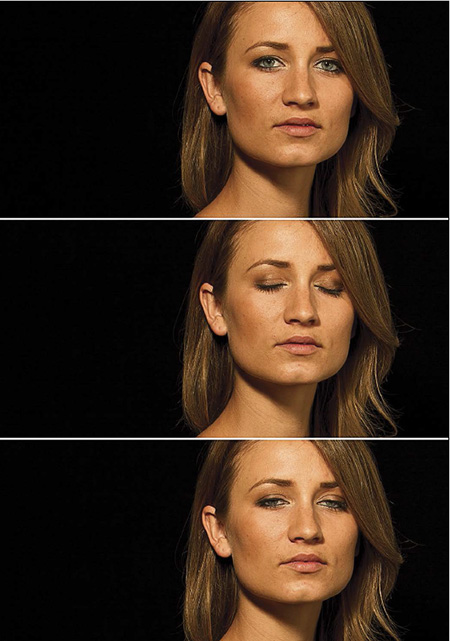
Figure 9.10 Even an experienced model will blink occasionally in response to the E-TTL preflash. The hardest ones to see on the camera LCD are the half-blinks, as shown at bottom.
How the shutter and aperture are set factors into the settings made by E-TTL. In a few situations, your camera may not adequately fire your Speedlite because of the shooting mode you’ve selected on your camera.
When your camera is in Manual mode, you set both the aperture and the shutter speed. Your camera will be perfectly happy to set the flash exposure through E-TTL even though you are controlling the shutter and aperture directly. Use your aperture to control the depth of field and the shutter speed to control how the ambient light is recorded.
You select the aperture, and the camera sets the shutter speed. In dimly lit situations, the camera prioritizes the flash power for the subject. If your subject is standing against a wall, the wall will be lit as well. If your subject is standing away from the background, the background may go black. The challenge of using Av in low light is that you will often get excessively long shutter speeds. To avoid this, you can switch your camera to Manual mode or limit the flash sync speed via the camera’s custom functions. See the sidebar Flash Sync Speed in Av Mode .

In these modes, the camera sets the shutter speed between  ″ and the camera’s sync speed (typically
  ″). The camera also sets the aperture.
If
″ is not long enough to capture enough ambient light from the background, you will have a black background. In Program or Full Auto, the way to correct this is to either move closer to the subject or increase the ISO.
You select the shutter speed, and the camera sets the aperture. If the aperture display blinks, the background will be under- or overexposed. You can use a faster or slower shutter speed to adjust the amount of ambient light captured—which is what lights the background.
If your shutter speed is set faster than the sync speed for your camera, the camera will shoot at the sync speed rather than the speed you dialed in. For instance, if you’ve set the shutter for  ″ and your camera’s sync speed is
″, then your camera will fire at
″.
″ and your camera’s sync speed is
″, then your camera will fire at
″.
To shoot faster than the sync speed for your camera, you’ll need to switch the Speedlite into High-Speed Sync mode—which is the subject of Chapter 22 : Slicing Time With High-Speed Sync .
Speedliter’s Tip: —Flash Sync Speed In Av Mode—
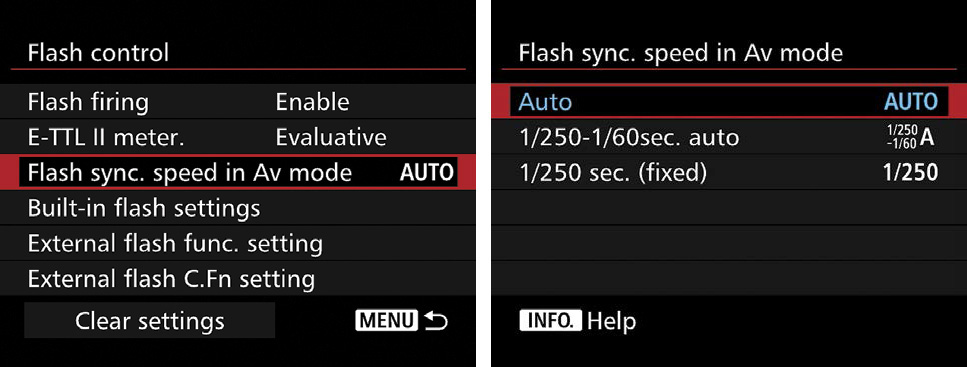
Auto
—The camera will automatically use any shutter speed from 30″ down to the sync speed of the camera (typically
″). This is the default setting on your camera, which is why you have shaky photos when shooting flash in dim light with your camera set to Av mode.
1/xxx–1/60sec. auto
—The camera will automatically use any shutter speed between the camera’s sync speed (typically
″) and
″. If the camera can use a shutter speed within this range that will show the background, it will. When the ambient light is dim, the background will be black.
1/xxx sec. (fixed)
—The camera will set the shutter speed to the camera’s sync speed (typically
″). Use this setting when you want the background to be as dark as possible.
E-TTL is amazing technology. Yet, I do not expect it to give me exactly the amount of flash that I want in every shot. Why? As I said earlier, the camera cannot know my vision or my intent as the photographer. So, I expect E-TTL to get the lighting close, and then I will dial in a bit of Flash Exposure Compensation (FEC)—a feature that I use in almost every E-TTL shot I make.
To shoot Speedlites in E-TTL, you must learn to use FEC. Think of FEC as the way to fine-tune E-TTL flash.
FEC adds or subtracts the amount you specify to the flash power calculated by the E-TTL algorithm in the camera.
FEC is expressed as EV (Exposure Value). You learned in Chapter 2 : Exposure Exposed , that an EV is exactly the same as a stop. So, if you dial +1 FEC, you are telling the camera to fire the Speedlite at one stop brighter than calculated by the E-TTL algorithm. If you dial in -2 FEC, you are telling the camera to set the power of the Speedlite two stops dimmer than calculated by E-TTL.
The default increment for FEC is  -stop. However, if your camera’s exposure compensation is in ½-stop increments, then the FEC will also be in ½-stop increments. Consult your user manual to determine how to change from one to the other.
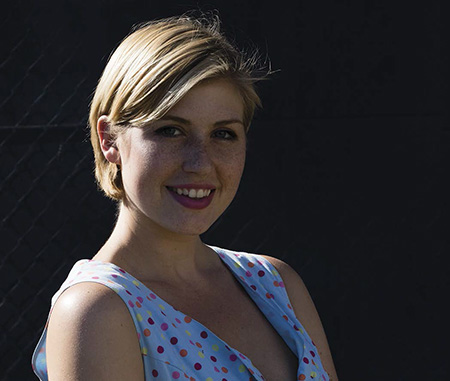
Figure 9.11 Brittany’s face is too dark in this ambient-only shot because the sun is coming from behind her—which is what creates the lovely hair and rim light.
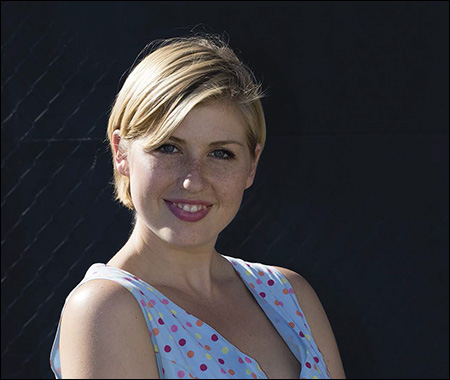
Figure 9.12 Using a hotshoe-mounted Speedlite in E-TTL mode is a quick way to add fill flash. To my eye, Brittany’s face is a bit too bright with 0 FEC.
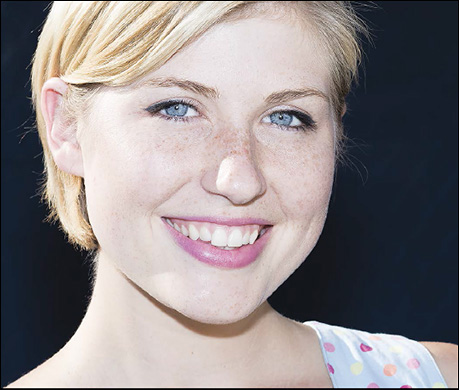
Figure 9.13 Dialing in an E-TTL adjustment of -1 FEC dims the Speedlite by one-stop. I think that the fill flash is now well-balanced with the ambient light.
As a general rule, you should use +FEC if the tones in your shot are predominantly bright and –FEC if the tones in your shot are predominantly dark. Why?
Prior to the introduction of the RGB metering sensors on the 1D X and 7D Mark II (see sidebar), virtually all E-TTL metering was based on luminance (brightness) alone. The E-TTL algorithm expects that the average luminance in the shot is that of medium gray.
So, E-TTL can falter when the dominant tone in a shot is high-key (mostly bright) or low-key (mostly dark). A bright object is bright because it reflects most of the flash back to the camera. When E-TTL sees this, it dials the flash power down so that the white becomes medium gray—which yields an underexposed shot.
Conversely, a dark object absorbs most of the flash and reflects little back to the camera. Since E-TTL is programmed to think that the scene is medium gray, it dials the flash power up (adding light to black makes it appear gray). The resulting shot is over-exposed.
For E-TTL shots with a broad range of tonality, extreme over- or underexposure is not a problem. It’s only when the scene is mostly bright or mostly dark that a significant issue can come up. When this happens, know that you should dial FEC in the same direction as the general tonality of the shot—up for bright scenes and down for dark scenes.
You can set FEC on your camera. You can set FEC on your Speedlite. Remember this—if you set FEC in both places, the FEC setting on the Speedlite is used—even if the FEC in the camera is greater. Further, the amounts are not added together. So, get in the habit of setting FEC in one place only.
Depending on your camera model, there are up to four ways to set FEC on your camera:
via your camera’s top-panel FEC button
on your camera’s Quick Control Screen
on an FEC button set in Custom Controls
on the camera’s Flash Function Settings
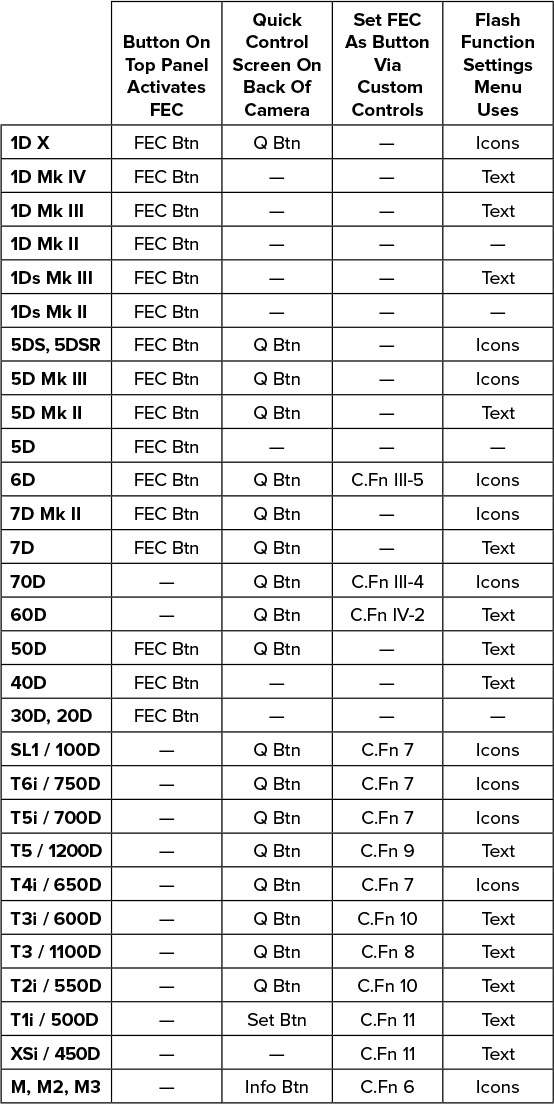
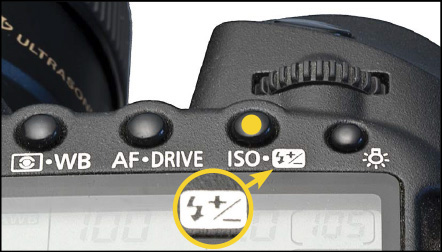
Many Canon cameras have a button on the top panel dedicated to FEC. Check out the chart in Figure 9.15 to see if your camera does.
Figure 9.15 You can change the FEC without taking your eye from the viewfinder by pushing the FEC button and then turning the Quick Control Dial. Shown here: 5D Mark III.
The advantage of this dedicated FEC button is that when you push it, you can set the FEC through the viewfinder (the preference of E-TTL shooting pros) or on the camera’s top LCD.
Most professional E-TTL shooters train their right index finger to find the location of the camera’s FEC button while they continue to look through their camera viewfinder. This gives them the opportunity to continue framing the shot while also adjusting the FEC.
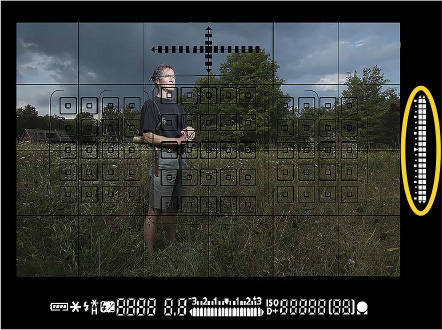
Figure 9.16 The 7D Mark II, like the 1D X, has a vertical FEC scale adjacent to the Exposure Compensation (EC) scale on the right side of the viewfinder. Other cameras show the FEC scale along the bottom of the viewfinder.
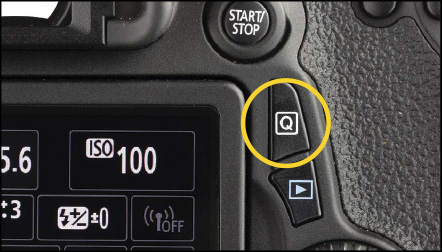
The Q button on the back of many Canon cameras is the gateway to the Quick Control Screen. If your camera has this feature, you will find that it is a convenient and fast way to change the settings on your camera.
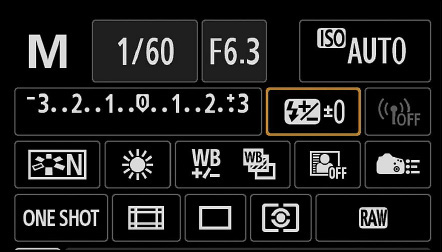
After you activate the Quick Control screen, look for the FEC icon (the flashbolt + /-) in one of the rectangles on the rear LCD. Then, highlight that space by using the joystick (if present) or rocking the Quick Control Dial (if no joystick) to choose FEC. Then, turn the Quick Control Dial to the FEC amount that you want.
Figure 9.17 The Q button on the back of the camera is the gateway to the Quick Control Menu. Once the Quick Menu is displayed, use the joystick (if present) or rock the Quick Control Dial (if no joystick) to choose the setting you want to change.
Figure 9.18 When the FEC box is highlighted on the Quick Menu, press the Set button to bring up the FEC scale on the LCD. Use the Select Dial to specify the amount, and then press the Set button to confirm your choice.
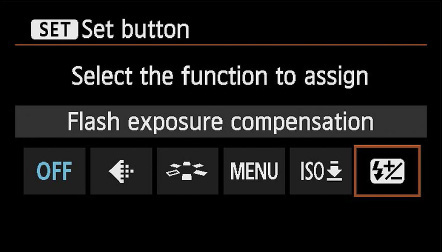
If your camera does not have a dedicated FEC button, do not fret. Many Canon cameras have the ability to create one via Custom Controls—found in the camera’s Custom Functions menu.
The functions that can be assigned to a specific button vary by camera model. Most often, for FEC, the Set button in the center of the Quick Control Dial (on the back of the camera) will be activated as the FEC button. Check the user manual for your camera to get the specifics on how to do this.
Figure 9.19 On the 70D, the Custom Controls option found in Custom Functions can be used to specify that the Set button be used to activate FEC.
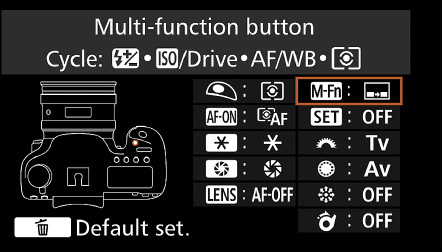
Figure 9.20 On the 7D Mark II, the Custom Controls option found in Custom Functions can be used to specify that the Multi-Function (M-Fn) button be used to activate FEC.
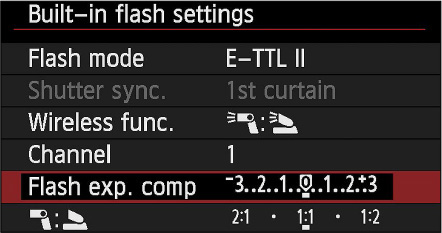
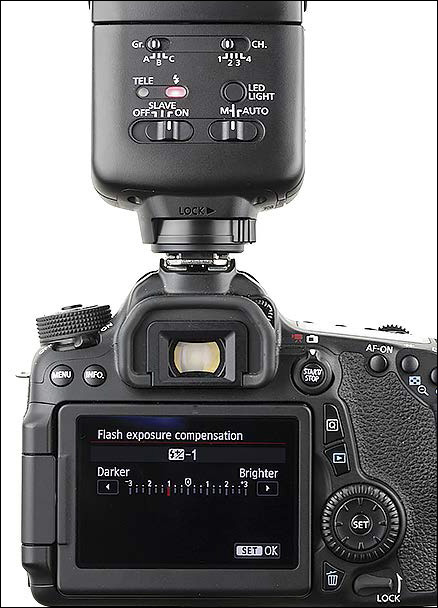
You can set FEC via the Flash Control menu (cameras with a pop-up flash) or the External Speedlite Control menu (cameras with a Speedliter in the hotshoe).
The disadvantage of this approach is that on all cameras other than the 7D Mark II, a tap on the shutter button resets the menu back to the top. So, it takes longer than the other methods. Conveniently, the 7D Mark II has a new feature that returns the Flash Control Menu to the same setting that you last used.
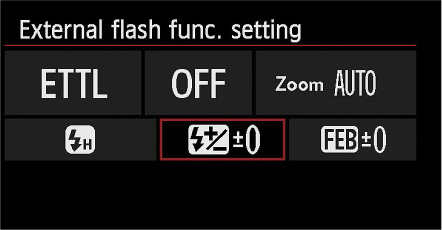
Figure 9.22 Adjusting FEC for an external Speedlite via the External Flash Function Settings menu on the 70D.
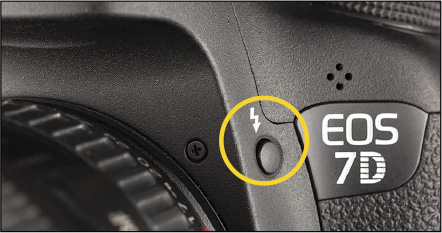
Figure 9.23 The Flash Activation button on the side of the 7D Mark II provides instant access to the Flash Control Menu. Another great feature of the 7D Mark II is that the menu stays at the last option chosen.
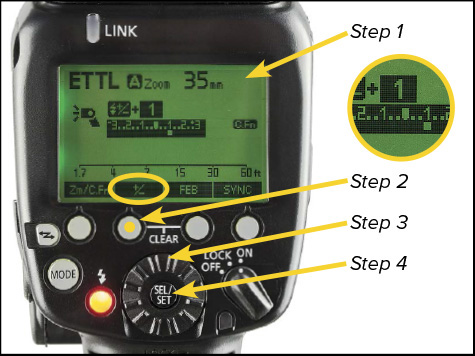
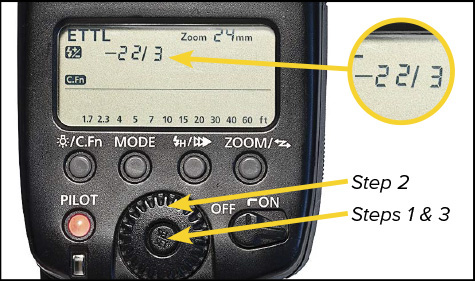
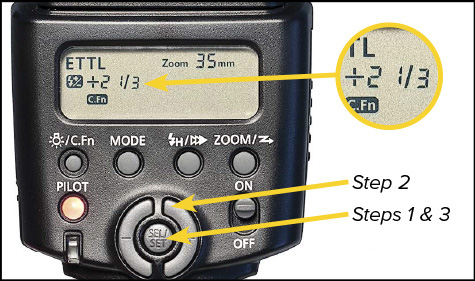
2. Press the +/- button to activate the FEC scale.
3. Turn the Select Dial to adjust the overall amount of FEC up or down. Here the FEC is +1-stop.
4. Press the Set button to confirm your choice.
Speedliter’s Tip: —Setting FEC On The 320EX, 270EX II, & 90EX—
1. Press the Set button so that the FEC icon is displayed on the left side of the LCD. You will see that the FEC icon and the FEC amount will blink.
2. Use the Select Wheel to specify the desired amount of FEC. Turn it left to reduce the FEC. Turn it right to increase the FEC. If you want to remove FEC entirely, set it to +0.
3. Press the Set button to confirm your choice.
1. Press the Set button so that the FEC icon is displayed on the left side of the LCD. You will see that the FEC icon and the FEC amount will blink.
2. Use the Select buttons (the C-shaped buttons on either side of the Set button) to specify the desired amount of FEC. Press the left Select button to reduce the FEC. Press the right Select button to increase the FEC. If you want to remove FEC entirely, set it to +0.
3. Press the Set button to confirm your choice.
As you have read several times throughout the Handbook already, there are two types of light in a flash photograph—ambient and flash. A unique feature of Canon’s Speedlite system is that, when shooting an automatic camera mode like Av or P, you can fine-tune ambient via Exposure Compensation (EC) independently of the fine-tuning you do to the Speedlite with Flash Exposure Compensation (FEC).
This is not true for other camera brands. If you have switched to Canon from Nikon (or read books about flash written by Nikon shooters), know that in Canon’s Speedlite system EC does not affect FEC. For instance, if I dial the EC down –1 to underexpose the ambient a bit, this does not also dim my Speedlite. Our EC is completely independent of our FEC. So, use EC as the fine-tuning control for the ambient exposure in Av or P and FEC as the fine-tuning control for E-TTL flash.
Figure 9.25 Although the intense afternoon sun created beautiful backlight, I toned down its strength by dialing in –1 EC.
Figure 9.26 Then I turned on the Speedlite for the first test shot at 0 FEC. This is how the camera wants to meter the flash.
Figure 9.27 I wanted Colin’s face and jersey to compete with the bright spots in the grass. So I dialed +1 FEC into the Speedlite.
Are you familiar with the focus-and-recompose technique in which the photographer puts a single focusing point on a specific spot (such as the subject’s eye), locks in the focus, and then frames the shot? The advantage of focus-and-recompose is that the photographer knows exactly where the focus point is and then has the freedom to frame the shot without worry of the camera refocusing.
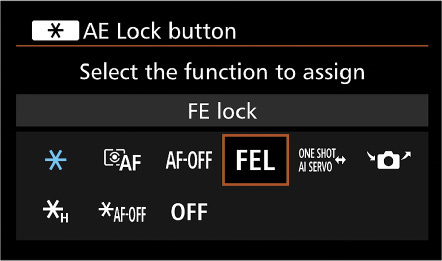
The Speedliter’s equivalent of focus-and-recompose is Flash Exposure Lock (FEL).
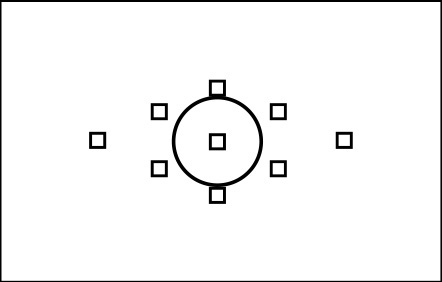
In FEL, the camera fires the preflash and then meters flash only from the zones contained within the viewfinder’s center circle—rather than the whole frame. The meter reading is held in memory for up to 16 seconds (or as long as the shutter button is pressed halfway). No matter what the viewfinder sees during this interval, the flash power will not change.
Wide-Angle Shots
—By aiming the center circle at an important element and using FEL, the photographer can recompose the frame as needed.
Extreme Tonality
—Experienced wedding shooters use FEL for accurate flash when shooting a frame that is mostly filled with the bride’s white gown or the groom’s black tuxedo. First, the photographer dials in the requisite amount of FEC (–FEC when filling the frame with the tux and +FEC when framing in the gown). Then, the photographer centers the circle on the black/white fabric, activates FEC, reframes the shot, and shoots.
Switching Between Vertical and Horizontal
—Changes in composition can cause E-TTL to change the flash power between shots, even when the distance between the subject and the Speedlite has not changed. If the same target is framed up in the center circle each time that FEL is activated, then the flash exposure will remain consistent from shot to shot.
Figure 9.28 FEL meters flash from the center area of the viewfinder. Consult your camera manual for the exact zone.
FEL locks the ambient and flash exposures into the camera for 16 seconds so that you can recompose your photograph and fire off a shot. After you take a shot, the camera automatically switches back to your specified metering pattern. Also, if 16 seconds goes by without a photo being made, then the camera switches back to your specified metering pattern.
You can extend the FEL metering by keeping your finger on the FEL button. As long as you hold it down, the camera will hold the exposure settings in memory.
Unfortunately, on most cameras, there is no way to lock the camera in FEL mode so that you can take multiple shots with one set of FEL readings. Instead, you have to return to your meter target and hit the FEL button for every shot.
FEL is available when the camera mode is set to Manual (M), Aperture-Priority (Av), Program (P), Shutter-Priority (Tv), or Bulb (B)—which Canon refers to as the “Creative Zone” modes.
FEL is not available in the following situations:
Speedlite is not in E-TTL
Full Auto mode (the green box)
Basic Zone modes (those icons on the mode like a mountain or a runner)
Live View is activated
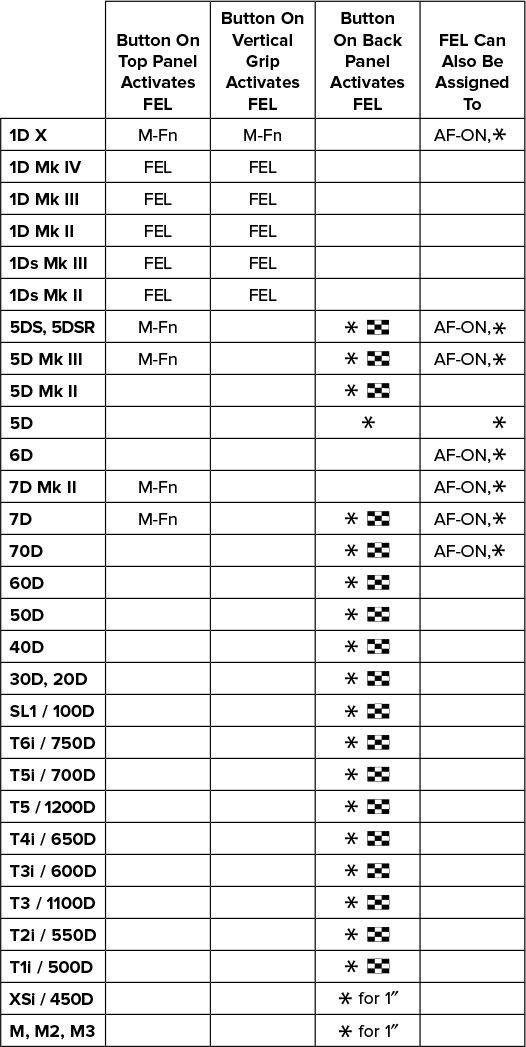
FEL is activated via a button in one or more of the following spots on your camera:
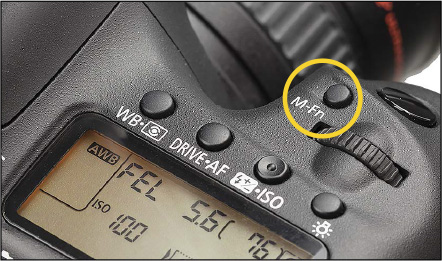
top panel
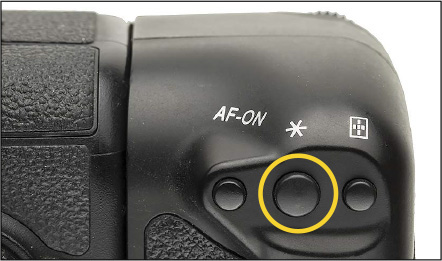
vertical grip
back panel
custom-assigned button
Any time that you are shooting for publication or shooting stock images that you hope will be used in a publication, it is very important to create alternate compositions. You need to do this so that the designer can place titles and text on or around your photo.
Since you will likely not know the layout at the time that you are shooting, once you settle on your main composition and get your hero shot(s), you should make a number of alternate compositions very quickly.
If you are shooting tight, zoom out or back up. If you are shooting wide, move in close. If you are shooting vertical, shoot horizontal. If you are shooting with the subject on the left, switch the symmetry and shoot with the subject on the right. You can do all of this in literally a few moments at the end of the shoot.
To assure that your exposures are consistent across this series of shots, center the viewfinder on the same spot and hit the FEL button. Then recompose and fire. This ensures that your exposures are the same even though your composition is changing significantly.
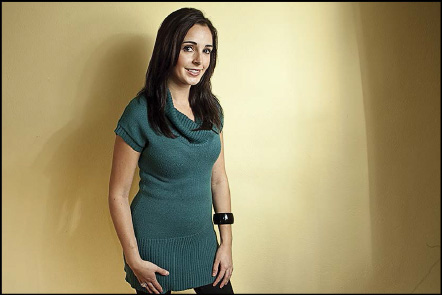
Figure 9.34 Here is the hero shot that I’ve made with the ambient and flash exposures dialed in to my taste via EC and FEC. I will return to this composition every time I want to meter via FEL. It is my “target shot.”
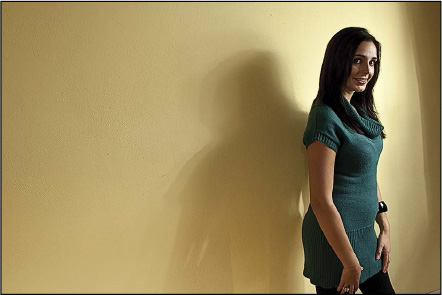
Figure 9.35 When my hero shot is wide, I’ll zoom in or step towards the subject to create a tighter shot.
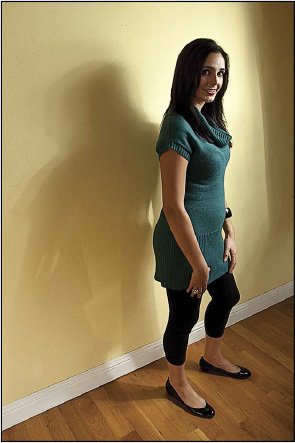
Figure 9.36 When my hero shot is horizontal, I will turn my camera and shoot vertical for several frames.
Figure 9.37 If the subject is to the left in my hero shot, then I’ll pan the camera and move her to the right.
E-TTL is usually a reliable tool. However, if you do not get the results you expect—especially if you have been successful with E-TTL before—check the following.
If you turn you Speedlite on for a bit of fill flash and find that your next shot is over-exposed, check the shutter speed for your last ambient-only shot. If it is above the sync speed for your camera, then you should activate High-Speed Sync on your Speedlite. If you are using a pop-up flash, which cannot do High-Speed Sync, then you will have to reduce your shutter speed to the camera’s sync speed and then rebalance the exposure by lowering the ISO and/or using a smaller aperture (higher F/stop number).
If you think that E-TTL is not changing the flash power, try this test: Using a relatively high ISO setting on your camera, move within a few feet of a subject and take a few test shots with the Speedlite in E-TTL mode. If the ready light comes on almost instantly after each shot, you can assume that E-TTL is working properly. (Moving close and raising the ISO reduces the amount of flash power needed, so the Speedlite can recycle quickly.) If you find that the ready light takes several seconds to illuminate, then check the following tip.
If you find that E-TTL fires consistently at full power, then change the batteries in your Speedlite. This is especially true for older models of Speedlites. When the battery voltage drops too low, the Speedlite circuits fire the flash at full power—strange, I know, but true. If the problem persists after installing fresh batteries, then clean the contacts on the foot of the Speedlite and in the camera’s hotshoe with a pencil eraser. Be sure to blow the rubbings away rather than brush them away with your oily fingertip.