′ on the fastest models. The trade-off is that the power of the flash is greatly reduced—typically by 2
 stops.
HIGH-SPEED SYNC IS A GAME CHANGER FOR FLASH PHOTOGRAPHERS
HIGH-SPEED SYNC CHANGES THE WAY YOUR SPEEDLITE FIRES
WORKFLOW FOR CREATING DRAMATIC LIGHT WITH HSS
ALTERNATIVES TO HIGH-SPEED SYNC
SHOOT: FLASHING WIDE OPEN IN FULL SUN
SHOOT: FILL FLASH WITH HIGH-SPEED ACTION
SHOOT: WHEN HIGH-SPEED SYNC IS NOT THE BEST CHOICE
High-Speed Sync (HSS) changes the way your Speedlite fires. Rather than a single, strong pulse, your Speedlite sends out an ultra-fast burst of low-power, stroboscopic pulses. Because the strobe pulses are so close together, your Speedlite effectively turns into a continuous light source for an instant.
High-Speed Sync enables the use of virtually any shutter speed on your camera—up to
′ on the fastest models. The trade-off is that the power of the flash is greatly reduced—typically by 2
stops.
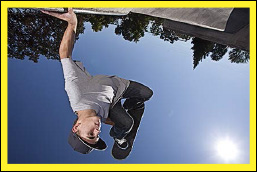
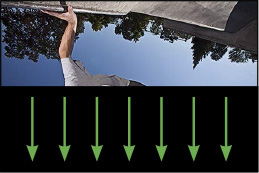
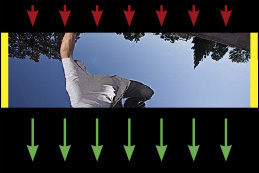
Figure 22.1
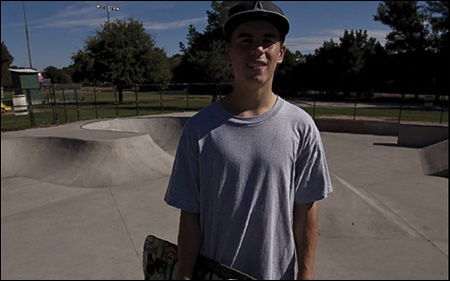
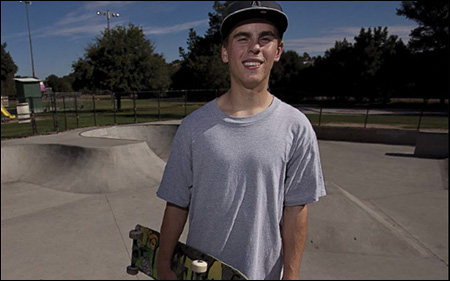
High-Speed Sync enables me to shoot at virtually any shutter speed. At left, the normal sync speed of my camera ( ″) blows out at a wide aperture in full sun. At right, the shot at
  ″ with the Speedlite switched into HSS.
High-Speed Sync (HSS) is a Speedlite-only flash mode that enables the use of shutter speeds faster than the camera’s sync speed. (See Chapter 7 : Control Your Speedlite for the basics of flash sync.)
While there are other sync technologies, such as HyperSync and faux-speed sync, they enable the camera to shoot only slightly faster (a stop or two) than the camera’s sync speed. With HSS, you can literally sync your Speedlite at any shutter speed up to
″.
Of course, this ability does not come without a trade-off. Getting the Speedlite to pulse its flashtube at an ultra-fast rate (which is how HSS works) consumes a tremendous amount of energy. Effectively, full power in HSS is the equivalent of  -power in normal sync. Still, in the right situations, HSS enables you to create shots that you cannot with other types of flash.
Here are three instances where you will want to know how to use HSS:
 Fill flash at wide aperture
—When you need fill flash outdoors in bright sunlight and you want shallow depth of field
Fill flash at wide aperture
—When you need fill flash outdoors in bright sunlight and you want shallow depth of field
Fill flash for high-speed action
—When you need fill flash outdoors in bright sunlight and you want to freeze motion
Dim the ambient light significantly
—When you want to underexpose the ambient light and then use flash to light your subject
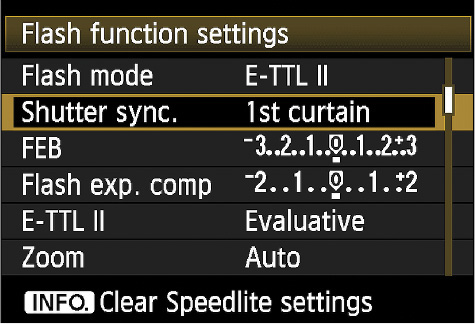
There are two options for activating High-Speed Sync (HSS). Depending upon your gear, you can activate it on your Speedlite and/or on your camera. If you have both options available, you need only do it in one place.
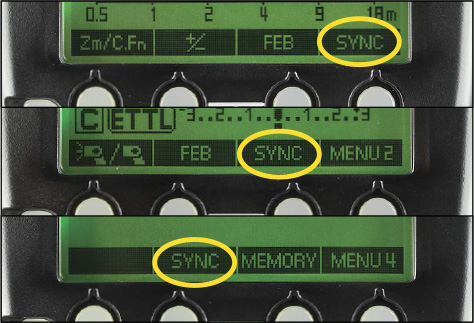
On the 600EX-RT Speedlite, the location of the Sync button changes depending upon the mode and wireless settings. The three positions shown in Figure 22.2 are (top to bottom): non-wireless E-TTL, Group mode in radio wireless, and E-TTL in radio wireless. When you are in the field, the easiest way to find the Sync button when it is not onscreen is to rotate through the menus by pressing the Menu button on the lower-right corner of the LCD.
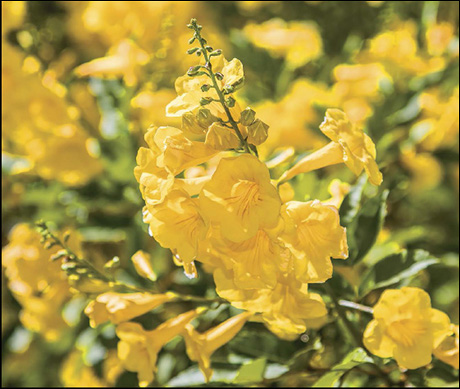
Figure 22.2 The shallow depth of field isolates this flower stem in the middle of the garden. HSS reduces the contrast by filling the shadows with a bit of flash.
Pressing the Sync button repeatedly cycles through normal sync > HSS > second-curtain sync > normal sync. One great feature of the new dot-matrix LCD is that icons can be formed on the fly. So on the 600EX-RT and ST-E3-RT transmitter, the location of the sync icon (see Figure 22.3 ) does not move around on the LCD as it does on the older 500- and 400-series Speedlites. You will either see no icon (normal sync), the HSS icon, or the second-curtain sync icon in that spot.
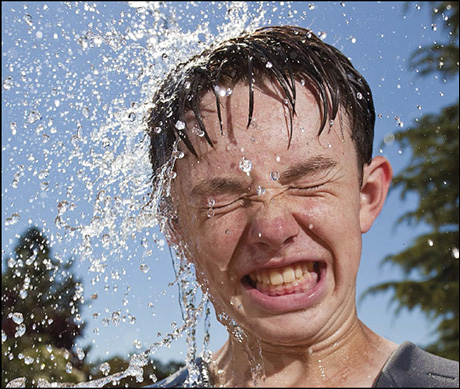
Figure 22.3 Freezing the water in mid-air required a super-fast shutter speed. HSS enabled the use of fill flash in this backlit shot.
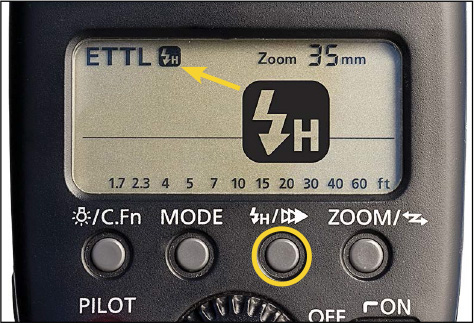
On the 500- and 400-series Speedlites, look for the dedicated sync button under the LCD. Just above the button, you will see the icons for HSS (the “flashbolt-H”) and second-curtain sync (three triangles). Pressing the Sync button repeatedly cycles through normal sync > HSS > second-curtain sync > normal sync.
You will see that the “flashbolt-H” icon appears in the upper-left corner of the screen (Figure 22.4 ). When you push the button a second time, you will go from HSS into second-curtain sync, and the icon (three triangles) jumps to the right side of the LCD.
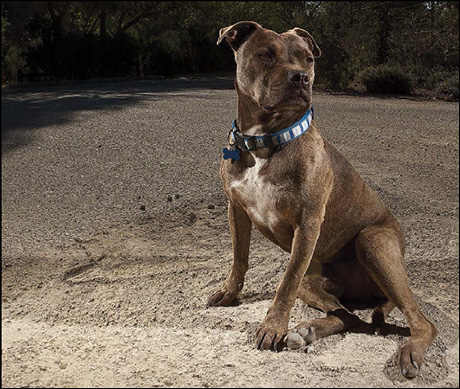
Figure 22.4 I used two Speedlites to sculpt highlights on the coat of this beautiful dog. HSS enabled me to dim the bright sunlight so that the dog would stand apart from the background.
As we have discussed throughout the Handbook , a great feature of the Canon Speedliting system is that you can control all the settings of a connected Speedlite on the LCD of compatible cameras. (For a complete list, see Chapter 0 : Quick Start Guide To Speedliting .) By “connected,” I mean that the Speedlite is either in the camera’s hotshoe or attached to the hotshoe via an E-TTL cord.
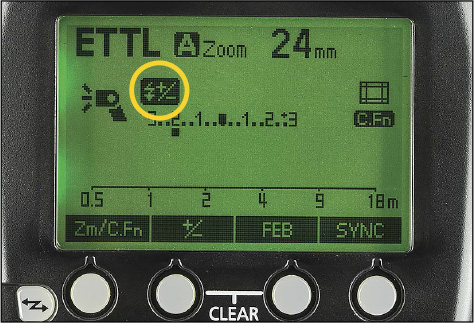
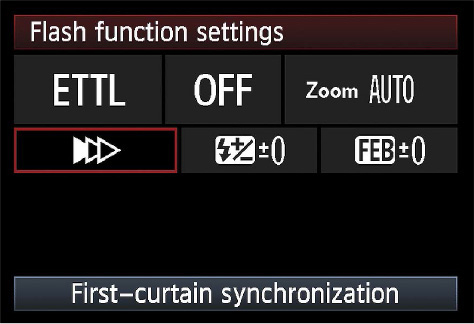
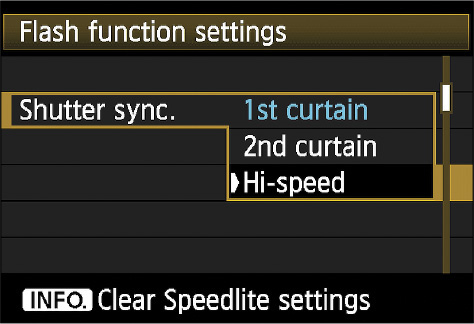
On 2012 and newer camera models, the status of the Speedlite system is displayed on a single screen (Figure 22.5 ). Activating HSS via the Set button and Select wheel on the back of the camera is very quick (Figure 22.6 ).
Figure 22.5 On the 600EX-RT, the location of the sync button LCD changes in response to the wireless setting and mode.
The LCDs of camera models introduced between 2007–2011 can also be used to control the settings of compatible Speedlites. (For a complete list, see Chapter 0 : Quick Start Guide To Speedliting .) On these cameras, the menu system is text-based rather than icon-based.
Figure 22.8 The LCD of 2012-newer camera models displays all the settings of the Speedlite system on one screen. Here the sync menu is highlighted.
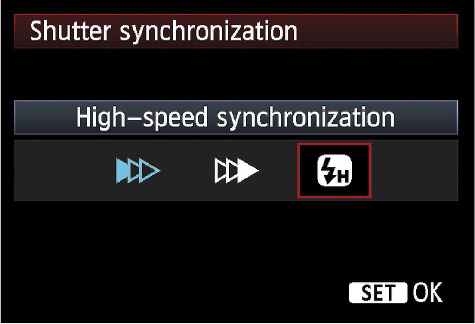
Figure 22.9 Pressing the Set button on the back of the camera displays the options available under the Sync menu. Here I have turned the Select wheel to highlight HSS. Pressing the Set button again will set the sync on the Speedlite to HSS.
Figure 22.10 The text-based menu of 2007-2011 camera models can be used to control the settings on compatible Speedlites. Here the Sync menu is activated.
Figure 22.11 Pressing the Set button on the back of the camera displays the options available under the Sync menu. Here I have turned the Select wheel to highlight HSS. Pressing the Set button again will set the sync on the Speedlite to HSS.
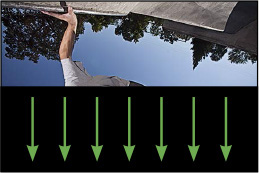
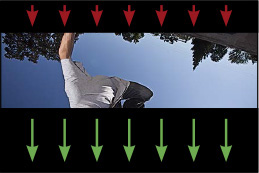
The type of shutter in a camera determines how the flash synchronizes with the exposure. Canon DSLRs have focal-plane shutters, which means the flash is coordinated with the movement of two curtains that fly across the sensor. Most point-and-shoot cameras have an electronic shutter, which means that the flash must fire when the sensor is energized to collect light. View cameras and some medium-format cameras escape the flash sync issue because they have leaf shutters inside their lenses, the blades of which open outward from the center.
The X-sync speed, commonly called sync speed
, is the fastest shutter speed at which the normal flash will synchronize with the camera. It varies by camera model. For 5D cameras, it’s
′. For virtually all other Canon DSLR it’s  ″. A few older 1D cameras sync at
  ′.
′.
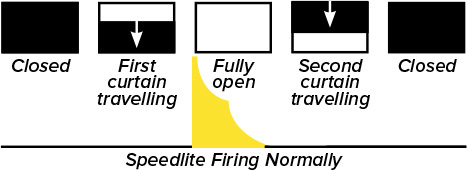
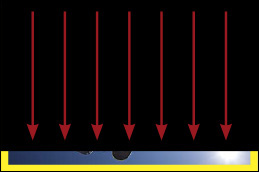
The focal-plane shutter in your DSLR is actually two curtains in front of the sensor. As shown in Figure 22.12 , when your camera is ready to fire, both curtains are fully closed across the sensor. The moment the shutter button is fully depressed, the second curtain opens fully and then the first curtain opens. When the first curtain is completely across the sensor, the entire sensor is exposed to light. The Speedlite will fire before the second curtain begins to close.
The sync speed is the fastest shutter speed at which the first curtain is completely across the sensor—meaning that the sensor is completely uncovered—before the second curtain has started to move.
At slower shutter speeds, the sensor is completely uncovered between the opening of the first curtain and the closing of the second curtain. At speeds faster than the sync speed, as shown in Figures 22.20 –22.23 , there is no point where the entire sensor is uncovered.
Note : It’s not a mistake that the image in these diagrams is upside down. This is the way that the lens projects the image onto the sensor.
Figure 22.12 When a DSLR is ready to fire, both the first curtain and second curtain are closed across the sensor.
Figure 22.13 When the shutter button is pushed, the second curtain opens completely, then the first curtain begins to open.
Figure 22.15 The Speedlite fires after the first curtain is completely across the sensor and before the second curtain begins to close.
Figure 22.17 When the second curtain is completely across the sensor, the exposure is over. The first curtain then resets to the closed position.
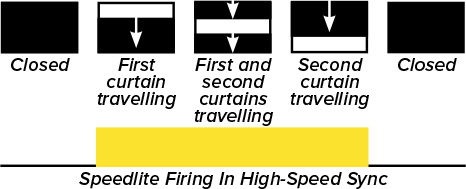
At faster shutter speeds, the interval between the movement of the two curtains means that the second curtain starts to move before the first curtain has cleared the sensor. Essentially, as shown in Figure 22.21 , the space between the curtains looks like a slit that travels across the sensor at a fast rate. The faster the shutter, the narrower the slit.
As you can see below in Figure 22.18 , shooting faster than the sync speed results in a portion of the flash-lit area appearing dark because it was covered by the second curtain during the flash.
Figure 22.18 The telltale sign that the sync speed has been exceeded is a dark band across the lower portion of the flash-lit area where the second curtain blocked the sensor when the Speedlite fired. The rest of the frame is lit with ambient sunlight.
To prevent this black band, your Canon DSLR will override your settings (when necessary) if there is a Canon Speedlite in the hotshoe. You may have set the shutter to  ″ in Manual mode, but the camera will force it back to the sync speed when HSS is not activated.
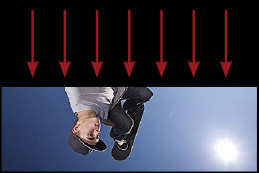
Likewise, if you are shooting in Av (Aperture Priority) at a wide aperture under bright ambient light, the shot will be overexposed when the camera fires at the sync speed rather than the much faster shutter speed needed to offset the wide aperture. This is the reason for the difference in the two frames shown in the chapter opener (Figure 22.1 ).
Figure 22.19 When a DSLR is ready to fire, both the first curtain and second curtain are closed across the sensor.
Figure 22.20 When the shutter button is pushed, the second curtain opens completely, then the first curtain begins to open.
Figure 22.21 At speeds faster than the sync speed, the second curtain begins to close before the first curtain is fully open.
Figure 22.24 When the second curtain is completely across the sensor, the exposure is over. The first curtain then resets to the closed position.
The magic of HSS happens because the Speedlite literally changes the way that the flash tube fires. This is why other types of electronic flash, including pop-up flashes, cannot do HSS.
In normal flash mode, your Speedlite fires as a single pulse of light. In HSS, the Speedlite turns into an ultra-fast strobe light that turns on and off 35,000 times per second. Effectively the Speedlite becomes a continuous light source for the brief duration of the exposure.
Figure 22.25 In normal sync mode, the Speedlite fires one big burst of light when the shutter is fully open.
Figure 22.26 In High-Speed Sync, the flash pulses rapidly as the two curtains travel across the sensor.
As illustrated in Figure 22.14 , you can see, in normal sync mode, the sensor is fully uncovered at the time the Speedlite fires. In contrast, as shown in Figures 22.28 –22.31 , at faster shutter speeds, there is no single point where the sensor is completely uncovered. HSS handles this by pulsing the Speedlite for the entire time that the slit between the curtains travels across the sensor.
Figure 22.27 When a DSLR is ready to fire, both the first curtain and second curtain are closed across the sensor.
Figure 22.28 When the shutter button is pushed, the second curtain opens, then the Speedlite starts firing and the first curtain begins to open.
Figure 22.29 The Speedlite continues to fire as the second curtain begins to follow the first curtain across the sensor.
Figure 22.30 The Speedlite continues to fire as the first curtain opens completely and the second curtain continues to close.
High-Speed Sync enables the use of virtually any shutter speed on your camera—up to
′ on the fastest models. But don’t think of High-Speed Sync as the solution for all your flash needs. The trade-off is that in order to get the ultra-fast stroboscopic pulse, the power of the flash is greatly reduced.
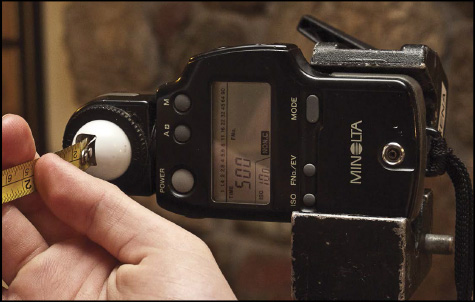
To quantify the power hit, I did a comparison between normal flash and HSS flash. I mounted my old Minolta Flashmeter IVF in the jaws of a Super Clamp on a light stand. Then I parked my camera with a Speedlite on top of a tripod and moved it so that the flashhead was exactly 36″ from the flashmeter. The Speedlite was connected to my camera via an E-TTL cord. I spent an afternoon firing off hundreds of pops at various power levels, controlling the Speedlite both manually and via E-TTL.
Figure 22.33 My trusty old Minolta Flashmeter IVF comes out of retirement to help me quantify the power hit in High-Speed Sync.
Here is a summary of my observations:
In E-TTL, when I did not exceed my sync speed, there was no difference in flash output between having HSS activated and not having it activated. Again, this was at or below the sync speed. Once I crossed over the sync speed, the light output fell.
In E-TTL, once I crossed over the sync speed, the power dropped to about halfway between ¼ and  power. Call it
power—which is a 2
-stop drop from
power. Call it
power—which is a 2
-stop drop from  .
.
By setting the camera to a small aperture when in normal sync, E-TTL drove the Speedlite to fire at full power. So the loss of power when crossing into HSS was significant, and the shot was underexposed.
By setting the camera to a wide aperture, when in normal sync, E-TTL fired the Speedlite at a lower power level. So when I increased the shutter speed into HSS territory, the E-TTL metering actually increased the output from the Speedlite in an effort to compensate for the HSS power loss.
With the Speedlite in Manual and with HSS activated, switching from
′ (my sync speed) to
′ cost me 2
stops of power just because the Speedlite fired in HSS mode. It did not matter what the Speedlite’s power level was—
,  , or
, or  . As soon as I moved across the sync speed, the light output dropped by an average of 2
stops.
. As soon as I moved across the sync speed, the light output dropped by an average of 2
stops.
So, the takeaway is that E-TTL is better suited for HSS work than Manual because E-TTL will increase the power to compensate for the power-hungry nature of HSS. However, if E-TTL is firing the Speedlite at
power or greater in normal sync, then E-TTL can only increase the power to
—which might not be enough to compensate for the HSS power hit.
If you need more power from your Speedlite when working in HSS but can’t get it because the flash is already firing at full power, then open your aperture and/or increase your ISO by one or more stops. Remember that, to keep the ambient exposure the same as before, you will also have to speed up your shutter by the same number of stops.
1. Without turning the Speedlite on, let the camera meter the ambient light and take a test shot at the settings it thinks are best.
2. If your camera was not in Manual mode for your step 1 test shot, switch to Manual mode and dial in the same exposure settings.
3.
Set the shutter speed one to three stops faster than the one determined by the camera in step 1. For instance, if the camera thinks the shutter should be at
′, switch it to
′ for a three-stop change (
′ >  ′ >
′ >  ′ >
′).
′ >
′).
4. Take a test shot.
5. Dial the shutter speed up or down and make more test shots until the ambient settles where you want it to be. You’re not thinking about anything other than the ambient light here. The subject will be underexposed, too. Fear not.
6. Modify your Speedlite to shape the light according to your vision: a grid, a snoot, a small softbox, or nothing at all.
7. Now turn your flash on in Manual or E-TTL mode with HSS activated.
8. Fire off a test shot.
9. Dial the amount of flash up or down until the lighting fits your vision. Use FEC if you are shooting in E-TTL.
10. Once you get the light looking how you want it, start firing away and giving your subject(s) suggestions and/or specific requests for movement.
Figure 22.34 The ambient light as metered by the camera (step 1). Subject and background are equally lit by the sun.
Figure 22.35 The –2-stop test shot (step 3). I like how the trees merge and make the background less distracting.
As a Speedliter, you should know that there are a couple of alternatives to HSS. Why should you know? So that you can impress your friends with newfound knowledge or get yourself out of a jam, whichever comes first.
HSS works because your Speedlite turns into a continuous light course, meaning that it appears to be on for the duration of the exposure. So what if the duration of your flash is longer than the shutter speed? You’ll recall that at full power, a Speedlite fires for about  ′. So could you fire at
′ or faster?
′. So could you fire at
′ or faster?
The answer is yes, sometimes. The key is to disconnect the Speedlite from the camera and trigger it via a PC-sync cord or manual radio trigger. The camera cannot sense that the Speedlite is there—otherwise it will limit the shutter to the sync speed. Another option is just to use a non-Canon flash in the hotshoe.
You’ll want to keep it in Manual at
as that gives you the longest flash duration. Then you’ll have to experiment with the shutter speed and aperture until you find the combination that suits your vision. It’s not elegant, like HSS, but it will usually work—especially with non-Canon gear—if you’re really patient.
Often the motivation to shoot HSS comes from wanting to use a fast shutter speed so that you can significantly underexpose the ambient light and still use a wide aperture. If you are working with flash units that are not compatible with HSS, you can literally dim the sun with a neutral density (ND) filter. An ND filter has a simple job: It blocks a specific amount of light without changing the color of the light that comes through.
For years I have carried the Singh-Ray Vari-ND in my camera bag. This unique filter gives me the ability to dial in two to eight stops of neutral density. Eight stops literally turns noon to midnight.
The downside—and it’s a huge issue for me—is that an ND filter is difficult to focus through. Also, at the darker range, it is virtually impossible to see the nuances of expression on the subject’s face.
Still, I carry it as a just-in-case solution. I believe in gear redundancy and in having options. I expect that someday the Vari-ND will enable me to shoot at a wide aperture under the noon sun with gear I borrowed because I managed to leave my Speedlite kit at home.
There are two reasons to shoot at a wide aperture. The first is that you are shooting under dim light. The second is that you want to minimize the effect of a distracting background with shallow depth of field.
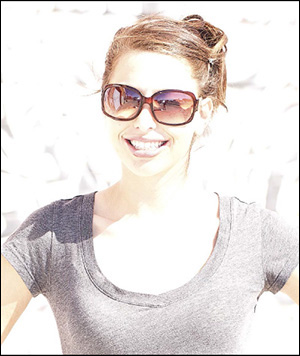
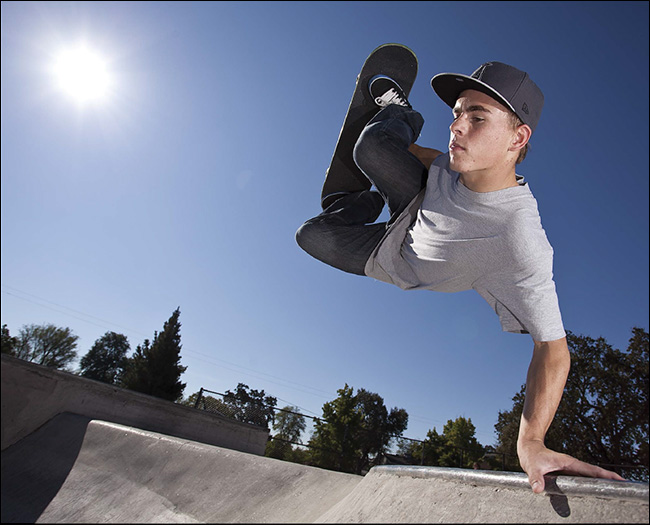
So what do you do if you want shallow depth of field when shooting under full sun? There is so much light that, in order to shoot at a wide aperture, you have to shoot at a fast shutter speed, right? This is exactly how I created the headshot in Figure 22.42
—a wide aperture (f/4) and a fast shutter (
″) under full sun.
The problem with shooting under full sun (at any shutter speed) is that the shadows will be harsh (see Figure 22.39 ). OK, so a bit of fill flash is needed to soften the shadows. Canon’s E-TTL system does a fine job of calculating the power needed for a bit of fill flash when the ambient is bright. For this situation, where the Speedlite is providing fill rather than key light, on-camera flash works great.
So I turned on the Speedlite and whammo! The camera overrides my settings and drives the shutter back down to its sync speed (Figure 22.40
). I went from
″ to
″—a change of 3 stops. It is not the flash that is overexposing the shot, it is the shutter speed.
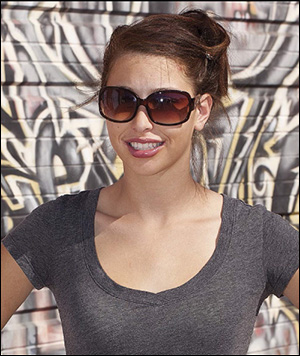
One option is to use a small aperture and shoot at the camera’s sync speed. Unfortunately, as shown in Figure 22.41 , the smaller aperture increased the depth of field. Now the graffiti in the background competes with my subject.
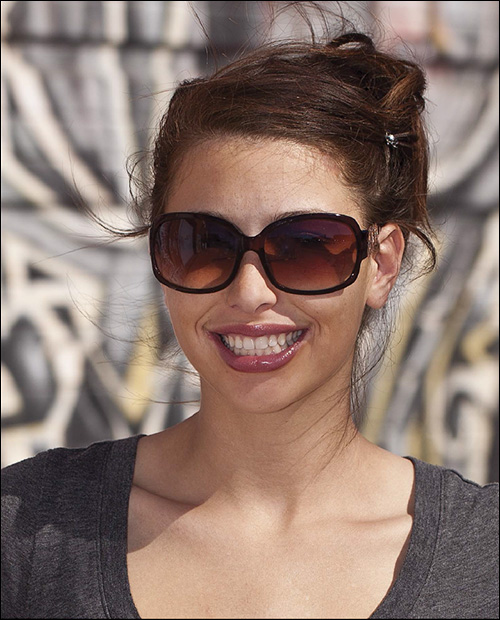
Fortunately, with a quick push of a button, High-Speed Sync is activated. Now the Speedlite and camera work together to create just the right amount of fill at the wide aperture that gives me the depth of field I desire (Figure 22.42 ).
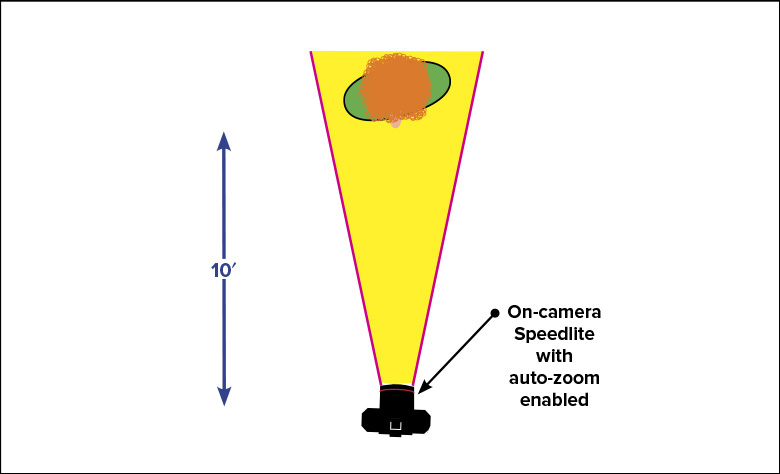
Environment: Urban street
Time of Day: Noon
Ambient: Full sun
Speedlite: One 580EX II in the hotshoe
Metering Mode: E-TTL
FEC: 0
Zoom: Auto zoom
Modifier: None
Distance: About 10′
Height: Level with Michaila’s head
Trigger: Hotshoe
Camera: 5D Mark II
Lens: 100mm f/2.8L Macro IS
Distance to Subject: About 10′
Exposure Mode: Aperture Priority
Exposure Compensation: 0
Exposure:
″, f/4, ISO 100
White Balance: Daylight
Figure 22.39
To minimize the background graffiti, I shot at f/4. The corresponding shutter speed was
″ at ISO 100. I think the facial shadows need to be opened up with fill flash.
Figure 22.40
Turning the Speedlite on results in an overexposed shot. But it is not the light from the flash that does the damage. Rather, the camera forced the shutter speed from
″ back to the sync speed (
″) because I did not have HSS activated.
Figure 22.41
Reducing the aperture from f/4 to f/13 rebalances the exposure at the camera’s
″ sync speed. Unfortunately, the background now competes with my subject.
Figure 22.42
Activating HSS allows me to return to my original exposure settings (
″, f/4) so that I have the lighting I need with the depth of field that I want.
Imagine the thoughts that ran through my mind when I heard, “We’re doing a story on stray animals that adopt rural wineries and vice versa. We need you to make a photo of Buster. He’s a pit bull.” Honestly, the idea of coming away with a portfolio-quality image was not among my reactions.
For several days, I pondered two issues: How to craft an interesting pic of a pit bull, and how to visually suggest that there’s a relationship between an animal and a winery.
I settled on the idea of placing Buster in an iconic position—meaning the camera would be slightly below his nose—and shooting towards the front of the winery. This would cover the relationship aspect. The interesting photo of a pit bull, I decided, would have to come through the lighting. I had it in my mind that I would hatchet light Buster in high-speed sync under a blazing, late-afternoon sun.
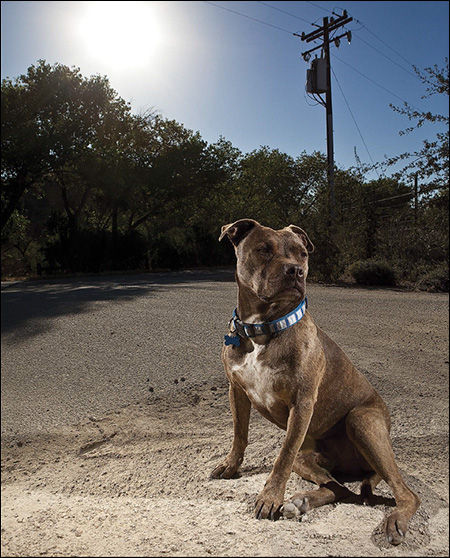
With diligent coaxing of Buster by his owner, Brian, I managed to get a handful of shots that fulfilled my original vision. You can see one of the outtakes in Figure 22.43 . Then after one shot, he walked past me a few feet and sat down by the road. As I swung around to find him, I saw the real shot—Buster sitting at the edge of the road where he likely decided that Cass Winery looked like a place that could offer food and shelter.
You will see in Figure 22.46
that the sun is literally in the shot. To manage the fiery orb and keep the entire frame from blowing out to white, I had to shoot at an extremely fast shutter speed ( ″). Another advantage of the underexpsoure was that the background trees merged together—allowing Buster’s head to become the focal point.
Hatchet lighting literally sculpted Buster’s body in this shoot. Compare Figures 22.43 and 22.44 to see the difference. The beauty of Buster’s fur is brought out by the highlights created by the Speedlites firing at each other.
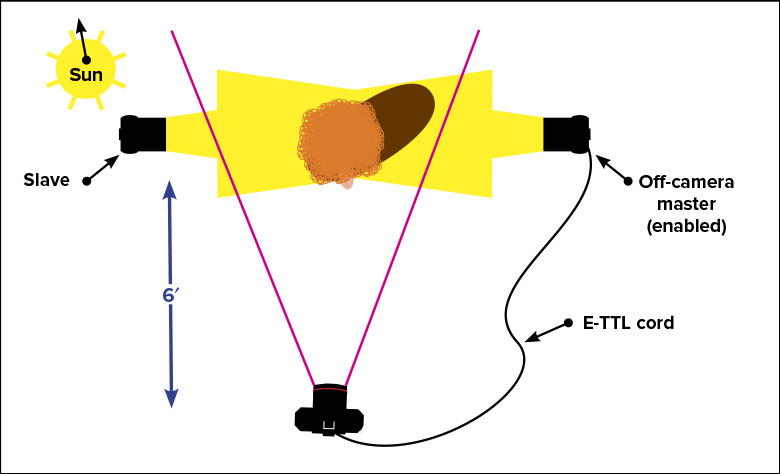
Environment: Rural country road
Time of Day: Late afternoon
Ambient: Blinding, full sun
Speedlites: Two 580EX IIs
Metering Mode: Manual
Power Level: Full
Zoom: Both zoomed to 105mm
Tilt: Both tilted sideways (vertically)
Modifier: None
Distance: About 6′
Height: 3′
Trigger: Optical master on extra-long E-TTL cord
Camera: 5D Mark II
Lens: 24–70mm f/2.8L
Distance to Subject: About 6′
Exposure Mode: Manual
Exposure:
″, f/11, ISO 200
White Balance: Daylight
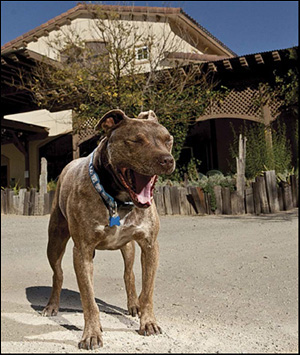
Figure 22.44 My original concept—show Buster and the winery. Notice how nice the hatchet light highlights the fur. Here the camera is looking 180° from the angle I used in Figure 22.46 .
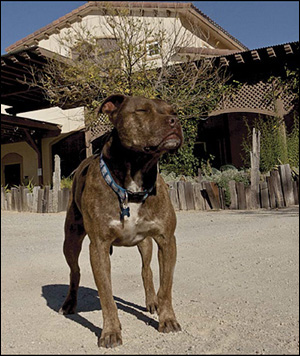
Figure 22.45 Without the flash there is nothing of interest in the frame. Foreground and background merge together.
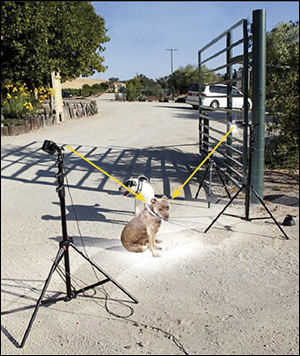
Figure 22.46 The hatchet light arrangement with the corded master on the left and the slave by the gatepost on the right.
Figure 22.47 The hero shot was not one that I had intended to make. Yet it was the shot of the day and ran with the story as a full page.
Two things about action sports portraits make them difficult to shoot:
You have to use a fast shutter speed to freeze the action.
You have to shoot under challenging lighting conditions.
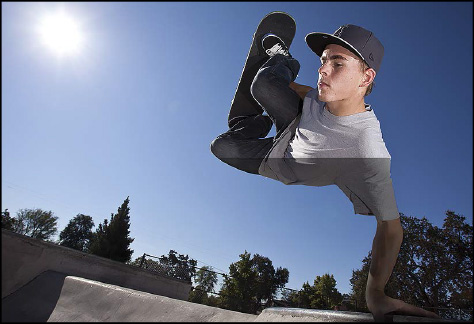
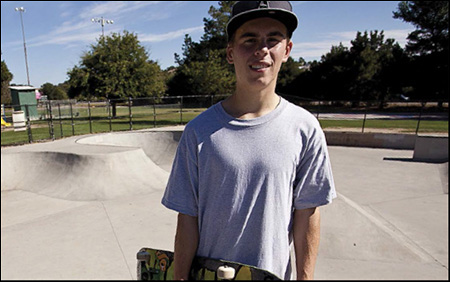
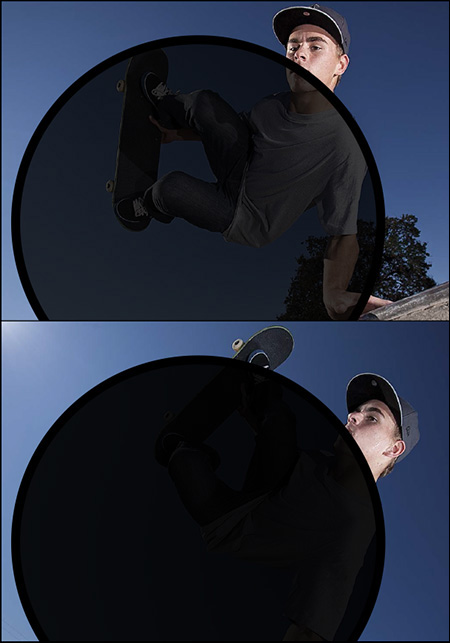
Somehow a trip to our local skatepark seemed like a good way to put HSS to the test.
Photographing Kyle flying through the air on his skateboard is like shooting a moving target. You know that something is going to happen, but you don’t know exactly when or where. Sometimes he would fly high. Sometimes he would fly long.
To emphasize the height of his aerials, I used a wide lens in very close and shot upwards into the sun. I decided that my best bet for lighting was to create a wide zone of fill light with a couple of Speedlites parked underneath his take-off zone.
My goal with HSS for this shoot was not to overpower the sun. Rather I just needed a good dose of fill light. My shutter was set about a stop under the ambient to saturate the sky just a bit.
Since I was only using two Speedlites and they were spread apart, I needed every bit of light from them I could get. So I switched from E-TTL into Manual and set the power to full (
). Jumping to Manual gives about a half-stop of additional brightness as the energy that would go to the E-TTL pre-flash is directed straight into the HSS pulse.
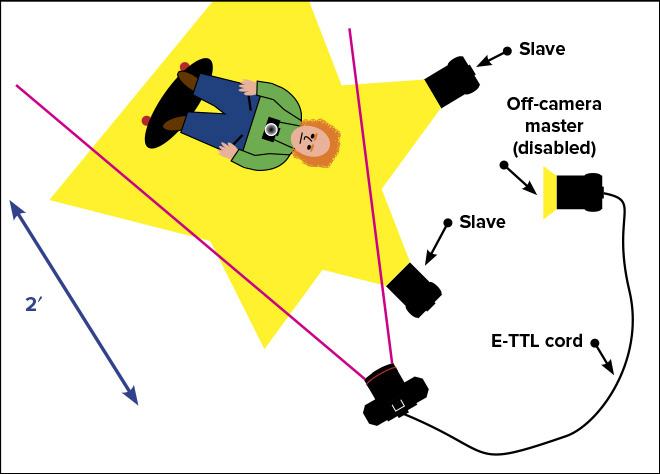
I have heard many times from photographers that Canon’s optical wireless system does not work outdoors in full sun. To these legions, I say, “Turn your slaves away from the sun, and move your master to a spot that they can see.”
The real issue is that the optical slave eye has a hard time seeing when it’s looking straight into the sun. In Figure 22.50 , you’ll see that I moved my master off-camera so that it was firing into the sun—meaning towards the slaves, which had been turned to look away from the sun.
Canon’s new radio wireless, of course, works in full sun without any issue. Park the slaves where you want them and fire away.
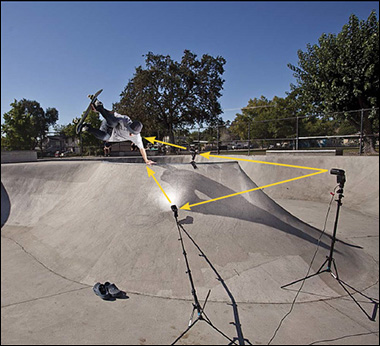
Environment: Outdoors, city skatepark
Time of Day: Late morning
Ambient: Full sun
Speedlites: Three 580EX IIs (one as master, two as slaves)
Metering Mode: Manual
Power Level: Full
Zoom: Slaves zoomed to 70mm
Modifier: None
Distance: 2′ to 4′
Height: Below Kyle 1′ to 3′
Trigger: Canon built-in wireless system with master moved off-camera on E-TTL cord
Camera: 5D Mark II
Lens: 17–40mm f/4L at 17mm
Distance to Subject: 2′ to 4′
Exposure Mode: Manual
Exposure:
″, f/5.6, ISO 100 (1 stop under ambient)
White Balance: Daylight
Figure 22.50 The master is on the stand at far right. One slave is on the left stand. The other is parked on the rail.
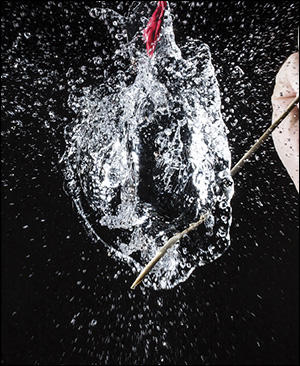
For super-fast action, a fast shutter with a Speedlite in high-speed sync is not always the best tool.
As you dial the power of a Speedlite down, the flash duration gets shorter and shorter. (The opposite is true for many studio strobes, by the way.) While Canon does not publish the statistics on their Speedlites, it is commonly thought that at the lowest power settings, the flash duration is less than  ″.
″.
It is possible to freeze high-speed action with the flash rather than the shutter. The key is that you keep the Speedlite out of high-speed sync (which actually extends the flash duration) and set the aperture and ISO so that you get a black frame. With no ambient light in the shot, 100% of the light comes from the Speedlite. If the flash is on for only
″, you have effectively created a “light shutter” that is much faster than your camera’s shutter.
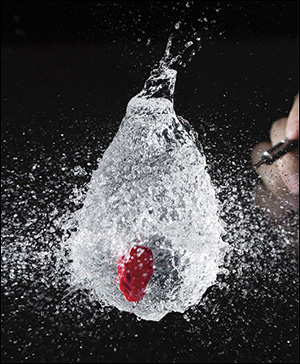
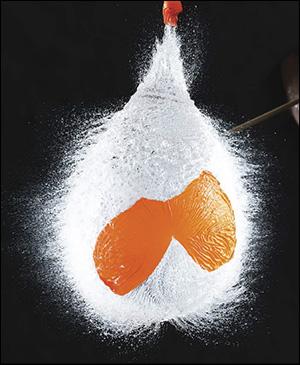
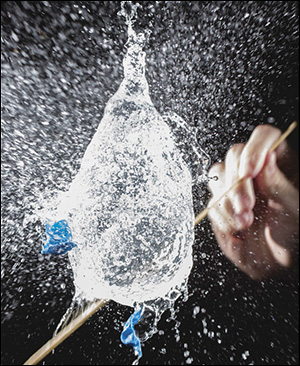
The two photos on the left (Figures 22.53
and 22.55
) were shot with a fast shutter and the Speedlite in high-speed sync at full power. The difference between the two is that I changed the shutter speed by two stops and then offset that move by changing the ISO. You can see in the top-left photo (Figure 22.53
) that
″ shutter speed stopped the water drops more sharply than did the
″ shutter used in Figure 22.55
. No surprise here.
Now look at the two photos on the right (Figures 22.54
and 22.56
). They were shot with the shutter at  ″ and the Speedlite in normal sync. In this series, I adjusted the aperture and ISO to offset the changes in flash power. You can clearly see in the upper-right photo (Figure 22.54
) that the flash at
″ and the Speedlite in normal sync. In this series, I adjusted the aperture and ISO to offset the changes in flash power. You can clearly see in the upper-right photo (Figure 22.54
) that the flash at  -power was able to stop the water far more clearly than did the
-power used in the photo below (Figure 22.56
). So dial the power down to stop action.
-power was able to stop the water far more clearly than did the
-power used in the photo below (Figure 22.56
). So dial the power down to stop action.
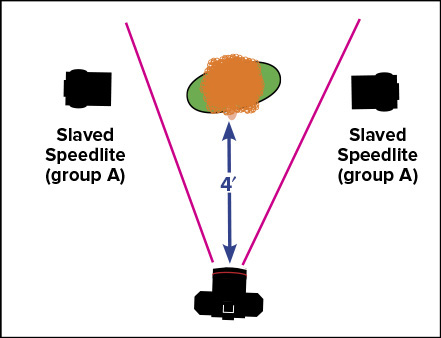
Environment: Studio
Time of Day: Not a factor
Ambient: None in frame
Speedlites: Two 600EX-RTs
Mode: Manual
Power Level: As stated in captions
Zoom: 80mm
Modifier: None
Distance: 3′
Height: Even with balloon
Trigger: ST-E3-RT
Camera: 5D Mark III
Lens: 100mm f/2.8L
Distance to Subject: 4′
Exposure Mode: Manual
Exposure: As stated in captions
White Balance: Daylight