Chapter 5. Position Is Relative
THE LIGHTING COMPASS
ON-AXIS AND OFF-AXIS LIGHT
LIGHT FROM ABOVE...AND BELOW
The Short Version
Shadows and highlights are the most important visual guides for the viewer when she is trying to decode your photograph. As a Speedliter, you will quickly learn that the relationships between the positions of your camera, subject, and light(s) determine how the shadows and highlights are created in your photos.
When thinking about light position, we need to understand the importance of both horizontal and vertical placement. An easy way to visualize this is to think of your light moving in a circle around your subject.
Figure 5.1
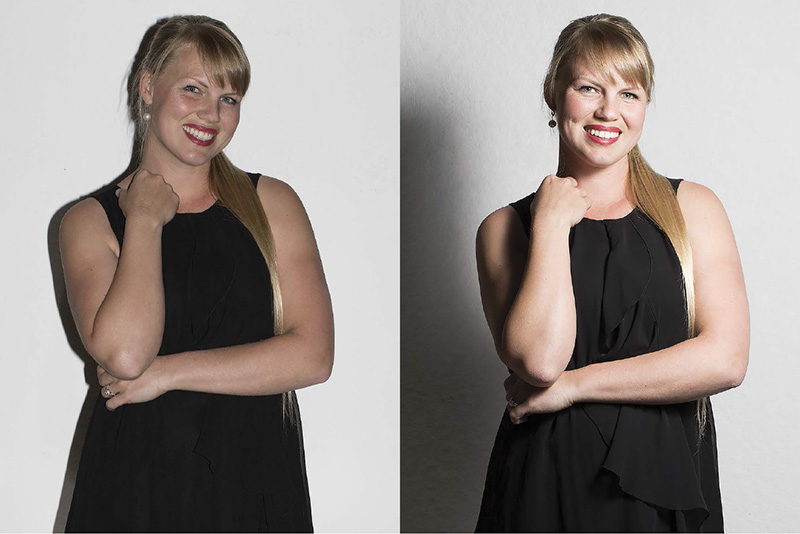
When Speedliting, the position of your flash significantly affects how your camera sees the shadows and, hence, how depth and texture are portrayed in your photographs. Left: When I tipped my camera to the right, my hotshoe Speedlite created the sharp-edged shadow that outlines Ava on the left. Note how the flat light on her face and dress hides important details. Right: I moved the Speedlite off-camera 45° to the right and fired it through a diffuser panel. Now the shadows reveal a sense of depth in Ava’s face and dress.
The Lighting Compass
As a kid, I spent a lot of time in the Boy Scouts and a lot of time in geometry classes—and actually enjoyed both immensely. The common link between the two was that I could play with a compass: in Scouts to find my way, and in geometry to draw circles. Speedliting has brought them together.
Every Light Has An Angle
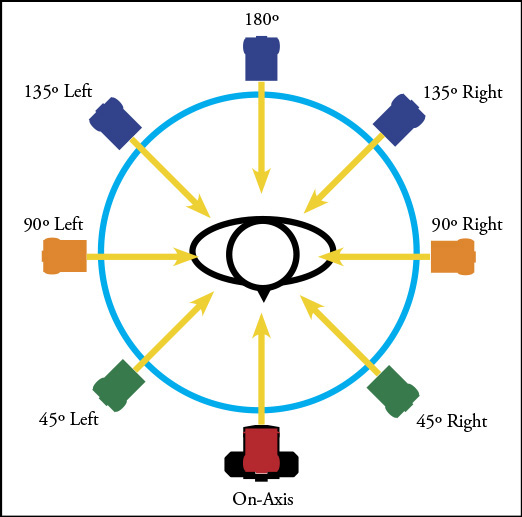
When I started teaching lighting, I came up with the idea of the “Lighting Compass” as a model to understand how the horizontal position of a light relative to the subject affects what the camera sees. As shown in Figure 5.2
, my Lighting Compass measures the angle between the camera and a light source using the subject as the center of the circle.
Figure 5.2
The Lighting Compass shows the position of Speedlites in a circle around the subject when looking from above. The angle between the camera and the flash is measured at the subject.
If a Speedlite is bolted into the camera’s hotshoe, I say that it is at 0° on the Lighting Compass. A flash that is exactly to the left or the right of the subject is at 90°. A flash that is opposite the camera is at 180°. Again, these refer to the Speedlite’s horizontal position. We’ll deal with its vertical position in the next section.
You Can Tell A Lot About A Light By Its Angle
The significance of a light’s position relative to the camera and the subject has to do with the shadow that it casts. A Speedlite that is parked on top of your camera will cast virtually no shadow across the face of someone right in front of your lens.
Here is the secret to making a perfectly lousy driver’s license photo: Make the light equal on both sides of the face so that it appears flat, like a cardboard cutout. This is why you were so disappointed with your early Speedlite photos: Everyone and everything was lit evenly.
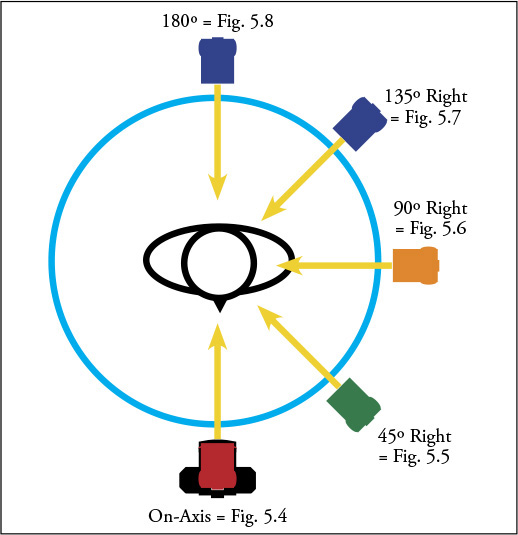
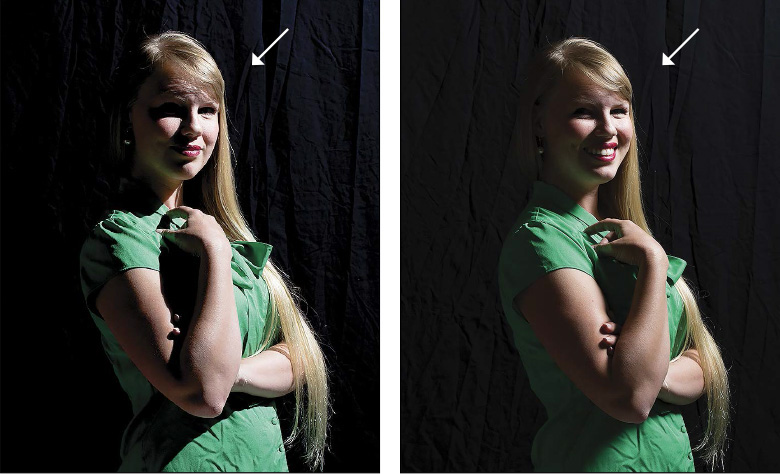
Now, take a peek at Figures 5.4
—5.8
. In this series of headshots, I placed the Speedlite just slightly above the model’s head. In each frame, it is the same distance from the model and fired at the same power setting. The only difference between the shots is that I moved the Speedlite to the right around the Lighting Compass.
See how the depth of the face changes as the Speedlite’s position moves from the camera toward 90°? The length of the shadow increases across the face until one half of the face is virtually in darkness. (If you’re getting antsy with the thought that a fill card would really help, you’re right. Try to hold on until we cover the details of fill cards in Chapter 19
: Portraits With One Speedlite
.)
Light Gets Brighter When It Comes At You
As we move past 90° on the Lighting Compass, there’s an interesting phenomenon that occurs when the Speedlite’s position moves from 90° to 180°—its apparent brightness increases. The light coming from behind appears brighter because it is skipping off the model and into the lens.
Look at Figures 5.4
(0°), 5.5
(45°), and 5.6
(90°) again. The brightness of the light on the face is very similar—it’s just the amount and direction of the shadows that have changed.
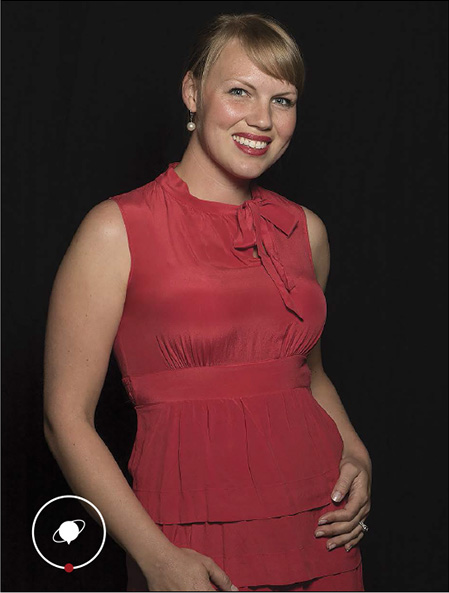
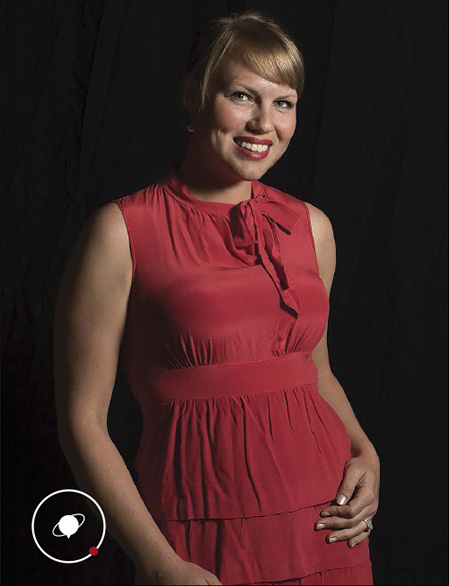
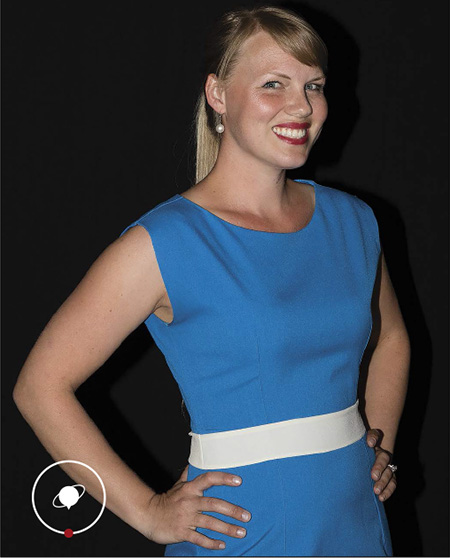
Figure 5.4
On-camera flash – 0°.
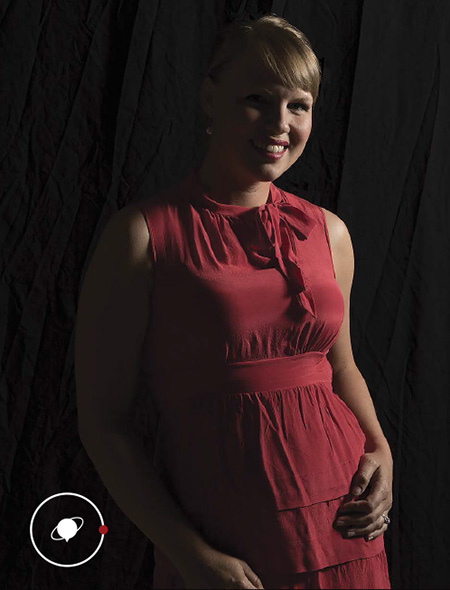
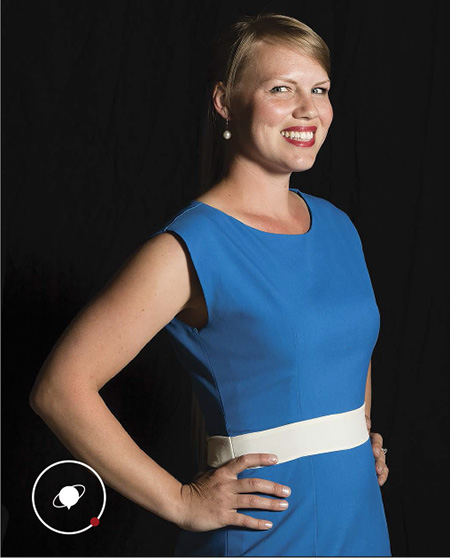
Figure 5.5
Speedlite at 45° to right.
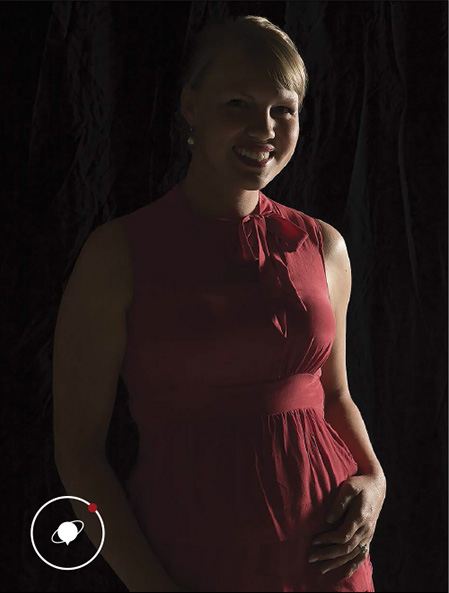
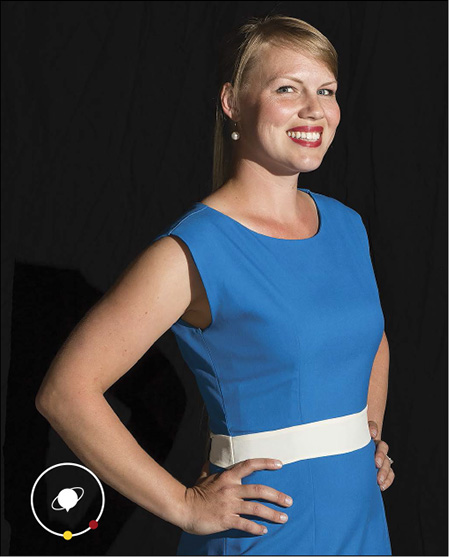
Figure 5.6
Speedlite at 90° to right.
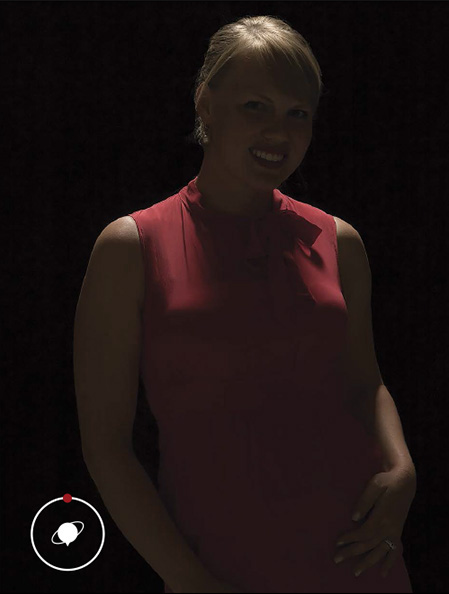
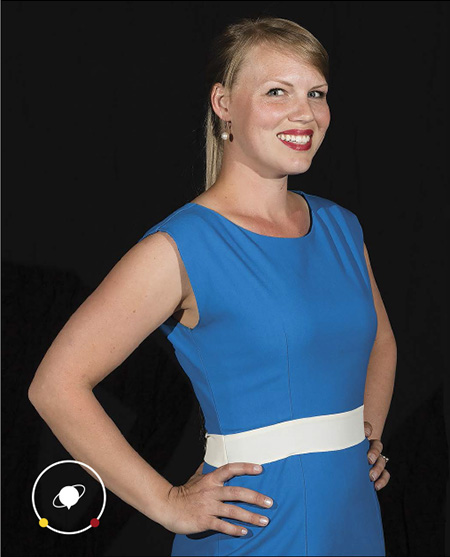
Figure 5.7
Speedlite at 135° to right.
Figure 5.8
Speedlite at 180°.
Now compare Figures 5.5
(45°) and 5.7
(135°). Notice how her hair in Figure 5.7
reflects more light than in Figure 5.5
. The best use for a Speedlite in the rear quadrant is as a rim or hair light.
If your subject has short hair or hair that is pulled back, then the light from a Speedlite in the rear quadrant will glance off the cheek and appear very bright to the camera. You can see this effect in the differences between Figures 5.5
(45°) and 5.7
(135°). This is a distinctive look that, when balanced with an adequate fill light, can produce a dynamic image.
You’ll have to remember that as you move your Speedlite around to the back half of the Lighting Compass, a lower power setting might be necessary. In a way, this is easy to remember because a Speedlite that’s pointing straight into the lens is as bright as it can get.
On-Axis and Off-Axis Light
On-camera flash has a bad reputation with many photographers. But on-camera flash is not bad; it is just misunderstood.
Defining On-Axis Flash
Any light that points at the subject from the same angle as the lens is an on-axis light. On the Lighting Compass, any light at 0° is, by definition, an on-axis light. So a Speedlite parked in your camera’s hotshoe is an on-axis light. So is a Speedlite positioned above the lens.
However, the light source does not have to be attached to your camera to be an on-axis light. It could be a light above or below your camera. The light could be in front of or behind your camera. The defining factor is that the light points toward your subject from the same perspective as the lens.
Now don’t get confused and think that any light that points at the subject is on-axis. Remember that the axis is defined by the direction of the lens.
The key point is that, when viewed through the camera, on-axis light hits the right and left sides of the subject equally, which in turn flattens the shadows seen by the camera.
Off-Axis Flash Is Easy
It’s an easy step to understand that all other lights that don’t point at the subject from the same direction as the lens are off-axis lights.
When viewed through the camera, off-axis light hits one side of the subject more than it hits the other. By doing so, an off-axis light casts a shadow across the subject that the camera will see. Generally, it’s much easier to make an interesting portrait with an off-axis light than it is with an on-axis light.
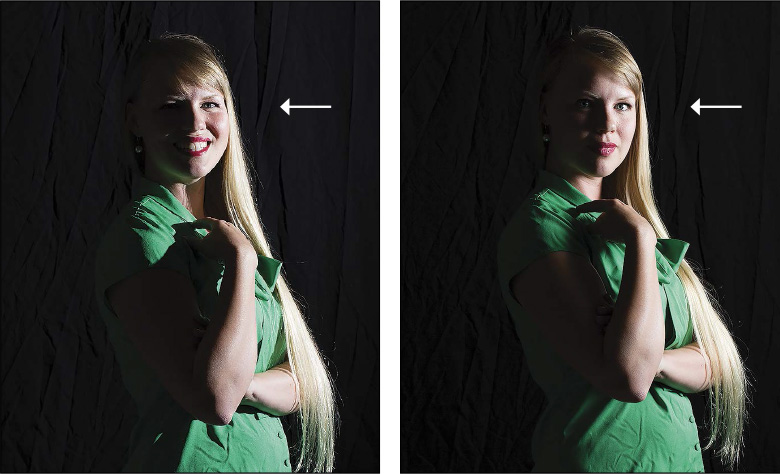
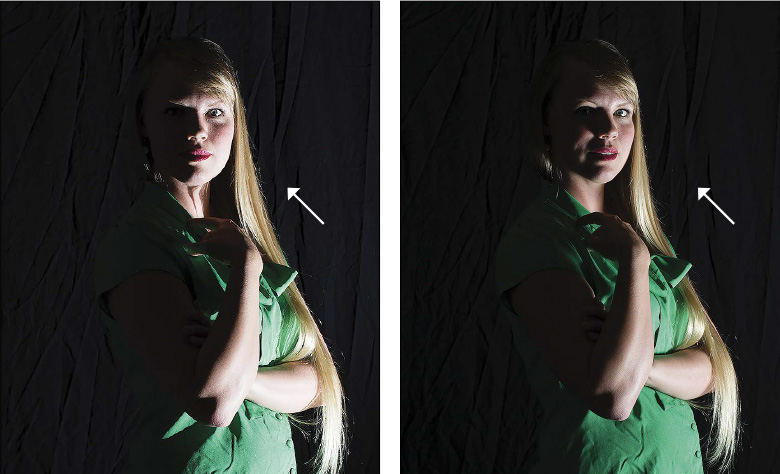
To see the difference, check out Figures 5.9
—5.12
, which were lit with direct flash from one or two Speedlites. (Figures 5.4
—5.8
, in contrast, were lit by a single Speedlite firing through a diffuser panel. Both series of shots demonstrate options for placing shadows and controlling their contrast.)
Figure 5.9
The on-axis light from a hotshoe-mounted Speedlite creates rather flat light.
Figure 5.10
When the Speedlite is moved to a lightstand 45° to the right, the camera sees shadows.
Figure 5.11
Adding fill flash from a hotshoe-mounted Speedlite opens up the shadows created by the key light at 45° right.
Figure 5.12
Moving the fill flash from the hotshoe to a lightstand 45° left and increasing the power opens up the shadows even more.
Figure 5.9
used an on-camera Speedlite as the single light source. Can you tell which way I tipped my camera to frame the shot? The ribbon shadow on Ava’s arm is the clue. I tipped my camera to the left, so the hotshoe-mounted Speedlite cast a shadow on the right.
Figure 5.10
shows how the shadows can become more dramatic when the flash is moved off-axis. In this shot, the Speedlite is swung around the Lighting Compass to a light stand 45° right. There is a more defined sense of depth, but the contrast of the shadows on Ava’s cheek and arm is too strong. I would prefer to see a bit of light in these shadowy areas.
Figure 5.11
adds an on-camera Speedlite as a fill flash. Since its power level is two stops below the key light at 45° right, it fills the shadows without flattening the light as in Figure 5.9
. If you have a camera with a pop-up flash, be sure to read the Speedliter’s Tip at left for a few helpful insights.
Figure 5.12
moves the fill light from the camera’s hotshoe to a light stand positioned at 45° left—at the same height as the key light 45° right. Since the power of the fill flash is one stop below the key, there are still shadows to help define shape—but it is also easy to see the details in those shadows.
Light from Above...And Below
In addition to thinking about the horizontal position of Speedlites, it’s important to understand how the position of a Speedlite (or Speedlites) above or below the subject affects the size and angles of the highlights and shadows.
Figure 5.13
The Lighting Inclinometer shows the angle of the position of a Speedlite above or below the subject’s head.
The Lighting Inclinometer
If you tipped the Lighting Compass from horizontal to vertical, you’d have my Lighting Inclinometer. Now we’re thinking about the angle of the Speedlite above or below the subject’s head. Consider your subject’s face to be the horizon line.
A light that’s level with the subject is at 0°. A light that is straight above the subject is at 90°. A light that is below the subject and aimed straight up is at –90°.
Shadows Fall...Usually
You intuitively know that light comes from above. The sun arcs above us. The lamps in our homes are above us. So, if all our principal light sources come from above, this also means that shadows usually fall. As a Speedliter, you will want to remember this important detail—light comes from above.
Since we expect that light will generally come from above, we also expect that shadows will fall. There’s a striking difference in the feel of shadows that fall and shadows that rise—as shown in Figures 5.14
–5.16
.
Figure 5.14
Left: Hard light from a bare Speedlite 45° above Ava’s head, angled down. Right: Soft light from the same position using Lastolite 24″ Ezybox as modifier.
Figure 5.15
Left: Hard light from a bare Speedlite level with Ava’s head. Right: Soft light from the same position using Lastolite 24″ Ezybox as modifier.
Figure 5.16
Left: Hard light from a bare Speedlite 45° below Ava’s head, angled up. Right:, Soft light from the same position using Lastolite 24″ Ezybox as modifier.
For each of these light positions in this series, the photos on the left were shot with a bare Speedlite to create hard light. The photos on the right were shot with the Speedlite firing through a Lastolite 24” Ezybox to create soft light.
My intent with this series is to show how the vertical position of the flash affects the angle of the shadows. To maximize the visibility of the shadow lines, the Speedlite was placed at 90° right on the Lighting Compass. As you can see, without another source of fill light (a second flash or a reflector), positioning the key light this far to the side of the subject creates too much contrast for anything less than overly dramatic light.