Chapter 19. Portraits With One Speedlite
BACK TO BASICS, QUICKLY
SHOOT: POSITION YOUR MODIFIER WITH INTENTION
SHOOT: ONE SPEEDLITE WITH FILL REFLECTOR
SHOOT: CREATING SOFT FILL LIGHT WITH A BIG UMBRELLA
SHOOT: BROAD AND SHORT LIGHTING
SHOOT: THINK OF THE SHUTTER AS A LIGHT MODIFIER
SHOOT: JUST A SLASH OF LIGHT
SHOOT: RING THE LENS WITH LIGHT
SHOOT: NOSE TO THE GRIDDED LIGHT
SHOOT: ONE-LIGHT WHITE SEAMLESS
SHOOT: SPEEDLITING A SILHOUETTE
SHOOT: DOES SOFTBOX SIZE MATTER?
The Short Version
When it comes to photographs, there is nothing in the world that we like to look at more than pictures of other people. So if you jumped straight here without reading the previous 300 pages, I understand completely. The quick answer is, “Yes, you can make great photographs of people with a single Speedlite.”
This chapter will take you through many of—but certainly not all—the types of light you can create with a single Speedlite. Ultimately, it is your imagination and willingness to experiment that will be your guide.
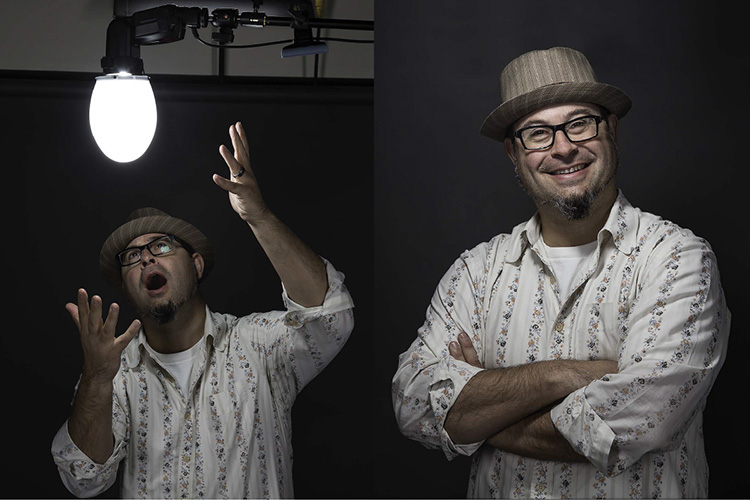
Figure 19.1
A single Speedlite and some basic modifiers are all you need to get started creating great light for portraits. Left: My dear friend Gabe gets theatric with the globe diffuser used to light the shot at right. Right: This handsome shot was made with Gabe standing below and slightly behind the globe diffuser.
Back to Basics, Quickly
To begin, think about whether you want hard or soft shadows and how you want to use those shadows to reveal depth and texture in your portraits. Then settle on the job that you want your Speedlite to perform.
One Speedlite, So Many Jobs
A single Speedlite can serve one of four main purposes:
 Key light
—Provides the main light on your subject
Key light
—Provides the main light on your subject
Fill light
—Adds light to the shadows so that the viewer can see details that would otherwise be hidden
Separation light
—Lights your subject from behind so that the hair and shoulders will stand out from the background
Background light
—Lights the background either to reveal details about the environment or, when very bright, to put your subject into silhouette
Location, Location, Location
The quality of light you get from your Speedlite is largely determined by its location. As I’ve said many times in the Handbook
, “If you want to create interesting light, you have to create interesting shadows.” If you don’t know what this means, take a close look at the information in Part 1: Before Speedlites, There Was Light
.
For the greatest range of lighting options, get your Speedlite off the top of the camera. Seriously, pretend as if your Speedlite cannot connect to the hotshoe on top of your camera. Check out Chapter 11
: Triggers For Off-Camera Flash
, if you need ideas on how to do this.
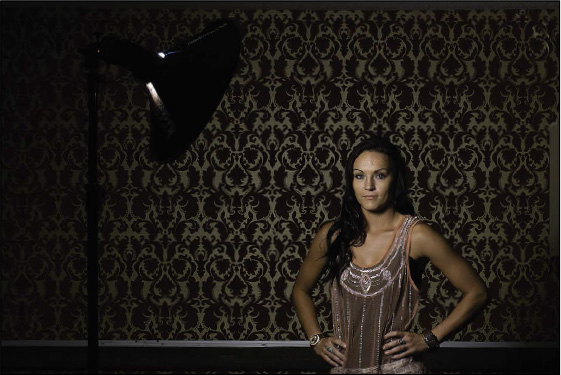
Figure 19.2
The difference between these two photos is the position of the flash and the setting of the zoom. This shot was made with the Speedlite bolted into the camera’s hotshoe. The zoom was set to Auto—resulting in a zoom of 35mm.
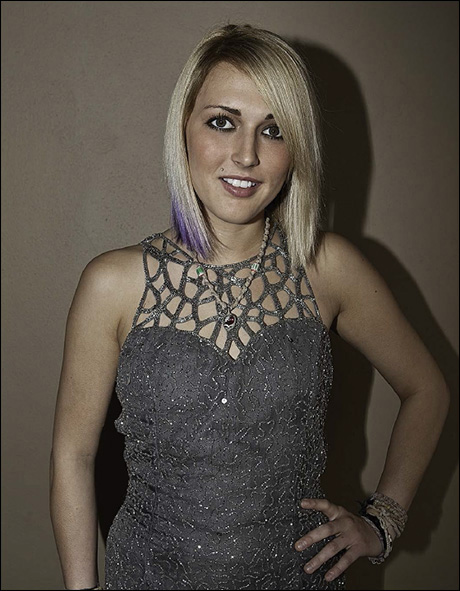
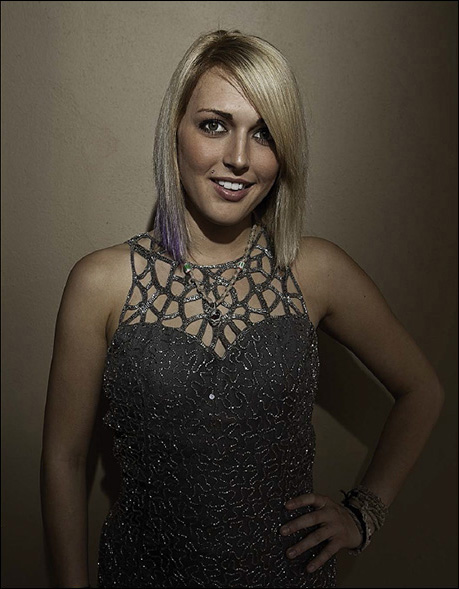
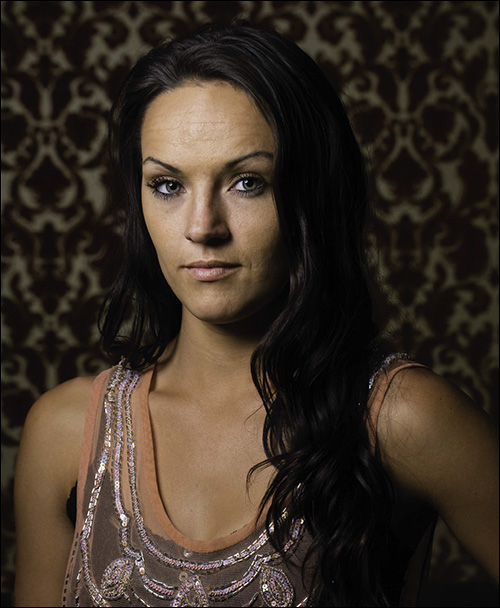
Figure 19.3
For this shot the Speedlite was manually zoomed to 105mm and held about 14″ straight above the camera. I had my assistant aim it directly at Kaitlin’s face. The vignette is created by the zoom of the Speedlite.
Shoot: Position Your Modifier with intention
One of the biggest questions that novice Speedliters struggle with is where to put a large modifier, such as an umbrella or softbox, in relation to the subject.
To Start, Raise The Modifier Slightly Above Your Subject’s Head
In our world, light comes from above and shadows fall. (For a complete review, head to Chapter 5
: Position Is Relative
.) So, as a starting point, position your Speedlite slightly above your subject’s head and angle it down 30° to 45°. Depending upon the modifier that you are using, you may have to step away from your shooting position and look at the modifier from the side to truly judge the angle.
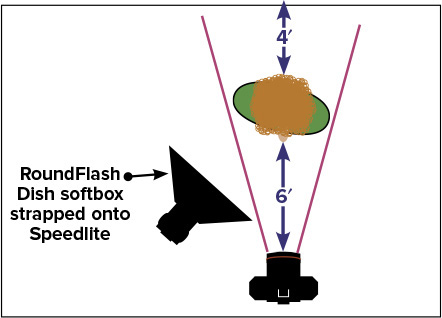
In Figure 19.5
, you can see the silhouette of my Speedlite and RoundFlash Dish in the upper-left corner. Imagine that a line bisects the Speedlite and softbox. Can you see that it extends directly towards Kailee’s face? I choose this position so that the flash would light her face and fall off gently as it descended down her torso. Again, this is a starting point.
Push Your Mod In For Softer Light, Pull It Out For Crisper Shadows
The first part of the question “How near/far should the light stand be from the subject?” is answered by the view of your camera. If you want the softest light possible, then you push the modifier right to the edge of the camera’s vision. For crisper shadow edges (aka harder light), you pull the modifier away from your subject until your test shots show that you have the desired shadow edges. Remember that, as you move your light stand in and out, you will have to adjust the height of the modifier to keep it centered on the subject’s face.
Lighting Details
Environment:
Vintage bar
Time of Day:
Not a factor
Ambient:
Dim tungsten
Speedlite:
One 600EX-RT
Mode:
Manual
Zoom:
Zoomed to 20mm
Modifier:
RoundFlash Dish
Distance:
About 3′
Height:
About 6.5′
Trigger:
ST-E3-RT Transmitter
Camera Details
Camera:
5D Mark III
Lens:
100mm f/2.8L Macro
Distance to Subject:
8′
Exposure Mode:
Manual
Exposure:
 ″, f/8, ISO 800
White Balance:
Daylight
Figure 19.4
Lighting diagram
Figure 19.5
The RoundFlash Dish was angled down from the left.
Figure 19.6
The RoundFlash Dish unfolds from a compact pouch into an 18″ softbox that straps onto the head of a Speedlite. As you can see, it creates beautiful light and shadow.
Shoot: One Speedlite with Fill Reflector
I’ve said it before: The range of bright and dark tones that can be recorded by our cameras is much narrower than the range of light we can see. With a single Speedlite, there is the great possibility that when you balance your exposure for the light on the bright side of your subject’s face, the other side will fall into dark shadow. An easy fix, when using one Speedlite, is to fill the shadows with a reflector.
Fly A Bit Of Light Past Your Subject For Fill
The idea in using a reflector to fill shadows is that you capture the light that flies past your subject and bounce it back. It helps if you angle your Speedlite so that a bit of its light flies in front of your subject. This is the light that you will catch in the reflector and bounce back. When you angle a light away from your subject, you are feathering the light.
Get Your Fill Reflector In Close
I push my fill reflector in as tight to my subject as possible—meaning that the reflector comes in until I see it in the frame and then I back it out just enough so that I don’t have to head into Photoshop later.
Lighting Details
Environment:
Indoors
Time of Day:
Late night
Ambient:
Very dim tungsten
Speedlite:
One 580EX II
Mode:
Manual
Power Level:

Zoom:
70mm
Modifier:
Large Rogue FlashBender strapped to off-camera side of head
Distance to Subject:
3′
Height:
Level with Zack’s head
Trigger:
Extra-long E-TTL cord
Camera Details
Camera:
5D Mark II
Lens:
24–70mm f/2.8L
Distance to Subject:
8′
Exposure Mode:
Manual
Exposure:
 ″, f/8, ISO 400
White Balance:
Flash
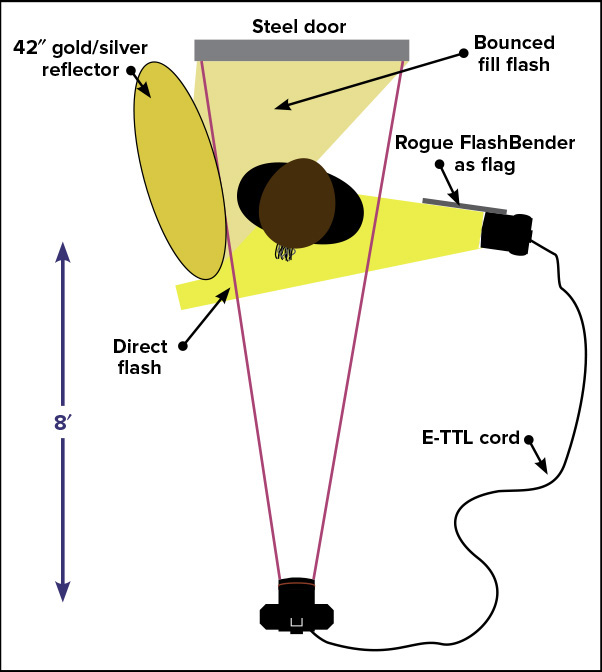
Figure 19.7
Lighting diagram
Figure 19.8
My friend Zack Arias (zarias.com
, DedPxl.com
), lit with a single Speedlite at camera right. The two keys to making this shot were to flag the flash from hitting the steel door directly behind Zack and to fill the shadowy side of his face. To flag the background, I strapped a large Rogue FlashBender to the side of the Speedlite and aimed it right behind Zack’s shoulder. To fill the shadows, I angled a 42″ gold/silver reflector disk so that the flash flying past Zack’s nose would bounce back into the shadows.
Figure 19.9
The shot without the reflector.
Shoot: Creating Soft Fill Light with a Big Umbrella
An umbrella is an easy and relatively affordable way to significantly increase the apparent size of your Speedlite—which means that the edges of the shadows will soften as the light reaches around your subject.
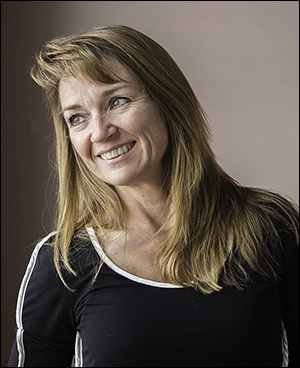
Windowlight May Be Soft, But It Is Still Directional
For this shoot, a series of large (4′ x 6′) windows on the left side of the lens provided a huge swath of ambient light. An overcast sky softened the ambient light even further. Still, as you can see in the inset photo (Figure 19.12
), there is a directional quality to the light. That is to say that since the windowlight crosses the model from the side, the soft light still casts shadows that the lens can see. Notice how her cheeks, nose, and jaw are sculpted by the shadows.
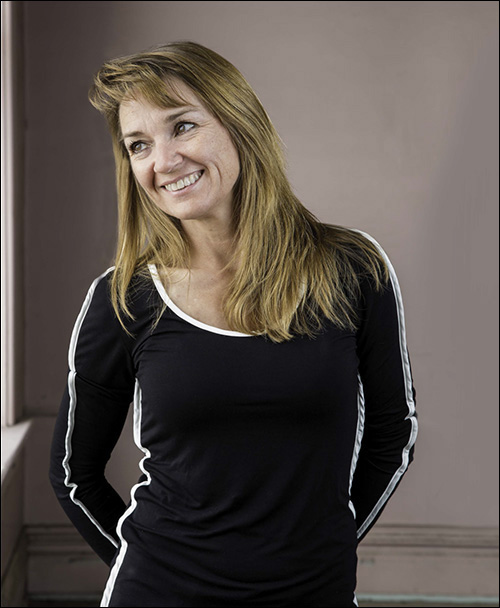
Blending Fill Flash Into Windowlight With A Large, White Umbrella
While I think that the windowlight-only shot is beautiful, I prefer the shot with the fill light for two reasons: the softening effect on the skin and the increased illumination on the hair. The softening of the skin happened because the flash fills the shadows and reduces the surface detail.
A key factor in making this fill light blend with the ambient windowlight is that I bounced my Speedlite into a 60″ white umbrella that was positioned in as close as I could get it—literally just outside the frame on the right. The size of the umbrella and the softening effect of its white fabric created a large source of soft light that blends in naturally with the windowlight. Essentially, I mirrored the look of the windowlight with my fill flash.
Lighting Details
Environment:
Indoors, adjacent to large window
Time of Day:
Late morning
Ambient:
Overcast daylight
Speedlite:
One 600EX-RT
Mode:
Manual
Zoom:
Zoomed to 20mm
Modifier:
6″ white umbrella
Distance to Subject:
Just out of frame
Height:
Center at 6′ and angled down
Trigger:
Extra-long E-TTL cord
Camera Details
Camera:
5D Mark III
Lens:
24-105mm f/4L IS at 80mm
Distance to Subject:
12′
Exposure Mode:
Manual
Exposure:
 ″, f/8, ISO 400
White Balance:
Daylight
Figure 19.10
Lighting diagram
Figure 19.11
A single Speedlite firing into large white umbrella just to the right of the camera’s view blends naturally with the windowlight. Notice how the light fills the shadows and softens the appearance of the skin.
Figure 19.12
While beautiful, the shadows in this windowlight-only shot sculpt the facial structure and define the skin more sharply than the shot with fill flash.
Shoot: Broad and Short Lighting
Broad and short lighting describes two styles of lighting that can be very useful when shooting headshots. Essentially, the difference is which side of the face is lit by the key (main) light.
Think About The Direction Of The Nose
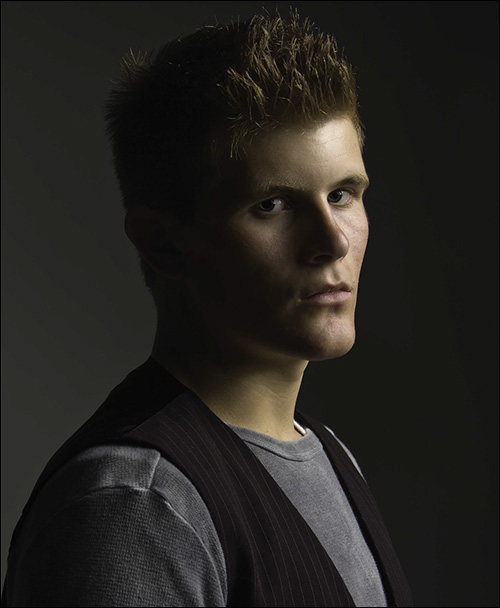
When a subject is not facing the lens directly, the nose points to one side of the frame or the other. The direction of the nose—relative to the position of the key light—is what determines whether a shot is broad lit or short lit. In Figure 19.14
, Max’s nose is on the same side of the lens as the key light (a Speedlite in a Westcott Apollo Medium softbox). From the camera’s viewpoint, the short side of Max’s face (or the narrow side of his face) is lit—hence the term “short lighting.”
Figure 19.13
Lighting diagram
Figure 19.14
Short lighting is created when the position of the key light illuminates the narrow side of the face- as seen by the camera.
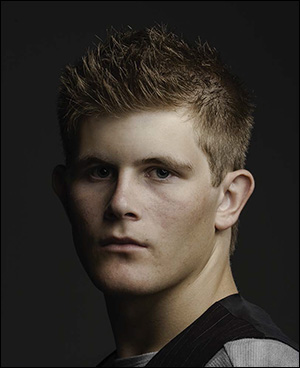
In the inset shot (Figure 19.15
), Max rotated so that his nose is on the opposite side of the lens from the key light. Now the broad side of his face is lit by the key light.
Figure 19.15
Broad lighting is created when the position of the key light illuminates the wide side of the face. For this shot, Max rotated so that he was facing away from the softbox and then turned his nose towards the lens.
Rotate The Subject Or Move The Light
The difference between Figures 19.14
and 19.15
is that Max started the shoot with his body facing the light (Figure 19.14
) and then rotated away from the light (Figure 19.15
). In both shots, the key light stayed in the same position, specifically to the right of the lens.
If you need to keep your subject in the same position (for instance), facing to the right as in Figure 19.14
, and you want to switch lighting styles (say from short to broad lighting), then you just need to move the key light to the other side of the subject’s nose.
Lighting Details
Environment:
Indoor studio
Time of Day:
Not a factor
Ambient:
None
Speedlite:
One 580EX II
Mode:
Manual
Zoom:
Zoomed to 20mm
Modifier:
Westcott Apollo Medium
Distance to Subject:
Just out of frame
Height:
Center at 6′ and angled down
Trigger:
Extra-long E-TTL cord
Camera Details
Camera:
5D
Lens:
70-200mm f/2.8L IS at 70mm
Distance to Subject:
6′
Exposure Mode:
Manual
Exposure:
″, f/11, ISO 100
White Balance:
Daylight
Shoot: Think of The Shutter as a Light Modifier
One advantage of flash over other sources of light is that you can use the shutter speed to dim the ambient light. This can be a valuable tool to guide your viewer’s eye.
Directing Your Viewer’s Focus
When we first encounter a new photo, the first spot that we look at is the brightest portion of the image. In portraits, an easy way to direct your viewer’s eye to your subject is to dim the brightness of the background in your shots. This will make your subject’s face stand out more prominently.
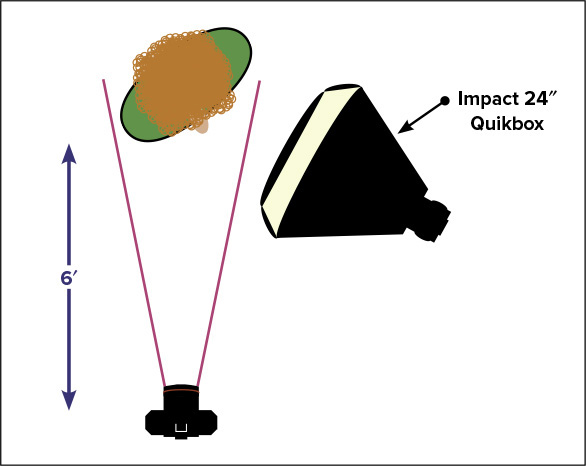
In Figures 19.17
–19.20
, I lit Kristen with a single Speedlite firing through an Impact 24″ Quikbox. The difference through the series is that I increased the shutter speed in one-stop increments to show the effect of dimming the background.
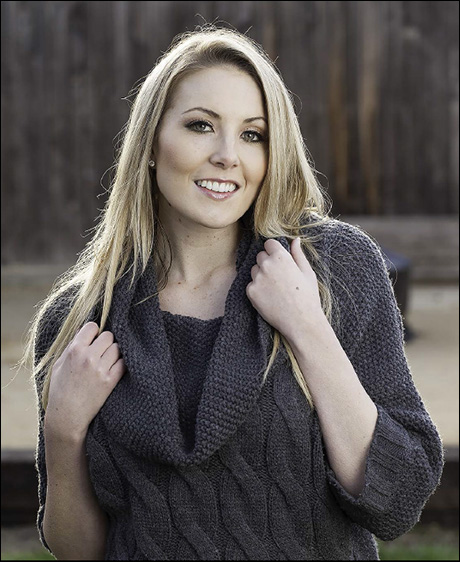
In Figure 19.17
, the
″ shutter creates a fill light that balances naturally with the late afternoon sun. Yet Kristin does not stand out clearly from the background. In the subsequent photos (shot at  ″,
″,  ″, and
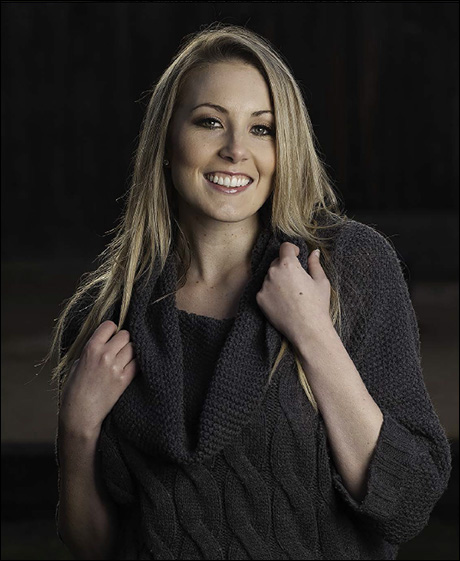
  ″), the backgrounds get progressively darker. The choice of which frame is the best is a matter of personal taste. I favor Figure 19.19
(
″) because it still maintains the rimmed edge of sunlight on Kristen’s hair.
″), the backgrounds get progressively darker. The choice of which frame is the best is a matter of personal taste. I favor Figure 19.19
(
″) because it still maintains the rimmed edge of sunlight on Kristen’s hair.
Keep in mind that as your shutter speed exceeds the sync speed of your camera, you have to activate High-Speed Sync on your Speedlite. See Chapter 7
: Control Your Speedlite
for the basics on HSS and Chapter 22
: Slicing Time With High-Speed Sync
for a detailed discussion.
Lighting Details
Environment:
Outdoors
Time of Day:
Late afternoon
Ambient:
Golden hour sun behind Kristen
Speedlite:
One 600EX-RT
Mode:
E-TTL
FEC:
0 FEC
Zoom:
Zoomed to 24mm
Gel:
 CTO
CTO
Modifier:
Impact 24″ Quikbox
Distance:
About 4′ to subject
Height:
Level with subject’s head
Trigger:
ST-E3-RT Transmitter
Camera Details
Camera:
5D Mark II
Lens:
100mm f/2.8L Macro IS
Distance to Subject:
6′
Exposure Mode:
Manual
Exposure Comp:
As listed
Exposure:
Manual
White Balance:
Daylight
Figure 19.16
Lighting diagram
Figure 19.17
″, f/5.6, ISO 400. Speedlite fired in E-TTL with 0 FEC.
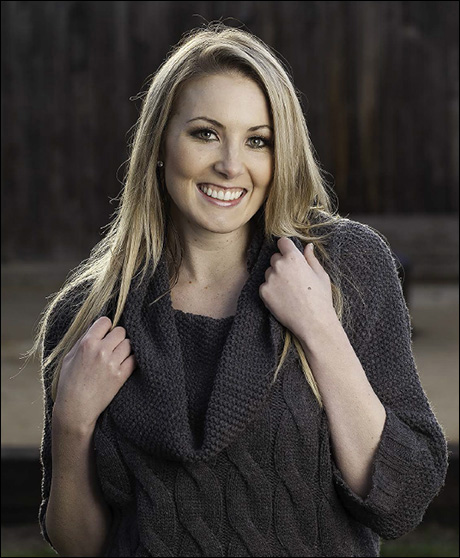
Figure 19.18
″, f/5.6, ISO 400. Speedlite fired in E-TTL with 0 FEC.
Figure 19.19
″, f/5.6, ISO 400. Speedlite fired in E-TTL with 0 FEC.
Figure 19.20
″, f/5.6, ISO 400. Speedlite fired in E-TTL with 0 FEC.
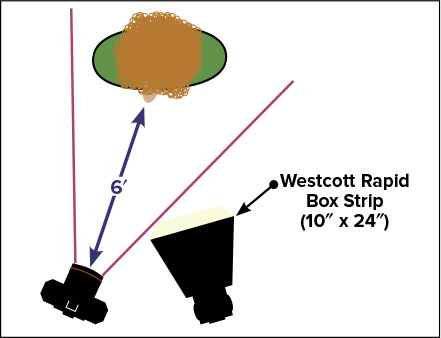
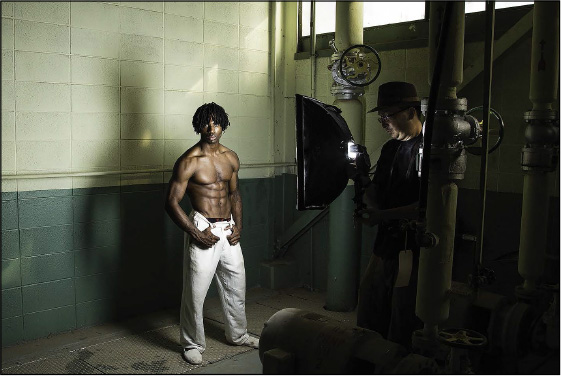
Shoot: Just a Slash of Light
In addition to thinking about how you will light your subject, you should consider what will happen to the light that flies past your subject. When you are outdoors, the excess flash is typically not a problem. When you are indoors, the excess light may be undesirable—especially when your subject is close to the background.
Use A Narrow Softbox To Light The Subject, But Not The Background
For this shoot, we were shooting in an old warehouse. The layers of dust that accumulated on the nearby windows (top-right corner of Figure 19.22
) created beautiful golden patches of light that angled down across the wall.
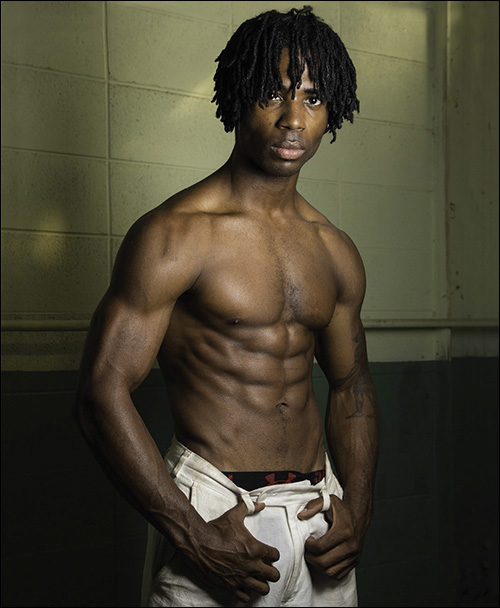
I wanted to light Isaac without having the excess flash fly past him onto the background. The go-to solution is a strip softbox. Strip boxes are much narrower than standard softboxes.
In this case, the Westcott Rapid Box Strip, at 10″ x 24″, was the perfect solution. As you can see in Figure 19.22
, the softbox was pushed in tight—right up to the edge of the camera’s field of view.
This served two purposes:
Being close enabled me to reduce the power to the minimum, which reduced the effect of the excess light flying past on the background wall.
Being close increased the apparent size of the softbox (relative to Isaac), so the light appeared softer.
Lighting Details
Environment:
Warehouse
Time of Day:
Mid-afternoon
Ambient:
Dusty glass windows, sunlight outside
Speedlite:
One 600EX-RT
Mode:
Manual
Zoom:
Zoomed to 20mm
Modifier:
Westcott Rapid Box Strip (10″ x 24″ softbox)
Distance:
About 4′
Height:
About 4′
Trigger:
ST-E3-RT Transmitter
Camera Details
Camera:
5D Mark III
Lens:
24–105mm f/4L IS at 55mm
Distance to Subject:
6′
Exposure Mode:
Manual
Exposure:
 ″, f/8, ISO 400
White Balance:
Daylight
Figure 19.21
Lighting diagram
Figure 19.22
Our location for the shoot
Figure 19.23
The narrow softbox enabled me to cast soft light onto Isaac without it spilling onto the wall behind.
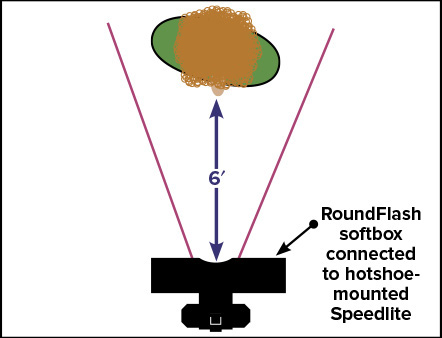
Shoot: RING The Lens with Light
As I covered in Chapter 14
: Go Ahead, Mod Your Speedlite
, ring light adapters are specialty modifiers that capture the light from your Speedlite and redirect it to a panel that encircles the lens.
The Distinctive Look Of A Ring Flash
Ring lights are often used by fashion and glamour photographers to create snappy, yet soft, light. When the subject is close to the background (as Brittany is in Figure 19.25
), the geometry of the ring light around the lens casts a distinctive outline shadow that surrounds the subject. Circular catchlights in the center of the pupils are another tell-tale sign of ring lights.
The RoundFlash Is My Favorite Ring Light Adapter For Speedlites
Of the three ring light adapters that I reviewed in Chapter 14
, my favorite was the RoundFlash. While it appears to be a cumbersome modifier (turn back to Figure 14.27
), it adds very little weight to the camera. As importantly, it sets up quickly and, when not in use, folds up into a compact pouch that you can stuff into a corner of your camera bag. The other adapters that I featured are rigid plastic, which means that they take up more room in the bag and potentially could be damaged more easily. Another great advantage of the RoundFlash over the other adapters is the size of its diffuser panel. Measuring 20″ in diameter, it creates beautiful, soft light, as you can see in Figure 19.25
.
Lighting Details
Environment:
Studio
Time of Day:
Not a factor
Ambient:
Not a factor
Speedlite:
One 600EX-RT
Mode:
E-TTL
FEC:
0
Zoom:
Zoomed to 35mm
Modifier:
RoundFlash ring light softbox
Distance:
About 4′
Height:
About 5′ (camera-mounted)
Trigger:
Sitting in camera hotshoe
Camera Details
Camera:
5D Mark III
Lens:
24–105mm f/4L IS at 45mm
Distance to Subject:
4′
Exposure Mode:
Manual
Exposure:
 ″, f/8, ISO 400
White Balance:
Daylight
Figure 19.24
Lighting diagram
Figure 19.25
Ring light has a distinctive look. The clues that I used a ring light adapter are the circular catchlights in Brittany’s eyes and the soft outline shadow on the wall.
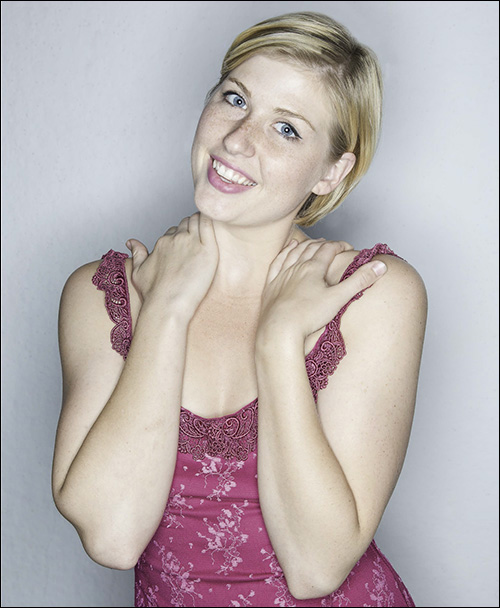
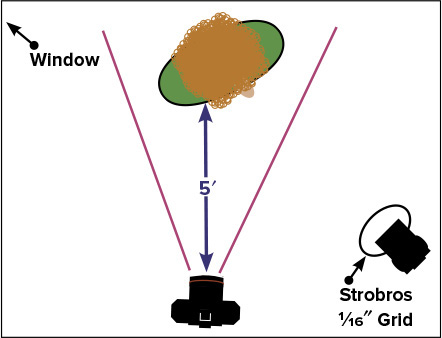
Shoot: Nose to The Gridded Light
A great tip to remember when shooting portraits with hard light is that if you aim the flash directly at the subject’s nose (or vice versa), the harshness of the hard shadows is minimized.
Grids Are A Favorite Modifier
As you can see in Figure 19.27
, I placed a gridded Speedlite to the right side of my camera and aimed it straight at Arlan’s nose. The purpose for the  ″ grid was to create a tight pool of light on his face and hat. My visual strategy was to reveal just enough of his environment and wardrobe so that you would get a sense of his persona and then encourage you to focus on his handsome face.
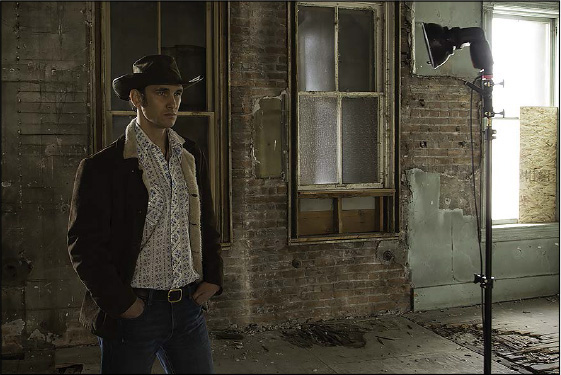
A Window Creates Rim Light
Take a close look at the left edge of the jacket, neck, and hat in Figure 19.28
. See the edge of light that provides the critical separation between the subject and the background? It is ambient light that came from a window about 45° to the left of and 8′ behind the model. Without that edge of rim light, his jacket, neck, and hat would have merged into the background.
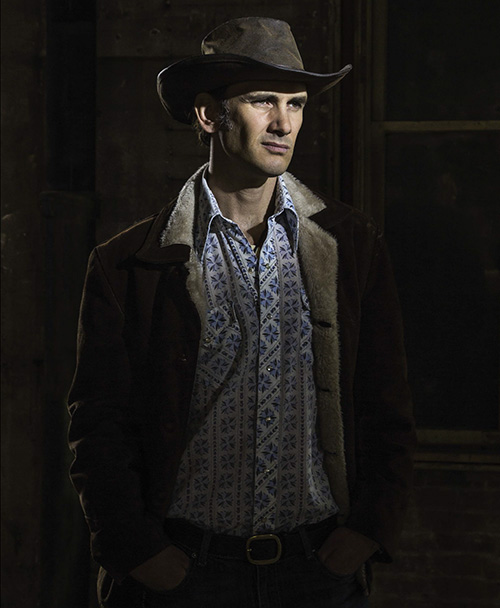
So my ambient exposure was based on two goals:
Dim the background so that the viewer will focus on my subject’s face.
Maintain just enough of the ambient rim light to provide a clear separation between the subject and the background.
Lighting Details
Environment:
Old warehouse
Time of Day:
Early afternoon
Ambient:
Diffuse windowlight
Speedlite:
One 600EX-RT
Mode:
Manual
Zoom:
Zoomed to 200mm
Modifier:
Strobros Grid
″
Distance:
About 5′
Height:
7′ (angled down)
Trigger:
ST-E3-RT Transmitter
Camera Details
Camera:
5D Mark III
Lens:
24–105mm f/4L IS at 60mm
Distance to Subject:
5′
Exposure Mode:
Manual
Exposure:
″, f/8, ISO 800
White Balance:
Daylight
Figure 19.26
Lighting diagram
Figure 19.27
Our location for the shoot
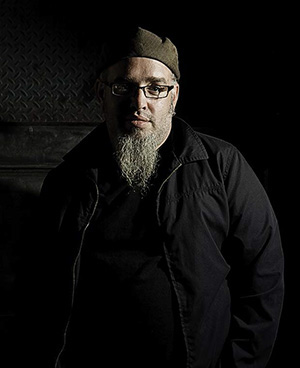
Figure 19.28
I dimmed the ambient light by two stops with my shutter speed and aimed the gridded flash directly at Arlan’s nose. You will note that the nose and chin shadows are hard, but their placement accentuates his features.
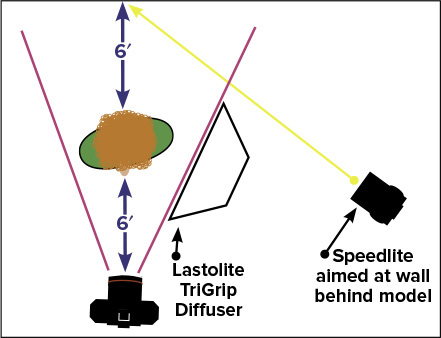
Shoot: One-Light White Seamless
While it is easier to create a white seamless shot (one with a pure white background) using multiple flashes, it is possible to do it with a single Speedlite and a large diffuser.
Most Of The Flash Lights The Background
The key to getting a white background is to overexpose a light-colored wall, meaning that it must be flooded with flash. For this shoot, the Speedlite was zoomed moderately tight (105mm), positioned about 45° to the side, and aimed at the wall behind the model.
Then, as you can see in Figure 19.30
, a large diffuser panel (in this case, a Lastolite TriGrip Diffuser) was held between Katie and the flash—just outside of the camera’s view. The diffuser captures the outer rays of the flash and creates soft light on the subject. As always, the closer the diffuser is to the subject, the greater its apparent size becomes (relative to the size of the subject) and the softer the light becomes.
Maximize The Separation Between The Wall And The Subject
The distance between the wall and your subject is the key to creating a shot with sharp, contrasty edges. You want a gap of 5′ or more. If your subject is too close to the background, then the bright wall will act like a giant reflector panel and wrap your subject in edge-softening light. If you find this to be an issue, then have your subject step farther from the background.
Lighting Details
Environment:
Rustic exhibition hall
Time of Day:
Not a factor
Ambient:
Not a factor
Speedlite:
One 600EX-RT
Mode:
Manual
Zoom:
Zoomed to 80mm
Modifier:
Lastolite TriGrip Diffuser
Distance:
About 12′
Height:
6′
Trigger:
ST-E3-RT Transmitter
Camera Details
Camera:
5D Mark III
Lens:
24–105mm f/4L IS at 60mm
Distance to Subject:
6′
Exposure Mode:
Manual
Exposure:
″, f/5.6, ISO 800
White Balance:
Daylight
Figure 19.29
Lighting diagram
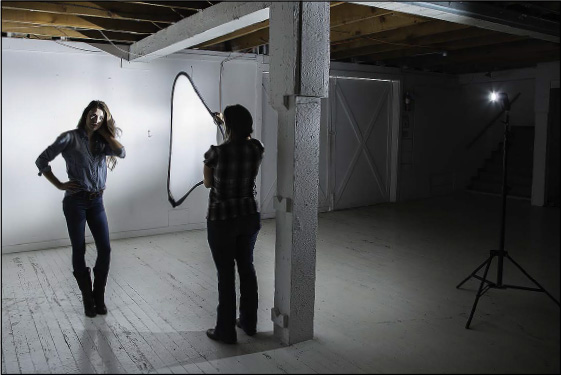
Figure 19.30
Our location for the shoot
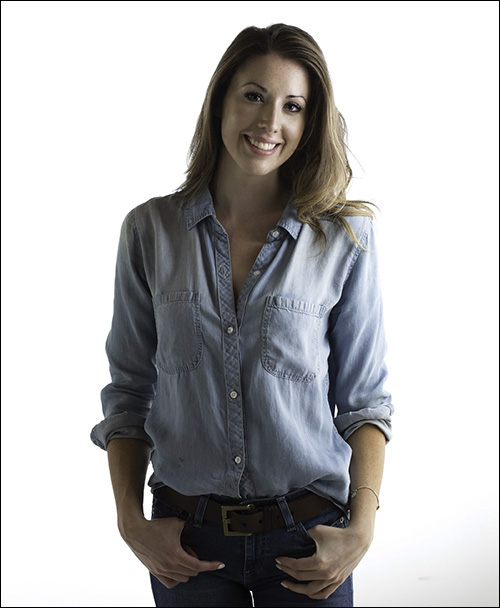
Figure 19.31
The key to getting a white background is to flood it with flash. The key to having a sharp contrast between the subject and the wall is to maximize the distance between them.
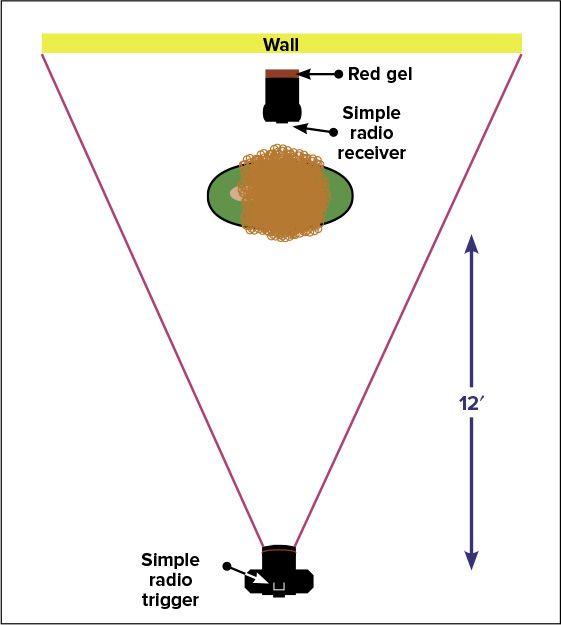
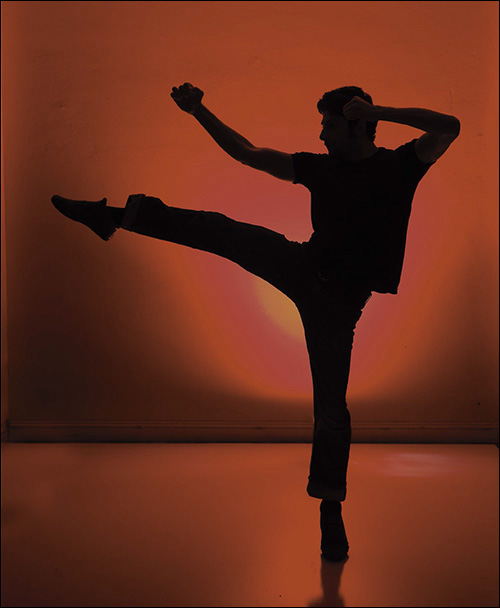
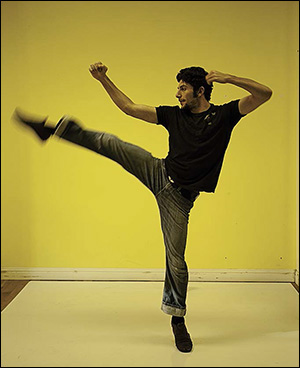
Shoot: Speedliting a Silhouette
Sometimes turning your Speedlite at the background can create more dramatic light than when you aim it at your subject. For this shoot, I actually underexposed Arian to such an extent that he turned into a silhouette.
Use Zoom To Create The Background Pattern
Even before Arian stepped into the frame, I experimented with different zoom settings on my Speedlite to see how they would illuminate the background. If you want a broad, even field of color, zoom your Speedlite out wide (to 24mm). If you want a spot of light that dramatically fades to black, zoom it in tight (to 105mm). The hero shot at right was made with the Speedlite zoomed to 70mm. The hotspot of color is the result of the Rosco medium red gel firing onto the deep yellow wall.
Hide The Flash
Pay attention to the details when shooting silhouettes. I had to hide the Speedlite behind Arian’s leg and instruct him on exactly where to stand.
Sometimes Less Is More
When it comes to the intensity of the color from a gel, the more light you push through it, the lighter the color appears. So if you are looking for a deep, saturated color, remember to turn the power of your flash down rather than up. (I know this sounds backwards.)
Lighting Details
Environment:
Empty store
Time of Day:
Not a factor
Ambient:
Very dim, overhead fluorescent turned off during shoot
Speedlites:
One 580EX
Mode:
Manual
Zoom:
Zoomed to 70mm
Tilt:
Straight up
Gel:
Rosco Medium Red
Modifier:
None
Distance:
Pushed up to wall
Height:
Sitting on floor
Trigger:
Simple radio triggers
Camera Details
Camera:
5D Mark II
Lens:
EF 17–40mm f/4L
Distance to Subject:
12′
Exposure Mode:
Manual
Exposure:
″, f/8, ISO 400
White Balance:
Flash
Figure 19.32
Lighting diagram
Figure 19.33
My hero shot was made with the Speedlite power dialed manually to  .
.
Figure 19.34
The set was two sheets of tile board pushed up to a yellow wall.
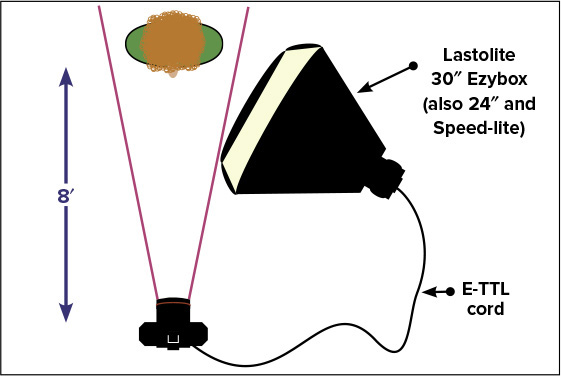
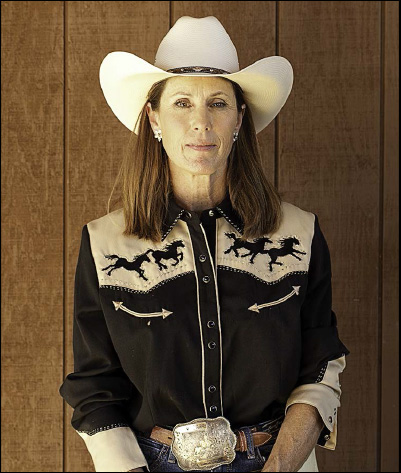
Shoot: Does Softbox Size Matter?
Is there a difference between light created by the various sizes of Lastolite’s Ezyboxes—Speed-lite (about 10″), Hotshoe 24″, and Hotshoe 30″? As these portraits of my friend Annette show, the answer is “no and yes.”
All Three Ezyboxes Create Soft Light
Figure 19.36
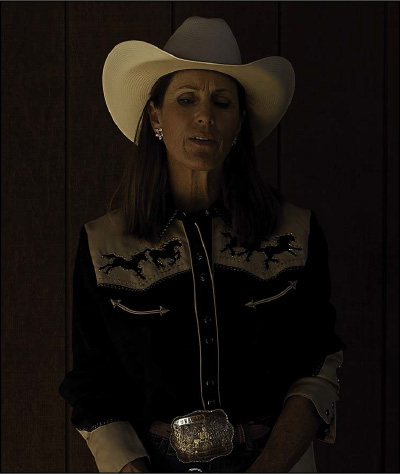
is the ambient light as the camera wanted to record it in Av with 0 EC. Figure 19.37
is my manual exposure (ambient minus three stops). In Figure 19.38
, I fired a bare Speedlite at Annette. You can tell it is bare because the shadows are hard, and the light does not reach around her face.
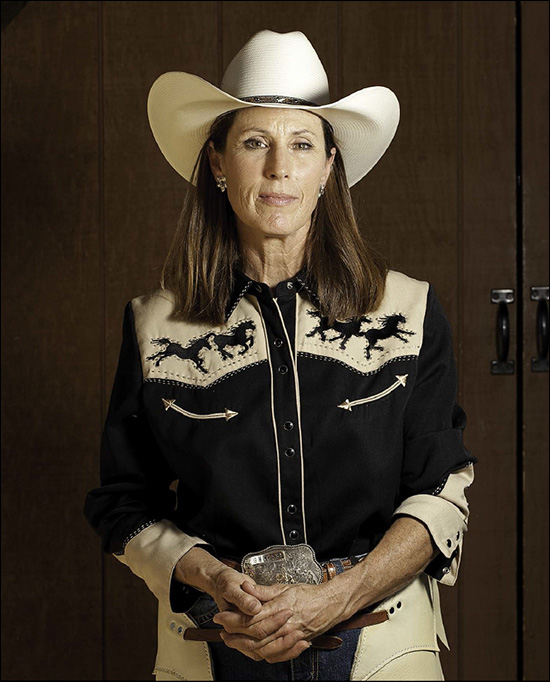
Now look at Figures 19.39
–19.41
. All were created by the three sizes of Ezyboxes. You can see in each that the light reaches around Annette’s face and that the shadows are soft. To make a fair comparison, I moved the stand so that the diffuser of each softbox was the same distance from her face.
The Difference Is The Reach Of The Light
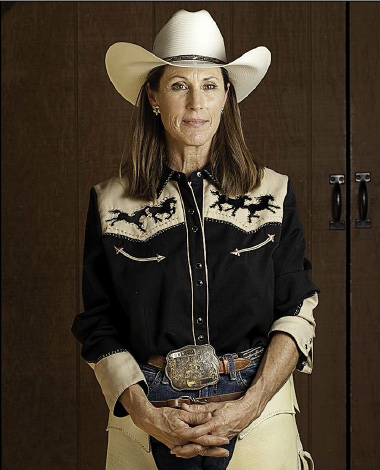
I also centered the height of each softbox on Annette’s nose. As you can see in Figure 19.39
(the largest frame), the small Speed-lite Ezybox did a fine job of creating soft light. The difference between the three—and you have to look close to see it—is that the larger softboxes also carried the soft light farther down on Annette’s arms. If I had lowered the 30″ so that the top was even with Annette’s hat, the soft light at the bottom would be even more apparent.
Lighting Details
Environment:
Outdoors under eave
Time of Day:
Mid-afternoon
Ambient:
indirect sunlight
Speedlite:
One 580EX II
Mode:
E-TTL
FEC:
0 FEC
Zoom:
24mm
Modifier:
Lastolite Ezyboxes
Distance to Subject:
About 2′
Height:
Centered on subject’s nose
Trigger:
Extra-long E-TTL cord
Camera Details
Camera:
5D Mark II
Lens:
100mm f/2.8L Macro IS
Distance to Subject:
8′
Exposure Mode:
Manual
Exposure:
″, f/8, ISO 100
White Balance:
Daylight
Figure 19.35
Lighting diagram
Figure 19.36
My 5D Mark II metered the ambient at
″, f/5.6, ISO 100.
Figure 19.37
I dimmed the ambient by manually dialing the exposure to
″, f/8, ISO 100—a change of –3 stops.
Figure 19.38
Without a softbox, the bare flash creates hard shadows.
Figure 19.39
Even the smallest of the softboxes, the Lastolite Speed-lite, created beautiful light.
Figure 19.40
The Ezybox 24″ provides soft light with a slightly smaller vignette at the bottom.
Figure 19.41
The Ezybox 30″ provides beautiful light from Annette’s hat down to her hands.