Figure 11.1 For this fun shot, two Speedlites were placed inside the mailbox and a third was fired into a gold umbrella at camera left. A handful of Fuller’s Earth created the smoke effect.
CHOOSING AN OFF-CAMERA TRIGGER IS ALWAYS A MATTER OF CONTROL
E-TTL CORDS: AFFORDABLE AND VERSATILE CONTROL OF AN OFF-CAMERA SPEEDLITE
OPTICAL SLAVES EYES: ENABLE CANON SPEEDLITES TO BE USED WITH OTHER BRANDS
CANON’S BUILT-IN OPTICAL WIRELESS SYSTEM
FIRE NOW! MANUAL RADIO TRIGGERS
POWER-ADJUSTING MANUAL RADIO TRIGGERS
E-TTL RADIO TRIGGERS: COMPARED TO THE 600EX-RT RADIO-ENABLED SPEEDLITE
Figure 11.1 For this fun shot, two Speedlites were placed inside the mailbox and a third was fired into a gold umbrella at camera left. A handful of Fuller’s Earth created the smoke effect.
Moving your Speedlite off the top of your camera is a fast way to take a huge step forward as a photographer. Why? We see shape and depth in a photo based on the shadows. When your main light source is right on top of your camera, the light is very flat. Moving the Speedlite even a short distance away from your lens can help add depth by adding shadows.
This chapter runs through the many options that are available for off-camera Speedlite control. A simple trigger is a great way to get started with off-camera flash as you learn the basics of Speedliting.
Then, in next chapters, Chapter 12 : Optical Wireless: The Canon Way , and Chapter 13 : Radio Speedliting: Canon’s New Frontier you will go deep into Canon’s built-in wireless systems—which are the basis for most of my Speedliting.
All triggers tell an off-camera flash when to fire. Some triggers can also adjust the power of the remote flash—which can be very helpful when you want to make a change quickly from your camera. A few triggers can even change the mode of the flash, say from E-TTL to Manual. A few triggers can even access Canon’s on-camera External Flash menu system.
There are three broad categories of triggers that will fire an off-camera flash—cords, optical wireless, and radio wireless. Within each of these categories are several options. The choice of which option is best for you is a matter of how much control you want to have.
All of us were born with an umbilical cord. So, it seems fitting that one of the best ways to start with off-camera flash is with a cord.
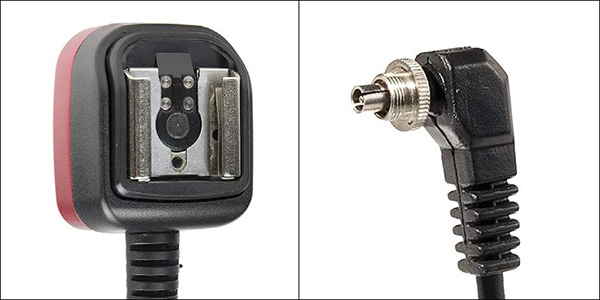
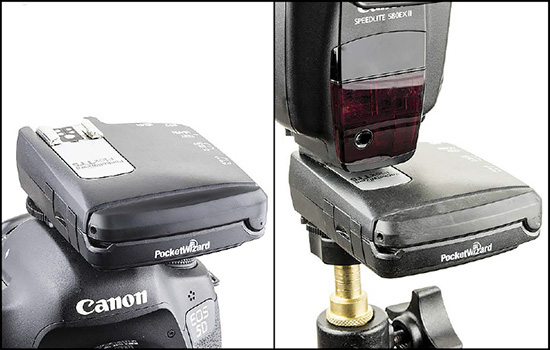
Figure 11.2 Left: An E-TTL cord maintains full communication between camera and flash. Right: A PC-sync cord can only say “Fire Now!”
 E-TTL cords
—These are my number one recommendation for Speedliters starting with off-camera flash. E-TTL cords are wired to maintain the full communication path between camera and Speedlite. The great advantage of an E-TTL cord, which can also work in Manual mode, is that it maintains full access to the on-camera menu system.
E-TTL cords
—These are my number one recommendation for Speedliters starting with off-camera flash. E-TTL cords are wired to maintain the full communication path between camera and Speedlite. The great advantage of an E-TTL cord, which can also work in Manual mode, is that it maintains full access to the on-camera menu system.
PC-Sync cords
—These cord are decades-old technology that can only tell a flash or strobe to fire. They cannot tell the flash to adjust power, change mode, zoom, etc. For this reason, I do not recommend them.
An optical wireless trigger uses a pulse (or multiple pulses) of light to send the instructions to the receiver—which then fires the flash/strobe. Optical triggers must have a direct visual path between the transmitter and the receiver. While it is possible to bounce the signal off an interior wall, it is not possible to send the signal through a wall or much beyond 40′.
Optical Slave Eye
—This electronic circuit fires the flash/strobe when it sees a burst of light from another flash. It cannot change any settings on the unit.
Canon Optical Wireless
—This is the original form of wireless control that Canon built into most of its EX Speedlites. This system will tell the slave Speedlite(s) to change mode, power, sync, etc.
Radio triggers free the photographer from having to maintain a clear visual path between camera and flash. They also have the potential to work over hundreds of feet.
Fire Now! triggers
tell a flash/strobe to fire, but will not adjust the power setting. These cannot be controlled via Canon’s on-camera menu system.
Manual power adjusting radio triggers
will adjust the power of the remote flash in Manual mode only. These cannot be controlled via Canon’s on-camera menu system.
E-TTL radio triggers
will control a Canon Speedlite in E-TTL mode. Most also provide the ability to control the Speedlite’s power manually. Many, but not all, E-TTL radio triggers provide full access to Canon’s on-camera menu system.
Canon radio wireless
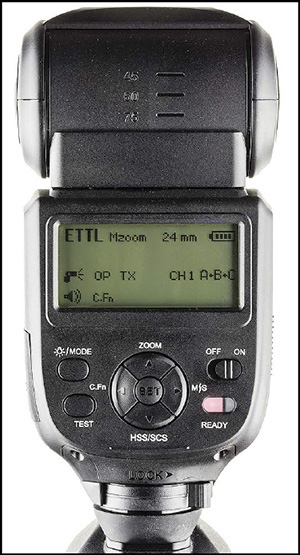
was introduced in 2012 with the 600EX-RT Speedlite and ST-E3-RT transmitter as the world’s first Speedlite system with two-way radio-control built into the flash. Canon’s radio wireless combines full access to the on-camera menu with the extended range and wall-piercing capabilities of radio. Additionally, the slaves report their status back to the master—another world’s first.
As you already have read, I am addicted to Canon’s on-camera control menu for Speedlites. If you are too, then my first recommendation for taking your Speedlite off camera is to use an E-TTL cord. Among the many advantages of an E-TTL cord is that you maintain on-camera control and full access to all of your Speedlite modes: E-TTL, Manual, Multi, etc. Further, you can change the sync, zoom the flashhead, turn wireless on/off, and use FEC.
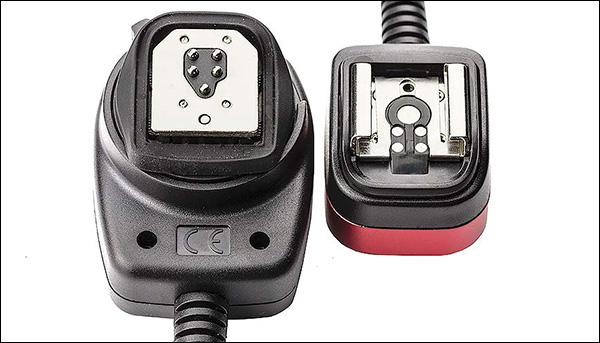
E-TTL cords are made specifically to work with Canon Speedlites. The camera end will have a five-pin plate that looks exactly like the foot of a Canon Speedlite. The flash end of the cord will have a hotshoe with five contacts that look exactly like the pattern in your camera’s hotshoe. The two ends are connected by a special five-conductor cord that carries the full path of communication between camera and Speedlite.
Figure 11.3 Left: The camera-end of an E-TTL cord looks exactly like the foot of a Canon Speedlite. Right: The flash-end of an E-TTL cord looks like the hotshoe on a Canon camera.
E-TTL cords come as coiled and straight versions in a variety of lengths from 3′ to over 30′. You should remember that these lengths refer to the cord’s length when fully extended. The working length of a coiled cord is typically half the length listed on the package.
While a short coiled cord is great for using a Speedlite at the end of your arm or in a flash bracket, longer E-TTL cords should always be straight rather than coiled. When you pull on a long, coiled cord just a bit too much, it will act like a spring and topple your lightstand—sending your Speedlite crashing to the ground.
Your body came with a built-in flash bracket—your left arm. While a real flash bracket is handy for extended use, when I find myself in situations where I did not bring one, I’ll just hold the Speedlite at arm’s length in my left hand. This will seem awkward at first, but with a bit of practice, you will get the hang of it. When you need two hands to change a setting on your camera, cradle the Speedlite on your shoulder.
If you are a wedding or event photographer, an easy way to get your Speedlite off-camera while still maintaining portability is to mount it on a flash bracket.
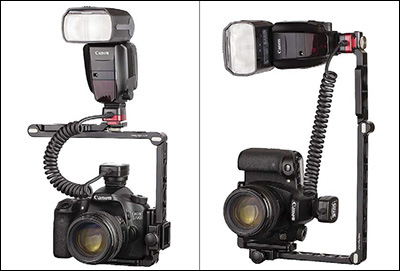
Figure 11.4 The WPF-1 Wedding Pro Flash Bracket by Really Right Stuff keeps the Speedlite centered over the top of the lens in both orientations.
My favorite is the WPF-1 from Really Right Stuff (ReallyRightStuff.com ). Their unique design enables the bracket to keep the Speedlite oriented with the direction of the viewfinder, yet the Speedlite is always above the camera when you go from horizontal to vertical.
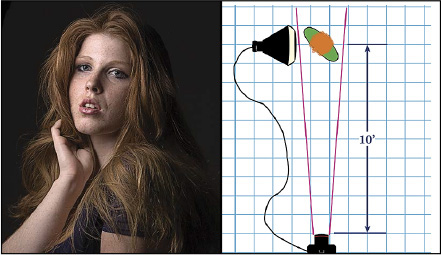
Prior to Canon’s introduction of radio-enabled Speedlites, my most used bit of off-camera gear was a 32′ straight E-TTL cord. Even with radio-enabled Speedlites in my kit, I almost always have a 32′ E-TTL cord in my bag as a backup in case my radio transmitter goes out. With the extra-long E-TTL cord, I can move a master Speedlite (optical or radio) off-camera to a position where it will add valuable light to the shot and control my slaved Speedlites.
Figure 11.5 An extra-long E-TTL cord maintains full control of the Speedlite from the camera’s LCD while allowing the flash to be positioned in the optimal spot.
I know that 32′ sounds like a lot, but you need 6′ or so for the cord to drop down the length of the light stand and 6′ or so for the cord to run from the floor up to the photographer’s eye. Now a 32′ cord really equates to 20′ of mobility—which is a great range for most of the Speedliting I do.
While writing the first edition of the Handbook , I had an extra-long E-TTL cord custom-made to my specifications. That cord was so valuable to the creation of many of the this book’s shots that I tried to get several large retailers to fabricate them for sale. When they all said “No thanks,” I crowd-sourced the funds to have an initial batch of 500 cords made. My little cord company, OCF Gear, has been a garage-based venture ever since. All the cords in these photos are sold by OCF Gear. Canon and other third-party vendors also make E-TTL cords.
The design of my OCF Gear cords has evolved through the years. One of the big changes that I made is to have the base of the hotshoe machined out of solid aluminum. This provides far more strength than the plastic foot with a threaded metal insert.
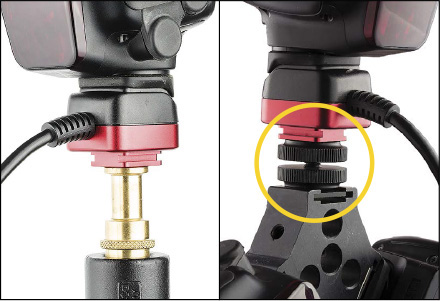
The best way to connect an E-TTL cord to a lightstand is to thread the hotshoe directly onto a swivel adapter and then connect the adapter to the top of the stand. My favorite swivel adapter is the Manfrotto 026.
To attach the cord to a multi-light bracket like the Lastolite Tri-Flash, use a “1/4-20 to hotshoe adapter”—as shown in Figure 11.7 .
Figure 11.7 Left: Thread the hotshoe of your E-TTL cord directly onto a swivel adapter. Right: For multi-light brackets, use a “1/4-20 to hotshoe adapter.”
An optical slave eye is an electronic circuit that will fire the flash when it sees a bright burst of bright light from another source. Do not confuse this with Canon’s optical wireless—the built-in system that enables a master Speedlite to control slaved Speedlites (which we will go deep into in Chapter 12 , Optical Wireless: The Canon Way ).
The advantages of an optical slave eye are:
May already be built into your non-Canon gear and inexpensive to add if not built in
Different brands of gear can be used together
Enables earlier generations of Canon Speedlites to be used with the 600EX-RT. (You must use Manual mode in radio wireless to eliminate the preflash.)
However, there are several disadvantages to optical slave eyes:
Cannot be used with E-TTL as the pre-flash metering trips the slave eye prematurely
Cannot be mixed with Canon optical wireless, the pre-flash instructions from the master will trip the slave eyes prematurely
Cannot be used with red-eye reduction flashes
The power level must be adjusted on all flashes/strobes individually.
The ambient light must be rather dim so that the sensor can see the flash (cannot be used outdoors in bright sun).
Must have line-of-sight between on-camera flash/trigger and the optical slave eye, range limited to 20′ or so.
Many brands of small flash and studio strobes have an optical slave eye built-in. Canon is not among them. This is not hard to remedy.
Canon Speedlites must be used with Canon-specific slave eyes. So, if you tried an optical slave eye and it did not repeatedly fire your Speedlite, chances are that is was not made specifically for Canon flash.
The issue has to do with the voltage of Canon Speedlites. An optical slave circuit gets its power from the Speedlite rather than from a battery. With Canon Speedlites the voltage does not drop far enough after the flash exposure to release the typical slave circuit. Essentially, the eye thinks that the Speedlite is still firing. With ordinary optical slave eyes, the result is that they will fire a Speedlite once and then lock up.
Sonia is small company in India that makes a range of optical slave eyes. While they used to be readily available, in the five years between the writing of the first edition of the Handbook and this edition, Sonia slaves have become hard to find. Still, they are worth a mention.
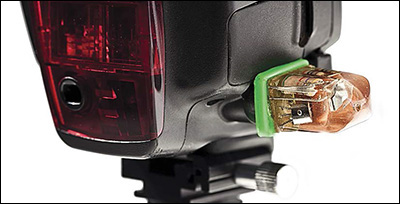
As a Canonista, you must use the Sonia slaves with a green base (see Figure 11.8 ). The standard yellow and orange versions do not have the additional circuit that makes them compatible with the power cycle of Canon Speedlites.
Figure 11.8 Sonia’s Canon-compatible slaves have green bases. The Sonia slave with a PC-male jack will plug directly into the PC socket on a 580EX II and the 600EX-RT.
Sonia offers Canon-compatible slaves in both 3.5mm miniphone and PC-male. The PC-male can be plugged directly into the PC socket on a 580EX II and the 600EX-RT. For other Canon Speedlites, you will need to use an additional adapter to connect the slave eye to the foot of the flash.
After requests from many Speedliters who had difficulty sourcing the Sonia slaves, OCF Gear introduced the Smart Eye™—which contains the Canon-compatible slave circuitry in a hotshoe with a metal foot that can be threaded onto a standard 1/4-20 fitting or clamped into a bracket. The Smart Eye™ can be used with all Canon EX Speedlites.
Figure 11.9 The Smart Eye™ by OCF Gear is compatible with any Canon EX Speedlite. It features a durable metal foot that threads onto a lightstand.
As we consider options to trigger off-camera flashes, we must differentiate between the simple optical slave eye—which fires the unit when it sees a bright burst of light—and the flexibility of the optical wireless system that Canon has built into most models of EX Speedlites.
Chapter 12 , Optical Wireless: The Canon Way will go deep into the buttons and dials technique for operating the system. For now, here are the highlights:
The master Speedlite or transmitter sends coded instructions to off-camera slave Speedlites via pre-flash pulses of light (hence the name optical
wireless).
Changes to the mode, power setting, and sync on the master will be transmitted to the slave on the next pre-flash. E-TTL, Manual, and Multi are available; as are 1st-curtain and high speed sync.
Conveniently, many combinations of Canon cameras and Speedlites enable the optical master to be controlled via the camera’s LCD. This is much easier than using the LCD on the master Speedlite.
I have had years of success with Canon’s optical wireless system—both indoors and outside in full sun. The key is to turn the body of the slave so that it faces the master (while turning the flash head towards the subject). In situations where the slave would look into the sun, an extra-long E-TTL cord can be used to move the master so that the slave looks away from the sun.
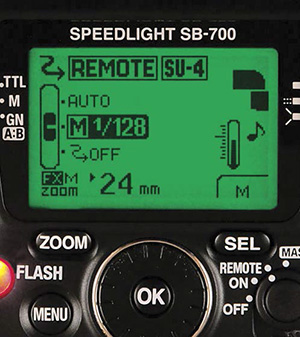
Speedliter’s Jargon: —Nikon’s SU-4 Mode—
Fire Now! manual radio triggers have the ability to do one thing only—fire a Speedlite, strobe, or, in many cases, a camera. All of the following will fire virtually any brand of Speedlite, but you have to set the power on each unit by hand. When using this type of trigger, you do not activate Canon’s built-in wireless system.
At $35/set, Yongnuo’s RF-603C II transceivers are a great value in a Fire Now! radio trigger. Some sets come with cords that can also be used to fire a Canon camera remotely.
The Cactus V5 transceivers (about $75/set) provide reliable control of off-camera flash. The Multi-Channel triggering feature enables up to four groups of flashes to be fired together or individually (helpful when you are testing your setup and want to see what an individual light is contributing to the shot).
At $110/set, the Vello FreeWave Fusion Pro transceivers provide pro-grade features and build quality. The 3.5mm socket makes it easy to connect these triggers to strobes as well.
For many years, Pocket Wizard has dominated the world of pro-grade radio triggers. Their name is synonymous with durability. These PW triggers connect to Speedlites via a cable.
PlusX Transceiver—about $90 each. This entry-level unit from PocketWizard provides 10 channels of communication and compatibility with the entire PW range.
Plus III Transceiver—about $135 each. These versatile units provide 32 channels and the ability to assign flashes to four groups—each of which can be turned on/off from the camera-mounted transmitter.
MultiMax Transceiver—about $265 each. These are the flash/camera triggers used by pros in studios and stadiums around the world. They can be coded to a unique ID so that no other photographer can fire your gear.
This relatively new class of radio trigger has the ability to adjust the power of specific Speedlites or strobes in Manual mode. Some of the following will adjust the power of Canon Speedlites. Others will only provide power control for dedicated models of Speedlites.
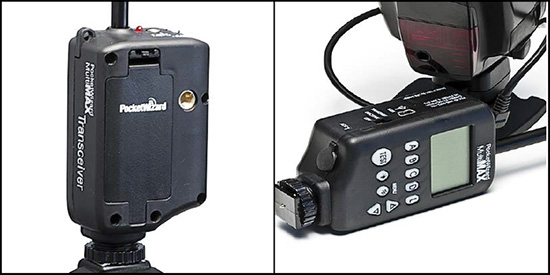
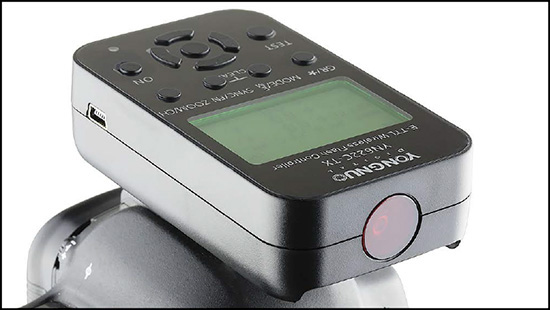
The YN-560-TX Flash Controller (about $50) provides radio control of the power setting on Yongnuo’s YN-560 III or IV Speedlites (see right). It will also fire Canon and other brands of Speedlites in manual mode when connected to Yongnuo’s RF-603 (Figure 11.10 ) or RF-602 transceivers—but you will have to adjust the power by hand on each remote flash. This upright controller has an LCD that displays the settings for three groups of Speedlites. If you do not already have a Canon Speedlite, the YN-560-TX controller and a few YN-560 IV Speedlites are a value-priced way to step into radio Speedliting.
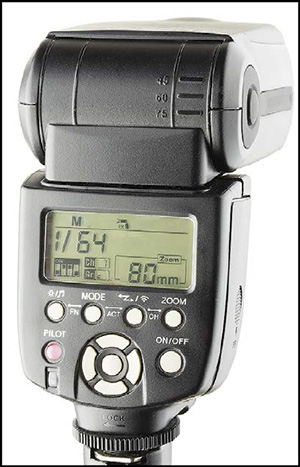
The YN-560 IV (about $75) is the fourth-generation in this value-oriented line of Speedlites. The YN-560 IV has radio circuitry built-in so that it can be a radio master to control the power setting on other YN-560 IV and YN-560 III Speedlites. It can also be remotely controlled as a slave by the YN-560-TX Flash Controller described above. The YN-560 IV will also trigger Speedlites connected to Yongnuo’s RF-602/603 transceivers—but you will have to adjust the power manually on each unit.
The Cactus V6 transceiver (about $70/each) provides remote power control (in manual mode only) for Canon, Nikon, and many other brands of Speedlites. However, it does not provide access to a Canon camera’s External Speedlite Control menu, so all the settings must be made on the transceiver. One unique feature of the Cactus V6 is that it enables the simultaneous use of multiple brands of gear—meaning that Canon and Nikon flashes can be used in the same firing group.
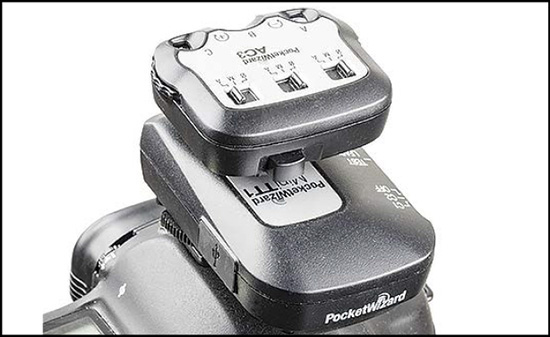
Figure 11.17 The AC-3 Zone Controller must be used atop a PocketWizard MiniTT1 (shown here) or the FlexTT5 (shown in Figure 11.24 ).
The AC-3 Zone Controller (about $80 + transceiver) is an accessory for the PocketWizard ControlTL system that provides manual control of power for up to three groups of lights. It also provides the ability to turn individual groups on/off. With special receivers, the AC-3 will also adjust the power on strobes, such as the Einstein E640. The AC-3 cannot be used alone. Rather, it must be attached to either a MiniTT1 or a FlexTT5 transceiver that sits in the camera’s hotshoe. See the E-TTL section for details on these devices.
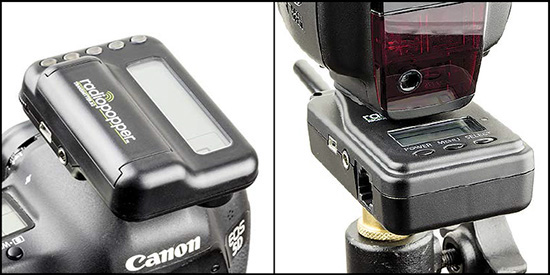
RadioPopper Jr2
Figure 11.18 The RadioPopper Jr2 system uses a dedicated transmitter for the camera and a dedicated receiver for the Speedlite.
The RadioPopper Jr2 transmitter and receiver (about $125 each) are a versatile system that provides direct power control of remote flashes and strobes. These are not transceivers, so you will have to remember to have both devices in the field. If you have two receivers and no transmitter, you are out of luck.
E-TTL radio triggers add the auto flash capability of E-TTL to the features of manual radio triggers. With the new radio-enabled 600EX-RT Speedlite as an option, you can reasonably ask whether it is better to add E-TTL radio triggers to kits that contain 500- and 400-series Speedlites or just sell the older gear and buy into the 600EX-RT system.
So, the comparison gets down to two options:
Buying E-TTL triggers (one for the camera and one for each Speedlite). Some models cut access to Canon’s on-camera menu system. Plus, you will have to learn how to operate a new piece of gear.
Buying 600EX-RT Speedlites (and perhaps the ST-E3-RT transmitter) and off-setting this investment with the resale value of your current gear—for the convenience of having a simplified lighting kit that can be controlled completely from the LCD of your camera (including access to the new on/off functionality of Group mode).
Figure 11.19 Yongnuo’s YN-622C-TX Flash controller provides radio control of slave Speedlites in E-TTL and Manual modes simultaneously.
If you have older Canon Speedlites and want radio control, check out the YN-622C-TX ($50). It provides the equivalent of Group mode (E-TTL, Manual, and on/off by group) via the External Speedlite Control menu on 2012-newer Canon cameras. If you have an older Canon camera, the LCD on the top of the YN-622-TX provides similar control capabilities. In addition to the YN-622C-TX, each slave Speedlite must be attached to a YN-622 transceiver (shown in Figure 11.20 ). Master/slave = $85.
Yongnuo YN-622 Transceiver
Figure 11.20 Yongnuo’s YN-622C Flash controller can be used as a radio master and as a receiver.
Yongnuo’s YN-622 transceiver ($45) lacks the LCD found on the YN-622C-TX, but adds a hotshoe that enables a flash to be used on camera along with off-camera slaves. Can be controlled via the “External Speedlite Control” menu on 2007-newer models of Canon cameras. Master/slave = $80.
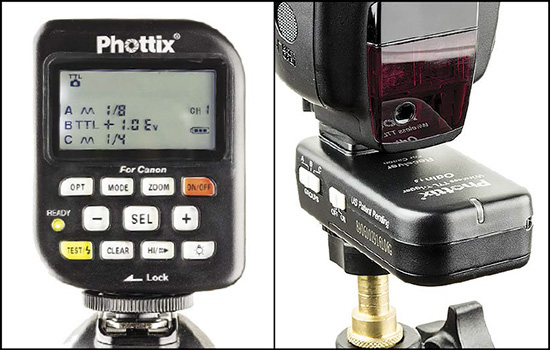
Phottix’s Odin controller ($200) sits vertically in the hotshoe which makes easy reading on the LCD for up to three groups of lights. Like Canon’s Group mode on the 600EX-RT, the Odin allows specific groups to be run in E-TTL while others runs in Manual mode. A unique feature of the Odin system is that it enables slaves to be zoomed remotely via the Odin receiver ($140). Wireless second-curtain sync is also possible with the Odin system. Master/slave = $300 as a set . Also described in more detail at the end of Chapter 13 : Radio Speedliting: Canon’s New Frontier .
Phottix’s Mitros+ Flash features the Odin transmitter built into a Canon compatible flash. If you have the Odin transmitter, the Mitros+ can be operated as an off-camera slave. Flash = $400. Also described in more detail at the end of Chapter 13 : Radio Speedliting: Canon’s New Frontier .
I have long been a fan of the Cinderella start-up company RadioPopper. It is not widely known, but the first E-TTL radio trigger was invented by Kevin King, a wedding shooter who taught himself electronics and created the RadioPopper prototype in his living room.
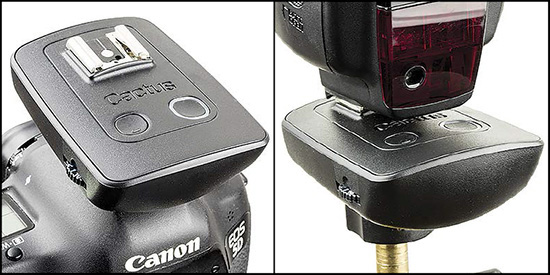
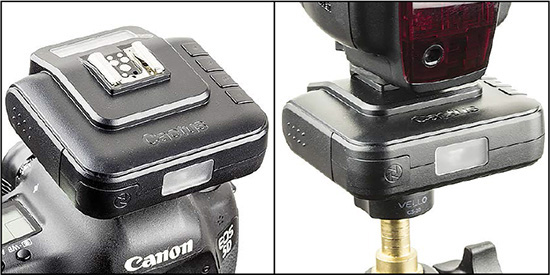
The RadioPopper PX system has two parts: the PX transmitter ($190) that sits on top of a master Speedlite connected to the camera’s hotshoe and the PX receiver ($190) that ingeniously mounts to the front of a slaved Canon Speedlite. The simple (and brilliant) idea behind the PX system is that it picks up the optical pulse emitted by the master, transmits the message by radio, converts the message back to optical pulses, and feeds them into the optical sensor on the front of the slave.
Because the PX transmitter must sit atop a master Speedlite, you maintain full access to the on-camera menu system. The master Speedlite can add light to the shot or be used only to create instructions for the slaves. Master/slave = $380 + master Speedlite .
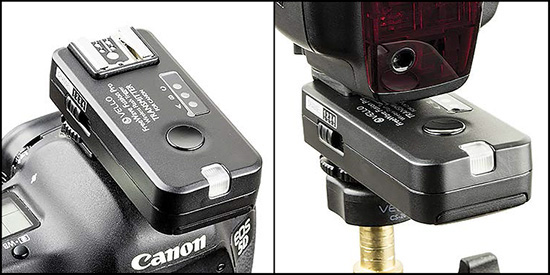
Figure 11.24 PocketWizard’s FlexTT5 can be used as an E-TTL radio transmitter (left) and as a receiver (right). The MiniTT1 (Figure 11.17 ) can be a transmitter only.
PocketWizard’s ControlTL system provides radio control for E-TTL Speedlites and the ability to fire strobes via any of PocketWizard’s manual radio triggers, such as the Plus III or MultiMax. A unique aspect of the ControlTL system is the AC3 ZoneController which, when added to the MiniTT1 transmitter ($200) or the FlexTT5 transceiver ($230), provides the ability to shut a group down completely and the ability to segregate groups into E-TTL and manual with full control from the camera.
The Achilles heel of the ControlTL system is that when used with certain Canon Speedlites (the 580EX II, 580EX, and 430EX), the range is limited due to radio interference with the Speedlite. This seems to be a US/Canada-only problem as PW’s frequencies in North America are different than in other parts of the world.
In addition to the range issues with certain models of Speedlites, the ControlTL system will not display all control options on the camera’s LCD—which is a deal-breaker for me. However, if you rely heavily on PocketWizards to fire strobes, then the ControlTL system is a helpful way to get them to work with Speedlites.
Master/slave (MiniTT1 + FlexTT5) = $385. Master/slave (two FlexTT5) = $460. AC3 ZoneController = $80.
Canon Speedlites & Transmitters
1—Canon 600EX-RT Speedlite
2—Canon ST-E3-RT Transmitter
3—Canon 580EX II Speedlite
4—Canon ST-E2 Transmitter
5—Canon Pop-Up Flash on 7D Mark II,
7D, 70D, 60D, Rebel T6i, T5i, T4i, T3i
E-TTL Cords
6—Canon OC-E3 Cord
7—OCF Gear Smart Cord™ 3C
8—OCF Gear Smart Cord™ 16C/32C
Optical Slave Eyes
9—Sonia Green Base Slave, PC-Sync
10—OCF Gear Smart Eye™
Fire Now! Manual Radio Triggers
11—Yongnuo RF-603C II
12—Cactus V5 Transceiver
13—Vello FreeWave Fusion Pro
14—Pocket Wizard Plus / MultiMax
Power Adjusting Manual Radio Triggers
15—Yongnuo YN-560-TX
16—Yongnuo YN-560 IV Speedlite
17—Cactus V6 Transceiver
18—PocketWizard AC-3 Zone Controller
19—RadioPopper Jr2
E-TTL Radio Triggers
20—Yongnuo YN-622C-TX Controller
21—Yongnuo YN-622 Transceiver
22—Phottix Odin Controller
23—Phottix Mitros+ Transceiver Flash
24—RadioPopper PX
25—PocketWizard MiniTT1 / FlexTT5