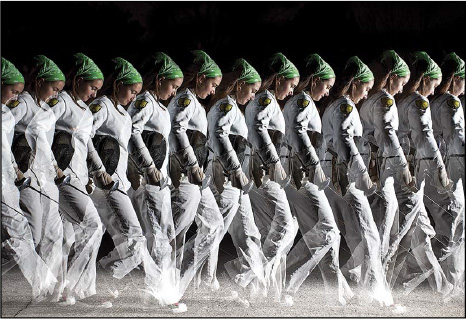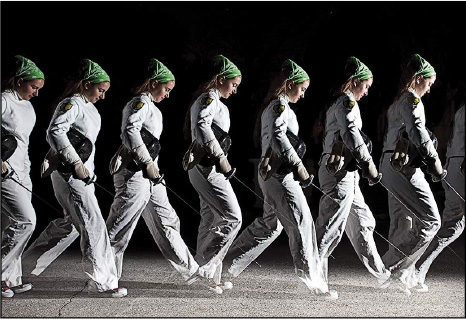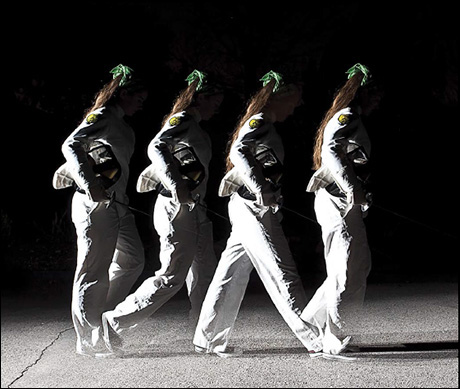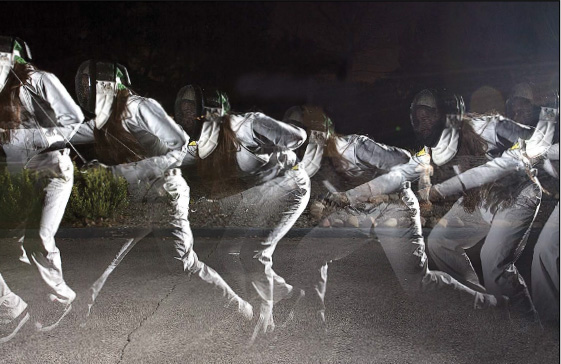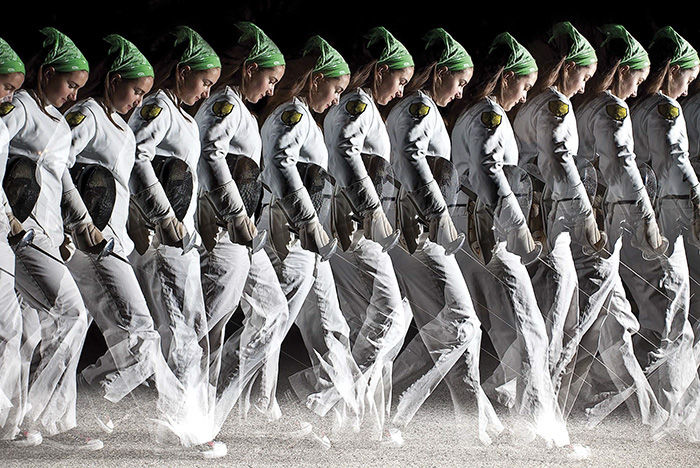
Figure 10.1 Even a simple act like walking can become visually dramatic. This stroboscopic image was made with a pair of 580EX IIs firing in Multi mode at 6Hz.
MULTI MODE: FLASHING AGAIN AND AGAIN
OTHER CONSIDERATIONS FOR STROBOSCOPIC
EXTERNAL FLASH METERING: THINK “E-TTL WITHOUT THE PREFLASH”
EXTERNAL AUTO (EXT.A)—TALKS WITH THE CAMERA
EXTERNAL MANUAL (EXT.M)—WORKS INDEPENDENTLY OF THE CAMERA
OTHER TIPS FOR EXTERNAL FLASH METERING
Beyond Manual and E-TTL, many Canon Speedlites provide additional functionality through modes such as Multi and External Auto / External Manual. If you have a Speedlite capable of operating in these modes, you should know the basics of how to use them. You will still use Manual and E-TTL for most of your shooting, but having the added potential for creative expression is helpful.
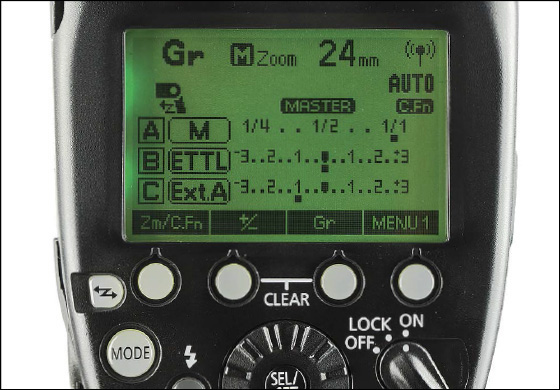
If you have the 600EX-RT operating in radio wireless, one new mode that you must know about is Group mode. It enables you to fire slaved Speedlites in different modes simultaneously—a first for Canon shooters.
Figure 10.1 Even a simple act like walking can become visually dramatic. This stroboscopic image was made with a pair of 580EX IIs firing in Multi mode at 6Hz.
Depending upon the model of your Speedlite, you may have some or all of the following specialty flash modes available to you.
Multi mode fires one or more Speedlites for a specified number of flashes at a specific rate per second. When used scientifically, stroboscopic flash can be used to study motion. When used for fun, stroboscopic can create memorable photos of sports action and theatrical gesture.
External Auto uses the External Metering Sensor on the front of the 600EX-RT and the 580EX II to meter light coming back from the subject. This provides a result similar to E-TTL—with the added benefit that there is no pre-flash. In External Auto, the Speedlite receives aperture and ISO information from the camera.
External Manual is also available on the 600EX-RT and the 580EX II. It provides the same benefits as External Auto. The difference is that the aperture and ISO settings are dialed directly into the Speedlite by the photographer.
With the introduction of the 600EX-RT and radio-enabled wireless flash, Canon provided Speedliters with the ability to control slaved Speedlites in different modes simultaneously. Specifically, the modes of radio slave groups can be set to E-TTL, Manual, or External Auto. We will go deep into the specifics of Group mode in Chapter 13 : Radio Speedliting .
Multi mode turns your Speedlite into a disco strobe, meaning that the Speedlite will fire a specified number of times during one exposure. Think of Multi as a way to create time-lapse photos within a single frame.
 Subject
: A subject that moves is best. The motion does not have to be smooth—like a golf swing—but it helps. Also, light-colored objects are easier to photograph stroboscopically than dark objects.
Subject
: A subject that moves is best. The motion does not have to be smooth—like a golf swing—but it helps. Also, light-colored objects are easier to photograph stroboscopically than dark objects.
Black Set
: Having a dark place to shoot is a great help. Since the exposure will be relatively long, even a small amount of ambient light can add up.
Camera
: Any Canon EOS camera will do.
Speedlite(s)
: Must have at least one 600-or 500-series Speedlite. You can shoot several Speedlites in Multi via wireless mode.
Tripod
: The exposure in Multi mode is often several seconds. You will want to lock your camera down on a solid base.
Shutter Release
: Although it is possible to fire the shutter via the on-camera button, an electronic shutter release will allow you to focus on the action.
External Battery Pack
: Using an external battery pack will help with the reliability of your stroboscopic work. If you don’t have an external pack, make sure you are using freshly charged batteries.
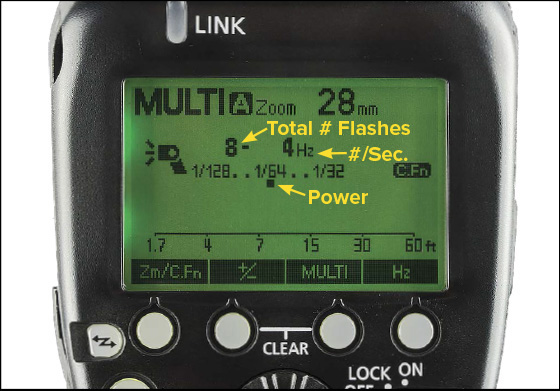
After switching your Speedlite into Multi mode, you will have to specify the following:
Number of flashes
: This is the total number of flashes that you want the Speedlite to emit (2, 10, 50, etc.).
Hertz (Hz)
: This is the frequency of the flashes; one Hz equals one flash per second, 10 Hz equals ten flashes per second.
Power level
: Multi mode fires the Speedlite at a fixed power level that you set. You may use any power level at or below  power. The power level you select will determine the number of pops you get out of the Speedlite
Shooting with stroboscopic flash is often a matter of best guesses. For instance, the number of flashes that you need is determined by the entire duration of the motion that you want to capture and how close you want the segments of that motion.
If you want to be a strobo geek, then use a stopwatch to time the golfer’s swing or the ballerina’s jump and divide that by the interval of time that you want between pops. If the swing or jump takes three seconds and you want three pops per second (3 Hz), then the number of flashes is nine.
Me? I just guess at the interval, dim the lights, and start a series of test shots.
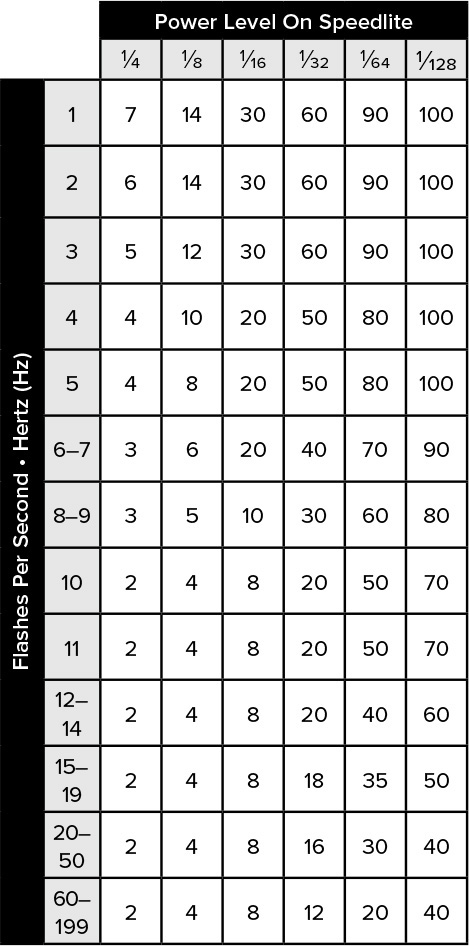
When shooting stroboscopic, there is the risk that you can overheat your Speedlite and cause permanent damage. There are two mechanisms built into the Canon system to prevent overheating: a thermal circuit (600EX-RT and 580EX II only) and the programming of the Speedlite. In the latter case, the Speedlite will limit the number of flashes to the quantities shown in Figure 10.5 .
Figure 10.5 The maximum number of flashes that a Speedlite will allow in Multi mode is based on the power level and the frequency of the flashes. This table shows the data for the 600EX-RT and 580EX II.
I think it is best to have an experimenter’s attitude when working in stroboscopic. The best advice I can give you on setting the Hertz is to guess and then do a test shot. Compare the differences between 6Hz and 3Hz in Figures 10.6 and 10.7 . The proper Hertz setting is largely a matter of your photographic intent.
Figure 10.6 Compare this photo to Figure 10.6 . For this shot, the Hertz was set to 6Hz.
There is no such thing as metering in Multi mode. You have to dial the power level in on the Speedlite. Like the Hz, it always starts with a guess and a test shot. As when working in Manual mode, if you don’t know, then dial the power to  and see what happens.
Your minimum shutter speed needs to be long enough to capture all your flashes. So, if you have set your Speedlite to fire 12 pops at 4 Hz, your exposure needs to be at least 3″ long—12 pops divided by 4 per second equals 3″.
If you are shooting on a black set (one with no ambient light), you can use extremely long exposures. Most Canon DSLRs have shutters speeds as long as 30″. If you need a longer exposure, switch your camera into Bulb mode—and be sure to use a shutter release cable.
To set Multi mode when not shooting wireless:
1.
Confirm that the upper right corner of the Speedlite LCD does not show an icon. If it shows the radio wireless icon  or the optical wireless icon
 , press the wireless button
 repeatedly until there is no wireless icon in the corner.
2. Press the Mode button repeatedly to cycle through the mode options in the upper left corner of the Speedlite LCD until MULTI is displayed. The options cycle as follows: ETTL > M > MULTI > Ext.A > Ext.M > ETTL.
3. Press the +/– button to set the power at which the Speedlite will fire. Turn the select wheel so that the mark sits beneath the desired power level. Then press the Sel/Set button to confirm the power setting.
4. Press the MULTI button to set the total number of times the Speedlite will fire. Turn the select wheel so that the desired number of flashes is displayed. Then press the Sel/Set button to confirm the power setting. Note that the maximum number of flashes is limited by flash power and Hertz, as indicated by the numbers listed in Figure 10.5 .
5. Press the Hz button to specify the number of flashes per second.
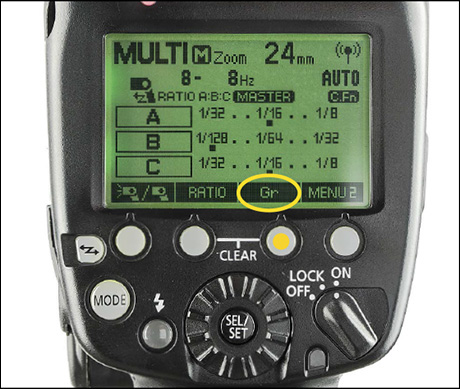
If the 600EX-RT is set as a radio or optical master Speedlite or when using the ST-E3-RT transmitter, you will substitute step 3 above. Specifically, to set the power, use the rightmost button to select Menu 2, then press the Gr button, then press +/– button to set the power.
Figure 10.8 Confirm that the radio or optical icon does not appear in the upper-right corner of the LCD. Then press the Mode button to cycle through the mode selections until Multi appears in the upper left corner.
Figure 10.9 When shooting radio wireless, use the Group button to access the power level for each Group.
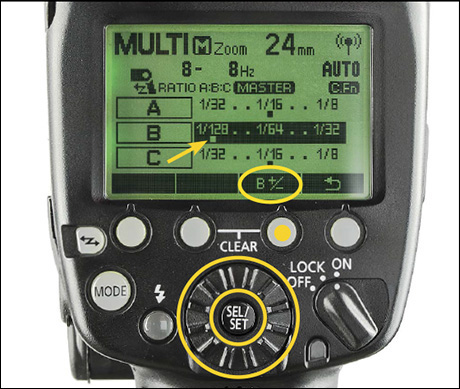
Figure 10.10 Then press the +/- button to activate the power setting for a specific Group. Use the Select Dial to specify the power level and the Set button to confirm your choice.
On the 580EX, the Set button and Select Dial are used to control the Multi system:
1. Push the Mode button so that Multi displays on the LCD.
2. Press the Set button. The Hz setting will start blinking on the LCD (the indication that it can be changed).
3. Turn the Select Dial to set the number of flashes that you want per second (6Hz = six flashes/second), then press the Set button to confirm.
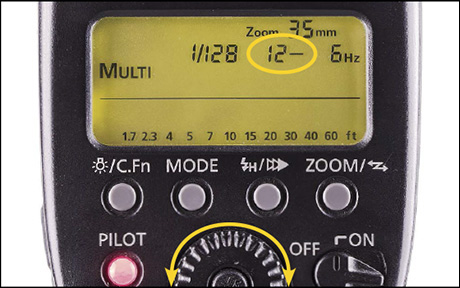
4. The center line/number will blink. Turn the Select Dial to set the total number of flashes that you want. In Figure 10.13 , the number of flashes has been set to 12. Then press the Set button to confirm.
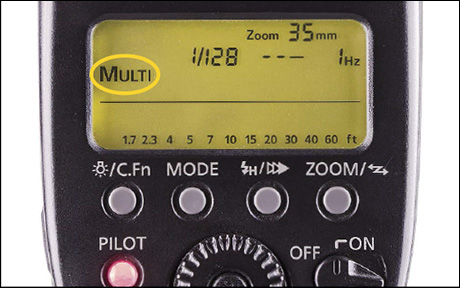
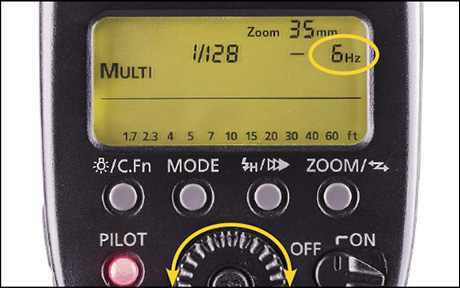
Figure 10.11 When you activate Multi mode, the default setting will be 1/128 power, no flashes, at 1 Hz.
Figure 10.12 The first setting changed is the Hertz (flashes per second). Here the flash is set to fire six times per second.
Figure 10.13 The next setting—the total number of flashes—will blink. Here the number of flashes is set to 12.
5.
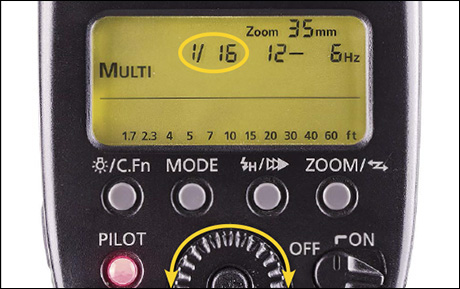
The power level will blink. Turn the Select Dial to set the power level. In Figure 10.14
, the power level has been set to  . Then press the Set button to confirm.
Figure 10.14 The last setting—the power level—will blink. Here the power has been dialed from 1/128 to 1/16.
Note: Your shutter speed must be long enough for all the flashes. In this example, 12 flashes at 6 Hz will require a minimum shutter speed of 2″. If the shutter speed is faster, the Speedlite will not fire the entire series of flashes.
Stroboscopic flash is subject to the same physics that govern regular Speedliting—meaning that an on-camera Speedlite will flatten your subject in strobo as much as it does in the other flash modes. So, if you have a single Speedlite, my strong recommendation is that you move it off-camera with an ETTL cord (see the Speedliter’s Tip below).
There is no doubt that a single Speedlite—even with its power limited to a maximum of ¼ in Multi mode—can produce enough light for stroboscopic shots. The real limitation of using a single Speedlite for stroboscopic work is the quality of the light that you will produce.
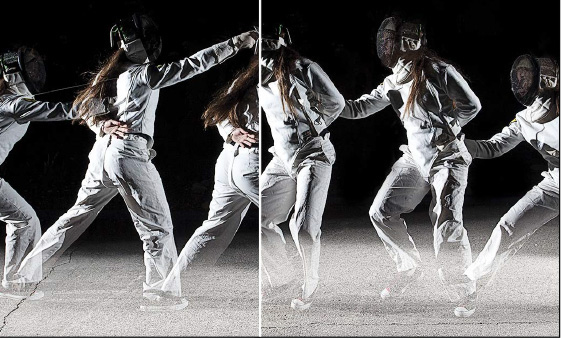
Keep in mind that the extended length of stroboscopic exposures necessitates that you shoot in very dark conditions. So, since your Speedlite(s) will be the sole source of light, the subject will have very dark, contrasty shadows. As you can see in the adjacent photos, a pair of Speedlites facing each other helps fill out the subject’s form.
Still, if a single Speedlite is what you have, then it is far better to shoot with one flash than to just dream about shooting strobo.
Speedliter’s Tip: —Use An Extra-Long ETTL Cord For Multi Mode Shots With One Speedlite—
To coin a bad pun, using multiple Speedlites is when stroboscopic really shines. And, at the risk of sounding redundant, I’m going to coin the phrase “multi-strobo” so that I can quickly refer to the use of multiple Speedlites in Multi mode.
The first advantage of multi-strobo is that you have the ability to reduce the harshness of the shadows. Keep in mind that Multi has to be shot on a dark set. So, virtually all the light hitting your subject will be coming from the Speedlite(s).
If you have a single Speedlite, then the side of the subject that is away from the Speedlite will be in complete darkness—as shown in Figures 10.5 and 10.6 .
If you have multiple Speedlites, then you have options. By setting your Speedlites in front of and behind Helaina, as I did in Figures 10.1 , 10.3 , and 10.4 , she is well lit. Notice how the brighter side transitions from her back to her front as she moves farther from the left Speedlite and closer to the right Speedlite.
If you take another look at the table in Figure 10.2
, you will see that if you reduce the power from
to
or from
to
, you get more than twice the number of pops. So, by using two Speedlites side-by-side (say on a Wizard Bracket), you can fire them at a lower power level and get more pops from the Speedlite.
If your subject is moving any distance (say you are photographing a runner sprinting 50′), then you will want to have many Speedlites so that you can create a wide area through which your subject can move.
If you have a subject that moves across the set, as in the case of Figure 10.1 , then you have to think about the inverse square law (sorry). Specifically, if you want even light across a wide area, then you have to pull your lights back. When you pull your lights back, the light hitting the subject will become dimmer. So, the way to overcome that is to gang up a number of Speedlites and fire them off from a distance.
A Speedlite lowers its power by shortening the length of the flash burst. So, the lower the power, the faster the burst.
Because strobo is shot on a dark set with the shutter open for a relatively long time, the duration of the flash is effectively the shutter speed for each individual pop of the flash. If you are shooting a subject that moves quite fast, having several Speedlites firing at low power will give you shorter bursts of flash.
1. Set the slaves up as slaves. Don’t worry about them saying E-TTL on the LCD.
2. Set your master up as a master.
3. Switch the mode of the master to Multi.
4. Push the Pilot button on the master to fire a confirmation flash, or fire a test shot with your camera.
The slaves will instantaneously jump from E-TTL into Multi when they see the pre-flash from the master. If you have a 430EX as a slave, the LCD will still say E-TTL, but it will fire in Multi.
I’ve wondered if Canon labeled stroboscopic as “Multi” mode because there are multiple things that can go “wrong.” Don’t fret. You’ll sort them out as you go along. Here are a few discoveries that I’ve made along the way.
If your subject does a sport that leads with one hand, like fencing or fly casting, then you’ll find that one direction looks more natural than the other. In Figure 10.18 , the left side is not as interesting to me as the right side.
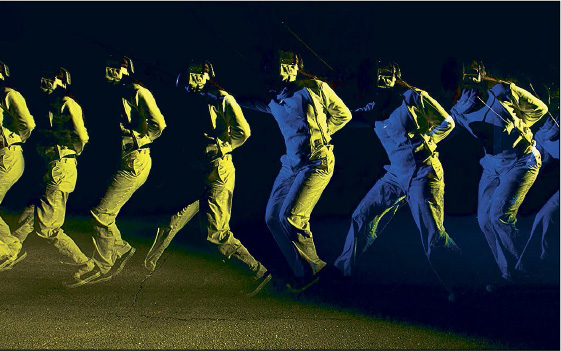
If you’re shooting multiple Speedlites in strobo, then gel them with multiple colors. In Figure 10.19
, you can see that the blue light stopped firing before the yellow. This happened because it was firing at
power and the yellow light was firing at  power.
Figure 10.18 The same action happening in opposite directions. The right appears more natural to me.
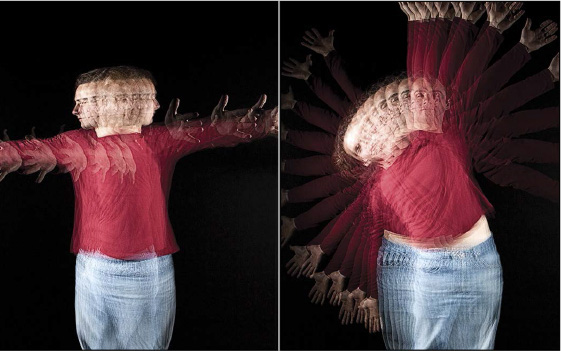
If your subject is mostly spinning in front of the lens, then the series will pile up on itself. If your subject is moving across the frame, then you will capture a series that has more width.
Thanks to the stroboscopic layering of light, you will find that your background is recorded differently than you see it. A black sheet of foam core will show up as gray. Bushes and rocks that you can’t see will mix with your subject. The solution is to flag your lights.
Figure 10.21 If your Speedlites are not flagged, then you will likely find that background objects appear in the photo. Flag your lights and they will stay hidden.
Prior to the era of through-the-lens flash metering, the quest for automatic flash led to the use of a thyristor circuit built into the body of the flash. This sensor captured light coming back from the subject. When the flash metered enough light coming back—based upon aperture and ISO settings dialed in by the photographer—then it automatically stopped firing. For subjects that were close to the lens, the duration of the flash burst would be very short. For subjects at a distance, the flash would illuminate for a longer period.
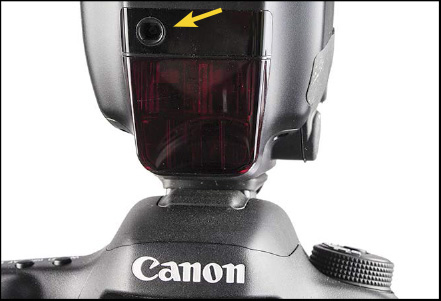
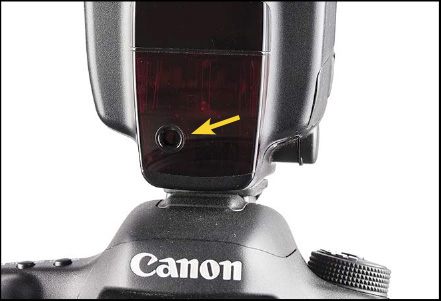
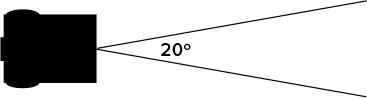
In 2007, when Canon introduced the 580EX II, one of the new features added into the Speedlite was the inclusion of an external flash metering sensor. The sensor is the little bucket inside the red panel on front—as shown in Figure 10.22 . While the sensor was visible, activating external flash metering required the use of custom function settings. So, few Speedliters explore this new functionality.
In 2012, with the introduction of the 600EX-RT, the two modes of external flash metering were brought out of obscurity and added to the options available on the Speedlite’s Mode button.
Speedliter’s Tip: —The External Sensor Has A Narrow View—
There are circumstances where external metering can provide valuable solutions for automatic flash. This is particulary true for professional photographers shooting in complex situations.
For instance, when the subject-to-flash distance is changing—which makes an automatic flash mode helpful—the pre-flash of E-TTL will prematurely fire other flash units that are being triggered with optical slave eyes (such as studio strobes).
Using the radio feature of the 600EX-RT system and External Auto mode enables the photographer to have the best of both worlds—studio packs triggered via their built-in optical slave eyes and Speedlites adjusting flash power automatically.
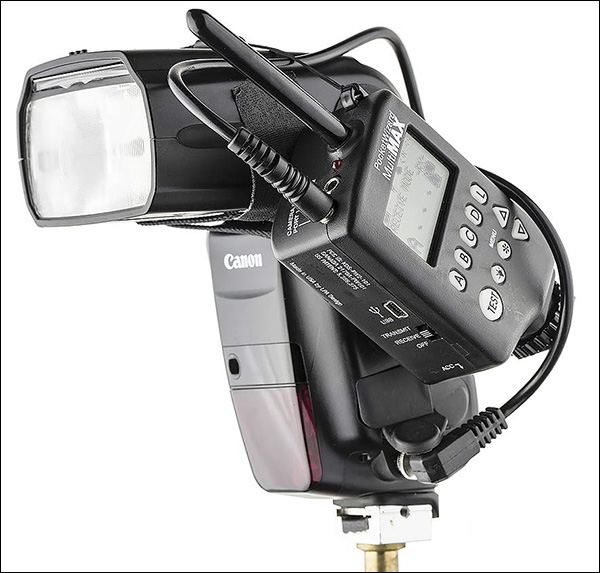
The other external metering mode, External Manual, also gives you the ability to have an automatic flash triggered by third-party radio or infrared devices, such as the PocketWizard trigger shown in Figure 10.24 .
Figure 10.24 External Manual mode enables Speedlites to provide automatic flash when triggered by radio triggers, such as the PocketWizard MultiMax shown here.
External flash metering comes in two versions: Auto and Manual. This wording is a bit tricky because in both cases the Speedlite meters the flash and shuts itself automatically. The difference has to do with how the camera’s exposure settings are communicated to the Speedlite—automatically or manually.
In order for the external flash metering system to have a sense of how much flash is enough, it must know two of the camera’s exposure settings: aperture and ISO. If the camera is using a tiny aperture or a low ISO, then a longer burst flash is needed. If the camera is using a wide aperture or the ISO is high, then a shorter burst of flash will be adequate.
In the case of External Auto, the aperture and ISO settings are automatically provided by compatible cameras through the hotshoe. Additionally, when a 600EX-RT is operating as a radio master, this information is transmitted to slave 600EX-RTs operating in External Auto.
The following EOS cameras are compatible with External Auto mode:
Rebel XS, XSi, XT, XTi, T1i–T6i, SL1
40D–70D
5D Mk II–5D Mk III, 5DS, 5DS R
6D, 7D–7D Mk II
1D Mk III–Mk IV, 1Ds Mk III, 1D X
M, M2, M3 (mirrorless)
External Automatic is available on the 600EX-RT in two situations:
The wireless system is not activated.
The Speedlite is being operated as a radio master in Group mode (see full description of Group mode later in this chapter).
To set External Auto on the 600EX-RT:
1.
Confirm that the upper right corner of the Speedlite LCD does not show an icon—see Figure 10.25
. If it shows the radio wireless icon
or the optical wireless icon
, press the wireless button repeatedly until there is no wireless icon
in the corner.
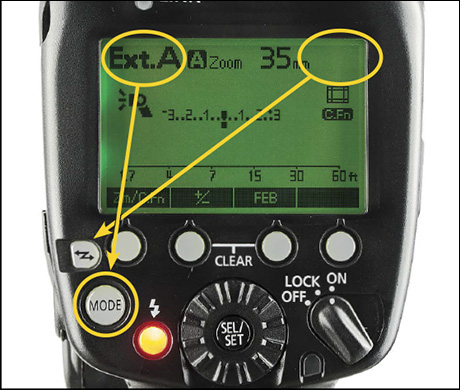
Figure 10.25 Confirm that the radio or optical icon does not appear in the upper-right corner of the LCD. If either is present, press the Wireless button repeatedly until it disappears. Then press the Mode button to cycle through the mode selections until Ext.A appears in the upper left corner.
2. Press the Mode button repeatedly to cycle through the mode options in the upper left corner of the Speedlite LCD until Ext.A is displayed. The options cycle as follows: ETTL > M > MULTI > Ext.A > Ext.M > ETTL.
Note: External Auto may also be set via the mode options under External Speedlite Control on your camera’s LCD.
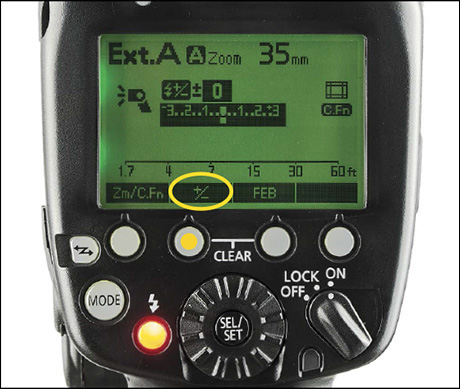
Just as Flash Exposure Compensation (FEC) is used to fine-tune automatic flash in E-TTL, FEC can be used to fine-tune the automatic flash of External Auto. As shown in Figure 10.26 , when Ext.A is activated on the 600EX-RT, the second button from the left becomes the +/– button. Pressing this button brings up the FEC scale. Use the Select Dial to specify the amount. See Chapter 9 : E Is For Evaluative for FEC tips.
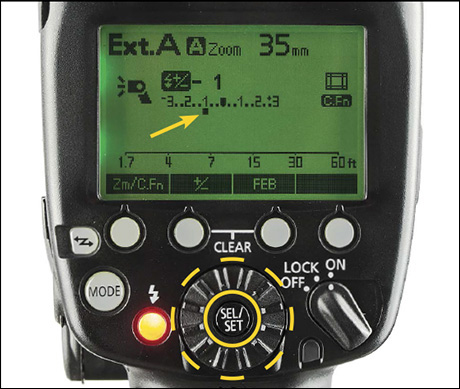
Figure 10.27 Turn the Select Wheel to specify the amount, shown here as –1-stop. Press the Sel/Set button to confirm the amount you set.
External Automatic must be activated on the 580EX II via Custom Function–05. There are two ways to do this:
On the Speedlite itself (harder)
On the camera LCD via External Speedlite Control (easier)
To activate External Auto on the LCD of the 580EX II:
1. Press and hold the C.Fn button (leftmost) until C.Fn appears on the LCD.
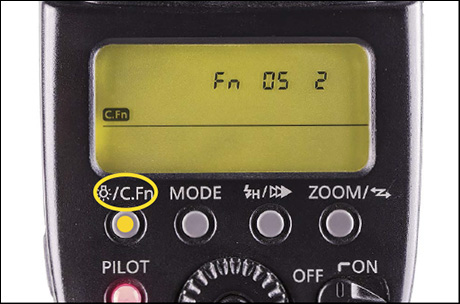
2. Turn the Select Dial until Fn 05 appears on the screen—see Figure 10.28 .
Figure 10.28 To activate External Auto on the LCD of the 580EX II, press and hold the C.Fn button, scroll to C.Fn–05, and then choose option 2.
3. Press the Set button to indicate that you made a change. The current setting will blink.
4. Turn the Select Dial until 02 appears on the screen.
5. Press the Set button to indicate that you want to set option 2 (External Auto).
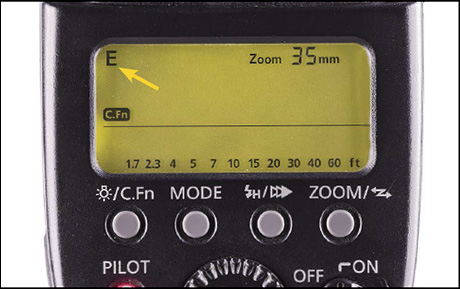
6. Press the Mode button to exit. As shown in Figure 10.30 , an E now appears in the upper left corner of the Speedlite’s LCD.
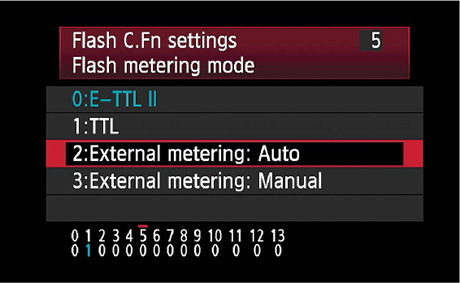
Figure 10.29 The Flash Custom Function Settings menu on the LCD of compatible cameras is an easier way to activate External Auto on the 580EX II.
Figure 10.30 When the 580EX II is set to an external flash metering mode, an E appears in the upper-left corner of the LCD.
On compatible cameras, it is easier to activate External Auto mode via the External Speedlite Control Menu on the camera’s LCD—as shown in Figure 10.29 . Look for “Flash Metering Mode” on the list of options.
In External Auto mode, you can use Flash Exposure Compensation to fine-tune the amount of flash—just as you can in E-TTL.
1. Press the Set button so that the FEC icon is displayed on the left side of the LCD. You will see that the FEC icon and the FEC amount will blink.
2. Use the Select Wheel to specify the desired amount of FEC. Turn it left to reduce the FEC; turn it right to increase the FEC. If you want to remove FEC entirely, set it to +0.
3. Press the Set button to confirm your choice.
External Manual is related to External Auto. Both use the external flash metering sensor to automatically quench the flash when enough light comes back from the subject. The difference is that in External Manual, you must manually dial the aperture and ISO settings into the Speedlite. In External Auto, these settings are passed on automatically by the camera.
External Manual is available on all EOS cameras and also when you trigger your off-camera Speedlite with third-party radio and infrared devices or with an optical slave eye.
External Manual is only available when the wireless system is not activated. You can set External Manual on the camera LCD or directly on the LCD of the 600EX-RT:
1. Confirm that the 600EX-RT is not in a wireless mode (no icon in upper-right corner).
2. Press the ISO button (second from right in Figure 10.31 ) and then turn the Select Dial until the displayed setting matches the camera’s ISO setting. Press the Set button at the center of the Select Dial to confirm.
3. Press the F button (rightmost in Figure 10.31 ) and then turn the Select Dial until the displayed setting matches the camera’s ISO setting. Press the Set button at the center of the Select Dial to confirm your choice.
External Manual must be activated on the 580EX II via Custom Function–05. There are two ways to do this:
On the Speedlite itself (harder)
On the camera LCD via External Speedlite Control (easier—see Figure 10.29
)
To activate External Manual mode on the LCD of the 580EX II:
1. Press and hold the C.Fn button (leftmost) until C.Fn appears on the LCD.
2. Turn the Select Dial until Fn 05 appears on the screen (see Figure 10.28 ).
3. Press the Set button to indicate that you made a change. The current setting will blink.
4. Turn the Select Dial until 03 appears on the screen.
5. Press the Set button to indicate that you want to set option 3 (External Manual).
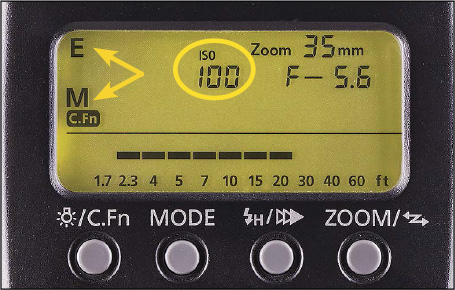
6. Press the Mode button to exit. As shown in Figure 10.32 , an E and M now appear on the left edge of the Speedlite’s LCD.
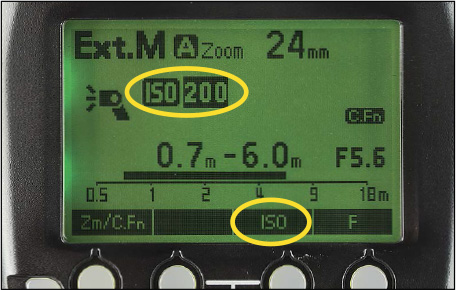
Figure 10.32 The External Manual screen on the 580EX II can be distinguished from the External Auto screen because External Manual lists the ISO setting that has been dialed into the Speedlite.
On compatible cameras, it is easier to activate External Manual mode via the Flash Custom Function Settings menu (under External Speedlite Control) on the camera’s LCD—as shown in Figure 10.29 . Look for “Flash Metering Mode” on the list of options.
In External Manual, you must dial the aperture and ISO settings into the Speedlite. To do this on the 580EX II, follow these steps:
1. Press the Set button at the center of the Select Wheel so the ISO setting on the LCD blinks.
2. Turn the Select Dial until the displayed setting matches the camera’s ISO setting.
3. Press the Set button to confirm you choice. Now the Aperture setting will blink.
4. Turn the Select Dial until the displayed setting matches the camera’s aperture setting.
5. Press the Set button to confirm you choice.
To fine-tune the amount of light being generated in External Manual mode, you have to take advantage of the fact that there is no direct communication link between the camera and Speedlite. The best way to do this is to change the ISO setting on the Speedlite. If you want more flash, you dial the ISO setting down. If you want less flash, dial the ISO setting up.
It is also possible to change the ISO setting on your camera. If you are shooting the camera in Manual mode, then you will have to make an off-setting move to the shutter speed in order to keep the ambient exposure balanced. When doing this, remember that in External Manual you cannot exceed your camera’s sync speed.
When you are shooting either external flash metering mode and you press the shutter button half-way, the Speedlite LCD displays a distance scale. You can see this scale in Figure 10.38. This scale shows how near/far your subject may be based on the aperture and ISO settings used.
If your subject is within the displayed range, then the flash will adjust the power to provide adequate illumination. If the minimum distance on the scale is greater than the distance to your subject, use a smaller aperture or lower the ISO. If the maximum distance on the scale is not as far as your subject, open up the aperture or raise the ISO.
When shooting in either external flash metering mode, the shutter speed may not exceed the sync speed for your camera. There is no such thing as high-speed sync with external flash metering.
The two greatest features brought about by the introduction of the 600EX-RT are: two-way radio communication between master and slave, and the brand new Group mode. We will go deep into the details of radio-enabled Speedliting in Chapter 13 : Radio Speedliting: Canon’s New Frontier . However, some discussion of Group mode is warranted now as this chapter focuses upon specialty flash modes and Group shows up when you press the Mode button on the 600EX-RT.
The first bit to know about Group mode is that Canon now uses the word Group to mean two things:
Slave ID Group
is the name given to one or more slaved Speedlites assigned to a specific task.
Group mode
is a feature of the 600EX-RT Speedlite and ST-E3-RT Transmitter that enables groups of slaves to operate in different modes.
As you become acquainted with these two concepts, the meaning of Group will become apparent through context.
Group mode opens up new frontiers of creativity for Speedliters. For the first time, we have the ability to simultaneously operate slaved Speedlite in different modes:
E-TTL
Manual
External Auto
As importantly, Group mode enables the Speedliter to turn off groups individually, which is very helpful when you want to test the light from a specific group without having to walk around and turn off all the other Speedlites one by one.
Group mode is only available with Canon’s radio-enabled Speedlite system. So, you must use either a 600EX-RT Speedlite or a ST-E3-RT Transmitter as the radio master. You must also use the 600EX-RT as radio slaves.
It is not possible to use 500- or lower series of Speedlites in Group mode as these units do not work in radio wireless.
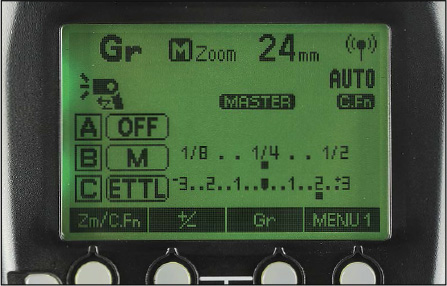
Figure 10.34 In addition to enabling the use of mixed modes, groups can also be turned on/off from the Master in Group mode.
Read Chapter 13 : Radio Speedliting: Canon’s New Frontier for the details on how to work the buttons and dials of Group mode.