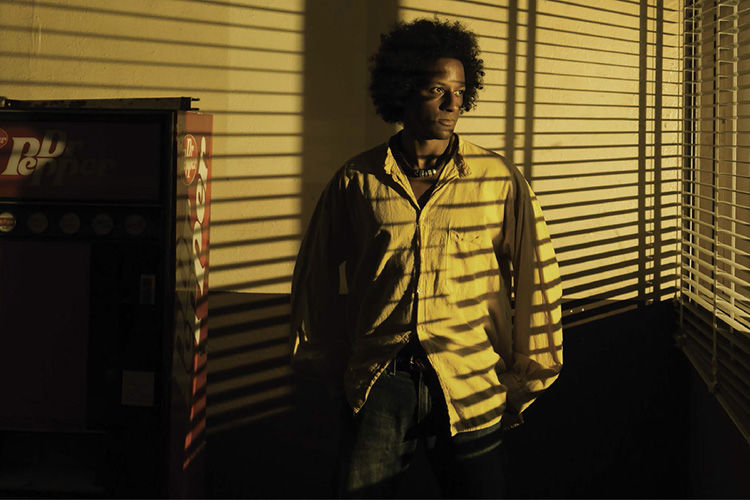
Figure 21.1 A single Speedlite and an amber-colored gel were all it took to turn this dull break room into a dramatically lit space. I made the shadows appear more boldly by using a fast shutter speed to eliminate the ambient light.
IF COLOR CORRECTION IS NEEDED, DID SOMETHING GO WRONG?
THE DAYLIGHT CYCLE AFFECTS THE COLOR OF SUNLIGHT
THINK ABOUT WHITE BALANCE AS A CREATIVE TOOL
SHOOT: GELLED FILL FLASH AT SUNSET
SHOOT: GOLDEN HOUR AT ANY TIME
There are two major groups of gels: those that shift the color of one light source to another (e.g., daylight to tungsten) and those that create a color effect (e.g., change the color of a background to bright red). Using both types of gels, along with changes in the white balance of your camera, can create dramatic effects.
There are also two minor groups of gels—neutral density and polarizing—that limit the light without changing its color. Think of these as technical rather than creative gels.
Figure 21.1 A single Speedlite and an amber-colored gel were all it took to turn this dull break room into a dramatically lit space. I made the shadows appear more boldly by using a fast shutter speed to eliminate the ambient light.
Gels are an important part of a Speedliter’s kit. These thin sheets of colored plastic change the color of your Speedlite for technical and creative purposes.
Gels can be used for four main tasks:
 Color correction
: CTO (color temperature orange) gels make your Speedlite appear to the camera as if it was a tungsten light bulb. CTB (color temperature blue) gels can be used on tungsten sources to balance them with the daylight color of your Speedlites.
Color correction
: CTO (color temperature orange) gels make your Speedlite appear to the camera as if it was a tungsten light bulb. CTB (color temperature blue) gels can be used on tungsten sources to balance them with the daylight color of your Speedlites.
Theatrical color
: There is literally an entire rainbow of colored gels that can be used on a Speedlite. Strap one on when you want to add a spot of color on your subject or background.
Neutral density
: Sometimes setting your Speedlite to minimum power just is not low enough. To get even less light out of your flash, you can darken it with a neutral density gel.
Polarizing
: If you have to photograph an antique oil painting that has shiny varnish over a cracked surface, the easiest way to eliminate the glare is to polarize your light sources and then shoot with a polarizing filter on your lens.
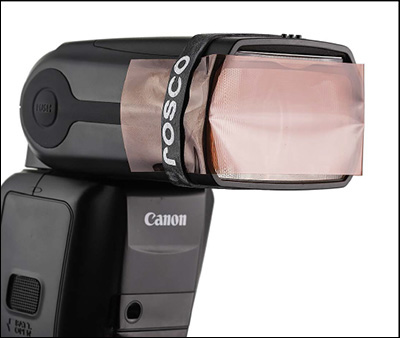
Figure 21.2 The colors in the Rosco Strobist Gel Collection provides a wide assortment of colors. At 1.5″ x 5.5″, they barely fit on 600- and 500-series Speedlites. On smaller Speedlites, they’re fine.
So you hear some guy going on about how he used a color correction gel. Then you wonder what went wrong with his colors that made it necessary to correct them. Here’s an insider’s tip: If they were called “color shift” gels, then you would not be confused by the term.
The issue is not that one color is right and another is wrong. The issue is that there is either a difference in the color temperature of two light sources or a difference between the color temperature of a light source and the color balance of the medium used to record that light.
Hollywood has long dealt with differences in the color temperature of light sources. For instance, big tungsten lights are often used outdoors to provide a broad swath of fill light on sunlit sets. Tungsten has a lower color temperature than daylight, meaning that it will appear orange on daylight film. To make the orange-tinted tungsten light appear like daylight, the grip will frame up a big sheet of CTB (color temperature blue) in front of each tungsten light. The additional blue shifts the color of the tungsten light so that it appears to the camera the same way that natural daylight appears.
1. Plusgreen
2. Half-cut CTB
3. Quarter-cut CTO
4. Half-cut CTO
5. Full-cut CTO
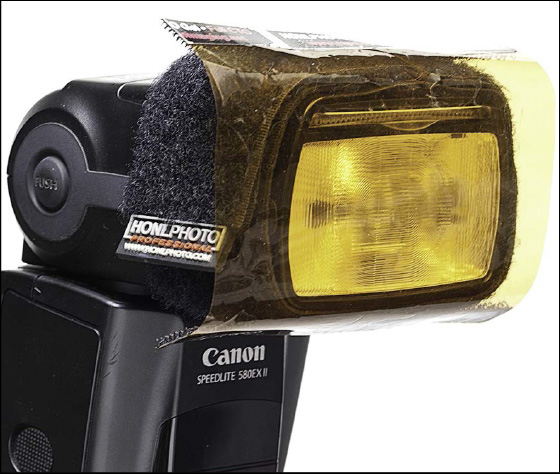
Figure 21.3 A set of color correction gels from HonlPhoto. Each gel is edged with hooked Velcro strips that attach directly to a fuzzy speed strap.
Conversely, there are daylight-balanced incandescent lights, such as the HMI (short for Hydrargyrum medium-arc iodide, which is why everyone calls these lights HMI). For daylight fill, an HMI can be used without a gel. However, if you want to use an HMI indoors and balance it with traditional tungsten lights, the grip will frame up a big sheet of CTO (color temperature orange) in front of the HMI to make it appear more orange, like the tungsten lights.
In the pre-digital era, film was balanced for either daylight or tungsten. If you shot tungsten film outdoors, the images looked very blue. If you shot daylight film indoors with tungsten illumination, the images looked too orange.
In the digital world, these differences are handled by the white balance setting (WB) in the camera. Canon’s Auto White Balance (AWB) setting is so good that perhaps you’ve never found the need to explore the dedicated white balance settings on your camera.
As you know, every time you fire your Speedlite, your photo has two types of light in it—ambient and flash. If the color temperatures match, then they will blend naturally. If the color temperature of the flash is different than the ambient, then your photo will have a color cast in either the ambient or flash.
For instance, in Figure 21.4 , the ambient and flash blend naturally in this incandescent-lit studio because I used the Tungsten WB and gelled the Speedlite with full-cut CTO. Yet, in the frame below, I switched the white balance on the camera to Daylight and the color has shifted to amber.
Likewise, in Figure 21.6 , I used the Tungsten WB, but pulled the gel from the Speedlite—so the flash appears blue. Finally, I switched back to Daylight WB with the Speedlites ungelled. The color is more neutral, but the shot appears too warm due to the incandescent lights.
An important part of being a Speedliter is to understand that the color of sunlight changes in a rhythmic manner throughout the day.
The daylight cycle starts afresh each day as the night sky gives way to the pre-dawn twilight. As the sun approaches the horizon, its rays hit the upper layers of the atmosphere. The longer red rays punch on through and keep going straight back into space. The shorter blue rays bounce off the atmosphere and come down as blueish light (Figure 21.10 ).
When the sun crosses the horizon, blue hour gives way to golden hour. Now the longer red rays punch through the thick layer of atmosphere and the shorter blue rays bounce away (Figure 21.9 ). Eventually the sun climbs high enough that the atmosphere does not significantly affect the color and we have neutral, mid-day sunlight (Figure 21.8 ).
In the afternoon, the cycle reverses. Mid-day sun merges into golden hour before sunset and blue hour follows.
Figure 21.8
This late afternoon shot, made 40 minutes before sunset, is typical of midday sunlight. The whites are neutral and the shadows are contrasty. Exposure:  ″, f/8, ISO 100.
Figure 21.9
This golden hour shot, made 10 minutes before sunset, shows the warm glow that happens when the sun is near the horizon. Exposure:  ″, f/8, ISO 100.
Figure 21.10 After the sun drops below the horizon, there is still a significant amount of light that can be captured off the dome of the sky. To make this blue hour shot nearly an hour after sunset, I made a combined change of 15.33 stops from the golden hour exposure. Note how the light takes on a soft, blue quality. Exposure: 20″, f/8, ISO 1,600.
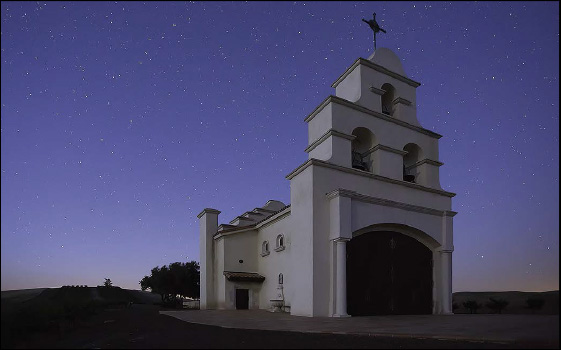
Figure 21.11 Even though I could hardly see the chapel 80 minutes after sunset, an extremely high ISO enabled me to capture enough light to make this beautiful twilight shot. Exposure: 6″, f/4, ISO 12,800.
When shooting film, the white balance is locked in for the length of the roll. In digital photography, white balance can literally be changed from shot to shot.
Today, you can think of white balance (WB) as another creative tool. By changing to a specific WB, your camera effectively adds the opposite of that light source to every pixel in the file. For instance, when you change your white balance to Tungsten, the camera adds extra blue to every pixel to neutralize the orange color cast of tungsten light.
You will recall that I have said previously that the color balance of electronic flash is very close to daylight. Hopefully, you have noticed that I do most of my flash photography with the camera set to Daylight WB.
You should consider whether you want the color cast of your flash to be the same as or different from the color temperature of your ambient light.
If you gel your Speedlite to match the camera’s WB, such as when you use a CTO gel and a Tungsten WB, then the flash will appear neutral white.
If your camera’s WB and the Speedlite’s gel do not match, then your image will have a color cast in the portion lit by the Speedlite.
If you shoot in RAW (your camera writes the files in CR2 format rather than as JPEGs), you may be used to the idea that you have complete control over changing the white balance setting of the shot later on your computer. This is the main reason that I shoot everything in either Daylight or Tungsten WB. I know that I can fine-tune the white balance of my RAW files in post-production.
When shooting with gels, however, I routinely fiddle with the WB setting on my camera so that I can see the disconnect (either intentional or unintentional) between the color of my flash and the color of the ambient light.
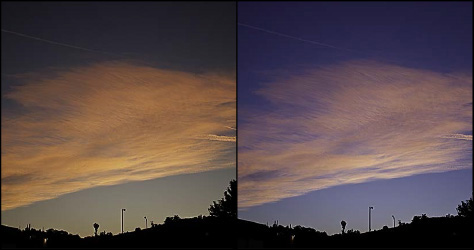
Figure 21.12 The only difference between these two frames is the white balance. At left is Daylight, and at right is Fluorescent.
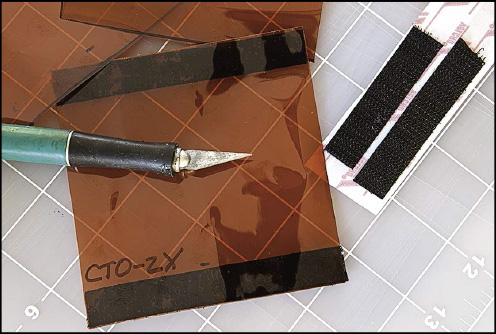
Speedliter’s Tip: —Cut Your Own Gels—
A pre-made gel system, with its collection of gels and holder, is an easy way to get started with gels. Of course, each system has its limitations.
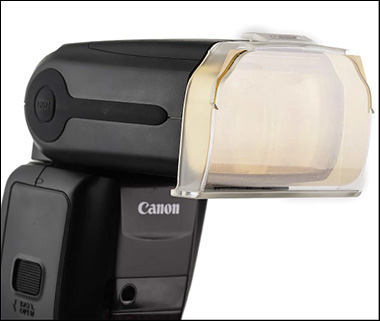
Canon provides a clip-on gel holder and two die-cut gels with the 600EX-RT (Figure 21.13 ). Further, the 600EX-RT has sensors beneath the head that sense which gel is being used. This enables the camera to shift its white balance automatically to account for the color of the gel. Unfortunately, I have found this accessory to be useless in my style of shooting. It is virtually impossible to not detach the gel holder while attaching a strap-on grid or flag. Further the range of gels is extremely limited.
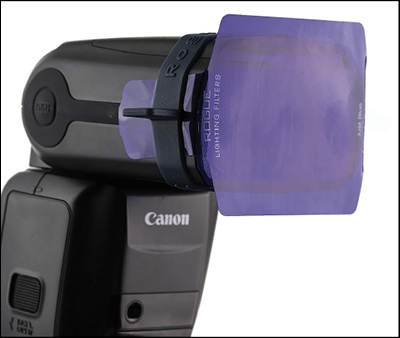
Rogue offers a nice range of color correction and color effect gels in two styles. The most versatile is the 3″ x 2.25″ gel that attaches to the Speedlite via an included band (Figure 21.14 ). There is also a die-cut set of round gels designed for use with the Rogue grid system. Each comes with a nylon case.
I am a huge fan of Rosco gels. Virtually all the colors that I list in this chapter are Rosco gels. That said, I cannot recommend their Strobist Gel collection if you shoot a 500- or 600-series Speedlite. At 1.5″ x 5.5″ the gels are too short to fully cover the face of the flashhead without taking the time to precisely position the gel (Figure 21.15 ). If you shoot the smaller Canon Speedlites, then the Strobist set is worthy of consideration.
Figure 21.13 The gel holder provided with the 600EX-RT is difficult to use with a Speedlite modifier, such as a grid or flag. Further, the gel selection is very limited.
Figure 21.15 The Rosco Strobist gel kit is a very tight fit when used with 500- and 600-series Speedlites.
For me, the most important criterion for mounting gels is speed. By speed, I mean that if a gel holder requires more than two seconds (2″) to switch out a gel, then I’m not a fan. When the sun is crashing to the horizon and I’m deciding which strength of CTO works best, I cannot afford the time it takes to use some holders.
The second critical factor to consider when evaluating gel mounts is to make sure that there are no light leaks around the gel. If there is a gap, white light will dilute the effect of the gel. For instance, I find that the Lumiquest gel holder is too small to use on Speedlites with full-sized heads (600- and 500-series).
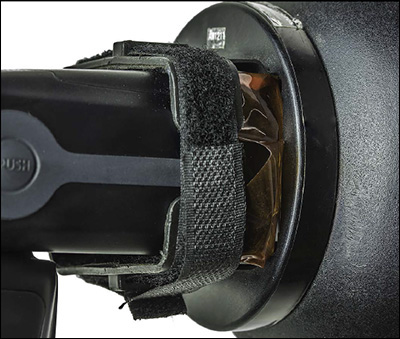
The fastest way I’ve found to mount gels is to use a fuzzy speed strap and large gels (3.75″ x 3.75″ or bigger) that have hooked Velcro along two sides (Figure 21.16 ). These straps are so important to me that I carry several spares.
One of the many uses for “gaff” is to affix gels to your Speedlites (Figure 21.17 ). I think that this is the best way to affix undersized gels to larger Speedlites (600- and 500-series) because you can assure that there is no light leak. Of course, ensuring that the gel is aligned properly takes time—sometimes too much time.
When using a gel with slip-on mods, like the Strobros Beauty Dish II and a grid, I just skip the speed strap and push the mod right over the gel (Figure 21.18 ). It takes a bit of practice and crinkles the gel, but I’ve done this successfully for years with no long-term damage to the gels.
Figure 21.16 I prefer oversized gels that I can attach or remove to a fuzzy speed strap in a split-second.
Figure 21.18 When using a strap-on mod with a gel, I skip the speed strap and press the mod over the gel.
Once you move beyond the precision of matching one light source to another, the world of gels gets very colorful. Color effect (aka theatrical) gels literally come in a rainbow of colors.
So how and why would you want to use color in your photographs? Here are a few ideas.
Create ambience
—You can change the mood of a scene completely with a gel. Want scandal? Go with red. Want sadness? Go with deep blue.
Tint the shadows
—If the key light on your subject is warm, then tint the fill light with a cool gel. The next time you watch a movie, you will see that this is done all the time.
Spruce up a dull scene
—What do you do when you arrive on location and discover that the background is plain, boring white? You can dim the ambient with the shutter and then turn the background into any color you want with a gelled Speedlite.
Speedliter’s Tip: —Neutral Density Gels—

Rosco N.3 (3402) = 1 stop. N.6 (3403) = 2 stops. N.9 (3404) = 3 stops.
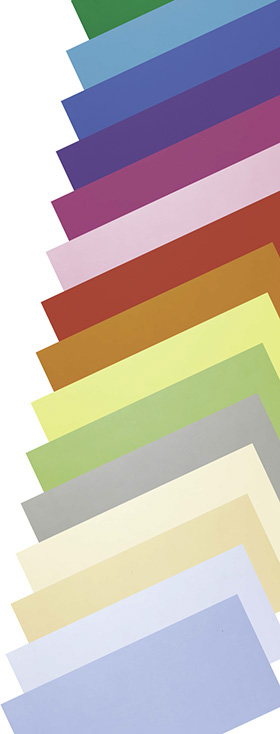
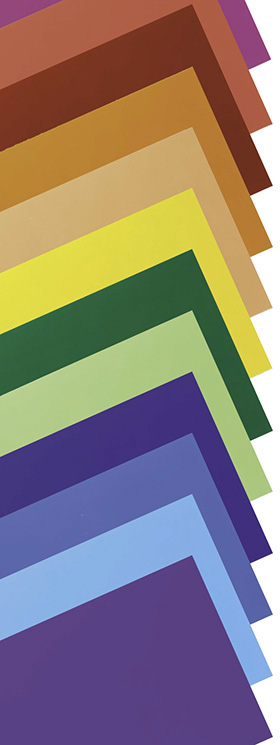
Figure 21.19 Some of my favorite Rosco gels. Top to bottom: Fischer Fuchsia, Scarlet, Medium Red, Orange, Mayan Sun, Deep Straw, Primary Green, Leaf Green, Indigo, Bright Blue, Tahitian Blue, and Rose Indigo.
When you’re starting out, you’ll do fine with the HonlPhoto color correction and color effect gel sets. Then, as you become more experienced and more obsessed, you’ll want to put together your own collection. Here’s a rundown of my favorite gels. The numbers listed are from the Rosco gel catalog.
CTO / Color Temperature Orange —full (3407), half (3408), and quarter (3409)—these are the must-have gels for blending Speedlites with incandescent and warm fluorescent bulbs. These are also the gels I use to blend fill flash in with golden hour sunlight and to create the look of golden hour light from scratch. Carry all three strengths so that you can fine-tune the color of your flash.
Roscolux Colors —I’ve picked these twelve colors as a basic rainbow of gels. They are shown on the opposite page top to bottom as listed here—Fischer Fuchsia (349), Scarlet (24), Medium Red (27), Orange (23), Mayan Sun (318), Deep Straw (15), Primary Green (91), Leaf Green (386), Indigo (59), Bright Blue (79), Tahitian Blue (369), and Rose Indigo (358).
Plusgreen —full (3304) and half (3315)—helpful if you shoot Speedlites under old fluorescent lights. Modern CFLs are typically warm (tungsten-balanced, Figure 3.3 ) or cool (daylight-balanced, Figure 3.4 ) and, thus, do not require the use of a Plusgreen gel.
Vapor —Industrial (3150)—sometimes helpful when shooting Speedlites under sodium-vapor.
CTB / Color Temperature Blue
—CTBs are used on tungsten lights to move them towards daylight. Speedlites are already daylight balanced, so CTBs are of little use this way. If you are really fanatical, you can use a  -cut of CTB with the open shade white balance. I don’t.
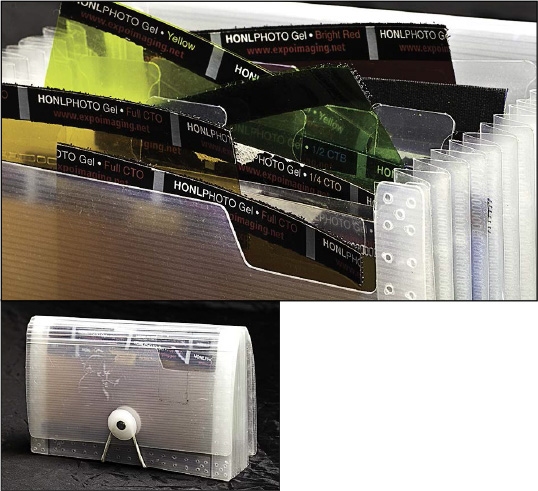
Speedliter’s Tip: —A Wallet For Your Gels—
Speedliter’s Tip: —Unbind The Rosco Swatchbook—

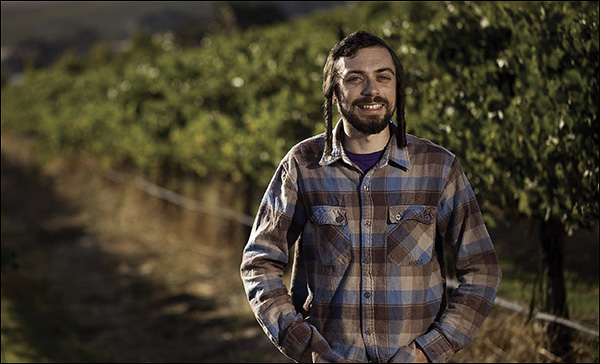
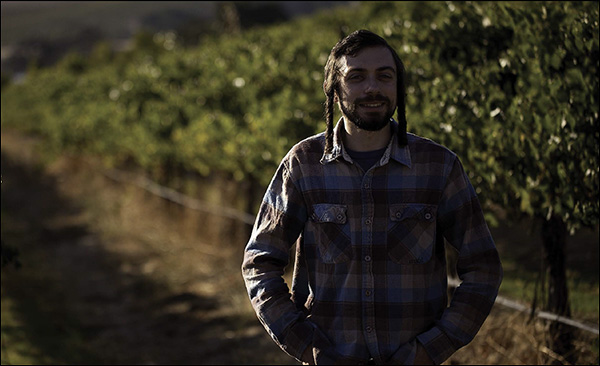
I like shooting towards the sun. This is particularly effective with location portraits as it creates a bright outline across the subject’s hair and shoulders. The problem is that our cameras cannot capture this bright light and the details in the shadows at the same time. Your Speedlite will be happy to come to the rescue.
Unless you are looking to turn your subject into a silhouette, you will need to use your Speedlite to add fill light that will open up the shadow details when you point your camera toward the sun. There are a couple of considerations for fill light: where the Speedlite should be placed, and how to modify it.
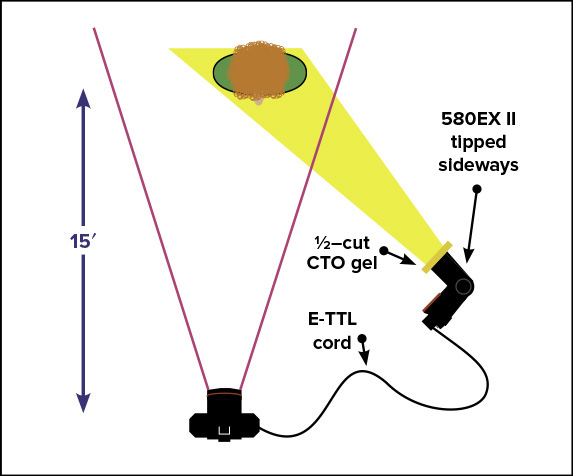
While you certainly can use your Speedlite on-camera for fill flash (as the Canon engineers designed it), I prefer to move my Speedlite off-camera. Usually, I will place it opposite the sun. I imagine a line that runs from the sun’s direction through the subject, and I place my Speedlite along that line.
As for whether to modify the Speedlite or not, this depends on two things: how much fill flash I need to get out of the Speedlite, and the quality of light that I’m looking for. I encourage you to try both straight flash and softening the fill by bouncing the Speedlite into a large reflector.
In this shoot, I used a  -cut of CTO gel to warm the fill. As shown in the top photo, I think there is a natural blending of the fill on Misha’s face with the warmth of the sunlight on the background. If ungelled, the fill flash would have been very cool and unnatural.
Environment: Vineyard
Time of Day: Late afternoon
Ambient: Direct sun
Speedlite: One 580EX II
Mode: E-TTL
FEC: 0 FEC
Zoom: 105mm
Gel:
-cut CTO
Modifier: None
Distance: About 12′ to subject
Height: About 1′ above subject’s head
Trigger: Extra-long E-TTL cord
Camera: 5D Mark II
Lens: 100mm f/2.8L Macro IS
Distance to Subject: 15′
Exposure Mode: Aperture Priority
Exposure Compensation:
– stop
stop
Exposure:
 ″, f/2.8, ISO 100
White Balance: Daylight
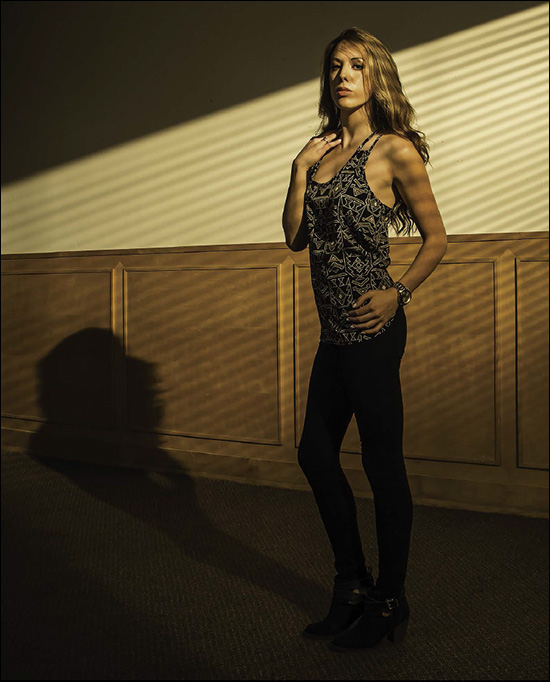
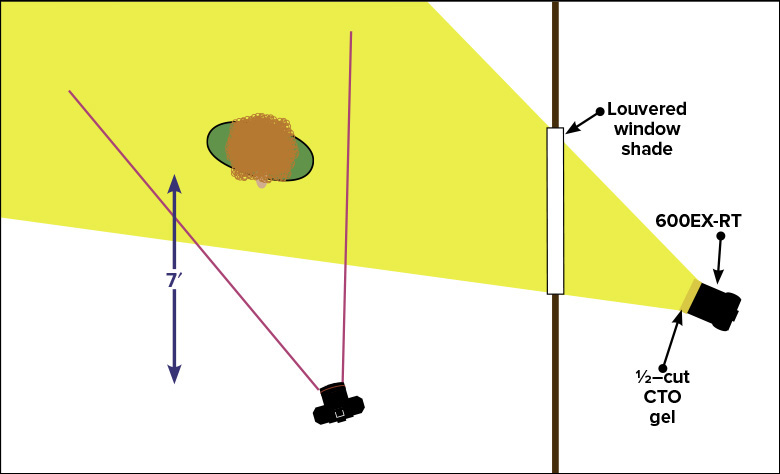
My sensei, Joe McNally, taught me this technique years ago: Gel a flash with CTO and park it outside a window to create the look of golden hour indoors at any time.
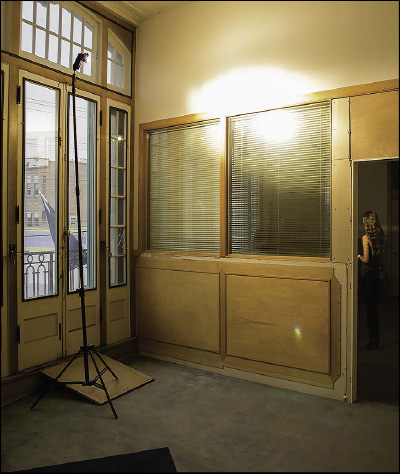
There are two characteristics of sunlight just after sunrise and just before sunset: shadow angle and color. To successfully create the illusion of a rising/setting sun, it is best to cast long, angled shadows by positioning the flash outside a window—even an indoor window (Figure 21.23 ). It is difficult to pull off this shot with the flash in the same room as the subject.
The second factor in making the shot believable is to color the flash—which is somewhat like adding salt to soup—you do it to taste. I have lived my entire life in the Pacific Southwest. For me, golden hour has a distinctly golden hue. Yet, when I teach in northern latitudes, I have noticed that golden hour is much paler. So the choice of color is up to you. Generally, I use a half- or full-cut of CTO and fine-tune the shot from the RAW file.
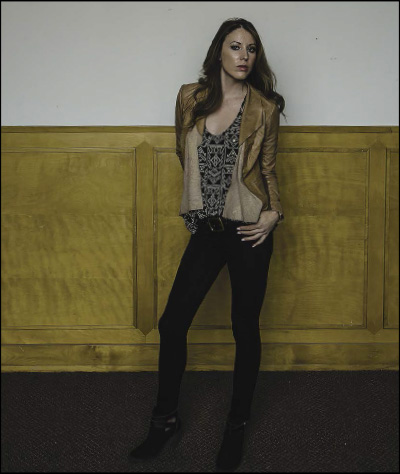
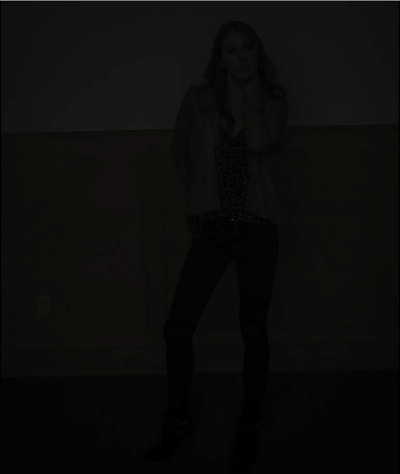
The first step in creating the look of golden hour is to take out all the ambient light in the shot. Compare Figures 21.24 and 21.25 to see the effect that a three-stop increase in my shutter speed had on the ambient light. You want to get to a nearly-black frame so that you can control every aspect of the light coming through the window.
When you throw a bunch of shadows across a room, you do not want one of those shadows to hide your subject’s eyes. So, ask her to move slowly until she can see the face of the Speedlite. Then you will know that her eyes will not be in shadow. Tip: Do this without firing the flash, if you want to remain friends.
Environment: Indoors
Time of Day: Not a factor
Ambient: Cloudy daylight
Speedlites: One 600EX-RT
Mode: Manual
Zoom: 200mm
Gel:
-cut CTO
Modifier: Window shade
Distance to Subject: 12′
Height: 8′
Trigger: ST-E3-RT Transmitter
Camera: 5D Mark III
Lens: 24–105mm f/4L at 24mm
Distance to Subject: 7′
Exposure Mode: Manual
Exposure:
 ″, f/8, ISO 400
White Balance: Daylight
Figure 21.25 A three-stop increase in my shutter speed removed most of the ambient light out of the shot.
Figure 21.26
The dramatic shadows in the hero shot were created by placing the Speedlite outside the window. The golden color was created with a
–cut CTO gel.
Trust me on this one—you can make the sky turn bluer by strapping an orange gel to your Speedlite. Like I said, trust me.
The first step is to shift your camera into Tungsten white balance. The Tungsten white balance counteracts the orange tint of incandescent lights by adding a blue tint to the entire frame. Under tungsten lights, this additional blue makes the whites appear white. This also means that, under daylight, the entire frame will seem slightly blue.
The second step is to shift the color of your Speedlites so that they appear like tungsten—which means that the light from your Speedlite will appear white to the camera. Generally it takes a full cut of CTO to make the Speedlite look neutral with a Tungsten white balance. If you want the subject to have a warmer look, add another
-cut or full cut on top.
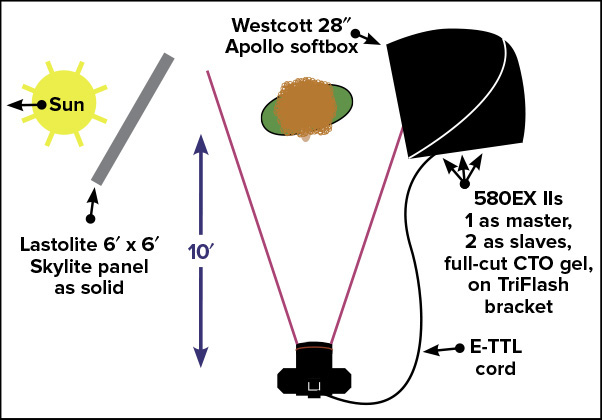
Make it easy on yourself by putting your subject in shade and pointing the camera towards the north sky. If there is no source of shade, then make your own. For this shoot, two of my sons, Vin and Tony, managed the 6′ x 6′ Lastolite Skylite panel—which you can see in Figure 21.33 .
Environment: Outdoors
Time of Day: Late afternoon
Ambient: Direct sun, blocked with panel
Speedlites: Three 580EX IIs in softbox
Mode: E-TTL
FEC: 0
Zoom: 24mm
Gel: Full-cut CTO
Modifier: Westcott 28″ Apollo softbox
Distance: 4′
Height: Softbox 2′ above Colin’s head
Trigger: Cord to master inside Apollo
Camera: 5D Mark II
Lens: 24–70mm f/2.8L
Distance to Subject: 10′
Exposure Mode: Aperture Priority
Exposure Compensation: 0
Exposure:
 ″, f/5.6, ISO 100
White Balance: Tungsten
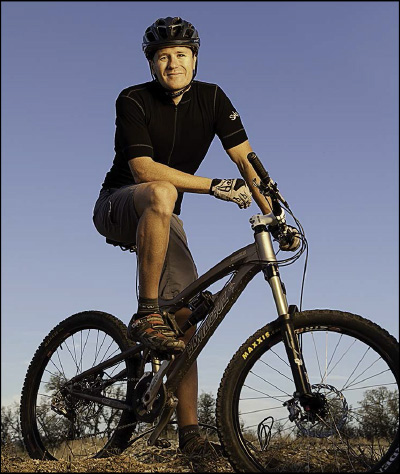
Figure 21.30 Daylight WB with full-cut CTO on the Speedlites. Colin’s skin is too warm, and the sky is too dull.
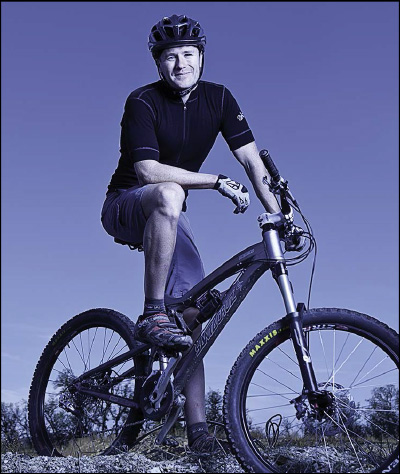
Figure 21.32 Tungsten WB and full-cut CTO on the Speedlites. Colin’s skin has returned to a more natural tone.
Figure 21.33 Our set was a spot on the side of the road. To left: the Lastolite Skylite panel that we used to put Colin in the shade. To right: the Westcott Apollo 28″ softbox with a TriFlash bracket holding three Speedlites inside.
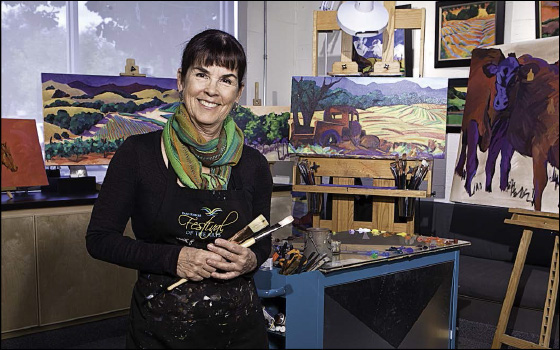
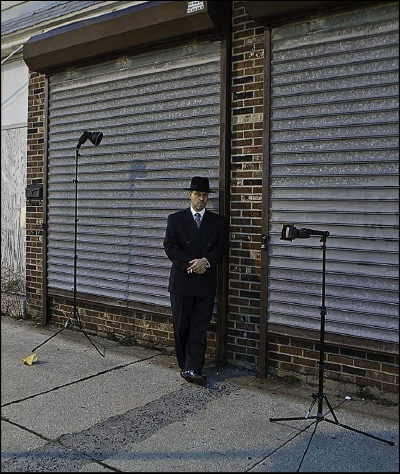
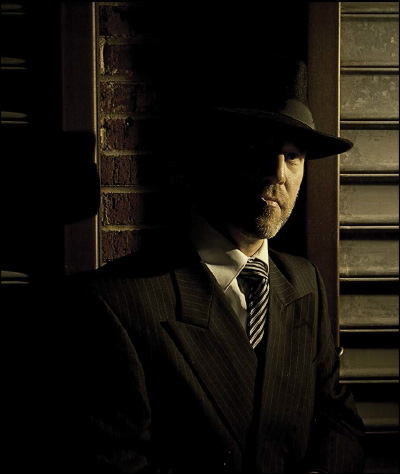
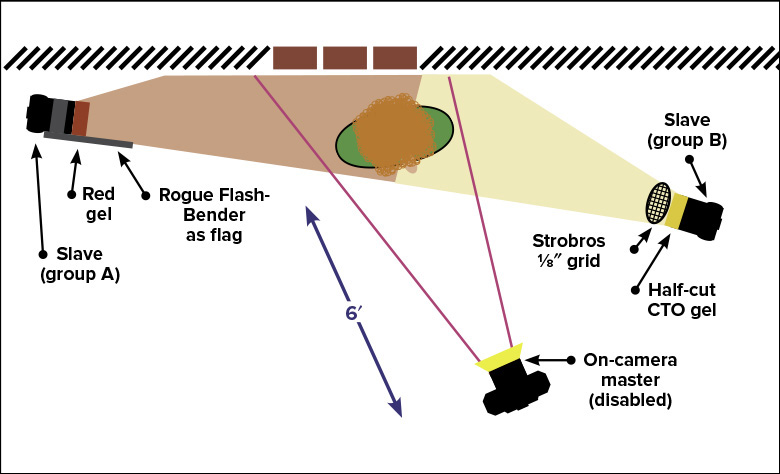
My friend Mark is a fanatic about film noir and the many novelists who feed the genre. For years, Mark has made an amazing series of self-portraits that you would swear are still frames from vintage detective movies. When I set out to shoot Mark’s portrait, there was no question about what he would wear and how I would light the shot. As I am obsessed with color, I lit the set in noir-style, but did not hesitate to reach for my gel kit.
You can see the set, an abandoned storefront lit by a streetlight, in Figure 21.34
—a shot created by locking the camera on a tripod and using a 3″ shutter speed (which is why Mark is leaning against the building). Dialing the shutter to  ″ (slightly more than -7 stops) sucked out the sodium-vapor light and gave me a black frame. This important step let me know that every bit of light in my shots after the black frame was light that I created.
For consistency when gelling, it’s important to set the white balance of the camera to something other than auto (AWB). In AWB the color will change from shot to shot as you adjust the gels. So, as I usually do, I used Daylight WB.
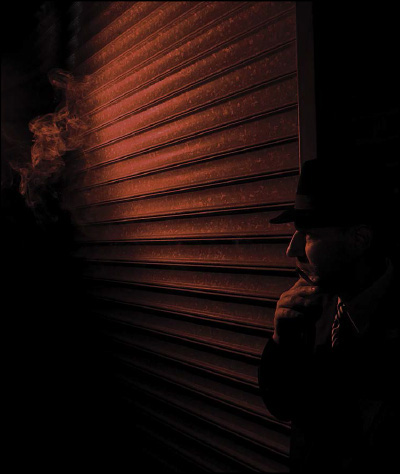
On the left side of the set, as shown in Figure 21.34 , I gelled the Speedlite with medium red and flagged the light from the lens with the large Rogue FlashBender. The role of this light was to cast red light on the steel door. I wanted to suggest that there was an old neon sign just out of frame.
To the right of the camera, I gelled the flash with a half-cut of CTO and gridded it with the Strobros  ″ grid. The half-CTO warms the light on Mark just a bit—suggesting the look of an incandescent lamp nearby. The grid makes the light directional.
I came to this shoot with a preconceived idea of the noir-style light that I wanted to create. About halfway through, I fired the camera before the second slave had recycled. I then realized from this “accident” that I had other options for the lighting. You can see how I explored these other options in Figures 21.35 and 21.36 . Both also fit into the noir theme.
Environment: Neglected urban street
Time of Day: 90 minutes after sunset
Ambient: Sodium-vapor street light overhead
Speedlites: Two 580EX IIs
Mode: Manual
Power Levels:
Left slave:
, right slave:
Zoom: Both slaves, 24mm
Gel: Left slave: Medium Red, right slave: half-CTO
Modifier:
Right slave: Strobros
grid
Distance: Left slave: 6′, right slave: 4′
Height: Left slave: 8′, right slave: 3–4′
Trigger: Canon optical wireless, 580EX II in hotshoe as a disabled master
Camera: 5D Mark II
Lens: 24–70mm f/2.8L
Distance to Subject: ranged from 2′ to 8′
Exposure Mode: Manual
Exposure:
″, f/11, ISO 400
White Balance: Daylight
Figure 21.37 Once the lighting was set, I asked Mark to play the role of a street-wise detective on the hunt for the “perp” while trying to avoid bumping into his “dame.”