PROVENÇAL DAGWOOD | PAGE 392
Traditionally, the American barbecue was a relentless procession of meat dishes. If you didn’t like hamburgers, hot dogs, shish kebab, or steak, you were pretty much out of luck. No wonder many vegetarians found it easier to stay at home rather than to deal with making a meal from coleslaw and potato salad.
Fortunately, times have changed. As more and more Americans switch to at least a partially vegetarian diet, chefs and pit masters have turned their talents to meatless grilling. Vegetarian barbecue has gone full force from the fringe into the culinary mainstream.
This chapter focuses on a number of the world’s great grilled vegetarian main dishes, from Swiss raclette to Indian vegetable kebabs to Japanese dengaku (a whimsical dish with a name that means tofu on stilts). Who says you need meat?
That’s not just boosterism on my part. When I was writing The Barbecue! Bible, both my wife and daughter had given up eating meat (both have since come to take a more accepting view of animal protein). Vegetarian grilling was one way we could continue to have family meals. But, don’t take my word for it. Try the recipes in this chapter and you, too, will see: You don’t need meat to have a great time at a barbecue.
I’ll never forget the first time I tasted grilled pizza. The year was 1985, and the place was Al Forno restaurant in Providence, Rhode Island. The waitress set before me a rectangle of dough, cracker crisp at the edges, smokily singed on the bottom, moistly chewy in the center, and simply topped with puddles of fresh tomato sauce, a dusting of grated cheese, and a handful of chopped fresh basil. It was everything pizza should be—and more—boasting the primeval smoke flavor of Indian tandoori breads combined with the puffy moistness of freshly baked pita. It was love at first bite.
Al Forno owners Johanne Killeen and George Germon created their grilled pizza somewhat by accident. “A vendor told us about a grilled pizza he’d had in Italy,” recalls Johanne. “We realized he had probably mistaken a wood-fired oven for a grill, but we were intrigued enough to try to cook the dough on the grill.”
Grilled pizza is easy to make, impressive to serve, and about one of the best tasting things you’ll ever put in your mouth. Just remember a few simple points to watch. First, set up the grill for two-zone grilling, so that you have a hotter section (over which to sear the dough) and a cooler section (over which to keep the pizza warm without burning the bottom while you put on the toppings).
Second, make the pizzas by stretching out the dough in olive oil instead of rolling it in flour (the oil helps the dough crisp). The first stretch you make will shrink most of the way back. Keep stretching; eventually, you’ll achieve the proper shape and thinness.
Finally, keep in mind that the topping goes on a grilled pizza in the opposite sequence of a conventional pizza: first the olive oil, then the cheese, and finally the tomato sauce or tomatoes. This allows the cheese to melt even though it isn’t exposed to direct heat. Here’s the basic dough, plus two grilled pizzas that will change the way you think about pizza forever.
Al Forno’s dough owes its earthy flavor to the use of three different types of flour: white flour, whole wheat flour, and stone-ground cornmeal.
ADVANCE PREPARATION
2 to 3 hours for making and raising the dough
INGREDIENTS
1 envelope active dry yeast
1 teaspoon sugar
2 teaspoons coarse salt (kosher or sea)
3 tablespoons fine white cornmeal
3 tablespoons whole-wheat flour
1 tablespoon extra-virgin olive oil, plus oil for the bowl
3 to 3½ cups unbleached all-purpose flour, or more as needed
1. Place 1 cup of warm water in a large bowl and add the yeast and sugar. Stir until the sugar dissolves, then let the yeast mixture sit for 5 minutes. Stir in the salt, cornmeal, whole-wheat flour, and olive oil. Gradually stir in enough all-purpose flour to form a dough that comes away from the side of the bowl. Knead the dough on a floured work surface, or in a food processor or mixer fitted with a dough hook, until it is smooth and elastic. The dough should be soft and pliable, but not sticky. Kneading should take 6 to 8 minutes.
2. Lightly oil a clean large bowl. Place the dough in the bowl, brush the top with olive oil, and cover it loosely with plastic wrap. Let the dough rise in a warm, draft-free spot until doubled in bulk, 1 to 2 hours. Punch down the dough.
3. Let the dough rise until doubled in bulk again, 40 to 50 minutes. Punch the dough down and divide it into 2 equal pieces. Shape each piece of dough into a ball, then flatten them slightly so they resemble thick disks. You’re now ready to make the pizzas.
Here’s a grilled version of the simplest of all pizzas, the Margherita. To heighten the grilled flavor, I like to char the tomatoes. Once the slices are charred, you can dice the tomatoes before using them to top the crust.
2 large ripe tomatoes, cored and sliced crosswise ½ inch thick
6 tablespoons extra-virgin olive oil, or more as needed
Coarse salt (kosher or sea) and freshly ground black pepper
1 recipe Basic Pizza Dough (previous)
2 cloves garlic, minced
⅔ cup shredded or diced Italian Fontina cheese
⅓ cup freshly grated Pecorino Romano cheese
16 fresh basil leaves
1. Set up the grill for two-zone grilling (see page 18), preheating two thirds of the grill to medium and leaving one third heat free as a safety zone.
2. When ready to cook, brush each tomato slice with a small amount of olive oil and season it with salt and pepper to taste. Char the tomato slices on the hot side of the grill, turning them with a spatula, about 2 minutes per side. Transfer the tomato slices to a plate and let cool. Leave the fire burning.
3. Generously oil a large baking sheet and place one disk of pizza dough on it. Using your fingers and the palms of your hands, stretch out the dough into a 13 by 9–inch rectangle (it doesn’t need to be too even). This stretching technique takes a little practice, so don’t be discouraged if your first rectangle isn’t picture-perfect. Stretch out the remaining disk of pizza dough to the same size on a second oiled baking sheet.
4. Working with one rectangle of dough at a time and using both hands, gently lift the dough from the baking sheet. Drape it on the grill grate over the hot zone of the grill. Within a minute or so, the underside of the dough will crisp, darken, and harden and the top will puff slightly. Using tongs or two spatulas, turn the dough over and move it to the cool zone of the grill.
5. Quickly brush the top of the pizza with 1 tablespoon of the olive oil. Scatter half of the garlic on top, then sprinkle half of the Fontina and Pecorino Romano cheese over it and arrange half of the tomato slices and 8 basil leaves on top. Drizzle another tablespoon of olive oil over the top of the pizza and season it with salt and pepper to taste.
6. Slide the pizza back over the hot zone of the grill, rotating it to ensure even cooking. Cook the pizza until the underside is slightly charred and the cheese is melted on top, 2 to 4 minutes.
7. Remove the pizza from the grill, cut it into serving pieces, and serve it, then repeat the procedure with the second rectangle of dough and the remaining ingredients.
When making grilled pizza, Al Forno owners Johanne and George urge that you keep the toppings simple. You don’t want to mask the flavor of the grilled dough.
1 recipe Basic Pizza Dough (page 382)
6 tablespoons extra-virgin olive oil, or more as needed
2 cloves garlic, minced
1 cup shredded Bel Paese cheese
6 tablespoons freshly grated Parmesan cheese
2 large ripe tomatoes, peeled and seeded (see page 454), then coarsely chopped
24 arugula leaves (from 1 bunch, rinsed and stemmed)
1. Prepare the pizza as described in the recipe for Grilled Pizza with Tomato, Basil, and Cheese, working with one rectangle of dough at a time. After you turn over the dough for each pizza, sprinkle the top of each with half of the Bel Paese and Parmesan cheese, followed by half of the chopped tomatoes. Arrange 12 arugula leaves on top of each pizza.
2. Slide the pizza back over the hot zone of the grill, rotating it to ensure even cooking. Cook the pizza until the underside is slightly charred and the cheese is melted on top, 2 to 4 minutes.
3. Remove each pizza from the grill when it is done and cut it into serving pieces.
Raclette is the original grilling cheese. For centuries, this Franco-Swiss favorite has been melted in front of a fire and served over boiled potatoes or bread. The term raclette describes both the dish and the cheese used to make it. The latter is a large, disk-shaped semifirm cow’s milk cheese, about three inches thick and weighing thirteen to seventeen pounds. It has a 45 percent butterfat content. The nonedible, dark beige rind encases a robustly flavored cheese.
2 pounds small red potatoes, scrubbed and cut in half
Salt
30 tiny pickled (cocktail) onions, drained
30 small sour pickles, such as cornichons, drained
6 thick slices rye bread or country-style bread
1 wedge (2½ to 3 pounds) raclette cheese (see Note)
1. Place the potatoes in a pot with salted water to cover. Bring to a boil over high heat, then reduce the heat to medium and let the potatoes simmer until tender, about 10 minutes. Drain the potatoes in a colander, rinse them with cold water, and drain again. Divide the potatoes, onions, and pickles among 6 serving plates and set aside.
2. If cooking the raclette next to a fireplace or wood stove, build a brisk fire. If using a grill, set it up for direct grilling and preheat to high.
3. When ready to cook, spear the bread on a long-handled fork (or hold it with tongs) and toast it in front of the fire. Alternatively, you can toast the bread on the hot grill grate, turning it with tongs, 1 to 3 minutes per side. Divide the toasted bread among the serving plates with the potatoes, onions, and pickles.
4. To make the raclette:
If cooking in a fireplace, using long-handled, spring-loaded tongs, hold the cheese next to the fire until the surface begins to melt, 2 to 4 minutes. Scrape a small amount of the melted cheese onto each plate over the bread, potatoes, onions, and pickles. Return the cheese to the fire and continue until you have melted as much as you need.
If cooking on a grill, brush and oil the grill grate and place the cheese directly on it. Cook the cheese until the bottom is melted, about 2 minutes. Scrape a small amount of the melted cheese onto each plate over the bread, potatoes, onions, and pickles. Return the cheese to the grate and continue until you have melted as much as you need.
NOTE: You’ll need about 2½ pounds of cheese to serve 6 people. But when working in front of a fire, it’s easier to work with a larger piece—say 4 to 6 pounds. It will hold up better in front of the flames. Use the leftover cheese at another grill session.
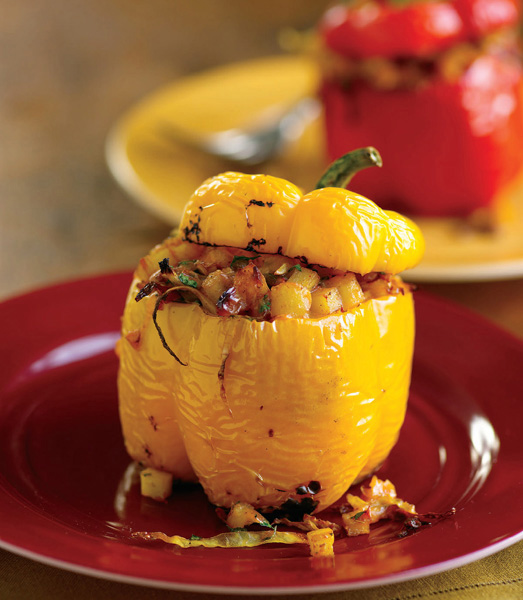
Stuffed peppers turn up at tandoori parlors throughout northern India. The pepper in question looks like a miniature green bell pepper but is hotter. The overall effect is a cross between an American green bell pepper and a Mexican chile poblano. I compensate for the lack of heat in our peppers by adding a good dose of cayenne to the filling. Incidentally, the filling is a meal in itself—a soulful stew of onion, potato, cabbage, and cashew nuts assertively seasoned with spices and cheese. Indians would roast the stuffed peppers on vertical spits in a tandoor. The upright position keeps the filling from falling out. Lacking a tandoor, the best way to cook the peppers is to stand them upright on the grate, and grill them using the indirect method. Although not traditional, yellow or red bell peppers are delicious for stuffing too.
FOR THE BELL PEPPERS AND MARINADE
4 large yellow, red, or green bell peppers
2 tablespoons fresh lemon juice
1 tablespoon vegetable oil
1 clove garlic, coarsely chopped
1 piece (½ inch) peeled fresh ginger
¼ teaspoon salt
FOR THE FILLING
2 tablespoons vegetable oil
½ teaspoon cumin seeds
½ teaspoon ground turmeric
¼ teaspoon cayenne pepper, or more to taste
1 medium-size onion, finely chopped
1 clove garlic, minced
1 potato (about 10 ounces), peeled and cut into ¼-inch dice
⅓ small head green cabbage, cored and thinly sliced
1 large ripe tomato, finely chopped
2 tablespoons cashew nuts, coarsely chopped
2 tablespoons golden raisins (optional)
¼ cup finely chopped fresh cilantro
½ cup grated Gouda or mild Cheddar cheese
Salt
1. Prepare the bell peppers and marinade: Carefully cut the caps (the stem ends) off the bell peppers and set them aside. (Each cap section should be about ½ inch deep.) Using a spoon or melon baller, scrape the veins and seeds out of the bell peppers. Set the bell peppers aside, with their caps.
2. Combine the lemon juice, 1 tablespoon of oil, chopped garlic, ginger, and ¼ teaspoon of salt in a food processor or blender and process until smooth. Using a pastry brush, paint the insides of the bell peppers and their caps with the marinade, then set the peppers aside to marinate.
3. Make the filling: Heat the 2 tablespoons of oil in a large skillet or saucepan over medium heat. Add the cumin seeds, turmeric, cayenne, onion, and minced garlic and cook until the onion is just beginning to brown, about 5 minutes. Stir in the potato, cabbage, tomato, cashews, and raisins (if using) and cook for 2 minutes. Reduce the heat to low, cover the pan, and cook the vegetables until soft, stirring occasionally, 10 to 15 minutes. Check after 10 minutes, and if the vegetables look wet, uncover the pan for the last 5 minutes of cooking to evaporate any excess liquid. Stir in the cilantro and cook for 1 minute. Stir in the cheese. Remove pan from heat and taste for seasoning, adding salt to taste and more cayenne as necessary; the filling should be highly seasoned.
4. Spoon the filling into the bell peppers. If they don’t stand up on their own, position them on rings made from crumpled aluminum foil. Place the caps on top. The peppers can be stuffed up to 6 hours ahead and refrigerated, covered loosely with plastic wrap.
5. Set up the grill for indirect grilling, place a drip pan in the center, and preheat to high.
6. When ready to cook, place the stuffed peppers in the center of the hot grate away from the heat. Cover the grill and cook the peppers until they are nicely browned and tender, 20 to 30 minutes. I like to move the peppers directly over the flames for a few minutes at the end to lightly char the skins. Serve the peppers at once.
TANDOORI PEPPERS | PREVIOUS
This ingenious recipe was inspired by Manu Mehta, executive chef at the Sheraton Rajputana hotel in Jaipur. Mehta caters to a large vegetarian clientele, so he created a meatless version of the local barbecue, sula—literally rabbit. He makes the dish with paneer (a white Indian cheese) instead of the traditional game—hence the nickname “white rabbit.” Paneer is a soft but solid cheese, not unlike farmer’s cheese or Hispanic queso blanco.
The chef and I agreed you could also make this dish with a thoroughly non-Indian ingredient with a consistency very similar to paneer: tofu. If you’ve ever complained that tofu is bland, this is the recipe for you. The bean curd receives a double blast of flavor: first from the cilantro and mint stuffing, then from the garlic, ginger, and jalapeño marinade. Add the charcoal flavor imparted by grilling and you have a dish guaranteed to turn skeptics into believers.
ADVANCE PREPARATION
30 minutes for draining the tofu, plus 4 hours for marinating the tofu
FOR THE TOFU AND FILLING
2 pieces (each 1 pound) extra-firm tofu
3 tablespoons chopped fresh cilantro
3 tablespoons chopped fresh mint or additional cilantro
1 scallion, both white and green parts, trimmed and coarsely sliced
1 to 2 jalapeño peppers or other hot peppers, seeded
1 tablespoon fresh lemon juice
1 tablespoon vegetable oil
¼ teaspoon salt
FOR THE MARINADE
3 cloves garlic, sliced
1 piece (1 inch) peeled fresh ginger, sliced
1 jalapeño pepper, seeded
2 tablespoons vegetable oil
1 tablespoon sweet paprika
1 teaspoon ground coriander
½ teaspoon cayenne pepper, or more to taste
½ teaspoon salt, or more to taste
¾ cup plain whole-milk yogurt ¼ cup heavy (whipping) cream or sour cream
3 tablespoons chopped fresh cilantro
1 tablespoon fresh lemon juice, or more to taste
3 tablespoons unsalted butter, melted
1. Prepare the tofu and filling: Rinse the tofu under cold running water and drain it. Place a cutting board on a slight incline in the sink. Place the tofu on the cutting board and put a heavy plate or pot lid on top of the tofu to press out the excess liquid; this will take about 30 minutes.
2. Cut each piece of drained tofu horizontally in half, then cut each of these pieces in half crosswise. Arrange the pieces of tofu flat at the edge of a cutting board. Holding the blade of a paring knife parallel to the cutting board, cut a deep pocket in one side of each piece of tofu.
3. Combine the 3 tablespoons of cilantro, the mint and scallion, 1 to 2 jalapeños, lemon juice, 1 tablespoon of oil, and ¼ teaspoon of salt in a food processor and process to a coarse paste. Spoon equal amounts of filling into the pocket in each piece of tofu.
4. Prepare the marinade: Combine the garlic, ginger, jalapeño, 2 tablespoons of oil, and 2 tablespoons of water in a food processor or blender and process to a smooth paste. Transfer the marinade to a small bowl and stir in the paprika, coriander, cayenne, ½ teaspoon salt, yogurt, cream, 3 tablespoons of cilantro, and 1 tablespoon lemon juice. Taste for seasoning adding more cayenne, salt, and/or lemon juice as necessary; the marinade should be highly seasoned. Pour one third of the marinade over the bottom of a nonreactive baking dish and arrange the stuffed tofu on top. Pour the remaining marinade over the tofu. Let the tofu marinate in the refrigerator, covered, for 4 hours.
5. Set up the grill for direct grilling and preheat to high.
6. When ready to cook, brush and oil the grill grate. Remove the tofu from the marinade and discard the marinade. Arrange the tofu on the hot grate. Grill the tofu, turning it carefully with a spatula, until nicely browned and thoroughly heated through, about 4 minutes per side. Brush the tofu once or twice with some of the melted butter as it grills.
7. Transfer the tofu to serving plates or a platter and brush it once more with melted butter before serving.
Dengaku is a popular dish at the teahouses that line the lovely Philosopher’s Walk in Kyoto. The dish takes its curious name from the Japanese word for stilt. The stilts in question are two bamboo skewers that are used to hold the piece of tofu over the coals as it grills. The traditional grill for cooking dengaku does not have a grate. Instead, the skewers are propped up over the flames and the tofu is grilled in midair—what I call grateless grilling. Acceptable results can be obtained on a regular grill or hibachi, but you will lose some glaze.
ADVANCE PREPARATION
30 minutes for draining the tofu
SPECIAL EQUIPMENT
16 long bamboo skewers and an aluminum foil shield (see box, page 23)
INGREDIENTS
2 pieces (each 1 pound) extra-firm tofu
½ cup white miso
2 tablespoons mirin (sweet rice wine) or cream sherry
2 tablespoons sake
2 tablespoons sugar
1 tablespoon mayonnaise
1 tablespoon sesame seeds, toasted (see box, page 113)
1. Rinse the tofu under cold running water and drain it. Place a cutting board on a slight incline in the sink. Place the tofu on the cutting board and put a heavy plate or pot lid on top of the tofu to press out the excess liquid; this will take about 30 minutes.
2. Combine the miso, mirin, sake, sugar, and mayonnaise in the top of a double boiler and whisk until smooth. Cook the miso glaze over gently simmering water until thick and creamy, about 3 minutes.
3. Cut each piece of drained tofu horizontally in half, then cut each of these pieces in half crosswise. Push 2 skewers through each piece of tofu, starting at a narrow end.
4. Set up the grill for direct grilling and preheat to high. If desired, use a grateless grill setup (see box, page 211).
5. When ready to cook, arrange the tofu on the grill as described for grateless grilling or brush and oil the grill grate and place the tofu directly on it with the aluminum foil shield under the ends of the skewers. Grill the tofu, turning with a spatula, until it is lightly browned on each side, 3 to 4 minutes per side. Brush the tofu with the miso glaze as it cooks.
6. Transfer the tofu to serving plates or a platter, sprinkle the sesame seeds on top, and serve at once.
When I was growing up, no one knew from vegetarian burgers. Today, they’ve become big business, as more and more health-conscious Americans adopt at least partial vegetarian diets. The following recipe combines mushrooms, oats, and brown rice in a patty that looks somewhat like a hamburger and has a rich, earthy flavor that could almost be described as meaty. It’s also a great way to use up leftover brown rice. Note that vegetarian burgers are more fragile than beef or lamb burgers. Cook them on a well-oiled vegetable grate and turn them as gently as possible with a spatula.
ADVANCE PREPARATION
4 to 5 hours total for chilling the burger mixture and patties
SPECIAL EQUIPMENT
Vegetable grate
2 tablespoons extra-virgin olive oil
1 medium-size onion, finely chopped
2 cloves garlic, minced
8 ounces white mushrooms, wiped clean with dampened paper towels and finely chopped
1 cup cooked brown rice
½ cup quick oats
4 ounces coarsely grated sharp Cheddar cheese (about ¾ cup)
1 egg, lightly beaten
Salt and freshly ground black pepper
2 to 3 tablespoons fine dry bread crumbs, as needed
FOR SERVING
½ head iceberg lettuce, thinly sliced
1 large ripe tomato, thinly sliced
1 large onion (optional), thinly sliced
Pickle slices
4 whole-wheat hamburger buns
Ketchup and/or mayonnaise and/or mustard
1. Prepare the burger mixture: Heat the olive oil in a nonstick skillet over medium heat. Add the onion and garlic and cook until soft but not brown, about 4 minutes. Increase the heat to medium-high, add the mushrooms, and cook, stirring occasionally, until tender and most of the mushroom liquid has evaporated, about 4 minutes.
2. Stir in the brown rice and cook for 1 minute. Transfer the mushroom mixture to a large bowl. Stir in the oats, Cheddar cheese, and egg. Season with salt and pepper to taste. If the burger mixture seems too moist, add the bread crumbs. Cover the burger mixture and refrigerate it until firm, 3 to 4 hours.
3. Line a baking sheet or large plate with plastic wrap. Divide the burger mixture into equal portions. Lightly wet your hands with cold water, then form each portion of the burger mixture into a patty. Place the patties on the prepared baking sheet, cover them loosely with plastic wrap, and refrigerate for 1 hour. Arrange the lettuce, tomato slices, onion slices (if using), and pickles on a platter and set aside.
4. Set up the grill for direct grilling and preheat to high.
5. When ready to cook, place a vegetable grate on the hot grill and preheat it for 5 minutes. Oil the vegetable grate and arrange the patties on it. Grill the patties, turning them carefully with a spatula, until nicely browned on both sides, 4 to 6 minutes per side. As the patties cook, toast the hamburger buns on the grate as well.
7. Serve the patties as you would any burger, piling the buns high with tomato, onion (if desired), lettuce, pickles, and smearing on ketchup, mayonnaise, or mustard—or all three.
How do you cater to a large, affluent vegetarian community in a land of avid meat eaters? Nisar Waris faces this challenge daily. Waris is the chef of Peshawar, the signature restaurant in the Sheraton Rajputana hotel in Jaipur. His staff has created a huge repertoire of vegetarian barbecue items, including these singular kebabs. Talk about an amazing set of flavors! Chef Waris skillfully combines the sweetness of yams and raisins, the nuttiness of cashews and pistachios, and the spicy zing of cardamom and cilantro. It’s enough to make you want to give up meat! Waris molds and grills the yam mixture on skewers, but you can also form it into burger-like patties. To start with, the yams can be either grilled, using the indirect method, or baked.
ADVANCE PREPARATION
3 hours for chilling the yam mixture (optional)
SPECIAL EQUIPMENT
4 long, flat, metal skewers
FOR THE KEBABS
1 pound yams or sweet potatoes (enough to make 1 cup puree; see Notes)
¼ cup chickpea flour (besan; see Notes) or whole-wheat flour
2 cups coarsely chopped nut mixture, including cashews, pistachios, and almonds, and/or sunflower seeds
1 tablespoon heavy (whipping) cream or sour cream
1 teaspoon fresh lemon juice, or more to taste
½ cup golden raisins, finely chopped
⅓ cup chopped fresh cilantro
1 teaspoon freshly ground white pepper
½ teaspoon Quick Garam Masala (page 496) or ground coriander
¼ teaspoon ground cardamom
½ teaspoon salt, or more to taste
3 tablespoons unsalted butter, melted
FOR SERVING
Naan, pita bread, or lavash
Lemon wedges
Sliced onions
Sliced cucumbers
Sliced tomatoes
Sliced chile peppers
1. If you are using the grill to cook the yams, set it up for indirect grilling, place a drip pan in the center, and preheat the grill to medium-high. If you are using the oven to cook the yams, preheat it to 400°F.
2. To grill the yams, place them in the center of the hot grill, over the drip pan and away from the heat, and cover the grill. Or bake the yams in the oven. Either way the yams will be done when soft, 40 minutes to 1 hour.
3. Transfer the yams to a plate and let cool. Peel the yams, then mash them in a large bowl with a potato masher, fork, or pestle. (Don’t puree the yams in a food processor or the mixture will become gummy.)
4. Cook the chickpea flour in a dry skillet over medium heat until lightly toasted and fragrant, about 2 minutes (do not use a nonstick skillet for this). Stir the chickpea flour into the yams. Add the mixed nuts to the skillet and cook, stirring, over medium heat until lightly toasted and fragrant, 3 to 5 minutes. Stir the nuts into the yams.
5. Stir the cream, lemon juice, raisins, cilantro, white pepper, garam marsala, cardamom, and salt into the yam mixture. Taste for seasoning, adding more lemon juice and/or salt as necessary; the yam mixture should be highly seasoned. You can form the kebabs now, but the mixture will be easier to work with if you refrigerate it, covered, for 3 hours. You can also make the kebab mixture the day before and chill it overnight if desired.
6. Oil the skewers. Divide the yam mixture into four equal portions. Lightly wet your hands with cold water, then mold each portion onto a skewer to make a sausage shape 9 to 10 inches long and 1 inch in diameter. If you are making the kebabs ahead of time, place them on oiled baking sheets and cover them loosely with plastic wrap. Refrigerate the kebabs until ready to cook.
7. Set up the grill for direct grilling and preheat to high. If desired, use a grateless grill setup (see box, page 21).
8. When ready to cook, lightly brush the kebabs with melted butter and arrange them on the grill as described for grateless grilling or brush and oil the grill grate and place the kebabs directly on it. Grill the kebabs, turning once or twice, until lightly browned on all sides, about 8 minutes in all. Brush the kebabs with butter again as they grill.
9. To serve: Using a piece of naan, pita bread, or lavash to protect your hand, unskewer the kebabs onto serving plates or a platter. Serve the kebabs with the bread, lemon wedges, and a platter of sliced onions, cucumbers, tomatoes, and chile peppers.
NOTES: The best yam to use here is a true yam, a starchy tuber with minimal sweetness. Look for true yams at Hispanic or Caribbean markets. I’ve also made the dish with boniatos (white-fleshed Caribbean sweet potatoes, which taste like roasted chestnuts) and, of course, American sweet potatoes.
Chickpea flour (besan) is made from roasted chickpeas. It has a tart, nutty, earthy flavor and is available at Indian and some Italian markets and natural foods stores. You can substitute whole-wheat flour.
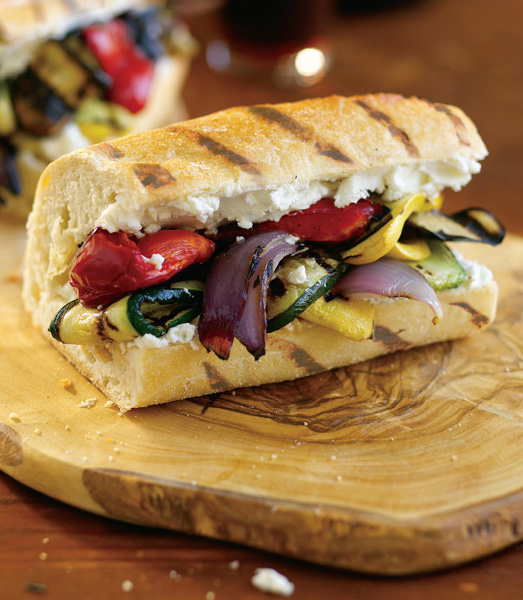
If you like grilled vegetables and goat cheese, you’ll love this sandwich, which fairly explodes with the evocative flavors of Provence. Rosemary and garlic lend a Mediterranean fragrance to vegetables that are traditionally associated with ratatouille, the classic vegetable stew from this region of France. The tangy cheese provides a counterpoint in texture to the vegetables. Use a soft, spreadable fresh goat cheese like Montrachet for best results. These sandwiches can be made a few hours ahead of time and are great to take on picnics, with the vegetable juices soaking into the bread.
FOR THE VEGETABLES
1 medium-size eggplant (12 to 14 ounces), stem end trimmed off
2 medium-size zucchini, stem ends trimmed off
2 medium-size yellow squash, stem ends trimmed off
2 medium-size red bell peppers
1 medium-size red onion, peeled but root end left attached
FOR THE BASTING MIXTURE
3 tablespoons extra-virgin olive oil
2 tablespoons fresh lemon juice
2 cloves garlic, minced
1 sprig fresh rosemary, or 1 teaspoon dried rosemary Salt and freshly ground black pepper
FOR SERVING
1 long baguette
8 ounces fresh goat cheese, at room temperature
1. Prepare the vegetables: Cut the eggplant, zucchini, and yellow squash lengthwise into ¼-inch-thick slices. Core, seed, and quarter the bell peppers. Quarter the onion, leaving the root end attached to each piece (the root will help the onion hold together as it grills).
2. Make the basting mixture: Combine the olive oil, lemon juice, and garlic in a small bowl. If using dried rosemary, add it directly to the olive oil mixture.
3. Set up the grill for direct grilling and preheat to high.
4. When ready to cook, brush the eggplant, zucchini, squash, bell pepper, and onion slices with some of the olive oil mixture, using the rosemary sprig as a basting brush. (If you are not using fresh rosemary, use a pastry brush.) Arrange the vegetables on the hot grate and grill, turning with tongs, until nicely browned, 3 to 6 minutes per side. Brush the vegetables once or twice more with the olive oil mixture and season them with salt and black pepper as they cook. Transfer the vegetables to a platter to cool. Cut the root end off the onion wedges and break the layers apart.
5. To serve: Cut the bread crosswise into four equal pieces. Split each piece lengthwise in half for the sandwiches. Brush the insides of each piece of bread with any remaining olive oil mixture and spread the goat cheese over them. Sandwich the eggplant, zucchini, squash, bell pepper, and onion slices inside the bread. Cut the sandwiches in half and serve warm or at room temperature.
The portobello mushroom has become the fin de siècle “steak,” a grilled vegetable alternative to beef. The broad fleshy mushroom cap has a rich meaty flavor, and luckily, portobellos are available at most supermarkets and specialty food shops. To this, add a fresh basil-flavored aioli (French garlic mayonnaise) and you’ve got a sandwich that tap dances on your taste buds!
Vegetable grate
INGREDIENTS
4 large portobello mushrooms, wiped clean with dampened paper towels
3 cloves garlic, cut into thin slivers
Leaves from 1 sprig fresh rosemary (optional)
3 tablespoons extra-virgin olive oil
3 tablespoons balsamic vinegar
1 large ripe tomato, cut crosswise into ½-inch slices
Salt and freshly ground black pepper
4 onion rolls, hamburger buns, or 5-inch sections of baguette, split
Basil Aioli (recipe follows) or mayonnaise
1 bunch arugula, rinsed and spun dry
1. Cut the stems off the portobello mushrooms flush with the mushroom caps. Using the tip of a paring knife, make tiny holes in the caps and insert the garlic slivers and rosemary leaves (if using).
2. Combine the olive oil and balsamic vinegar in a small bowl and whisk to mix. Generously brush the portobello caps and tomato slices with some of the oil and vinegar mixture and season them with salt and pepper.
3. Set up the grill for direct grilling and preheat to high.
4. When ready to cook, place a vegetable grate on the hot grill and preheat it for 5 minutes. Arrange the portobello caps, rounded side down, and the tomato slices on the hot grate and grill, turning with a spatula, until nicely browned and soft, 3 to 6 minutes per side. Brush the vegetables once or twice as they cook with the oil and vinegar mixture.
5. Spread the insides of the rolls or bread with Basil Aioli or mayonnaise. Add the grilled mushrooms and tomato slices and the arugula and serve at once.
Aioli is a garlic mayonnaise from the south of France. This version uses commercial mayonnaise as a base to avoid the small but worrisome health risks associated with eating raw egg yolks.
1 cup mayonnaise
3 cloves garlic, put through a garlic press
24 fresh basil leaves, thinly slivered
1 tablespoon fresh lemon juice
Salt and freshly ground black pepper
Combine the mayonnaise, garlic, basil, and lemon juice in a small bowl and whisk to mix. Season with salt and pepper to taste.