GRILLED VEGETABLES IN THE STYLE OF SANTA MARGHERITA | PAGE 398
When I was growing up, barbecue meant meat. Especially steak. The idea of grilling a bell pepper or a portobello mushroom would have seemed as strange as landing a man on the moon.
Well, we did land a man on the moon and we have discovered grilled vegetables. In fact, North Americans may be newcomers to a wide range of grilled vegetables, but we’ve embraced the cause with religious fervor. And why not? Because no other cooking method produces a better taste. Grilling evaporates some of the water in a vegetable, concentrating the flavor. High, dry heat caramelizes natural plant sugars, heightening a vegetable’s sweetness. Unlike boiling, which removes flavor from vegetables, grilling seems to intensify their natural taste. Add a whiff of smoke (from wood chips or wood chunks) and you’ll have vegetables with an astonishing depth of flavor.
This chapter offers a mouthwatering tour of the world of grilled vegetables, from Korean grilled oyster mushrooms to tandoori cauliflower fragrant with Indian spices. Along the way, you’ll learn how to grill corn, fennel, long beans, and even breadfruit. If you had trouble eating your vegetables when you were a kid, it’s probably because they weren’t grilled.
These colorful vegetable kebabs turn up at any barbecue in the Republic of Georgia. Their simplicity makes a nice counterpoint to the complex flavors of Georgian marinated meats. Georgian Pickled Plum Sauce (page 467) would be a good accompaniment, but the vegetable kebabs are also delicious plain. Choose tomatoes that are ripe but still a little firm, so they won’t fall off the skewers. A Georgian would use a flat, wide steel skewer.
SPECIAL EQUIPMENT
4 long, flat metal skewers
INGREDIENTS
8 small green bell peppers, cored and seeded
6 ripe plum tomatoes
16 large white mushrooms, stemmed, caps wiped clean with dampened paper towels
3 tablespoons extra-virgin olive oil
Coarse salt (kosher or sea) and freshly ground black pepper
1 lemon, cut in half
1. Thread the vegetables on the skewers, alternating bell peppers and tomatoes and placing mushrooms between each. Brush the kebabs with olive oil and season them with salt and pepper.
2. Set up the grill for direct grilling and preheat to high.
3. When ready to cook, brush and oil the grill grate. Arrange the kebabs on the hot grate and grill, turning with tongs, until nicely browned, 4 to 6 minutes per side (8 to 12 minutes in all), brushing with olive oil. Remove the skewers, squeeze lemon juice on the vegetables, and serve at once.
Robatayaki refers to a theatrical, upscale style of Japanese grilling (you can read about it on page 412). Traditionally, the foods were grilled over a prized Japanese charcoal called bincho, and in certain sections of Tokyo—among the eateries near the Yurakucho train station, for example—you still find restaurants with charcoal grills. Others take a more contemporary approach, cooking food over high-tech gas grills. This mixed vegetable grill has many virtues, not the least of which is that it’s the very best way I know of to cook okra.
SPECIAL EQUIPMENT
50 to 60 bamboo skewers (assorted lengths) and an aluminum foil shield (see box, page 23)
INGREDIENTS
1 pound okra
1 pound sugar snap peas, stems and strings removed
1 pound thick asparagus, fibrous ends removed, stalks trimmed to matching lengths
12 ounces fresh shiitake or large white mushrooms, stemmed, caps wiped clean with dampened paper towels
1 bunch scallions, both white and green parts, trimmed and cut into 2-inch pieces
1 tablespoon coarse salt (kosher or sea)
2 teaspoons freshly ground white pepper (optional)
2 to 4 tablespoons Asian (dark) sesame oil
1. Trim the tips off the stems of the okra, but do not cut into the pods; this would expose the insides to air, making the okra slimy. Arrange 4 or 5 okra side by side in a neat row on a cutting board. Stick a bamboo skewer through each end of each piece. The idea is to create a sort of raft that will hold the okra flat for grilling. Transfer the skewered okra to a large platter. Skewer the sugar snap peas the same way and transfer them to the okra platter.
2. Cut the asparagus stalks in half crosswise. Thread these halves crosswise on skewers (so the asparagus stalks are at a 90 degree angle to the skewers), 4 to 5 pieces to a skewer, alternating tip halves and stalk pieces. Transfer the skewered asparagus to the platter with the okra and sugar snap peas.
3. Cut any large shiitakes in half or quarters; leave small ones whole. Thread the shiitake caps onto skewers, 4 caps to a skewer, alternating them with pieces of scallion. The caps should be threaded on so they will lie flat on the grill (skewer them across the cap, not through the stem). Transfer the shiitake skewers to the platter.
4. Mix the salt and white pepper (if using) in a small bowl. Brush the vegetables with the sesame oil and sprinkle the salt and pepper on top.
5. Set up the grill for direct grilling and preheat to high.
6. When ready to cook, brush and oil the grill grate. Arrange the okra, sugar snap peas, asparagus, and shiitakes on the hot grate with the aluminum foil shield under the ends of the skewers and grill, turning with tongs, until browned and tender, 3 to 6 minutes per side, depending on the vegetable. Serve the various skewers of vegetables as soon as they’re ready. Don’t worry about serving everything at once; it’s more fun if the vegetables arrive sequentially.
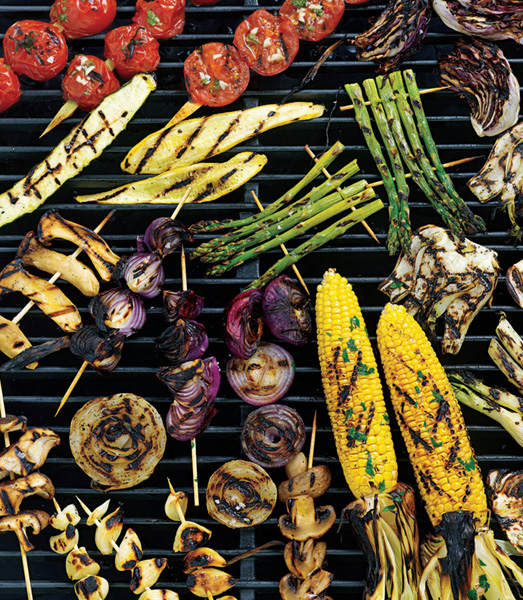
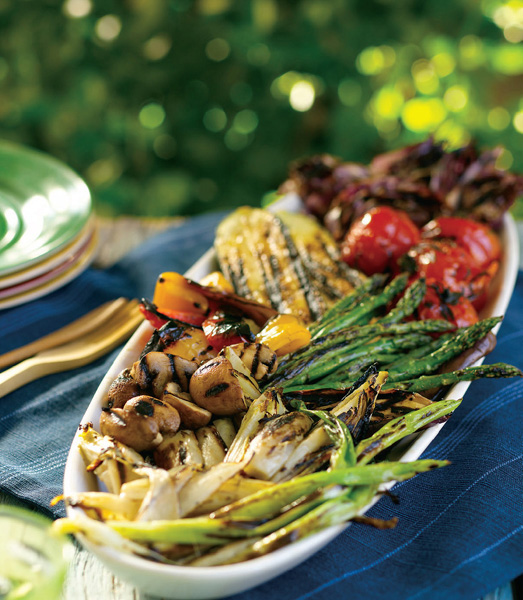
After two grueling weeks on the barbecue trail, the town of Santa Margherita on the Italian Riviera appeared like an oasis in the desert. Imagine a spectacularly craggy cove surrounding a harbor filled with bobbing yachts and fishing boats. Trompe l’oeil painted houses. Cafés crowded with chic young Italians. Come lunchtime, it was impossible to ignore a buffet served on a bluff overlooking the bay—especially the centerpiece of that buffet, an enormous platter of grilled vegetables.
In keeping with the Italian understatement when it comes to grilling, the vegetables were cooked without the benefit of a marinade and with only a drizzle of olive oil and squirt of lemon juice by way of a sauce. But I guarantee you’ll never taste better grilled vegetables, nor feast your eyes on a prettier platter. Use the following ingredient list as a starting point, substituting whatever vegetables look freshest.
SPECIAL EQUIPMENT
Vegetable grate (optional)
HOW TO GRILL PERFECT VEGETABLES EVERY TIME | PAGE 396
2 medium-size red bell peppers
2 medium-size yellow bell peppers
2 Belgian endives
1 pound fresh cremini or regular white mushrooms, stemmed, caps wiped clean with dampened paper towels
4 small eggplants or zucchini
½ cup extra-virgin olive oil
Coarse salt (kosher or sea) and freshly ground black pepper
1 pound thick asparagus, fibrous ends removed
8 small ripe tomatoes
2 tablespoons balsamic vinegar (optional)
8 lemon wedges, for serving
1. Core, halve, and seed the red and yellow bell peppers, then cut each pepper in half lengthwise into 3 strips. Cut the endives lengthwise in quarters, leaving the stem ends attached. Cut the mushrooms in half and the eggplants in half lengthwise.
2. Set up the grill for direct grilling and preheat to high.
3. When ready to cook, preheat a vegetable grate (if using) for 5 minutes, then brush and oil it or the grill grate. Lightly brush the bell pepper pieces with some of the olive oil, season them with salt and black pepper to taste, and arrange them on the hot grate. Grill the bell peppers until lightly charred on both sides, leaving the skins intact, 4 to 6 minutes per side. Brush the bell peppers lightly with olive oil and season them with salt and black pepper once or twice as they grill. Transfer the bell peppers to a platter. Leave the fire burning.
4. Oil, season, and grill the endives, mushrooms, eggplants, asparagus, and tomatoes the same way as the bell peppers. Each vegetable should be nicely charred on the outside and soft and tender inside; depending on the vegetable, this will take 3 to 6 minutes per side. Brush all of the vegetables lightly with olive oil and season them with salt and black pepper once or twice as they grill.
5. Arrange the grilled vegetables in rows on a platter, varying the colors and shapes. Drizzle the remaining olive oil on top of the hot vegetables and let cool.
6. Just before serving, season the vegetables again with salt and pepper. If you like, drizzle a little balsamic vinegar on top. Serve lemon wedges on the side for squeezing over the vegetables.
In general, Trinidadians aren’t big grillers, preferring the deep-fat frying of their British heritage or the stewing of their African forebears. That’s not to say that you don’t see a lot of charcoal fires at roadside stalls in Port of Spain. But by and large, they are used to heat bubbling stockpots and fryers, not for direct grilling. One exception are the chokas enjoyed by the Indian community. A choka is a fire-roasted vegetable that is chopped and seasoned with oil.
The traditional vegetable for choka is eggplant, but you can also use tomatoes, potatoes, even pumpkin. Choka is customarily served with sada roti (flat bread)—often for breakfast. In this country, you can use pita bread or any of the grilled breads featured in this book. Here’s a choka inspired by a stylish Port of Spain restaurant called Monsoon.
FOR THE CHOKA
2 smallish eggplants (10 to 12 ounces each)
6 cloves garlic, peeled and cut in half lengthwise
2 ripe medium-size tomatoes
1 medium-size green bell pepper
1 large onion, peeled and cut into quarters (leave the root ends intact)
1 tablespoon vegetable oil
Salt and freshly ground black pepper
FOR THE SPICE MIXTURE
2 tablespoons vegetable oil
2 teaspoons mustard seeds, preferably black
1 medium-size onion, finely chopped
2 cloves garlic, minced
1 tablespoon finely chopped peeled fresh ginger
½ to 1 Scotch bonnet chile, seeded and minced
2 tablespoons fresh lime juice
¼ cup chopped fresh cilantro, for garnish
1. Prepare the choka: Using the tip of a paring knife, make 6 randomly placed slits around each eggplant. Insert a half clove of garlic in each slit. Lightly brush the eggplants, tomatoes, bell pepper, and onion quarters with the 1 tablespoon of oil and season with salt and black pepper to taste.
2. Set up the grill for direct grilling and preheat to high.
3. When ready to cook, brush and oil the grill grate. Arrange the eggplants, tomatoes, bell pepper, and onion quarters on the hot grate and grill, turning with tongs, until the skins are charred, about 20 minutes for the eggplant (the flesh should be very soft as well) and bell pepper and about 12 minutes for the tomatoes and onion quarters. Transfer the vegetables to a plate and let cool.
4. Scrape most of the charred skin off the vegetables. Cut the eggplant and tomatoes into 1-inch dice. Core, seed, and finely dice the bell pepper. Cut the root end off the onion quarters and thinly slice the onion crosswise. Transfer the vegetables to a shallow heatproof serving bowl and stir to mix, then season them with salt and black pepper to taste (see Note).
5. Just before serving, prepare the spice mixture: Heat the 2 tablespoons of oil in a small, heavy skillet over medium-high heat. Add the mustard seeds, chopped onion, minced garlic, ginger, and Scotch bonnet and cook until fragrant and golden brown, about 5 minutes. Add the lime juice, let come to a boil, then pour the hot spice mixture over the vegetables. Toss gently to mix, sprinkle the cilantro on top, and serve the vegetables warm or at room temperature.
NOTE: The recipe can be prepared to this point up to 2 days ahead of time. Keep, covered, in the refrigerator.
La Tomaquera is a one-room chop house in a working-class neighborhood in Barcelona. It’s the sort of place that takes pride in not serving Coca-Cola; the sort of place that closes early when there’s a soccer game on TV. For about $30, you could eat yourself into oblivion in this lively restaurant. For me that meant feasting on snails in a rich gravy, followed by an assortment of grilled beef, lamb, and other meats.
What most captivated me was an unusual vegetable dish, grilled artichokes—one of the best things I have eaten in my life. The long, low-heat grilling process renders the leaves so crisp, you can almost eat them whole. I know of only one other dish with artichokes so delectably crisp—Rome’s carciofi alla giudia, artichokes in the Jewish style.
For best results, choose medium-size artichokes, ones with leaves that are fairly spread open. You could also use baby artichokes, but if you do, cook them for a shorter amount of time. Avoid the dense jumbo globe artichokes, which are delicious boiled, but difficult to grill.
8 medium-size artichokes
½ lemon
1 cup (2 sticks) unsalted butter
6 cloves garlic, minced
¼ cup minced fresh flat-leaf parsley
Coarse salt (kosher or sea)
Lots of cracked or coarsely ground black pepper
1. Cut the stems off the artichokes so the artichokes stand upright. Rub the artichoke bottoms with the cut side of the lemon to prevent discoloring. Using kitchen shears, trim off the spiny tips of the leaves. Using your fingers, gently push the leaves apart to open the artichoke like a flower.
2. Melt the butter in a small, heavy saucepan over low heat, then add the garlic and parsley. Increase the heat to medium and let the butter mixture come to a simmer. Let simmer until the garlic loses its rawness, about 3 minutes. Brush the artichokes all over with a generous amount of the garlic butter and sprinkle them with salt and pepper. Pour a spoonful of the garlic butter over the top of each artichoke, letting it drip into the leaves.
3. Set up the grill for direct grilling and preheat to medium-low.
4. When ready to cook, brush and oil the grill grate. Arrange the artichokes on the hot grate, stem side down, and grill until the bottoms are a deep golden brown, about 30 minutes, rotating the artichokes frequently with tongs to ensure even cooking. Baste the artichokes often with the garlic butter and season them generously with salt and pepper.
5. Starting in the center and working with tongs, again spread the artichoke leaves out to open each artichoke like a flower. Baste the artichokes with more garlic butter and season them with more salt and pepper. Invert the artichokes and cook them until they are a deep golden brown, 30 to 40 minutes longer. The leaves should be crisp and should pull out easily; the heart should be tender (test it for doneness by inserting a skewer). If using a charcoal grill, you’ll need to add 25 fresh coals after 1 hour.
6. Invert the artichokes (the artichoke bottoms will now be on the grate) and baste and season them again. Let the artichokes cook a few minutes longer to rewarm the bottoms. Drizzle any remaining garlic butter over the artichokes and serve at once.
Breadfruit was brought to the Caribbean from the South Pacific by the infamous Captain Bligh and has become one of the classic accompaniments to Jamaica’s jerk pork. Some restaurants in Jamaica even have a special charcoal pit for roasting breadfruits, which are buried in the embers. Char roasting is one of the best ways to cook this large, round (think bowling ball), pebbly, and green-skinned fruit, the chief characteristic of which is its mild flavor (some people might say utter blandness)—perfect for taming the blast furnace heat of jerk pork.
Breadfruit may be fruit, botanically speaking, but it’s usually served as a vegetable or starch. Charring imparts a smoky flavor that is readily absorbed by the starchy, white flesh. The most authentic way to cook it is on a charcoal grill, but you can also char it on a gas grill using either the direct or indirect method. Breadfruit can be found at West Indian markets and specialty greengrocers. Choose a firm, unblemished specimen and let it ripen at room temperature until it just begins to yield when pressed with your thumb. It should still be rather firm.
1 breadfruit (3 to 4 pounds)
4 tablespoons (½ stick) salted butter, for serving
Salt and freshly ground black pepper
1. If using a charcoal grill, build a nice bed of glowing embers. When ready to cook, nestle the breadfruit in the coals, raking them around the breadfruit to cover as much of it as possible.
If using a gas grill, preheat it to medium. When ready to cook, place the breadfruit on the hot grate.
2. Cook the breadfruit until the skin is charred and the flesh is very soft, 40 minutes to 1 hour, depending on the size and ripeness of the breadfruit. If using a gas grill, turn the breadfruit often with tongs. To test for doneness, insert a metal skewer; the breadfruit should be soft in the center.
3. To serve, cut or break the breadfruit into wedges and trim away the burnt part. Spread the butter over the breadfruit, season it with salt and pepper, and mash it with a fork.
NOTE: You can also grill the breadfruit on a gas grill using the indirect method; preheat the grill to medium-high. When ready to cook, place the breadfruit in the center of the grill, away from the heat, cover the grill, and cook the breadfruit until well browned on the outside and soft in the center, 1 to 1½ hours. (I prefer the direct method, because you actually char the skin of the breadfruit, but the indirect method requires less intervention.)
When it comes to barbecue, few Westerners would think of cauliflower. Not so in India. There, gobi is appreciated for its ability to absorb smoke and spice flavors and maintain its firm texture. You’ll need to know about two special ingredients for this recipe: besan (chickpea flour) and ajwain (carum seeds). Both are available at Indian markets, and chickpea flour can also be found at natural foods stores and many specialty food shops. If it’s unavailable, whole-wheat flour makes an acceptable substitute. I’ve made the ajwain optional, as it’s somewhat more difficult to find. The cauliflower will still be plenty flavorful without it.
ADVANCE PREPARATION
2 hours for marinating the cauliflower
8 long metal skewers
INGREDIENTS
2 cups plain whole-milk yogurt (see Note)
1 whole cauliflower (about 1½ pounds)
3 cloves garlic, minced
1½ tablespoons grated peeled fresh ginger
¼ cup vegetable oil
1 tablespoon sweet paprika
1 teaspoon cayenne pepper
1 teaspoon salt
½ teaspoon freshly ground black pepper
½ teaspoon ajwain (optional)
½ teaspoon ground cumin
2 teaspoons fresh lemon juice
¾ cup chickpea flour (besan), or ¼ cup whole-wheat flour, or more as needed
3 tablespoons unsalted butter, melted, for brushing
1. Set a yogurt strainer, or a regular strainer lined with a double layer of dampened cheesecloth, over a medium-size bowl. Add the yogurt and let drain, in the refrigerator, for 4 hours. You should wind up with about 1¼ cups.
2. Cut the cauliflower into florets, leaving about 1 inch of stem on each floret. Prick each floret 8 to 10 times with a trussing needle or carving fork to allow the marinade to penetrate to the center.
3. Combine the garlic, ginger, and oil in a food processor or mini chopper and process to a smooth paste. Alternatively, you can pound the garlic and ginger to a paste in a mortar with a pestle, then work in the oil. Transfer the garlic paste to a large nonreactive bowl. Whisk in the paprika, cayenne, salt, black pepper, ajwain (if using), cumin, lemon juice, drained yogurt, and enough chickpea flour to make a smooth mixture. Stir in the cauliflower. Let the cauliflower marinate in the refrigerator, covered, for 2 hours.
4. Remove the cauliflower florets from the marinade, setting aside the marinade, and thread the florets through the stems onto the skewers. (The flower ends of the cauliflower should all be pointing up.)
5. Set up the grill for indirect grilling, place a drip pan in the center, and preheat the grill to high.
6. When ready to cook, spoon any remaining marinade over the cauliflower, arrange the skewers on the hot grate over the drip pan, and cover the grill. Grill the cauliflower for 10 minutes, then brush the florets with a little melted butter. Continue grilling the cauliflower until nicely browned and tender, 10 to 20 minutes longer. Move the skewers directly over the flames for the last 2 to 3 minutes to lightly brown the cauliflower.
7. Brush the cauliflower with the remaining butter and slide it off the skewers onto plates or a platter. Serve at once.
NOTE: If you prefer not to drain the yogurt, you will need only 1½ cups.
Despite the wide use of charcoal as a cooking fuel, Trinidadians aren’t particularly keen on grilling. One exception is corn. Stroll through Queen’s Park Savannah in Port of Spain at dusk and you’ll find large crowds at the corn vendors lining up for crackling crisp ears of a mature variety of corn most Americans would consider too large, old, and dried out to eat. But it’s these very defects that make the corn so munchable and delicious.
Traditionally, the cooked ears are brushed with melted butter and sprinkled with salt and pepper. Inspired by a popular Trinidadian herb, I’ve come up with a more interesting topping: shadon beni butter. Shadon beni (literally false cilantro) is a dark green, thumb-shaped, sawtooth-edged herb with a taste similar to cilantro. It’s generally sold in North America by its Hispanic name, culantro (look for it in Hispanic and West Indian markets). But don’t despair if you can’t find shadon beni: cilantro makes an equally delicious butter. By the way, you can use shadon beni butter as a great topping for other simply grilled vegetables and seafood.
8 ears of corn (the larger and older, the better)
8 tablespoons (1 stick) salted butter, at room temperature
3 tablespoons finely chopped fresh culantro or cilantro
2 scallions, both white and green parts, trimmed and minced
1 clove garlic, minced
Freshly ground black pepper
1. Shuck the corn and set it aside while you prepare the shadon beni butter.
2. Place the butter, culantro, scallions, and garlic in a food processor and process until smooth. Season the butter with pepper to taste and transfer it to a bowl. Alternatively, if the herbs and garlic are very finely minced, you can stir them right into the butter in a bowl.
3. Set up the grill for direct grilling and preheat to high.
4. When ready to cook, brush and oil the grill grate. Arrange the corn on the hot grate and grill, turning with tongs, until nicely browned all over, 8 to 12 minutes. As the corn cooks, brush it occasionally with the shadon beni butter.
5. Remove the corn from the grill and brush it once more with the shadon beni butter. Serve at once.
Grilled eggplant might seem like an odd bar snack to Westerners, but it’s a best seller in the teriyaki bars near the train stations in Tokyo. I like to think of it as a vegetarian hot dog. The “barbecue sauce” used to glaze the eggplants is a sweet-salty mix made from miso (cultured soy bean paste). White miso, the most common variety, can be found in the refrigerator case of natural foods stores and in many large supermarkets. For this recipe, the eggplant of choice would be a slim Asian variety. The advantage to a small eggplant is that it cooks quickly and can be eaten in a couple of bites. You can also serve the eggplants as a main course; they’ll feed two to three people.
6 Asian eggplants (about 4 ounces each)
⅓ cup white miso
1 tablespoon sake
1 tablespoon mirin (sweet rice wine) or cream sherry
1 tablespoon sugar
1 tablespoon mayonnaise
1 tablespoon Asian (dark) sesame oil, for brushing
1 teaspoon black sesame seeds or toasted regular sesame seeds (see box, page 113)
1. Cut the eggplants in half lengthwise. Using a sharp knife, make shallow crisscrosses on the skin and cut sides of each half eggplant. The cuts should be about ⅛ inch deep and ⅛ inch apart.
2. Combine the miso, sake, mirin, sugar, and mayonnaise in a bowl and whisk until smooth.
3. Set up the grill for direct grilling and preheat to high.
4. When ready to cook, brush and oil the grill grate. Brush the eggplants on both sides with the sesame oil. Arrange the eggplants, cut side down, on the hot grate and grill until nicely browned, 3 to 4 minutes. Turn the eggplants with tongs and spread a generous spoonful of miso sauce over the cut side of each. Continue grilling the eggplants until the undersides are nicely browned and the flesh is soft, 6 to 8 minutes longer. To test for doneness, gently squeeze the sides of the eggplants; they should be softly yielding.
5. Transfer the eggplants to a serving platter, sprinkle the sesame seeds on top, and serve at once.
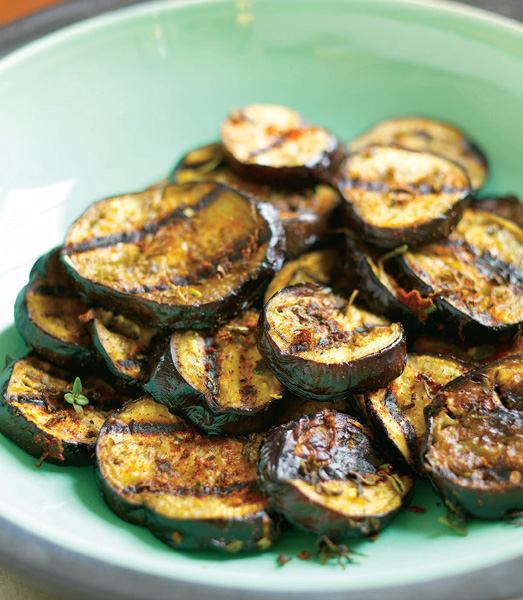
Argentineans don’t generally dilute their staunchly carnivornian meals with superfluous side dishes or vegetables. However, grilled eggplant has become part of the steak house repertoire. The eggplant of choice is a small (four inch long) Italian variety—the sort you’d find in an Italian market or specialty food shop. Larger eggplants can be cooked this way, too.
3 small (4 to 6 ounces each) Italian eggplants
2 cloves garlic, minced
3 tablespoons extra-virgin olive oil
1 teaspoon dried oregano
1 teaspoon dried basil
1 teaspoon fresh thyme leaves, or ½ teaspoon dried thyme
1 teaspoon sweet or hot paprika
½ teaspoon hot red pepper flakes (optional)
Salt and freshly ground black pepper
1. Cut the eggplants crosswise into ½-inch slices. Mix the garlic and olive oil in a small bowl, then brush some of the garlic oil over the cut sides of the eggplants.
2. Combine the oregano, basil, thyme, paprika, and hot pepper flakes (if using) in a small bowl and set aside.
3. Set up the grill for direct grilling and preheat to high.
4. When ready to cook, brush and oil the grill grate. Arrange the eggplant slices on the hot grate and grill until nicely browned on the bottom, 3 to 5 minutes. Lightly brush the top of the eggplant slices with some of the garlic oil. Turn the eggplants with tongs and brush the other side with the remaining garlic oil.
5. Sprinkle the herb mixture over the eggplants and season them with salt and black pepper to taste. Continue cooking the eggplants on the second side until they are nicely browned and the flesh is soft, 3 to 5 minutes longer. Serve the eggplants at once.
ARGENTINEAN GRILLED EGGPLANT | PREVIOUS
You’ve probably seen it in the produce section of the supermarket: the weird vegetable with the fernlike, feathery leaves, crisp green stalks, and bulbous, green-white bottom. The taste of fresh fennel might well be described as licorice-flavored celery. Grilling seems to bring out its sweetness. Add a sweet-sour balsamic vinegar marinade and you have a vegetable you’re not likely to soon forget. It can be served at room temperature as an antipasto or hot as a vegetable side dish. The balsamic vinegar marinade doubles as the dressing.
ADVANCE PREPARATION
2 hours for marinating the fennel
INGREDIENTS
4 small or 2 large fennel bulbs (1½ to 2 pounds)
⅓ cup extra-virgin olive oil
⅓ cup balsamic vinegar
2 tablespoons honey
2 cloves garlic, minced
2 small shallots, minced
3 tablespoons chopped fresh tarragon or basil
Salt and freshly ground black pepper
1. Cut the stalks and outside leaves off the fennel. (Reserve the stalks for another use, such as the Fennel-Grilled Bass on page 307.) Cut each fennel bulb lengthwise into ½-inch-wide slices through the narrow side.
2. Place the olive oil, balsamic vinegar, honey, garlic, shallots, and tarragon in a large nonreactive bowl and whisk to mix. Add the sliced fennel and toss to coat thoroughly. Let the fennel marinate, covered, for 2 hours; it does not have to be refrigerated.
3. Set up the grill for direct grilling and preheat to high.
4. When ready to cook, brush and oil the grill grate. Remove the fennel slices from the marinade, setting aside the marinade. Place the fennel on the hot grate, and grill, turning with tongs, until just tender, 8 to 12 minutes in all, seasoning it with salt and pepper to taste.
5. Toss the grilled fennel with any remaining marinade and serve warm or at room temperature.
These tiny kebabs traditionally accompany Korean grilled meats, like Korean Sesame-Grilled Beef (bool kogi; page 150). The grilling imparts a delicate charcoal flavor, while the foil covering prevents the garlic cloves from burning.
SPECIAL EQUIPMENT
8 large wooden toothpicks
INGREDIENTS
2 to 3 heads garlic (for 24 large cloves)
1 tablespoon Asian (dark) sesame oil
Salt and freshly ground black pepper
1. Break the heads of garlic into cloves. Peel each clove (see Note). Skewer the garlic cloves crosswise on toothpicks, 3 cloves to a toothpick. Brush the garlic cloves with the sesame oil and season them with salt and pepper to taste. Loosely wrap each kebab in aluminum foil.
2. Set up the grill for direct grilling and preheat to high.
3. When ready to cook, arrange the toothpicks of garlic on the hot grate and grill until the garlic is tender, about 5 minutes per side, turning with tongs to ensure even cooking. Remove the foil from the garlic a few minutes before the garlic is done grilling to allow it to brown lightly.
NOTE: To loosen the skin, gently flatten the cloves of garlic using the side of a cleaver or chef’s knife. Or use a flexible tube-shaped garlic peeler.
Long beans (aka yard-long beans) are a traditional Chinese vegetable. Shaped like green beans but up to eighteen inches long, they found their way to the Caribbean via the Chinese indentured laborers who came to Trinidad in the mid-1800s. Long beans taste similar to green beans but are a little earthier. Perhaps the niftiest thing about them is that they are so long, you can tie them into decorative knots.
SPECIAL EQUIPMENT
Vegetable grate (optional)
INGREDIENTS
1 pound long beans or green beans
2 tablespoons Asian (dark) sesame oil
Salt and freshly ground black pepper
1 tablespoon sesame seeds, toasted (see box, page 113)
1. Bring a large pot of salted water to a boil and cook the long beans until crisp-tender, about 3 minutes. Rinse the beans under cold running water and drain well. Cut each long bean into an 8 to 9-inch length and tie each into a loose knot (see Note). Let the beans dry on paper towels.
2. Set up the grill for direct grilling and preheat to high.
3. When ready to cook, preheat a vegetable grate (if using) for 5 minutes, then brush and oil it or the grill grate. Brush the knotted beans with the sesame oil and season them with salt and pepper to taste. Arrange the beans on the hot grate and grill, turning with tongs, until nicely browned, 8 to 10 minutes in all.
4. Transfer the long beans to serving plates or a platter, sprinkle the sesame seeds on top, and serve at once.
NOTE: If using regular green beans, thread 4 or 5 crosswise on short bamboo skewers and use an aluminum foil shield when you grill them (see box, page 23). Young, slender green beans don’t need to be parboiled.
Mushrooms are the perfect vegetable for grilling. The high heat caramelizes the outside of the mushrooms, intensifying their flavor. The mushrooms’ high water content keeps them moist. These virtues aren’t lost on Koreans, who enjoy a wide variety of grilled mushroom dishes. These kebabs are vegetarian, but Koreans will often grill mushrooms with strips of chicken or beef.
ADVANCE PREPARATION
1 to 2 hours for marinating the kebabs
SPECIAL EQUIPMENT
12 long bamboo skewers (or as needed) and an aluminum foil shield (see box, page 23)
INGREDIENTS
12 ounces fresh shiitake or cremini mushrooms, stemmed, caps wiped clean with dampened paper towels
2 bunches large scallions, both white and green parts, trimmed
1 medium-size yellow bell pepper, cored, seeded, and cut into 1½ by ½–inch strips
¼ cup soy sauce
3 tablespoons sugar
1 tablespoon Asian (dark) sesame oil
4 cloves garlic, minced
2 tablespoons sesame seeds, toasted (see box, page 113)
½ teaspoon freshly ground black pepper
1. Cut each mushroom into ½-inch-thick slices. Cut the white part of the scallions into pieces the length of the mushroom strips (about 1½ inches long). Finely chop the scallion greens. Thread the mushroom strips onto skewers so they will lie flat on the grill, alternating them with scallion whites and bell pepper strips threaded onto the skewers the short way. Place the kebabs in a baking dish.
2. Whisk together the soy sauce, sugar, sesame oil, garlic, 1 tablespoon of sesame seeds, and the black pepper in a large bowl. Pour the soy sauce mixture over the kebabs and let marinate at room temperature for 1 to 2 hours, turning once.
3. Set up the grill for direct grilling and preheat to high.
4. When ready to cook, brush and oil the grill grate. Remove the kebabs from the marinade, setting aside the marinade. Arrange the kebabs on the hot grate with the aluminum foil shield under the ends of the skewers and grill, turning with tongs and brushing often with the marinade, until the mushrooms are tender and the scallions and bell pepper are nicely browned, 3 to 5 minutes per side (6 to 10 minutes in all).
5. Sprinkle the chopped scallion greens and remaining tablespoon of sesame seeds over the kebabs and serve them hot or at room temperature.
Oyster mushrooms are elongated gray mushrooms that have something oysterlike about their slippery, softly chewy consistency. If you can’t find them, you can substitute other exotic mushrooms or even quartered white mushrooms. This recipe was inspired by the Korea House in Seoul, where it was part of a hanjongshik, a dazzling array of more than two dozen different miniature dishes that comprise a traditional Korean table d’hôte.
SPECIAL EQUIPMENT
Vegetable grate, or 12 short bamboo skewers, and an aluminum foil shield (see box, page 23)
INGREDIENTS
1 pound oyster or medium-size white mushrooms
½ medium-size green bell pepper, cored and seeded
½ medium-size red bell pepper, cored and seeded
2 cloves garlic, minced
3 scallions, both white and green parts, trimmed and minced
3 tablespoons soy sauce
1½ tablespoons Asian (dark) sesame oil
1 tablespoon sugar
1 tablespoon sesame seeds, toasted (see box, page 113)
Salt and freshly ground black pepper
1. Trim the ends off the oyster mushrooms. Cut the bell pepper halves on the diagonal into thin slices.
2. Combine the garlic, scallions, soy sauce, sesame oil, sugar, and sesame seeds in a small bowl. Season the sesame oil mixture with salt to taste and plenty of black pepper and stir until the sugar dissolves. Add the mushrooms and bell peppers and toss to mix, then let marinate for 15 minutes. Then, if not using a vegetable grate, thread the mushrooms and bell peppers onto skewers.
3. Set up the grill for direct grilling and preheat to high.
4. When ready to cook, preheat a vegetable grate (if using) for 5 minutes, then brush and oil it or the grill grate. Arrange the mushrooms and bell peppers on the hot grate with the aluminum foil shield under the ends of the skewers. Grill, turning with tongs, until the vegetables are nicely browned and tender, 3 to 5 minutes per side (6 to 10 minutes in all).
5. Transfer the mushrooms and bell peppers to a serving platter, plates, or bowls. This dish can be served hot, cold, or at room temperature.
These colorful kebabs turn up at yakitori joints around Tokyo and make a terrific side dish or vegetarian appetizer. I love the way the flavor of the grilled scallions permeates the shiitakes. Fresh shiitakes are widely available, but you could also use dried Chinese black mushrooms (soaked in hot water for twenty minutes) or another type of mushroom.
8 long bamboo skewers and an aluminum foil shield (see box, page 23)
INGREDIENTS
1 bunch large scallions, both white and green parts, trimmed
24 small fresh shiitakes, stemmed, caps wiped clean with dampened paper towels
3 tablespoons soy sauce
3 tablespoons mirin (sweet rice wine) or cream sherry
1 tablespoon sugar
1 clove garlic, minced
1. Cut the scallions crosswise into pieces the size of the mushroom caps, about 1½ inches long. Thread the shiitake caps onto the skewers so they will lie flat on the grill, alternating them with pieces of scallion, threaded on crosswise. Place 3 mushroom caps and 4 scallion pieces on each skewer. Reserve any leftover scallion pieces for another use.
2. Combine the soy sauce, mirin, sugar, and garlic in a small bowl and whisk until the sugar dissolves.
3. Set up the grill for direct grilling and preheat to high.
4. When ready to cook, brush and oil the grill grate. Arrange the kebabs on the hot grate with the aluminum foil shield under the ends of the skewers and grill, turning with tongs and brushing with the soy mixture, until the shiitakes are tender and the scallions are nicely browned, 3 to 5 minutes per side (6 to 10 in all). Serve at once.
Mushroom caps grilled with chorizo, garlic, and olive oil are a popular Spanish tapa—so popular, in fact, that there’s a tapas bar in Madrid, the Mesón del Champiñón, that serves this and only this dish. The Mesón stands in a row of tapas bars—each with its own specialty—built directly into the retaining wall of the Plaza Mayor. It should be noted that the Mesón cooks its mushroom caps on a plancha (griddle), but grilling produces a more interesting flavor. It’s also a lot more fun because you get to do it outdoors. This recipe can be served either as an appetizer or as a vegetable side dish.
SPECIAL EQUIPMENT
Vegetable grate (optional); toothpicks, for serving
INGREDIENTS
16 large white mushrooms, stemmed, caps wiped clean with dampened paper towels
⅓ cup extra-virgin olive oil, or more as needed
4 slices (each ¼ inch thick, 1 to 2 ounces total) cooked chorizo sausage (see Note)
4 cloves garlic, minced
¼ cup chopped flat-leaf parsley
½ lemon
Salt and freshly ground black pepper
1. Generously brush the mushrooms on both sides with some of the olive oil and place the mushrooms in a baking dish, rounded side down.
2. Cut each chorizo slice in quarters and place one quarter in each mushroom cap. Divide the garlic and parsley among the mushroom caps. Squeeze a little lemon juice into each mushroom cap and drizzle any remaining olive oil over them. Generously season the mushrooms with salt and pepper.
3. Set up the grill for indirect cooking, place a drip pan in the center, and preheat the grill to high.
4. When ready to cook, preheat a vegetable grate (if using) for 5 minutes. Arrange the chorizo-stuffed mushrooms in the center of the hot grate, away from the heat, and cover the grill. Cook the mushrooms until tender and nicely browned and the sausage and garlic are sizzling, about 20 minutes. For a smokier flavor, move the mushroom caps directly over the flames for the last 5 minutes of grilling.
5. Transfer the grilled mushrooms to a platter and stick a toothpick in each for serving.
NOTE: Chorizo is a spicy Spanish sausage. I’ve also prepared these mushroom caps with country ham instead of chorizo. You’d need about 2 ounces of ham cut into tiny slivers.
Stuffed mushrooms was one of the first dishes I ever learned to make and I’m still fascinated by the fungus’s ability to absorb the flavors of a filling while retaining its own. I like to make this dish with jumbo mushroom caps, behemoths measuring three inches across that seem custom grown for stuffing. I fill them with arugula butter and cook them on the grill using the indirect method. Amazing.
SPECIAL EQUIPMENT
Vegetable grate (optional)
INGREDIENTS
1 bunch arugula, stemmed, rinsed, spun dry, and coarsely chopped
1 clove garlic, minced
8 tablespoons (1 stick) unsalted butter, at room temperature
A few drops of fresh lemon juice
Salt and freshly ground black pepper
8 jumbo or 16 large white mushrooms, stemmed, caps wiped clean with dampened paper towels
¼ cup freshly grated Parmesan cheese
1. Finely chop the arugula and garlic in a food processor. Add the butter and lemon juice, season with salt and pepper to taste, and process until smooth. Spread the arugula butter in the mushroom caps and sprinkle the Parmesan cheese on top.
2. Set up the grill for indirect cooking, place a drip pan in the center, and preheat the grill to high.
3. When ready to cook, preheat a vegetable grate (if using) for 5 minutes, then brush and oil it or the grill grate. Arrange the mushrooms in the center of the hot grate, away from the heat, and cover the grill. Cook the mushrooms until browned and tender and the butter is melted and sizzling, about 20 minutes. For a smokier flavor, move the mushroom caps directly over the flames for the last 5 minutes of grilling. Serve the mushrooms at once.
Okra is the vegetable people love to hate. What they dislike is its tendency to get slimy, especially when boiled or stewed. Others, like me, are drawn to its crunch—when not overcooked—and sweet, earthy flavor. I discovered grilled okra in Tokyo, where it’s part of the stunning array of grilled vegetables, meats, and seafood served at robatayaki restaurants (which specialize in Japanese grilling). For a Mediterranean touch, use olive oil instead of sesame oil.
SPECIAL EQUIPMENT
8 short bamboo skewers and an aluminum foil shield (see box, page 23)
INGREDIENTS
1 pound fresh okra (see Note)
1 tablespoon Asian (dark) sesame oil or extra-virgin olive oil
Salt and freshly ground black pepper
1. Trim the tips off the stems of the okra, but do not cut into the pods; this would expose the insides to air, making the okra slimy. Arrange 4 or 5 okra side by side in a neat row at the edge of a cutting board. Stick a bamboo skewer through each end of each okra, skewering group of 4 or 5 okra with 2 skewers. The idea is to make a sort of raft that holds the okra flat for grilling. Transfer the skewered okra to a platter. Lightly brush both sides of the okra with sesame oil and season them with salt and pepper to taste.
2. Set up the grill for direct grilling and preheat to high.
3. When ready to cook, brush and oil the grill grate. Arrange the skewered okra on the hot grate with the aluminum foil shield under the ends of the skewers and grill, turning with a flat spatula, until tender and lightly browned, about 4 to 5 minutes per side (8 to 10 minutes in all). Serve the okra at once, letting everyone remove the skewers themselves.
NOTE: When buying okra, choose smallish pods of uniform size. They should be about the length and width of your forefinger. Look for crisp, springy, bright green pods, avoiding okra that look brown or shriveled.
Succulent, tender calçots (pronounced CAL-sots) are Catalan green onions—and what onions. The sweet, fleshy shoots are buried with earth as they grow (much like Belgian endives) to keep them pale and delicately flavored. The calçots are charred over burning vine trimmings, then wrapped in newspaper to steam and finish cooking. Every January, when calçots are harvested, huge calçadas (onion feasts) take place throughout Catalonia. Traditionally, the onions are dipped in an almond and roasted tomato sauce called romesco and messily devoured by hand. But, you can also enjoy them with olive oil, salt, and pepper.
This recipe can be prepared with green onions or large scallions. I particularly like using green Vidalia onions, which are available from December to April from Bland Farms.
INGREDIENTS
2 bunches green onions, or 4 bunches large scallions, both white and green parts, trimmed
Coarse salt (kosher or sea)
Romesco Sauce, for serving (optional; page 472)
Spanish extra-virgin olive oil (optional), for serving
Freshly ground black pepper (optional), for serving
1. Set up the grill for direct grilling and preheat to high.
2. When ready to cook, brush and oil the grill grate. Arrange the onions on the hot grate and grill, turning with tongs, until charred all over, 8 to 12 minutes (scallions will take less time than green onions). Season the onions with plenty of salt as they cook. When done, wrap the charred onions in a thick layer of paper towels (or use newspaper as they do in Spain) and let them rest for 15 minutes.
3. Unwrap the onions and pick away the charred skin with your fingers. Serve the onions warm with Romesco Sauce for dipping or drizzle olive oil on top, season them with pepper, and pop them into your mouth.
Like most Italian grilled dishes, this one is simple. Good results depend on the quality of the raw ingredients, rather than on complex marinades or lots of ingredients. You can use any type of bell pepper or even a kaleidoscopic mixture of red, green, yellow, and purple peppers. I first tasted the dish made solely with red bell peppers and that’s how I prefer it. For a more rustic dish, leave the pepper skins on as I do here. For a more refined dish, grill the peppers whole and peel them as described in the box about grilling vegetables on page 396.
Vegetable grate (optional)
INGREDIENTS
4 red bell peppers
¼ cup extra-virgin olive oil
Coarse salt (kosher or sea) and freshly ground black pepper
2 to 4 oil-packed anchovy fillets, drained and cut into ¼-inch pieces
2 tablespoons drained capers
4 fresh basil leaves, thinly slivered
¼ cup niçoise or other oil-cured black olives
1 tablespoon balsamic vinegar, or more to taste
1. Cut the bell peppers in half, then stem and seed them. Cut each half lengthwise into 2 pieces. Toss the bell pepper pieces with 1 tablespoon of the olive oil and season them with salt and pepper to taste.
2. Set up the grill for direct grilling and preheat to high.
3. When ready to cook, preheat a vegetable grate (if using) for 5 minutes, then brush and oil it or the grill grate. Arrange the peppers on the hot grate and grill, turning with tongs, until blistered and nicely browned all over, 3 to 5 minutes per side (6 to 10 minutes in all). Transfer the grilled bell peppers to a cutting board and let cool. Cut each bell pepper piece into ½-inch-wide strips and place the strips in a shallow serving bowl.
4. Add the anchovies, capers, basil leaves, olives, balsamic vinegar, and remaining 3 tablespoons of olive oil to the bowl with the peppers and stir to combine. Let the bell peppers marinate for at least 15 minutes or as long as 2 hours before serving.
The plantain is a jumbo cousin of the banana. It’s always served cooked, usually as a starch or vegetable. A green plantain tastes bland like a potato. When ripe (the skin will be black), plantains become as sweet as a ripe banana. Both green and ripe plantains can be grilled, but I prefer the ripe ones: The fire caramelizes the sugars in the plantains and makes them candy sweet. Grilling the plantain pieces in their skins keeps them moist and tender.
4 very ripe (black) plantains (see Note), unpeeled
1. Cut 1 inch off each end of the plantains, then cut each plantain crosswise sharply on the diagonal into 2-inch pieces.
2. Set up the grill for direct grilling and preheat to high.
3. When ready to cook, place the plantains on the hot grate and grill, turning often with tongs, until the skins are charred, the exposed ends are nicely caramelized, and the flesh in the center is soft. This will take 12 to 15 minutes. To test for softness, press the plantains with your finger.
4. Serve the grilled plantains in the skins. Cut off the skin before eating.
NOTE: If you live in an area with a large Hispanic community, you may be able to buy ripe plantains. Otherwise, let green ones ripen at room temperature until their skins are black (this can take up to a week).
The inspirations for the following similarly prepared potatoes—both great—couldn’t hail from two more disparate sources. When my wife, Barbara, was a young girl, she and her bunkmates at summer camp would prepare a campfire dish called potatoes à la ketchup. Sliced potatoes were tossed with ketchup and butter and grilled in a foil bundle on the fire. Eaten steamy hot, they were camp comfort food at its best. Years later, in quite a different setting, we had another foil-grilled potato dish—this one flavored with sesame seeds and soy sauce—at a Japanese steak house at the Sahid Jaya hotel in Jakarta.
Yukon Gold potatoes were not available when Barbara was a kid, but we love their buttery flavor when we make this dish today.
SPECIAL EQUIPMENT
Heavy-duty aluminum foil
INGREDIENTS
2 tablespoons ketchup
1 tablespoon Worcestershire sauce
1 tablespoon fresh lemon juice
4 tablespoons (½ stick) unsalted butter, at room temperature
4 medium-size potatoes (each about 6 ounces), cut into ¼-inch slices
1 small onion, thinly sliced
Salt and freshly ground black pepper
1. Mix the ketchup, Worcestershire sauce, and lemon juice in a small nonreactive bowl and set aside.
2. Cut 4 pieces of heavy-duty aluminum foil, each 14 by 8 inches. Place a piece of foil, shiny side down and narrow edge toward you, on a work surface. Smear a tablespoon of the butter in the center of the bottom half of the foil rectangle (the half closest to you). Arrange one quarter of the potatoes in a mound on top of the butter. Place one quarter of the onion on top of the potatoes. Spoon 1 tablespoon of the ketchup mixture over the potatoes and season them with salt and pepper to taste. Fold the top half of the foil over the potatoes and bring the top and bottom edges together. Fold the edges over several times to make a tight seal. Prepare packages of the remaining potatoes the same way.
3. Set up the grill for indirect grilling and preheat it to medium-high. No drip pan is necessary for this recipe.
4. When ready to cook, place the foil packages in the center of the hot grate, away from the heat, and cover the grill. Cook the packages until dramatically puffed, 20 to 30 minutes. Carefully open a package to check the potato for doneness.
5. Serve the potatoes in the foil packages, warning everyone to open the packages at arm’s length, using knives and forks, as the escaping steam will be very hot.
Most Westerners don’t associate potatoes with such Asian seasonings as ginger and soy sauce, but the combination is really quite pleasing.
SPECIAL EQUIPMENT
Heavy-duty aluminum foil
INGREDIENTS
2 tablespoons soy sauce
2 tablespoons sesame seeds, toasted (see box, page 113)
1 clove garlic, thinly sliced
2 scallions, both white and green parts, trimmed and finely chopped
4 tablespoons (½ stick) unsalted butter, at room temperature
4 medium-size potatoes (each about 6 ounces), cut into ¼-inch slices
Salt and freshly ground black pepper
1. Place the soy sauce, sesame seeds, garlic, and scallions in a small bowl and stir to mix.
2. Cut 4 pieces of heavy-duty aluminum foil, each 14 by 8 inches. Place a piece of foil, shiny side down and narrow edge toward you, on a work surface. Smear a tablespoon of the butter in the center of the bottom half of the foil rectangle (the half closest to you). Arrange one quarter of the potatoes in a mound on top of the butter. Spoon one quarter of the soy sauce mixture over the potatoes and season them with salt and pepper to taste. Fold the top half of the foil over the potatoes and bring the top and bottom edges together. Fold the edges over several times to make a tight seal. Prepare packages of the remaining potatoes the same way.
3. Set up the grill for indirect grilling and preheat it to medium-high. No drip pan is necessary for this recipe.
4. When ready to cook, place the foil packages in the center of the hot grate, away from the heat, and cover the grill. Cook the packages until they are dramatically puffed, 20 to 30 minutes. Carefully open a package to check the potato for doneness.
5. Serve the potatoes in the foil packages, warning everyone to open the packages at arm’s length, using knives and forks, as the escaping steam will be very hot.
This is the most basic, primal way to cook root vegetables—a method as old as mankind itself. The process is simple enough: You bury the vegetables in a mound of glowing coals. The exterior burns, imparting a wonderful smoke flavor, leaving the flesh inside sweet and tender. Sweet onions like Vidalias or Walla Wallas are particularly good cooked this way, as are rich-fleshed potatoes, like Yukon Golds.
FOR ROASTING
4 large baking potatoes, unpeeled
4 large sweet onions, in their skins
FOR SERVING
Balsamic vinegar
Extra-virgin olive oil
Coarse salt (kosher or sea) and freshly ground black pepper
Unsalted butter
Sour cream
1. Set up a charcoal grill for direct grilling and preheat to high.
2. When ready to cook, rake half of the coals to one side of the grill. Arrange the potatoes and onions on top of the remaining coals, with the potatoes together in one spot and the onions in another (they cook at different rates and this allows you to remove each when done). Using tongs, place the reserved coals on top of the potatoes and onions.
3. Grill the potatoes and onions until very soft, 40 minutes to 1 hour for the potatoes, 20 to 30 minutes for the onions. To test for doneness, poke a skewer into the center of each. It should slip in very easily. Remove the potatoes and onions from the coals with tongs. Brush away the ashes with a pastry brush and place the potatoes and onions on a serving platter.
4. To eat, cut open the potatoes and onions and eat the flesh out of the skins (the skins of the potatoes will be too ashy to eat). Sprinkle the onions with a few drops of balsamic vinegar and olive oil and some salt and pepper (if desired; the onions are pretty darn good by themselves). Eat the potatoes with butter and/or sour cream and salt and pepper.
Where did the universally popular potato originate? There are numerous theories, but the evidence seems to point to Peru. This mountainous country in northern South America is the home of such distinctive potatoes as the purple potato and the camote (a type of sweet potato, but not as sweet as those in the U.S.). In fact, more different types of potatoes probably grow in Peru than in any other country in the world. The following recipe uses a variety of Peruvian potatoes, which are available at specialty food shops and greengrocers. The purple potato tastes similar to the North American boiling potato. The camote has a mild, nutty, semisweet flavor reminiscent of roasted chestnuts. (The Yukon Gold variety isn’t strictly traditional, but it sure tastes good.)
SPECIAL EQUIPMENT
Vegetable grate (optional)
INGREDIENTS
2 pounds mixed potatoes, including purple potatoes, camotes or sweet potatoes, boniatos (Caribbean sweet potatoes), and/or Yukon Gold potatoes, scrubbed but unpeeled
4 tablespoons (½ stick) unsalted butter, or ¼ cup extra-virgin olive oil
2 cloves garlic, minced
2 tablespoons chopped fresh flat-leaf parsley
Salt and freshly ground black pepper
1. Place the potatoes in a large pot and add cold water to cover. Bring to a boil over medium heat and cook, uncovered, until tender, about 10 minutes for small potatoes, 20 to 30 minutes for large. Drain the potatoes, then rinse them under cold running water to stop the cooking. Peel the potatoes with a paring knife and cut them lengthwise into ½-inch-thick slices.
2. Melt the butter, with the garlic and parsley, in a saucepan over high heat. Bring the butter to a sizzle but do not let the garlic brown. Remove the pan from the heat.
3. Set up the grill for direct grilling and preheat to high.
4. When ready to cook, preheat a vegetable grate (if using) for 5 minutes, then brush and oil it or the grill grate. Brush the potato slices with the butter mixture and arrange them on the hot grate. Grill the potatoes, turning with tongs, until golden brown on both sides, 2 to 3 minutes per side. Season the potatoes with salt and pepper as they cook. Serve at once.
These potatoes are a traditional accompaniment to Greek spit-roasted lamb (page 206). Lemon is one of the dominating flavors, and although North Americans don’t usually associate it with potatoes, I must say it adds a whole new dimension. For extra richness, stir a few tablespoons of butter into the potatoes at the end.
SPECIAL EQUIPMENT
1 cup wood chips, soaked for 1 hour in cold water to cover and drained
INGREDIENTS
3 pounds small red potatoes, scrubbed and cut in half
¼ cup extra-virgin olive oil
4 cloves garlic, coarsely chopped
2 bay leaves
1 teaspoon dried oregano
Coarse salt (kosher or sea) and freshly ground black pepper
1 lemon, cut in half
2 tablespoons unsalted butter (optional)
2 tablespoons chopped fresh dill
1. Place the potatoes in a roasting pan, toss them with the olive oil, garlic, bay leaves, and oregano, and season them with salt and pepper to taste. Squeeze lemon juice over the potatoes, then place the lemon rind halves on top, with the cut side up.
2. Set up the grill for indirect cooking. No drip pan is necessary for this recipe.
If using a gas grill, place the wood chips in the smoker box and preheat the grill to high; when smoke appears, reduce the heat to medium.
If using a charcoal grill, preheat it to medium.
3. When ready to cook, if using a charcoal grill, toss the wood chips on the coals. Set the roasting pan in the center of the grill and cover the grill. Cook the potatoes until browned and tender, 1 to 1¼ hours, stirring them from time to time to ensure even cooking. Stir in the butter (if using) and dill during the last 15 minutes of cooking.
4. To serve, remove and discard the lemon rinds and bay leaves from the potatoes. Taste for seasoning, adding more salt and/or pepper as necessary, and serve.
This recipe is one of my favorite ways to prepare pumpkin. It is especially good served with Jerk Pork Tenderloin (page 182), Buccaneer Chicken (page 265), or Bahamian Grilled Chicken (page 260). It does require using your grill twice, however: first to cook the pumpkin, then to grill the gratin. For this reason, you may wish to prepare the pumpkin on the weekend (when you have plenty of time) and grill the gratin just before serving. This has an added benefit. If bad weather should prevent you from grilling the following day, you can always finish the gratin in the oven. I guarantee the extra grilling is worth the effort—this is one of the tastiest gratins ever.
The traditional pumpkin for this recipe is calabaza, a dense, heavy, dark orange squash with an intense pumpkin flavor. Calabaza is sold in halves or pieces. The closest North American squash would be a butternut.
1 piece (about 2 pounds) calabaza, or 2 medium-size butternut squash
2 cloves garlic
3 tablespoons unsalted butter, chilled, cut into ¼-inch pieces, plus additional butter for greasing the gratin dish
1 cup heavy (whipping) cream
Salt and freshly ground black pepper
Freshly grated nutmeg
1 cup freshly grated Parmesan cheese
3 tablespoons fresh bread crumbs, toasted (see box, page 113)
1. Scoop the seeds out of the calabaza or cut the butternut squash in half and remove the seeds. Wrap the squash loosely in aluminum foil.
2. Set up the grill for indirect grilling and preheat it to medium. No drip pan is necessary for this recipe.
3. When ready to cook, place the squash in the center of the hot grate, away from the heat, and cover the grill. Cook the squash until it is very tender, about 1 hour. Remove the squash, open the foil (being careful to avoid the escaping steam), and let the squash cool to room temperature. Leave the grill burning. (If you are cooking the gratin the next day, you’ll have to set up the grill for indirect grilling again and preheat to high.)
4. Trim the skin off the squash and then cut the flesh into ¼-inch-thick slices. Mince one of the garlic cloves and set it aside. Cut the remaining garlic clove in half and rub a 10-inch flame proof gratin dish with it; lightly butter the dish. Arrange one fourth of the squash in a layer in the bottom of the dish. Pour ⅓ cup of the cream on top and sprinkle it with salt, pepper, nutmeg, one third of the minced garlic, ⅓ cup of the Parmesan cheese, and some of the pieces of butter. Arrange another layer of squash on top and pour ⅓ cup of cream over it. Top this with salt, pepper, nutmeg, half the garlic, ⅓ cup of the Parmesan cheese, and some butter. Repeat in this fashion to make another complete layer of squash (save a little butter for the top). Arrange the remaining squash on top, sprinkle the bread crumbs over it, and dot it with the remaining butter. The recipe can be prepared ahead to this stage. If making ahead, cover it loosely with plastic wrap and refrigerate until ready to grill, up to 48 hours.
5. If you are making and serving the gratin on the same day, you’ll need to increase the heat to high. If you are using a charcoal grill, you’ll need to add 10 to 12 fresh coals to each side.
6. When ready to cook, place the gratin in the center of the hot grate, away from the heat, and cover the grill. Cook the gratin until it is bubbling, crusty, and brown, 20 to 30 minutes. Serve at once.
Grilled sweet potatoes are a popular Korean street food. I first tasted this snack at the Tongdaemun Market in Seoul, where it offered a double dose of pleasure. The first was gustatory—the unexpected contrast between the sweetness of the potato and the sesame saltiness of the dipping sauce. The second pleasure was purely tactile: The potato has a wonderful way of warming your hands in Korea’s frigid winter air. Sweet potatoes were brought to Korea from Japan in the eighteenth century as a famine-prevention food, and there’s nothing quite as satisfying to eat when you’re strolling through the market. If you’re used to the butter/brown sugar approach to sweet potatoes, this preparation will come as a revelation.
4 medium-size sweet potatoes (each 4 to 5 inches long and about 1½ inches wide)
5 tablespoons soy sauce
5 tablespoons sake or dry sherry
2 tablespoons sugar
2 scallions, both white and green parts, trimmed and minced
2 cloves garlic, minced
2 tablespoons sesame seeds, toasted (see box, page 113)
1. Scrub the sweet potatoes and blot them dry with paper towels.
2. Set up the grill for direct grilling and preheat to medium-high.
3. When ready to cook, brush and oil the grill grate. Place the sweet potatoes on the hot grate and grill, turning often with tongs, until very well browned and squeezably soft, 30 to 40 minutes.
4. Meanwhile, make the sauce. Combine the soy sauce, sake, sugar, scallions, garlic, and sesame seeds in a small bowl and whisk until blended and the sugar dissolves. Spoon the sauce into 4 small bowls or ramekins.
5. Serve the sweet potatoes with the bowls of sauce. To eat out of hand, simply dip the potatoes in the sauce. To serve the sweet potatoes as a side dish, cut them open and spoon the sauce over them.
Grilled tomatoes accompany kebabs throughout Central Asia, from Iraq to the Republic of Georgia. Use smallish tomatoes (two and a half to three inches across) that are firm but ripe. Flat metal skewers work the best for holding the tomatoes, which would slip off a skinny metal skewer.
SPECIAL EQUIPMENT
2 long, flat metal skewers
INGREDIENTS
8 ripe small round or plum tomatoes
2 tablespoons extra-virgin olive oil
2 tablespoons chopped fresh dill
Salt and freshly ground black pepper
1. Thread the tomatoes crosswise on the skewers, brush them with the olive oil, and season with the dill and salt and pepper to taste.
2. Set up the grill for direct grilling and preheat to high.
3. When ready to cook, brush and oil the grill grate. Place the skewered tomatoes on the hot grate and grill, turning as necessary with tongs, until the skins are charred and blistered and the flesh inside is hot and soft, 8 to 12 minutes in all.
4. Ease the tomatoes off the skewers with a fork onto a serving platter or plates and serve at once.