Vulnerability scanning consists of looking for known vulnerabilities in known products. The traffic sent is very target-specific, as opposed to the traffic sent by the tools described Chapter 17, which require a lot of pseudorandom traffic.
A vulnerability scanner can execute intrusive or nonintrusive tests. An intrusive test tries to exercise the vulnerability, which can crash or alter the remote target. A non-intrusive test tries not to cause any harm to the target. The test usually consists of checking the remote service version, or checking whether the vulnerable options are enabled. Intrusive tests are typically much more accurate, but obviously they cannot be performed in a production environment. A nonintrusive test cannot determine for sure if a service installed is vulnerable, only if it might be vulnerable.
A vulnerability scanner such as Nessus (see Nessus) differs from a penetration tool by the manner in which it exploits vulnerabilities. A scanner ensures that the vulnerability exists, but doesn't attempt to compromise the vulnerable software. A crash or degradation of the service is only a side effect of an intrusive test, not a goal.
I do not advise using any of the available vulnerability scanners to test an IDS. First, you can never be sure what type of test is performed. Checking the program version or what options are available generates legitimate traffic that should not be detected by an IDS. Even intrusive tests often do not exploit the potential vulnerability in a dangerous way, and may not trigger any log on the IDS. Use a penetration tool such as Metasploit (see Chapter 7) to test the detection capabilities of an IDS or other security device.
Nessus (http://www.nessus.org) by Tenable is a free vulnerability scanner, probably the most well-known tool in this category. Nessus 3 is available on Linux, Windows, Mac OS X, Solaris, and FreeBSD.
Each vulnerability scan or set of vulnerability scans comes as a plug-in. New plug-ins are released regularly and cover several protocols (for example, HTTP, SMTP, FTP, SNMP, RPC, LDAP, and TFTP), backdoors, applications, and local vulnerabilities, and can detect the actual applications running on each open port. It supports SSL (HTTPS, IMAPS, and SMTPS). Nessus covers over 10,000 vulnerabilities.
Nessus 2 was released under the GPL license. Nessus 3 is still free, but not open source anymore. However, there is now an official Windows version.
Plug-ins are still free after you register your copy of Nessus 3, but they are only available after seven days. For a real-time plug-in feed, you have to pay for the Direct Feed (http://www.tenablesecurity.com/products/direct.shtml). In addition, Supervisory Control And Data Acquisition (SCADA) and Compliance checks plug-ins are only available through the commercial Direct Feed.
The new version is faster than 2.0 and extends the NASL language used to write the plug-ins.
Nessus is composed of a client and a server. There is a graphical client interface for both Windows and Linux. The client can run on a different machine than the server. For large networks, it is possible to control several servers in parallel from one client with Tenable Security Center (http://www.tenablesecurity.com/products/sc.shtml), a commercial tool.
Warning
Due to network limitations on Windows, the maximum number of hosts is 10, the maximum number of concurrent security checks is 4, and the maximum number of packets per second for a port scan is 50 if the Nessus service runs on this version of Windows. But you could move the server to Linux (FreeBSD or Solaris also) or to an Enterprise version of Windows (2000, 2003) and still run the graphical client on Windows XP to work around these limitations.
The Security Center contains additional features such as an improved reporting system and granular user rights management. This management tool allows several network administrators to track vulnerabilities, prioritize issues, and share vulnerability information. Each user can have different rights. It can also correlate logs from different Intrusion Detection Systems (IDS) such as Snort (see Snort). It is only available as a commercial tool; there is no free version available from Tenable.
Once the software is installed, you need to register your copy and update the plug-ins. If you have direct access to the Internet, use the client to do so. If you do not have direct access to the Internet, you can do both offline. Go to http://plugins.nessus.org/offline.php to register your copy manually. Use your activation received by email and the challenge code given by Nessus when you start it. Then you can download a new plug-in package periodically with the URL provided during the registration process. Decompress the plug-in package to c:\Program Files\Tenable\Nessus\Plugins.
Tip
The plug-in package is a tar.gz file (tarball compressed with gzip), a format popular on Linux and Unix systems, but not on Windows. It is not a file format handled natively by Windows. You can download 7-Zip, for example, a free and open software to decompress this package. But Cygwin can do the job with the command:
tar xvfzall−3.0.tar.gz-C/cygdrive/c/Program\ Files/Tenable/Nessus/plugins
Including the plug-ins, Nessus takes about 230 MB of disk space.
The Nessus server is started automatically as a service under the name Tenable Nessus. If you do not use Nessus very often, you can change it to start manually to save some resources.
Warning
On Windows 2000 and 2003, install Nessus with Administrator privileges in order for the software to run correctly.
Nessus is supported officially on Red Hat (Enterprise, Fedora), SUSE, and Debian. But the RPM available on Tenable's web site works perfectly for other Linux distributions that support RPM, such as Mandriva.
Tip
Linux distributions usually include version 2 of Nessus, as it is the latest open source version available. You need to get version 3 directly from Tenable's web site.
Nessus is installed in /opt/nessus. Since this is not a standard path on Linux, you need to update a couple of environment variables:
[julien@asus ˜]$export PATH=$PATH:/opt/nessus/bin[julien@asus ˜]$export MANPATH=$MANPATH:/opt/nessus/man
The tools located in /opt/nessus/bin are available to all local users. Commands in /opt/nessus/sbin are used to manage nessus and the server nessusd. They are only executable by the root user. /opt/nessus/sbin should also be added to the default path of the root user:
[root@asus ˜]$export PATH=$PATH:/opt/nessus/sbin[root@asus ˜]$export MANPATH=$MANPATH:/opt/nessus/man
Tip
To avoid typing these commands every time you log in, you can add these two lines to ˜/.bashrc
You need to add a user to administrate nessusd before it can be used. As a root or sudo(see Chapter 14) user, follow these steps:
[root@asus ˜]# nessus-add-first-user

Add a new nessusd user
----------------------


Login : nessusd
Authentication (pass/cert) [pass] : pass
Login password :
Login password (again) :
You can choose any name to manage nessusd. For the authentication mechanism, you can choose between password (pass) and a certificate (cert). If the nessusd server is located on your own machine, it is easier to authenticate with a password. When you enter the password during user creation, the password is not displayed. If you decide to use a certificate, the nessus runs the command nessus-mkcert-client.
Next, you will be prompted to create rules for the new user:
User rules
----------
nessusd has a rules system that allows you to restrict the hosts that nessusd has the
right to test. For instance, you may want the user to be able to scan his
own host only.

Please see the nessus-adduser(8) manpage for the rules syntax

Enter the rules for this user, and press ctrl-D once you are done :
(the user can have an empty rules set)
You can add rules now or later to restrict the rights of the users to scan certain hosts. System-wide rules are added to the file /opt/nessus/etcs/nessus/nessud.rules. User-specific rules are added to /opt/nessus/var/nessus/users/<login>/auth/rules.
The rules describe the rights of each user by listing the networks that each user can or cannot scan.
For example, this rule allows the scanning of 192.168.1.0 to 192.168.1.255 only:
accept 192.168.1.0/24
default deny
This example rule allows the scanning of any IP address, except 192.168.1.0 to 192.168.1.9 and 192.168.1.11 to 192.168.1.255:
deny 192.168.1.0/24
accept 192.168.1.10/32
default accept
It is also possible to allow access to the client machine only:
acceptclient_ipdefaultdeny
After you have finished adding rules, you will see this message:
[...]
Thank you. You can now start Nessus by typing :
/opt/nessus/sbin/nessusd -D
You can add additional users with the command nessus-adduser. To remove a user, use nessus-rmuser <login>.
On most Linux systems, nessusd should be started/restarted/stopped from /etc/init.d/nessusd start|restart|stop rather than from /opt/nessus/sbin/nessusd -D.
To register your copy of Nessus, you need to copy the output of the command nessus-fetch--challenge along with your registration code received by email to http://plugins.nessus.org/offline.php. Or if you have direct access to Internet, type nessus-fetch --registeractivation_code
Make sure that the set up is complete by displaying the list of plug-ins:
[julien@asus ˜]nessus -q -p127.0.0.1 1241 nessusd password
127.0.0.1 is the IP address of the nessusd daemon, 1241 is the default port of the daemon. nessusd is a username we created earlier; it is followed by the password.
Tip
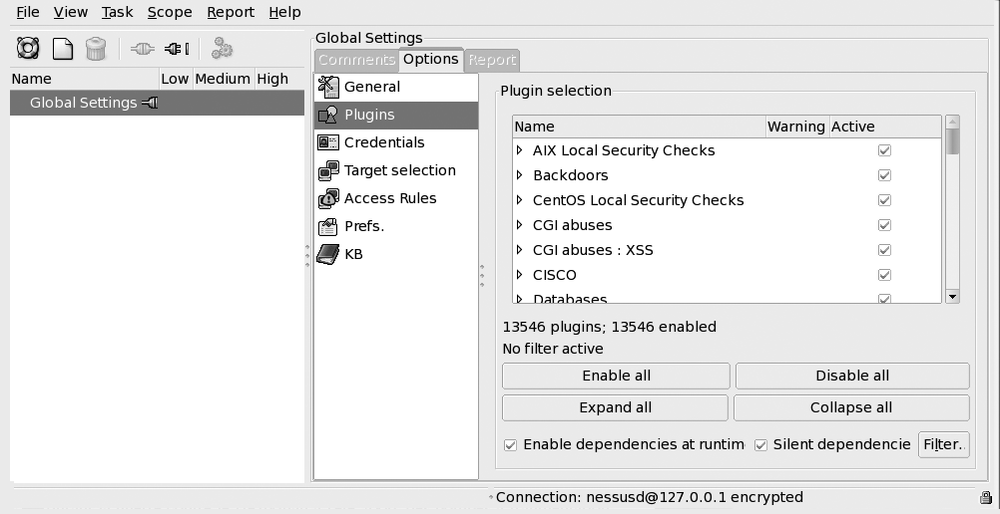
NessusClient, a Linux graphical interface for the client shown in Figure 3-1 can be downloaded at http://www.nessus.org/download/index.php.
You can also check that Nessus is correctly set up to update the list of plug-ins:
[julien@asus ˜]  nessus-fetch -check
 nessus-fetch is properly configured to receive a Registered feed
Optionally, you can tune the nessusd configuration file /opt/nessus/etc/nessus/nessud.conf. You may want to modify these values in particular:
# Number of hours to wait beween two updates
auto_update_delay = 24 # can be changed to 12 or 6
# Maximum number of simulataneous hosts tested
max_hosts = 40     # can be lowered to use less bandwidth
# Maximum number of simultaneous checks on each host
max_check = 5 # can be lowered to save resources

# CGI paths to check
cgi_path = /cgi-bin:/scripts # add /cgi and any special location used on your network

# Can users upload their plugins
plugin_upload = yes     # this is a security risk, it is safer to say no

#If set to yes, Nessus jumps randomly from addresses to addresses instead of doing the
m in incremental order
slice_network_addresses = no # set to yes to try to evade firewalls or IDS
Be careful when changing the number of simultaneous hosts to check and the number of checks, as these choices increase the bandwidth, CPU, and memory usage on both the server and the target hosts.
You can automatically update the plug-ins with nessusd by setting up the auto_update variable to yes. If you prefer to use a cron job instead—for example, to launch a command in case of failure—do not launch an update at a plain hour (e.g., 5:00 p.m.). Instead, use a random number between 5 and 55 for the minutes (e.g., 5:17 p.m.) to distribute the load over time on the remote server.
This chapter focuses on network vulnerability scanning, so I will not detail the local vulnerability checks done by Nessus. If you provide Nessus with the credentials of a target, it can ssh(see Chapter 15) to it and check known binaries on the host for local vulnerabilities. Nessus looks at specific well-known security vulnerabilities, but also does generic checks, such as looking for file permissions or sensible configuration files.
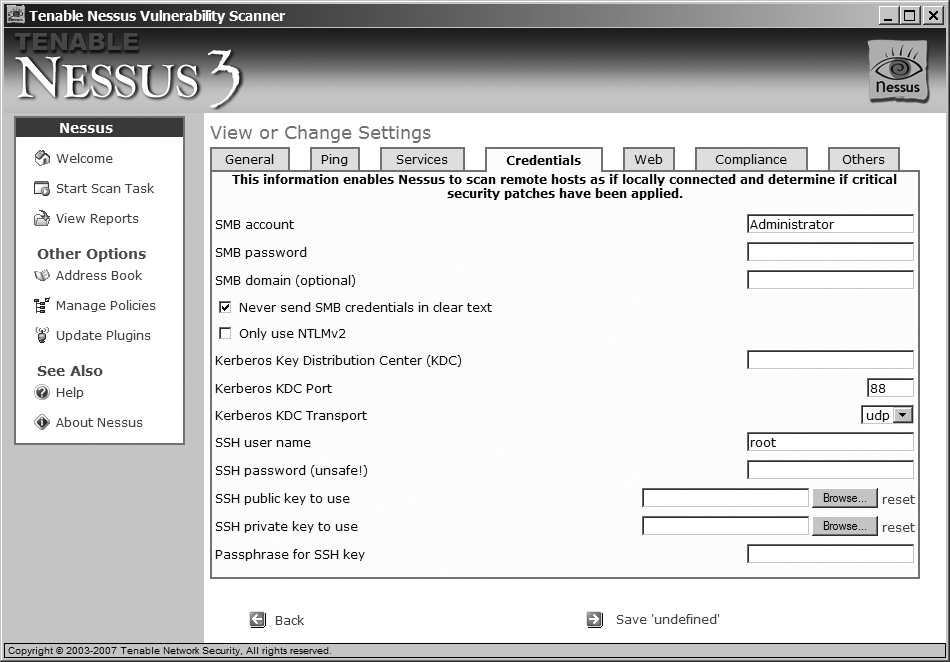
The login and password information are part of the policy. This means that if you want to connect to servers that have different passwords, you have to create a new policy for each of them. In the Windows client, the credentials are accessible after clicking on Edit Settings, as shown in Figure 3-2.
You can run a scan from inside your network to get as much information as you can on potential vulnerabilities or weaknesses. Or you can scan your network from the outside to understand how an attacker sees it. You want to do a thorough analysis of all servers at the interface between your local network and the Internet, usually your DMZ zone: mail server, HTTP server with web applications, and VPN server.
You can start a scan simply by inputting the IP address or hostname of the targets. Nessus proposes four types of scan:
- Nonintrusive scan
This is best suited to scan targets in a production network. A scan of one target on a 100 MB network from a Windows XP client takes about 25 minutes.
- Intrusive scan
This enables all plug-ins, including dangerous checks that can harm the target. This scan takes about 30 minutes for one target.
- Predefined policy
Use a predefined or customized policy defined earlier. Check the section "Policy Configuration" later in this chapter for more details.
- New policy
Define a new policy to use for the scan. Check the later section "Policy Configuration" for more details.
Warning
If your goal is to test a remote server, do not forget to turn off any anti-virus, firewall, or other security software running on the Nessus server. This software may drop some of the traffic generated by Nessus.
Nessus first does a port scan to identify the services running and the target operating system (see Chapter 2). It uses a combination of features to determine what the target is running. Here is what it tries to discover:
What services are running? For example, SSH and NTP are more common on a Unix machine, NetBios and MS-RPC are more on common on Windows.
How the target reacts to malformed ICMP packets.
SNMP information.
Information gathered from an NTP service.
To get more information about operating system fingerprints, check out Chapter 2 and examples related to p0f(see Getting Information from the LAN).
The port-scanning phase is very important. It is used by Nessus to know what plug-ins are relevant (Apache or ISS plug-ins for a web server, Linux or Windows vulnerabilities, etc.), and what service is running on what port. Nessus can detect services on nonstandard ports.
Tip
If you scan a large network, it is more efficient to place one Nessus server per network segment.
There could be false detection if the target is behind a Port Address Translator, since each port could correspond to a different operating system. A firewall between the Nessus server and the target could drop the malformed ICMP traffic. This would then lead in false positives in vulnerabilities found by Nessus. If you know the details of the machine you are scanning, it is possible to tell Nessus what operating system or services are running on the host in a policy (see the section "Policy Configuration" later in this chapter).
If you run a web server with virtual hosts—that is you have different web domains with the same IP address—you need to indicate the list of virtual hosts to Nessus. Where you enter the IP address of the target, add the hostnames between brackets: 192.168.1.1[domain.comdomain.netdomain.org]. You can save it in the address book to avoid typing a long list all the time.
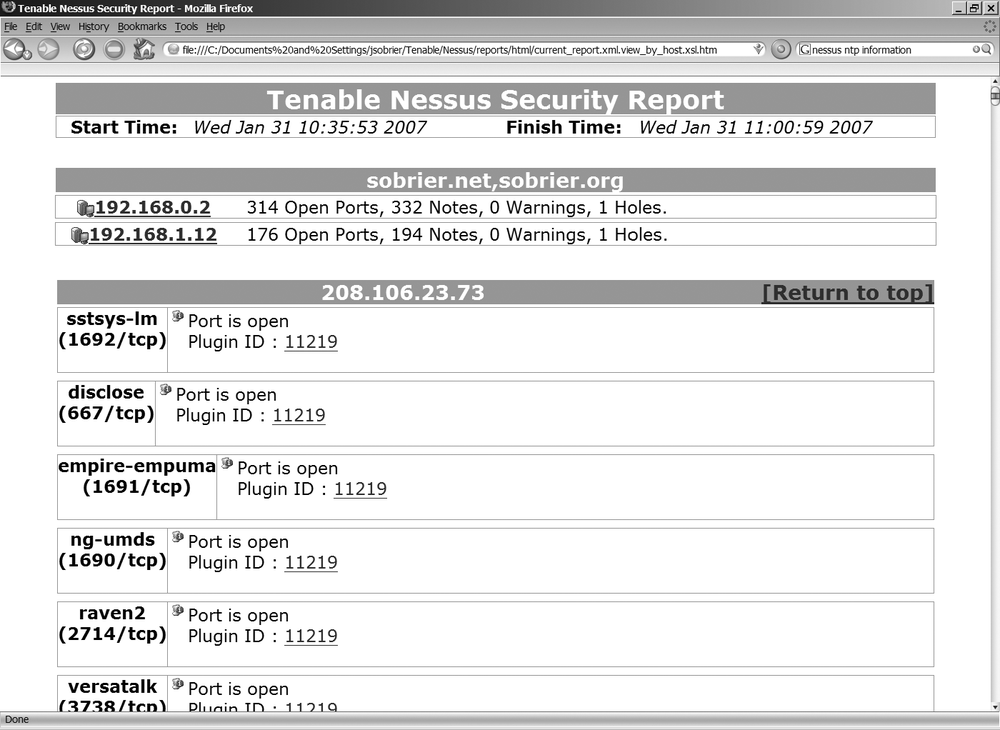
At the end of a scan, Nessus generates a report that provides a list of all open ports and the potential risks associated. If you use any encryption (SSH, HTTPS, IMAPS, SMTPS), Nessus analyzes the algorithms allowed and warns you if any weak encryption mechanism are allowed (see Figure 3-3).
You may see a list of more specific issues (such as a list of vulnerable software versions that you run) or known vulnerable CGI scripts.
All these results should be double-checked; there are often a lot of false positives:
A firewall or other security device may have detected the ongoing scan. My firewall can detect the scan after a few seconds and blocks all traffic generated by Nessus. The report shows a lot of open ports that do not exist on the target because it misinterpreted the dropped packets (see Chapter 2). Nessus may also display that it was able to crash the target when the traffic was actually dropped by the firewall.
Some vulnerability checks are too superficial. Sometimes, a plug-in looks for the version in the banner only. This may not be enough to know whether the service is actually vulnerable. It is possible that the server has been patched without changing the software version, or that the vulnerable options are not enabled. See "Plug-in Code Example" later in this chapter to understand how to verify what a plug-in is actually doing.
If a service or server is incorrectly identified, checks that do not apply to the actual version may give wrong results.
The scan results highlight potential issues that should then be checked one by one. This is a good base to start tightening up the security of the servers running on a network. But like all the tools described in this book, some manual work is necessary to analyze the results, and other security checks with other tools should be performed.
All reports are automatically saved. They can be reviewed later. You can also compare two reports to see whether you actually did increase the security of the target between the last scan, or whether the target was modified since the last scan.
Instead of running a full scan, it is possible to customize the areas that should be checked. By reducing the number of checks that are done and by tuning the default settings, you both reduce the duration of the scan and improve its accuracy.
The settings are associated with a policy. This means that each target that requires special settings (different passwords for example) requires its own policy. You cannot clone a policy; this makes Nessus hard to use accurately on a large networks.
To modify the default settings, create a new policy and click on Edit Settings. Under the General tab, you can select how thorough the test will be. For a full scan, unselect Safe Check and select "Thorough tests." For more verbose output (but also more false positives), select Paranoid for report paranoia and "verbose Report" for verbosity.
The Credentials tab contains settings used for local vulnerability checks. See "Local Vulnerabilities" earlier in this section for more information.
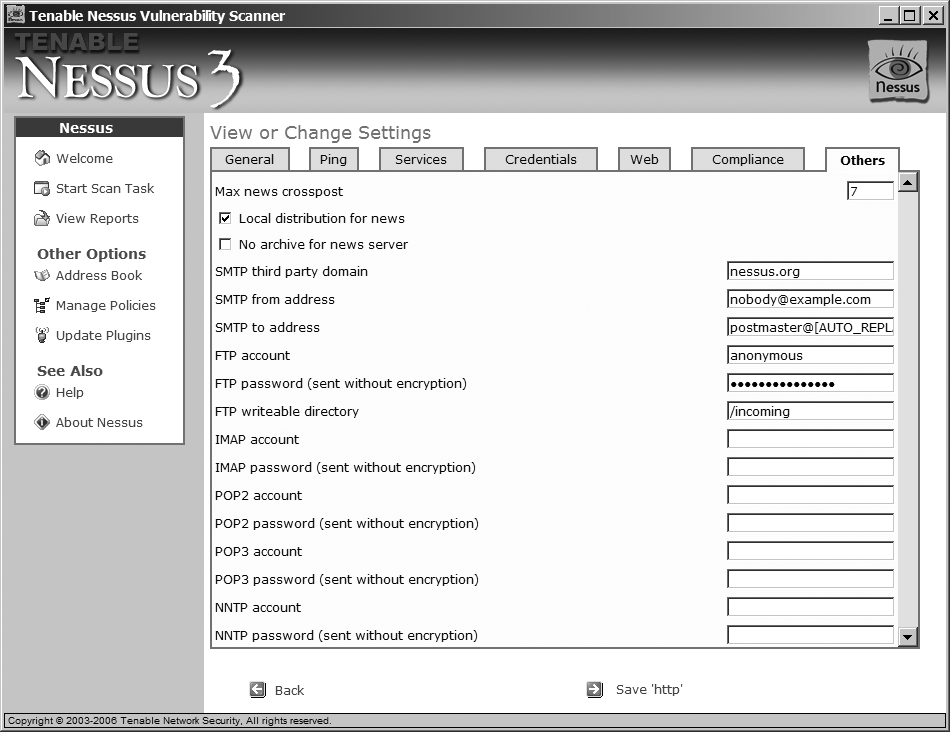
The tabs for Others and Web contain login and password information for different services, as shown in Figure 3-4. This information is needed to perform all the tests.
If you have subscribed to the Direct Plugin Feed, you can add your compliance policy files under the Compliance tab. These files describe your company policies for different OSs. Nessus can check whether the targets comply with them.
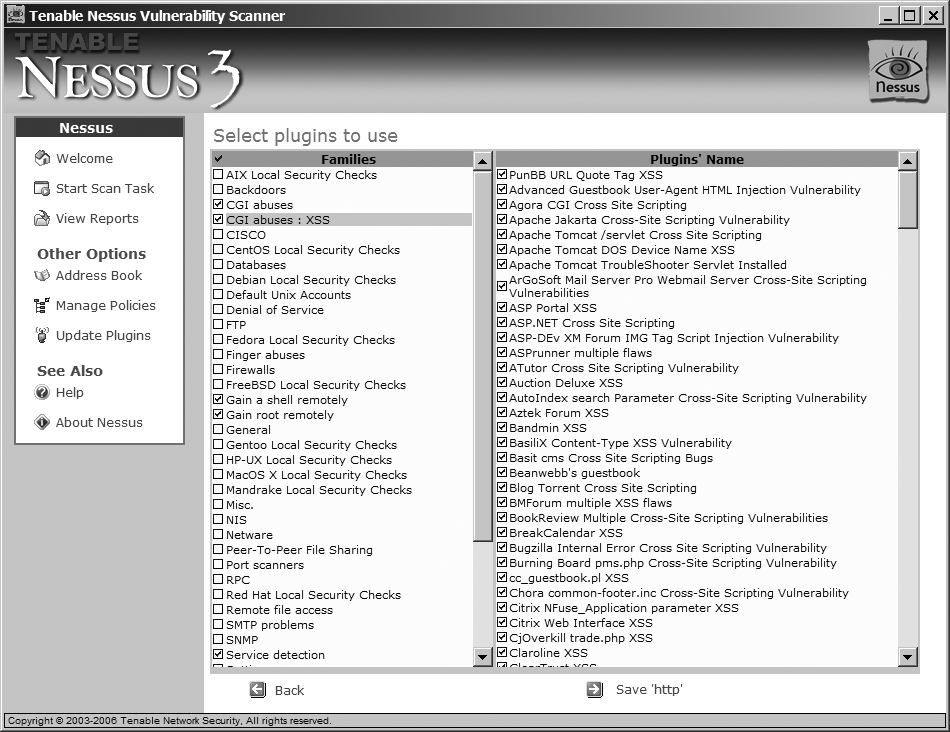
You can select the list of plug-ins to enable by clicking Edit Plugins. By default, all plug-ins shown are enabled. However, it you selected "Safe checks" in the settings, the plug-ins considered dangerous (denial of service, exploitation of a vulnerability, etc.) are not run.
The plug-ins are organized by family (for example, Web Server, Windows). A brief description of each plug-in is available, as shown in Figure 3-5. The description provides some useful information when you do the report analysis:
What is it actually doing? When you see something like "Software X version Y has a known vulnerability," the plug-in is very likely looking for a banner and not exercising the actual vulnerability. This can be verified by looking at the plug-in code (see "Plug-in Code Example" later in this chapter).
What software or OS version does it apply to? If you know you are scanning Windows targets only, there is little value in enabling plug-ins that look for Unix vulnerabilities. The scan takes longer and you potentially get more false positives.
A workaround. The plug-in may describe how to configure the vulnerable service to not be vulnerable. You may want to check that this is not already in place on the target.
Is it a local or remote vulnerability check? If the plug-in is a local check, you need to add the credentials to connect to the target.
This list of plug-ins can also be found in the XML file c:\Program Files\Tenable\Nessus\plugins\plugins.xml. This file is easier to use to do a search. It also provides additional information, such as dependencies on other plug-ins, the script name, and the category. The category is represented by a number in the XML file and a name in the plug-in code. The category indicates what type of action is performed by the plug-in, as shown in Table 3-1.
Table 3-1. Plug-in categories and actions performed
Category number | Category name | Description |
|---|---|---|
1 | ACT_SCANNER | Network scan (harmless) |
2 | ACT_SETTINGS | Settings used by other plug-ins |
3 | ACT_GATHER_INFO | Information gathering (banner check, presence of a file, etc.) |
4 | ACT_ATTACK | Performs a network attack |
5 | ACT_MIXED_ATTACK | Performs several types of attack; some may be harmful |
6 | ACT_DESTRUCTIVE_ATTACK | Performs harmful attack |
12 | ACT_DENIAL | Denial of service |
13 | ACT_KILL_HOST | Attempts to crash the target |
14 | ACT_FLOOD | Floods the device, may harm the target |
15 | ACT_END | Information about each host |
The category is different from the family. For example, the plug-in Imagemap.exe in the family CGI: Abuses performs a denial of service, but is not part of the family Denial of Service.
In a detail analysis of Nessus results, you may have to understand what the plug-in did exactly. On Windows, all scripts are located in c:\Program Files\Tenable\Nessus\plugins\scripts\, and on Linux in /opt/nessus/lib/nessus/plugins/. They are written in NASL, a special language used by Nessus.
This book is not going to teach you the NASL language to write your own scripts. NASL is easy to read, so we will only look at a couple of examples to understand what is done in the plug-in.
Let's start with a simple CGI plug-in, zope.nasl. The first part of the script is the description available in the GUI:
if(description)
{
 script_id(10447);
 script_bugtraq_id(1354);
 script_version ("$Revision$");
 script_cve_id("CVE-2000-0483");
 [...]
 exit(0);
}
The code for the plug-in starts after the comment:
# The script code starts here
[...]
banner = get_http_banner(port:port);

if(banner)
{
if(egrep(pattern:"^Server: .*Zope 2\.((0\..*)|(1\.[0-6]))", string:banner))
     security_hole(port);
}
In this example, the plug-in looks at the HTTP reply from the web server to verify what the web server software is. If the target runs Zope 2.0 to 2.1.6, this is reported in the scan result. This is a safe plug-in in the category ACT_GATHER_INFO. It generates valid traffic that should not be blocked or detected as malicious by any security device.
Now, look at smtp_relay2.nasl. This plug-in checks whether your SMTP server is configured in OPEN RELAY mode, which would allow a spammer to use your mail server to send millions of email:
send(socket: soc, data: strcat('HELO ', src_name, '\r\n'));
smtp_recv_line(socket: soc);
for (i = 0; soc && (from_l[i] || to_l[i]); i ++)
{
  mf = strcat('MAIL FROM: <', from_l[i], '>\r\n');
  send(socket: soc, data: mf);
  l = smtp_recv_line(socket: soc);
  if (! l || l =˜ '^5[0-9][0-9]')
  {
    smtp_close(socket: soc);
    soc = smtp_open(port: port, helo: domain);
  }
  else
  {
    rt = strcat('RCPT TO: <', to_l[i], '>\r\n');
    send(socket: soc, data: rt);
In this part of the code, Nessus uses the following commands to send an email:
HELO localhost
MAIL FROM: <nessus@localhost>
RCPT TO: <nessus@domain.com>
If the SMTP server is correctly configured, it should reject this email because the recipient is not part of your network. The plug-ins check the reply code sent by the server to the last command:
if (l =˜ '^2[0-9][0-9]')
    {
      mf -= '\r\n'; rt -= '\r\n';
      rep = strcat(rep, '\t', mf, '\n\t', rt, '\n\n');
      break;
   }
    [...]
   }
}
[...]
If the response code is 200 to 299, the SMTP server agrees to deliver the email. Nessus reports that your SMTP server can be used by spammers.
If you know other scripting languages (for example, Perl, Python, or Bash), you can understand what each plug-in is really doing. I usually look at the code of each plug-in when going through the results of a scan; it is often easier than analyzing the target to check whether it is really vulnerable.
Everything that is done with the Windows GUI can be done with the command line on Linux. All the parameters must be added to a configuration file. The Linux GUI uses ˜/.nessusrc; you can use the same filename with the command line or use a new one:
[julien@asus ˜]nessus -c ˜/.nessusrc -q127.0.0.1 1241 nessud mypasswordtargets.txt results.nsr-Tnsr
Tip
You can add the -V argument (verbose) to get information about the scan in progress.
targets.txt contains the list of targets to scan (one per line), in the same format used in the Windows GUI. The results of the scan are contained in results.nsr. The -T option allows you to get the Nessus report in HTML (-T hml), text (-T txt), XML (-T xml) or one of the Nessus format (-T nbe, -T nsr). It is preferable to generate the report in .nsr or .nbe format because it can later be converted to any of the other formats:
[julien@asus ˜]nessus -i results.nsr -o results.htmlIt is not possible to create or manage policies from the command line. All changes have to be done in the configuration file (e.g., enable/disable plug-ins, server settings, and credential information).
Unfortunately, there is no official documentation for this configuration file. But there is a Nessus knowledge base at http://www.edgeos/nessuskb/ where you can find a lot of examples. You can also generate the configuration file with the GUI and update it later.
The configuration file looks like this:
#global settings
trusted_ca = /opt/nessus/com/nessus/CA/cacert.pem
paranoia_level = 2
nessusd_user = nessusd
[...]
begin(SERVER_PREFS)
#server settings
end(SERVER_PREFS)

begin(PLUGINS_PREFS)
# plugin settings
end(PLUGINS_PREFS)

begin(PLUGIN_SET)
#list of plugins enabled
 20532 = yes
 15352 = yes
[...]
end(PLUGIN_SET)
As you can see, you must explicitly list all plug-ins that are enabled. This means that after each plug-in update, you have to add the new plug-ins to the file. There is a great unofficial tool to generate an up-to-date list automatically: update-nessurc. This Perl script can be found at http://www.tifaware.com/perl/update-nessusrc/.
The help information for update-nessurc is part of the script and accessed via perldoc:
[julien@asus ˜]perldoc update-nessusrcAfter you download the script and make it executable (chmod u+x update-nessusrc), you must edit the script to enter information about the Nessus server:
############################################################################ # Initialize variables. our $nessusd_host = '127.0.0.1'; our $nessusd_port =1241; our $nessusd_user = 'nessusd'; our $nessusd_user_pass = 'mypassword'; our $proxy = ''; #no proxy
You can get a summary of the default nessurc configuration:
[julien@asus ˜]./update-nessusrc -s ˜/.nessusrc
Id:        24021
Name:    Easy File Sharing FTP Server PASS Command Buffer Overflow Vulnerability
Family:    Gain a shell remotely
Risk:    High / CVSS Base Core: 7 (AV:R/AC:L/Au:NR/C:P/A:P/I:P/B:N)
Category:    denial
[...]
Before you make any modification with update-nessusrc, you should back up your configuration file. By default, the configuration file selects all plug-ins except the dangerous ones (denial, destructive_attack, flood, killhost) and the port scans that are selected individually in the variable @plugins_includes(plug-ins 10180 and 10335).
You can select the plug-ins to enable by:
- Category
You can select
_all_for all categories and exclude specific categories by prepending their name with!:./update-nessusrc -c "_all_,\!destructive_attacks" ˜/.nessusrcWarning
If you use the Bash shell on Linux, you need to escape
!, as in\!.- Family
It works the same way as filtering by category, except that you need to override the default categories:
./update-nessusrc -c "" -f "infos,CGI abuses" ˜/.nessusrc- Risk
The risks factors must be typed as a regular expression:
./update-nessusrc -c "" -r "High|Medium" ˜/.nessusrc- Plugin ID
You can select all plug-ins with
_all_, or a range of plug-insx-y. You can also exclude some of them with!, or!x-yto exclude plug-insxtoy:update-nessusrc -c "" -i "10000-15000,20000-30000,!15010-15100,!25011" ˜/.nessusrc
There is an additional special filter: the SANS Top 20 Vulnerabilities (see http://www.sans.org/top20/). To enable the corresponding plug-ins, type:
[julien@asus ˜]./update-nessusrc -t ˜/.nessusrcTip
You can add the -s argument to any of these commands to get the list of changes done by update-nessusrc
These filters can be combined together. You can also use the -x argument, which works like -I but excludes specific plug-in IDs.
Some plug-ins need additional configuration. You can find these in the configuration file between begin(PLUGINS_PREFS) and end(PLUGINS_PREFS). update-nessurc cannot update these special settings. It is possible that a new plug-in does not work because it has not been configured correctly. It is safer to run nessusClient on Linux after each plug-in update to make sure all plug-ins are correctly configured, and then use update-nessusrc as a policy manager tool.
It is also possible to use the command line in Windows. This is handy to run Nessus in a schedule task or as part of a script. However, it is not as powerful as the Linux command line. You can only launch a couple of tasks:
The reports are saved in c:\Documents and Settings\<user>\Tenable\Nessus\reports.
