WebInspect 7.0 is a proprietary web scanner from SPI Dynamics. A license for one target IP address is about $4,500. It is available on Windows only.
Warning
Version 7 requires Windows XP or higher, with .NET 2.0 and SQL Server Express. If you get the error Cannot alter the login ''sa'', because it does not exist or you do not have permission while installing SQL Server express, refer to http://support.microsoft.com/?kbid=917827 for a workaround.
If you have not previously installed .NET 2.0, you are required to log out of Windows twice: once after the installation of the .NET package and once after the first start up of WebInspect.
Like Nikto, this scanner does check for some known vulnerabilities, but it also does much more. WebInspect first crawls the web site to figure out its structure, all the files available, the parameters used in the URL, and the web forms. It uses this information to create traffic derived from both known vulnerabilities and generic vector attacks (SQL injection, cross-site scripting, command injection) for your web application.
WebInspect is a great tool to test the robustness of a web application. It was used to find cross-site scripting in Tikiwiki (an open source wiki), code execution in Oracle Web server 10g, and information disclosure in IBM WebSphere. It can also be used to test web services.
A wizard drives you through the main options to start a new scan:
- URL
If the web site is not on the standard port 80, you need to include the port number in the URL—for example, http://www.mydomain.net:88/.
- Restrict to folder
You can restrict a scan to a folder, or to a folder with its subdirectories.
- Assessment method
By default, the web site is crawled and audited at the same tine, so you get results early. You can select "Prompt for web form values during scan." During the first scan, every time WebInspect finds a form, it prompts you for the values to enter. These values are stored and used automatically for future scans. This is especially useful if you use a web form for authentication and you want to give WebInspect access to the private content of your web site.
- Settings
See the section "Settings Tuning" later in this chapter for the scan settings.
- Select a Policy
See the section "Policy Tuning" later in this chapter for more details about predefined and custom policies. To get the detailed list of checks enabled in a policy, click on Create after selecting the policy to view.
- Network Authentication
WebInspect handles four types of identification: HTTP Basic, NTLM, Digest, and Kerberos. It can automatically detect what type of authentication is used on the web site. Enter a login and password to be used. If your authentication is done through a web form, select "Prompt for web form values during scan" on the first screen, as explained previously in the description for the Assessment method.
- Auto-fill web forms
You can change the default values such as zip code, email address, and so on used in the web forms, and add more of them.
- Network Proxy
You can specify an optional proxy server to use. WebInspect includes its own Proxy. See the section "WebInspect Tools" later in this chapter for more details.
You do not need to fill out all these options. You can click on Finish at any time to run a scan with the default option (standard policy, not network authentication, no external proxy, and so on).
Tip
If the target is on your local network but also has a public IP address on the Internet and uses virtual host, you may have problems scanning it with a 1-IP address license from SPI. For example, the local IP address of the target http://domain.net/ is 192.168.1.50, and its public IP address is 212.212.212.212. You would have a license for 192.168.1.50. But if you ask WebInspect to scan http://domain.net/, it may be resolved as 212.212.212.212 by your DNS server. To bypass this, edit the host file c:\Windows\system32\drivers\etc\hosts and add the following line:
192.168.1.50 domain.net www.domain.net
This file is checked first by Windows when it needs to resolve a domain name. In this example, domain.net, www.domain.net(add more subdomains if needed) are always resolved as 192.168.1.50.
The policy management in WebInspect is similar to Nessus (see "Policy Configuration" earlier in this chapter). A set of predefined policies already exists:
- Standard
The default policy that includes nondangerous checks only. This policy can be used on production applications.
- Assault
This policy contains dangerous plug-ins and should not be used on web sites in production.
Tip
The Assault policy contains most of the tests, but not all. Some SQL Injection checks and SOAP assessment are not selected.
- Specific groups
You can run certain types of tests: cross-site scripting and SQL injection.
You can also create your own policy from scratch or from an existing policy. To create a new policy, select Tools →Policy Manager. The list of checks is displayed, organized by categories and subgroups, as shown in Figure 3-6.
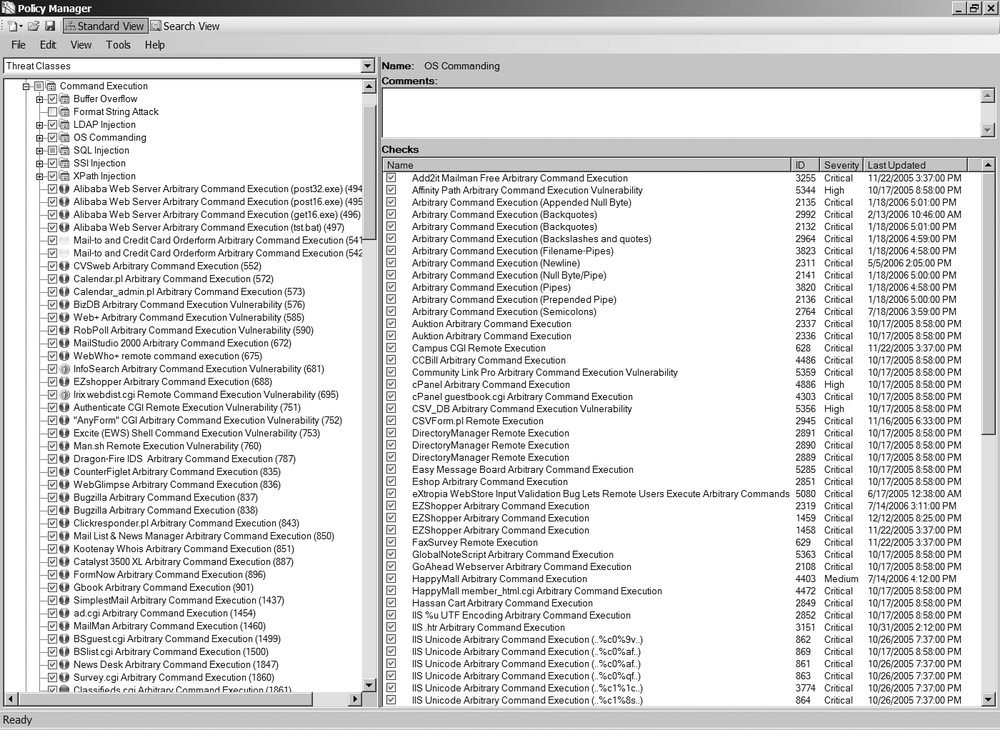
The default selection corresponds to the Standard policy. You can select each test individually, or an entire category or subgroup by clicking on the small box. You can also change the view from display by Attack Groups to display by Severity or by Threat Classes.
Tip
An empty box means that none of the tests inside the group have been selected. A green square indicates that part of the tests are selected, and a checked boxed indicates that all of them are selected.
To tweak an existing policy, select File →New →Assault Policy or another predefined policy. You cannot overwrite any of the predefined policies; you can only save the modified version under a new name. The custom policies are then available under the group Custom.
There are a couple of default settings that you may want to change for all your scans. Select Edit →Default Scan Settings to keep the changes for all the future scans, or choose Edit →Current Scan Settings for the current session only.
- General →Limit maximum URL hits to 15
The same URL is checked a maximum of 15 times, even if it contains variables that can have more than 15 different values. For example, if the URL is in the form http://www.domain.net/product.asp?id=x where X can vary from 1 to 1,000,000, WebInspect checks only 15 different values. If you think that some web pages must be checked with all possible values references on your web site, you can increase the default value or simply uncheck this option.
- General →Limit maximum crawl folder depth to 500
WebInspect crawls up to 500 levels down from the top directory. The use of a lot of subdirectories is common with URL rewriting where a URL such as http://www.domain.net/product.asp?type=clothes&id=1 is rewritten in a more user-friendly way such as http://www.domain.net/products/clothes/1/.
- General →Consecutive 'single host'/'any host' retry failures to stop scan
If WebInspect fails to reach a host more than the number of times specified, the scan is stopped. This can be an issue if there is a network device behind WebInspect and the target that you can turn off. The device could drop some malicious traffic. You might want to simply disable this feature.
- Requestor → Use separate requestors
You can increase the number of threads on a powerful machine to speed up the scan.
- Session Storage
You may be interested in additional information in the report such as the list of 404 errors, or if you hit any setting threshold such as the maximum folder depth or maximum number of hits for a single URL, etc. You can select them in the Session Storage section.
- File Not Found
WebInspect already contains a number of patterns to identify a custom 404 page. You can also add your own.
The default values are fine for most web sites, but there is such a variety of web applications that a custom settings feature is a must have for a web scanner.
If you selected the default simultaneous crawl and audit method, you get the first results very quickly. On the left part of the report, you can find the list of pages folder and the pages found by WebInspect. An icon shows whether a potential vulnerability was found.
Tip
By default, the folders are unfolded. You can right-click on the top node or any folder to unfold it in order to get a good overview of all pages found.
If you use a script to generate an image (e.g., <img src="gener-ate.cgi?id=23">), this script may not be found by WebInspect. This should be fixed in a later update.
WebInspect lists all references to external web sites. You can right-click on them, and chose Add Host to include them in the scan, if your license allows their IP address.
On the right in Figure 3-7, you can see that WebInspect's dashboard gives you an overview of how many vulnerabilities were found by severity, and how many tests are done and how many are remaining.
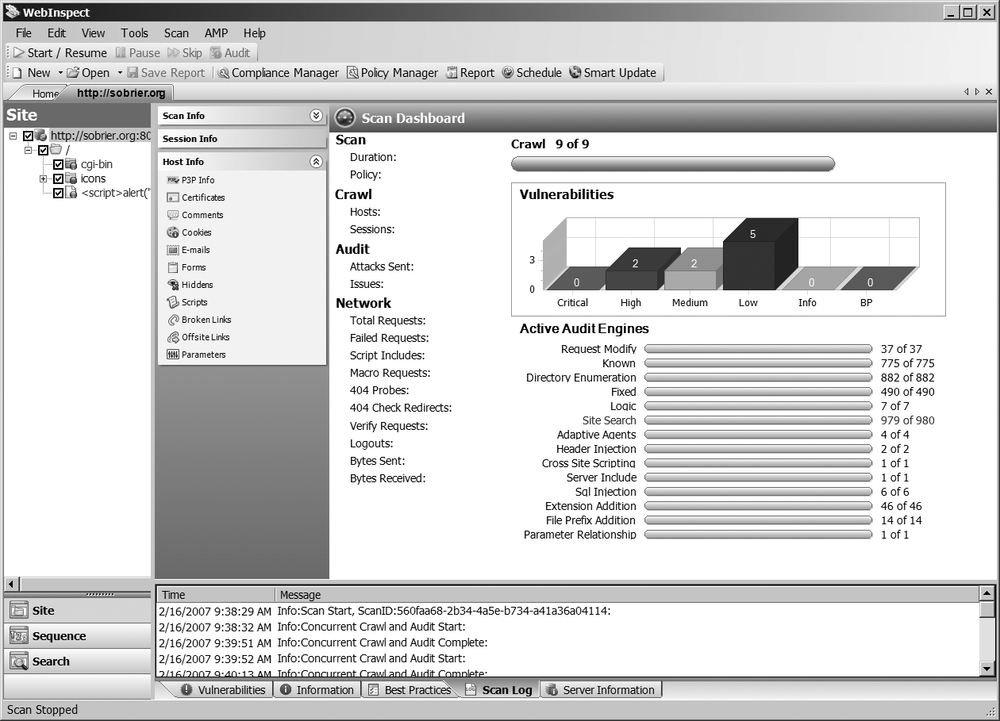
At the bottom, the Scan Log Tab displays the details of the scan. The Server Information tab gives information about the server version (e.g., Apache, Microsoft IIS) and the services running (e.g., ASP, PHP). The Vulnerabilities tab, the most important, gives the list of vulnerabilities found for the page selected in the left pane, or for all the subfolders and pages found in the selected directory.
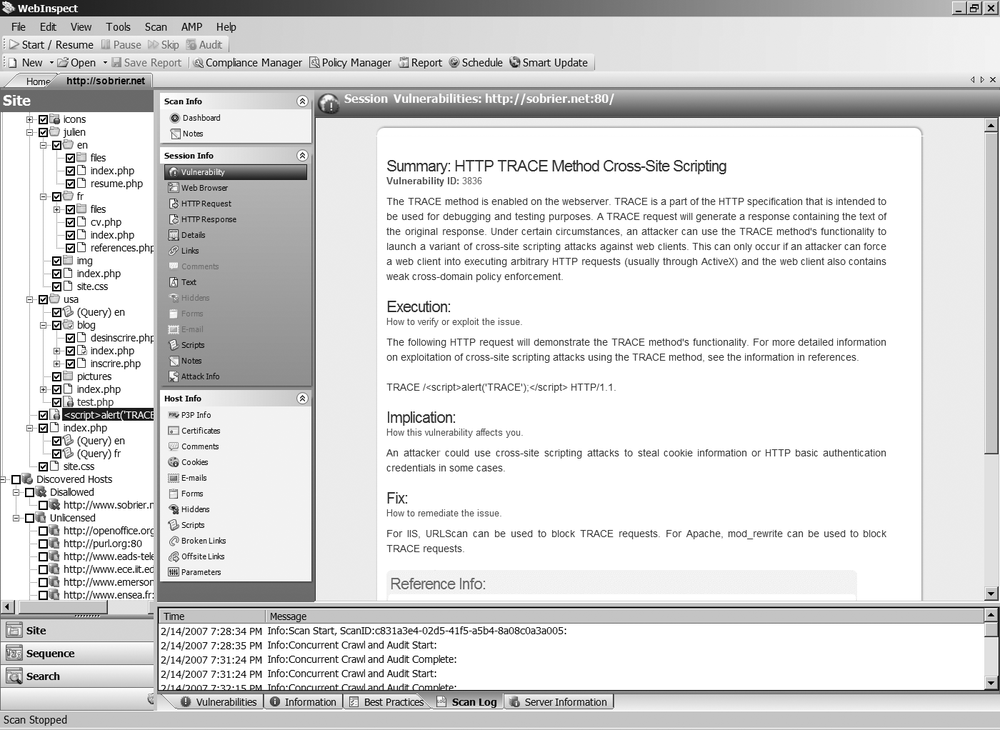
To view the details of a vulnerability, double-click on one of them in the Vulnerabilities tab, or select a page on the left pane and click on Vulnerability in the center pane, below Session Info. As shown in Figure 3-8, WebInspect gives a lot of information for each vulnerability—a description, the consequences, a possible fix, and references—that help you to understand what WebInspect finds and whether it is a false positive (see the next section for further information on false positives).
In the middle pane, under Host Info, there is a particularly interesting feature called Comments. It displays all the HTML comments found in the page. You would be surprised to see what information can be found there. It is not convenient to click on each page to see the comments, but you can export all of them into a single page to make a search. To do so, go to File →Export →Scan Details and choose Comments. You can do the same thing for hidden fields and other interesting parameters.
Most false positives I encountered are caused by URL rewriting. WebInspect looks for directories that are not referenced by the web site, usually because they are supposed to be hidden (e.g., /admin, /test). But if you use URL rewriting to map, for example, http://mydomain.net/forums/ to the folder /groups, WebInspect reports /groups as a hidden folder event, although it has exactly the same content as the virtual folder /forums.
WebInspect may also report a lot of malicious finds from a directory that uses URL rewriting. It is common to rewrite URLs that have a lot of variables into a user-friendly URL that uses a directory structure—for example, http://www.domain.com/product.asp?category=clothes&brand=mybrand&id=1 turns into http://www.domain.com/products/clothes/mybrand/1. WebInspect thinks /products/clothers/mybrand/clothes is a folder and 1 is a filename. So it looks for /products/clothes/mybrand/admin.exe, /products/clothes/mybrand/debug.pl. The web server doesn'tt return a 404 File Not Found because the actual file is always product.asp, admin.exe, or debug.pl, which are only parameters of a URL for the server. WebInspect doesn't check the content of the file return (since it could change) and relies on the web server response code. But you can work around this type of issue. If the script product.asp is well designed, it should return an error when the ID is malformed (not a number) or doesn't exist. You can add this error message to the list of custom 404 in the WebInspect settings; see "Settings Tuning," earlier.
Another set of false positives is due to the fact that tests are not correlated with the web server version shown in the HTTP reply. For example, the availability of /icons tells an attacker that you are very likely running Apache, and if its content is browsable, the version of Apache could be figured out. But this does not matter at all, as the server name and version are part of the HTTP reply. However, this information could be faked. There is a tradeoff between false positives and false negatives. WebInspect seems to have chosen to give more information to avoid false negatives; this is always a good choice for a security tool, even if it means more work to analyze the results.
Whenever you find a false positive, you can mark it as such by right-clicking on the vulnerability in the left pane and choosing Annotate →Mark As False Positive. You can also edit the vulnerability information to change its severity and probability.
Under Session Info, there are also a number of very useful features to analyze each vulnerability. The most used are probably the HTTP Request and Reply that shows the request from WebInspect, and the reply from the server. This is usually enough to determine whether this is a legitimate hit or a false positive.
Tip
The Web Browser feature under Host Info opens the page requested by WebInspect in a real web browser. If WebInspect did a successful cross-site scripting, you can actually see the JavaScript being executed.
Once the audit of a web site is finished, you can use tools embedded in WebInspect to go deeper in a vulnerability analysis or even to exploit a vulnerability found. They are available under Tools. Here are a few of them:
- HTTP Editor
You can tune any request done by WebInspect. If you think WebInspect pointed out something interesting but did not do enough, you can tweak the request to add a custom header, a cookie, modify a variable, and replay it, as shown in Figure 3-9. It includes a hexadecimal editor if you need to add non-ASCII characters. There are a lot of encoding mechanisms (Base64, encryption, hash) accessible by right-clicking on the text you want to encode.
- SPI Proxy
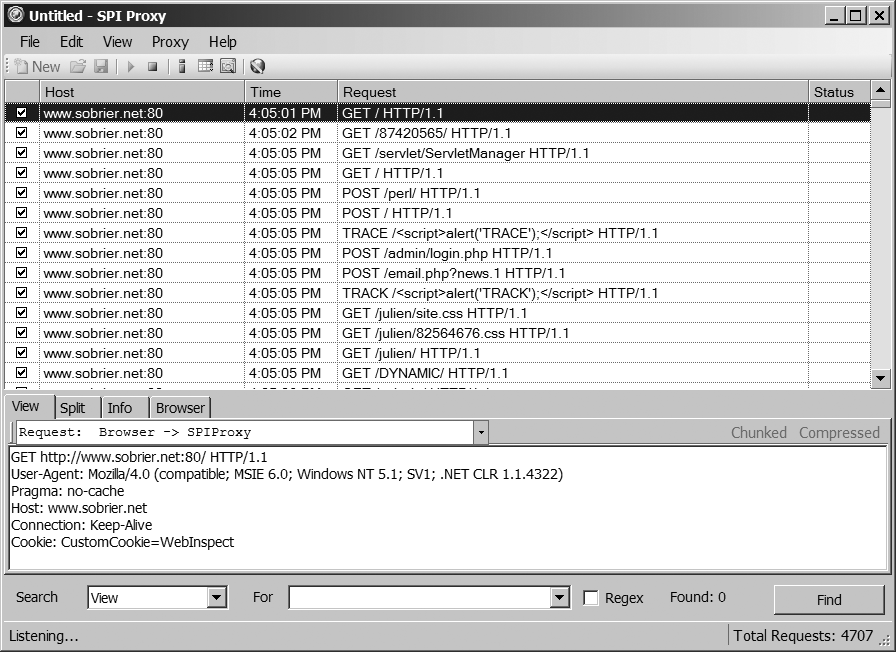
WebInspect has integrated an advanced web proxy. In the Search view, you can search on the requests and the replies. It is interesting to see all the replies from a particular script to understand how it behaved against bad attacks.
You must start the proxy before you start the scan. Then, in the last screen of the scan wizard, choose "Specific proxy server" and type
127.0.0.1for the address and8080for the port. Figure 3-10 shows that all traffic is recorded,just like a regular proxy.- SQL Injector
This tool can be used to both confirm and exploit an SQL injection vulnerability. If you find a confirmed or possible SQL injection vulnerability in the report, copy the URL into the SQL Injector tool. WebInspect uses different tests to determine the database version. Unlike some simpler injection tools, it does not rely on a generic database error message because it could be masked by the server. This tool works with Oracle, DB2, MySQL, and SQL Server. If the database detection is successful, it can grab the database structure and the content of each table. WebInspect can be turned from an audit tool into an exploitation tool.
- SPI Fuzzer
WebInspect includes an easy-to-use HTTP fuzzer (seeChapter 22). To start from an existing request, select Session →Raw Create, and paste the data copied from an HTTP Request. Then highlight the part you want to fuzz and right-click to choose Generator. There are a number of predefined generators—for example, a number generator. Click on Configure to select the minimum (e.g.,
0), maximum (e.g.,100), and increment (e.g.,1). You get a request that looks like this:GET /product.asp?id=[IntGenerator-0] HTTP/1.0 Connection: Close Host: domain.net User-Agent: Mozilla/4.0 (compatible; MSIE 5.01; Windows NT 5.0) Pragma: no-cache Content-Type: text/plain
Given our example configuration, WebInspect generates 101 requests from
id=0toid=100and displays the 101 replies. If you know what you are looking for (e.g., a specific error message, a 404), you can add a filter to keep the interesting replies only.

All these tools are very powerful and can be used independently of the regular crawl and audit. I personally use them for further analysis of potential vulnerabilities found during the audit.
Like Nessus, WebInspect can be set up as a server where clients can connect to, and from which you can control other WebInspect scanners. This allows you to tune the right access you give to each pen tester for targets and types of checks.
In WebInspect 7, the SPI Monitor daemon shows in the system tray. It is used to monitor the scheduled audits and the AMP status. It is stopped by default. You need to specify a URL, a login, and a password for clients to access the audit.
This feature requires an additional license.
—Julien Sorbrier