Glacier travel and crevasse rescue is perhaps the most technically complex area of general mountaineering. In effect, a party traveling on a crevassed glacier must be in a perpetual state of self-rescue preparedness. Many mountaineers will never encounter deep crevasses or even active glaciers, but for those who do, it’s often said that sooner or later you’ll fall into a crevasse. Nor will skill or fame protect you: Mugs Stump, one of America’s leading alpinists, and Babu Chhiri Sherpa, Everest climber who held the record for speed, are among those who perished in crevasse falls. Who can forget the chilling photograph of Louis Lachenal’s final ski tracks disappearing into a crevasse on the Vallée Blanche. The bold Renato Casarotto fell into a crevasse in a seemingly safe area on K2 and died within sight of base camp and his wife; his body appeared in the ice 17 years later. Reinhold Messner and Joe Simpson fell into crevasses, though they somehow survived. Aircraft have fallen into crevasses and snowmobile crevasse accidents are not uncommon.
Even as snow is falling it’s undergoing metamorphism, a process mentioned in Chapter 5 in the section on avalanche hazard. If transformed snow lasts long enough through the warm season, it’ll become ice when the weather cools as winter approaches. This ice, with lots of air entrapped, is called névé or alpine ice. Permanent snowfields haven’t the depth to creep downhill the way glaciers do, but they may still have small crevasses. If the névé builds up and becomes increasingly dense over many years, a giant field of ice may form that can become hundreds of feet thick and miles long. When the ice is 80 or 100 feet thick, its weight causes ice at the bottom to become plastic, and the whole block will begin oozing slowly down its mountain valley as a glacier. Big glaciers can move several meters (yards) each day; some in Alaska move over 40 meters daily. Steep sections above the glacier don’t build the depth for plastic flow, so the thick ice of the glacier pulls away, leaving a gap called a bergschrund. The bergschrund usually goes all the way to bedrock, but it can be filled with avalanche debris, blocks of snow and ice, and spindrift off the slope above. The bergschrund increases in size as snow melts in the spring and into late season, when it can turn into an overhanging water ice climb. Many times getting over or around the bergschrund as you approach from the glacier below is a climb’s most challenging element; icicle fangs make it appear even more formidable as you peer into the dark and chilly depths. In late season, permanent snowfields develop gaps between them and surrounding rock walls as the snow melts away. This gap is called a moat, and large ones may be as challenging to cross as the bergschrund.
Every year’s accumulation of snow adds to the glacier and presses it down the mountain, with solid ice being carried atop the plastic ice below. If the path of the glacier changes direction, the solid ice fractures. On the insides of curves and concave regions, compression ridges are formed, and on the outsides and areas where the glacier moves over convex terrain, cracks open far down to the plastic ice. If the drop of terrain below the glacier is steep enough, an icefall forms where large blocks of ice called seracs can tumble down without warning at any time of the day or night and during any season.
As the glacier travels to lower and warmer parts of its valley, the annual accumulation of snow becomes insufficient to make up for the ice that disappears in warmer weather. This lower region of the glacier is called the ablation zone; the region between it and the accumulation zone above is called the firn line. Ultimately, melting wins entirely, and the ice ends at the glacier terminus, where rocks and grit that have been picked up and carried along by the glacier are deposited. On large glaciers, the terminus area may be covered by stones, completely concealing the ice surface and making for miserable travel. The pile of rubble that gets dumped along the sides of a glacier is called a lateral moraine, and at the end it’s called a terminal moraine; these are often piled as steeply as the angle of repose, leaving large boulders frighteningly unstable. The finely ground rock dust in icy glacier meltwater is called glacial flour and accounts for the milky tint of gray rivers and blue lakes that are fed from the glacier.
There are many other details of glaciers as well as polyglot terms to label them, but this generally describes active glaciers—those whose ice is thick enough to create the movement that results in the formation of crevasses. Glaciers change seasonally. In winter, snowfall and blowing snow form bridges that cover the openings of crevasses just as snow bridges form over mountain streams. Bridges build from the edges and are thinner in the middle. On glaciers of maritime mountain ranges, snow bridges are dense and remarkably strong, but in continental ranges the snow can metamorphose into weak crystals and hoar may form on the underside of bridges, within the crevasse, without any surface indication of weakness. In spring, travel over glaciers is relatively easy, but not carefree. Crevasses of unknown extent may be hidden by snow bridges of unknown strength, with only the slightest indication on the snow surface that danger lies beneath. A snowy surface on the glacier may require snowshoes or skis for travel, but it makes for good arrests. As the season progresses, the snow melts, and snow bridges sag and begin opening up, revealing crevasses. Where one is visible, others are often hidden nearby. Melting can be surprisingly rapid, dropping the snow by inches in a single day and calling for careful probing with something longer than an ax when selecting a camp site on the glacier—often a creepy proposition due to the creaking sounds of the moving ice as well as the omnipresent danger. Melting can also increase the size of the bergschrund considerably, even from the time you ascend it until the time you return. Finally, in late season, snow and snow bridges may have melted away entirely, below the firn line at least, exposing the ice of the glacier and making crevasses readily apparent; moats gape and the bergschrund may become virtually impassible. Wide crevasses must be circumnavigated, and mountaineers wear crampons on the bare ice of even low-angle glaciers. As winter storms return, the glacial ice again becomes covered by snow, crevasses begin to fill in, and bridges begin to form across them. Metamorphism is beginning, so bridges on maritime glaciers will begin to strengthen, and snow bridges over crevasses of continental glaciers will begin to weaken, even before they’re completely formed.
For a frame of reference, glaciers can be described as wet or dry, having nothing to do with their content of water or vermouth. A wet glacier is one that’s covered by snow and where crevasses are hidden by snow bridges, but where the tractable surface offers the possibility of successful self-arrest. A glacier that’s dry in late season has all, or nearly all, of its crevasses made visible, but the bare ice surface thwarts attempts to self arrest. These two conditions, wet and dry, bear significantly on a climbing team’s decision to rope up, set anchors, or travel unroped. The most worrisome condition is a glacier that’s primarily, but not exclusively, either wet or dry. Extensive glaciers may be wet above their firn line and dry below.
Before we get to tactics, let’s take a closer look at a crevasse. When first formed, the walls of a crevasse are smooth and parallel, and it is deep—80 or more feet—down to the ice made plastic by the weight above it. After a time the crevasse may become partly filled in with avalanche debris, old snow, collapsed snow bridges, and blocks of ice. Crevasses in more benign climates, such as in a good percentage of the Lower 48, tend to be much less deep and wide, but that may mean only that falling into one offers more opportunity to collide with something. In late season, the surface of a glacier may be bare ice with little snow cover, but during most of the season—and certainly the best time for easy glacier travel—there will be snow covering the glacier ice and snow bridging at least part of most crevasses. Despite the illustrations you may have seen, few people fall off the edge of a precipice when they take a crevasse fall; more likely they disappear down a small hole of their own making. Snow bridges are thicker at the sides, so when a climber falls through (and not all crevasse falls go completely through; many go only waist deep) she’ll likely be free falling until caught by the rope, and then she’ll hang, substantially in space. That’s good, especially if the climber is wearing crampons, because injuries are less likely. The worst fall would result in the climber being wedged head down into a narrow crevasse after striking ice or snagging a crampon on the way down.
In the event of a serious crevasse fall, from the fallen climber’s perspective, the ground drops away without warning, and the climber instantly finds himself hanging, hopefully upright, in a cold, quiet, and dimly lit vault, much different from the warmer, sunny surface of the glacier. After the snow and ice stop raining down, the climber looks up to see a patch of sky and the rope cut deeply into the snow at the edge of the hole above that he’s just made. From the perspective of others in the party, a climber, typically the first on the rope, has suddenly vanished, sometimes without a sound and sometimes into a hole that isn’t visible even from a short distance. If the party has been attentive, they immediately dive for the snow away from the hole and assume self-arrest positions as the rope comes tight first on the second climber and then on the third, the force being cushioned as the rope cuts into the snow of the crevasse lip. A party taken by surprise will be jerked and dragged toward the hole, but hopefully the snow that concealed the crevasse will slow them down and allow boots, axes, and adrenaline-inspired determination to bring things to a halt. The second climber on the rope may have no choice but to be a human haul bag anchor, but hopefully the third climber will have enough time to turn away from the fall and execute a face down arrest. In most cases, that’s what happens. Parties of two must take special precautions, not the least of which is to attentively minimize slack in the rope between them.
Before we take a look at how the party deals with this situation, let’s turn back the clock and see how they prepared their equipment and techniques beforehand.
The first order of business is sizing up your opponent. Will the glacier be wet or dry, or have parts of both? How steep is it? Are there extensive crevasse fields or icefalls? Will you be crossing the bergschrund? If so, how? What about moats? What about avalanche danger?
Next, choose your weapons. Will the party travel on boots only, boots with crampons, snowshoes, or skis? Everyone on the same rope should make the same choice. Will wands be needed? If so, make them out of 3- or 4-foot bamboo gardening stakes with flags made of surveyor’s tape or folded-over duck tape in some color other than silver. How many wands will you need? What protection hardware will be appropriate? How much? When the potential for crevasse fall exists, the minimum gear for each mountaineer is at least one piece of snow or ice pro (a minimum of two pieces each for a team of two), a 4-foot webbing runner, 2 personally sized prusik loops, and a shoulder sling carrying a cordelette and 4 carabiners. Adding a prusik-tending pulley or a pair of Ultralegeres would be good, too. Beyond that, be guided by your experience in practicing rescue methods and by your assessment of the crevasse danger you anticipate.
Organize the rope based on the crevasse character (small, or deep and wide) and the number in the party. The optimum on a rope is 3 climbers; 4 is manageable; 2 requires special techniques and more skills in organization and rescue. You’ll want 8 to 15 meters (yards) of rope between each climber, enough to span the likely width between crevasses; a party of 4 might use all of a standard length rope, requiring hasty reorganization when rope is needed for a rescue, especially if a prompt rappel to the fallen climber is required. Consider bringing a second rope, such as a shorter, skinny, low-stretch (static) rope, to use in rescues, hauling, and around glacier camp as a cordon and potty belay. In general, you’ll travel roped if on foot, on snow-covered glaciers in the summer, when crevasse patterns are unknown or difficult to assess, when the snow cover is weak or variable, as it might be on continental glaciers, and whenever visibility is poor. You may deem it safer to forgo roping up on dry glaciers and may demur in winter when snow cover is consistent, deep, and of high density, as it may be on maritime glaciers. Many forgo a rope when skiing downhill in winter on well-covered glaciers; roped skiing is miserable.
After you’ve come up with a plan and a list, ensure compliant participation by every member of the group. You don’t want to start out climbing in the wee small hours hearing the question, “So, what’d ya bring?”
Let’s say your optimum party of three elects to leave a short 10 meters (33 feet) of rope between climbers, because you foresee only smaller crevasses. That leaves 30 m remaining from a standard rope, along with the question of where it should be carried. The choices would be 15 m with the first and last climbers, or all 30 m with the last. The tradeoff probably favors splitting the excess, but that could change if a longer gap were used between climbers. You could also divide the rope into fourths, about 13 m, with one fourth in the last climber’s pack. A party of four would probably want to divide the rope into thirds (about 18 m), and leave no excess.
A party of two will want at least 20 meters (65 feet) of separation, to give the second plenty of opportunity to arrest. Because one climber must arrest the other without assistance, the party may elect to tie bulky knots in the rope between them, hoping the knots will add friction in the snow and contribute to the arrest. This works well in reasonable snow and would even give comfort to a party of three if tied between the leader and second. The knots will complicate rescue operations, but better that than the alternative. Use butterfly knots to create small loops every two meters, which will consume less than a meter each or 5 to 8 meters for all. When you practice prusiking up a rope having these safety knots, use the loops as part of your technique. This again raises the question of how best to distribute the excess length and whether to carry an additional short, light rescue rope.
Having allocated the rope, the party members will tie Yosemite bowline loops into the ends and butterfly knot loops between and will connect themselves. Each climber, even those on the ends, will attach from their harness loops to the rope loops with an HMS biner, carried with the two large webbing loops of the harness on the wide end of the carabiner and the rope on the small end (which is how the biner is designed).
Now comes donning everything else. The focus of gear organization for glacier travel is to facilitate rescue in the event of a crevasse fall. This strongly influences the sequence of attaching things to your body. Specifically, you’ll want to put things on in the reverse of the order that you’d follow in taking them off—whether it’s you who falls or whether you’re a rescuer. If you fall far, you’ll want to take off as much as possible and be able to do so while hanging from the rope. You also don’t want to lose anything, so that means that everything must be tethered. Positively everything: not just your ax, but your skis or snowshoes, hiking poles, backpack, probe pole, protection and ascending hardware, camera, hat or helmet, sunglasses—the whole nine yards. If you’re a rescuer, you’ll want to be sure that you can reach whatever you’ll need to set an anchor while you’re simultaneously holding a face-down arrest.
The first items to adorn your body would be things like the chest harness sling and its nonlocking carabiner if it needs one (use my method and it won’t), then the sling with pro and runners along with your rope ascending gear, next your walkie-talkie and camera on their sturdy shoulder lanyards (never loop anything around your neck that could turn into a garrote). Finally, throw on your backpack with any extra rope coiled up and secured under the top pocket, near the insulated jacket you may want to don when you stop for lunch or find yourself in a crevasse. The rope could also be carried in a bag or even wrapped around the pack’s top pocket. Tether the pack’s haul loop to your harness in any conveniently removable way, such as with an extra prusik loop clipped to your harness belay loop with a small nonlocker. The length of the tether should allow you to reach the pack if you’ve removed it and it’s hanging on its tether. If the pack’s haul loop isn’t impressively burly, supplement it with a runner between the pack’s shoulder straps. Sometimes you’ll see the recommendation to tether your pack with a short end of the climbing rope, but I don’t agree; if you fall into a crevasse, you’ll probably want to remove the pack and either haul the pack out or clip it to the rope you’ll ascend, so having its own tether is easier to deal with, plus you’ll be spared a cold carabiner on your neck. If you’re an arresting climber, you may want to utilize the rope while preventing your pack from departing on its own initiative, so it should be tethered independently.
Finally, you’ll probably want to pre-attach your prusik loops to the rope using Klemheist knots, to save time in the event they’re needed. The end of one of them will connect to a locker on your harness’s belay loop or tie-in points, the other (the one for your foot) will just get stuffed into a pocket. Climbers in the middle of the rope won’t know in advance which direction is up, so they’ll pre-attach a prusik on each side of their clip-in loop. There are more elaborate systems for ascending ropes using friction knots or mechanical ascenders, including the Texas and Frog systems, but crevasse rescue is used only infrequently and then only for short distances, so simplicity wins over the complexity and efficiency of single-use systems that cavers might prefer. When sizing and positioning your prusiks, give thought to potential interference by the chest harness’s carabiner; when prusiking, you don’t want to find that the chest harness frustrates your efforts to ascend the rope. As always with complicated systems, try before you fly.
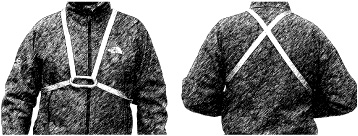
Old-school chest harness.
Although each climber may start out with a chest harness in place, only the first climber should actually clip the rope to her harness (with a non-locker). There are several reasons. If the second climber were to clip his chest harness and the leader fell, the second would be yanked forward from above his center of gravity, just like with a Kiwi coil; he’d be sprawled face first rather than have a fighting chance to lean back and quickly dig in his boots. Experiments have shown that falls caught by a full-body harness (waist plus chest) are actually more injurious, however counterintuitive that might be. If the leader might have to apply an arrest, on a team of two, for example, she also might want not to clip her chest harness until after falling, even though it may be a struggle to get upright (Mr. Backpack will not be your friend)—a struggle potentially made more difficult by injury from the fall.
All the careful organization and planning that has gone into getting ready to move can be nuked when you stop for a clothing change. As usual, you’ll want to start the day off chilled, knowing that you’ll soon warm up, but each time you take off some or all of the incredible amount of gear that’s lashed to your body, you’ll want to put it back on with the same care as when you started the outing. And whenever possible, you’ll want to check your companions and have them check you, just as you always do whenever you alter the safety system of a roped climb.
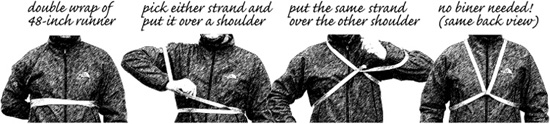
New-school harness needs no carabiner.

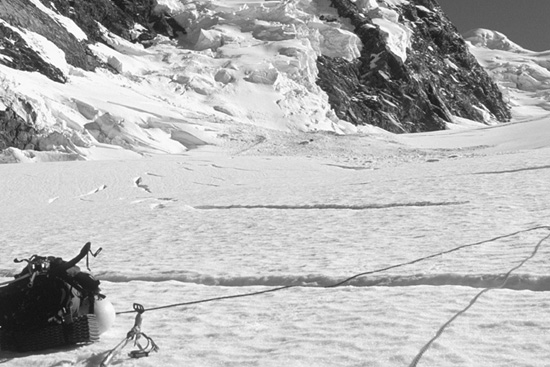
The beast of burden ready for glacier travel.
All this preparation and mutual checking has consumed a lot of time, which is a good thing, as the sun is now up so it’s possible to scan the glacial terrain and plan the route. Many glacier ascents begin in the dark, but usually only on familiar trade routes, where you can follow the boot tracks of guided climbers. In many cases, the flow of the glacier won’t be obvious or influential; you’ll just have to rely on your visual evaluation, and perhaps reports from previous climbers, to select a route that offers the best snow bridges, most predictable crevasses, and fewest cul-de-sacs—and, of course, avoids ice falls and seracs and subjects the team to minimum avalanche danger on the route itself or from nearby runs.
The leader has decided that she prefers not to crawl for the entire outing, so instead of using her ax as a crevasse probe, she has brought a long, basketless ski pole. On a serious continental glacier she might have elected a longer pole yet, and she knows that perfectly vertical probing isn’t required until a weakness has been discovered. In most cases, she’ll be probing the remains of a single season’s snowfall, down to the ice surface. Other climbers follow, carrying their axes with the arrest grip and vigilantly keeping slack out of the rope, letting it barely drag on the snow. After a while, the group learns to match pace, and they actually do manage to keep slack out of the rope and avoid jerking each other, and they never carry coils.
This group is competent, so they always keep slack out of the rope, even when they stop for a clothing break or for lunch. They keep slack out of the rope—even if they have to revert to belaying—when they change leads or maneuver around complex terrain features. They keep the rope tight when they probe out a campsite, and when they wand out the perimeter. They place crossed wands to mark danger or uncertainty. They’re ever vigilant and follow the maxim don’t go where you don’t probe. Above all, they communicate, even if that means using radios.
Not all glacier travel is trudging. Some glaciers are steep and require the same climbing techniques as steep snow or ice, made all the more interesting by the possibility of crevasses. Crossing open crevasses, like crossing an open bergschrund, can involve ice climbing and even aiding on hard ice. If the route is steep, the most competent climber may lead on the ascent but will be the final climber on the rope coming down.
Camping on a glacier is pretty much the same as camping on snow, unless you are faced with no option other than camping on a rubble-covered glacier, when it’s like camping on rubble. Camping on a dry glacier would be so miserable that I doubt if any climbers force themselves to do it. When you select a campsite, refer back to the section on avalanche hazard in Chapter 5 to inform your choice and avoid runout zones. Glaciers generally don’t afford opportunities for protection from winds, so you’ll have to construct your own. Even if things seem calm, glaciers can produce their own upslope or downslope winds during the day and night. I recommend constructing igloos rather than using tents (see the section on shelter systems in Chapter 18), but if you chose a tent, you’ll want to construct substantial snowblock shelter walls if there’s any possibility of storms or anabatic/katabatic winds, which is almost always. There’ll be a lot of hiking around, setting up tents and quarrying snow blocks for tent and eating area shelters. That means you must keep reminding yourself: where crevasses are possible, don’t go where you don’t probe. The first order of business, while still roped up and belaying, is to probe out all the area you think you might need and then wand the perimeter. Place the wands close enough that they won’t be missed during a nighttime biobreak or in a whiteout. Probe deeply enough, using that basketless ski pole or, better, avy probe to account for melting during the days you’ll be using the site; probe again in a couple of days. It isn’t unheard of for an unlucky glacier camper to step out of a tent and into a crevasse.
Some logistic concerns should be mentioned. You’ll learn soon enough to separate your pee area from where you quarry snow for water; make it obvious and be sure everyone gets the word before a light snowfall causes lamentable confusion. Poop can be tossed into a crevasse; it can even be safely spread on the surface and allowed to become naturally neutralized (takes a few weeks). If the area is popular enough that it would be unseemly to leave visible fecal matter, pack it out if no safe and deep crevasse is available. A shallow burial pit or piling snow on top isn’t a solution. Don’t throw waste paper, plastic bags, empty fuel cans, or any non-organic material into crevasses—pack it out, however icky. Be cautious about leaving out anything that will attract ravens (think of them as smart marmots with wings). Even piles of snow or wands on a buried cache will attract trash-habituated ravens, so be sure your cache containers are raven proof; don’t make the mistake of putting fuel in with food in those raven-proof pails, unless you think of petroleum as a spice.
Usually, a crevasse fall involves only modest forces, because the snow absorbs fall energy in various ways. The biggest worry is hitting something during the fall or snagging ice or self with ax or crampon, another reason to forgo crampons unless they’re unquestionably necessary, to be added to the difficulty of executing a graceful arrest without snagging a crampon and getting flipped over. In the event of a surprise crevasse fall, there’s a sequence of steps that the party must take, methodically and thoughtfully (and skillfully, too, one would hope).
Let’s assume that in an instant the leader has vanished below the surface, the second climber is sprawled on the snow, and the last climber is holding an arrest. Whew! The first thing to do is attempt communication. Can the third climber hold her arrest? Does the second climber think he can get off the rope, or is he pinned or tangled? Most importantly, is the fallen climber injured? If communication is imperfect, but things seem stable, one climber can start getting free of the rope but remain on belay. If things aren’t obviously stable, catching a downslope fall on thin snow, for example, one or both climbers will have to attempt to set a temporary anchor while simultaneously holding their arrests; same story for the second on a rope of two.
If the third climber is solid for now, the second climber should move toward the fallen climber, probing ahead with his ax, and attempt to establish communication to determine if the fallen climber is in immediate need of assistance. Any response from the fallen climber is welcome, because it means she’s conscious and breathing; there’s probably no need, then, for the second to immediately approach the hole through which the leader fell and knock down a lot of snow and ice. In the best case, communication can be established (even using radios), and the fallen climber is stable. If reassuring communication can’t be established, a furious effort must be made to build an anchor strong enough for a climber to approach the hole and possibly descend into the crevasse to assist the injured leader—a decision not lightly taken. This could be incredibly difficult, but it could be crucial to reach within minutes a person who’s unable to breathe or who’s hanging immobile in a harness and subject to harness hang syndrome.
In most cases, the very snow that hides danger minimizes it upon a fall, making for effective arrests and gentle forces. Don’t immediately go into Z-pulley mode. If the fall is short, and if the leader is prepared, she can immediately begin ascending the rope while the remainder of the team, knowing this to be the plan and having already held the force of the fall, simply use their arrests to hold the rope. If it’s feasible, this is much faster than diving into engineering mode and setting anchors. The team has read The Mountaineering Handbook, so they know that, aided by friction, they’ll only have to hold around 100 lbf (0.4 kN), probably less, between them to hold the fallen climber’s ascent, and they can easily do that if the load is shared on their harnesses. In fact, under optimal conditions, two climbers may be able to pull the leader out using only cooperative hauling off their harnesses. The main problem will be negotiating the lip of the hole; that may require a lot of thrashing and grunting from the fallen leader and the belayers.
Keep your mind open to easy possibilities. As with any other self-rescue situation, the easiest option is always to lower the victim, even if only to a temporary rest that’s more comfortable than hanging in a harness. If the fallen climber could prusik up the rope, could climb out under tension, or could even hike along in the crevasse under belay and reach the surface or a spot where climbing up is easier, such options would be more efficient than constructing a science fair project on the surface. If the fallen climber is able to prusik up to the surface, that makes things easy for the rescuers—they’ll only have to help the leader haul herself over the lip. To make the lip-crossing process easier, the rescuers might first haul up most of the leader’s gear; hauling her pack through the crevasse lip helps blast a nice path for the ascending leader.
Meanwhile, down in the crevasse, the leader has gotten herself oriented, taken off her pack and snowshoes, and removed her insulating jacket from her pack; since she was carrying an ax we know she’s already wearing gloves. She’s put her jacket on, pulled her toque out of the jacket and put it on, and stowed her sunglasses and camera. The pack and maybe snowshoes are clipped to the climbing rope at her waist; she has clipped her chest harness to the rope, attached her foot prusik to her strong foot using a slip knot, and is ready to prusik up. Or—she’s done as much of this as possible but is unable to climb up; she keeps her legs moving periodically and dodges chunks of snow falling from above.
The second climber may now have to expand the opening in the snow in order to communicate effectively with the fallen leader and assess the crevasse—all the while probing ahead and remaining connected to the anchored rope with a prusik. After the assessment, all the facts are on the table, resources have been inventoried, and a plan must be formulated that fits the circumstances.
If a brute force haul or the leader simply extricating herself aren’t feasible, the climbers on the surface must assess their predicament in terms of conducting a technical rescue. Do they have the gear that conditions require? How much rope is available? How much operating space is available on the crevasse field? Are there any other persons nearby who could assist? Let’s assume that space is available to set up anchors, the crevasse is apparently vertical, and no easy exit is obvious, and no one else is available to assist (if there were, the simplest solution might be for several climbers to attach prusiks and simply haul on the rope).
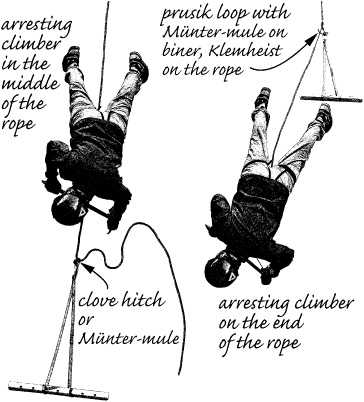
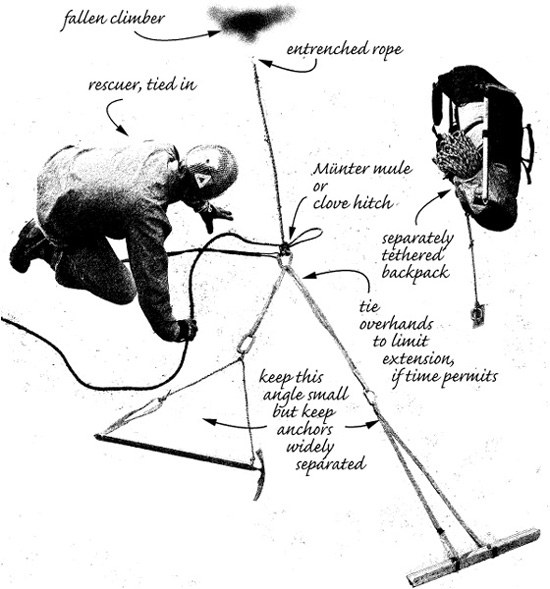
To get a technical rescue started, the rescuer with the best arrest will hold it while the other removes his pack, clips its tether to the rope, and sets an anchor back from the crevasse opening, all the while probing before he steps ahead and probing the area where he’ll set the anchor. This anchor could be temporary, or it could become part or all of the eventual rescue anchor. The climber has read the sections in this book on forces (Chapter 11) and anchors (Chapter 12), so he knows that the anchor won’t have to hold more than body weight, but it really, really can’t come out; he covers it with snow to prevent melt out during the upcoming processes. If the best location for an anchor is on the far side of the arresting climber, the rope can be connected to the anchor’s carabiner with a clove hitch (which is what the pulley systems illustrated in Chapter 25 show) or a Münter-mule on the rope. If the best location for an anchor is between the arresting climber and the victim; the rope there will be taught, and the third climber will have to connect to the anchor with a friction knot. The arresting climber will take his longest prusik loop (or add a runner to a short one) and connect the taut rope to the biner on the anchor with a Klemheist and Münter-mule. He’s even calmed down enough to remember to clip an overhand-on-a-bight loop in the rope to the biner, for safety.
Starting the anchor-building process for a crevasse rescue.
After a solid anchor is established, the arresting climber can ease the rope tension onto the anchor and stand up, finally. She probes her way over to the anchor scene (if things are really marginal, she may want to be belayed), drops her pack and clips it in, and begins building another anchor. If the first anchor can become a component of the rescue anchor, so much the better, and she sets another anchor several feet from the first (so one anchor doesn’t weaken the other), approximately in line with the force on the rope (to limit force multiplication). If the rescuers first built a hasty anchor, using a ski or snowshoe as a deadman, for example, they’ll now build a favorably located rescue anchor with at least two equalized placements, creating the master point of the rescue anchor. If an extra picket is available, they’ll use it to anchor packs and extra hardware independently of the rope anchor system; if the anchor should fail, you don’t want to find yourself on the glacier surface without any resources. The second climber has been busy probing a wider path to the crevasse and has informed the fallen climber of progress on the surface.
Building the rescue anchor.
If hauling is the plan, whether you intend to haul on the climbing rope or conclude that a new haul rope must be set up (and you have enough rope to do so), you’d want to place something at the crevasse lip to prevent the haul rope from cutting into the snow and producing excessive resistance. A backpack works, but results in considerable friction itself; an ax shaft works better if you can work it into place; even a spare picket or fluke will suffice and won’t have as many sharp points as an ax. It may be possible to kick and shove such an object under the leader’s rope after excavating the crevasse lip; that would allow that rope strand to be used as part of the rescue pulley system and open up options. Rolling a picket into place may be easiest; you could try walking an ax by moving one end at a time and rolling it. Easier yet is starting over with a new rope strand over a supportive object placed near the climbing rope (the one that was entrenched in the crevasse lip during the fall). Prepare the crevasse lip while you’re at it, which means clearing away most of the overhanging snow and digging a ramp down through the soft snow until encountering ice or hard snow that the fallen climber can climb or be pulled over. Whatever you use to prevent entrenchment, be sure to tether it somehow, or it’s a goner.
Especially if there’s only one rescuer and the fall is short, one possible rescue plan is simply to drop a loop in the end of the rope (connected to an anchor by a clove hitch and draped over an ax shaft or backpack at the crevasse lip) and have the fallen climber step up on the loop; clipping the rope to a chest harness helps with balance. Then the main rope to the fallen climber can be shifted atop the ax shaft and tightly re-attached to the anchor with a Münter-mule on a prusik loop or with another clove hitch before the victim transfers her weight back to it. The looped rope strand is then shortened and re-anchored, the fallen climber steps upward again, and the process is repeated. The climber on the surface tends the prusiks or clove hitches holding the two rope strands but doesn’t do any hauling; the fallen climber doesn’t use personal prusik loops but climbs out using the rope. An abbreviated version of this dropped loop technique can be used to assist the crevassed climber in getting over the lip. If twice as much free rope is available as necessary to reach the fallen climber, the easiest way to haul gear out (or the climber, if there were enough pullers available) is to lower a force-doubling pulley and have the fallen climber attach it to the load.
The climbing rope is anchored to the master point of the rescue anchor using clove hitch or, better, a prusik loop with a Klemheist on the rope and a Münter-mule at the master point locker, then the hasty anchor’s Münter-mule is released to transfer the climbing rope tension to the rescue anchor. The healthy fallen climber will ascend her rope with her prusiks while the rescuers drag pack, skis, and other gear (but not ax) out of the crevasse. Skis will be awkward to get over the crevasse lip unless they have mountaineering-type holes in the ends; a sled will be heavy as well as awkward and might be left in the crevasse until after the fallen climber has made it out, if the crevassed climber can maneuver around it. A composed climber may elect to delay egress in order to help wrangle equipment. After the gear has been hauled, you might as well use the hauling system to assist the fallen climber’s efforts to ascend the climbing rope. At some point, the hauling rope could be passed to the crevassed climber, who’ll transfer her prusiks to the anchored strand before continuing up to the surface, avoiding a struggle with the entrenched climbing rope at the crevasse lip.
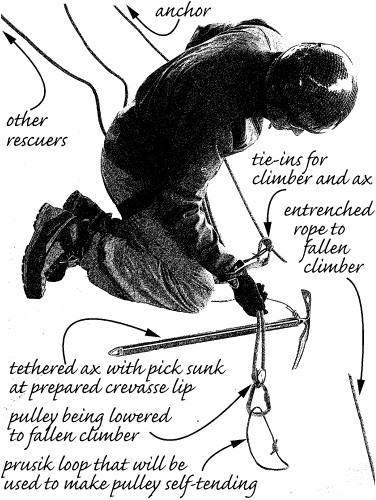
Lowering a C-pulley to the fallen climber.
Many scenarios are possible, using some combination of engineering by the rescuers and climbing by the person in the crevasse. If everything goes smoothly, the climber and rescuers can work simultaneously, and everything and everybody will be removed from the crevasse in short order.
If the fallen climber is unable to prusik up the rope, a serious hauling system must be constructed. Pulley systems are described in excruciating detail in the previous chapter on self-rescue; just remember that an injured climber should be monitored anytime a hauling system is used. If two pullers are available, a Z-pulley system will deliver around 190 lbf (0.85 kN) through a rope that isn’t entrenched, even figuring on friction over an ax shaft; maybe more with adrenaline-charged rescuers pulling from their harnesses with good stances. If only one rescuer is available for pulling, a more complex mariner haul may be necessary, or a CZ or ZC combination. The Z-pulley requires pulling up three times as much rope as distance the load is moved, and the mariner haul five times; that potentially requires a lot of carefully probed space on the glacier or a lot of resets of the pulley systems. Because the pullers must remain tethered for safety, the lengths of those tethers limit how far they can hike to pull before they must reset prusiks and start a new haul. The hauling rope is secured by a Münter-mule, which will allow slack to be released if necessary. The sticking point will be getting the climber and her equipment over the crevasse lip; that could require considerable excavation of the crevasse lip to avoid high forces and a painful thrash if the fallen climber is injured.
These descriptions of crevasse rescue procedures are only pedagogical examples. There’s no fixed recipe for a crevasse rescue, and there’s no point attempting to commit specific scenarios to memory, because it’s likely they won’t suit the actual situation that confronts your party. The specific techniques and anchors employed will depend on the terrain, available equipment and rescuers, ability of the crevassed mountaineer to participate, even the weather. It’s much more important to understand the various techniques well enough to string together the specific rescue solution your circumstances demand. Here are some salient points:
![]() When moving on glacier, be attentive, always keep slack out of the rope, arrest promptly.
When moving on glacier, be attentive, always keep slack out of the rope, arrest promptly.
![]() In the event of a fall, calm down and sort things out before you leap into action.
In the event of a fall, calm down and sort things out before you leap into action.
![]() Don’t go where you don’t probe.
Don’t go where you don’t probe.
![]() Constantly communicate with your companions.
Constantly communicate with your companions.
![]() Stay anchored and tied in throughout the rescue.
Stay anchored and tied in throughout the rescue.
![]() As quickly as possible, determine if the fallen climber needs immediate assistance.
As quickly as possible, determine if the fallen climber needs immediate assistance.
![]() Determine if the fallen climber can participate in the rescue.
Determine if the fallen climber can participate in the rescue.
![]() Consider brute force options before you attempt complex hauling systems.
Consider brute force options before you attempt complex hauling systems.
![]() As soon as the climber is out of the crevasse, perform a first-aid evaluation and consider treatment for hypothermia.
As soon as the climber is out of the crevasse, perform a first-aid evaluation and consider treatment for hypothermia.
The most important principle of all is to avoid crevasse falls in the first place. The lesson is not, “Hey, so what if someone falls into a crevasse? I read how to set up a Z-pulley,” but rather that rescue operations, while feasible, are complex, tiring, and time consuming—and potentially dangerous to everyone involved.