Most spinners I know are intrigued, smitten, and captivated by color, and almost as many are perplexed and nearly paralyzed when it comes to working with it, which means that they buy a lot of beautifully dyed fiber and it just sits in their stash, too loved to use. But color is easy if you let it be. Color is everywhere, all around you. If you can get dressed in the morning, you can work with color in spinning.
The key to not stressing about working with color is to make it as simple as possible. Don’t use a color wheel; use the world around you. Don’t get me wrong. If you want to study color and use a color wheel, by all means go for it, but if a color wheel and philosophies of color make you twitchy and keep you from spinning your colorful stash, start with the easy way. As soon as you start working with color without stress, you will start noticing color and color combinations everywhere.
Remember that this book is all about commercially prepped and already-dyed fibers, so I’m not going to teach you to dye, but I do want to talk a little about how the dyers we love dye fiber. There are several ways that they do so; the most common are solid, semisolid, gradient, patterned, and random.
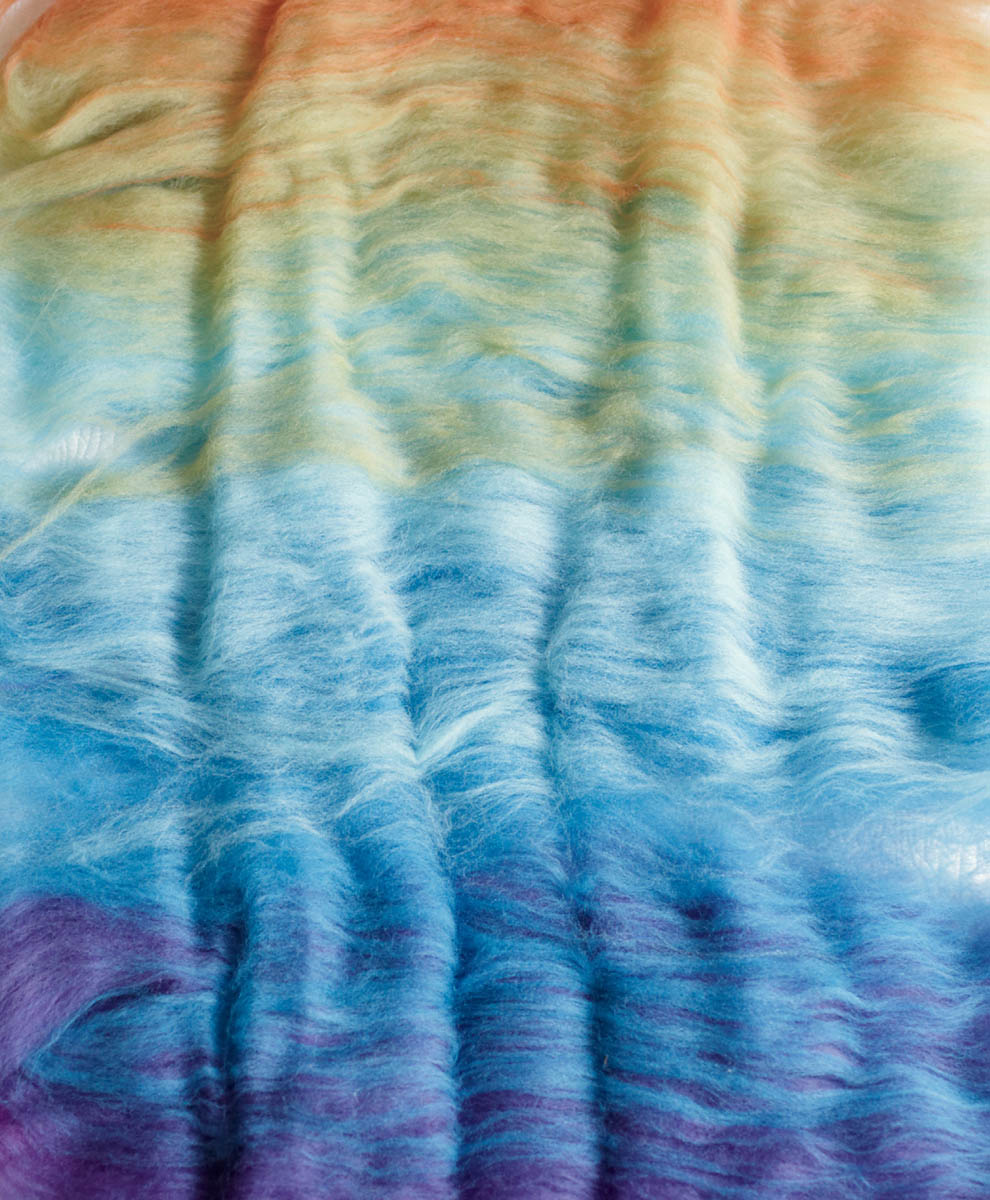
Many factors in addition to dye affect the color of a fiber, and just about everything in the spinning process can intensify or soften colors in your finished yarn. It’s not magic. It mostly comes down to how close together the fibers are, because their density affects how much light and color they reflect. The denser and less airy a fiber is, the darker the color will be. The color itself doesn’t change, and in fact, sometimes you can’t even see a difference unless you look at the examples side by side. But when you’re working with color, many little things taken together make a significant difference in the end result.
The fiber you are using affects the color. Notice in the photos below how different undyed wool and silk are. The Corriedale fiber looks soft, and the bombyx silk is reflective and super shiny. When color is applied to them, look what happens. Each fiber was dyed a light blue, attempting to saturate the fibers completely. The color looks the same, but different: softer on the wool and brighter on the silk, yet it is the same exact color and dye.
Have you run out of a particular colorway on a particular breed and then filled in with the same colorway on a different breed only to discover something wasn’t quite right? Even between wools there’s a difference in color. The photos below show three different wools — Corriedale, Bluefaced Leicester (BFL), and Wensleydale — all dyed with the same colorway. You may not notice a big difference at a casual glance, but put them side by side, and you can see that the Corriedale brings an almost matte quality to the colors, whereas the BFL is a deeper color with a hint of shine, and the Wensleydale, with its natural luster, makes the colors intense and glossy.
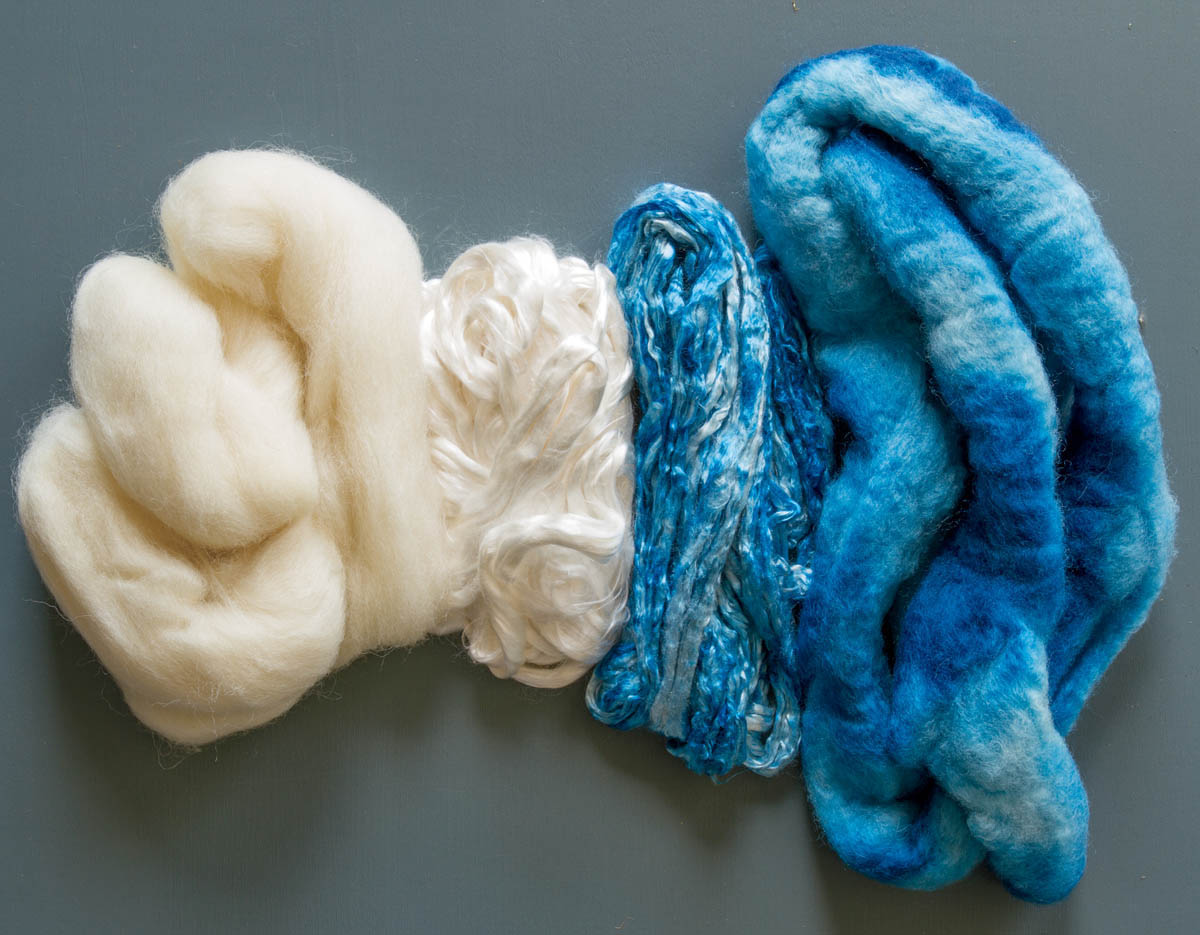
Corriedale fiber (far left and far right) and silk fiber (center) undyed, then dyed with same dye color
Okay. I know some of you want the basics of a color wheel. I get the same questions over and over again when I teach: “How do I pick colors that go together?” “How do I keep my dyed fiber from turning to mud when I spin it?” Here are the basics and the answers to those two questions.

A color wheel is set up around the primary colors. You know those; all the way back to preschool we’ve been talking about them and mixing a few colors from them. They are blue, yellow, and red. They are usually set up like a peace sign on a color wheel that looks like a big pie. In between the primary colors are three slices of color called the secondary colors, which are what you get when the two primaries on either side of a secondary color are combined. For example, the primary colors blue and yellow make the secondary color green. Flanking the secondary colors are the tertiary colors. A tertiary color is created by combining a secondary and a primary color. For example, lime green is a tertiary color made by mixing the secondary color green and the primary color yellow.
A complementary color is the color directly across the wheel from any color.
If you want to make sure your colors are not dull or muddy, work with colors and colorways that use three colors all in a row on the wheel, with maybe a single complementary for an accent. Yarn becomes muddy when you travel around the wheel, picking up too many colors that are spaced far apart or across from each other on the wheel. For example, if you blend red and purple from one side of the wheel with green and yellow from the other, you’ll end up with a muddy brown.

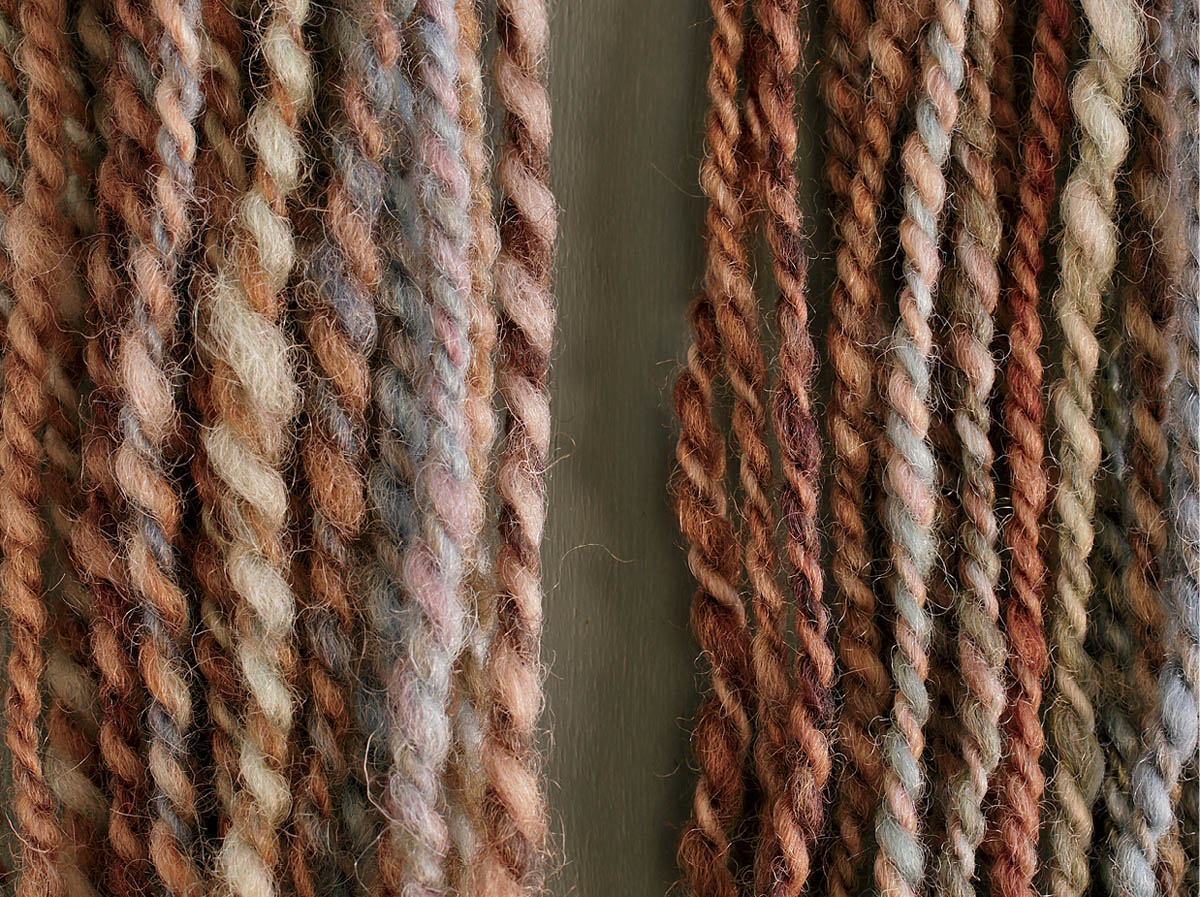
Different breeds take dye differently. Shown from the top clockwise: Corriedale, Wensleydale, and BFL.
How fiber is prepped affects the color, too. A combed preparation, like top, aligns and compacts the fiber, providing more surface to reflect the colors, so they look deeper. Going in the opposite direction, a woolen preparation, like roving, crisscrosses the fibers and adds air among them, providing less surface to reflect colors, so they tend to look lighter. The more woolen and airy the preparation, the lighter the colors look. Compare the examples of a roving, a rolag, and a batt (below): the color gets a smidgen lighter as the preparation gets airier. This characteristic gives you options; as a spinner, you’re never stuck with a color. If you like a color you’ve bought as top but would like it to be a little lighter or softer hue, card it into rolags or batts.
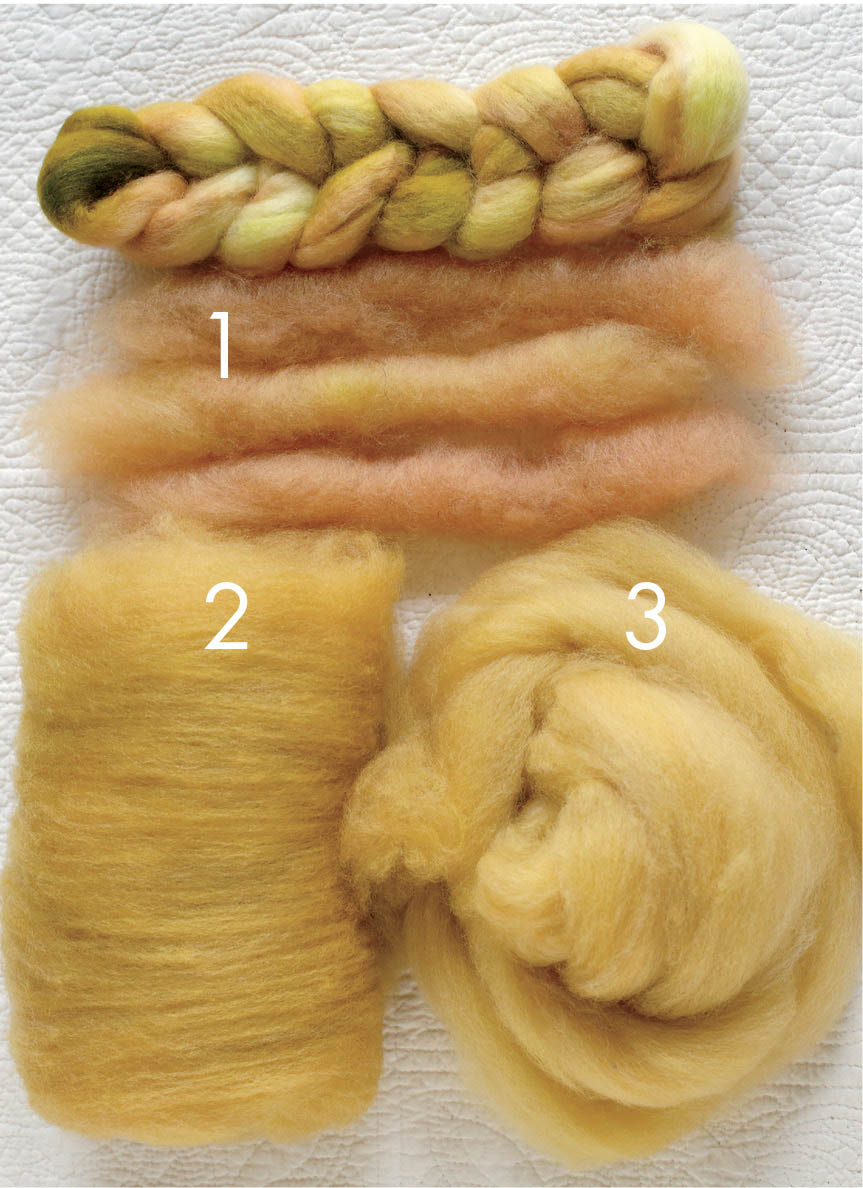
Different fiber preparations affect color. Note the color variation among these preps made from the same braided top: (1) rolag, (2) batt, (3) roving.
Another factor that affects color is whether your drafting method works for or against the way the fiber behaves because of its preparation. Spinning top with a worsted draft gives the most intense version of a color, whereas spinning top with a woolen draft lightens it a bit. The opposite is true when you’re working with a carded preparation: spinning it with a woolen draft produces a softer version of a color than spinning the same preparation worsted.
Left, Top spun woolen; Right, Top spun worsted
Left, Roving spun woolen; Right, Roving spun worsted (long draw)
Size does matter! The finer the yarn, the deeper a color appears. Look at the two yarns above. They are the same colorway, fiber, preparation, and draft, and both are 2-ply. As a side note, this sample illustrates a case of when “I know better” leads to disappointment. I was sure my brain, hands, and feet would remember the size of yarn I was spinning. I spun one yarn, plied and finished it without saving even a ply-back sample — because I knew better. I was going to spin the second yarn right away. What could change so much, after all? As you can see, however, the second yarn is a great deal finer and denser, bad for the project I was going to knit but excellent as an example of how size can change a color. The color of the finer yarn is deeper and much more vibrant.
Size also matters when you’re working with a variegated fiber and you want to control the length of a color run. I see spinners sit at their wheel with a fresh braid and instantly start stripping it vertically. When they begin to spin it, some ask what happened to the long color runs they thought they’d get from this fiber. Short answer: They stripped them away! The more a pattern-dyed fiber is stripped vertically, the shorter each color run becomes. Look at the example below. I spun all into approximately the same-size singles. Here, the orange is pulled out of each to compare the lengths of the color runs; look at the difference. If you want the longest possible color runs from a dyed fiber, strip it as little as possible.
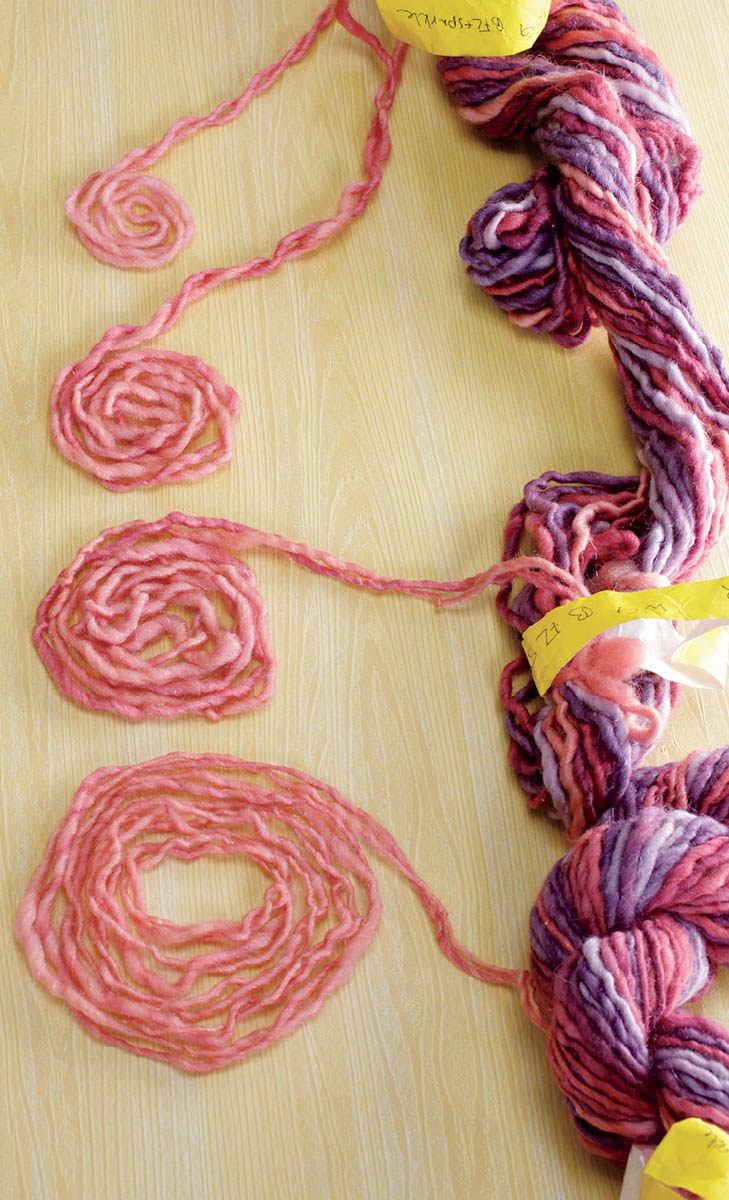
The spirals of yarn at the left were all spun from the same variegated braid, but the amount of each color was determined by how many times the braid was split (divided vertically). The bottom yarn was spun from a section of pink fiber without splitting the braid; the next one up was spun from the braid split in half; the second from the top was spun from one-quarter of the thickness of the braid; and the top yarn was spun with one-eighth of the thickness of the braid.

Yarn size affects color. Note the more vibrant color in the finer yarn on the right compared to the thicker yarn on the left spun from the same braid.
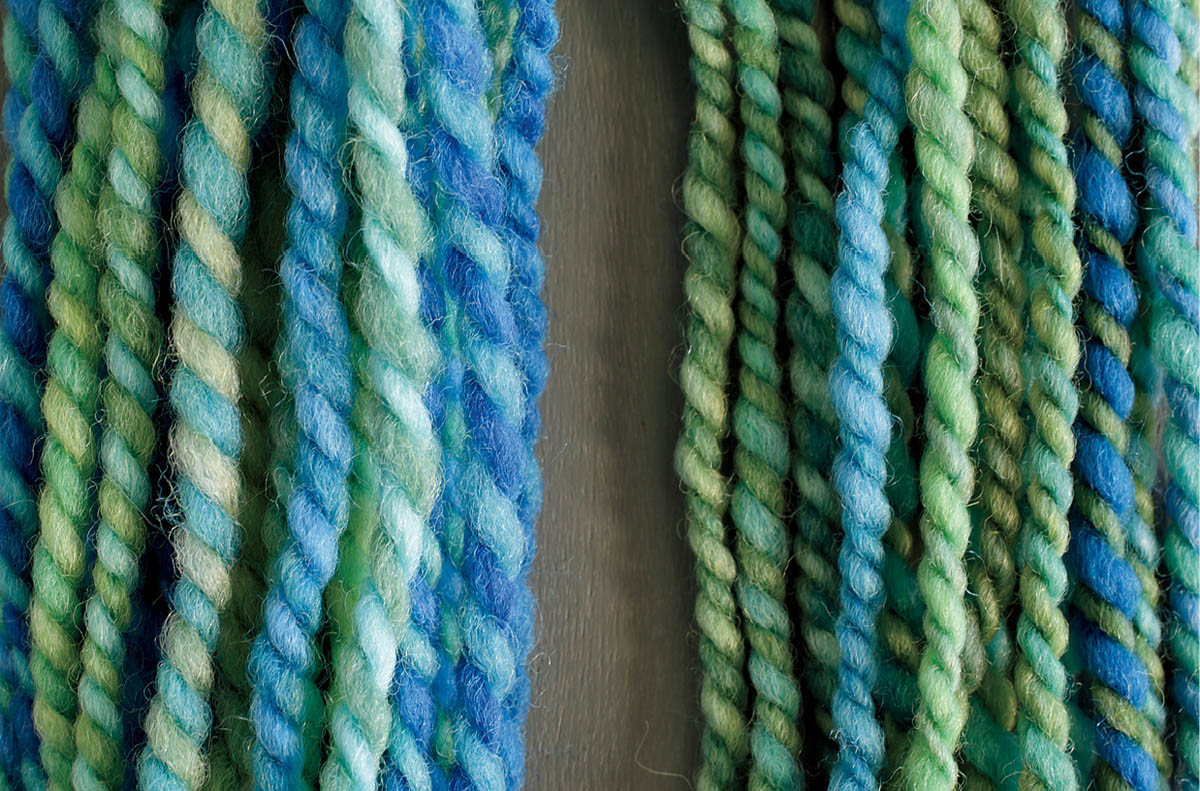
The more plies, the more saturated a color looks. Adding plies condenses the yarn and adds more area with less space for light to get through. The more light reflects off a surface, the more intense a color looks. Compare the yarns in the photo above; they are the same fiber, prep, draft, and size of the singles. The difference is the number of plies: a singles, a 2-ply, and a 3-ply.

The more plies in a yarn, the more saturated the colors appear to be. From left to right: singles, 2-ply, 3-ply
How you finish a yarn affects the surface structure, and if it affects the surface of a yarn, it affects the color. The more roughed up or fuzzy a yarn is, the less surface it has to reflect light and color. If you want to keep your color as intense as it is in your freshly spun yarn, finish it with as little disruption as possible: a soak and a snap. If you’d like to soften the look of the yarn and color, whack it not only to soften its look, but also to raise fuzz. (See chapter 7 for information on finishing.)
Superwash is a chemical process that strips the scales from wool fiber and yarn. The scales on wool are what cause a fiber or yarn to felt when introduced to soap, agitation, and abrupt changes in temperature. The removal of the scales also creates a surface on yarn and fiber that dye loves. Dye strikes fast and intensely on superwash fiber and yarn. The same colorway can look completely different on a regular and a superwash fiber.
The superwash Merino top at the left took the same dye more intensely than the same Merino top untreated at the right.
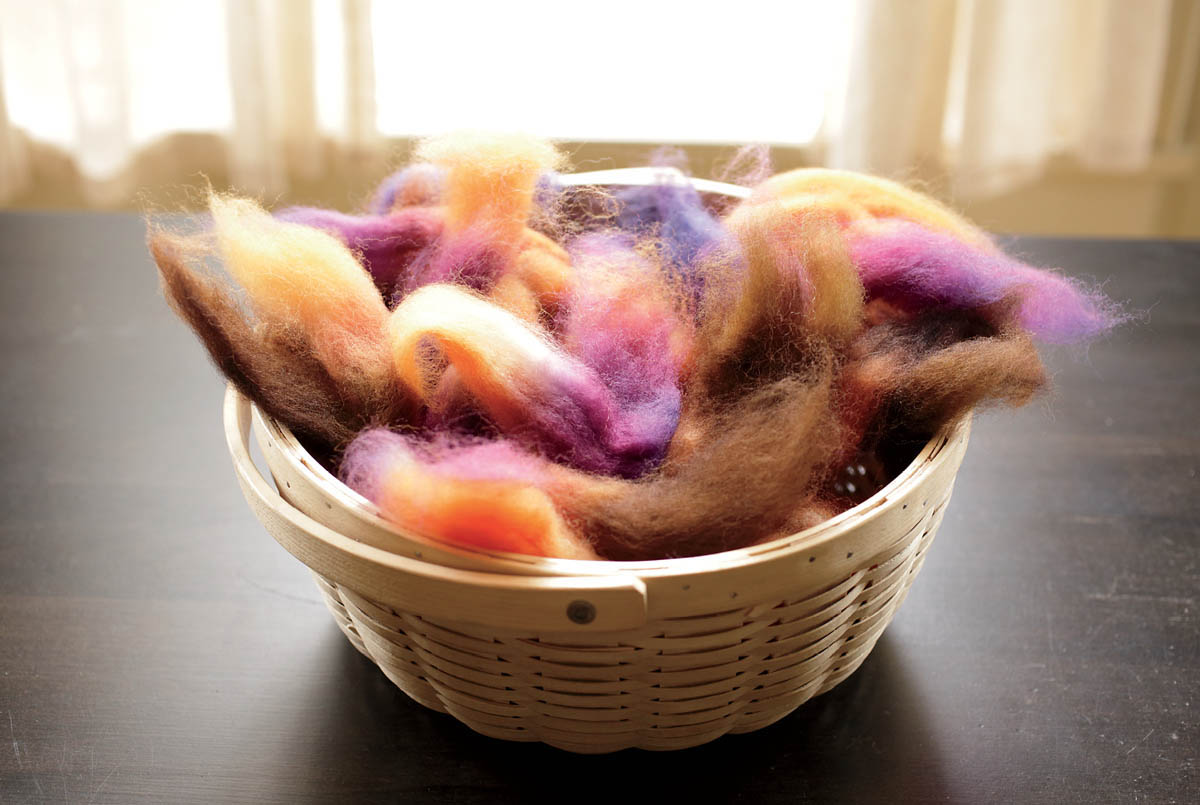
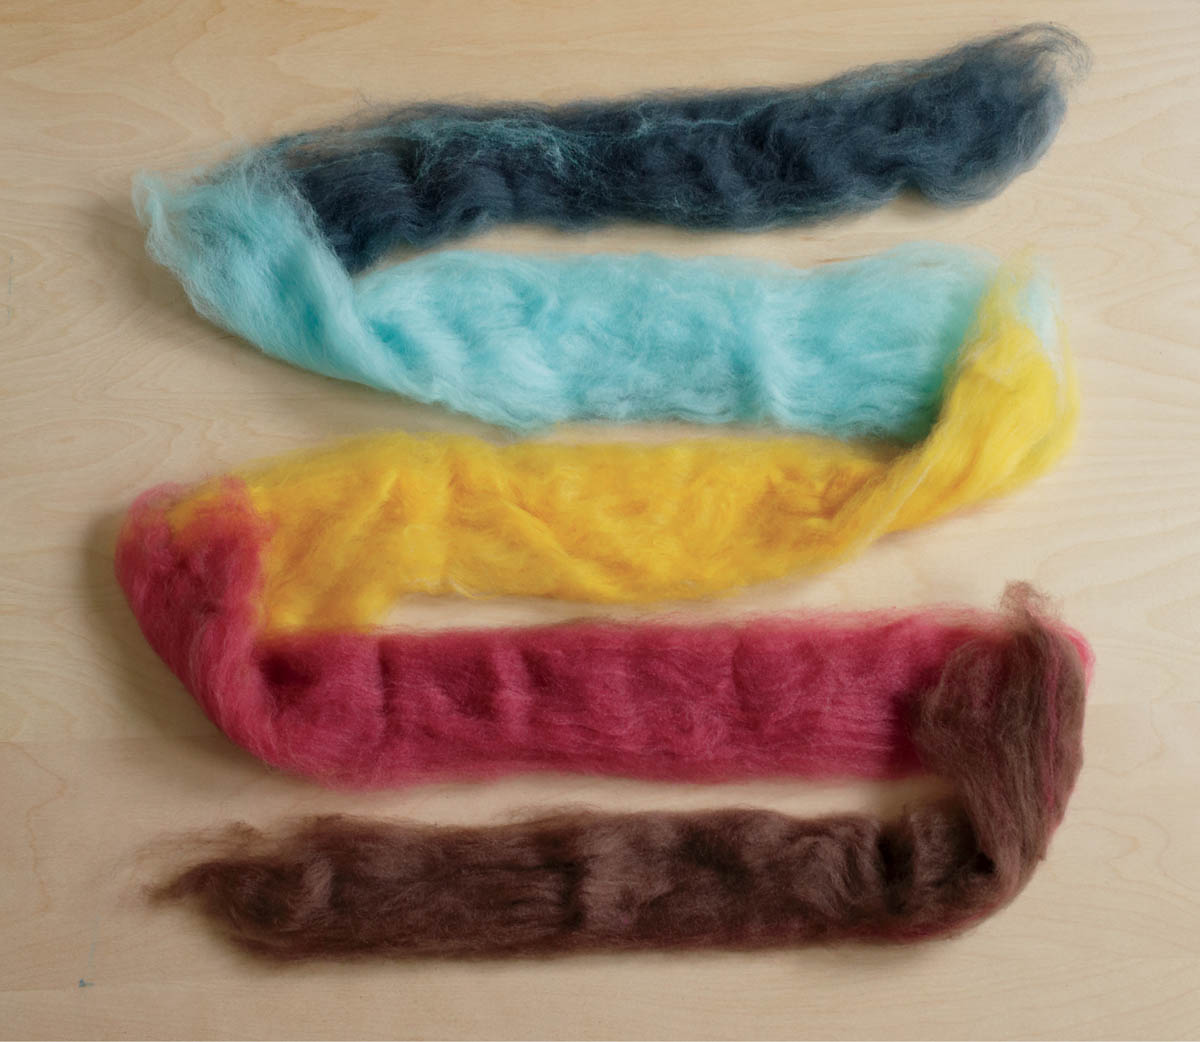
All of this leads me to your fiber stash. Just how many braids of variegated fiber do you have in there? How many are in colorways that match? The variegated braid is both the joy and bane of a spinner’s stash. We love to buy them, but we aren’t sure how to use them.
I know my stash is 80 percent variegated braids, and probably less than 5 percent match the colorway of any other braid. I buy them as souvenirs now when I go on a trip. It used to be T-shirts, then it was spindles; for years now it’s been braids of variegated fiber. If we toured my variegated braid stash, I could tell you where I bought each one, who was with me, and at least two funny stories from the trip. I take my stash very personally.
What can you do with a stash heavy in variegated braids in ones or twos of a particular colorway? If you’re happy with the amount of fiber but spin your braids the same every time, just taking what you get and not even quite sure what that’s going to be, you can keep the color flow exactly the same as the braid or learn to mix up the colorway within a single braid with some confidence. If you want to make something bigger than is possible with 4 to 8 ounces of fiber, you can learn to combine variegated fibers with solids, semisolids, and other dyed fibers to create an almost infinite amount of fiber that all works together.
The two easiest ways to maintain the sequence of colors in a fiber braid are to spin singles or to chain ply.
Have you ever spun a singles, finished it, and knit with it, only to discover that the fabric leaned in one direction or the other? This is called biasing, something that makes spinning knitters crazy. I have a fix for this, and it has nothing to do with blocking or weighing your yarn. The fix for bias can be described in two words: less twist. When I spin a singles to keep as a singles, I use about 30 percent less twist than I would for a singles that will live its life as a plied yarn. Why? When you ply a yarn, you remove a portion of the twist in the singles. If you spin a singles as if it were going to be plied, but then finish it without plying it, the extra twist destined to be a lovely ply is now a singles with extra twist. That twist will go somewhere in your knitting; it will make your stitches lean. Your knitting will bias in one direction or another, depending on which way you spun your singles.
When I’m spinning a singles that I intend to use as singles, I still do a ply-back sample to help keep me on track as to size and twist (see How to Make a Ply-Back Sample). A singles hanging on my wheel will just untwist, so I let it ply on itself and knot it to keep twist in the yarn. I usually use a control card, too.

The swatch at the left was knit with a loose-twist singles; the one on the right was knit with a tightly twisted singles, which caused biasing.
A quick-and-easy way to ply for color consistency is to chain ply (also called Navajo ply, N-ply, and crochet ply; see How to Chain Ply). I like to call it chain ply because it is literally a way of plying that makes a continuous chain through looping — like crochet. I’ve had a hard time coming to love chain ply, but it’s quick and easy, and since the technique uses only one or two bobbins it’s perfect when I don’t have enough bobbins free for a 2-ply or 3-ply. There are spinners, like Sarah Anderson, who adore the technique and make truly beautiful yarn with chain ply.
I use it sparingly, but I have become quite smitten with one aspect of it: it allows me to match up the colors of the singles as closely as I possibly can while plying. For a long time, when I chain plied I used the same-size loops. Once I got into a rhythm, I took the colors as they came, even where the colors didn’t match (marled parts — high-contrast colors plied together like a candy cane — and all). Here’s a truth about handdyed fiber: it’s dyed by a person, not a machine. Rarely are the lengths of color equal and even; sometimes the dyer even intentionally makes the lengths uneven and different. When I used the same-size loops to ply, there were more than a few marled spots, since I wasn’t trying to keep same-color sections together as I plied.
When I’m chain plying, I particularly want to keep the colors clear and the same as the original fiber, with as little marling as possible. It was a revelation to me when I realized I could vary the size of the loops throughout the plying process in order to match up the color lengths. When there is a long stretch of a color, I use big loops; when the color span is short or I get close to the spot where the colors change, I switch to smaller loops to catch the changes in a shorter length, and therefore avoid marling.
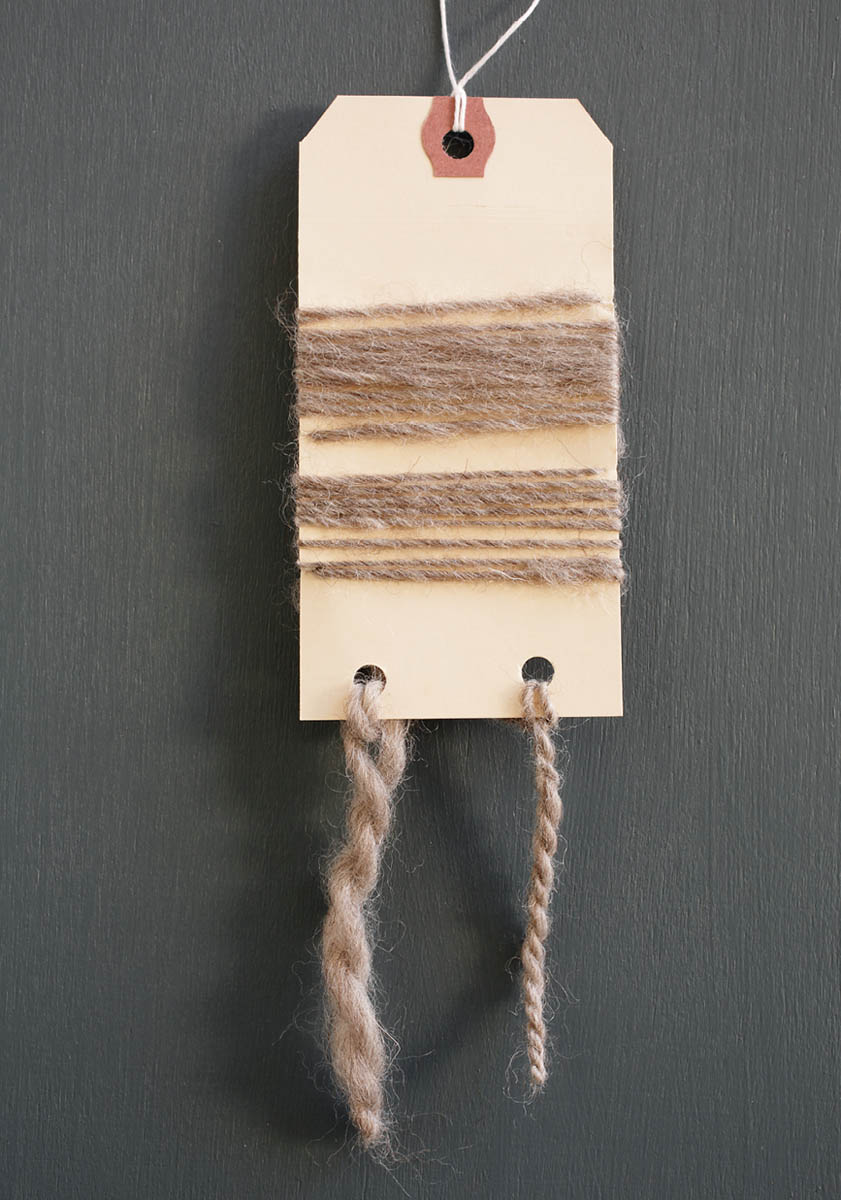
I keep ply-back and yarn samples on a control card nearby whenever I spin. The more loosely twisted yarn on the left would work better for knitting if used as singles.

I controlled the colors when plying on the yarn on the left to avoid marling; I allowed the colors to overlap when plying the yarn on the right.
Until very recently, I thought that achieving a color match between plies was just sorcery. I imagined there were just a few spinners talented enough to divide the fiber evenly enough and spin singles consistently enough to ply a perfect match colorwise. I tried measuring every aspect of this process in grams, twist angle, and grist (see Grist), but nothing ever worked for me; it was always hit or miss. Then I learned the trick: break it to make it. I divide and spin my singles as I always have, but when I ply, I change the way I approach it. Using a 2-ply as an example, I start plying and the colors match just fine, then the inevitable happens: a new color creeps in too soon. Instead of just giving up and letting it barber pole, what I do now is to break one of the plies and remove the too-soon or too-late color so that the plies match again. I then splice the new end to the old and keep plying, magically matching colors!

As I spun a variegated yarn with two strands of orange aligning nicely (a), I suddenly came to a section of purple before I’d used up the orange (b). To avoid marling, I broke off the orange at that point (c) and moved ahead to where the purple began in the second strand. I spliced in the new purple end and continued to ply with colors matching.
Do you core spin? I use core spinning to keep my colors in line and, at the same time, create a unique yarn. The keys to successful core spinning are to use a core that won’t become overtwisted too quickly, to draft at a 90-degree angle, and to use low to medium twist to create the yarn. There are whole books written on making textured and art yarns that teach all of the nuances of creating an excellent core-spun yarn.
When I core spin, I use either commercially spun wool yarn or unspun fiber as the core. I like wool because it’s grabby, but other spinners use cotton, acrylic, and even wire as their cores. If I am using a commercial yarn for the core, I run it through my wheel in the opposite direction that I will be spinning my core spun. This helps avoid the overtwisting problem that most new core spinners have.
When you first try core spinning, slow way down, because you’re dealing with more variables than when you’re just drafting a regular yarn. Attach your core to your leader, and spin the core and the fiber that will wrap the core as a singles yarn together for a few inches before you start core spinning. Let the core rest lightly in the palm of your front hand; there is no need to manipulate the core yarn. Hold the fiber that will wrap the core in your fiber hand, and start the wheel spinning to the right (Z twist), letting the fiber wrap around the core at a 90-degree angle. Draft the fiber out by opening and closing the thumb and index finger of your front hand (like a lobster claw) to tension against. Draft on the wrapping fiber or yarn as thinly or thickly as you’d like, but make sure that it’s secure and that it doesn’t slide on the core.
Many times when I sit down to spin, I spin a variegated braid just as it comes: I divide it to spin two singles and then ply it to a little overbalanced. That is my go-to yarn. But I love to have choices, especially when I have a project in mind and may not want lots of hard striping in it. I also want options when I’m trying to spin down my stash and come across colorways that need a little something or when I’m spinning a braid I don’t really like any more. Sometimes the fiber just needs a bit of rearranging to look fresh again. My examples are all for a 2-ply yarn, but the idea can be used with 2, 3, 4, or more plies.
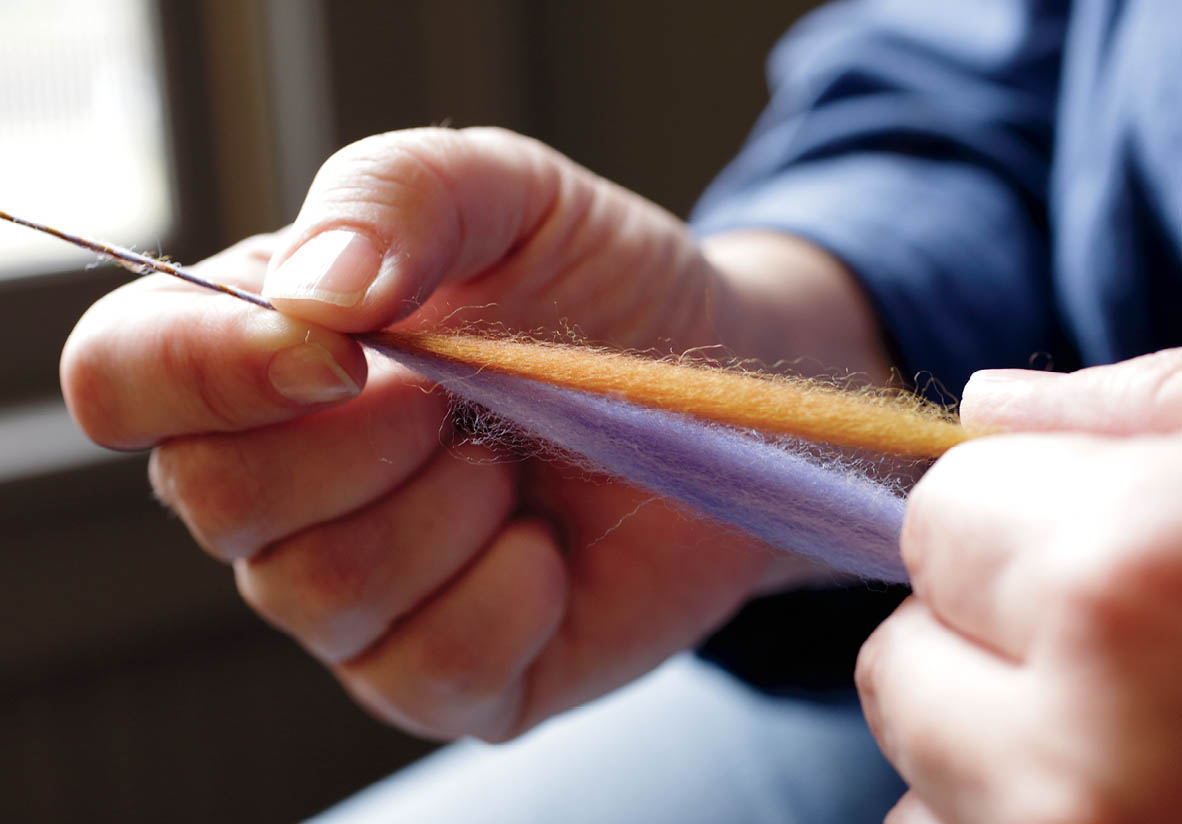
An easy way to get different color combinations is to flip half of the fiber when spinning the singles. Split the fiber vertically to spin a 2-ply, and then spin one half as it comes, beginning to end. When it comes time to spin the other half, spin it from the opposite direction, starting at the other end. This just lines up the colors differently when they are plied, and it makes a nice change.
Here’s a tip to keep track of which end to spin. Right after you split the fiber, place a loose overhand knot on the ends to spin from. This helps keep you from getting confused and spending extra nonspinning time trying to figure which end to start with for the second ply. (Ask me how I know.)

Example of yarn spun with flipped plies
Spin from opposite ends of each strip of fiber to get the flip effect.
There has been a lot written about fractal spinning. The ultimate (and original) article is by Janel Laidman in the Summer 2007 issue of Spin•off magazine. I have a simple way of describing it that uses no math or science: it’s all about combining long and short. When I discussed predrafting (see here), I pointed out that the more a fiber is stripped vertically, the shorter the individual colors in a color run become. Fractal spinning takes advantage of that idea. For a 2-ply fractal, split your fiber once and spin one half of it so that you get long color runs. Split the remaining half again into halves, quarters, or even eighths, so that when you spin, you get shorter color runs. When the two singles are plied together, the short colors dart in and out of the long colors. Sometimes a whole colorway repeats on the short-run singles before the solid color changes on the long-run singles. The result is gorgeous, and it is mesmerizing to watch them ply together. When I divide my fiber for fractal spinning I take at least two steps between the sizes. I also keep in mind what size yarn I’m spinning, and I don’t strip to a size that I can’t draft. For example, I might ply the singles spun from half the length of the braid with singles spun from an eighth of the original braid.
What I notice about yarn spun fractally is that there are always more stretches of colors that match up than I expect. When the yarn is knit, there is still striping, but the stripes are softer and more undulating than the harder striping of a matched ply or even a random as-it-comes ply. Fractal is wonderful for bigger projects when minimal striping is desired.
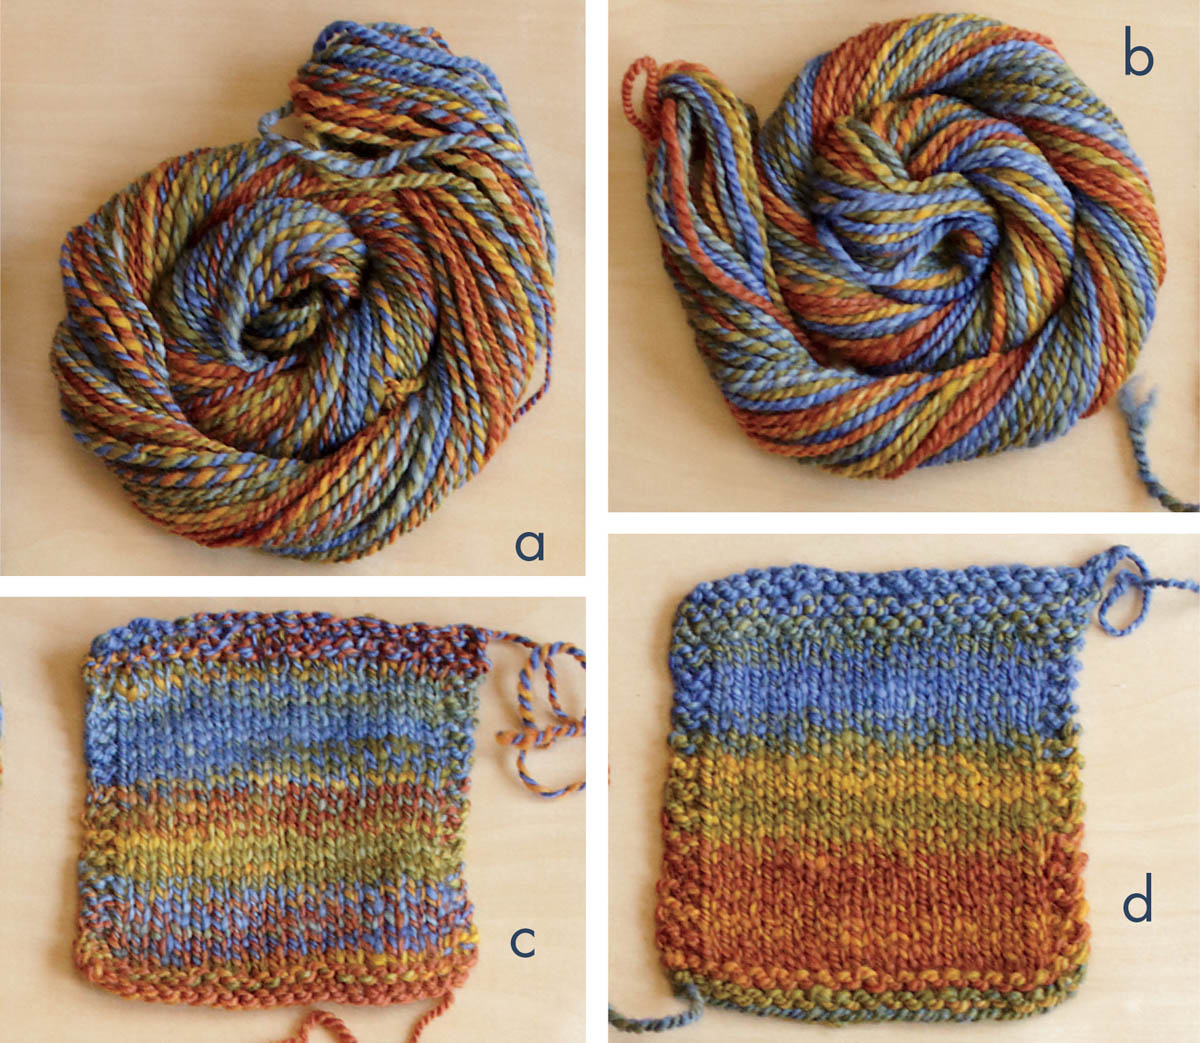
The yarn at the top is a 2-ply, fractal spun (a); the top swatch (c) was knit with this yarn. The bottom yarn (b) is a 2-ply, spun and plied as it comes, not trying to match colors; the bottom swatch (d) was knit with this yarn.
Yarns spun to create a progression are gorgeous to knit with, especially for lace. If you have a variegated braid and love the colors but don’t want the look of a variegated yarn, make it into a progression. Break the fiber apart by color. I am very aggressive about keeping my colors clear when I do this, picking out all secondary colors from each break. (In this context, “secondary colors” are those that occur where two dyes overlap to create a new color. They may not be true secondary color-wheel colors.) Then pile colors, like with like. Spin the colors one at a time in an order of your choice. You’ve given an old colorway new life!
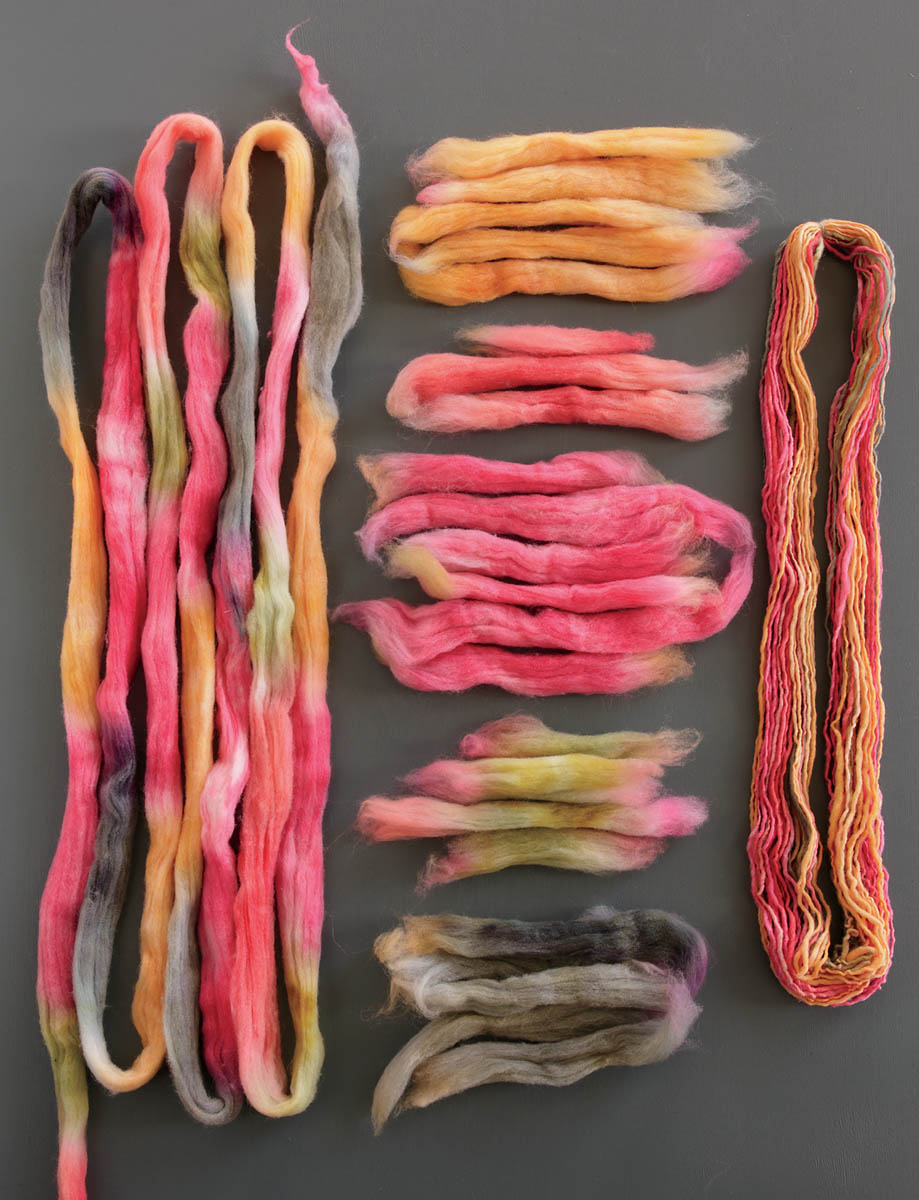
To spin a progression, break the fiber apart by color, then spin all of each color for a long, gradual shift in the colorway.
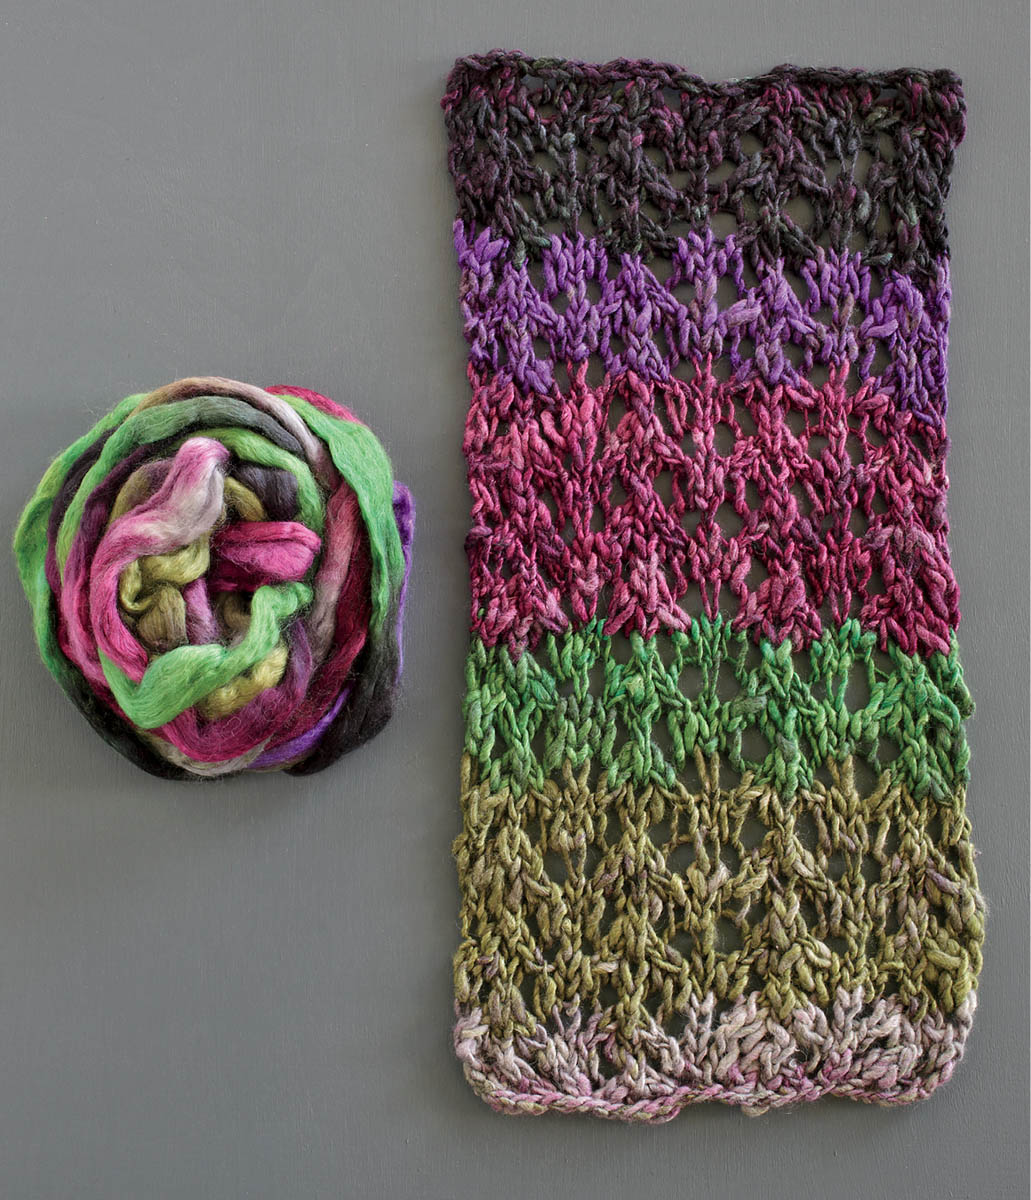
This lace swatch was knit with yarn that was spun progressively from top that was originally dyed in a variegated pattern.
Sometimes I find I have an issue with a particular color in a colorway. Maybe I used to love it but now I don’t. Or I liked all of the other colors in the colorway so much that I was sure I’d come around to that particular shade of pastel yellow. My technique for solving this dilemma is quick, easy, and oh so satisfying: break apart the top or roving, and get rid of the color you dislike! It’s up to you whether to remove just most of it or all traces of the offending color. You’ll never miss it.
I love this technique for no-longer-loved colorways. I usually split the braid into fourths and then shred it into pieces between 2 and 4 inches long, not worrying if the breaks happen between or within a couple of colors. I toss all of the pieces into a bag or basket and then spin, pulling fiber randomly from the bag. I ply it on itself and almost always am delighted with the crazy confetti yarn I’ve made.
A basketful of chunks ready to spin into confetti yarn
This is my 100 percent favorite thing to do with variegated fibers. It makes me feel like a mad color scientist, and it lets me stretch my stash to make something beyond scarves and socks. This technique is the one spinners in my classes are, at first, the most reluctant to try, but then they never want to leave the classroom, because they want to keep trying new combinations.
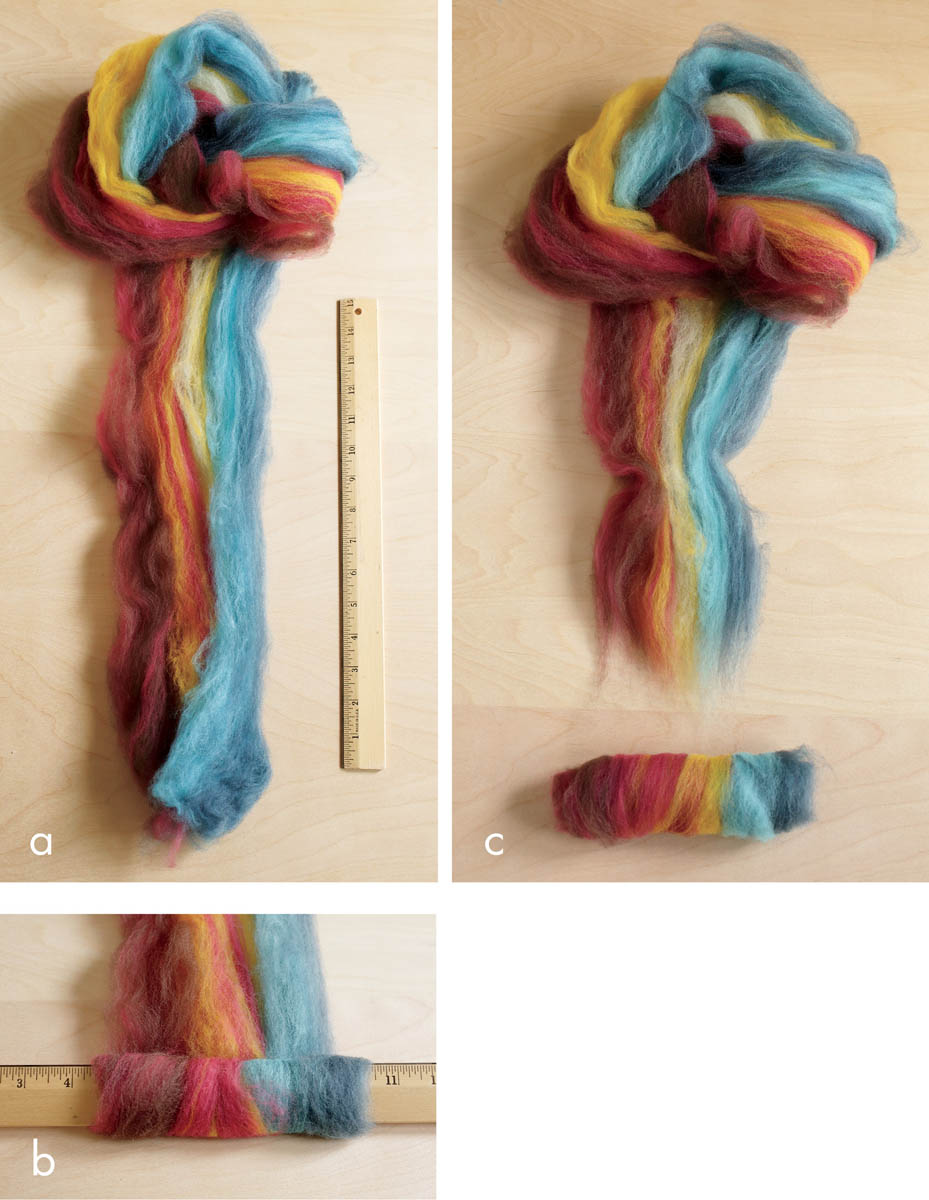
No color wheels will be used in the combining of colors for this portion, but why not? Because fiber dyers are color geniuses, and they really do all of the work for us, if we follow their lead. The quick-and-easy way to combine colors in a variegated roving is to get close to matching one color between two braids. That’s it. It works out to be gorgeous a frighteningly high percentage of the time.
If you want to use fiber braids for a large project, such as a sweater, you can use variegated tops in succession without combining them in any way when you spin, but just letting them follow one after the other in your knitting. For instance, you might start with a yarn made from fiber that is grass green, light blue, and fuchsia, and then next knit with a yarn spun from light blue, lemon, and orange, and after that orange, purple, and red. This method works great for sweaters knit in the round, especially if you save some yarn for matching the sleeves. If you like to knit your sweaters in pieces and then assemble them, you will have to separate your yarns to get fronts, backs, and sleeves to match, or simply embrace the beauty of a patchwork look.
If you’d like your succession of braids to blend a little more, you can ply them together in a pattern. For instance, for a 2-ply, ply together two singles of the first colorway, one singles each of the first and second colorways, two singles of the second colorway, one singles each of the second and third colorways and two singles of the third colorway. I divide the fiber evenly before I spin and make sure to label it or tuck it into labeled plastic bags. Make sure to label your yarn as soon as it’s on your niddy noddy, too. (No, you won’t remember which is which after you’re done!) If you want to get more color complexity with successions, add more braids and create more plies.
Variegated fibers can be mixed and blended with natural, solid, or semisolid fibers, which create a color veil, or cast, on the variegated colors. If you’d like your knitted fabric to have more contrast, ply the colors together, and if you’d like your fabric to look more washed by a color, blend the two together in the draft before you ply them together.

These 2-ply yarns were made using a variegated top and a natural white top. The top swatch (a) was knit with the yarn on the left (b), spun by drafting the variegated and white at the same time, then plying together. The bottom swatch (c) was knit with the yarn on the right (d), a singles of white and a singles of variegated plied together.
Blending fiber while drafting takes a little bit of practice before you can watch TV while doing it, but I’ve got a few tips to make it go smoother from the start.

Blending two different-colored fibers holding them side by side
Blending with fibers stacked
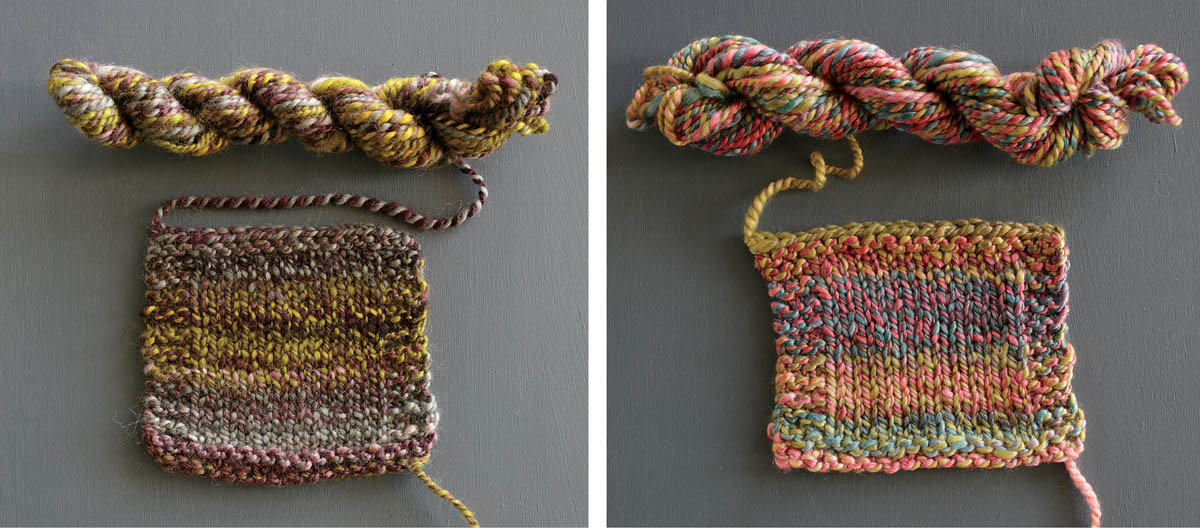
Working with variegated colorways is never-ending fun. I always get the same questions: which is easier, draft or ply, and how do the results differ? For me, both methods are equally easy, but they do give different, though similar, results in the finished yarn and fabric. They are different because there are different-size spots of color at play and multiple levels of combining; they are similar because the colors are the same.
When two colorways are spun as singles and plied together, they create a single marl. The colorways are mixed once, and the spots of color of each are bigger (relative to the size of the yarn you are spinning). When you draft two colorways together before plying, the colorways are mixed together twice, once in the singles while drafting and then again when you ply. The two colorways marl together in the single and then again in the ply. The spots of color in this method are smaller, creating color speckles rather than dots, with more visual color blending. You can see in the finished yarns below that the overall look is different.
When these mixed and blended yarns are knit, the look is strikingly different. In the plied sample, the striping is more pronounced, with visible edges; and depending on the contrast between the colorways, the marl or barber pole is more apparent. With the swatch knit with drafted-then-plied yarn, the striping is diminished, and sometimes there are no edges to be seen. The overall colors are softened into speckle-y loveliness. The photos below show more swatches knit with plied-and-drafted yarns, compared to swatches knit with just plied yarns.

Left: The two skeins of singles at the top were spun separately and then plied together to create the third skein.
Right: The same colorways were blended together before spinning the two skeins of singles at the top and then plied together to create the third skein.
The four photos below are a bonus: they were spun with a combination of different fiber blends, too.
Left: BFL 2-ply.
Right: Merino/Tencel 2-ply
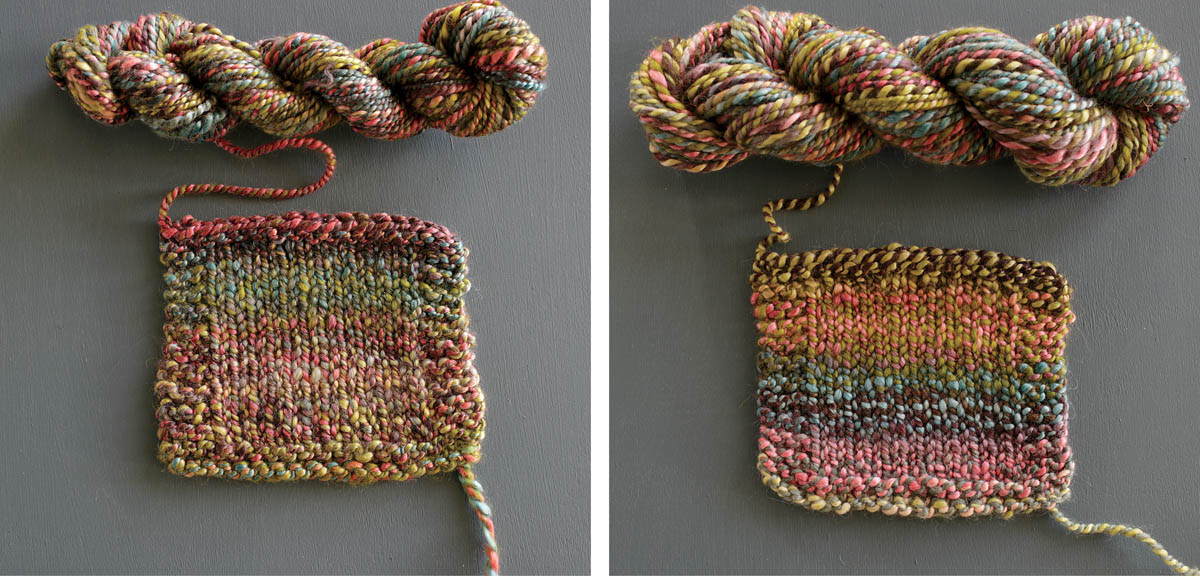
Left: Merino/Tencel and BFL drafted together, then plied.
Right: Merino/Tencel and BFL spun as separate plies, then plied together

Color blending isn’t limited to 2-plies! These samples are all 3-ply yarns made with three different colorways. The top samples (a) are each colorway spun as a single and plied together and the bottom samples (b) are all three colorways drafted together and then plied together. Adding more plies and colorways creates intricate and rich combinations of colors.
One of the most beloved types of batt is the striped version. Whether large or small, the colors and textures can be intoxicating when you first buy it, but after a bit, it sometimes may not be your favorite anymore. Don’t despair; there are ways to manipulate the colors within striped batts, too.
Most spinners strip their batts vertically, but the length of each color in the spun yarn is dependent on the width of your strip. You can strip each color individually and spin them in order for a gradated yarn, or you can strip each color multiple times and spin them in a repeating order of the original colors and make a variegated yarn. You can also try one of the techniques on the next four pages, including stacking, creating a fauxlag, chunking, or combining batts.

Stacking. Stacking is a great way to make a tweedy yarn from a batt. Strip the batt vertically, then stack the colors on top of each other, making lovely fiber layers. Attenuate your layers into roving and spin. Plied on itself, this method makes the stripes into speckles.

Stacking
Batt with colors stripped one by one and spun in order for gradated yarn
Fauxlags. Creating fauxlags from the batts results in smaller bursts of color and a loftier yarn. You decide whether to make them a single color or to include more than one color. I use a ruler or a dowel to create my fauxlags from batts. I lay down my ruler on my color arrangement (a), then roll the fiber and ruler together two or three rotations (b), tearing away the rest of the batt as I go. I then tear the fauxlag free of the batt and spin it (c).(All of these samples are from the same batt.)
Chunking. To create a truly random yarn from a batt, use chunking. Strip your batt multiple times, and then tear each strip into pieces 2 or 3 inches long. Throw all of the pieces into a basket or bag and mix them up. Then pull from your fiber salad randomly to spin.
Combining. You can always combine batts, too, just as I described working with variegated braids (here): strip, stack, ply, or blend, keeping a color or two in common.

