Chapter 11. Collaborating with Multiple Authors
When you first create a WordPress site, it’s a solo affair. You choose your site’s theme, write every post and page, and put every widget in place. Your readers can add comments, but you’re in charge of starting every conversation.
You might like this arrangement (and if so, that’s fine), but WordPress also makes it possible for you to have friends, colleagues, family members, and even complete strangers contribute to your site. You can, for example, create a site where several people post content, or you could be more selective, letting some people write content and others review and edit it. You can also implement an approval system to check the work of contributors before it goes live, and you can even create an entirely private site that only the people you approve can view.
In this chapter, you’ll learn how to enable all these features by registering new people—not new visitors, but new WordPress users who have special privileges on your site. You’ll also consider WordPress’s more ambitious multisite feature that’s open to self-hosters only. With a multisite network, you can let other people create their own sites on your web server. For example, big companies can use the multisite feature to give each employee a personal blog. Essentially, the multisite feature lets a whole family of WordPress sites exist side by side, on the same domain.
Adding People to Your Site
A new WordPress website starts with only one member: you. You assume the role of administrator, which means you can do anything from write a post to vaporize the entire site. Eventually, you may decide to make room for company. Usually, you make that decision because you want to work with co-authors, who will write posts for your site.
Before you add someone to your site, though, you need to decide what privileges that person will have. WordPress recognizes five roles, listed here in order of most to least powerful:
Administrator. Administrators can do absolutely everything. For example, if you add a friend as an administrator to your site, he can remove you, delete all your posts, and switch your site to a Hawaiian beach theme. WordPress strongly recommends that every site have just one administrator, to prevent power struggles.
Editor. Editors have full control over all posts and pages. They can create their own posts, and they can edit or delete any post, even ones they didn’t create. Editors can also manage post categories and tags, upload files, and moderate comments. They can’t change site settings, tweak the site’s layout and theme, or manage users.
Author. Authors have control over their own posts only. They can create new ones and upload pictures, and they can edit or delete their posts anytime. Everyone else’s content is off limits.
Contributor. Contributors are a more limited form of author. They can create draft posts, but they can’t actually publish them. Instead, contributors submit their work for review, and an editor or administrator approves and publishes it. Sadly, contributors can’t upload pictures, even for their own posts.
Follower or Subscriber. These people can read posts and add comments. WordPress.com calls them followers, while WordPress.org calls them subscribers. If you run a WordPress.com site, it automatically notifies your followers about newly posted content (perhaps by email, depending on their personal preferences). If you run a self-hosted site, your subscribers won’t get any notifications, but they can opt in to an email subscription service (Signing Up Subscribers).
Now that you know what roles WordPress recognizes, you’re ready to start creating new user accounts. There’s one wrinkle, however. The steps you take for a self-hosted site are significantly different from the ones for a WordPress.com site. If you’re a self-hoster, continue reading. If you’re a WordPress.com fan, skip ahead to Inviting People to Join a WordPress.com Site.
Note
In WordPress lingo, all of these different types of people—administrators, editors, authors, contributors, and so on—are users. Technically, a user is any person who has an account on your site. This account identifies the person and determines what he’s allowed to do. Everyone else is an ordinary, anonymous visitor.
Adding New People to a Self-Hosted Site
Using the dashboard, you can register new users, one at a time. You supply a few key details (like a user name, password, and email address), and let your users take it from there.
Here’s what to do:
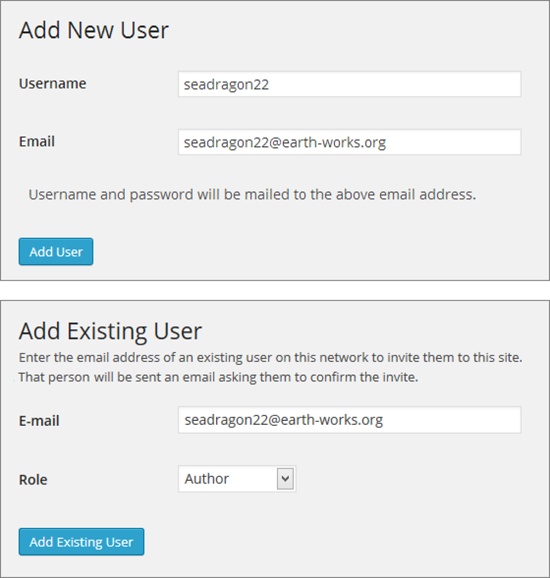
Choose Users→Add New.
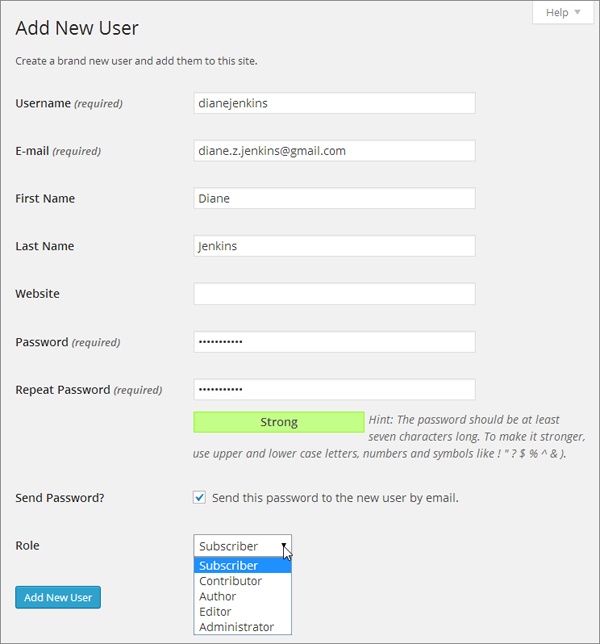
The Add New User page opens (Figure 11-1).
Choose a good user name for the person you’re inviting.
The best approach is to use a consistent system you can apply to everyone you add. For example, you might choose to combine a person’s first and last name, separated by an underscore (like sam_picheski).
Type in the person’s email address.
WordPress uses that address to send the person important notifications, including password resets.
Optionally, specify the person’s first name, last name, and website.
These are three descriptive details that become part of the person’s profile.
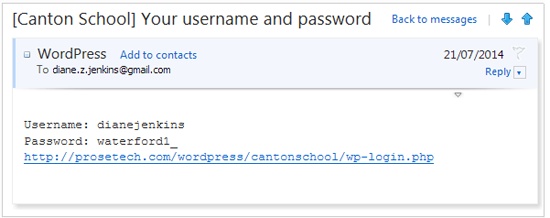
Type in a strong password. (See the box on A WordPress Password Is More Than a Formality for tips.)
When you create a new account, you must supply a password—WordPress doesn’t let people pick their passwords the first time they log in. However, if you check “Send this password to the new user by email,” WordPress emails the person her user name and password, along with a link to your site’s login page (Figure 11-2). (And even if you don’t ask, WordPress sends you, the administrator, an email with a record of the new user’s name and email address.)
Pick a role from the drop-down list.
You can use any of the roles described on Adding People to Your Site.
Click Add New User.
WordPress creates the account, sends a notification email (if you chose the “Send this password…” option), and takes you to the Users→All Users section of the dashboard. There, you can review a list of everyone you ever added to your site. Point to a user name, and you see two straightforward links—use Edit to change the person’s account info and Delete to remove the account.
You might want to add one other detail when you add a new user: changing the name WordPress displays when that person contributes content.
When your site has a single author (you), there’s no reason to attach the author’s name to every post. But once you have multiple people contributing to your site, it’s important to distinguish one author’s work from another’s. The standard year themes (like Twenty Twelve) handle this gracefully: As soon as your site publishes posts from more than one person, it modifies the text it adds to every post to include author information, like this:
This entry was posted in Uncategorized by mpm_site_admin. Bookmark the permalink.
Ordinarily, WordPress identifies a post author by his user name, which often makes for a lousy byline. Fortunately, you can choose something more meaningful and readable (both for you and your visitors). Here’s how:
Choose Users→All Users.
WordPress opens the Users page and lists everyone your site recognizes.
Point to the user name of the person whose info you want to change, and then click Edit.
The person’s profile page opens, where you see all her settings. You can tweak her personal preferences, like the dashboard’s color scheme and proofreading settings, but you probably won’t worry about these details—instead, you’ll let invited people configure their own profiles. But the person’s nickname affects the readability of the site for all your visitors, so it’s worth getting it right.
Choose an option from the “Display name publicly as” list.
For example, you can replace the WordPress user name from the previous example (dianejenkins) with the first name only (Diane), the last name (Jenkins), or a combination of the two (Diane Jenkins).
If you don’t see an option you like, type the name you want into the Nickname box, exactly as you want it to appear (for example, “Di Jenkins,” “Miss J,” or “Super Shorty”). WordPress adds the new nickname to the entries in the “Display name publicly as” list. To use it in place of her registered name, choose it.
Click Update Profile.
Your change is official.
Note
You can change an author’s name anytime. The change affects all the posts the person has written—the next time you view a post, you see the new name in the byline. This is one of the benefits of dynamic websites like the ones you create with WordPress—they’re intelligent enough to keep everything up to date.
Inviting People to Join a WordPress.com Site
Before you can register someone as a user on your WordPress.com site, that person must have a WordPress.com account. Some people may already have one (they might, for example, have their own site or they may be following someone else’s blog). Non-WordPressers need to sign up, and they need to do it themselves—you can’t create a WordPress.com account for someone else.
Instead, your job is to invite people to become users. For example, imagine you invite two friends, Cathy and Sanjeev. Cathy already has a WordPress.com account, which means that all she needs to do is accept your invitation. WordPress then authorizes her to read, edit, or manage your site (depending on the role you grant her). On the other hand, Sanjeev doesn’t have a WordPress.com account, so WordPress asks him to create one. Once he does, Sanjeev can accept your invitation and become a contributor, just like Cathy.
You can invite one person or several at a time. The only rule is that if you create an invitation for several people, all those people must have the same role. That means you can invite a batch of followers all at once, or a group of contributors, but not a mix of the two.
To create an invitation, follow these steps:
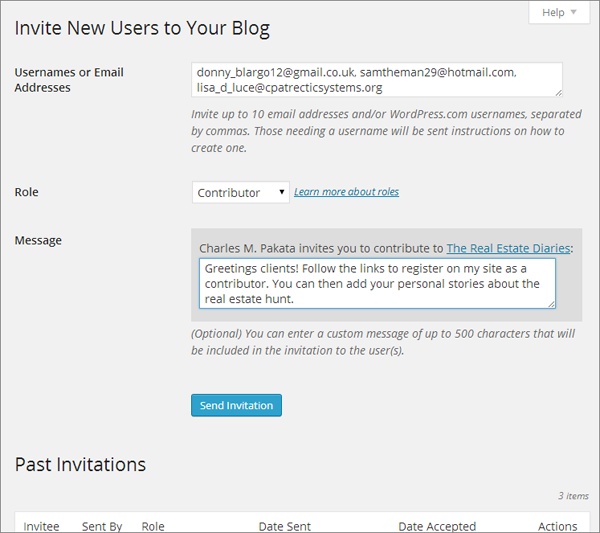
Choose Users→Invite New in the dashboard.
Enter a list of email addresses, one for each person you want to invite, separated by commas (Figure 11-3).
If you invite someone who already has a WordPress.com account, you can supply his WordPress.com user name instead of his email address (either way, the invitation reads the same).
Choose a role from the Role drop-down list.
You can specify any of the roles described on Adding People to Your Site.
In the Message box, type a short invitation.
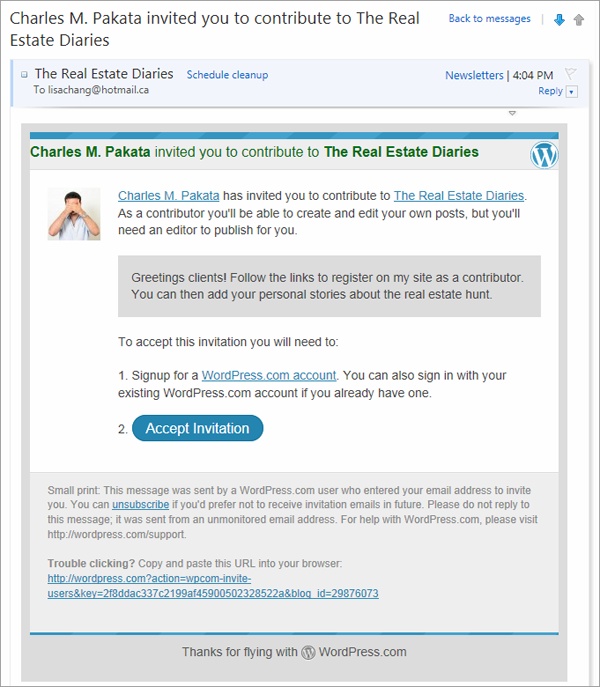
For example, if you’re inviting contributors, you might write “Come share your stories on my blog.” This note becomes part of the welcome message WordPress sends to each person on your list (Figure 11-4).
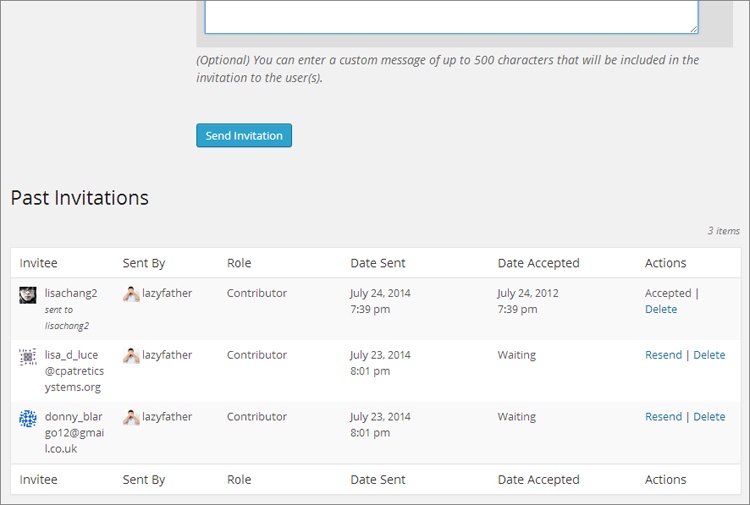
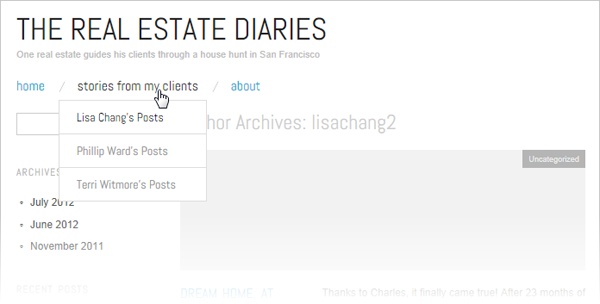
Figure 11-4. Here, site owner Charles Pakata invites Lisa Chang to contribute to his WordPress site, “The Real Estate Diaries.” If Chang clicks Accept Invitation, WordPress prompts her to sign in with her WordPress.com account (or to create an account if she doesn’t have one). She can then accept the invitation and become a contributor.WordPress sends the invitation into cyberspace.
Below your message, on the same “Invite New Users” page, WordPress keeps track of whom you invited and how they responded (Figure 11-5). It keeps the records until you delete them (more about that in a moment).
If you think a previously invited person missed your email, you can ask WordPress to send it again by clicking Resend. If you want to revoke an invitation that hasn’t been accepted, click Delete. Now, if that person clicks the activation link in the invitation message, WordPress displays an error message.
Once someone accepts your invitation, you may choose to remove the record of the invitation (click Delete) so you can focus on the people who haven’t responded. Deleting an invitation for a registered user has no effect on that person—he remains registered on your site. (If you decide that you do want to take down an existing user, you need to go to the Users→All Users section of the dashboard and click Remove next to the persona non grata.)
Working with Authors
The most common reason to add new users to your WordPress site is to get more content from more people. After all, new and interesting content is the lifeblood of any site, and by recruiting others to help you write it, you increase the odds that your site will grow and flourish.
As you already learned, all but one type of WordPress user (followers for WordPress.com sites, subscribers for self-hosted sites) can write posts. Whether you’re an administrator, editor, author, or contributor, the first step is the same: To write a post, you have to log in to the dashboard.
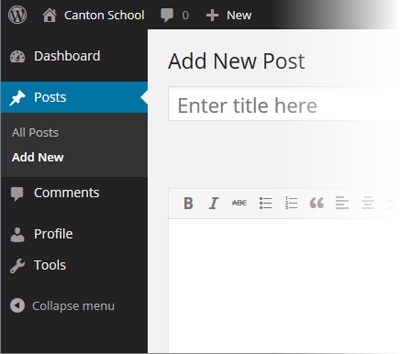
WordPress tailors the dashboard to the person’s role, so that each person sees only the menu commands he can use. For example, if you log in as a contributor, you see the stripped-down dashboard in Figure 11-6.
If you run a site on WordPress.com, every type of user can log in and see the dashboard, except followers. Why leave out followers? On WordPress.com, a person’s profile isn’t tied to your site—it’s actually part of that person’s WordPress.com account. For that reason, there’s no need for followers to use your site’s dashboard to change their profiles.
If you run a self-hosted site, every type of user can log in to the dashboard, although subscribers get just one option—the Profile command that lets them change their preferences and personal information.
Either way, the only type of user who can see the full, unrestricted version of the dashboard is an administrator—and, ideally, that’s just you.
The Post Approval Process for Contributors
Administrators, editors, and authors can add posts and pages to your site in the usual way. When they finish writing, they simply click Publish to make their content go live.
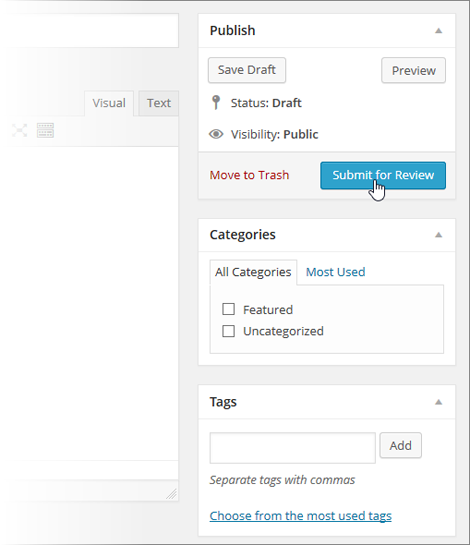
As you know, contributors have more limited powers. They can create posts but not publish them, which gives you a broad safety net—there’s no chance that bad content can get on your site, because you get to review it first. When contributors create posts, they have two options: They can save the post as a draft so they can return to it and edit it later, or they can submit it for review (Figure 11-7).
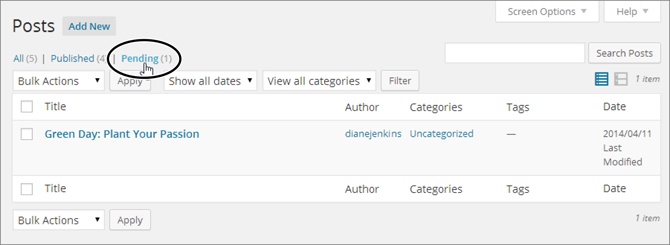
When a contributor submits a post this way, WordPress assigns it a special status, called pending. A pending post won’t appear on your site until an editor or administrator approves it. Here’s how you do that:
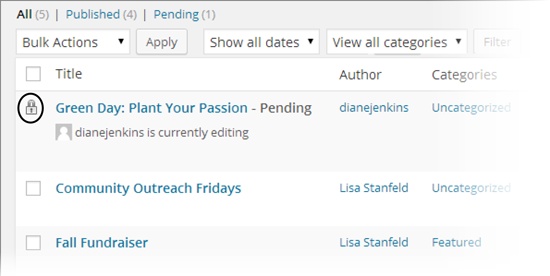
In the dashboard, choose Posts→All Posts.
Click the Pending link (Figure 11-8).
If you see a pending post you want to review, click its title.
WordPress opens the post in the Edit Post window. Make any changes you want, from minor corrections to adding completely new content.
If the post is ready for prime time, click Publish.
This is the same way you publish your own posts. In this case, however, the newly published post will have the original author’s byline, even if you edited the post.
If you make changes to a post but you’re not quite ready to publish it, click “Save as Pending” to store the edited version. You might do this to add questions or comments to the author’s work, for example. You can wrap your comments in square brackets [like this]. Then the post author can make changes and re-submit the post.
Note
Don’t be confused by the way WordPress uses the term “author.” Even though WordPress has a specific type of user called author, WordPress experts often use the same term to refer to anyone who writes a post on a WordPress site. Thus, administrators, authors, editors, and contributors can all act as post authors.
Post Locking
As you already know, authors and contributors are limited to editing their own work. But editors and administrators have more sweeping powers; they can dip into any page or post and make changes.
This setup creates the possibility of conflicts. An editor could start editing a post that a contributor is still writing. Or two editors could attempt to revise the same work at the same time. WordPress doesn’t have any post collaboration features—instead, only one person at a time can revise a post and save changes. To prevent one person’s edits from wiping out another person’s work, WordPress uses a simple post locking system.
Here’s an example of how it works. If Diane starts editing a post, WordPress takes note. Every 15 seconds, it sends a message from Diane’s browser to the server, which essentially says, “I’m still working!” (This message is part of an internal system called the Heartbeat API.) If Diane stops editing—say, she saves her work and navigates to another page, or she just closes the browser window without a second thought—the messages stop and WordPress realizes (within 15 seconds or so) that Diane has stopped working.
When you look at the posts on the All Posts page, WordPress shows you which ones are currently being edited (Figure 11-9).
Life gets more interesting when someone else joins the editing party. For example, consider what happens if Lisa attempts to edit the post Diane is working on. WordPress notices the conflict the moment Lisa picks up the post, and shows a warning message (Figure 11-10, top). Now it’s up to Lisa to decide whether she wants to wait for Diane to finish (by clicking “Go back”) or push her out of the way and take over (by clicking “Take over”; see Figure 11-10, bottom).

Note
When it comes to taking over a post, everyone is created equal. For example, if Lisa wants to take over the post that Diane is editing, it doesn’t matter if Diane is an administrator or a lowly contributor. Nor does it matter who created the post. As long as Lisa is allowed to edit the post, she’ll be able to wrest control from anyone who’s currently working on it.
Diane has no chance to stop Lisa’s post takeover. Once it happens, her editing session ends. All she can do is click “All Posts” to return to the post list. However, once Diane is back at the post list, nothing stops her from editing the same post again. If she does, she’ll see the same warning message that Lisa saw, informing her that someone else is working on the post. If she forges ahead, Lisa will be kicked out of her editing session.
Of course, the point of the post locking system isn’t for editors and authors to become locked in a series of dueling edits. Instead, it’s for times when someone still has a post open but probably isn’t editing it anymore. For example, if Diane starts revising a post but walks away from her computer for lunch, Lisa can still get some work done by assuming control of Diane’s work in progress.
Revision Tracking
WordPress has another tool that can help you manage successive edits. It’s called revision tracking, and it saves old versions of every post. You can step through a post’s edit history to see who changed a post, when the edit took place, and exactly what that person changed.
Note
Revision tracking is particularly useful on sites that have multiple authors. (And it’s a life-saver when an overeager author overwrites another person’s work.) However, revision tracking works just as well on single-author sites, where it lets you review your own edits.
You don’t need to turn on revision tracking—it’s always at work. Every time someone saves a post as a draft, publishes it, or updates it, WordPress takes a snapshot of the post’s content and adds it to the revision history. WordPress may also take a snapshot of a post-in-progress as you edit it, but it won’t keep more than one copy of your post in this state. After all, you wouldn’t want to clutter your revision list with thousands of in-progress autosaves.
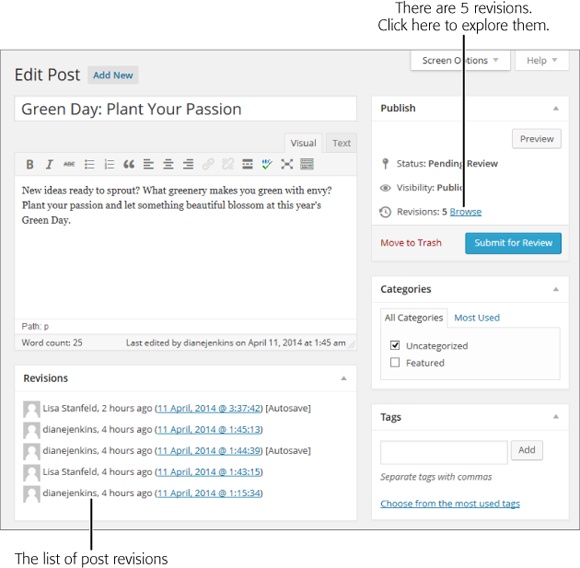
To see the edit history of a post, find the post in the All Posts page, and then click Edit. WordPress displays the revision history in two places (Figure 11-11):
The Publish box. Look here to find the number of revisions WordPress stored. Click Browse to review these snapshots in the Compare Revisions page.
The Revisions box. Check here to see a list of snapshots, from most recent to oldest. To inspect a revision, click the timestamp next to it.
Note
If you don’t see the Revisions box, click Screen Options in the top-right corner of the page, and then add a checkmark next to the Revisions option.
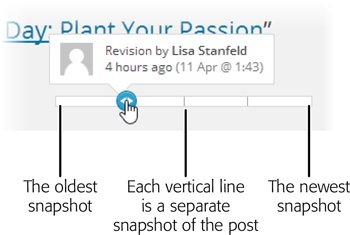
The easiest way to study the changes made to a post is to click the Browse link, which appears in the Publish box next to the Revisions count. WordPress takes you to the Compare Revisions page (Figure 11-12). Initially, it compares the differences between the current version of a post (shown in green on the right) and the previously saved version (shown in red on the left).

Once at the Compare Revisions page, you can dig deeper into the post’s edit history. First, grab hold of the circle that sits in the small slider near the top of the page. To see an older snapshot, drag the circle to the left. For example, if you drag the circle one notch left, WordPress compares the previous version of the post (which it shows on the right) to the version it saved just before that (which it shows on the left). Keep dragging and you’ll go further and further back in time (Figure 11-13).
Alternatively, you can use the buttons on either side of the slider button. Click Previous to go one step backward in time and Next to go one step forward.
To revert to an older version of a post, drag the slider back until the version you want appears on the right, in green. Then, click Restore This Revision, which appears just above the snapshot’s content.
When you drag the circle, WordPress compares two successive versions of a post (the one you pick, and the one just before that). But WordPress also allows curious administrators to perform an in-depth comparison that puts any two versions of a post under the microscope. For example, you could compare the oldest version of a post with the newest.
To do that, turn on the “Compare any two revisions” checkbox in the top-right corner of the page. Two circles appear in the slider, representing the two posts you want to compare. Drag the two circles to the two snapshots you want to examine, and WordPress compares their content underneath.
Revision tracking has one drawback. Keeping extra versions of all your posts takes space. If you host your site on WordPress.com, this isn’t a problem, because your revision history tops out at 25 snapshots per post. After this point, WordPress tosses out the oldest snapshot every time it takes a new one. But on a self-hosted site, there’s no limit. If you’re an obsessive sort who revises the same post over and over, your revision history can balloon into hundreds of snapshots per post. Even if you have room for all these revisions (which you almost certainly do), it’s never a good idea to waste space in your WordPress database. An unnecessarily big database makes backups slower and can even slow down the overall performance of your pages.
Unfortunately, there’s no way to delete old revisions using the dashboard. Instead, you need a plug-in to clear out the bloat. Numerous plug-ins can do the job, but WP-Optimize (http://tinyurl.com/wp-opti) is a popular, versatile choice. It clears several types of old data out of your database, including old post revisions, old drafts, and unapproved comments.
Alternatively, you can tell WordPress to save fewer snapshots. For example, you could set WordPress to store a maximum of five revisions for each post. You can do that with a plug-in (try the straightforward Revision Control, at http://tinyurl.com/rev-control), or you can edit the wp-config.php configuration file using the process described on 5. Hide Passwords with SSL.
If you decide to edit the wp-config.php file, you need to add a line like this to the end of the file in your website folder:
define('WP_POST_REVISIONS', 5);.This tells WordPress to store a maximum of five revisions per post. However, you can replace the 5 with whatever number you want. Or you can tell WordPress to never store any revisions by substituting this line of code:
define('WP_POST_REVISIONS', false );Now you’ll never have to worry about database bloat from old revisions, but you’ll also lose the safety net that lets you recover content if you accidentally erase or mangle it.
Browsing an Author’s Posts
Once you’ve added a few authors to your site and figured out a way for them to work without stepping on each other’s toes, it’s worth thinking about what your multi-authored site looks like to visitors. How can they browse the work of specific authors, or find out more about the writers they like best?
The first issue—reading the work of a specific author—is the easiest to resolve. Just as you can view all the posts in a particular category or all the posts that have the same tag, so you can browse all the posts by a specific author. The easiest way to do that is to click the author’s name, which appears just before or after the post content, depending on the theme (Figure 11-14).
Note
The name WordPress uses to sign posts is the author’s display name, which might be the person’s WordPress user name (the standard setting), her full first and last name, or a nickname. Users can configure their display names by editing their profile settings (Users→My Profile).
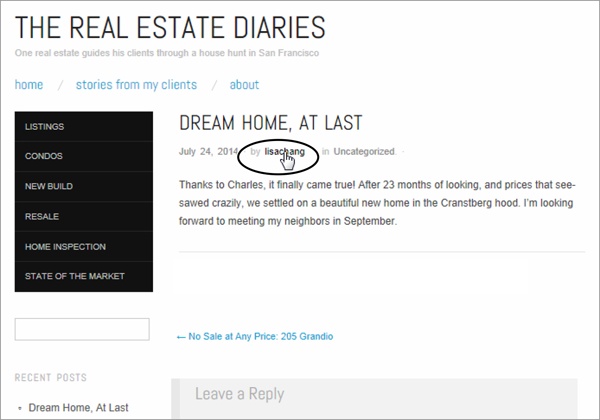
WordPress uses special web addresses to make it easy to browse posts by author. For example, if you click lisachang, WordPress adds /author/lisachang to the end of the site address, like this:
http://therealestatediaries.com/author/lisachangThis is essentially the same way that category web addresses work (Browsing Categories and Tags Using a Web Address).
Now that you know how to get the posts for a specific author, you can make it easier for visitors to get them as well. For example, you could create a menu that has a link for each author, and then display that menu in the main navigation area of your site (Figure 11-15), or in a sidebar, with the help of the Custom Menu widget (The Custom Menu Widget).
Adding Author Information
Ordinarily, WordPress keeps author information to a minimum. Even though it stores a few key details in each user’s profile—including a basic “Biographical info” box—none of these details show up in a post. All your readers see is the author’s name.
In some cases, you might prefer to showcase your author. For example, you might want to add a more detailed byline or include a brief bio that highlights the author’s achievements. The low-tech solution is to add this information to the bottom of the post (consider setting it in italics to make it stand apart from the rest of the content). But if you run a self-hosted site, this is one more challenge you can tackle with the right plug-in.
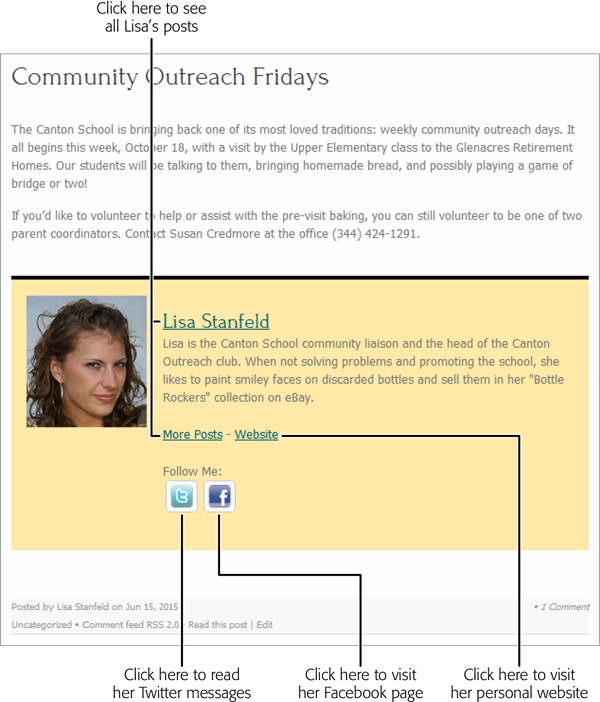
The WordPress plug-in repository is overflowing with author info widgets and bio boxes. One decent starting point is the WP About Author plug-in (http://tinyurl.com/wp-about-author), which automatically adds an author box to the bottom of every post. It also adds several new text boxes to every user’s profile, where authors can enter links to sites where they have public pages (like Facebook, Twitter, and Pinterest). The author’s bio will then include these links (Figure 11-16).
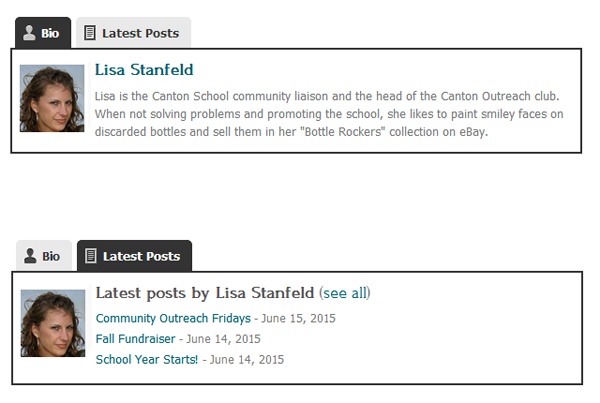
Another good author footer plug-in is the Fancier Author Box by ThematoSoup (http://tinyurl.com/authorbox). It uses a slightly smaller version of the author picture, fewer links, and a neato two-tab view that lets you see the author’s recent posts without leaving the current page (Figure 11-17).
Alternatively, you can use one of several plug-ins that puts author information into a widget. That way, you can take the author details out of a post and tuck them into a sidebar. One such plug-in is Author Spotlight (http://tinyurl.com/authorspot). Of course, this idea works only if your theme includes a sidebar in its single-post view. Most themes do, but the older Twenty Eleven theme limits its sidebar to the main post list, so author box widgets aren’t much use.
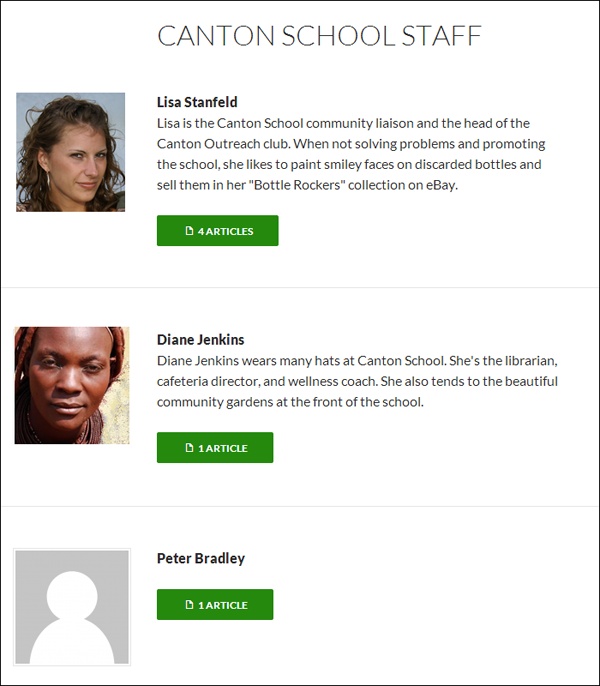
Finally, some themes include a ready-made author information page that you can drop into your site. Twenty Fourteen is an example—it includes a contributor page that shows information for every author (Figure 11-18).
Here’s how to create a contributor page if your site uses Twenty Fourteen:
In the dashboard, choose Pages→Add New.
Type in a title for your contributor page. The example in Figure 11-18 uses the title “Canton School Staff.”
Don’t bother typing in any page content, because none of it will appear in the contributor page.
In the Page Attributes box, change the Template setting to Contributor Page.
WordPress infuses the Contributor Page template with the magic code you need. It prepares a list of all your site’s authors and builds a page that describes them.
Optionally, alter the permalink for your page (Create Permalinks That Include the Category).
For example, you might want to use a short, meaningful address like http://cantonschool.org/staff.
If you don’t see the permalink (and the Edit button) under the page title, click in the empty content box underneath. That makes WordPress save a draft of your page, which forces it to create the permalink.
Click Publish to add the contributor page to your site.
The contributor page uses a few key details for each author. If you run a self-hosted site, it’s up to you (and your authors) to make sure this information is available, or you’ll end up with a distinctly drab contributor page.
Here’s what each author needs:
A proper display name. You specify that using the “Display name publicly as” setting (Adding New People to a Self-Hosted Site).
A descriptive biography. You enter this in the Biographical Info box when you edit a user’s profile (Adding New People to a Self-Hosted Site). In Figure 11-18, Peter Bradley lacks a biography.
A Gravatar picture. If you want a cute head-and-shoulders shot to appear next to your author details, you need the help of WordPress’s Gravatar service, which attaches a personal picture to any email address. The Gravatar Service explains how to set it up.
Removing Authors (and Other Users)
As your site evolves, the group of people you work with may change. You already know how to add users, but at some point you may decide to remove one. To do that, you first need to view your site’s user list by choosing Users→All Users.
If your site is on WordPress.com, the list includes all the administrators, editors, authors, and contributors registered on your site (it doesn’t include followers). To remove someone, point to the person’s user name and then click Remove. That person’s WordPress.com account remains intact, but she no longer has privileges on your site. If you remove a person who’s published posts on your site, the posts will remain (although you can delete them by going to the Posts→All Posts list).
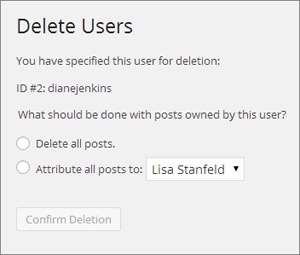
If you run a self-hosted site, the user list includes everyone who can publish on your site. Unlike a WordPress.com site, you don’t merely remove authors, you delete them by clicking the Delete link. Deleting someone’s account is a fairly drastic step, because it completely wipes the traces of that person off your site. WordPress will ask you what to do with any posts that belong to the newly deleted author (Figure 11-19). You can either delete her posts or assign them to another person.
If you don’t want to take such a drastic step, you can demote a user, so that he remains on your site but has fewer privileges. For example, you could change a contributor to an ordinary subscriber. That way, his existing posts will remain on your site, but he won’t be able to create any new ones. And if, sometime in the future, you decide to reenlist this person’s help, you can simply change his status from subscriber back to contributor.
To change a role, find the person in the user list and click Edit. Then pick a new role from the Role list and click Update User.
Building a Private Community
So far, you’ve used WordPress’s user registration features to open up your site to new contributors. Ironically, those same features are also an effective way to close the door to strangers. For example, you can prevent unregistered guests from reading certain posts, or even stop them from seeing any content at all.
Before you build a private site, however, make sure you have enough interested members. Transforming an ordinary site into a members-only hideout is a sure way to scare off 99.9 percent of your visitors. However, a private site makes sense if you already have a locked-in group of members. Your site might be the online home for a group of related people in the real world—for example, a team of researchers planning a new product, or a local self-help group for cancer survivors. But if you hope that people will stumble across your site and ask to sign up, you’re in for some long and lonely nights.
Note
The goals of a private site are very different from the goals of the average public site. A public site aims to attract new faces, gain buzz, and grow ever more popular. A private site is less ambitious—it allows certain types of discussions or collaboration in a quiet space.
Hiding and Locking Posts
You don’t need to make your site entirely private; WordPress gives you two ways to protect individual posts, so the wrong people can’t read them.
The first technique is password protection. The idea is simple—when you create a post, you pick a password that potential readers need to know. When someone tries to read the post, WordPress refuses to display it until the reader supplies the right password (Figure 11-20).
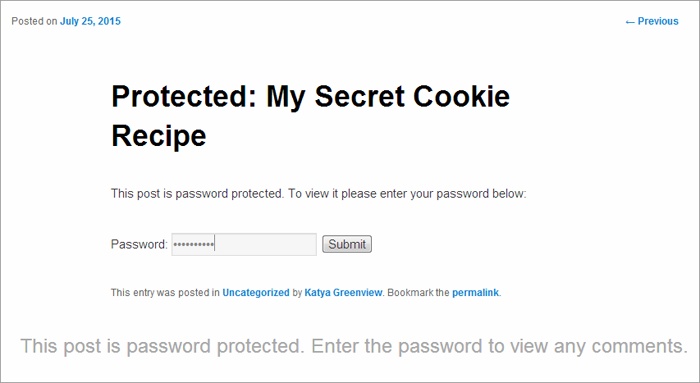
The nice part about password protection is that it’s straightforward: You either know the password or you don’t, and the password is all you need—protected posts don’t require that a reader be registered with the site. Of course, administrators and editors can edit any post, so password protection doesn’t affect them.
Note
Use password-protected posts sparingly. If your site includes a mix of public and password-protected posts, frustrated readers are likely to give up on you altogether. Password-protected posts make sense if your site isn’t really on the Web, but hosted on an organization’s internal network (a.k.a. an intranet).
WordPress’s second post-protection technique is private posts, which are hidden from everyone except logged-in administrators and editors. When other people visit the site, WordPress scrubs every trace of your private posts. They won’t appear in the post list, show up in searches, or appear when you browse by category, tag, date, or author.
To see your options, click the Edit link next to a post’s Visibility setting (see Figure 11-21).
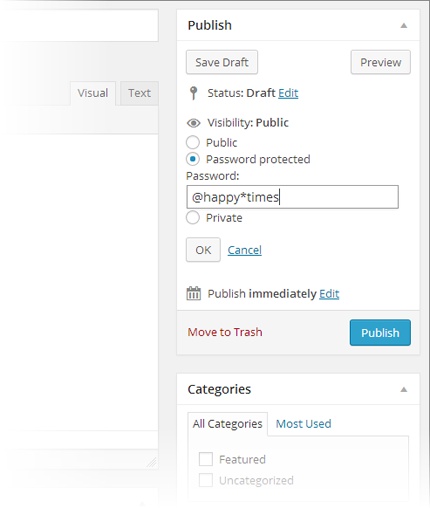
You can also add a password to a private post or make it private using the familiar Publish box, which appears in the Add New Post and the Edit Post pages.
Creating a Private Site
A completely private site is one that forces visitors to log in to view anything. If they don’t sign in, they can’t read a single post or page.
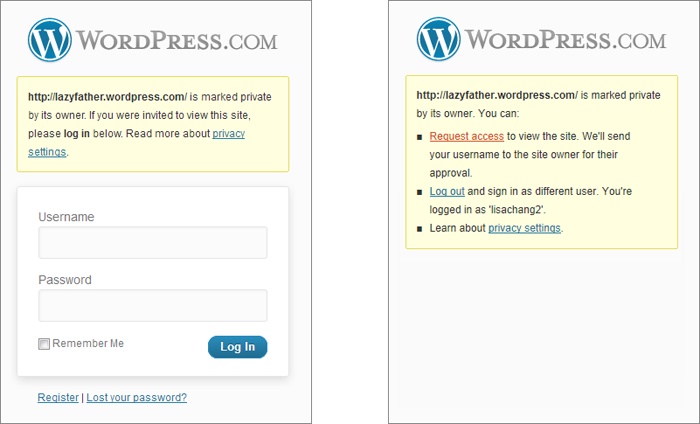
You can turn a WordPress.com site into a private site by flipping a single setting. Choose Settings→Privacy, turn on the “I would like my site to be private, visible only to users I choose” checkbox, and then click Save Changes. Now visitors will encounter the WordPress login page, no matter what they try to read (Figure 11-22).
Oddly enough, self-hosted sites lack the private site feature that WordPress.com offers. However, several simple plug-ins can fill the gap. One is Page Restrict (http://tinyurl.com/page-restrict), which lets you prevent people from accessing specific pages—or your entire site—until they log in. Page Restrict also lets you pick a suitable message that explains the issue to anonymous visitors, such as “This content is private. To view it, you must log in.”
Letting People Register Themselves on a Self-Hosted Site
If WordPress hosts your site, WordPress.com is in charge of registering your users. But if you run a self-hosted site, you’re in control, and that gives you a unique ability. If you’re feeling a bit daring, you can open the floodgates to your site and let your readers register themselves.
This strategy might seem a bit dangerous—and if you don’t think it through, it is. Giving random web visitors extra powers on your site is an extreme step for even the most trusting person. However, there are several scenarios where self-registration makes a lot of sense. Here are the most common:
You’re creating a private blog and you want to prohibit anonymous contributors, but you don’t want to make your restrictions onerous—you simply want to deter spammers and other riffraff. Often, the process of signing up is enough to keep out these troublemakers. And if you let readers sign themselves up, you save yourself the task of doing so, and save visitors the need to wait for your approval.
You’re creating a site that welcomes community contributors. You’re ready to let anyone sign up as a contributor, but you want to approve their content before it gets published (The Post Approval Process for Contributors). Be aware, however, that this is no small task—reviewing other people’s content and sniffing out spam makes comment moderation seem like a day at the spa.
You’ve restricted comments to people who have registered and logged in to the site (Facebook and Twitter Comments), but you’re willing to let people comment if they go through the trouble of creating an account. Sometimes, site owners take this step to lock out spammers, and typically it works well, although it also drives away legitimate commenters who can’t be bothered signing up. In most cases, it’s better to allow Facebook and Twitter authentication (Facebook and Twitter Comments), and to use Akismet to fight spam (Understanding Akismet).
Your WordPress site isn’t really on the Web; it’s on the internal network of a business or organization. Thus, you can assume that the people who reach your site are relatively trustworthy. (Of course, you still shouldn’t grant them any privileges more powerful than a contributor account without your personal review.)
Flipping on the self-registration feature takes just a few seconds. In the dashboard, choose Settings→General. Add a checkmark next to “Anyone can register,” choose a role in the New User Default Role box below, and then click Save Changes.
Warning
You should set the role for new users to subscriber or contributor—subscriber to welcome new readers to a private blog, and contributor to let potential authors sign themselves up. Never allow new people to sign themselves up as authors or editors, unless you want spammers to paste their ads all over your site.
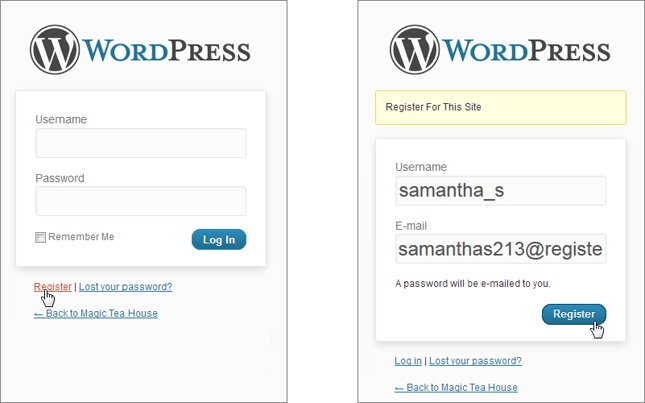
When you turn on self-registration, WordPress adds an extra link to the login page (Figure 11-23).
If you allow self-registration on a public website, you’ll eventually have spammers creating accounts. Usually, the offender is an automated computer program called a spambot. It searches the Web for WordPress sites and attempts to sign up on every one it finds, in the hope that the site will grant the spambot author or editor permissions. If a site is unwise enough to do so, the spambot immediately gets to work spewing spam into new posts. As long as you limit new users to the role of contributor or (powerless) subscriber, the spambot won’t be able to do anything.
(To make sure your site is clean, periodically review your user list and delete bad accounts.)
Creating a Network of Sites
So far, you’ve learned how to transform your site from a lonely one-man-band to a collaborative workspace full of authors, editors, and contributors. This transformation keeps you in control of your site but allows new recruits so you can expand your content, extend your reach, and attract new visitors.
Now you’ll take a step in a different direction. Instead of looking at adding multiple people to a crowded site, you’ll see how to create multiple WordPress sites that coexist on the same web server. Think of it as a way to empower your users to do even more. Now, each author gets a separate site, complete with its own web address, dashboard, theme, and reverse-chronological list of posts. Your web server hosts all these sites alongside your own, much like children living in their parent’s home.
For example, say you create a WordPress multisite network at http://EvilCompanyOfDoom.com. An employee named Gareth Keenan might create a site at http://EvilCompanyOfDoom.com/garethkeenan. Similarly, another employee might add a site at http://EvilCompanyOfDoom.com/dawntinsley. Of course, you don’t need to create sites based on individual people—you can just as easily create sites that represent departments, teams, clubs, or any other group of people who need to blog together.
Note
The multisite feature works well if you have a community of people who need to work independently, keep their content separate from everyone else’s, and have complete control over the way their content is organized and presented. For example, the Canton School site might use the multisite feature to give each teacher her own site. Teachers could then use their sites to post assignments and answer student questions. The multisite feature isn’t very useful if you want people to team up on the same project, share ideas, or blog together—in all these cases, a single site with multiple users makes more sense.
The multisite feature is particularly convenient when it comes to administration. When you build a network of sites, you become its network administrator—a special sort of administrator with sweeping powers over all the sites in the network. Using these powers, you can choose what themes your users can install and what plug-ins they use. And when a new version of WordPress comes out, you can update all the sites in a single step.
Before going any further, be aware of one thing: Building a network of sites is significantly more complex than adding people to an existing one. Expect to spend more time feeling your way around and relearning how to configure sites and users. Furthermore, be careful with the plug-ins you use, because some won’t work in a multisite network.
By the end of this chapter, you’ll know how to set up a network of sites, add sites, and perform the basic configuration that holds it all together. However, there are significant aspects of the multisite feature that are outside the scope of this book, like using it with subdomains (see the following Note).
Note
There are two ways to create addresses for the sites in a network. You can give each site its own subfolder (as in http://OrilliaBaseballTeams.com/madcats), or you can give each site its own subdomain (as in http://madcats.OrilliaBaseballTeams.com). The latter is the way WordPress.com works. It’s slightly more complicated, because it requires some additional settings on your web host. In this chapter, you’ll stick to the subfolder approach.
Creating a New Multisite Network from Scratch
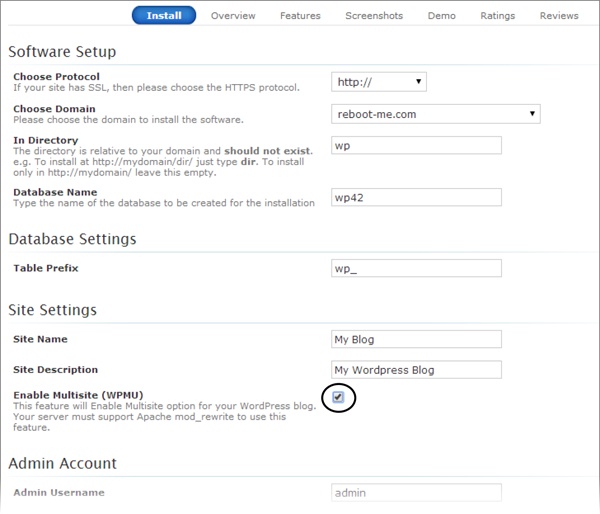
The easiest way to create a multisite network is to create a new WordPress site from scratch, using an autoinstaller that supports the multisite feature. For example, if you use Softaculous, the installation process is almost exactly the same as the one you used in Chapter 3 (Installing WordPress with an Autoinstaller). The difference is that somewhere in your autoinstaller, you need to find a setting named something like “Enable Multisite” and switch it on (Figure 11-24).
Once you install your site, you can go straight to the dashboard and look around. Skip ahead to the section Your Multisite Network: A First Look on the following page.
If you don’t have an autoinstaller that supports the multisite feature, you’ll need to install a normal WordPress site first and then go through the somewhat awkward conversion process outlined in the next section.
Converting an Existing Site to a Multisite Network
Converting an existing WordPress site into a multisite network is trickier than creating a new network from scratch. If you use subfolders (rather than subdomains) in your network, the conversion process will break any links within posts (see the Note near the bottom of this page to learn why). For that reason, it’s best to convert a newly created WordPress site, rather than one you’ve been using (and that other people have been reading) for some time.
But if you know how to use an FTP program and you’re undaunted by the challenge, it is possible to transition from an ordinary site to a multisite network. WordPress has the full and rather technical step-by-step instructions at http://tinyurl.com/2835suo. The process involves modifying two files in your site—wp-config.php and .htaccess—and changing a few related settings in the dashboard. But because you can’t directly edit the files on your site, you need to download them to your computer (that’s where the FTP program comes in), make your changes in a text editor, and then upload the new, modified files. If you’ve never fiddled with a WordPress installation before, it’s a bit tedious.
Your Multisite Network: A First Look
When you create a multisite network, WordPress starts you out with a single home site in the root of the installation folder. For example, if you install a multisite network at http://prosetech.com, the first site is at http://prosetech.com. This is exactly the same as when you create a standalone site. When you create additional sites, however, WordPress places them in subfolders. So if you add a site named teamseven, WordPress creates it at http://prosetech.com/teamseven. (You might think that it makes more sense to write TeamSeven rather than teamseven, but to WordPress it’s all the same. No matter what capitalization you use, WordPress shows the site name in lowercase letters when you manage it in the dashboard.)
Note
If you’re using subfolders (not subdomains) to arrange your multisite network, you’ll find one quirk in WordPress’s naming system. When you view a post or page on your home site, WordPress adds /blog to the address. For example, WordPress puts a post that would ordinarily be found at http://prosetech.com/2014/06/peanut-butter-prices-spike at http://prosetech.com/blog/2014/06/peanut-butter-prices-spike. This slightly awkward system makes sure that WordPress can’t confuse your home site blog with another site in the network, because it doesn’t allow any other site to use the name blog.
When you finish creating your multisite network, you find yourself at the dashboard of your home site. But if you attempt to augment your site’s features, you’ll find a new restriction. Even though you can activate an existing plug-in or theme, WordPress won’t let you install new ones. On a fresh WordPress install, you’ll probably get just a single theme (Twenty Fourteen) and two basic plug-ins (the essential Akismet spam-catcher, and the pointless Hello Dolly example).
If you haven’t already guessed, your home site has these new and slightly unwelcome limitations because it’s now part of your multisite network. These rules can be frustrating, but they have sound logic behind them. First, the theme limitations guarantee that your sites share a consistent look. Second, the theme and plug-in restrictions act as safeguards that prevent inexperienced users from uploading spam-filled extensions, which could compromise your entire network.
That said, you’ll probably want to tweak these restrictions to make them better suit your site. For example, you may want the sites on your network to use a different standard theme, or you may want to allow site creators to choose from a small group of approved themes. You might also have trusted plug-ins that you want to run on everyone’s site. You’ll learn how to make these changes shortly. But first, you need to understand how to add new sites to your network.
Adding a Site to Your Network
To add a site, you need to enter network administration mode. This is a step that only you, the network administrator, can take. Other administrators on your network will be able to manage their own sites, but they won’t be able to change the network settings—or even look at them.
Note
In WordPress parlance, a network administrator (also known as a super admin) is the person who manages a multisite network and has full power over all the sites inside. A site administrator oversees a single site—the site you create for him.
To start managing the network, point to the My Sites menu, which sits to the right of the navigation bar (that’s the black bar that stretches across the top of the page). Then click Network Admin (Figure 11-25).
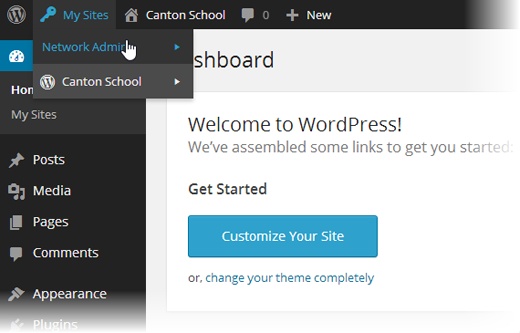
In network administration mode, the dashboard changes. Because you’re no longer managing a specific site, the Posts, Pages, Comments, Links, and Media menus all disappear. In their place is a smaller set of commands for managing sites, users, themes, plug-ins, network settings, and updates.
Tip
You can go straight to the network administration page by adding /wp-admin/network to the end of your home site address, as in http://prosetech.com/wp-admin/network.
Once in network administration mode, you can create a new site:
Choose Sites→Add New from the dashboard.
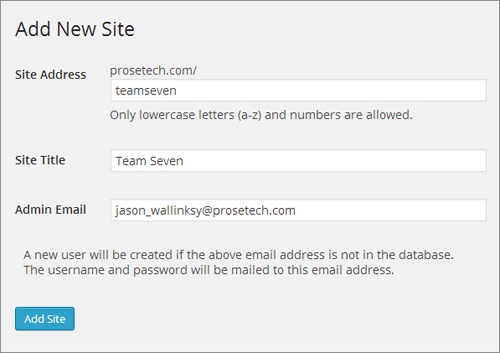
The Add New Site page opens (Figure 11-26).
Figure 11-26. WordPress knows that a network administrator may need to create dozens of sites. To keep your life simple, it asks for just three pieces of information: the site address, the site title, and the email address of the person who will become the site’s administrator. Here, WordPress will create the new site at http://prosetech.com/teamseven.Type the site’s folder name in the Site Address box.
WordPress adds the folder name to the address of your multisite network. For example, if you use the folder name drjanespears and your multisite network is at http://StMarciMarguerettaDoctors.org, the new site has the address http://StMarciMarguerettaDoctors.org/drjanespears.
Give the site a title.
The site administrator can change this later.
Supply the email address of the person who will own the site.
That person will become the site’s administrator.
Adding people to a multiuser network is different from adding people to a standalone site in one important respect: You don’t need to pick the password for new users. WordPress knows you’re busy, and it generates a random password and emails it to the new administrator.
Click Add Site.
WordPress creates the site and adds two links to the top of the Add New Site page: Visit Dashboard (which takes you to the new site’s dashboard) and Edit Site (which lets you change the site’s settings). The dashboard is in its familiar place—just add /wp-admin to the end of the site address to go straight to its front door.
Ideally, you won’t need to visit the new site’s dashboard, because the newly christened administrator will take it from there.
Understanding How Users Work in a Multisite Network
You can create as many sites as you want in a multisite network. In each site, you can add as many users as you need.
Sometimes, the same person needs to work on more than one site. For example, one person might need to contribute to different blogs maintained by different people. Or an administrator who manages one site in a network might also want to contribute to another.
To understand how to deal with this, you need to realize that a multisite network maintains a master list of all the users who belong to any site in the network. Each of those people has subscriber privileges on every site. (As you learned on Adding People to Your Site, subscribers are the lowest class of WordPress user—they can’t do anything more than read posts and write comments.)

In addition, you can give people special privileges for specific sites. For example, you might make someone an administrator on one blog and an author on another. In this case, there’s still just one record for that user, but now it’s registered with two different sets of capabilities on two different sites.
Note
Happily, WordPress makes people log in only once. When visitors move from one site to another in the same network, WordPress remembers who they are and determines what privileges they should have on each site.
If you choose Users→Add New on the network administration dashboard, you can add people to the master list (Figure 11-28, top). But WordPress won’t give new users any special privileges for any site.
Life is different for ordinary site administrators. Consider what happens if an administrator named Suzy logs into her dashboard. When she chooses Users→Add New, she’s not given the option to create an account for someone else. Instead, she can invite an existing user to take on a more powerful role on her site (Figure 11-28, bottom).
One potential problem with the user registration system is that it can create a lot of extra work. For example, if a site administrator needs to add someone new, he needs to ask you, the network administrator, to create the account first. To circumvent this restriction, go to Settings→Network Settings, choose “Allow site administrators to add new users to their site,” and then click Save Changes. Now site administrators can add new people to the master list.
Another problem occurs if one person contributes to several sites. In that case, someone needs to visit each dashboard and invite the user separately to each site. If you’re not the sort of person who likes to spend all weekend tweaking WordPress settings, you may want to enlist the help of a plug-in like Multisite User Management (http://tinyurl.com/multisite-um). It lets you set a default role for each site in a multisite network. Then, when you create a new user, she’s automatically registered on each site with the default role you chose.
Rolling Out Updates
One advantage of a multisite network is that it streamlines certain management tasks. For example, you can update WordPress on all the sites in your network in a single operation from the network administration page.
To get started, choose Updates→Available Updates from the network administration dashboard. You’ll see, at a glance, what themes, plug-ins, and WordPress system updates are available. If you’re not up to date, start by installing your updates on this page.
When you update themes or plug-ins, the changes take effect on all the sites in your network immediately. That’s because a multisite network stores only a single copy of each theme and each plug-in.
When you install a new version of WordPress, you need to take one more step. Choose Updates→Update Network, and then click the Update Network button to upgrade all your sites at once.
Adding Themes and Plug-Ins
In an ordinary WordPress website, the site administrator controls the themes and plug-ins the site uses. But in a multisite network, this approach would be too risky, because a single malicious plug-in could steal sensitive data from any site in the network, or wipe out the database of your entire network.
Instead, multisite networks use a more disciplined system. You, the network administrator, can pick the themes and plug-ins you want to allow. Site administrators can then choose from the options you set.
A typical multisite installation begins with a few standard themes (such as Twenty Twelve, Twenty Thirteen, and Twenty Fourteen), but only one of them is network enabled (Twenty Fourteen). That means Twenty Fourteen is the only theme the sites in your network can use. In fact, site administrators can’t see the other themes at all.
To add a new theme and make it accessible to the sites in your network, follow these steps:
Choose Themes→Add New, and search for the themes you want.
If you need a refresher, Visiting the Theme Gallery has the full story on theme searches.
To activate a standard year theme already on your network (but not enabled), such as Twenty Thirteen, jump straight to step 3.
When you find a suitable theme, click Install Now.
This downloads the theme to your multisite network but doesn’t actually make it available to any sites.
Click Network Enable.
The Network Enable link takes the place of the Activate link you see when you install a theme on an ordinary, standalone WordPress website. You can click Network Enable immediately after you install a theme, or you can view all your themes (Figure 11-29) and then click Network Enable next to the ones you want.
Figure 11-29. When you click Network Enable below a theme title, WordPress makes that theme available to all the sites in your network.You can also enable a theme for some sites but not others, although it’s awkward. First, make sure your theme isn’t network-activated. Then choose Sites→All Sites and click the Edit link under the site where you want to apply the theme. When the Edit Site page appears, click the Themes tab. In the list of disabled themes, click Enable next to the ones you want to add.
The process for installing plug-ins is similar but subtly different. First, choose Plugins→Add New and then search for the plug-in you want. When you find it, click Install Now. Now you have a choice:
Make the plug-in optional (don’t do anything). Once you install a plug-in, WordPress makes it available to every site administrator in your network. Each administrator can log in, visit the Plugins section of the dashboard, and choose what plug-ins to activate.
Activate the plug-in for every site. To do this, click the Network Activate link. When you network activate a plug-in, that plug-in automatically runs on every site in your network. However, site administrators won’t see the plug-in the Plugins section of the dashboard, and they won’t be able to deactivate it. That’s your job (click Network Deactivate to switch off a network activated plug-in).

Not all plug-ins work properly when network-activated, so it’s worth contacting the plug-in maker to ask, or testing a new plug-in the first time you network activate it.