Chapter 2. Signing Up with WordPress.com
In Chapter 1, you took a big-picture look at WordPress and the sites it can build. Now you’re ready to partner with WordPress and start building your own web masterpiece.
But not so fast. Before you can create even a single WordPress-powered page, you need to decide where to put it, and, as you found out in Chapter 1, WordPress gives you two perfectly good choices:
The WordPress.com hosting service. This is a wonderfully free and supremely convenient service for web authors who want to build an ordinary blog and can live with a few limitations.
Self-hosting. This option requires you to set up WordPress on your own web host, which is a little bit more work (but still not much hassle). Self-hosted sites are more powerful and flexible than WordPress.com-hosted sites—they let you show ads, use plug-ins, and create completely customized pages that go far beyond ordinary blogs.
In this chapter, you’ll get started with the first choice: using WordPress.com. But if you’d prefer to give self-hosting a whirl, skip this chapter and jump straight to Chapter 3. No matter which route you take, the paths converge in Chapter 4, where you’ll begin adding content, refining your site, and developing the skills of a true WordPress wizard.
Tip
If you’re still divided between the convenience of WordPress.com and the flexibility of a self-hosted site, you can review the key differences on WordPress.com Sites vs. Self-Hosted Sites. Or you can leave both doors open: Start with a WordPress.com website and buy a domain name (your own custom web address), as described in this chapter. That way, you can switch to a self-hosted site in the future if you outgrow WordPress.com.
Choosing a Web Address
As you already know, a web address is a short bit of text, like www.SuperStyleFreak.com, that someone types into a browser to get to your site.
The most essential part of a web address is the domain name (often shortened to just domain), which points to the web server where your website exists. For example, consider the website address http://WineSnobs.com/exotic-cocktails. The first part of the address, http://, indicates that the URL points to a location on the Internet, which uses a networking technology called HTTP. The second part of the address, WineSnobs.com, is the domain name. And the last part, /exotic-cocktails, points to a specific page on the WineSnobs.com domain. Clearly, the domain is the most important part of the equation, because it identifies the central hub for all your pages.
Before you sign up with WordPress.com, you need to give some serious thought to the domain name you want to use. That’s because WordPress.com gives you a choice: You can buy your own domain name, or you can use a WordPress.com freebie.
Here’s the catch: If you get a free domain name from WordPress.com, it will have .wordpress.com appended to the end of it. That means you’ll end up with an address like WineSnobs.wordpress.com. But if you pay WordPress.com a small yearly fee of about $18, you can buy a custom domain name that doesn’t have this limitation—say, WineSnobs.com. And while there’s nothing wrong with a web address that ends in .wordpress.com, a custom domain name can be beneficial for several reasons:
Names matter. A catchy web address is easier for visitors to remember, and a clever name can attract more visitors to your site. If you’re willing to buy a custom domain name, you’ll have more naming choices, and your web address will probably be shorter and snappier.
You may not want to advertise WordPress. In some circles, using WordPress is a badge of honor. But in other fields, it could make your site seem less professional. For example, victoriassecret.wordpress.com doesn’t leave quite the same impression as the real site address.
Custom domain names are more portable. This is usually the most important consideration. If you go with a free name and decide later to move your WordPress site to a different host, you’ll need to change your domain name. (For example, you might go from WineSnobs.wordpress.com to www.WineSnobs.com, assuming www.WineSnobs.com is even available when you make the move.) Changing your domain name risks severing the relationships you built up through your original .wordpress.com address. It also breaks any links on other sites that point to your site, and it confuses the visitors who have bookmarked your old site. And if all that’s not bad enough, you’ll lose the hard-earned Google search ranking that helps your site show up in web searches, too.
When you’re just starting out, it’s easy to underestimate the likelihood of migrating to a custom web host and the headache of changing your domain name. But life happens, people change, and many die-hard WordPress.com bloggers eventually move to a do-it-yourself web host so they have more flexibility in what they can do on their site. For all these reasons, we strongly suggest that you buy a custom domain name for your WordPress.com blog at the outset. If you do, you’ll be able to keep your domain name forever, even if you switch to a different web host. You’ll simply need to transfer your domain to your new host (as explained in Appendix A).
Note
Keep in mind that using a custom domain name or a domain name that you own doesn’t avoid any of the other limitations that hosting with WordPress.com imposes (see WordPress.com Sites vs. Self-Hosted Sites). For example, you still won’t be allowed to place ads on your site or to use plug-ins.
Before you continue, take a moment to determine your domain name strategy. If you’re a technophobic sort and you positively, absolutely don’t plan to move to a self-hosted site—ever—you can choose a good .wordpress.com address and forget about the rest. However, paying a little extra for a custom domain name is almost always worth the trouble. Think of it as a bit of added insurance for whatever the future might hold.
Assuming you do want a custom domain name for your WordPress site, you can get one in two ways. The most common method is to buy your domain name when you sign up with WordPress.com, as you’ll learn to do in the next section. At the time of this writing, WordPress.com charges $18 per year for most custom domains but increases the price for some specialty domains (for example, .me and .co domains cost $25 per year).
Another option is to use a domain name that you’ve already bought from a domain registrar. For example, you might have registered a domain name in the past, just to make sure no one else got hold of it. Or you might have bought a domain when you signed up to host your site with another company. For instance, if you bought the domain SuperStyleFreak.com a few months back, you can ask WordPress.com to use this web address when you create your blog. If you opt for this arrangement, you need to pay your original web host to maintain the domain registration (which typically costs about $10 a year) and you need to pay WordPress.com to use the domain (currently $13 per year). You also need to perform a bit of extra setup after you sign up with WordPress.com. The whole process is described on Using a Domain Name You Already Own.
Creating Your WordPress.com Account
Once you’ve got a basic idea about the identity of your blog and you’ve picked some potential names for the website address, you’re ready to create your site. The following steps take you through the process:
In your browser, travel to http://wordpress.com, and click the “Sign up now” link. (Or, for a shortcut, head straight to the sign-up page at http://wordpress.com/signup.)
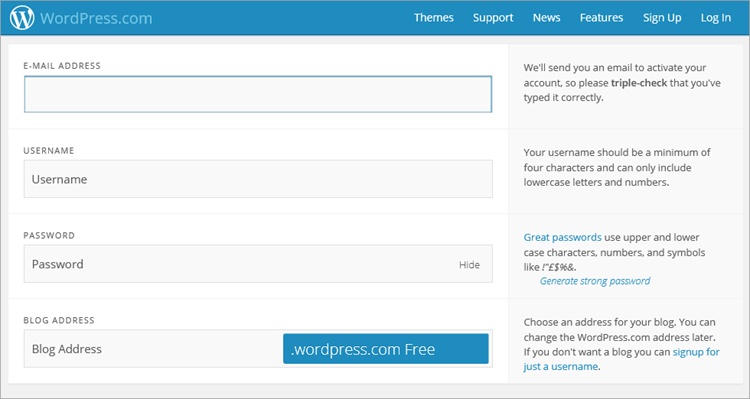
The all-in-one sign-up form appears (Figure 2-1).
Fill in your email address.
WordPress uses your email address to send its activation message when you finish signing up. If you don’t enter a valid email address, you won’t be able to activate your account and start blogging.
Choose a user name.
You use your user name and password to log into WordPress when you want to add new posts or manage your site. Sometimes, WordPressers use part of their blog name for the user name (for example, if your blog address is lazyfather.wordpress.com, your user name might be lazyfather).
WordPress has some rules about user names. You need at least four characters, which can use a combination of numbers and lowercase letters only. If someone already has the user name you want, a brief message appears under the user name box stating, “Sorry, that user name already exists!” It’s up to you to pick something unique before you continue.
Note
Not only does your user name become part of the login process, it’s also the name WordPress uses as your display name, which is the name that appears at the end of your blog posts and in the comments you leave (among other places). However, you can easily change your display name to something more suitable, as described on Adding New People to a Self-Hosted Site.
Choose a password.
Take the time to pick a password that’s different from the passwords you use on other sites, not found in the dictionary, and difficult to guess. If you’re not sure how to do that—or why you should bother—check out the box below.
Type the website address you want into the Blog Address box.
If you want to use a free .wordpress.com domain, type in the first part of the name (for example, “RebelPastryChef” for the domain RebelPastryChef.wordpress.com). Your address needs to have at least four characters.
If you want to buy a custom domain, which gives you the flexibility to move to a self-hosted site later, click the drop-down arrow to the right side of the Blog Address box. Then pick the top-level domain—that’s the final part of your domain name after the period, such as .me, .com, .net, or .org. Once you do that, type in the first part of the domain name, like “RebelPastryChef” to get the domain name RebelPastryChef.me. (As you probably already know, capitalization is unimportant in a domain name, so there’s no difference between RebelPastryChef.me and REBELpastrychef.ME, for instance.)
As explained earlier, if you already own a custom domain name, you can use that for your new WordPress blog. To make this work, you need to go through a process called mapping. The first step is to pick an ordinary .wordpress.com website address. You then associate this to your custom domain name after you finish the sign-up process, by visiting the WordPress.com store and following the steps on Using a Domain Name You Already Own. In this situation, the .wordpress.com website address that you pick isn’t terribly important, but you may as well try to get one that’s similar to your domain name.
Note
For almost all websites, the www prefix is an acceptable but optional part of the domain name. In other words, RebelPastryChef.me and www.RebelPastryChef.me are equivalent. Some people think that it’s simpler, cleaner, and more modern to leave out the extra letters at the beginning, and WordPress.com agrees. As a result, if you register a domain through WordPress.com, the www prefix never appears. If you insist on typing the www part into a browser, you’ll get to the right site, but WordPress will strip the prefix out of the browser’s address bar (changing www.RebelPastryChef.me to RebelPastryChef.me, for example).
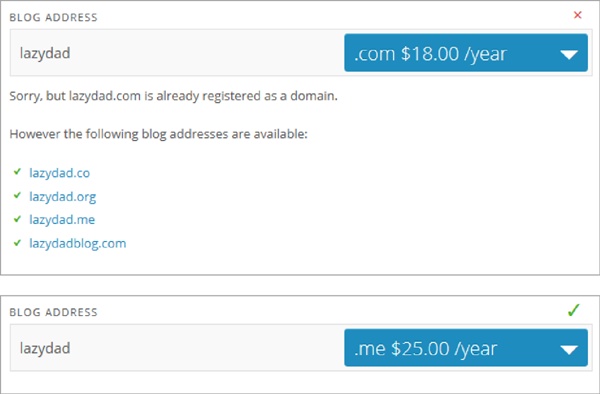
Wait while WordPress checks to see if your domain name is available.
A few seconds later, it reports the answer (Figure 2-2). If your first choice isn’t free, try a variation or change the top-level domain using the drop-down list on the right. Finding a good domain name requires equal parts effort, creativity, and compromise.
Figure 2-2. Top: Money can’t buy you lazydad.com; it’s already in someone else’s hands. Below the gentle rejection, WordPress suggests some names that aren’t taken, like lazy-father.com (with a hyphen). Bottom: Change the top-level domain to .me, and you get happier news: your site can still grab the domain lazydad.me.Scroll down to the table at the bottom of the page, which describes the different types of WordPress.com accounts (Figure 2-3).
WordPress.com gives you the choice of three account types:
WordPress.com Beginner. This gets you a free WordPress.com blog, with all the essential features. If you’re not sure which account to choose, this one is the best starting point. If you still need a bit more, you can buy individual upgrades (like the highly recommended Custom Domain upgrade, for a reasonable $18 a year).
WordPress.com Premium. Formerly called the WordPress Value Bundle, this option includes the same world-class free blogging engine as the WordPress.com Beginner account and a handful of small upgrades. While several of these enhancements are worthwhile, the overall package doesn’t quite justify its $99 price tag for most people (see the box on Premium and Business Accounts for a more detailed analysis).
WordPress.com Business. This choice has the same features as a WordPress.com Premium account, with a few more frills thrown into the mix, like the ability to get live chat technical support. Unfortunately, you’ll pay for these modest improvements with a hefty $299 a year fee.
Note
Businesses don’t need a Business account. WordPress.com has the same rules for all account types, and these rules let you describe and promote your business on your blog. However, if you’re trying to make money by showing ads, you’ll run afoul of the WordPress.com rules no matter which account type you choose.
Click the Create Blog button. Or if you’re buying one of the two enhanced types of WordPress.com accounts, click the corresponding Upgrade button instead.
Tip
WordPress is flexible. You can start with a WordPress.com Beginner account and upgrade to an enhanced account later (for the same price as WordPress offers at signup). Or, you can buy a WordPress.com Beginner account and add just the individual services you need, whenever you need them. You make these purchases in the WordPress.com store, as outlined on Visiting the WordPress.com Store.
The initial stage of your account setup is complete. What WordPress does next depends on whether you chose to buy a domain name.
If you chose a free .wordpress.com domain in step 5, WordPress invites you to do a bit of blog customization (Figure 2-4).
To help you get a jump-start on your blog, WordPress leads you through a series of pages that request more information. Although this step is optional, you can save time later by supplying three key details now: the title you want to use for your blog, a descriptive tagline that will be displayed just under your title, and a theme that will set the visual style of your entire site.
Figure 2-4. The more information you provide now, the less customization you’ll need to do later. As you step through this series of pages, WordPress collects the title and tagline for your blog (shown here), lets you pick the theme you want, and invites you to spread the word on Facebook and Twitter.Tip
The best starting theme for learning WordPress is the clean and streamlined Twenty Twelve theme. It starts simple and has room for plenty of customization. It’s also the theme you see in the first examples of this book. (Don’t be put off by the out-of-date sounding name, which simply reflects when WordPress first released the theme. Twenty Twelve remains a popular classic to this day.)
If you picked a custom domain name (in step 5), WordPress ends the sign-up process by presenting you with a domain registration form (Figure 2-5). Fill in your contact details and click Register Domain.
This registration information includes your name, postal address, and email address. WordPress submits this information, on your behalf, to the Domain Name System (DNS)—a key part of Internet bookkeeping that tracks who owns each piece of web real estate.
Figure 2-5. Here’s the information you need to register lazyfather.net. Use the checkbox at the bottom of the screen to keep this information hidden from spammers’ prying eyes, a good use of the $8 it costs.Domain name registration is public, which means that anyone with an Internet connection can look up your domain and find out that you own it. (Interested parties also get your phone number and email address.) Usually, this isn’t a problem, but it does provide an opening for spammers to hassle you. If you don’t want your public details exposed, don’t try to fake them with incorrect information. Instead, tick the box that says “Make my personal information private for this registration.” It costs an extra $8, but it gives you guaranteed anonymity—at least until you start posting.
Finally, WordPress asks you to pay up. Fill out your payment information and click the “Purchase and Register Domain” button. WordPress will email you a receipt.
Tip
WordPress doesn’t provide an email service. So if you buy the domain lazyfather.net, you can’t get email at joe@lazyfather.net. However, WordPress does let you forward email from your custom domain to another email address. For example, it can automatically redirect mail sent to the custom domain joe@lazyfather.net to a personal account like joe_symes23@gmail.com. If you want to use WordPress.com’s redirection service, you can find instructions at http://support.wordpress.com/email-forwarding.
Check your email for an activation message from WordPress. The message includes a button named Confirm Email Address or Log In. Click the button to activate your site.
Clicking the button launches your web browser and sends you to http://wordpress.com, the central administration station for all the blogs you create with WordPress.com. You’ll learn your way around in the next section.


Managing Your New Site
Once you complete the sign-up process and activate your account, you’re ready to do just about everything else.
The easiest starting point is the http://wordpress.com home page, where you can read other people’s blogs and manage your own. Once you get there, type in the user name and password you picked when you signed up, and then click Sign In. You’ll find yourself in WordPress.com’s central hub (Figure 2-6).

Initially, WordPress starts you at the Reader page, where you can keep track of your favorite blogs and hunt for new ones (Exploring the WordPress.com Community). But the best jumping-off point for a newly minted WordPress.com administrator like yourself is the My Blogs page. There, you’ll see a list of all the blogs you’ve created so far, which at this point is just one (Figure 2-7). Next to each blog are a set of handy management links, as well as a shortcut for adding a new post to your blog.
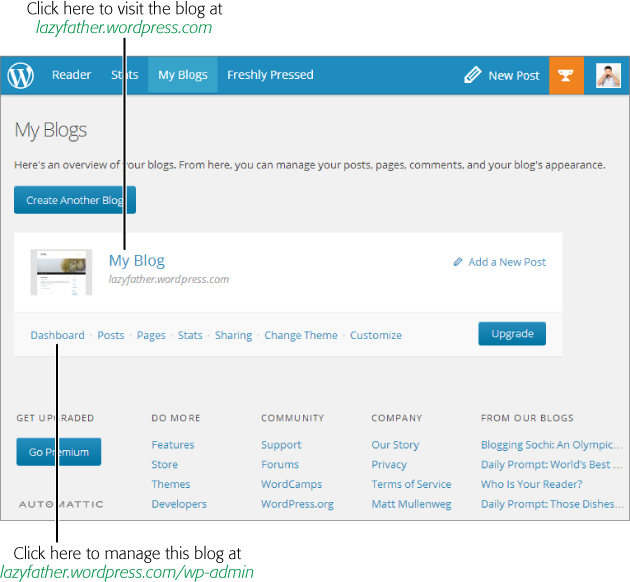
To visit your newly created WordPress.com blog, click its name on the My Blogs page. WordPress opens a new browser tab to show you the current state of your mostly blank site (Figure 2-8).
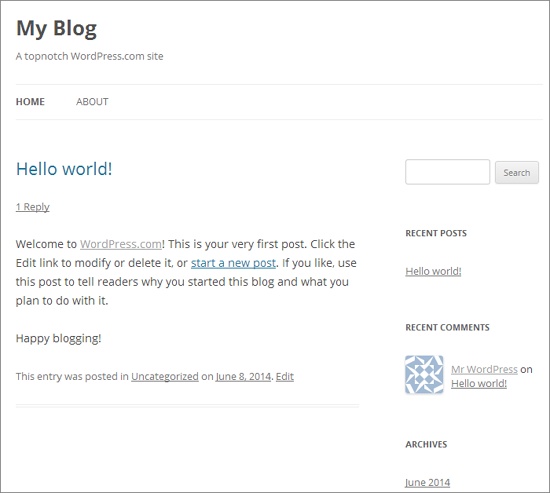
When you visit your site, take a moment to review the URL that appears in the browser’s address box. If you chose to go with a free .wordpress.com domain (like lazyfather.wordpress.com), this is the address you’ll see there. If you purchased a custom domain, your new domain won’t be working just yet, but WordPress.com will assign you a similar temporary .wordpress.com domain. For example, if you bought mysticalpeanuts.net, WordPress.com will start your site out at mysticalpeanuts.wordpress.com (or, if that’s not available, it adds the top-level domain into the name to come up with a slightly more awkward version of the address, like mysticalpeanutsdotcom.wordpress.com).
Most of the work you’ll perform with your WordPress site takes place at the dashboard, an administrative web interface that you can use to add posts, configure styles and settings, and much more (see Figure 2-9). To get there, click the Dashboard link that appears under your site on the My Blogs page. Incidentally, almost all the other links there also take you to the dashboard; they simply navigate to a specific section of it. For example, if you click Posts you’ll wind up at the Posts section of the dashboard, which you’ll study in detail in Chapter 4. The only exception is the Stats link, which shows you the visitor traffic and other statistics for your WordPress.com sites (just as if you clicked the Stats link at the top of the page, just between Reader and My Blogs).
Note
You’ve just learned the simplest way to visit the dashboard for your site: Log into WordPress.com, click My Blogs, and then click the Dashboard link. However, there’s a shortcut that lets you jump straight to the dashboard without going through WordPress.com. Just type in the web address for your blog, with /wp-admin added at the end. For example, to manage lazyfather.wordpress.com, you’d go to lazyfather.wordpress.com/wp-admin. (WordPress will ask you to sign in with your user name and password if you aren’t already logged in.)

Exploring the WordPress.com Community
Once you have your very own WordPress site, you’re also a member of the WordPress.com community. Warm and fuzzy feelings aside, the connections and exposure you get through the community can have real benefits, particularly if your WordPress.com site is a straight-up, traditional blog. These benefits include the following:
Ideas. No site exists in a vacuum, especially not a blog. By looking at other people’s work, you can tune in to a powerful source of inspiration for both content and style. On the content side, you can discover trending topics and popular subjects (using the Freshly Pressed tab and Popular Topics link described in the next section, for example). Then, you can join in on the conversation by giving your own spin on hot topics on your blog. On the style side, you can see how other people polish themes and perfect their layouts, and you can use that insight to improve your own site.
Promotion. As in the real world, one of the most successful ways to make friends, attract attention, or score a new job is by networking with other, like-minded people. When you find other blogs that tackle the same issues as yours, you can exchange links and create a blogroll that connects their sites to yours (The Custom Menu Widget). Or you can increase your exposure by commenting on someone else’s posts (on their blog) or publishing a full reply post (on your blog). Eventually, these practices can attract many more visitors to your site.
With that in mind, you’re ready to survey the field. Start at the WordPress.com front page (http://wordpress.com). If you aren’t already logged in, fill in your user name and password and then click Sign In.
You start at the Reader page. However, unless you’ve already subscribed to someone else’s blog, you won’t see any content there. Instead, you have to search for what you want.
There are several ways to track down WordPress.com content that might interest you:
Browse the recommended blogs. On the Reader page, click the “blogs we recommend” link that appears in the first bullet point. You can then click a category that interests you (like Popular Culture & Entertainment or Photography to see a short list with some of the best blogs on the subject. Click a blog’s name to view it in a separate tab. WordPress.com is willing to recommend only a very small set of blogs, so this approach won’t get you very deep into the WordPress.com community.
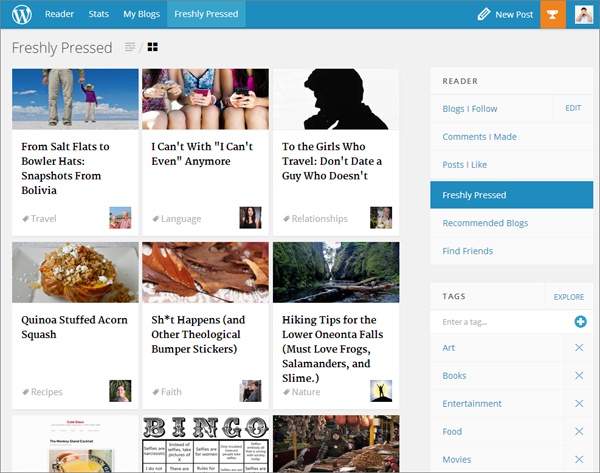
Read the Freshly Pressed page. The best place to get a sense of the chatter on WordPress.com is the Freshly Pressed page. It shows a cross-section of the day’s most attention-grabbing posts (Figure 2-10). Click a post that interests you to read the full article and continue on to the blog that hosts it.
Hunt for interesting posts by keyword. When WordPress bloggers create a new post, they add a few descriptive words, called tags, to classify it. Tags give you a way to home in on posts that interest you (as you’ll see on Understanding Tags, when you start posting). Tags also give you a way to find blogs that discuss your favorite topics. Begin by looking at the Tags box in the right-side column of the Reader page. Click one of the tag words, or type in a subject of your own in the search box to find more blogs.
Go tag surfing. You can browse some of the posts that use the most popular tags by clicking the Explore link in the top-right corner of the Tags box. When you do, WordPress shows a display that shows hot tags, sized to reflect their current popularity (Figure 2-11).
Tip
When you browse through WordPress.com, you don’t see the many sites created with WordPress software but hosted on sites other than WordPress.com. Although there’s no central repository of self-hosted WordPress sites, you can browse a showcase with some examples at http://wordpress.org/showcase.
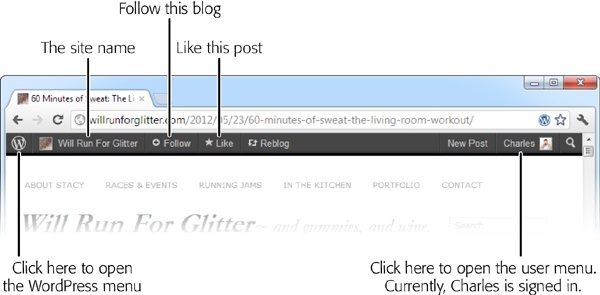
When you browse a WordPress.com blog (and you’re signed in under your WordPress.com account), a black toolbar appears at the top of the page (Figure 2-12). On the left side is the name of the blog you’re currently viewing and two important buttons: Follow and Like. If you like the post you’re reading, you can click the Like button (which adds it to a list of your favorite posts). Or, if you decide the content is so good that you want to come back to this site and read more, you can click the Follow button (which adds the site to your personal watch list of blogs).

Usually, you’ll choose to click Like on a post if you want to refer to it later—perhaps to follow an ongoing conversation in the Comments section. You’ll choose Follow to keep watching the blog for new content. To review your liked posts and read your followed blogs, return to http://wordpress.com and click the Reader tab. Now you’ll see the most recent posts from all the sites you follow, amalgamated into a single reverse-chronological list.
Visiting the WordPress.com Store
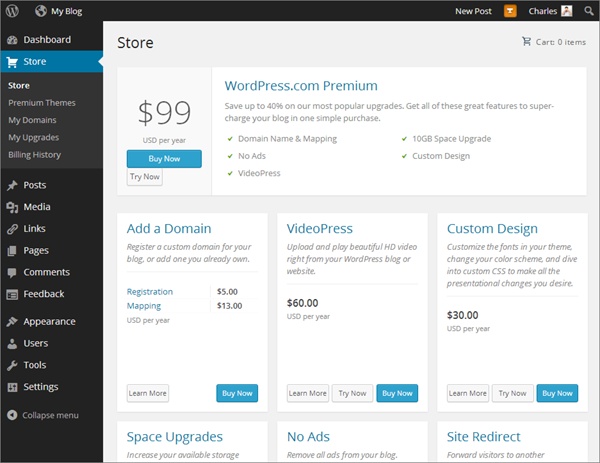
As you’ve already seen, when you sign up with WordPress, you can buy a custom domain name or a Premium account bundle. But what happens if you want to start simple (and cheap) but add more features in the future? The answer is the WordPress.com store, which is just a click away on the dashboard. It offers a long list of blog enhancements, each for a small yearly fee.
Getting to the store is easy. Once you load up the dashboard, click the Store link in the menu on the left. WordPress shows you the long list of upgrades it offers (Figure 2-13).
In the following sections, you’ll see how to use the store to deal with two more complex setup scenarios. First you’ll learn how to buy a custom domain for an existing WordPress.com site. Next you’ll see how to take a domain you already own and use it with an existing WordPress.com site.
Buying a Domain after Signup
Imagine you build a thriving blog using a free .wordpress.com address (say, HelloPickles.wordpress.com), but then decide you really want a custom domain name (like HelloPickles.net). Using the store, you can buy one for your existing blog, so you don’t need to create a whole new blog under a new name. Here’s how:
Go to the dashboard.
You can get there by visiting the My Blogs page and clicking the Dashboard link, or go there directly using your blog address and tacking /wp-admin onto the end.
Click Store in the menu on the left.
WordPress shows a list of all the upgrades you can buy.
In the “Add a Domain” box, click Buy Now.
WordPress displays a list of all the domains your site currently uses. Unless you already bought a custom domain name through WordPress.com, the list includes just one address: the .wordpress.com address you picked when you created your site (Figure 2-14).
Click the “Register a new Domain Name” button.
This tells WordPress you want to look for a new address.
Type the domain you want into the domain search box, and then click Go.
WordPress checks to see if the domain you want is available. If it isn’t, try typing something else.
If the domain is available, click Register Now to make it yours.
WordPress brings you to the standard domain registration page, where you fill in your personal details (as you saw back in Figure 2-5).
When you finish, click Register Domain and follow the instructions to pay.
When you add a custom domain name, WordPress won’t leave your current audience in the cold. Instead, it’s smart enough to reroute people visiting your old .wordpress.com address to your new domain. That means that if you started with HelloPickles.wordpress.com, and you then buy the custom domain HelloPickles.net, WordPress will automatically redirect people who type in HelloPickles.wordpress.com to your blog’s new domain, HelloPickles.net, just as you would want. (Really, there’s no difference between the two addresses. They are simply two names that point to the same site—your blog.)

Tip
Buying a custom domain for an already-created site is a useful technique if you think that you could be outgrowing WordPress.com, and you want to prepare your site for a possible move to self-hosting. Because WordPress automatically redirects visitors from your old .wordpress.com domain to your new custom domain, it gives everyone a chance to get used to your new address. And when you do decide to move, you can take your new domain with you (Missing WordPress.com Features).
Using a Domain Name You Already Own
Life is easiest if you buy your custom domain name from WordPress.com, but sometimes that isn’t possible. For example, you might have already bought the domain name from a domain registrar. (You may have even bought it years ago.) Because it isn’t currently possible to transfer a domain you own from another web host to WordPress.com, you need to use another trick, called mapping.
Technically, mapping is a technique that, in this case, connects your custom domain name to your WordPress.com blog. That way, when someone types in the custom domain name (say HelloPickles.net), that person ends up at your WordPress.com blog. And if that person types in your former .wordpress.com address (say, HelloPickles.wordpress.com), they’re redirected to your custom domain, which is what you want. It’s exactly as if you had bought the custom domain name from WordPress.com when you signed up.
Mapping is relatively easy, but it’s not free. WordPress charges a mapping fee (currently $13 a year), which you pay in addition to the annual fee you pay to keep the domain name registered through your original domain registrar.
Mapping requires you to complete two setup operations: one with the web host that registered the domain name, and one with WordPress. But before you get started with either operation, you need to decide exactly how you want to link your custom domain name with your WordPress site. You have two options:
Use your whole domain. For example, you might create a blog at www.WineSnobs.com. If you map this address to a WordPress.com address, you need to keep your entire website on WordPress.com. This makes sense if you purchased a domain name from another company but you haven’t actually bought any web space from that company.
Use a subdomain. Technically, a subdomain takes your domain name (say, www.WineSnobs.com), removes the optional www part, and adds a different prefix (like blog.WineSnobs.com). The goal is to create a separate web address for your WordPress site, so you can put something else at your main domain name (in this case, www.WineSnobs.com). Of course, your main site won’t be a WordPress site, and you’ll need to pay your web host for some web space.
Note
If all this talk about subdomains sounds familiar, it’s because the WordPress.com service uses subdomains itself to give everyone a unique spot on the wordpress.com server. For example, add the prefix GettingBloggedDown and you get the subdomain GettingBloggedDown.wordpress.com.
There’s also a third option—use a subdirectory in your domain (for example, www.WineSnobs.com/blog)—but WordPress.com doesn’t currently support that technique.
Before you can map your domain, you have to do a little extra configuration with your web host. These setup steps differ depending on whether you want to map the full domain name or you want to map just a subdomain, so follow the instructions in the appropriate section below.
Mapping an Entire Domain Name
If you’re mapping an entire domain name, you have to change your web domain’s name servers. These are the high-powered computers that direct traffic on the Internet, and that tell browsers where to go to find your site. Right now, your domain name uses the name servers at the company that registered your domain name, or at your original web host (not WordPress.com). You need to change that so your domain uses the WordPress.com name servers.
Making the change is simple enough—it usually involves changing just two pieces of text—the name server addresses. However, you may need to dig around on your web host’s administration page before you find exactly where these settings are (they’re usually in a section called “Domain Name Servers” or “DNS Settings”). If in doubt, contact your web host.
For example, if you’re using the web host www.brinkster.com, the name servers would be set to this:
NS1.BRINKSTER.COM
NS2.BRINKSTER.COM
No matter what web host you’re currently using, you must change the name servers to this:
NS1.WORDPRESS.COM
NS2.WORDPRESS.COM
NS1 and NS2 are the two computers that direct your visitors to the WordPress.com site they want to read.
Tip
Does your domain registrar provide an email address that you want to keep using? For example, maybe you want WordPress.com to put a blog on www.WineSnobs.com, which you originally registered with the well-known web hosting company GoDaddy, but you still want to receive email at rachel@WineSnobs.com. To pull this off, you need to carry out the extra configuration step covered at http://tinyurl.com/ext-email.
Mapping a Subdomain
If you’re mapping a subdomain, you need a slightly different configuration. Instead of changing your name servers, you must add a CNAME record. Although it sounds intimidatingly techy, all a CNAME record does is redirect traffic from your subdomain to your WordPress.com blog.
Every web host has a different process for defining a CNAME record, but it usually involves logging in, heading to an administration section with a name like “DNS Management” or “Name Server Management,” and then adding the CNAME record. Each record requires two pieces of information. The first is the subdomain prefix (for example, that’s blog if you’re creating the subdomain blog.WineSnobs.com). The second is your current WordPress.com address, like WineSnobs.wordpress.com, which is often called the destination.
Finishing the Job: Setting Up the WordPress.com Mapping
Name server changes require time to take effect. Once you make your changes, the settings need to be spread to various traffic-directing computers across the Internet. It will take at least 24 hours, and possibly two or three days, before the change takes effect and you can tell WordPress.com to start using your domain. Unfortunately, there’s no high-tech way to monitor the process.
Once your name server changes have taken effect, you can add the domain by following the next set of steps. If you’re not sure whether you’ve waited long enough, don’t worry—there’s no harm in trying. If the name server changes haven’t taken effect, WordPress will let you know when you get to step 4 below, and you’ll need to try again later.
Go to the dashboard.
You can get there by visiting the My Blogs page and clicking the Dashboard link, or go there directly by appending /wp-admin to the end of your blog address.
Click Store in the menu on the left.
WordPress shows a list of all the upgrades you can buy.
In the “Add a Domain” box, click Buy Now.
WordPress shows a list of all the domains your site currently uses.
Click the “Map a Domain Name you own” button.
Type the domain you already own into the text box and then click Go.
WordPress checks to see if the domain name exists. Because WordPress has no way of knowing that you own the domain, it will warn you that the blog is taken.
Click the long-winded “Yes, I already own this domain name. Map it to my WordPress.com blog” button.
WordPress will ask you for your payment details. Once you supply that, the mapping is complete. Congratulations—you can now get to your WordPress site by using your custom domain name.