Chapter 10. Adding Picture Galleries, Video, and Music
By now, you know that the simplest way to enhance any WordPress post is to toss in a picture or two. The Web is a visual medium, and a bit of eye candy is essential for capturing (and keeping) your readers’ attention.
But modern websites rarely stop with ordinary pictures. Today’s Web is splattered with rich media, including video clips, webcasts, podcasts, slideshows, and song players. In traditional websites, these ingredients can require hefty chunks of HTML and JavaScript code. But WordPress makes it easy to add media, thanks to two slick features you’re about to meet: automatic embeds and shortcodes.
In this chapter, you’ll use all the tools WordPress provides to add rich media to your site. First, you’ll supercharge your pictures by replacing ordinary images with slideshows and galleries, and you’ll learn how to transform your entire site into a photoblog or portfolio. Next, you’ll see how to embed a video window in a post, and how to host your video files on YouTube or your own web server. Lastly, you’ll get readers jammin’ with audio tracks, playlists, and podcasts.
Understanding Embeds and Shortcodes
You’ll rely on two WordPress features throughout this chapter. They’re called embeds and shortcodes. Both serve the same purpose: They let you slip special types of content (like slideshows and videos) into your posts and pages without forcing you to type in a bunch of JavaScript code or HTML markup. Instead, when you use embeds and shortcodes, you ask WordPress to fill in the necessary details for you.
If you use the free WordPress.com hosting service, embeds and shortcodes aren’t just about convenience—they’re the only way to embed media. That’s because WordPress.com prevents you from adding JavaScript code to your posts or using HTML’s media-embedding <iframe> element in them. This basic precaution defends Automattic’s web servers against a variety of sneaky attacks. But without these tools, there’s no do-it-yourself way to integrate rich media from other websites, like YouTube for video or Flickr for photos. Thankfully, embeds and shortcodes fill the gap.
Automatic Embeds
One of the shortcuts, called an automatic embed, takes web addresses that point to certain media files and replaces the URL with the media file itself—in other words, it automatically embeds the real media instead of just displaying a link pointing to it.
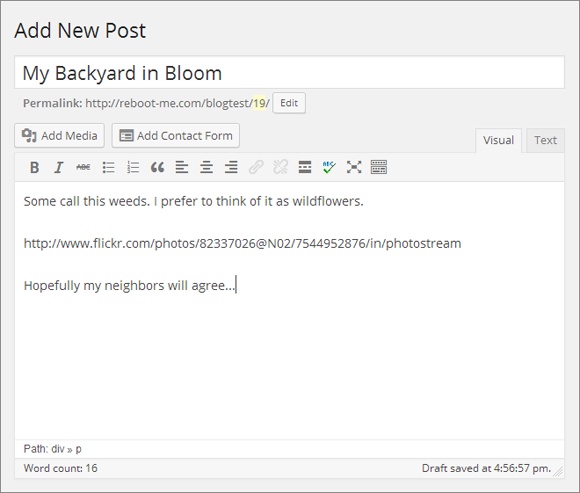
For example, imagine you type in this URL of a photo in someone’s Flickr stream:
http://www.flickr.com/photos/82337026@N02/7544952876/in/photostream
In the WordPress post editor, this web address looks ordinary enough (Figure 10-1).
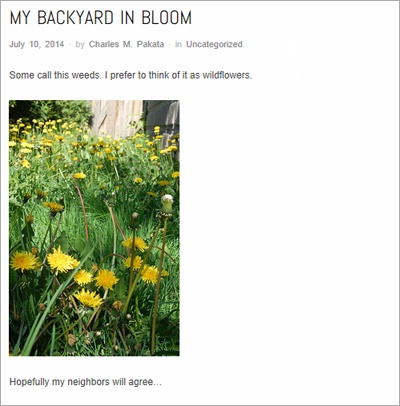
But WordPress works a bit of magic when you publish the page. At that point, it realizes that your URL points to a Flickr picture. Instead of showing a boring link, WordPress grabs the corresponding picture from the Flickr site and embeds it in your post (Figure 10-2). (Of course, if it isn’t your Flickr picture, you’re duty-bound to ask the owner for permission before you stuff it into your site.)
Note
Flickr, for those who haven’t come across it yet, is a website that lets you store and share photos. With tens of millions of users (and billions of pictures), Flickr is the world’s most popular picture-hosting service. It’s also a thriving online community, with groups that attract professional photographers, hobbyists, and ordinary people who just want to show off their snapshots. You can learn more at www.flickr.com.
For automatic embeds to work, you need to meet several criteria:
The URL must be on a separate line. Don’t crowd it up next to your text. As you can see in Figure 10-1, the URL stands alone, with paragraphs of text above and below it. It’s also important to make sure the URL doesn’t have any hidden formatting tags—if you’re not absolutely sure, take a look at the HTML in the Text tab and remove anything that doesn’t belong, like the <span>, <em>, and <strong> tags.
The URL can’t be formatted as a link. When you paste a website address into the WordPress editor, WordPress may format that address as a real, clickable link (that is, it may wrap your web address in an <a> anchor element). Here’s the problem: Links show up in the final post as, well, links. WordPress doesn’t swap in rich content in their place. If the URL appears blue in the post editor (and the address becomes underlined when you move your mouse over it), then WordPress formatted the address as a link. To turn it into plain text, select it and then click Unlink in the toolbar. Now the address turns into ordinary black text, which lets WordPress perform the URL-to-embedded-content switcheroo when it displays the page.
WordPress must recognize the site. WordPress auto-embeds content from a select group of sites that share pictures, videos, music, and slideshows. It does the same for a few other specialized services, like Twitter and Polldaddy. For the full list of well over 20 sites, see http://codex.wordpress.org/Embeds.
Flickr is one of the best-known photo-sharing sites, but WordPress recognizes several others, including Instagram, Imgur, SmugMug, and Photobucket. However, it conspicuously fails to recognize URLs from other image-hosting services, such as Google’s Picasa. To show a picture from a Picasa web album, you need to upload a copy of the picture to your site (awkward), provide a clickable link that takes the reader there (clumsy), or use a plug-in that displays Picasa pics (for self-hosters only).
WordPress constantly revises and expands its list of auto-embeds, so its recognition of other services will grow—slowly.
The [embed] Shortcode
Some WordPress aficionados write auto-embedded URLs differently from the earlier example. They add a special code before and after the URL, like this:
[embed]http://www.flickr.com/photos/...[/embed]
Here, the web address is the same, but it has an [embed] code at the beginning of the URL and a matching [/embed] code at the end. This line of code produces the same effect as in the previous example—WordPress replaces the URL with the appropriate embedded content, provided that it recognizes the URL.
The main reason you’d use the [embed] code is because it gives you the option to add two extra details: the height and width attributes. These attributes set the size of the embedded content. For example, here’s how you might tell WordPress you want your embedded picture to be 200 pixels wide and 300 pixels tall:
[embed width="200" height="300"]http://www.flickr.com/photos/...[/e
mbed]
The height and width attributes don’t always give you the effect you expect. It’s best to think of them as requests—requests that WordPress honors according to its own intricate (and slightly obscure) sizing rules. Here’s a rundown of what takes place:
If you don’t specify any size information, WordPress allows the embedded content to grow until it reaches its full size or hits the boundaries of your layout. For example, if you embed post content inside a 600-pixel-wide column, your embedded picture will grow to be 600 pixels wide (and however tall it needs to be to preserve the picture’s proper shape).
If you specify the width and height attributes, you override WordPress’s ordinary behavior. For example, you can specify a size to shrink a tall-and-skinny photo that would otherwise grow bigger than you want it to be. And if the media sharing site you use automatically shrinks your content, you may be able to use the width and height attributes to force it bigger. (See the box on this page for a full discussion of this often-perplexing issue.)
You can use either the width or height attribute on its own. For example, you can scale down a piece of content using a smaller width and let WordPress choose the height automatically to match the original aspect ratio.
WordPress doesn’t let you stretch embedded content out of shape. For example, if you assign a height and width to a picture that don’t match its aspect ratio, WordPress follows the most restrictive dimension and sizes the other to match.
Different themes and plug-ins can tinker with the style rules that size the elements in your layout, including embedded content. Unfortunately, the interplay between the embedded content, WordPress, and your theme is complex. Sometimes, despite your best efforts, embedded content will refuse your resizing demands.
More Shortcodes
Shortcodes are special instructions you put in your post or page. Like an auto-embedded URL, a shortcode tells WordPress to insert something in the current location. But auto-embeds are limited to a relatively small set of known websites, while shortcodes let you add a much broader range of media.
To use a shortcode, you put a predetermined code inside square brackets. For example, the following shortcode takes all the pictures attached to a post and combines them into a picture gallery:
An image gallery will show up here:
[gallery]
You’ll take a much closer look at galleries in the next section. For now, the important thing to understand is that, when you add a shortcode to a page or post, WordPress inserts something out of the ordinary.
Shortcodes always have the same syntax—each one consists of a bit of text wrapped in square brackets. In fact, the [embed] instruction you learned about in the previous section is actually a shortcode that tells WordPress to examine a web address and embed the appropriate content.
Note
You can type shortcodes into the visual editor (the Visual tab) or the HTML editor (the Text tab). Either way, WordPress recognizes the code by its square brackets.
The truly neat part about shortcodes is that they’re extensible. If you’re ambitious and you run a self-hosted WordPress site, you can create your own shortcodes (technically, it’s all about editing the functions.php file, as described on Extending WordPress with Functions.php). Even better, a clever plug-in developer can create shortcodes that let you display additional types of content, including contact forms, documents, maps, charts, ads, a view counter, and a PayPal donation link.
If you run a self-hosted WordPress site, you start with the shortcodes listed in Table 10-1.
SHORTCODE | DESCRIPTION |
[embed] | Wraps any embeddable URL that WordPress recognizes. You could use this shortcode for clarity, but you usually use it to size your embedded content, by adding the height and width attributes. |
[gallery] | Creates a picture gallery or slideshow. Described on Showing Groups of Pictures. |
[audio] | Shows an audio playback bar for an audio file (Playing Audio Files). |
[video] | Shows a video playback window for a video file (Showing a Video from Your Media Library). |
[caption] | Displays a text caption for a figure. WordPress uses it when you insert a captioned picture (Putting Pictures in a Post). |
[playlist] | Creates a simple playlist of audio or video files (Adding a Playlist). |
If you use WordPress.com, you can tap many more shortcodes. You can use all the shortcodes listed in Table 10-1 with the exception of [video], because WordPress.com uses [wpvideo] instead (as Premium Video Hosting explains). WordPress.com also includes a few dozen completely new shortcodes. This is handy, because WordPress.com doesn’t allow plug-ins, so you can’t add any shortcodes beyond those you start with.
Many of WordPress.com’s extra shortcodes duplicate the features WordPress provides through automatic embeds. For example, you can insert a picture from Instagram using the image’s URL (thanks to WordPress’s auto-embed feature) on a WordPress.com site or a self-hosted site. But on a WordPress.com site, you have the additional option of using the [instagram] shortcode. Either way, the result is the same.
But some of WordPress.com’s extra shortcodes embrace services that automatic embedding doesn’t. For example, if you stumble across a fascinating TED Talks video (from the thousands at www.ted.com), you can use the [ted] shortcode to embed the talk in one of your posts. All you need to do is reference its ID number, like this:
[ted id=1458]
For the full list of WordPress.com-supported shortcodes, along with an example of how to use each one, visit http://support.wordpress.com/shortcodes.
Tip
If you run a self-hosted site, you can add the extra shortcodes that WordPress.com sites get by installing the handy Jetpack plug-in (The Jetpack Plug-In).
Showing Groups of Pictures
Individual images are an important part of most posts and pages. As you already know, there’s no limit to the number of pictures you can include in a single post—you simply need to arrange your text around them in the best way possible.
But this approach isn’t ideal for posts where you want the pictures as the focal point (for example, a travelogue of your trip through Nepal) or where pictures are the whole point (for example, an amateur photographer’s snaps on a photoblog). In both cases, you need to tame your piles of pictures and present them in a way that lets visitors browse them at their leisure. In the following sections, you’ll consider a range of options for posts like these, starting with WordPress’s basic gallery feature.
Creating a Gallery
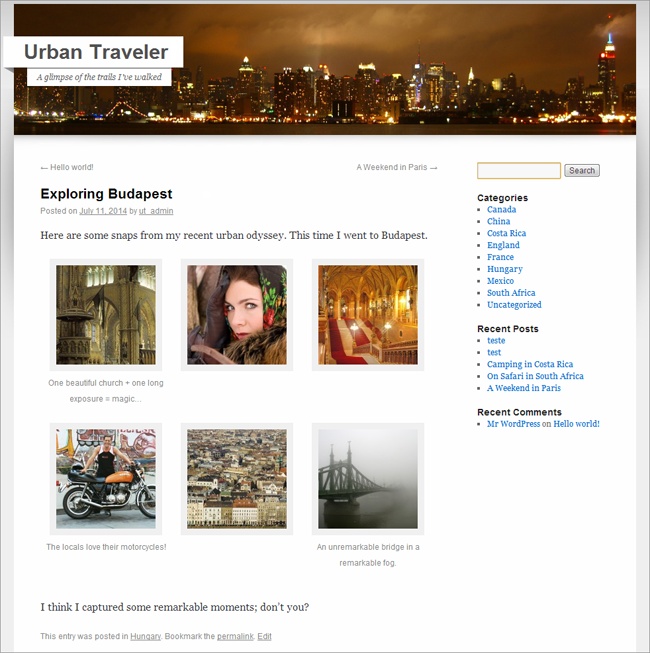
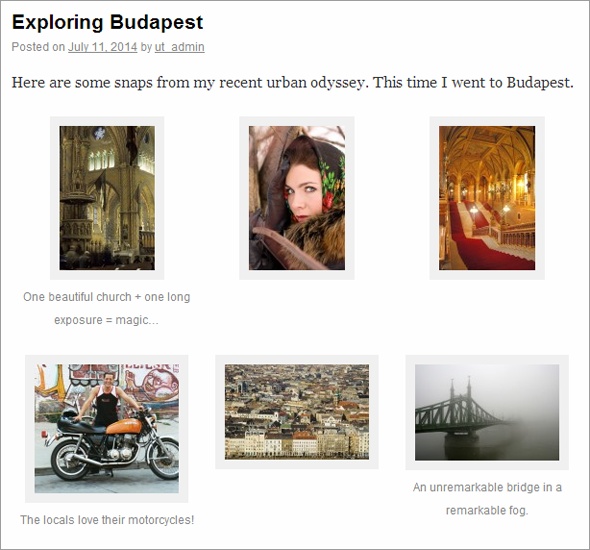
A gallery displays a set of thumbnail images on a page so it’s easy for visitors to scan them (Figure 10-3). To take a closer look at a pic, all you need to do is click a thumbnail.
When you click a picture in a gallery, you probably expect to see a larger version of the image. But WordPress does something a little different, and its exact behavior depends on how you host your site.
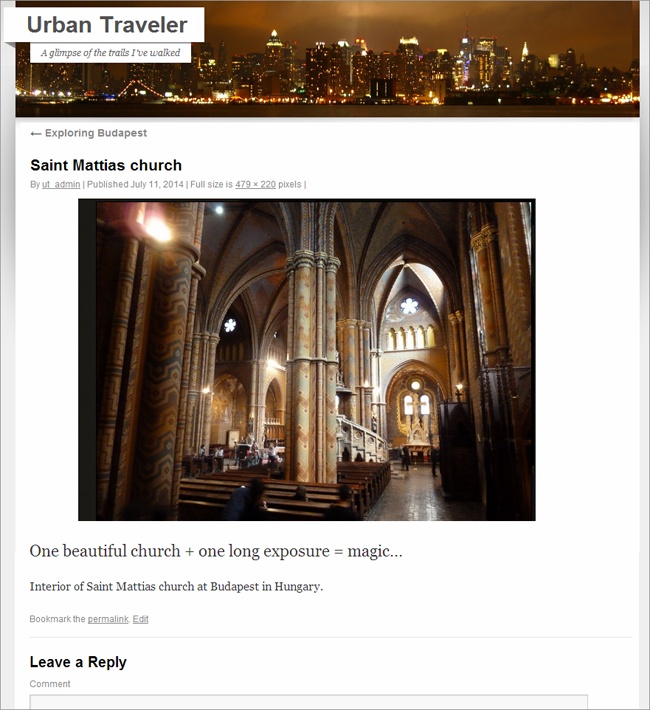
If you run a self-hosted site, WordPress launches what it calls an attachment page, which displays the larger-size picture along with its description (if you included it) and a place for comments (Figure 10-4).
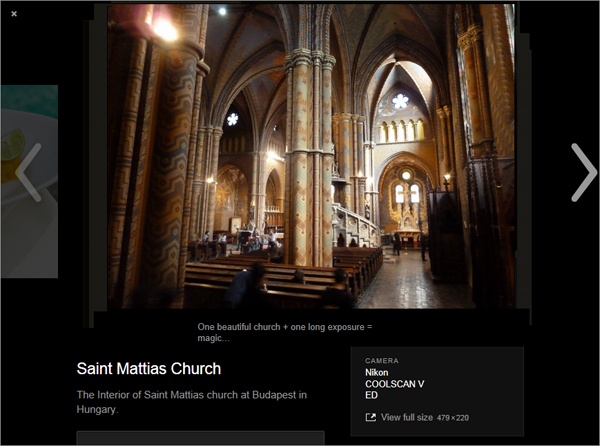
WordPress.com is a bit fancier—it includes the picture in a photo carousel, and viewers can step from one picture to the next (or former) by clicking the arrows on either side of the image (Figure 10-5).
Tip
A photo carousel dramatically showcases your pictures without taking the reader away from your post. Self-hosted sites can get this feature by installing the Jetpack plug-in (The Jetpack Plug-In). However, some WordPressers have found that the photo carousel doesn’t work with certain theme/browser/plug-in combinations. So if you install Jetpack but you still see ordinary attachment pages instead of the photo carousel, you probably ran into one of these conflicts.
Note
You can turn off the WordPress.com photo carousel, in which case viewers see an attachment page when they click a picture. To do that, choose Settings→Media from the dashboard menu, turn off the “Display images in full-size carousel slideshow” checkbox, and then click Save Changes.
Now that you know what a gallery looks like, you’re ready to add one of your own. Follow these steps:
Create a new post or edit an existing one.
Or create or edit a page; either way, the gallery-adding process is the same.
Click the Add Media button just above the edit box.
This is the same link you use to add single pictures. When you click it, the Insert Media window opens.
Upload the pictures you want in your gallery.
As you already know, you can upload files from your computer in two ways. One option is to drag them from your file browser (Windows Explorer or the Mac Finder) and drop them onto the page. The other is to click Select Files, browse for the pics, and then choose Open. Either way, WordPress uploads the pictures to your site’s media library (Viewing the Media Library).
If you already have the pictures in your media library, you don’t need to upload anything. Skip ahead to the next step.
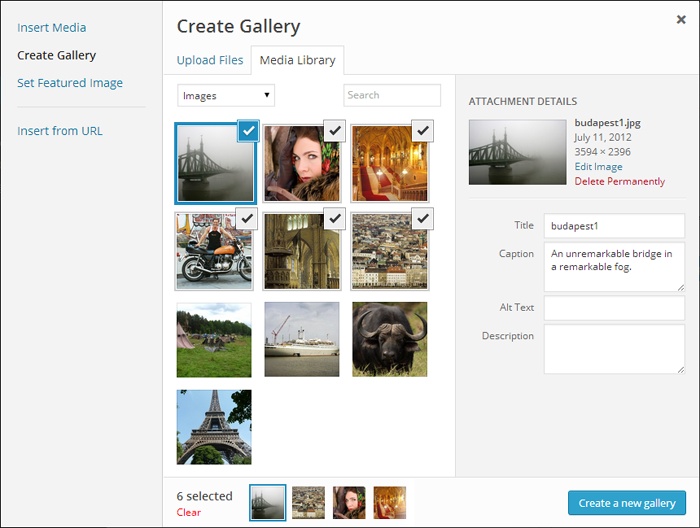
Once you upload the files, click the Create Gallery link on the left.
WordPress switches to the Media Library tab and shows you a grid of all the pictures you’ve ever uploaded. If you’ve got a thriving site that’s been around for a while, the list may be quite long. However, WordPress automatically selects the pictures you uploaded in step 3 and puts them at the top of your list (Figure 10-6). If these are all the pictures you need, you’re ready to carry on to the next step.
To add another picture to the gallery, click it. (Repeat this step to select as many pictures as you want.) To remove a picture, deselect it by clicking the checkmark in the top-right corner of the thumbnail.
Enter a description for each picture.
This is the same process you follow when you insert a single picture. Click each picture, one after the other, and then fill in the boxes on the right:
Title. This is the text that pops up when someone points to the picture.
Caption. This is a bit of optional text that, if you provide it, shows up under the picture.
Alternate Text. Use this box to describe the picture so that accessibility tools like screen readers can “speak” the text. Alternate text also helps search engines understand what a picture shows.
Description. This box contains additional text that appears on the picture’s attachment page (Figure 10-4) or in a photo carousel.
Once you add descriptive information for all your pictures, click “Create a new gallery” at the bottom right.
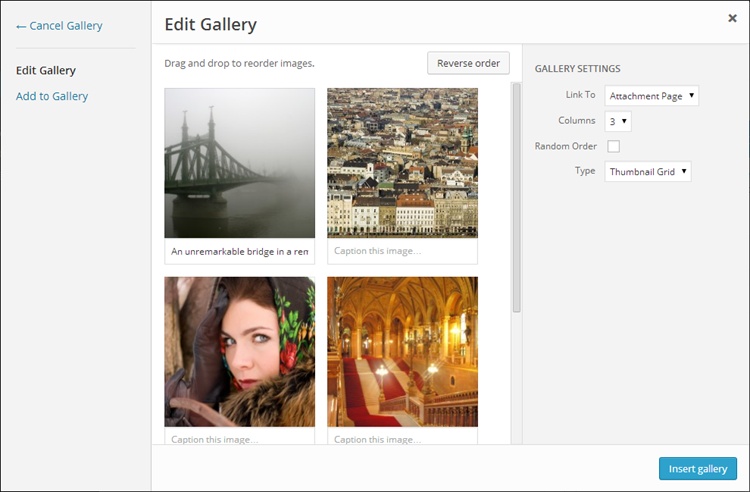
WordPress displays the pictures you picked in your gallery (Figure 10-7).
Drag your pictures into the order you want.
The WordPress gallery displays pictures in the order you picked them. That means the picture you picked first is the first one in the gallery. To rearrange them, simply drag the one you want to move to a new place.
To reverse your picture order, so the first picture becomes the last, the second picture becomes the second to last, and so on, click “Reverse order.”
If you prefer to let WordPress mix up your pictures every time someone views the gallery, turn on the Random Order checkbox, which appears on the right.
Tweak your gallery settings (in the Gallery Settings section on the right).
WordPress gives you several options for fine-tuning your gallery. They include:
Link To. This determines what page appears when someone clicks a thumbnail in the gallery. Ordinarily, this is the attachment page (choose Attachment Page to make it so), but you can keep things simple by showing the full-size image on its own, with no extra information (choose Media File). Or you can turn off links altogether (choose None).
Note
If you use the photo carousel feature (Creating a Gallery), WordPress ignores the Link To setting. Instead, it shows a photo carousel when a visitor clicks a picture.
Columns. Ordinarily, a gallery row displays three thumbnails per line (see Figure 10-3). But some themes can accommodate more mini-pics. If that’s the case for you, choose a different number here. But be warned: If your layout column isn’t wide enough for your pictures, WordPress breaks up the pics unevenly. For example, if you pick five gallery columns but your layout only has space for three pictures, WordPress splits each row of five into a row of three, followed by a row of two, creating a distracting zigzag effect.
Random Order. Switch on this checkbox to ignore the order your pictures have right now, and arrange them randomly each time someone views the page.
Type. This setting lets you change an ordinary gallery into a slideshow (pick Slideshow instead of Thumbnail Grid). However, this setting appears only on WordPress.com sites or self-hosted sites that use the Jetpack plug-in.
On WordPress.com sites (or Jetpack sites that have the Tiled Galleries feature activated), the Type list includes three more exotic choices. Tiled Mosaic packs the pictures tightly together in a jigsaw of squares and rectangles (rather than spacing them out in the standard, neatly separated squares). Square Tiles crops each thumbnail down to a perfect square, trimming off the edges if needed. Circles crops each thumbnail into a circle. The best way to get a sense for these fancy gallery types is to try them out.
Click “Insert gallery” at the bottom right.
This adds the gallery to your post (Figure 10-8). You can now publish your post.

If you click the Text tab to switch to HTML view, you see that your post now contains a [gallery] shortcode that looks something like this:
[gallery ids="341,185,342,340,246,339"]
There’s an ID number for each picture in your gallery. In the example above, the first picture in the gallery has the ID number 341, the second one has the ID 185, and so on. You can find the matching pictures in the media library.
The HTML view of your gallery-enriched post is more notable for what it doesn’t contain. There are no image tags, links, or other HTML wizardry. Instead, WordPress examines the [gallery] shortcode and then creates the gallery on the fly every time someone requests the page.
Editing a Gallery
To alter a gallery, edit your post and, in the visual editor, click the gallery to select it. Two icons appear in the top-left corner of the gallery: a pencil and a large X.
Click the X if you want to delete your gallery. Click the pencil and you wind up on the Edit Gallery page shown in Figure 10-7. There, you can do any of the following:
Edit gallery settings. These settings appear in the Gallery Settings box on the right.
Rearrange the order of your pictures. Drag them into the order you want, just as you did when you first created the gallery.
Edit picture information. Select a picture and edit the information that appears in the text boxes on the right.
Delete pictures. Point to the picture, and then click the X that appears in the top-right corner.
Add new pictures. Click “Add to Gallery” on the left. Now you can pick more images from the media library or drag one or more new pictures onto the page to upload them.
To make your changes permanent, click “Update gallery” when you finish.
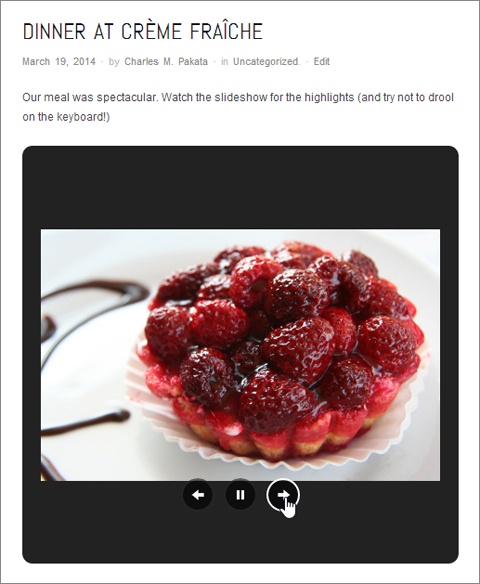
Creating a Slideshow
A slideshow is similar to a gallery in that it gives you an elegant way to deal with a group of related pictures. But where a gallery shows a group of photos all at once, a slideshow displays your pictures one at a time, typically framed by a small box (Figure 10-10).
If you use WordPress.com, it’s easy to add a basic slideshow. In fact, you follow the same process you followed to create a gallery, with one exception: In the second-to-last step (that’s step 8, on Creating a Gallery), you change the Type from Thumbnail Grid to Slideshow. You can transform an existing gallery into a slideshow the same way.
Once upon a time, WordPress.com used a separate [slideshow] shortcode for slideshows. Although this shortcode still works, WordPress doesn’t use it anymore. Instead, it tweaks the gallery shortcode by adding a type attribute. If you switch to the HTML view of your post after you add a slideshow, you see something like this:
[gallery type="slideshow" ids="341,185,342,340,246,339"]Freshly installed self-hosted WordPress sites don’t offer slideshows. You can add the type attribute to the [gallery] shortcode, but it won’t have any effect. However, slideshow support is just a plug-in away if you add Jetpack.
To create an even better slideshow, you need to go beyond WordPress and its plug-ins. Flickr offers the gold standard for slideshows, and if you have a Flickr account, you can drop a Flickr slideshow into any WordPress post or page. All you need is the right web address.
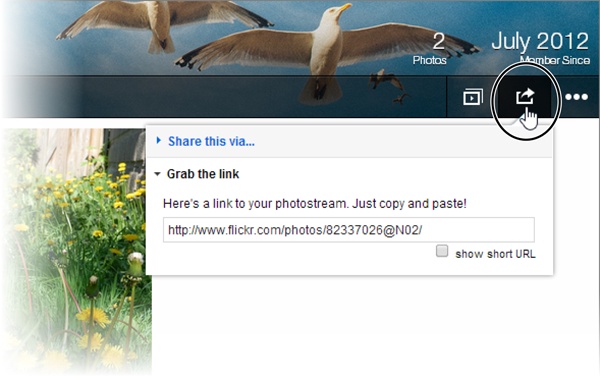
The easiest way to create a Flickr slideshow is to get a link for your entire photo stream (all the pictures you uploaded to Flickr, in other words). To do that, click your photo stream, click the tiny sharing button near the top-right corner of the page (Figure 10-11), and then choose “Grab the link.” You’ll see a link like this:
http://www.flickr.com/photos/82337026@N02/
To convert this to a slideshow link, add the text /show to the end of your web address, like this:
http://www.flickr.com/photos/82337026@N02/show/Using this web address, you see a slideshow that steps through all your Flickr pictures.
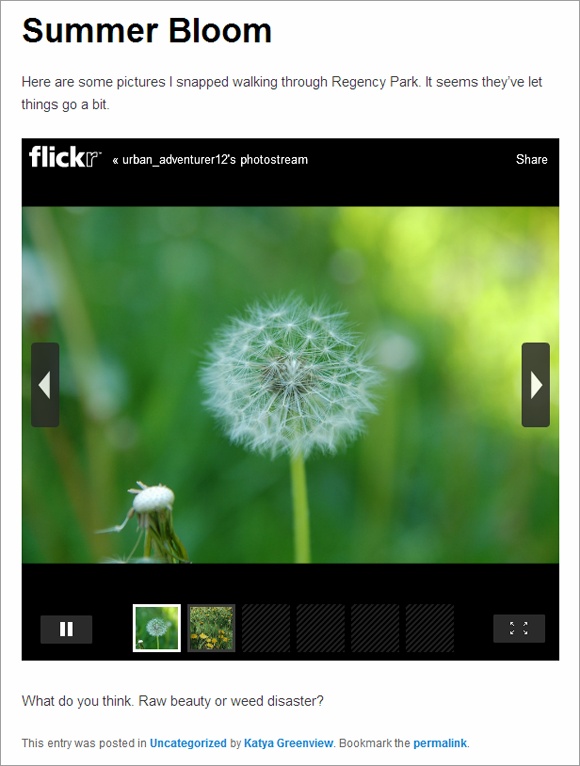
Next, you need to copy this address into a post or page, on its own line. Lastly, publish your page. Through the magic of auto-embedding, WordPress recognizes your slideshow URL and embeds a small version of the slideshow in your post (Figure 10-12).
Tip
If you’re a Flickr expert, you know that you can make a photo set that includes just some of your pictures. Conceptually, a photo set is like an album of shots you select and arrange in any order, which makes it more suitable for a slideshow. Once you create a photo set (which takes just a few drags and drops using Flickr’s Organizr tool), you can click the familiar Slideshow button to get a URL for it.
Themes That Make the Most of Pictures
Some sites are all about pictures and little else. For example, you might create a photoblog to showcase your nature photography. You could use the techniques you learned above to add galleries and slideshows, but the results won’t be ideal. Standard WordPress themes split up your pictures, making it impossible for visitors to browse your portfolio from beginning to end. And, worse, ordinary WordPress themes deemphasize pictures, hiding them deep in your site, behind a wall of posts.
The solution is to find a picture-centric theme, one that puts the focus on your pictures, without letting text, menus, and needless clicking get in the way. Happily, you can build specialized, picture-heavy sites like this in WordPress. All you need is a photoblog or portfolio theme.
There are several good options in the WordPress.com theme gallery, and many more in the much larger theme collection for self-hosted sites. Either way, you can dig up good candidates by searching for words like “photo,” “photoblog,” “picture,” and “portfolio.”
Every photoblog and portfolio theme works a bit differently, but most share some key features. First, the home page likely displays the pictures in your posts rather than the posts themselves. Figure 10-13 shows an example from Foto, a photography theme for self-hosted sites.
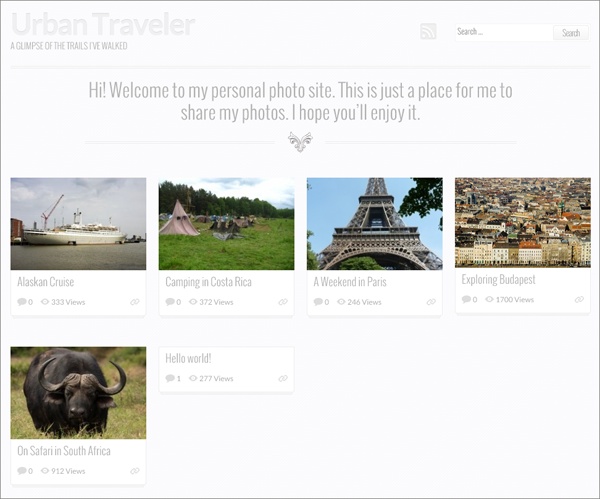
The Foto theme requires that you set a featured image for each of your posts (Featured Images). If you don’t, that post’s home-page tile will be blank. Many photoblog and portfolio themes work this way, so if you don’t see the pictures you expect after you switch themes, you most likely haven’t specified featured images for your posts.
Other themes aren’t as picky, and grab the first picture in a post, no matter what it is. One example is the self-hosted theme PinBlack. Like Foto, PinBlack creates a home page of tiled pictures. Unlike Foto, PinBlack uses any post picture it can get. If you try out PinBlack, you’ll notice other, more subtle differences as well. For example, its home page feels a bit more serious and businesslike, with a sleek gray-and-black color scheme with lime accents. (PinBlack is the starting point for the custom theme that powers the furniture store example developed in Chapter 14.)
Often, photoblog and portfolio themes assume that, for each of your posts, you’ll include just a single picture. They give special attention to this picture (which may be the featured image or just the first image in the post) by making it larger than normal and placing it at the top of the post.
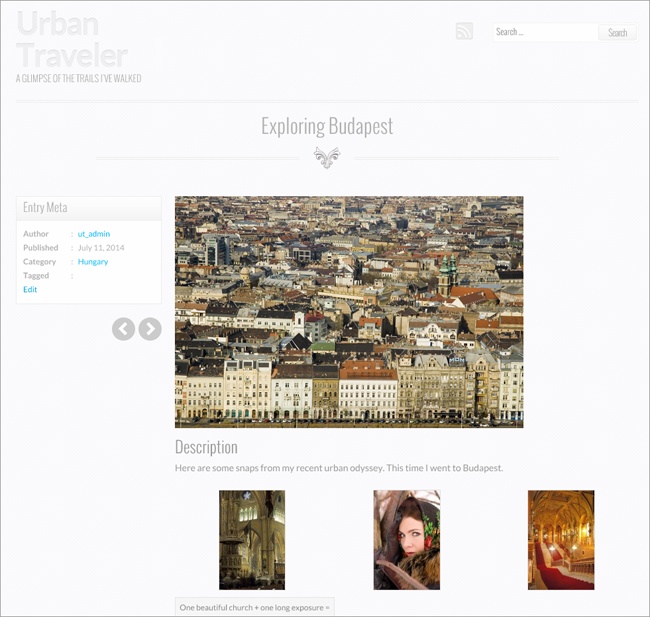
Photoblog and portfolio themes often include Back and Forward buttons that let readers move from one post to another, without making an interim stop at the home page and selecting from the full list of posts. This way, readers can browse your pictures and posts just as though they were scanning an image gallery, even if the pics appear in separate posts. Figure 10-14 shows how the back and forward buttons work with the Foto theme.
Note
When a picture appears in a lightbox, it floats over the web page, with the content behind it dimmed. This is the same effect you get when you view one of the pictures in a photo carousel, as described earlier. To douse the lightbox, click the X in the top-right corner of the picture box.
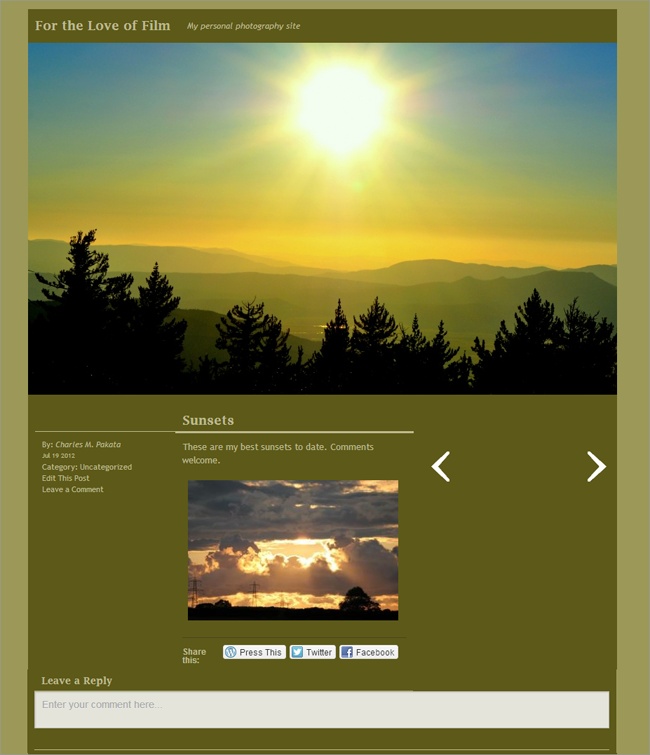
WordPress.com also includes attractive photoblog and portfolio themes. One notable example is the Duotone theme, which is designed to be a simple but beautiful way to showcase your photography.
Duotone doesn’t include a picture-tile home page. Instead, it takes viewers straight into picture-browsing mode. Guests begin with a picture from your most recent post and use the arrow buttons to step from one post to the next, just as visitors do with the Foto theme (Figure 10-15). The Duotone theme also has an unusual frill—every time a visitor moves to a new post, the theme picks a color from that post’s picture and uses it as the background color.
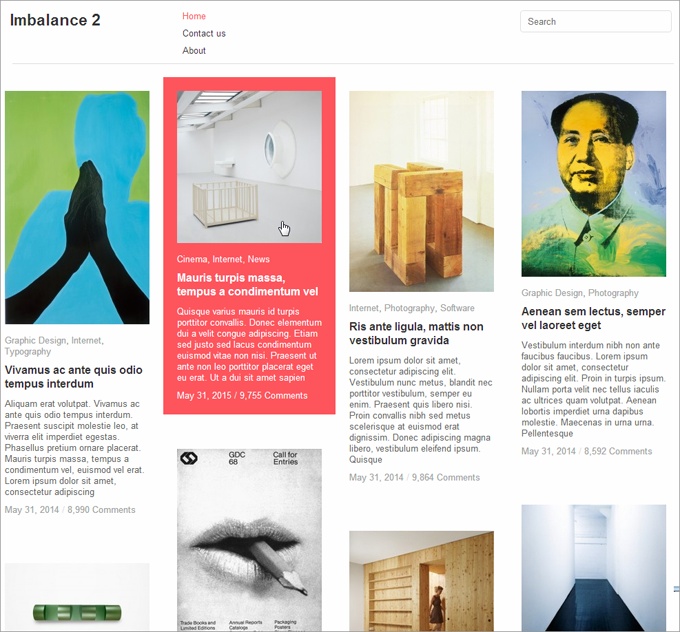
WordPress.com also includes portfolio themes. One is the professionally polished Imbalance 2. Much like Foto, Imbalance 2 creates a tiled display of featured images, but it also includes an excerpt from each post, as you can see in Figure 10-16.
Finally, it’s worth noting that some themes, while not all-out photoblogs or portfolio sites, offer some enhanced picture features. For example, many themes place a strip of pictures from recent posts across the home page. Sometimes they animate the strip, so that the pictures slide by or blend into each other, one after the other. The most obvious example is Twenty Fourteen, but you can also see this feature in the Canton School example (Featured Images).
Note
At first glance, Twenty Fourteen can be mistaken for a photoblog, especially if you use the grid of pictures on the home page. However, there are clear differences. Once you scroll past the picture grid or slider, you find an ordinary list of posts, just as you do on all the standard year themes. And Twenty Fourteen doesn’t provide arrows to let you step from post to post, which are a hallmark of many photoblogs.
Embedding a Video
Now that you’ve jazzed up your site with pictures, it’s time for something even more ambitious: video.
There are two reasons you might put a video playback window in a post (or page). First, you may want to use someone else’s video to add a little something extra to your content (which is the ordinary text in your post). For example, if you comment on a local protest concert, your post will be more interesting if you include a clip of the event. Similarly, if you review a new movie, you might include its trailer. If you talk about a trip to Egypt, you might want to take visitors inside the pyramids. In all these examples, the video adds a bit of context to your post.
The other possibility is that the video may actually be your content. For example, you might use video to show your band’s latest live performance, a bike-repair tutorial you filmed in your garage, or a blistering web rant about the ever-dwindling size of a Pringles can. In all these cases, you create the video and then use your WordPress site to share it with a larger audience.
Tip
Depending on the type of site you create, your written content doesn’t need to be about the video—instead, the video could add supplementary information or a bit of visual distraction. For example, you may talk about your favorite coffee blend and add a video that shows the grueling coffee harvest in Indonesia. Used carefully and sparingly, video accompaniment can enhance your posts in the same way a whimsical picture cribbed from a free photo service can.
To present someone else’s video on your site, find the movie on a video-sharing site and copy the address. Most of the time, that video-sharing site will be YouTube, the wildly popular hub that rarely drops out of the top three world’s most visited websites.
And if you want to show your own videos, you’ll probably still turn to a video-hosting service like YouTube because the alternative—uploading your video files straight to your web server—has some significant drawbacks. Here are some of the reasons you should strongly consider a video-hosting service:
Bandwidth. Video files are large—vastly bigger than any other sort of content you can put on a site, even truckloads of pictures. And although you probably have room for your video files on your web server, you might not have the bandwidth allotment you need to play back the videos for all your visitors, especially if your website picks up some buzz and has a hot month. The result could be extra charges or even a crashed website that refuses to respond to anyone.
Encoding. Usually, the kind of file you create when you record a video differs from the kind you need when you want to share it online. When recording, you need a high-quality format that stands up well to editing. But when viewing a video over the Web, you need a heavily compressed, streamlined format that ensures smooth, stutter-free playback. Sadly, the process of converting your video files to a web-friendly format is time-consuming, and it often requires some technical knowledge.
Compatibility. In today’s world, there’s no single web-friendly video format that accommodates the variety of web browsers, devices (computers, tablets, and mobile phones), and web connections (fast and slow) out there. Video services like YouTube solve this problem by encoding the same video file multiple times, so that there’s a version that works well for everyone. You can do the same on your own, but without a pricey professional tool, you’re in for hours of tedium.
For all these reasons, it rarely makes sense to go it alone with video files, even if you produce them yourself. Instead, pick a good video service and park your files there. In the following section, you’ll start with YouTube.
Showing a YouTube Video
Hosting a YouTube video in WordPress is ridiculously easy. All you need is the video’s web address.
To get it, start by visiting the video page on YouTube. (If you’re one of the six people who haven’t yet visited YouTube, start at www.youtube.com.) If you haven’t already found the video you want, you can spend some time searching around.
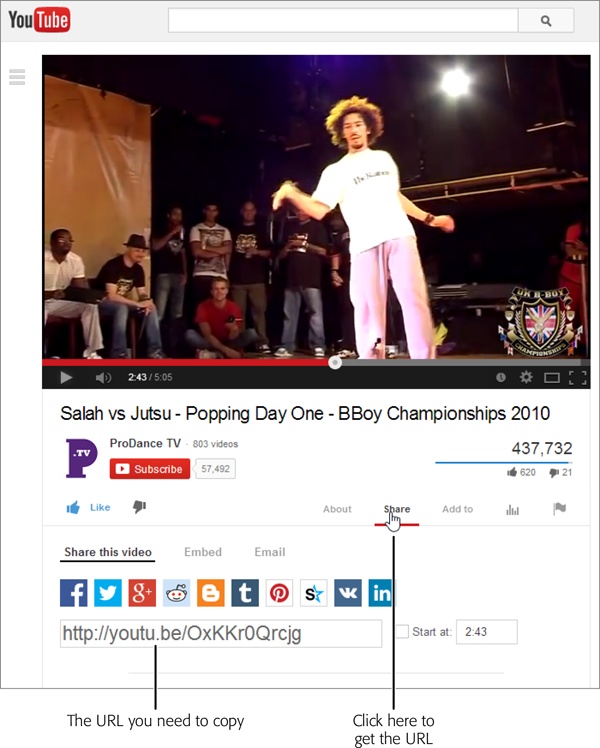
When you find the right video, click the Share link under the video window. A panel of information pops open, including a text box with the URL you need (Figure 10-17).
The URL will look something like this:
http://youtu.be/OxKKr0Qrcjg
The first part, youtu.be, is a more compact form of the video’s full web address (which starts with www.youtube.com/watch?v=). The string of letters and numbers after it uniquely identifies the video you want.
The next step is even easier. Paste the video URL into your WordPress post, on a separate line, in the location where you want the video to appear, like this:
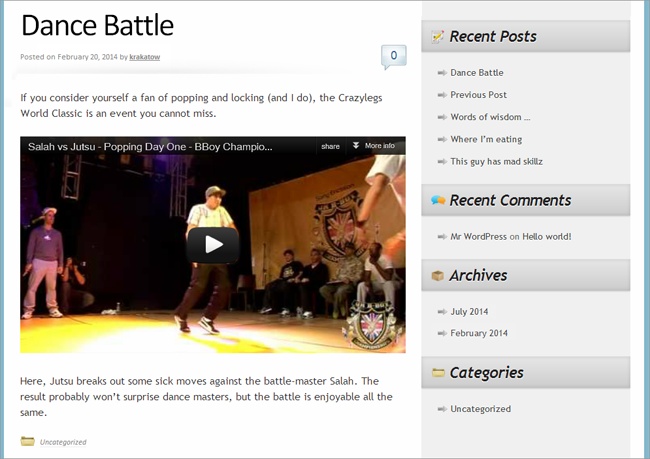
If you consider yourself a fan of popping and locking (and I do), the
World Classic is an event you cannot miss.

http://youtu.be/OxKKr0Qrcjg

Here, Jutsu breaks out some sick moves against the battle-master Salah ...
Now publish your post. You’ll be rewarded with another transformation, courtesy of WordPress’s auto-embed feature. This time the URL turns into an embedded video window (Figure 10-18).
Configuring the YouTube Video Window
If the embedded window looks the way you want it to, there’s no need to do anything else. But if you want to tweak its size, you can.
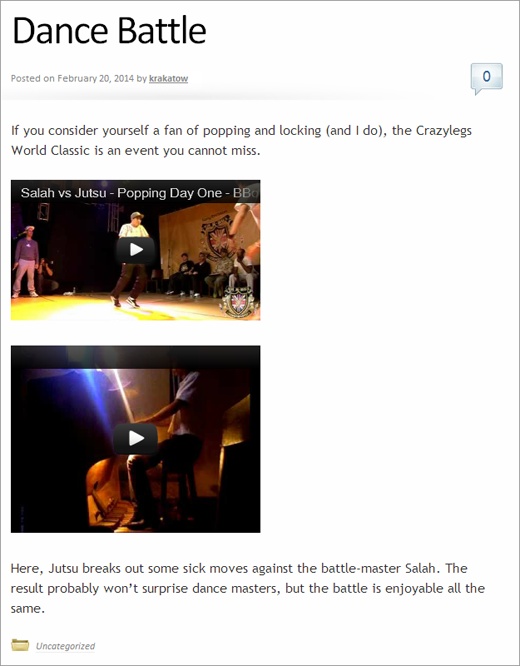
The easiest way to do that is by using the height and width attributes of the [embed] shortcode, as you did earlier. Here’s an example that caps the video window at 300 pixels wide, rather than letting it grow to fit the column it’s in (Figure 10-19):
[embed width="300"]http://youtu.be/OxKKr0Qrcjg[/embed]
This straightforward approach doesn’t always work. Certain themes and plug-ins accidentally disrupt the sizing process, leaving you with full-sized YouTube videos. To narrow down the cause of the problem, try disabling all your plug-ins one by one, and then re-enabling them individually until you find the misbehaving plug-in. If that doesn’t help, you can also try previewing your post with a different theme.
Note
The shape of the video window depends on the video itself. YouTube won’t stretch a video out of its normal proportions. For that reason, you should probably specify just the width or height of your video, but not both. If you do use both, your video window will get the dimensions you specify, but YouTube will pad the video with blank space to avoid stretching it.
Once you switch to the [embed] shortcode, you’re free to make a few other refinements. The trick is to tack extra pieces of information to the end of the YouTube URL. However, there’s a catch. This technique works on WordPress.com sites and on self-hosted sites that use the Jetpack plug-in. But if you try it on a self-hosted site that doesn’t use Jetpack, the altered URL will confuse the embedding processes and you’ll wind up with an ordinary link instead of a video window.
There are three details you can change by editing the URL. First, adding &rel=0 to the end of the URL hides YouTube’s “related videos” teaser, which usually plays after your video. Web authors use this feature to make sure their readers won’t catch sight of someone else’s content, become distracted, and then surf away to watch more videos or visit a different site. Here’s an example:
[embed]http://youtu.be/OxKKr0Qrcjg&rel=0[/embed]You can also set where playback should start and where it should end by adding &start and &end to the URL, along with a number of seconds. For example, this video player hides related videos, starts playback at the 1-minute mark (when the viewer presses the Play button), and pauses it at the 2-minute mark:
[embed]http://youtu.be/OxKKr0Qrcjg&rel=0&start=60&end=120[/embed]
Finally, it’s worth noting that you can do the same thing using a slightly different syntax with the [youtube] shortcode:
[youtube=http://youtu.be/OxKKr0Qrcjg&rel=0&start=60&end=120]
In the old days of WordPress (a couple of years ago), the [youtube] shortcode was mandatory, so it persists as a popular technique. But once again, your site needs to be on WordPress.com, or it needs the help of the Jetpack plug-in.
Showing Videos from Other Video Services
Although YouTube is the most popular video service, it’s not the only game in town. Happily, WordPress’s auto-embed feature lets you play video from a range of other media sites, including:
Hulu
Dailymotion
Vimeo
Viddler
blip.tv
Funny or Die
Qik
Flickr (for videos as well as pictures)
Revision3
WordPress.tv
As with YouTube, you simply supply a web address that points to a video on one of these sites, and WordPress does the rest.
Additionally, if you use WordPress.com or you installed Jetpack, you can use the following shortcodes to embed even more types of video:
The list of eligible sites is ever-growing, so don’t be surprised to find additional services listed when you check WordPress’s official list of auto-embeds (http://codex.wordpress.org/Embeds) and shortcodes (http://support.wordpress.com/shortcodes).
When you embed video, WordPress configures the size of the playback window to suit the content and to fit in your post area. However, in some situations, you might want to tweak the size to get it just right. If you use one of the video types from the first list, you can control the size of the video player by wrapping your URL in the [embed] shortcode and then adding the height and width attributes. If you use one of the more specialized shortcodes in the second list, you probably need to add similar height and width attributes to that shortcode. Here’s where things get a bit tricky, because many shortcodes have similar but maddeningly different syntax. To see exactly how to format a specific shortcode, check out the WordPress documentation at http://support.wordpress.com/shortcodes, and click the Full Instructions link next to the shortcode you plan to use.
Showing a Video from Your Media Library
Although a free video-hosting service meets most people’s needs most of the time, self-hosted WordPress sites can host their own videos. The basic approach is pure simplicity:
Click Add Media above the post editor.
This opens the familiar Insert Media window, which you used to add pictures and picture galleries earlier.
Drag your video file onto the Insert Media page.
Not any format will work. And, confusingly enough, there are more video formats than Ben & Jerry’s ice cream flavors. For best results, you should use a video file encoded with the high-quality, wildly popular H.264 video codec, and stored in the MP4 container format. If your file has the extension .mp4, you’re off to a good start.
Tip
If you don’t have an MP4 video file on hand, think carefully before you continue. If you upload a different video format, your video player may not work on certain browsers, on mobile devices, or on anything, actually. To straighten out the format of your video files, consider a good video converter like the free Miro Video Converter (downloadable from www.mirovideoconverter.com), which can convert almost anything to MP4 format.
Depending on the size of your video, you may have a bit of a wait. Grab a cup of coffee.
In the “Embed or Link” setting (on the right), pick Embed Media Player.
Your other option is to add an ordinary link that points to the media file.
Click “Insert into post.”
WordPress slots your video in using the [video] shortcode.
At the end of this process, expect to see something like this:
[video width="704" height="400" mp4="http://magicteahouse.net/brewing.mp4"]
Here, the [video] shortcode specifies the size of the video window (based on the dimensions of your video file) and identifies the video file stored on your site. When you publish your post, the shortcode creates a video window similar to the one you got with YouTube.
Although the process seems easy, plenty of caveats apply. First, it’s up to you to make sure that you have the not-inconsiderable space to store the video file, and the monthly bandwidth to show it to all of your viewers.
It’s also up to you to make sure you use a video file format that most browsers can play back. The previous example uses the most popular standard: an .mp4 video file. Most browsers can play it, but there are plenty of exceptions, including the Opera browser and old versions of Internet Explorer. Fortunately, WordPress relies on the nearly miraculous powers of a JavaScript tool called MediaElement.js (http://mediaelementjs.com). It rounds out most browser issues by intelligently switching to other players, like Flash or Silverlight, when a browser can’t play the file you supply. Thanks to MediaElement.js, the [video] shortcode shown above works reliably on almost as many computers as the YouTube shortcode (although it won’t work so nicely on mobile devices, because there’s no slimmed-down, low-bandwidth mobile version, like the sort that YouTube creates).
You have another option, but it’s impractical unless you’re ready to sacrifice your social life and spend hours of extra video-encoding time. Obsessive web developers can resolve format issues by providing fallback video files—multiple copies of the same movie in different formats. You can then specify a range of formats that the [video] shortcode can use. Here’s an example that supplies a standard MP4 video but adds fallback videos for the free WebM codec and for the Flash (.flv) player:
[video width="704" height="400" mp4="http://magicteahouse.net/brewing.mp4"
 webm="http://magicteahouse.net/brewing.webm"
 flv="http://magicteahouse.net/brewing.flv"]
If you find yourself in the difficult position of running into the limitations of YouTube, but not wanting to face the headaches of do-it-yourself video hosting with the [video] shortcode, there’s one more option. You can sign up with another video hosting service—one that may not be free, but will provide more features and control than YouTube does. The next section has the details.
Premium Video Hosting
As you learned earlier, it’s generally a bad idea to host videos on your own website, unless you’re a web development god with a clear plan. But there may be times when a free video-hosting site won’t suit your needs. Here are some of the problems you might encounter hosting your files on a free service:
Privacy. Free video services make your videos visible to the entire world. If you have a video with sensitive material in it, or one you want to sell to a group of subscribers, you won’t want it on a free video service where it’s exposed to prying eyes.
Ads. Video sharing services may try to profit from your free account by including ads. They use two basic strategies: playing a television-commercial-style ad before your video starts playing, or superimposing an irritating banner over your video while it plays. YouTube’s advertising policy is good—it won’t show ads unless you give it permission to (usually in a misguided attempt to make a buck) or you post someone else’s copyrighted content and they ask YouTube to slap on an ad (in which case they collect the money).
Content restrictions. Free video services won’t allow certain types of content. YouTube’s content policy is fairly liberal, allowing everything short of hate speech, pornography, and bomb-making tutorials. That said, videos are sometimes removed for disputable reasons, and popular videos are occasionally poached by traffic-seeking video thieves, who post their own copies and try to trick YouTube into removing the original, legitimate videos.
Note
There was a time when YouTube capped videos to a modest 15 minutes, and video-makers flocked to premium video services to get more time. But these days, YouTube will let you upload multi-hour videos as long as you verify your account by mobile phone. The process for doing this is described at http://tinyurl.com/long-vids.
To escape these restrictions, you need to pay for a video hosting package. For example, the popular video site Vimeo (http://vimeo.com) offers free basic hosting and a more flexible premium service that costs $60 per year. The latter offers unlimited bandwidth, no length restriction, and the option to limit your videos to specific people, who must sign in to see them. Vimeo is particularly generous with storage space, letting premium members upload 5 GB of video per week. It also gives viewers high-quality streaming right out of the box. To get the same quality on YouTube, a viewer needs to click the gear icon in the bottom-right corner of the video window and manually pick a higher resolution.
WordPress also offers its own video hosting service called VideoPress. Like Vimeo, VideoPress offers unrestricted bandwidth and lets you upload large files. It also integrates well with WordPress.com, giving you the option to limit video viewing to your site’s registered users. (You’ll learn how to create private sites with registered users in Chapter 11.) VideoPress is particularly well suited to WordPress.com sites, because it’s integrated into the WordPress.com hosting service, and only a simple upgrade away. However, it’s far stingier with space than Vimeo. You start with a paltry 3 GB of storage, and if you need more, you need to pay a yearly fee, which rings up at about $20 per 10 GB.
To sign up for VideoPress, you buy the VideoPress upgrade. Click Store in the dashboard, look for the VideoPress box, and then click “Buy now.” Or consider buying a Premium account, which is described in the box on Premium and Business Accounts.
Once you sign up for VideoPress, you upload videos by clicking Add Media above the post editor box. Uploading a video is more or less the same as uploading a picture, except that you can specify a few more details, such as a rating (from a family-friendly G to an explicit X-18) and a thumbnail (the still image the video box displays before the video starts playing). The upload process also takes quite a bit longer.
Note
If you have high-quality HD video, you may need to use a video tool to re-encode it to a leaner, more heavily compressed format before uploading it. Otherwise, you’ll be stuck with a gigantic file on your WordPress.com site, eating up valuable space. (This is different from the process you follow when you upload a video to YouTube, which takes any file you can throw at it and doesn’t complain about space.) You may also experience technical troubles if you upload huge files. Although VideoPress officially supports files of up to 1.4 GB, gargantuan uploads can fail, sometimes after hours of waiting.
When you finish uploading a video, you can add it to your post using the trusty “Insert into Post” button. This embeds a VideoPress shortcode that looks something like this:
[wpvideo MTFnELOW]
The result is a VideoPress window that looks a lot like a YouTube video player.
Playing Audio Files
Sometimes, you’ll want to let readers play an audio clip (or several) without using a full-blown video window. An obvious example is if you’re a music artist promoting your work. However, audio files are equally well suited to the spoken word, whether that’s an interview, talk show, sermon, audio book, or motivational lecture. Audio files are particularly useful if you want to join the Web’s thriving community of podcasters—sites that provide downloadable, long audio files that users can listen to on the go (for example, on their iPods or smartphones).
You might expect that adding audio to your WordPress site is easier than adding video. After all, audio files are smaller and simpler than video files. But you’ll face many of the same issues. In the following sections, you’ll consider three strategies for getting audio into a web page.
Adding a Basic Audio Player
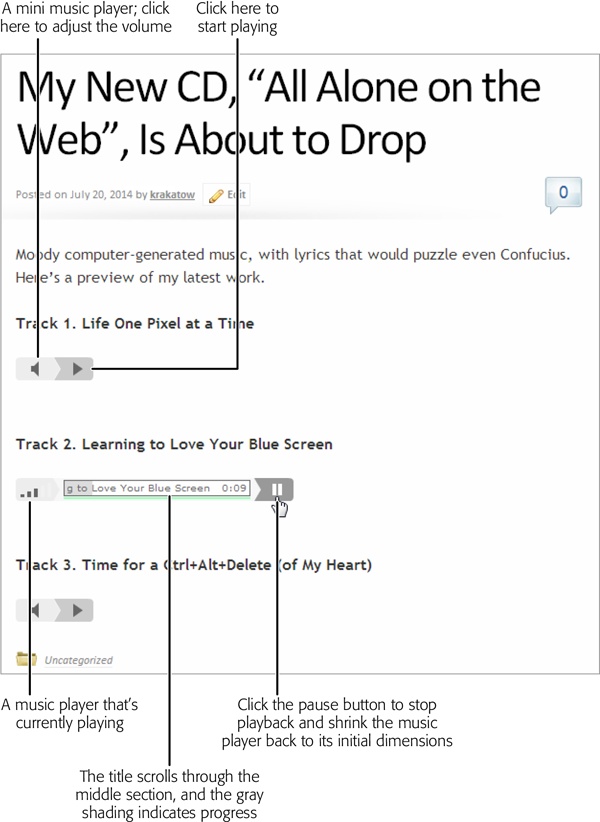
The simplest approach to hosting audio is to upload the file to your website. You can then provide a link that readers can use to download the file or (even better) a tiny audio player that lets them listen without leaving your site (Figure 10-20).
Before you get started, you need to upload your audio file. Ideally, you’ll upload an MP3 file to ensure that it plays on most browsers. Technically, Internet Explorer, Safari, and Google Chrome play MP3 files, but Firefox and Opera don’t. However, most websites get by using the Flash player to fill the gap. Essentially, the process works like this:
If the browser you use recognizes both MP3 files and HTML5 markup, WordPress creates an HTML5 <audio> element that points to your MP3 file. The browser then creates a miniature audio player, like the ones shown in Figure 10-20.
If a browser doesn’t play these two standard file types, WordPress uses a small Flash program that creates a tiny audio player. The end result is the same—your guests see a simple music player.
In the unlikely event that a browser can’t meet either of these requirements, WordPress swaps in an ordinary HTML link. Guests click the link to download the audio file, where they can play it using a desktop music player.
The Flash fallback solution is a good one, but it’s a bit too messy to implement on your own. Fortunately, WordPress does all the work for you with the [audio] shortcode, which is every bit as straightforward as it should be. You simply add an attribute named src that points to your audio file. Here’s an example that launches an MP3 file on another web server:
[audio src="http://wpcom.files.wordpress.com/2007/01/mattmullenweg-interview.mp3"]
You can also use the [audio] shortcode to play music files stored on your own website. But before you go any further, there’s a significant catch that applies if WordPress.com hosts your site. Unless you buy a space upgrade or have a Premium account (Premium Video Hosting), WordPress.com won’t let you upload any audio files, even if you have plenty of space left in your initial 3 GB storage allotment. Instead, you can play only audio files stored on other sites.
Depending on what you’re trying to accomplish, this limit might be a minor inconvenience or completely unworkable. If it’s the latter, you have two options. You can buy a space upgrade for as little as $20 a year (click the Store menu in the dashboard to sign up), or you can use a music hosting service, as covered on Using a Music-Sharing Service.
To play an audio file directly from your site, you need to upload it to the media library and then embed it with the [audio] shortcode. Here’s how:
First, click Add Media above the post editor.
This is the same link you used to upload a picture.
In the Insert Media window, pick your audio file.
Now wait for it to upload.
When you finish uploading the track, fill in its title.
The music player displays the title while the track plays (Figure 10-20). If you don’t supply a title, the player lists it as Track 1.
In the “Embed or Link” setting (on the right), pick Embed Media Player.
Your other option is to add an ordinary link to your audio file, which isn’t what you want.
Click “Insert into post.”
Now WordPress adds the [audio] shortcode.
Publish your post.
You’re rewarded with a tiny music player. You can repeat this process to add as many music players as you want to the same page.
Adding a Playlist
You can use the [audio] shortcode to add as many audio playback bars as you want. Figure 10-20, for instance, has three. But if you want to give your visitor the chance to peruse a group of related tracks—like a concert of songs performed by your trombone quartet—there’s a better way. You can group your tracks together in a playlist.
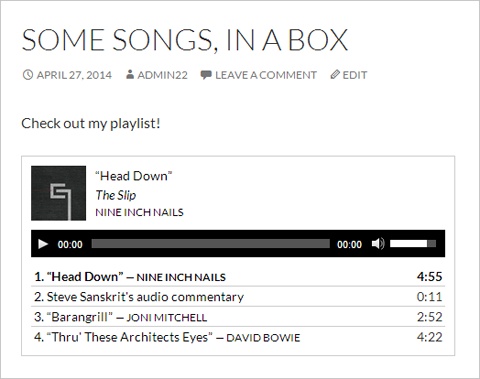
A playlist is a list of audio or video files with a single playback bar or video window (see Figure 10-21). Your visitor can click a specific track to play it, or let the playlist move automatically from one file to the next.
Here’s how to add an audio playlist (see the Note below for video playlists):
Click Add Media.
Drag your audio files onto the Insert Media window,
You can skip this step if you already uploaded all the files you need.
Once you’ve uploaded all your files, click Create Audio Playlist on the left.
The Create Audio Playlist command appears in the Insert Media window only if you have at least one audio file in your site’s media library.
Click each track you want to use in your playlist, and fill in its details on the right.
Every audio file in the playlist accepts three pieces of information:
Title. The track title shows up in the playlist, and in the playback box when WordPress starts playing the track. WordPress figures out the title by reading the track’s metadata—the tiny bits of information stored in the audio file that identify the artist, song title, album, and more. But if the title isn’t quite right, you can edit it.
Caption. The caption is an optional bit of information. Initially, it starts out blank. However, if you supply a caption, WordPress shows it in the playlist instead of the title and author information. (For example, in Figure 10-21, the second track has a caption and the other three do not.) Even if you write a caption, the playback box still shows the title and author information when it starts playing the track.
Description. WordPress also gets this information from the metadata in the audio file, if it’s available. The description is a short bit of text that provides extra information, like this: “Head Down from The Slip by Nine Inch Nails. Released: 2008. Track 6 of 10.” Currently, the playlist feature doesn’t use the description.
Click the “Create a new playlist” button.
This adds the tracks you picked to your fledgling playlist.
Configure your playlist.
Configuring a playlist is much like configuring a picture gallery. You can drag your tracks around to change their order, and on the right, you can alter a few basic settings:
Show Tracklist. If you clear this checkbox, you’ll get a music player that shows the track it’s currently playing but doesn’t show the full playlist underneath. That means the listener can’t skip to a specific song.
Show Artist Name in Tracklist. If you clear this checkbox, each entry in the playlist will show the track’s title, instead of the title and author. This setting has no effect on tracks that have a caption.
Show Images. If set (which is the original setting), WordPress will contact a music database on the Web and fetch the appropriate album cover for your track. It then displays that tiny thumbnail image in the playback box when it plays the track (as in Figure 10-21). Obviously, this option works only for professionally released work. (And don’t forget to get the copyright holder’s permission before you put her work on your site.)
Click “Insert audio playlist.”
WordPress adds the [playlist] shortcode to your post.
Publish your post.
The payoff is a simple but effective playlist, live in your post.
Note
You can create a vdeo playlist in much the same way as an audio playlist. The difference is that you upload video files instead of audio files, and you click a link named Create Video Playlist instead of Create Audio Playlist. The finished result is a bit different, too—it looks like a standard video window with a playlist attached underneath.
Using a Music-Sharing Service
If you’re serious about sharing a set of audio tracks—for example, you’re a band trying to popularize your work—your best bet is to sign up with a serious music-sharing service.
The first advantage is that a good music service increases the exposure of your audio tracks. Casual music browsers may stumble across your work, similar artists may link to it, and just about anyone can add a comment or click Like, which boosts your buzz. The second advantage is that you get a number of extras, like the ability to provide music in different formats for different browsers (without resorting to Flash), and a sleek jukebox-style player that seamlessly plays a whole set of your songs.
WordPress has built-in support for the following music-sharing services through its auto-embed feature:
If you have a WordPress.com site or a self-hosted site with the Jetpack plug-in, you get two extra services courtesy of shortcodes:
[bandcamp] for audio on Bandcamp
[8tracks] for audio on 8tracks
Once again, the shortcode syntax varies subtly for each service, so you need to get the exact details at http://support.wordpress.com/shortcodes. Figure 10-22 shows a site that uses SoundCloud.
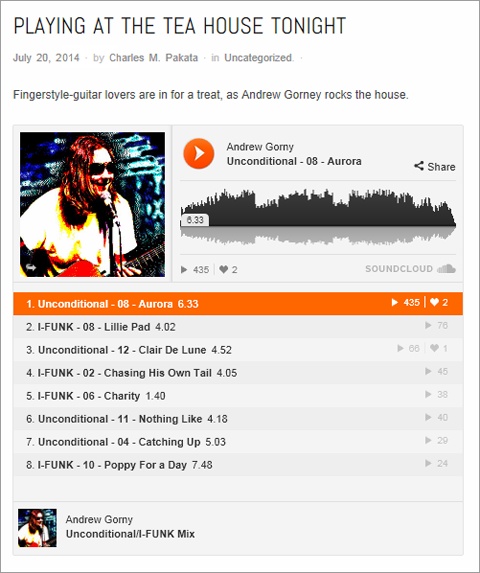
SoundCloud offers a sweet deal: no charge for the first 120 minutes of audio you upload, and a polished music player that makes almost any music look good. If you need more storage, you have to pay a yearly fee. (Currently, that’s $55 a year for 240 minutes, or $135 per year for unlimited uploads.) If you plan to sell your music, a service like Bandcamp may make more sense—it gives you unlimited room to store audio but takes a percentage of your sales, if anyone buys your tracks.
To sign up with SoundCloud, start at http://soundcloud.com, click Sign Up, and follow the instructions. Once you upload some audio files, you can start embedding them in your WordPress posts. SoundCloud gives you the option of a single-track music player, or you can assemble a group of tracks into a playlist (as in Figure 10-22).
To embed your SoundCloud content in a WordPress post, browse to the song or playlist you want to use, and then copy the URL out of the address bar. Here’s the URL that creates the music player in Figure 10-22:
https://soundcloud.com/andrewgorny/sets/ag-com-splash
If you want to adjust the size of the SoundCloud player, use the [embed] shortcode with the height and width attributes.
Podcasting
So far, you’ve seen how to let viewers play individual audio tracks or a playlist with a bunch of music on it. Podcasting is a similar, but slightly different, way to present audio. It gives readers the choice of listening to audio files the normal way (in their browsers by clicking the Play button) or downloading the audio files so they can put them on a mobile device.
The central idea with podcasting is that you prepare content that busy people will listen to on the go. Usually, the content is long—30 minutes to an hour is common for podcasts. If your audio file is only a couple of minutes long, it’s not worth a visitor’s trouble to download it and transfer it to a mobile device.
Podcast creators also tend to organize podcasts in groups—for example, they make each audio file an episode in a series, and release them at regular intervals (say, weekly). Good examples of podcasts include a web talk show with commentary and interviews, a motivational lecture, a spoken chapter from an audio book, or a 45-minute techno mix for a workout session.
Note
The word podcasting is a mash-up of pod and broadcast—pod because this form of audio file distribution first gained popularity with the iPod music player, and broadcasting because a podcast creator provides easily accessible, regularly released audio “shows,” a concept that’s a bit like television broadcasting.
Creating Podcast-Friendly Audio
You don’t need any special technique to upload a podcast audio file. You can simply create a post and add an ordinary link to the file. If you want to get a bit fancier, you can use the audio player feature described on Playing Audio Files. That way, visitors can play the audio in their browsers if they haven’t caught the podcast bug.
You should save podcast audio as MP3 files, because a range of mobile devices can play back that format. You can also create podcast video files, but that process is a bit more complicated. You first need to make sure the video is in MP4 format, then you have to upload it to a host, and finally you need to link to it from your post.
Note
If you want to use a video file for podcasting and embed it so guests can play it directly inside their browsers, you need the help of a high-caliber podcasting plug-in, as explained in the box on Better Podcasting with a Plug-In.
Getting Your Podcast Feed
Although podcast audio is the same as normal audio, there’s a slight difference in the way you present podcasts. For readers to find your podcasts quickly and download new episodes easily, you need a way to separate these audio files from the rest of your site.
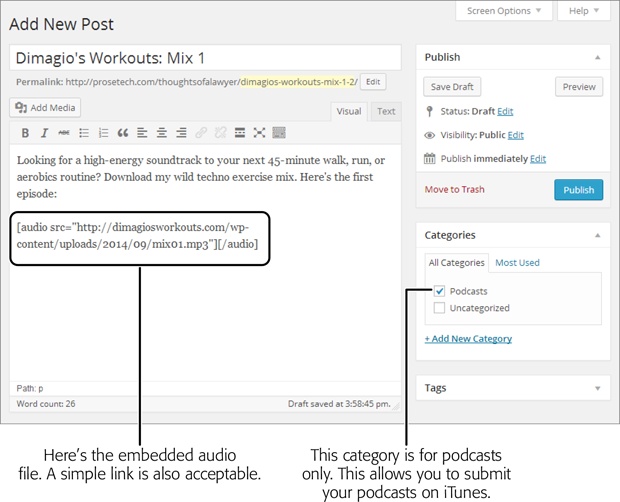
To do that, you create a dedicated category for posts that contain podcasts. You can give this category a name like “Podcasts” or “Lectures” or “Audio Book.” Then, when you create a new post that has an audio file in it and you want to include that audio as part of your podcast, assign the post your podcast-specific category (Figure 10-23). Depending on the structure of your site (and the way you let viewers browse it), you may decide to set two categories—one to identify the type of post (say, “Sports”), and one to flag the post as a podcast (“Podcasts”).
You group audio files into a single podcast category so you can generate a feed for that category. As you’ll learn on Managing Your Site’s Feed, a feed is a sort of index to your content. In the case of podcasting, your feed tells other programs and websites where to get the podcast files on your site. It also lets you notify visitors when you publish a new file—say, if they subscribe to your podcast in iTunes.
Note
iTunes is one of the favorite tools for podcast-lovers. If your site offers podcasts and you’d like to use them to attract new visitors (and why wouldn’t you?), you need to submit some podcast information to iTunes.
You can get the feed for a category using a URL with this syntax:
http://[Site]/category/[CategoryName]/feed
So if you have a site named http://dimagiosworkouts.com, you can get a feed for the Podcasts category like this:
http://dimagiosworkouts.com/category/podcasts/feed
This is a valuable link—it’s the piece of information you need to supply to iTunes to register your podcast.
To register with iTunes, start by reviewing Apple’s instructions at http://tinyurl.com/podcastspecs. First, read the “Testing Your Feed” section, which explains how to make sure your feed includes the podcast files you expect, and that the feed works. Then, follow up with the instructions in the “Submitting Your Podcast to the iTunes Store” section to learn how to officially tell iTunes about your feed, and make it visible to a podcast-hungry audience of millions.