Chapter 14. Building an Advanced WordPress Site
In the previous chapter, you learned how to stretch WordPress’s capabilities by editing your theme files. You saw how a few small changes, like adding a style rule or changing a section of PHP code, let you customize details that would ordinarily be out of reach.
Tinkering with your WordPress theme is a great way to make a number of small but genuinely useful tweaks to your site. But once you start poking around the inner workings of a theme, you open the door to a more ambitious endeavor: reworking the entire theme to create a completely customized site.
In this chapter, you’ll learn how to modify a theme by creating a showcase site for the furniture company Distinct Furnishings. You’ll see how to create a browsable product catalog, with custom post types and custom category pages. You’ll even get a taste of ecommerce with a simple, yet functional, shopping cart powered by PayPal.
Note
The theme customizing you’ll do in this chapter is just a first step in a long journey, but it’s a valuable one even if you choose not to design your own theme from scratch. That’s because the more you know about the inner workings of WordPress, the better you can evaluate themes you might want to use, and the more successful you’ll be if you decide to customize a theme.
Planning Your Site
The first step to building an advanced, customized site is to get out a notepad and start planning. Before you set fingers to keyboard, you should ask (and answer) a few questions:
It’s important to think about these questions early on, because you need to consider how you want visitors to interact with your site. And that, in turn, determines the kind of changes you need to make to your theme. In the case of Distinct Furnishings, for example, the site’s job is to display information about the different pieces of furniture the company sells. Visitors will arrive at the site and browse through the items that interest them. Essentially, the Distinct Furnishings site is a product catalog, which is a common type of advanced WordPress site.
Picking a Theme
Every WordPress theme has similar underpinnings, but no two themes are quite the same. If you start out editing a theme that isn’t well suited to your site, you’ll create extra work for yourself. So before you commit to a theme, make sure you’ve got the best, most workable one for your needs.
There are many ways to pick a good theme for customization:
Some WordPressers pick one they understand (like Twenty Twelve) and use that in all their customization projects.
Some web designers pick a theme that’s as close as possible to the final result they want. This means they have much less customization to do, but it also forces them to spend time learning the subtly different workings of a new template.
Some WordPress pros use a heavily stripped-down theme, which provides very little beyond the core WordPress code. This way, they don’t need to worry about removing built-in features and embellishments they don’t want, but it also means they need to supply the majority of the markup and styles that format the site, which takes time and requires some serious web design skills.
Some WordPressers favor theme frameworks, which are simple, foundational themes designed for other developers to extend. The drawback is choice and complexity: There are many theme frameworks to choose from, and they all have their own subtly different structure. (To learn more, read what WordPress has to say at http://tinyurl.com/theme-f.)
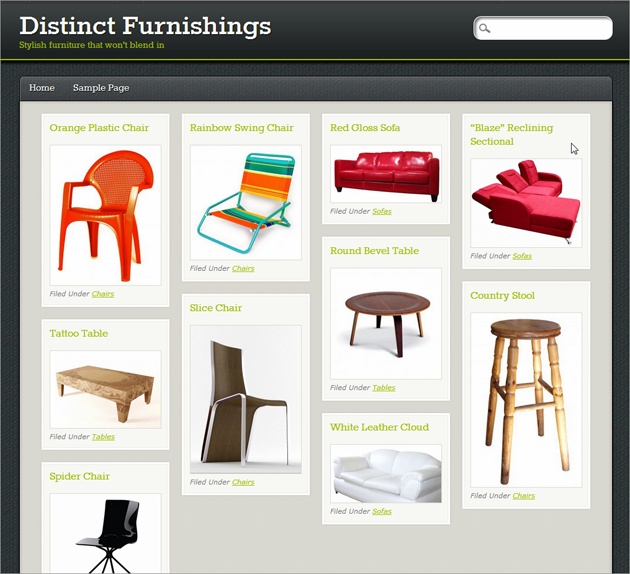
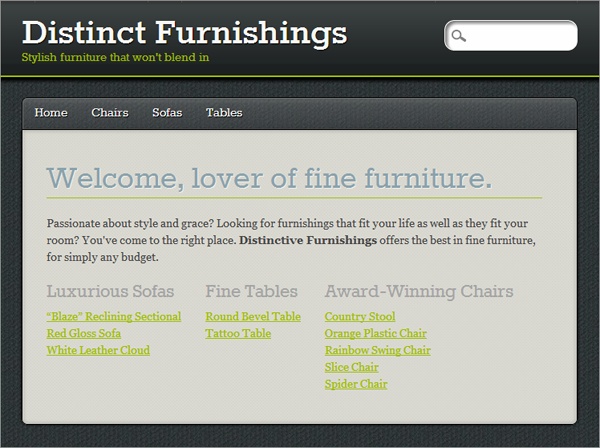
The Distinct Furnishings site follows the second approach. It uses the PinBlack theme (http://tinyurl.com/pinblack), which already has most of the right layout and formatting in place (Figure 14-1).
Before you go any further, you need to decide whether you want to work on a child theme (Protecting Yourself with a Child Theme) or the original theme files. As you learned in Chapter 13, child themes are always the right choice when you make cosmetic changes to a theme you love. They’re also a good idea if you plan to make targeted changes to specific aspects of a theme, while leaving the rest of it alone. But if you plan to make extensive changes that will require you to modify most of the template files in a theme, a child theme doesn’t make as much sense. Since you’ll override almost all the functionality in the original template, there’s little reason to use a child theme that retains its relationship with its parent.
Once again, there’s no clear-cut answer for all situations. It depends on how complex a theme you start with, and how heavily you plan on customizing it.
If you decide to create a child theme that extends an original theme, follow the instructions on Creating a Child Theme.
If you decide to create a completely new theme that replaces the original theme, continue reading the next section. This is the approach the Distinct Furnishings example follows with the PinBlack theme.
Creating a Custom Copy of a Theme
In theory, you can edit any theme in the dashboard without taking any special steps. But doing so is risky. Eventually, the creator of the original theme will distribute an update, and it’s all too easy to accidentally install the update and wipe out all your carefully crafted customizations.
To protect yourself, create a copy of the theme that WordPress won’t ever try to update. Here’s how:
Download the theme files to your computer.
You can do this two ways. One is to use an FTP program and drag the appropriate theme folder (say, pinblack) from your site’s /wp-content/themes folder to your computer.
The other option is to visit the WordPress themes directory at http://wordpress.org/themes. Search for the theme you’re using, view it, and then click Download. WordPress stores the theme files in a ZIP file. Double-click the ZIP filename to peek inside, find the theme folder, and copy that folder to your computer (say, the desktop) so you can edit the files it contains.
Open the theme’s style.css file in a text editor.
Usually, that means Notepad on a Windows computer and TextEdit on a Mac.
At the top of the file, you see the header comment with its basic information about the theme.
Change the theme name.
For example, where it says this:
Theme Name: PinBlack
Change it to:
Theme Name: PinBlack_Custom
This is the name WordPress will use in the dashboard for the copied theme.
Remove the theme URL.
That’s the line that starts with “Theme URI.” Find it and delete it. This severs the link between your theme and the original one, ensuring that any theme update won’t overwrite your customized files.
Rename the theme folder to match the theme name.
For example, if you used the name PinBlack_Custom, you might rename the theme folder pinblackcustom. It doesn’t really matter what name you use, as long as you change the folder name from the original (pinblack) in some way.
Upload the new theme to your site.
You can do this two ways, too. The most direct is with an FTP program, where you drag the new theme folder (say, pinblackcustom) from your computer to your site’s /wp-content/themes area.
The other option is to ZIP up your theme folder, and then upload it using the dashboard. Once you create the ZIP file, choose Appearance→Themes, click the Install Themes tab, and then click Upload. Select your ZIP file (click Browse or Choose File—the button’s name depends on your browser), and then send it off to your site (click Install Now).
Either way, once you upload the custom version of your theme, you can start using it.
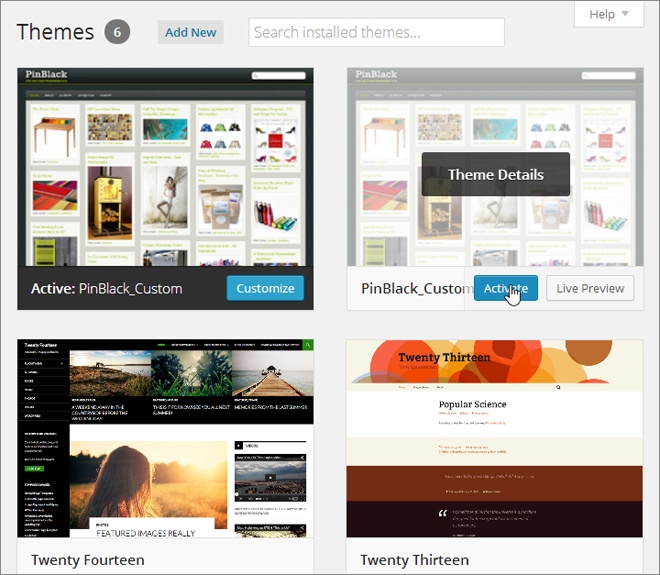
Choose Appearance→Themes, point to your theme, and then click Activate.
Figure 14-2 shows the PinBlack_Custom theme being activated.
Adding New Types of Posts
Throughout this book, you’ve relied on two basic WordPress ingredients: posts and pages. But WordPress has a semi-secret superpower: It can manage other types of content, provided you define them first. These are called custom post types.
Consider the Distinct Furnishings site. Its goal is to present a product catalog that describes the items that it offers for sale. You could put each furniture item into an ordinary post, but that approach could get messy, especially if you want your site to feature ordinary news-style postings as well as product postings.
A better system is to create a custom post type called product that’s tailored to the furniture items you want to show. Using this post type, you can create a separate product post for each piece of furniture in the catalog.
Product posts (or any type of custom post) are a lot like ordinary posts, except that they come with extra features. For example, you can choose to put your product posts in a separate section of your website, organize them in a different way, and attach different bits of information to them. Custom post types are also a linchpin of professional ecommerce plug-ins and themes, as you’ll learn at the end of this chapter.
Note
Custom post types are the gateway between an ordinary blog and a true content-management system (CMS)—in other words, they let you create a site that can display any type of content you create.
Here’s the catch: Creating a custom post type is a bit of work. Not only do you need to define a custom post type (using code or a plug-in), you also need to alter your theme to use it. In fact, without these changes, your custom post type won’t appear on your site at all.
In the following sections, you’ll consider two ways to create a custom post type for products. First, you’ll consider the raw code approach, which requires nothing more than the WordPress dashboard and a bit of bravery. Then, you’ll pick up a plug-in that can do the same job more efficiently.
Defining a Custom Post Type in Code
To create a custom post type, you begin by choosing a name for it. This name should be short, with all lowercase letters and no fancy characters. (Hyphens are technically allowed, but can cause various annoyances, so avoid them.) Examples of good post type names include review, recipe, book, employee, exhibit, article, and so on. Distinct Furnishings uses a custom post type named product.
Someday in the future, WordPress may offer a dashboard menu for creating custom post types, but today it asks you to do the work the hard way, by running a snippet of code. You add this code to your theme’s functions.php file—the all-purpose theme extender you use to unlock new features (Extending WordPress with Functions.php).
To edit functions.php, choose Appearance→Editor in the dashboard, and then click the “Theme Functions (functions.php)” link on the right. Scroll down past all the code that’s already there. You can add your code at the end.
Tip
If you’re working with a child theme, you won’t already have a functions.php file, but you can make one (Step 1. Find the Template File). Once you create a new, blank functions.php file, write <?php on the first line to begin a block of PHP code. Then add the code that registers your custom post type underneath.
The easiest way to register a custom post type is to copy a ready-made block of code and change the details to suit your post type. Here’s an example that you can paste straight into the functions.php file on your site, provided you edit the details in bold:
function create_product_post_type() {
  $labels = array(
   'name'           => 'Products',
   'singular_name'  => 'Product'
  );
  $args = array(
   'labels'     => $labels,
   'public'     => true,
   'supports'   => array( 'title', 'editor', 'thumbnail', 'excerpt' ),
   'taxonomies' => array( 'category' )  );
  register_post_type( 'product', $args );
}

add_action( 'init', 'create_product_post_type' );
Tip
Many parts of this chapter introduce useful snippets of code that you can adapt for your own site. Rather than type this code in by hand, you can download these excerpts from the Missing CD page for this book (http://www.oreilly.com/pub/missingmanuals/wpmm2e). You can then modify them and paste them into your own template files. And if you want to browse the example site from this chapter, visit http://prosetech.com/wordpress.
This code has two pieces. First, it includes a custom function named create_product_post_type(), which defines the custom post type. Then, it uses the add_action() function to tell WordPress to run the create_product_post_type()function when it initializes the theme. This makes sure that your site starts out with your custom post type, ready to go.
Note
The name you use for your custom-type-creating function is unimportant, as long as you’re clear, consistent, and you don’t use the name of an existing function. The name create_product_post_type() makes sense in this example, because it registers a new custom post type named product. If you created a custom post type for movie reviews, for example, you might choose to name the function create_review_post_type(), but this detail doesn’t change the way the code works.
Inside the create_product_post_type() function is the meat of the code: the instructions that determine the key details for your new post type. When registering a custom post type, you have the chance to specify an avalanche of settings, including many minor details. The current example includes just the essentials:
Name and singular name. These are the descriptive titles that appear in the dashboard, as you’ll see on Making Your Custom Post Type Appear on Your Site. Choose names that match your post type. In the Distinct Furnishings example, the custom post type is product, so it makes sense to use the singular name Product and the plural name Products. (But it’s not always as straightforward as adding an “s.” For example, if you have a custom product type called story, you’d want to use the titles “Story” and “Stories.”)
Public. If a post type is public, it appears in the dashboard, allowing you to manage all the posts of that type. In the case of Distinct Furnishings, that means you can log in to the dashboard and create new products or edit existing ones, as you’ll see shortly. Private post types are hidden from view and managed with code. (For example, plug-ins sometimes use private post types for their own information-storing purposes.)
Supports. A custom post type can use some or all of the features of ordinary posts and pages. You get the features you want by including them in a list. In this example, products support featured images and excerpts, but not revision-tracking or comments. For the list of features from which you can choose, go to http://tinyurl.com/reg-cpt.
Taxonomies. As you learned earlier in this book, a taxonomy is a way of organizing posts. In this example, the new product post type uses the standard category organization system, as do posts. The product post type doesn’t elect to use tags—although it could, if you replaced (
‘category’)with (‘category’, ‘post_tag’). But the most powerful (and complex) approach is to create your own taxonomy. You’ll dip your feet into those waters on Adding eCommerce.
Finally, the register_post_type() function is the part that works the magic, creating the custom post type according to the recipe you provide. When registering a custom post type, you need to provide the all-lowercase name you picked, which is the key bit of information that identifies your type.
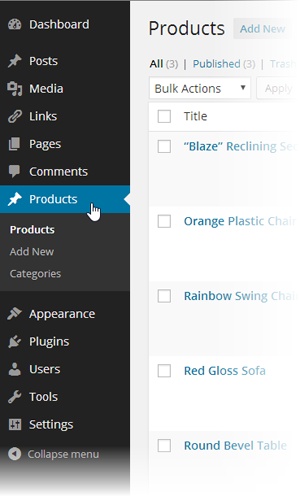
Once you add this code to the functions.php file, it’s time to see if you successfully created the post type. Click the Update File button to store your changes, and then refresh your browser. Assuming all is well, your new post type will appear in the dashboard menu (Figure 14-3).
There’s one more task to carry out before you continue. Because of a quirk in the way WordPress handles permalinks, you need to force it to refresh its permalink settings when you create a custom post type. If you don’t, WordPress may fail to show posts that use your custom post type. To fix this problem, follow these steps:
Choose Settings→Permalinks in the dashboard.
Make sure you’re using one of the pretty permalink settings, such as “Post name” (Permalinks on a Self-Hosted Site).
Click Save Changes, even if you haven’t changed anything.
Now you’re ready to start adding content to your site.
Creating Sample Content
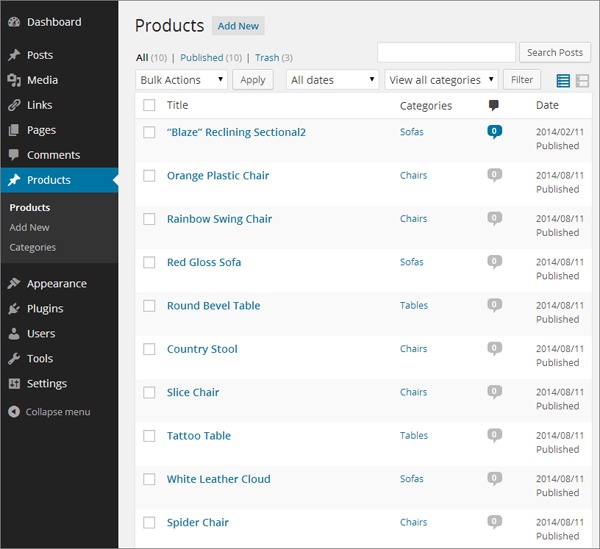
Now that you have a custom post type, you’re ready to put it to use by creating some sample posts. Adding a post that uses a custom post type is the same as adding an ordinary post, but instead of choosing Posts→Add New, you choose Products→Add New (Figure 14-4).
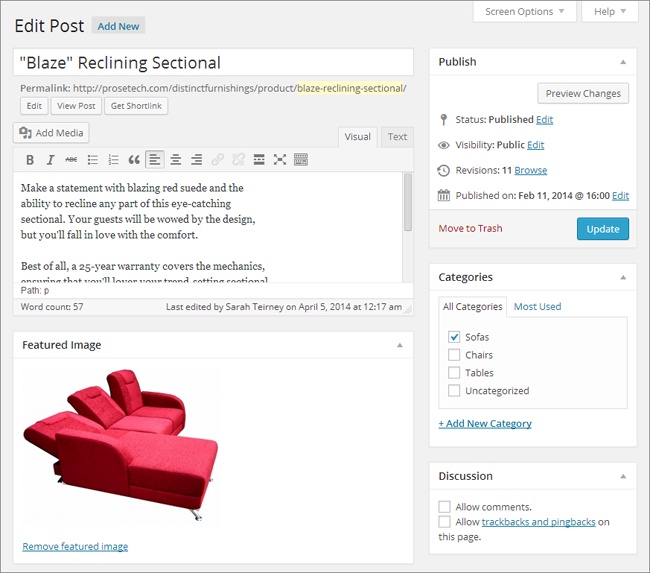
Just like an ordinary post, your new product post gets its own page and permalink. And just like an ordinary post, you click Preview to take a look at the work in progress and Publish to add it to your site. When you finish, choose Products→Products to look at a list of all the products you added (Figure 14-5).
Making Your Custom Post Type Appear on Your Site
So far, life with custom post types is good. In the Distinct Furnishings site, you can easily review your products and add new ones. But dig a little deeper, and you’ll find a glaring problem. Although you can visit each product post using its permalink (for example, http://distinctfurnishings.net/product/red-gloss-sofa to take a look at the Red Gloss Sofa), your products won’t appear in any of WordPress’s archive pages. These include the pages that display a list of posts by author, category, tag, or date, and the home page that shows the reverse-chronological listing of all your posts.
In other words, if you hit up the home page, you’ll find it empty. And if you visit a category page like http://distinctfurnishings.net/sofas, you won’t see the products you put in the Sofas category.
There are two ways to fix this. The most versatile approach (and the one preferred by WordPress experts), is to create your own archive pages that use custom queries to pull out the product posts you want, in the order you want them. You’ll learn how to do that later in this chapter (starting on Creating Custom Category Pages). But in the meantime, you can use a simpler solution: Tell WordPress to always include your custom post type in all its archive pages. You do that by revisiting the functions.php file and adding one more block of ready-to-roll code:
function add_product_to_archives( $wp_query ) {
    $types_array = array( 'post', 'product' );
    if( is_archive() && empty( $query->query_vars['suppress_filters'] ) ) {
        set_query_var( 'post_type', $types_array );
    }
}

add_action('pre_get_posts', 'add_product_to_archives');
This code tells WordPress to include product posts in all its archive pages. (If you created a different custom post type, substitute its name instead of product in the code above.)
Now if you visit the Distinct Furnishings home page, you’ll see a list of all its products, just like the one shown in Figure 14-1. (Of course, the arrangement of these products needs a bit of work to look good, but that’s a task you’ll tackle on Building a Better Home Page.)
Defining a Custom Post Type with a Plug-In
Creating a custom post type with code really isn’t that bad. As long as you have the right code in hand, it’s a simple case of copy, paste, and edit. However, even WordPress gurus get tired of writing code—and exasperated by the way minor typos can cause big-time headaches.
The problem gets worse if you get more ambitious and decide to add custom taxonomies to your site. As described in the box on Classifying Your Posts with Custom Taxonomies, custom taxonomies let you attach extra bits of information to your custom post types. For example, Distinct Furnishings might use custom taxonomies to add color, style, and price information to its products. The problem is that every custom taxonomy needs to be registered in code, much like every post type, and that adds up to a tedious afternoon.
For all these reasons, most WordPress developers use some sort of plug-in to create custom post types. Two of the best and most popular are Custom Post Type UI (http://tinyurl.com/cust-pt-ui) and Types (http://wordpress.org/plugins/types). Both work the same way: They add tools to the dashboard that let you define new posts types and new taxonomies, no coding required.
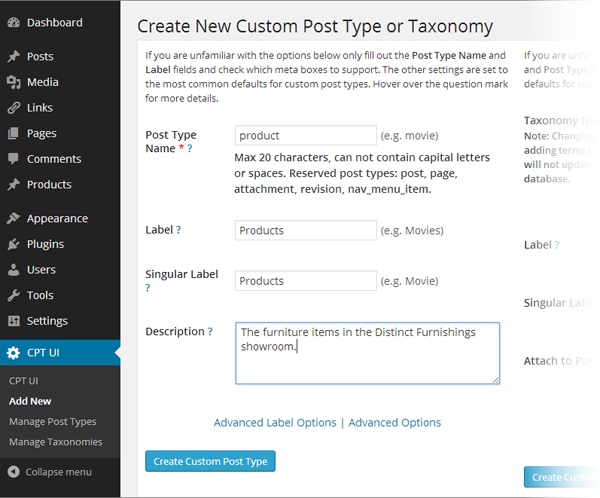
For example, if you install and activate the Custom Post Type UI, you can follow these steps to create a custom post type:
Choose CPT UI→Add New in the dashboard menu.
This brings you to a management page where you can create a new custom post type (using the boxes on the left) or a new taxonomy (on the right).
Fill in three key details: the name of your custom type, the plural and singular labels, and an optional description (Figure 14-6).
Click Advanced Options.
You’ll see a whack of extra settings (all of which are explained, somewhat tersely, in the function reference at http://tinyurl.com/reg-cpt).
In the Supports section, select the features you want with your custom post type.
To duplicate the code-only example you saw earlier, you need to tick the Title, Editor, Featured Image, and Excerpt checkboxes.
In the Built-in Taxonomies section, add a checkmark next to Categories if you want your custom post type to use categories.
You can also switch on the Tags checkbox to use tags with your custom post type.
Click Create Custom Post Type.
The Custom Post Type UI plug-in creates the code that builds your custom post type. You’ll see it in the dashboard menu, exactly as if you added the necessary code to the functions.php file.
To modify your new custom post type, you need to use the plug-in. Choose CPT UI→Manage Post Types to see all the post types you created, and to edit or delete any of them.
Creating Custom Category Pages
Now that you’ve picked a theme, created a custom post type, and added a bit of sample content, you’re ready to start reengineering your site. Your goal is to remove the “bloggish” details that don’t really fit, and make your site feel like a fine-tuned custom creation.
The first challenge is to give your visitors a decent way to browse Distinct Furnishing’s products. Right now, WordPress sorts the products the same way that it sorts posts—in reverse-chronological order, based on the date you published the post. While that makes sense for a blog, a news website, and many other types of sites, it isn’t terribly useful in a product catalog. Visitors who arrive at Distinct Furnishings probably won’t want to see every item crowded into a somewhat disordered single page of tiles (Figure 14-1). Instead, they’ll want to focus on the type of furniture they need—like a sofa, chair, or table.
This is clearly a job for the WordPress category system. As you already know, you can browse posts by category by putting the category name in the web address, like this:
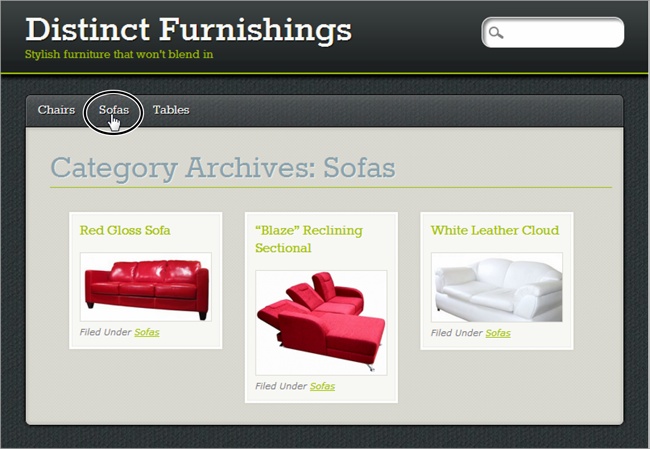
http://distinctfurnishings.net/sofasOf course, you won’t expect your visitors to type this address on their own. Instead, you’ll supply the links in a post or page, in the Categories widget, or in a menu. Menus are the most common way that visitors navigate sites (Figure 14-7).
The menu approach is probably the best browsing experience you can create without editing your theme. However, it’s not perfect. It has several shortcomings:
You can’t display different categories of products in different ways. For example, you might want the sofa-browsing page to look different from the tables-browsing page.
You can’t display additional information about a category.
You can’t control the order of products within a category—WordPress still puts them in reverse-chronological order by publication date.
However, you can control all these options by customizing the category page template (also known as a category archive page), which creates the page shown in Figure 14-7. For example, when you visit a web address like http://distinctfurnishings.net/sofas, the category page grabs the products in the Sofas category and displays them.
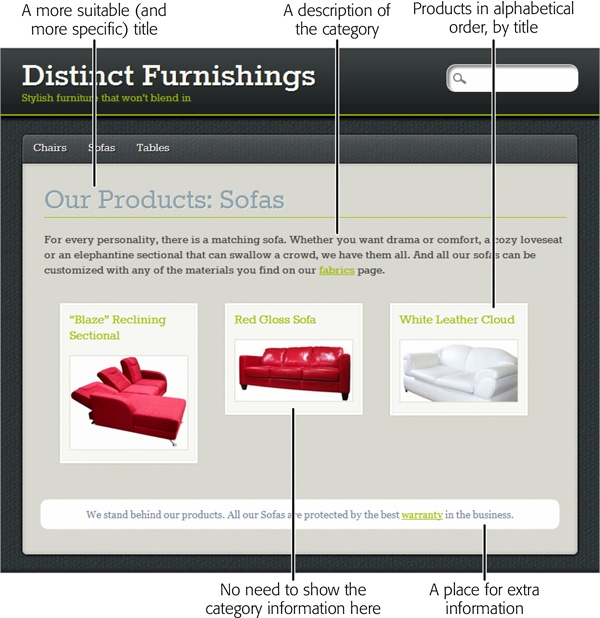
The stock category page does a decent enough job, but you can do better by editing your theme. Figure 14-8 shows a revamped version of the category page that adds a number of refinements. In the following sections, you’ll learn how to make these improvements.
Adding a Category Description
The first and easiest change you can make to the category page template is adding a category description. Many themes, including PinBlack, automatically display the category description on the category page. You don’t even need to edit your theme.
When you first create a category, it doesn’t have a description, but you can easily add one to the category record. Start by choosing Posts→Categories to see a list of all your categories, and then click the Edit link under the category you want to edit. Then type the category description in the Description box.
Tip
Although the Description box doesn’t give you the editing conveniences you get when editing a post or a page, you can still type in any HTML you want. For example you can insert <img> elements that show pictures, <a> elements that create links, and formatted <div> elements that use classes from the style.css file.
Here’s the description for the Sofas category shown in Figure 14-8:
For every personality, there's a matching sofa. Whether you want drama
or comfort, a cozy loveseat, or an elephantine sectional that can swallow
a small crowd, we have them all. And all our sofas can be customized
with any of the materials you find on our
<a href="http://distinctfurnishings.net/fabrics">fabrics</a> page.
When you finish editing the category description, click Update to save your changes.
Finding the Right Template File
To add more information to the category page, or to change any other detail (or if your theme doesn’t include category descriptions to begin with), you need to edit the theme’s template files. But first, you have to find the right files.
When WordPress assembles a page, it prefers to use a specific template (say, one designed for browsing categories) rather than a more general one (one designed for browsing any group of posts, for example). To pick a category template, WordPress goes through this list, from top to bottom, and stops when it finds a match:
category-slug.php
This is the template for a specific category. For example, if you browse the Sofas category, the slug-specific template that WordPress uses is category-sofas.php.
category-ID.php
This template also displays category pages, but it specifies the category using the category ID. For example, if the Sofas category has an ID of 4, the template file is category-4.php. You can get the category ID by editing the category record and looking carefully at the web address in your browser. But instead of going to that trouble, use the category-slug naming system instead—it’s easier to understand and has the same effect as the older category-ID approach.
category.php
This is the standard template for category pages that don’t have specialized formatting. If you haven’t customized your theme, this is probably the template doing the work displaying category pages.
archive.php
This is a more general template that lets you browse by category, tag, author, or date when you don’t have a more specific template doing the work.
index.php
This is your home page, and the final fallback if every other template file is missing.
Almost no theme uses either of the first two types of template (category-slug.php and category-ID.php) out of the box. That’s because these templates are for you, the website creator, so you can add category-specific formatting wherever you need it, to suit the types of posts you want to put on your site.
Most themes include a category.php page, but a few don’t, relying on archive.php instead. In such a case, the archive.php template may include complex instructions that display different text or formatting depending on whether your visitor browses by category, tag, author, or date.
PinBlack includes the category.php file, so this is the one you want to edit. Choose Appearance→Editor and click the “Category Template (category.php)” link to get started. Inside, you find several dozen pages of interwoven HTML markup and PHP code. The overall pattern will be familiar from the previous chapter (Introducing the Template Files). First, a get_header() instruction starts the page and inserts the header, then the loop displays all your posts, and finally a get_footer()instruction adds the footer and ends the document.
Tip
Before you edit these templates, it’s a good idea to make a backup copy of each. The easiest way to do that is to launch an FTP program and drag the templates to your computer to download them. A backup is important because you might decide later that you need to display some posts in a more typical single-post page. If so, you’ll have a copy of the unedited template ready to roll. Keeping a backup is also a good idea in case you get carried away with your template surgery and accidentally lobotomize your page.
Changing a Category Page’s Title
Once you crack open the category template, there’s nothing you can’t change. The first target is the title of the page. Most themes use something generic, if they use a title at all.
The PinBlack theme shows a heading with text like this: “Category Archives: Sofas” (Figure 14-7). To quickly home in on this part of the template, press Ctrl+F (Command+F on a Mac) and type in “category archive.” That takes you to a part of the template that looks like this:
<h1 class="archive-title">
<?php
    printf( __( 'Category Archives: %s', 'pinblack' ), '<span>' .
      single_cat_title( '', false ) . '</span>' );
?>
</h1>
It may take a second to puzzle out this markup, because it relies on some hardworking PHP code. The printf() function inserts some formatted text into the current page. Here’s where things get a bit tricky. The printf() function actually stitches together several pieces of text, using single quotation marks to demarcate each piece of text and periods to link the pieces together. The result is a bit of HTML that looks like this, which the template spits out onto the page (Figure 14-7):
Category Archives: <span>Sofas</span>
The words “Category Archives” sound a bit jargony—imagine you’re browsing a list of bestsellers on Amazon.com and see “Category Archives: Bestsellers” at the top of the page instead of the more recognizable “Recent Bestsellers.”
To replace this heading with the more suitable text shown in Figure 14-8, make this simple edit:
<h1 class="archive-title">
<?php
    printf( __( 'Our Products: %s', 'pinblack' ), '<span>' .
      single_cat_title( '', false ) . '</span>' );
?>
</h1>
As always when you edit a template, click Update to save your changes and then take a look at your site to see the change.
Adding Extra Information
One of the most common ways to soup up a category page is to add extra bits of useful information. You know how to add a category description (Managing Categories), which the category page includes automatically. But when you edit the template, you can add content elsewhere on the page. One example is the white, rounded box at the bottom of Figure 14-8, which provides a reassuring message about the furniture warranty, and a link to the relevant page.
To add this sort of detail, you need to find the right spot in the template and insert your own HTML. For example, to place something at the end of a page, you need to scroll down until you’re nearly at the end of the template, where you find a line like this:
</div> <!-- end #content -->
This is the closing </div> tag, which ends the content section of the page. After this line, the template adds the final footer.
To add more content, you need to add a section before the closing </div> tag. Here’s the markup that creates the white box in the Distinct Furnishings example:
<div id="WarrantyBox">We stand behind our products. All our<?php single_cat_title(); ?> are protected by the best<a href="http://distinctfurnishings.net/warranty">warranty</a>in the business.</div></div> <!-- end #content -->
Notice that the new content doesn’t include the word “Sofas.” That’s because you want the template to work for all your categories, so you use the single_cat_title() function to grab the name of the current category. The category page uses the same trick to add the category name to the title of the category page, as you saw earlier.
Note
This code assumes there’s a page with warranty information at http://distinctfurnishings.net/warranty. You can create this page the usual way, using the Pages→Add New command.
There’s another important detail in this example—the box applies custom formatting using the technique you saw in Chapter 13. First, you make sure your new content has a unique ID (if it occurs just once on the page) or a unique class name (if it occurs multiple times). In the Distinct Furnishings example, the new section has the ID WarrantyBox. But the exact ID name doesn’t matter, as long as you add a corresponding style rule in the style.css file (Style.css: How a Theme Identifies Itself).
Here’s the style rule that makes the warranty box look pretty by setting the colors, spacing, and border:
#WarrantyBox {
    color: #708090;
    background: white;
    margin: 25px;
    padding: 10px;
    text-align: center;
    border-radius: 10px;
}Reordering Posts
By now, you’re well aware of WordPress’s fascination with fresh content. Whenever you have a list of posts, WordPress puts the newest ones first, leaving the older entries to languish at the end. This makes sense for a series of news bulletins, but it’s less helpful for a product catalog. To fix the problem, you need to tweak the loop in the category page. (The loop is the crucial bit of code that creates the list of posts in a WordPress site. You first considered it on Delving into the Loop, where you learned to highlight new posts. Now you’ll modify it to put posts in a different order.)
The first step is to find out where the loop begins. In most well-designed themes—including Twenty Eleven and PinBlack—a comment clearly signals its start. It looks like this:
<?php /* Start the Loop */ ?>
To change the order of posts, you need to act here, before the loop pulls any posts out of the database. The easiest way to do that is with a handy WordPress function called query_posts(), which changes the query that an archive page uses to get its posts. (A query is a database operation that fetches a group of records that meet the criteria you specify.)
Before you look at the solution for reordering posts, it helps to consider the simplest operation query_posts()can perform. It looks like this:
<?php
    $posts = query_posts( $query_string );
?>

<?php /* Start the Loop */ ?>
This code takes the query that WordPress wants to run, which is stored in the $query_string variable, hands it to the query_posts() function, and stuffs the result (the group of matching posts) into the $posts variable. That creates the plain-vanilla version of the category page, with all the posts you normally get, in the order you expect.
To get a different result, you need to stick some extra text onto the end of the query command in the $query_string variable. For example, to sort posts by their titles in alphabetical order, you modify $query_string like this:
<?php
    $posts = query_posts( $query_string . '&orderby=title&
order=asc' );
?>

<?php /* Start the Loop */ ?>
Here, it helps to understand the SQL language that databases love, because that’s what $query_string uses. But even if you’re not a database god, you can decipher the query command above. The &orderby=title portion tells WordPress “and by the way, sort the posts by title.” The &order=asc portion adds “and when you do that sort, use ascending alphabetical order, just like a dictionary does.” Together, these two instructions override the reverse-chronological order that WordPress would otherwise apply.
This is just one way to edit the loop that creates a post list. You’ll see a similar but slightly different example later in this chapter. In the meantime, you can explore the query_post() function in more detail in WordPress’s function reference at http://tinyurl.com/yhjtze5.
Removing Post Footers
The final detail to adjust on your catalog page is the footer that appears under every product tile. It displays the category information (for example, “Filed Under Sofas”). Because you put every product in Distinct Furnishings into a single category, and because all the posts on a category page share the same category, this information doesn’t help anyone.
To remove it, look for and delete this markup:
<footer>
  <p class="cat"><?php _e("Filed Under", 'pinblack'); ?>
  <?php the_category(', '); ?>
  </p>
</footer> <!-- end article footer -->Building a Better Home Page
The Distinct Furnishings site now has a first-rate browsing system, which lets potential customers hunt through the product catalog one category at a time. However, new visitors still arrive at the standard home page, which features every product in one big jumble.
The easiest way to fix this is to add a static page and set it as the home page for the site. This new home page can provide a welcome message and invite visitors to dig into the content by offering a navigation menu. If this solution suits your needs, follow the instructions on Custom Menus. You don’t need to customize a template, or look at any PHP code.
But the home page also presents an opportunity to do more. Instead of using a plain page, you can add links that take visitors straight to specific products. You could type in an <a> element with the exact web address for each one, but that’s not flexible, and it forces you to make frequent page edits to keep your home page current. A more ambitious approach is to use some clever PHP to create links that appear on your home page automatically.
Figure 14-9 shows this technique in action. Here, the home page includes a welcome message and links to every product category, sorted by title.
Creating a page like this is easier than it appears. It’s a technique worth learning even if you don’t want the exact result shown in Figure 14-9, because you can easily adapt it to display other product links—for example, for featured products, new products, or products on sale (see the box on Highlighting Products on Sale).
The following sections show you how to create a custom home page like this one.
Cleaning Out the Template
The first step in creating this sort of custom home page is to find the template you want and prepare it for editing. In virtually all modern themes, the index.php template is the one you want. It creates a home page with the standard list of posts. (The only exception is if your theme has a home.php file—if it does, edit that template instead.) To get started, choose Appearance→Editor and then pick “Main Index Template (index.php).”
In many ways, the index.php template is like the category.php template you considered in the first part of this chapter. The heart of both is a loop that extracts and displays posts. The most significant difference is that category.php uses a narrower query that includes the posts in just a single category.
You could keep the standard loop in the index.php template and simply change the way it displays each post. You’ve seen examples that use this technique to highlight new posts (Delving into the Loop) and change the post order (Reordering Posts). But Figure 14-9 makes a more radical change—it grabs several separate post lists, by category, and then displays them. The easiest way to make this happen is to remove the existing loop entirely and add all new code. In most themes, that means deleting everything inside the content <div>.
In the PinBlack theme, deleting the loop leaves you with this exceedingly simple skeleton:
<?php get_header(); ?>

  <div id="content" class="clearfix">

  </div> <!-- end #content -->

<?php get_footer(); ?>
All this template does is add a header and footer to a page. In between is a great big empty section where you can slot in your own content.
Note
Remember, the header template (header.php) isn’t just a header—it has the HTML markup that begins each page, which includes the title, style sheet links, background, and menu. Similarly, the footer template (footer.php) includes the HTML that ends every page. So even in a simple stripped-down template like the one shown above, your site ends up with a fully formatted home page, albeit one that doesn’t have any content in it.
Adding Text
Now that you’ve removed everything you don’t need from the home page, you can start adding the content you do want to the index.php template. First, start with the plain text and HTML. Wrap it in a <div> so you can apply style sheet formatting. In the Distinct Furnishings page, the main section is in a <div> that has the ID WelcomePageMain. Inside is a heading and a single paragraph of text:
<?php get_header(); ?> <div id="content" class="clearfix"><div id="WelcomePageMain"><h1 class="archive-title">Welcome, lover of finefurniture.</h1><p>Passionate about style and grace? Looking forfurnishings thatfit your life as well as they fit your room? You've come to theright place.<b>Distinct Furnishings</b> offers the best in finefurniture, for simplyany budget.</p></div></div> <!-- end #content --> <?php get_footer(); ?>
The specific ID you use isn’t important, as long as it doesn’t clash with the names in your theme’s style.css file, and as long as you create a matching rule in your style sheet. In the Distinct Furnishings example, the style sheet rule adds some margin space around the main content area, so it isn’t smushed up against the edges:
#WelcomePageMain {
   margin: 30px;
}
You can also use existing styles where appropriate—in this example, the <h1> heading uses the ready-made archive-title class, the same one that formats the title in the category page. (Keen eyes may have noticed this detail when editing the category page on Changing a Category Page’s Title.) Every theme uses different class names, and if you can’t find the class name that adds the formatting you want, you need to create a new style rule and add the formatting on your own.
Creating the Links
The next step is more interesting. Immediately after the introductory text on Distinct Furnishing’s home page, you want to create three sections, each with a heading and a list of links. You can decide exactly how you structure this markup—and if you’re an HTML whiz, you may already have a plan. The Distinct Furnishings example places each column of links in a separate <div> element, as explained in the box below.
Here’s how the first column starts:
<div class="FloatingColumn">
  <h2>Luxurious Sofas</h2>
Next, you add the links that belong in this category. The best way to do that is through the miraculously useful WordPress function called get_posts().
If you’ve never written a computer program before (and we assume you haven’t), using get_posts() is a sizeable task. Not only do you need to create the database query that gets your posts, but you also need to write the code that looks at each post and extracts the information you want displayed on the home page. Fortunately, you don’t need to do this from scratch. You can start with one of the chunks of code from WordPress’s function reference for get_posts() at http://tinyurl.com/23km6q5. There, you’ll see code that displays post titles, displays posts in random order, and gets the posts that belong to a specific category. You can copy one of these examples into the index.php page to try it out. Or start with this very basic code:
<?php global $post; $args = array([ Your search and sort criteria go here. ]); $myposts = get_posts( $args ); foreach( $myposts as $post ) : setup_postdata($post); ?>[ This is where you display the post data you want. ]<?php endforeach; ?>
This is an all-purpose function that handles any post-querying task. All you need to do is replace the two square-bracketed sections with the right details. (If you want to use this code in your own templates, you can get it as a text file on the Missing CD page at http://www.oreilly.com/pub/missingmanuals/wpmm2e.)
The first detail you need to supply is the $args variable. It holds all the criteria and settings that WordPress uses to query the database. There are plenty of options you can stuff into $args, and WordPress has the full list at http://tinyurl.com/yhjtze5. But in this example, the $args variable has just three settings. Taken together, they tell WordPress to get the product posts from a specific category and sort them by post title (that’s the product name) in ascending alphabetical order:
$args = array('post_type' => 'product','category' => 4,'orderby' => 'title', 'order' => 'asc');
This query grabs the posts in the Luxurious Sofas category, because that category has the ID of 4.
Tip
To find the ID for your categories, go to the Posts→Categories section and edit the category. Then examine your browser’s address bar for the tag_ID code:
http://distinctfurnishings.net/wp-admin/edit-tags.php?action=edit&taxonomy=category
&tag_ID
=4&post_type=post
In this example, the category ID is 4.
The next detail you need to supply is the HTML markup you want to add to the page. WordPress copies your content to the page multiple times, once for each post it finds. This is more or less the same way the standard loop works.
In your HTML markup, you use WordPress’s oddly named “the_” functions to get information about each post. For example, to get the post title, you use the_title(), like so:
foreach( $myposts as $post ) : setup_postdata($post); ?><?php the_title(); ?><br /><?php endforeach; ?>
This inserts a list of post titles into the page. After each title, the <br /> element adds a new line. The result is something like this:
“Blaze” Reclining Sectional
Red Gloss Sofa
White Leather Cloud
The example in Figure 14-9 is a bit more practical. It creates a link (an <a> element) for each post. The post title becomes the link’s label. The target of the link is the post web address. To get the title of the post, you use the function the_title(), which you just saw. To get the post address, you use the function the_permalink(). Here’s how the code fits into the markup:
<a href="<?php the_permalink(); ?>"><?php the_title(); ?></a> </br>
Just to make sure you haven’t lost your place, here’s the complete markup that creates the list of products in the Luxurious Sofas category. The customized details are in bold.
<div class="FloatingColumn">
  <h2>Luxurious Sofas</h2>
  <?php
    global $post;
    $args = array('post_type' => 'product', 'category' => 4,

     'orderby' => 'title', 'order' => 'asc' );
    $myposts = get_posts( $args );
    foreach( $myposts as $post ) :
      setup_postdata($post); ?>
    <a href="<?php the_permalink(); ?>"><?php
 the_title(); ?></a>
    <br />
  <?php endforeach; ?>
</div>
To create the other two columns (Fine Tables and Award-Winning Chairs), copy the section shown above (once for each column), and adjust the heading and the category ID accordingly.
Here’s the result:
<div class="FloatingColumn"> <h2>Fine Tables</h2> <?php global $post; $args = array('post_type' => 'product', 'category' =>5, 'orderby' => 'title', 'order' => 'asc' ); $myposts = get_posts( $args ); foreach( $myposts as $post ) : setup_postdata($post); ?> <a href="<?php the_permalink(); ?>"><?php the_title(); ?></a> <br /> <?php endforeach; ?> </div> <div class="FloatingColumn"> <h2>Award-Winning Chairs</h2> <?php global $post; $args = array('post_type' => 'product', 'category' =>3, 'orderby' => 'title', 'order' => 'asc' ); $myposts = get_posts( $args ); foreach( $myposts as $post ) : setup_postdata($post); ?> <a href="<?php the_permalink(); ?>"><?php the_title(); ?></a> <br /> <?php endforeach; ?> </div>
The result is a page that looks up posts from three different categories and combines them into a compact, perfectly organized set of links.
Making a Smarter Product Page
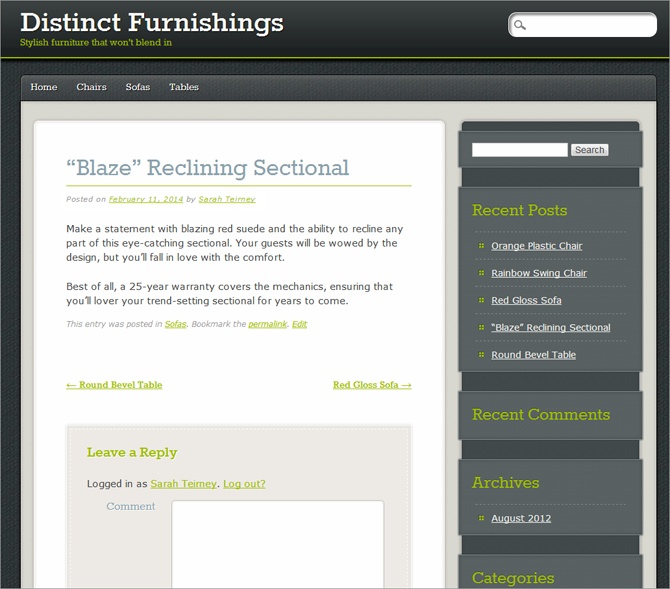
The changes you’ve made so far have transformed the Distinct Furnishings site into a sleek, browsable product catalog, with no trace of its WordPress blog roots—at least, not until you click a product. Once you do, you see the standard post-viewing page that includes plenty of unnecessary information, like the author name and publication date, and a sidebar of mostly useless widgets (Figure 14-10).
Fortunately, it isn’t hard to change the product posts. Once again, the task involves editing a template, but with significantly less work this time. You don’t need to tamper with loop code or change your query. In fact, most of the work involves removing post details that don’t apply to your product listings.
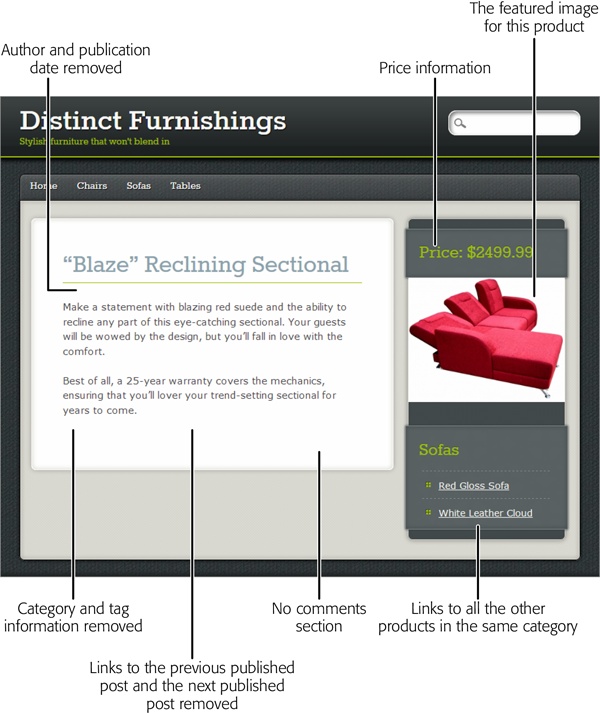
Figure 14-11 shows the goal: a cleaned-up post that showcases the current product.
Cleaning Out the Templates
To change the way WordPress displays your posts, you need to work with two template files. As you may remember from Chapter 13, single.php creates the single-post view for every post and page. However, it gets help from another template, depending on the type of content it’s displaying. In the case of an ordinary post, single.php asks content-single.php to do the real work of showing the post content (Introducing the Template Files explains the process).
Although you could do all your work by editing these two files, that’s not the best approach. That’s because changing single.php and content-single.php changes the appearance of all your posts, including product posts and regular posts (and any other custom post types you choose to create). A better solution is to create new versions of single.php and content-single.php that are tailored for displaying products.
WordPress makes this job surprisingly easy. In fact, when it displays a post that uses a custom post type, it checks the theme to see if there’s a specialized template that can help out. It does this by looking for a file that has a name in this form:
single-[type].php
For example, when you view a product in the Distinct Furnishings site, WordPress looks for a template named single-product.php. Unless you created this file, it won’t exist, and WordPress will fall back on the standard single.php template. But now that you understand how WordPress selects the single-post template, you can create new, more specialized templates.
Creating Single-Product.Php
The easiest way to get started is to create a copy of single.php, and name that copy single-product.php. You can do that using an FTP program—just copy single.php to your computer, rename it, and then upload it back to the theme directory.
Once you create single-product.php, you can edit it. As usual, you can choose Appearance→Editor and do all your editing in the dashboard.
Your first task is to remove the navigation links that let readers step from one post to another. They don’t make sense when you profile products, because the links are based on the publication date, which is an arbitrary order for furniture items.
The navigation links appear inside the loop, just before the comment section. In the PinBlack theme, you need to find and remove this line:
<?php pinblack_content_nav( 'nav-below' ); ?>Your second task is to modify the line just above that one, which loads the content template:
<?php get_template_part( 'content', 'single' ); ?>
When WordPress processes this instruction, it injects the content and runs the code from the content-single.php template. But that’s a problem, because you need a type-specific version of the content template—one that WordPress will use for product posts only.
Although WordPress does look for a type-specific version of your single-post template (like single-product.php), it won’t look for a type-specific version of the content template. Instead, it’s up to you to change the get_template_part() function to tell WordPress what template to use.
Here’s an example:
<?php get_template_part( 'content', 'single-product' ); ?>This tells WordPress to load up a template named content-single-product.php, and use that for the post content.
If you’ve gotten lost in the morass of templates, here’s a quick review of what happens on the Distinct Furnishings site:
When WordPress displays an ordinary post, it uses the single.php template, which, in turn, tells WordPress to use the content-single.php to show the post content.
When WordPress displays a product post, it finds the single-product.php template, which tells WordPress to use the content-single-product.php to show the post content.
Creating Content-Single-Product.Php
It’s up to you to create the content-single-product.php file. The best starting point is to make a copy of content-single.php, and change its name to content-single-product.php.
Now you’re ready to edit content-single-product.php. Here, you want to remove two sections. First, find the section just under the post title, which displays the publication author and date. It looks like this:
<div class="entry-meta">
  <?php pinblack_posted_on(); ?>
</div>
Remove it completely.
Next, find the section that adds the category and tag information after the post content. The PinBlack theme wraps this section in a massive <footer> element. You can delete the whole thing, from the opening <footer> tag to the closing one (</footer>).
Note
Now that you’ve gone through the heavy lifting—creating a custom post type and giving it its own pair of templates—you’re ready to enjoy the rewards. Your site now has the flexibility to separate different types of content and deal with it in different ways. For example, if you add a news post, you’ll get the familiar date, author information, and previous and next links. Add a product, and none of these unnecessary details will appear. In the rest of this chapter, you’ll see how to add even more product-specific details to your product pages, like prices and shopping cart buttons.
Custom Fields: Adding Extra Pieces of Information to a Post
As you probably know, WordPress stores the information for every post in a separate record in a database on your website. That record includes obvious details like the post title and post content, along with a slew of extra info about the author, the publication date, the last modified date, the excerpt, and so on. (Database geeks can get the full, behind-the-scenes details at http://tinyurl.com/3a88qt.)
The product posts don’t include price information, and why would they? Price is one of many additional possible details that apply only to certain sites in certain scenarios. Of course, you’re free to put the price information in the post content, but that’s a bit sloppy. There’s no way to make sure that every post puts its price in the same place and formats it the same way. There’s also no guarantee that every post includes a price, and there’s no easy way to extract it if you need it (for example, if you want to create a query that pulls out posts in a certain price range).
You’re probably prepared to live with this limitation, but WordPress has a surprisingly flexible feature that can help. It’s called custom fields, and it lets you bolt extra pieces of information onto any post.
Here’s how:
Start editing one of your product posts.
The quickest approach is to choose Posts→All Posts, and then click the Edit link under the first post in the list.
Click the Screen Options button in the top-right corner of the Edit Post page, and then turn on the checkmark next to Custom Fields.
If you haven’t used any custom fields on your site, the Custom Fields box is tucked away out of site (Figure 14-12). But once you change the screen options, it appears under the editor box that holds the post content.
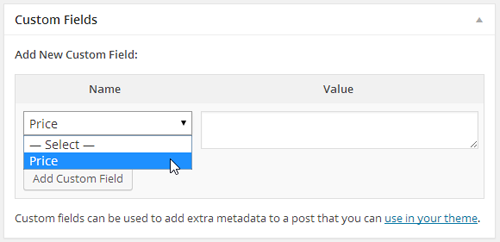
In the Custom Fields box, fill in a name for your custom field.
In the Distinct Furnishings example, that name is Price.
If you see the word “—Select—” in the Name box, your theme already has one or more custom fields that it uses for its own purposes. To add a new field, you must first click the “Enter new” link. That clears the text box so you can type in a name.
Type in a value for your custom field.
The value applies to this particular post. For example, if you add a custom field named Price, the custom field value is the price of the current product (say, 1499.99). Enter the number only—don’t include a currency symbol, a “thousands” comma, or any additional text.
Click Add Custom Field.
Click Update to save the changed version of your post.
You’re done. WordPress creates a new custom field for your posts and attaches the value you supplied to the current post.
Next you need to set the price for every other product. You already created the custom field you need, but you need to supply the correct value for each product.
Choose Posts→All Posts to see your list of posts, and then click Edit under the post you want to change.
In the Custom Fields section, select “Price” from the Name box (Figure 14-13).
Figure 14-13. Once you add a custom field, WordPress makes it available to every other post. All you need to do is select it and fill in suitable values.Note
You may find entries that you didn’t create in the custom field list. That’s because a WordPress theme, plug-in, or feature has added it. (For example, if you add a video file to a post, your site gets a new enclosure custom field.) These fields aren’t meant for your use, and you can safely ignore them.
Type in the appropriate price in the Value box, and then click Add Custom Field.
Click Update to save the post.
If you have posts left to edit, return to step 7.
Continue editing posts until you assign a price to each one.

Creating a custom field doesn’t change what your posts look like. In fact, WordPress carries on exactly as it did before, displaying the post content and ignoring the extra information. To change this state of affairs, you need to extract the information from your custom field and show it in the right place.
The most straightforward way to do so is to edit the content-single-product.php template, fetch the price information, and show it somewhere on the page. To do this, you use the get_post_meta() function, like so:
<?php echo get_post_meta( get_the_ID(), 'Price', true ); ?>The echo command takes the price information that the get_post_meta() function provides and copies it into the page.
The revised post page in Distinct Furnishings (Figure 14-11) uses this approach. It styles the price using the <div> element, like this:
<div class="Price">
  Price: $
  <?php echo get_post_meta( get_the_ID(), 'Price', true ); ?>
</div>
The only step left is to add a style rule for the Price class in the style.css file. This lets you apply the formatting you need to your custom field.
Adding eCommerce
A product catalog is a great way to advertise your wares to the world. But some sites go further by giving visitors the ability to buy products.
eCommerce isn’t suited for every site. For example, a furniture store like Distinct Furnishings might prefer to let salespeople handle all the selling in person. If your business has items that are difficult to ship, available to local buyers only, or one of a kind (for example, individual items in an antique warehouse), you might make a sensible decision to pass on any type of ecommerce.
Of course, there are even more sites that will want to take advantage of ecommerce. Some will need to ship items (for example, a shop that sells handcrafted jewelry), while others will be able to deliver the goods right away (like an indie band that lets purchasers download high-quality audio tracks). And although ecommerce features aren’t a part of the WordPress software, they’re available through a wide range of plug-ins. In the rest of this chapter, you’ll consider one that lets you integrate a PayPal shopping cart into your site.
Signing Up with PayPal
PayPal strikes a simple but compelling deal: You tell it the name and price of your product, and it gives you a shopping cart that you can drop into your website, with little (if any) customization.
When a customer buys one of your products, PayPal handles the checkout process and then notifies you by email. At this point, you need to deliver the goods (for example, by shipping them out or sending them electronically). Shortly after the transaction, the money appears in your PayPal account. You can then transfer it to a bank account or use it to buy stuff on other PayPal-equipped websites.
You might already have a PayPal account, but odds are it’s a personal one—suitable for buying other people’s goods but not much else. Before you can set up a PayPal shopping cart, you need a premier or business account (see the box on the next page).
Note
All PayPal accounts are free to set up. PayPal makes its money on the commission it takes when you make a sale, as detailed below.
If you already have a personal PayPal account, you can upgrade to a premier or business account quickly by visiting www.paypal.com/upgrade. If you don’t have an account, you need to sign up for one by following these steps:
Head to the PayPal website (www.paypal.com) and click the Sign Up link.
PayPal’s Sign Up page opens.
Choose your country and language.
Choose the type of account you want to create (Personal, Premier, or Business), and then click Get Started in the corresponding box.
PayPal takes you to a new page to fill in your account information.
Enter your email address, choose a password, and then fill in your personal details.
PayPal wants your name, address, and phone number.
Make sure you create a complex password—you don’t want a malicious hacker guessing it and using your PayPal account to go on an electronic buying binge.
If you create a business account, you have two pages of information to fill out. The extra information includes the type of business you run, the business name, and the business address.
Finally, click “Agree and Create Account” to complete the process.
PayPal sends you an email confirmation immediately. Once you click the link in the message, it activates your account, and you can create your first PayPal shopping cart.
Installing a Shopping Cart Plug-In
PayPal has a shopping cart feature that lets you put a cart on any website. If you’re building a traditional site, you need to use the PayPal site to create a form, which you can then cut and paste into a web page. But if you’re building a WordPress website, the job gets significantly easier, because you can install a plug-in that does all the form-generating work for you.
There’s no shortage of PayPal-powered shopping cart plug-ins. Overall, they fall into two categories:
Simple PayPal shopping carts. These no-nonsense plug-ins give you the quickest way to add a no-frills PayPal shopping cart to your site. One popular example is the WordPress Simple PayPal Shopping Cart (http://tinyurl.com/paypal-c). This is the type of plug-in you’ll consider in this chapter.
Advanced ecommerce frameworks. The best examples are the wildly popular plug-ins WooCommerce (http://tinyurl.com/woo-com) and WP ecommerce (http://tinyurl.com/wp-ecom). Both let you build a customized shopping cart and checkout page, using the payment gateway that you choose (such as PayPal or Google Checkout). And both define a custom post type for products, which is packed with useful product details. Serious sellers with lots of products almost always go this route.
In this section, you’ll use the WordPress Simple PayPal Shopping Cart plug-in. To get started, choose Plugins→Add New, and search for “simple paypal.” When you find the plug-in, install and activate it.
To configure the plug-in, choose Settings→WP Shopping Cart. At a minimum, you need to enter your PayPal email address at the top of the Settings form. The other details are optional; they let you customize the text in the shopping cart pages, the default currency, shipping costs, the threshold for free shipping, and the web address the customer goes to after making a purchase, among other details.
Adding the Shopping Cart
PayPal doesn’t care about the details of your products. All it needs to know is the name of your product and its price. With these two pieces of information, you can create an “Add to Cart” button, and PayPal takes it from there.
The WordPress Simple PayPal Shopping Cart plug-in adds a shortcode (Understanding Embeds and Shortcodes) that makes it easy to create an “Add to Cart” button. The shortcode looks like this:
[wp_cart:ProductName:price:Price:end
]
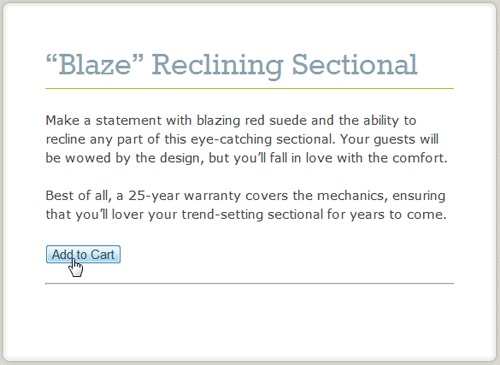
So if you want to sell the Blaze Reclining Sectional for $2,499.99, you need to edit the post for the Blaze Reclining Sectional and add the shortcode to the end of the post, after your content. Here’s what the shortcode should look like:
[wp_cart:Blaze Reclining Sectional:price:2499.99:end]
Now, when you view this product, the shortcode turns into an “Add to Cart” button (Figure 14-14).
You can click the “Add to Cart” button, but you won’t know what’s going into your shopping cart (and you won’t be able to complete your purchase). To properly test the button, you need a way to display the contents of the cart. The WordPress Simple PayPal Shopping Cart plug-in gives you two options: adding another shortcode to your product posts, or using a widget.
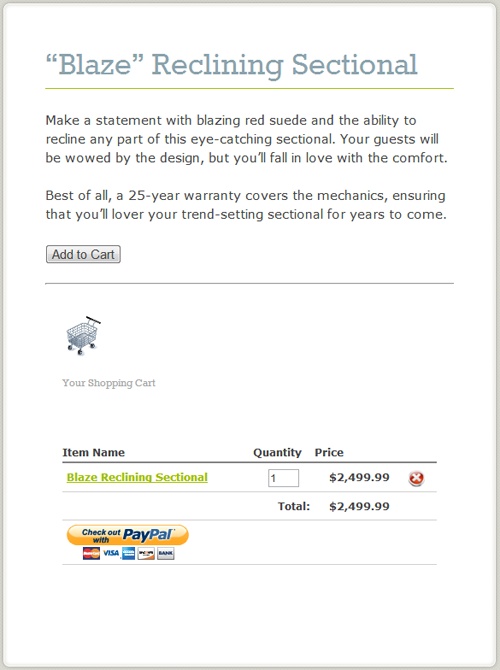
Using the shortcode approach, you can create a shopping cart that appears at the bottom of the post. To try this out, begin by editing a product post (say, the Blaze Reclining Sectional). Scroll to the bottom, after the shortcode that creates the “Add to Cart” button, and add this shortcode:
[show_wp_shopping_cart]
Now update the product post and take a look. The first time you view the product, you’ll see the “Add to Cart” button, same as before. But once you click it, the shopping cart becomes visible underneath (Figure 14-15). Click “Check out with PayPal,” fill in some credit card details, and voilà!—your first ecommerce sale.
The only problem with the shopping cart shortcode is that you need to add it to every product post. That’s understandable in the case of the “Add to Cart” shortcode, because every product has a different price. But it’s needless extra work for the shopping cart.
There are two solutions that can save you the effort. One is to add the shopping cart shortcode to a template file (as explained in the next section). A simpler approach is to use the handy shopping cart widget described next.
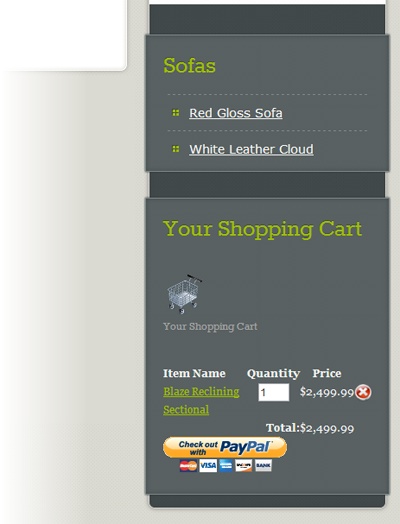
To use the shopping card widget, choose Appearance→Widgets. Then, drag the WP PayPal Shopping Cart widget to the right place in your template. (Common choices include a sidebar or a footer.) Figure 14-16 shows the shopping cart in a sidebar.
Tip
To tweak the formatting around the shopping cart (for example, to change its margins, background color, or border), write a style rule that targets the shopping_cart class.
The shopping cart follows your visitors around your site. They can visit several product pages and add several items to their carts before checking out. When a visitor clicks “Check out with PayPal,” the PayPal service takes over, asking for a shipping address and credit card information. At the end of the checkout process, you get an email that confirms the purchase.
Putting the Shopping Cart in Your Template
The Distinct Furnishings shopping cart does its job. Visitors can choose items, place simple orders, and—most importantly—send money your way. However, you can improve the way the shopping cart fits in with your site.
Right now, the Simple PayPal Shopping Cart plug-in forces you to do some serious extra work, especially if you have a large catalog of products. After all, you need to edit every product post to add an “Add to Cart” button and, optionally, to add the shopping cart. You also need to enter the price for each product twice: once as a custom field, so it appears on the page (Custom Fields: Adding Extra Pieces of Information to a Post), and once in the shortcode for the “Add to Cart” button. This is a hazardous approach because, later on, it’s all too easy to change a price in one place without updating the other. Make a minor mistake, and you can end up with products that are listed at one price but sell at their old price, creating a discount program you definitely didn’t anticipate.
Happily, there’s a solution. You can take details like the shopping cart and the “Add to Cart” button and add them to the product post template (single-product.php)—the same file you customized on Creating Single-Product.Php. This technique saves time and avoids the problem of inconsistent prices.
However, this approach isn’t as convenient as you might expect. Based on the template-editing experience you picked up in this chapter, you probably assume that the solution is to edit the single-product.php template file and put the handy Simple PayPal Shopping Cart shortcodes there. But that presents a problem. Most of the time, WordPress ignores shortcodes that appear in template files. That means you’ll end up with useless bits of text in your site (like “[show_wp_shopping_cart]”) instead of the shopping cart features you really want.
Sometimes, there are workarounds. For example, you can try WordPress’s do_shortcode() function, which searches for the code attached to a shortcode and attempts to execute it. But do_shortcode() is slow, and it doesn’t always work, depending on the plug-in. A better option is to find the actual plug-in function that does the work and use it.
To do that, you could look through the complete plug-in code (browse it at Plugins→Editor), but that’s a hit-or-miss effort that requires a ninja-level understanding of WordPress code. A better choice is to check your plug-in’s documentation or support forum. If you trawl the forum for the Simple PayPal Shopping Cart (http://tinyurl.com/spp-forum), you’ll dig up two plug-in-provided functions that can help.
First, you can use print_wp_shopping_cart() to display the shopping cart wherever you want it:
<?php
  echo print_wp_shopping_cart();
?>
Here, the trusty echo command grabs the cart and inserts it into the page.
Second, you can use print_wp_cart_button_for_product() to create an “Add to Cart” button. This option is slightly more involved, because you need to supply two key product details: the product name and price. You can grab the product name from the post title, and you can get the price from the custom field. Here’s the code that does the job:
<?php
  $productname = get_the_title();
  $price = get_post_meta( get_the_ID(), 'Price', true );

  echo print_wp_cart_button_for_product($productname, $price);
?>
Add both of these code snippets to the right place in the single-product.php template file, and you end up with a streamlined shopping cart that appears exactly where you want it, and an “Add to Cart” button that works for every item.