Chapter 6. Jazzing Up Your Posts
You know what an ordinary WordPress post looks like—it starts with a title, followed by one or more paragraphs of text. And there’s nothing wrong with that. Providing that you pick the right theme, your WordPress site can look surprisingly hip, even if it holds nothing more than plain text.
However, there are plenty of types of sites that need more from a post. For example, if you’re posting news articles, you certainly want to add pictures. And if you’re writing long posts (on anything from business analytics to relationship advice), you’ll improve your audience’s reading experience if you use subheadings to structure your thoughts. To add details like these, along with lists, links, and the other accouterments of a web page, you need to take charge of WordPress’s post editor, which you’ll do in this chapter.
Fancy posts aren’t just about formatting—they’re also about features. For example, you can use specialized tags to show just a portion of a post on your home page (rather than the whole thing), giving you a ridiculously useful way to promote many posts in a small space. Or you can use images from your posts to create a slideshow that, say, promotes your top posts on the home page. In this chapter, you’ll use all these techniques to improve the aesthetics and showcase the richness of your site.
Making Fancier Posts
You’ve seen plenty of WordPress posts so far, but none are likely to impress your web designer friends. Fortunately, you don’t need to stick with the plain and ordinary. WordPress is packed with tools that can help you create epically formatted posts.
The easiest way to start styling your posts is to start with a new one (to do that, choose Posts→Add New, as usual). Then look at the toolbar that sits at the top of the editing box—it’s stocked with useful formatting commands (Figure 6-1).

Even though WordPress creates your posts using web-friendly HTML markup, the toolbar buttons work in almost the same way they do in a word processor, complete with a basic Undo feature. It’s like having a miniature Microsoft Word in your browser.
You can format your posts two ways. One is to select the bit of text that needs formatting and then click the corresponding toolbar button. You might, for example, select a single word and add bold formatting by clicking the B button. Another approach is to use the toolbar buttons to turn a feature on or off (which computer nerds call toggling) as you write. For example, you could click the I button to turn on italic formatting, type something, and then click the I button again to turn off italics.
Tip
If you want to start a new line of text without starting a whole new paragraph, press Shift+Enter at the end of the preceding line (instead of hitting just the Enter key). Why? If you click just Enter, WordPress thinks you want to start a new paragraph and adds extra space just before the beginning of that paragraph. When you use Shift+Enter, WordPress doesn’t add the extra space.
The following sections explain a few of the finer points of post formatting. You’ll see the proper way to work with headings, add links and special characters, and unlock even more capabilities by editing your post’s HTML.
Using Subheadings
Every blog post starts with a heading—the title of your post, which sits above the post content. But if you’re writing a long post, it’s a good idea to subdivide your writing into smaller units using subheadings.
To create a subheading, use the drop-down Format menu on the far left of the second row of the toolbar (Figure 6-2). Usually, the menu displays the word “Paragraph,” which tells you that WordPress is styling the current text as an ordinary paragraph. But you can choose three sizes of heading from the menu, too.
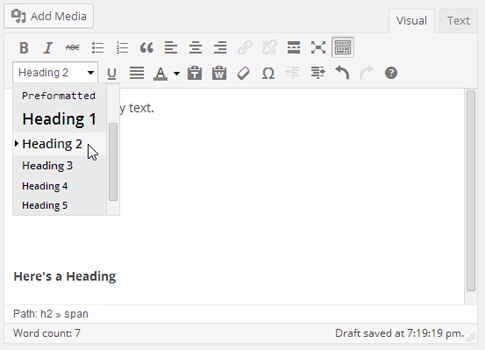
The heading level you use depends, at least in part, on your theme. Here are some guidelines:
Don’t use level-1 headings inside your posts, because they’ll clash with the main post title or the website title, confusing search engines and assistive devices like screen readers.
If you use a modern theme, use level-2 headings to subdivide a post. This is the right approach for the standard year themes, from Twenty Eleven on.
If you use an older theme, you may need to use level-2 or level-3 headings when subdividing a post. First, try level-2 headings. If they appear in the published page with the same type size as the post title, use level-3 headings instead.
Showing a Code Listing
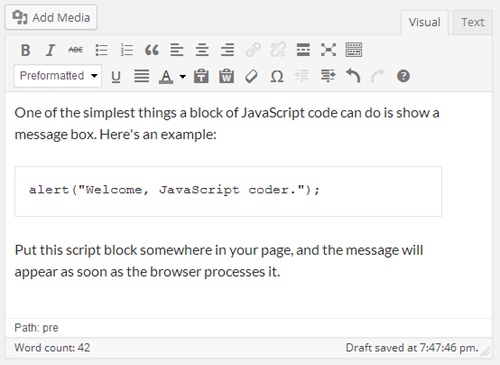
You may notice that the Format list has more than just headings in it. It also includes the Paragraph, Address, and Preformatted formats, which map to the HTML elements <p>, <address>, and <pre>, respectively.
WordPress uses the <p> element to style ordinary paragraphs, and you’ve already seen plenty of those. The <address> element is meant for contact information about who wrote the page, but it’s rarely used. But the <pre> element is more useful—it displays text in a fixed-width font, which is ideal for listing programming code or simulating computer output (Figure 6-3).
Adding Links
The Web wouldn’t amount to much without links, those blue underlined bits of text that let you jump from one web page to another. You can easily add links to a post. For example, imagine you have this sentence:
This story was reported in The New York Times.
To turn “The New York Times” into a link, select the text, and then click the Insert Link button in the toolbar. A window appears where you can either supply a full website address or link to one of your own posts (Figure 6-4).
Note
If you want to link to a file—for example, a document that your guest can download or a picture she can view—you need to store that file in WordPress’s media library. You’ll get the full details on Viewing the Media Library.
To remove a link, click anywhere inside the link text and then click the Remove Link button (which is right next to the Insert Link button in the toolbar).

Inserting Special Characters
Special characters are usually defined as characters you don’t see on your everyday keyboard. For example, if you use a standard U.S. keyboard, special characters include things like accented letters and typographic symbols.
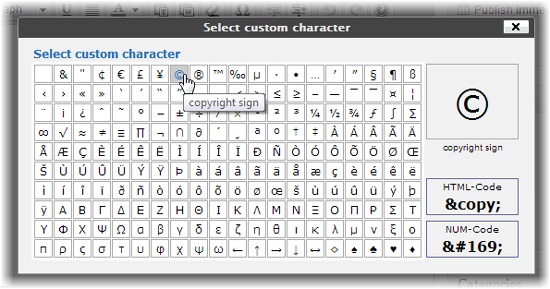
WordPress lets you drop in one of a small set of special characters using the Insert Custom Character command. Click it, and a window appears with a grid of unusual characters. Point to one to get a close-up look at it, and then click it to close the window and insert the character into your post (see Figure 6-5).
You may not need all the special characters you think you do. WordPress automatically substitutes special characters for some character combinations. For example, if you type two dashes (--) between words, WordPress turns them into a seamless en dash (–) when you publish the post. Three dashes in a row creates a slightly longer em dash (—). Similarly, WordPress turns ordinary straight quotes (“”) into typographically correct quotation marks (“”). It works the same magic with apostrophes.
Note
The oddest special characters you can use with WordPress are smilies, character combinations like :) that turn into emoticons like  . WordPress performs this substitution automatically, and you can find out what smilies you can use (and the characters you need to type to trigger them) at http://tinyurl.com/using-smilies. On the other hand, if the smilies feature is running amok and changing character sequences you don’t want it to, choose Settings→Writing and turn off the checkbox next to “Convert emoticons like :-) and :-P to graphics on display.”
Using the HTML View
All the toolbar buttons you studied so far work by inserting the right HTML into your posts, behind the scenes. But if you’ve got a bit of web design experience, you don’t need to rely on the buttons. Using WordPress’s HTML view, you can directly edit your post’s HTML markup. You won’t be limited by the buttons in the toolbar—instead, you can enter any HTML element you want.
To switch to HTML view, click the Text tab that sits just above the post content box, on the right (Figure 6-6). To go back to the visual editor, click the Visual tab. In fact, there’s no reason you can’t spend time in both places. For example, you might write your post in the visual editor and then switch to HTML view to inspect the markup.
HTML view gives you a slightly different toolbar. It still has the useful “full screen” button, but most of the other shortcuts, which insert various HTML tags, aren’t much help—if you’re savvy enough to prefer the HTML view, then you probably want to type in your markup by hand.

If you’re a seasoned web designer, you might feel that WordPress’s HTML editor isn’t up to snuff. Full HTML editing programs like Adobe Dreamweaver are packed with little frills that can make editing easier—for example, they automatically add closing tags to HTML elements and suggest possible tag names as you type. (HTML editors also have more powerful layout and styling features, but those features make more sense when you’re designing the look and layout of an entire site, not just adding a bit of content to a post.)
Most WordPress developers don’t need the full features of a program like Dreamweaver. But there are exceptions. If you write long, complex posts—for example, the articles you saw in the Internet Encyclopedia of Philosophy (Other Types of WordPress Sites)—you probably don’t want to do all your editing in a web page window. Hardcore HTML lovers who find themselves in this situation can write posts in an HTML editor like Dreamweaver, copy the markup, and then paste it into WordPress’s Text content box. But don’t try this unless you really understand your markup. You don’t want to transfer a whack of formatting details to your WordPress post, like a <span> element that has hardcoded font settings. If you do, you’ll introduce some serious issues, including inconsistencies between posts and problems changing themes.
Getting a Better Post Editor
Most WordPress fans do their work directly in their web browsers, using the WordPress editor. But if you’re working with long documents and you’re missing your favorite conveniences, you have other options.
One is to upgrade your WordPress editor. This approach makes sense if you’re happy creating your posts in the familiar Add New Post web page but don’t feel like you’re getting enough help from WordPress. Using a plug-in, you can swap in an editor that has a bit more muscle. (Of course, you’ll need a self-hosted WordPress site to change your editor, because WordPress.com doesn’t let you add plug-ins.)
You can search for a pumped-up post editor on the WordPress plug-in page (http://wordpress.org/plugins), as explained in Chapter 9. Plenty of them offer advanced features like search-and-replace, style-based editing, and support for creating tables. One of the most popular is TinyMCE. Check it out at http://tinyurl.com/tinyeditor and learn about installing plug-ins on Searching for a Plug-In.
Another solution is to do your post-writing work in another program. You’ve already learned that you can paste in pure HTML using the WordPress editor’s HTML view (Using the HTML View), but this technique is a bit touchy—paste in the wrong markup and you can scramble your site. A better approach is to use a program that lets you compose rich content, and then posts that content to your site safely and cleanly, without an awkward cut-and-paste step.
On a Windows computer, you can use Microsoft’s free Windows Live Writer to compose properly formatted posts on your desktop, even if you don’t have an Internet connection. When you’re ready, a single click publishes the posts on your blog. Windows Live Writer is available free at http://tinyurl.com/win-essentials. Mac fiends can find similar blog-writing tools, including the popular—but, sadly, not free (it’s $40)—MarsEdit (www.red-sweater.com/marsedit).
Note
WordPress has a list of even more desktop post editors for Windows, Mac OS, and Linux at http://tinyurl.com/blog-client. Most offer handy formatting features, and all of them let you compose your work offline.
Finally, Microsoft Word lovers can use their favorite word processor to write WordPress posts using the little-known “Blog post” template. Word asks for your site’s URL, user name, and password, after which it lets you create new posts and edit old ones, all from the comfort of the Word window.
Tip
Although it’s tempting to do your WordPress work in Word, with its silky smooth formatting features and AutoCorrect, the free Windows Live Writer program is still a better choice. That’s because Windows Live Writer offers a few key features that Word omits, like the ability to schedule a post for future publication (Delayed Publishing), add tags, and edit your post’s slug (Changing a Post’s Permalink).
Adding Pictures
You’ve now toured many of the post-enhancing features the Add New Post page offers. But there are several frills you haven’t yet touched. The most obvious is adding graphics.
Virtually every good WordPress site can be made better with pictures. WordPress gives you several ways to do that, from the obvious (plopping them into your posts, alongside your text) to the more interesting (using them to build photoblogs, create slideshows, and advertise new posts on your home page). In the following sections, you’ll learn how to take advantage of these slick picture tricks.
Putting Pictures in a Post
The most obvious place for a picture is in a post, right along with your content. WordPress makes it easy to insert pictures as you create a post (on the Add New Post page) or edit one (on the Edit Post page). In fact, you can put as many images as you want into any post.
In a post’s edit box, click the spot where you want to add a picture.
It doesn’t matter whether you use the visual editor (the Visual tab) or the HTML editor (the Text tab). If you use the visual editor, you’ll see every picture you insert right next to your post text. If you use the HTML editor, you’ll see the raw HTML markup for each picture. This markup includes an <img> element for the picture, wrapped in an <a> anchor element that turns the picture into a link so readers can click it to see the full-size image, and possibly some other elements, like a title or a caption.
Just above the box where you type in your content, click the Add Media button.
The Insert Media window appears (Figure 6-7). It gives you three ways to find a picture: You can upload a file from your computer (using the Upload Files tab), use a file you already uploaded to WordPress’s media library (using the Media Library tab), or grab a file that’s stored on another website (by clicking the “Insert from URL” link on the left).
In this example, you want to stick to the Upload Files tab. Grabbing pictures from other websites (using “Insert from URL”) might be worthwhile if you store graphics on another part of your site. But if it’s someone else’s site, don’t chance it—the risk that the picture is copyrighted, or that the webmaster could change or move it to a new address, is too great. The Media Library tab is also useful, but only after you build up a collection of pictures. You’ll take a look at it on Viewing the Media Library.
Note
The Insert Media window also has links for creating a picture gallery (Showing Groups of Pictures) and setting your post’s featured image (Featured Images). WordPress.com users will see even more links, for adding tweets and YouTube videos. Ignore all these details for now—you’ll revisit them soon enough.
Pick the files you want to upload.
WordPress gives you two options. The quickest approach is to drag files from an open file browser window (like Windows Explorer or the Mac’s Finder) and drop them in the Insert Media window box. You can drag as many files as you want, either all at once or one at a time, and you can keep dropping in new files before WordPress finishes uploading the old ones.
Your other option is to pick your files from a standard dialog box. To do that, click the Select Files button, browse to the right folder, and then pick what you want. Ctrl-click (Command-click on a Mac) to select multiple files at once.
Tip
If your files are really big, uploading just isn’t practical (and it might fail halfway through). For example, it’s probably a bad idea to upload files straight from your 22-megapixel digital camera. To save time, scale it down in an image-editing program first.
Once you upload your files, WordPress switches to the Media Library tab, which lists all the images you ever added to your site. It puts new pictures at the top of the list.
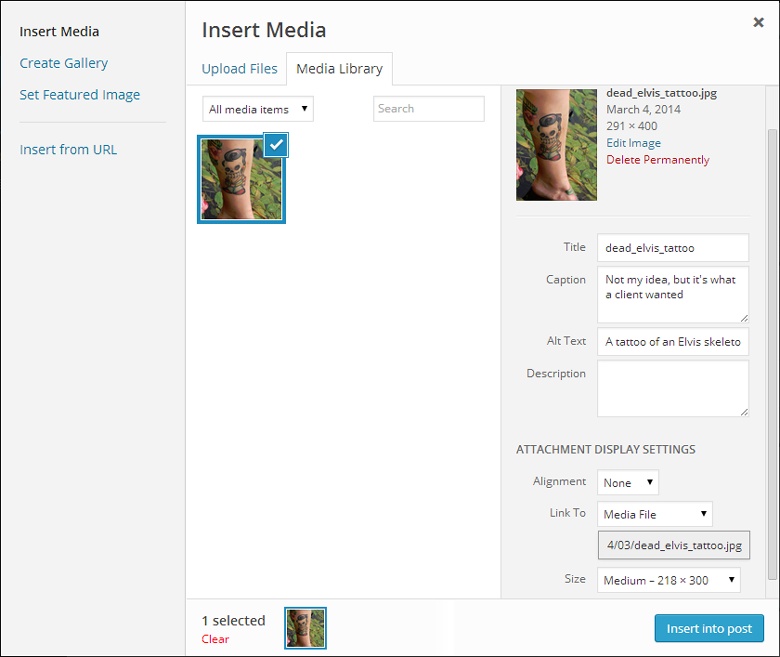
If your files are particularly large (or your web connection is particularly slow), you’ll see a progress bar ticking along, tracking the upload progress of each file. When WordPress finishes an upload, it replaces the progress bar with a thumbnail of your image. On the right, a pile of text boxes asks you for all kinds of information about your picture (see Figure 6-8).
Figure 6-8. Here, WordPress has just finished uploading the file dead_elvis_tattoo.jpg. Currently, it’s the only file in this site’s Media Library. Before you insert it into your post, you need to enter a bit of information.Tip
If you plan to upload your picture using the drag-and-drop approach, here’s a valuable shortcut. Instead of clicking the Add Media button to get started, just drag the picture right onto the post editor in the Add New Post page. WordPress will open the Insert Media window, take you to the Media Library tab, and start uploading your picture. You can then carry on with step 4.
Scroll down and fill in the information for your picture. WordPress asks for the following:
Title is the text that appears in a tooltip when someone points to a picture.
Caption adds an optional caption that appears on the page near your picture. Different themes handle captions differently, but they usually place them under your picture, as in Figure 6-9. Captions can include HTML tags (for example, <b> for bold formatting), but you need to add them yourself.
Alt Text is the alternate text sent to assistive devices (like screen readers) to help people with disabilities interpret pictures they can’t see.
Description is a longer, more detailed explanation of the picture. You can use it for your records, or you might decide to display it on your page—but you need to find a theme that shows image descriptions (most don’t) or edit your theme by hand (Chapter 13). If you don’t plan to use the description, you can leave this box empty.
Alignment determines where a picture appears relative to its text. If you choose None, the picture stands on its own, wherever you inserted it. Paragraphs may appear before it or after it, but the post content won’t flow on either side of the picture. If you choose Left or Right, WordPress puts the picture on one side of the page and lets text flow around the other side (see Figure 6-9).
Tip
If your text narrates your pictures, you probably want to choose None for the alignment so you can position the pictures exactly where you want them. Examples include food blogs with pictures of meals, travelogues with pictures of tourist sites, and home renovation stories with a photo journal of the step-by-step process. On the other hand, if you have a rich layout that’s more like a glossy magazine, you might decide to use Left or Right for your picture alignment.
Link To is the web address where WordPress sends visitors if they click your pic. Usually, this setting is set to Media File and if someone clicks your picture, the browser displays the full-size picture file without any headers, sidebars, captions, or extra content. Alternatively, you can choose Attachment Page, which tells WordPress to take readers to something called, sensibly enough, an attachment page, which features the full-sized version of your picture and a section for reader comments. Or you can send readers to a web address—select Custom URL from the Link To menu and then type in the address you want. Finally, you can tell WordPress to not make the picture clickable at all (select None).
Size tells WordPress how big the picture should be in your post. You can choose Full Size to use the original dimensions of the uploaded file, or you can use one of the scaled-down versions of your picture, which WordPress creates automatically when you upload a file. You’ll notice that WordPress maintains the relative proportions of your picture—it never squashes a picture more width-wise than it does height-wise. (Remember that readers can click a scaled-down picture to see the full-size image, unless you set the Link To setting to Custom URL or None.)
Note
In addition to storing the original file you upload, WordPress creates three extra versions of every picture: a 150 x 150 pixel thumbnail, a 300 x 300 medium-size image, and a 1024 x 1024 large-size pic. You can change these defaults in the Settings→Media section of the dashboard, under the “Image sizes” heading. However, the changes affect only new pictures, not the ones you’ve already uploaded.
Optionally, you can edit your picture by clicking the Edit Image link, which appears just above all the text boxes. Click Save when you finish.
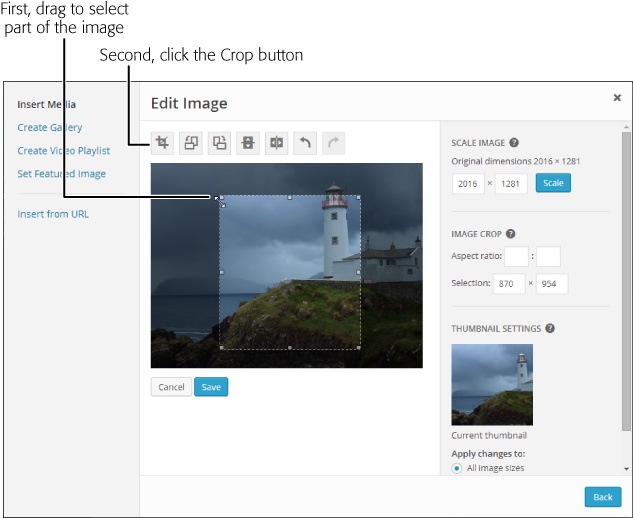
When you edit a picture, WordPress opens the Edit Image box (Figure 6-10). There, you can make a few simple changes.
Most usefully, you can crop your picture. To do that, drag a rectangle around the region you want to keep and then click the Crop button, which appears in the small strip of buttons above your picture. This is the most common type of picture edit.
You can also scale your picture down, reducing its size. To do so, type in either a new width or a new height in the Scale Image section on the right, using pixels as the unit of measure. WordPress adjusts the other dimension proportionally, ensuring that you don’t distort the picture. Then click Scale to apply the change.
Finally, you can also flip or rotate your picture by clicking the corresponding button above the picture.
Figure 6-10. As you drag your mouse over a portion of your picture, the Image Crop section (right) shows the exact size (in pixels) of your selection.Note
When you edit a picture, WordPress actually creates a new file. If you look at the picture’s URL, you’ll notice that WordPress appends a number to the end of the filename, so dead_elvis_tattoo.jpg becomes dead_elvis_tattoo1339626522667.jpg, for example. There are two reasons for this sleight of hand. First, it prevents problems if one of your posts needs to use the original version of the picture. Second, it lets you get your original picture back later if you ever need it. To do that, edit the image, and then click Restore Original Image.
Click the “Insert into post” button in the Insert Media window to add the picture to your post.
When you insert a picture, you’ll see it in the visual editor. If you chose left or right alignment, you can type your text around the side of the picture. If you chose None or Center for the alignment, you can type text only above and below the image.
To tweak your picture, first click it to select it. Two small icons appear in the picture’s top-left corner. Click the “X” icon to remove the picture from your post. Click the pencil icon to open an Image Details box that lets you alter the picture (using all the same tools available when you first insert a picture).


Note
If you delete a picture from your post, it still exists on your WordPress site. This might be what you want (for example, it lets you use the picture in another post), or it might be a problem (if you’re worrying about someone stumbling across an embarrassing incident you made the mistake of photographing). To wipe a picture off your site, you need to use the media library, as described in the next section.
Viewing the Media Library
When you upload a picture, WordPress stores it in the wp-content/uploads folder of your site. For example, if you upload a picture named face_photo.jpg to the Magic Tea House site in January 2014, WordPress stores it at http://magicteahouse.net/wp-content/uploads/2014/01/face_photo.jpg. Behind the scenes, WordPress also creates large, medium, and thumbnail-sized copies of your picture with names like face_photo_300x200.jpg, and stores them in the same folder. That way, WordPress doesn’t waste bandwidth sending a full-sized picture if a post needs to display just a tiny thumbnail.
WordPress might store more files than you think. In addition to all the pictures you insert into posts, all the featured images you use, and any custom header or background images you add to your theme, WordPress stores files that you attach to your posts here, too, like PDFs, Word documents, and spreadsheets. Furthermore, if you change a picture (using the basic cropping, resizing, and rotating tools described on Putting Pictures in a Post), WordPress stores a new, separate version of the picture as well.
WordPress calls this repository, which holds your pictures and files, the media library. To see the current contents of your site’s media library, choose Media→Library (Figure 6-11).
There are two reasons you might want to use the media library: to remove files you don’t need anymore, and to upload files you want to use in the future.
Deleting Pictures from the Media Library
You might choose to delete a media file as part of your basic website housekeeping. After all, why keep a file you’re not using, especially if it’s distracting you from the files you really do want?
To delete a media file, point to its filename and then click the Delete Permanently link that appears underneath.

If you delete a picture that other posts are using, you have a small problem. Now when someone reads the post, they’ll see the broken-picture-link icon, the universal browser sign that something is missing. Correcting this problem is easy (just edit the post to delete the picture box), but it’s up to you to find the post.
Note
WordPress doesn’t let you replace a picture that’s in the media library. Even if you upload a picture that has the same name as one already in your library, WordPress puts it in a different subfolder or gives it a slightly different filename. The same thing happens if you edit a picture that’s already in the media library. This system prevents a number of seriously frustrating problems, but it also means that there’s no way to update the picture in a post without editing the post.
Adding Pictures to the Media Library
You might choose to add an image to your library to prepare for future posts. Maybe you have a batch of pictures that detail a home renovation project, and you plan to write about the process on your blog, “Home Sweet Home.” However, you don’t want to start writing those posts yet. To make sure the pictures are ready when you need them, you can upload them straight to the media library, and then use them later. Here’s what to do:
Choose Media→Add New.
This takes you to the Upload New Media page, which is strikingly similar to the Insert Media window you used earlier.
Add your files.
You upload media files by dragging them onto the “Drop files here” box or by clicking the Select Files button.
Optionally, fill in the information for each picture.
Fill in the picture details (like the title and caption) and edit the image (say, cropping it or flipping it). When you actually insert the image into a post, you still have the chance to enter new information or re-edit the picture. But if you get some of the preliminary details down when you upload the picture, you’ll save some time when you insert it.
To insert a picture from the media library into a post, use the same Add Media button you learned about earlier. Here’s what to do as you create or edit a post:
Move to the place in the post where you want to insert the picture, and then click Add Media.
Instead of adding a new file, click the Media Library tab to see what you’ve got.
You see a list of thumbnail images, one for each picture in your library.
Find the picture you want, and then click it.
You see the familiar picture thumbnail and picture details.
When you’re ready to add the picture, click “Insert into post.”

Featured Images
Instead of simply including a picture in a post, you can designate it as a featured image. A featured image represents a post, but it doesn’t actually show up as part of the post content. Instead, its role varies depending on the theme you use.
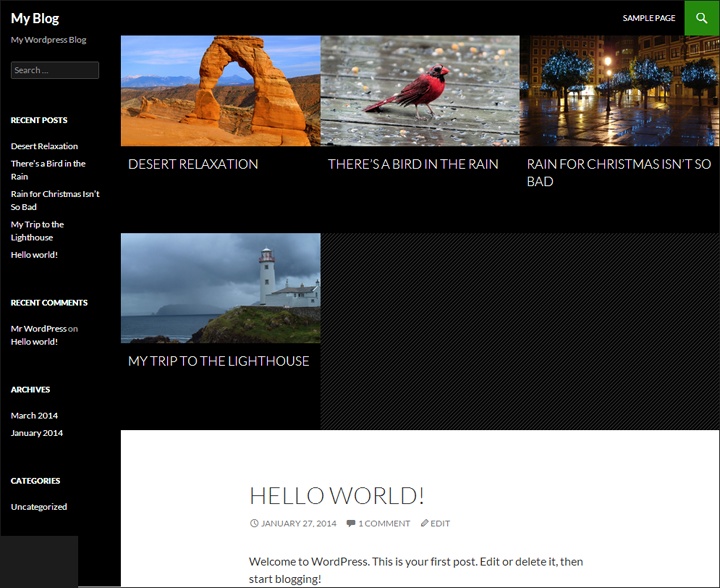
Some themes ignore featured images altogether. But many others place featured images at the top of the corresponding post, near the title area. Examples include Twenty Twelve, Twenty Thirteen, and Twenty Fourteen (as shown in Figure 6-13).

Some themes exploit featured images in clever ways. For example, the Twenty Eleven theme temporarily swaps in the picture for the name of your site when you view a post with a featured image (Figure 6-14).

Note
Twenty Eleven’s header-replacement trick works only if the featured image is at least as big as the header image. If your featured image isn’t as wide, WordPress won’t display it at all on the single-post page, nor will it explain the image’s perplexing absence.
More ambitious themes use featured images to promote posts—for example, to highlight them in some sort of scrolling banner or gallery. Depending on the theme, this detail might be a built-in part of the home page, or it might rely on a theme-specific widget.
Figure 6-15 shows the free Brightpage theme, which is available to self-hosted WordPress sites. It displays a featured-image slideshow on the home page. This slideshow automatically grabs all the posts in the category named Featured (which you must create) and displays the featured images for each post, one after the other.

The nice thing about Brightpage is that it makes it easy for you, the site designer, to choose what posts get featured treatment. When you create a new post that you want to appear in the slider, assign it to the Featured category (in addition to whatever more meaningful category you already use). After some time passes and you decide that the post is no longer important, go to the Edit Post page and remove it from the Featured category.
The Twenty Fourteen theme has a similar trick in store. Like Brightpage, it examines a group of posts you pick, retrieves their featured images, and uses them on the home page. The difference is in the details. While Brightpage asks you to identify the posts you want to use by creating a category named Featured, Twenty Fourteen expects you to use a tag named Featured. And while Brightpage uses a slider, Twenty Fourteen gives you the choice of a slider or a slick grid view, the latter being the standard setting (Figure 6-16).
Tip
To configure how Twenty Fourteen uses featured images, start by choosing Appearance→Customize (to customize the theme) and then click the Featured Content section. There, you can choose between a grid and a slider, and rename the Featured tag to something else.
Assigning a Featured Image to a Post
Each post can have just one featured image. To assign a featured image, you need to be in the Add New Post or Edit Post page. Then follow these steps:
Click the Add Media button.
This opens the Insert Media window you saw earlier (Figure 6-7).
Click the Set Featured Image link on the left.
If the picture you want to use isn’t already in the media library, upload it now.
You can upload your featured image by dragging it onto the Insert Media window, or by clicking Select Files and browsing for it.
If your picture is already in the Media Library, click the Media Library tab and then click the picture to select it.
Add the image information.
These details include the title, alternate text for screen readers, the caption, and the description. How much of this information WordPress uses in your post depends on the theme you chose, but it’s worth supplying the info just in case.
Click Edit Image, take a moment to scale and crop your picture, and then click Save to make your changes permanent.
When you insert a standard image into a post, you get the chance to size it. But when you use a featured image, you don’t have this control. If you upload a big picture, it’s possible that your theme will automatically crop out a large part of it. (The Brightpage theme does this, for example.) To prevent this, you need to scale the picture down before you upload it, using an image editor like Photoshop Elements, Windows Photo Gallery, Picasa, or the Mac’s Preview program. To find the right dimensions, you need to experiment or scour your theme’s documentation. (Self-hosters, search for your theme at http://wordpress.org/themes, and then click your way through to the “Theme Homepage” link. WordPress.com users, search for your theme at http://theme.wordpress.com.)
Click the “Set featured image” button in the bottom-right corner.
This adds the featured image and closes the Insert Media window so you can continue writing your post. Remember, you won’t see the picture appear alongside your text.
If you decide at some point that you don’t want this picture as your post’s featured image, find the Featured Image box in the bottom-right corner of the page (it shows a scaled-down preview of your pic) and then click “Remove featured image.”
Publish your post (or update it, if you already published it).
Remember, some themes don’t use featured images at all. If you use such a theme, you may not even know that your post has a featured image, because your theme never displays it.
Note
Featured posts are interesting because they rely on the interplay between WordPress features and theme features. WordPress defines the concept of the feature (in this case, featured images), and the theme decides how to exploit that concept, opening a wide, uncharted territory of possibilities. The same idea underpins many other WordPress features. For example, later in this chapter you’ll see how WordPress defines the concepts of post excerpts (Post Formats) and post formats (Summarizing Posts with Excerpts), but allows themes to use them in a variety of clever ways.
Showing Part of a Post
At the heart of every WordPress blog is a home page, and at the heart of every home page is a reverse-chronological list of posts. This list serves a vital purpose, showing a snapshot of current content so readers can tell, at a glance, what’s going down on your site.
However, the home pages you’ve seen so far have had one potential problem—they’re long, sometimes awkwardly so. Having multiple posts fused together into one long page is a great convenience for new visitors who want to read your content from end to end, but it’s not so helpful for return visitors who want to survey your new content and decide where to dive in.
Fortunately, WordPress has a handy solution. You can decide to show only the first part of each post, called a teaser, on your home page, which your visitor can click to read the standalone post.
One advantage to this approach is that you can pack quite a few teasers into your home page and keep them close together, no matter how long the posts really are. You can also put posts into tighter layouts—for example, creating a site that looks more like the front page of a newspaper. Another advantage is that it encourages readers to click through to the post, where they’ll also see the post comments and get the opportunity to join in the discussion.
However, trimming down posts introduces two possible disadvantages. First, there’s the extra link readers need to follow to read a full post. If someone wants to read several posts in a row, this extra step can add up to a lot more clicking. Second, you need to explicitly tell WordPress what part of a post belongs on the home page. It’s an easy job, but you need to do it for each post you create. If you’ve already written a few posts, you need to update them.
Note
As a general rule, informal, conversational blogs work well with the standard one-post-after-another stream that WordPress displays on the home page. But WordPress sites that have more detailed article-like posts, use multiple sections, or feature multiple authors, often work better with a tighter, leaner style that uses teasers.
In the following section, you’ll learn how to use teasers instead of full posts. You’ll also consider two related features: breaking posts into multiple pages and using post excerpts.
Displaying Teasers Using the “More” Quicktag
The best way to cut a post down to size is with a special WordPress code called the More quicktag. You place the More quicktag at the spot where you want to divide a post. The content that falls before the tag becomes the teaser, which WordPress displays on the home page (Figure 6-17, left). If a reader clicks through to the post page, he sees the entire post (Figure 6-17, right).

To insert the More quicktag in the visual editor, go to the spot in your post where you want to put the tag, and then click the Insert Read More Tag button. You’ll see a light-gray dividing line (Figure 6-18).
You can also add the More quicktag in the HTML editor. You could click the button labeled “more,” but it’s just as easy to type in the tag yourself, wherever you want it:
<!--more-->
HTML nerds will recognize that the More quicktag looks exactly like an HTML comment—the sort of thing you might put in your markup to leave notes to yourself. Browsers ignore HTML comments, and WordPress borrows this system to sneak in some of its own special codes.

Note
WordPress uses the More quicktag whenever your site displays more than one post at a time. The home page is the most obvious example, but you’ll also see multiple posts when you browse by category, date, or keyword. In these situations, the More quicktag serves the same purpose—it trims long posts down to more manageable teasers.
There’s one more trick you can do with the More tag. In the previous example, a “Continue reading” link led from the teaser to the full post. The theme determines the link’s wording, but you can substitute your own text. To do that, you need to edit your post in HTML view, and then stick the link text in the middle of the More tag, exactly as shown here:
<!--more Tell me more-->If you want to change the link text for every teaser, editing your theme is far more efficient than editing individual posts (see Part 4 to learn how to edit your theme).
Dividing a Post into Multiple Pages
The More quicktag lets you split a post into two pieces: the teaser, and the rest of the content. Alternatively, you can split a page into as many sections as you want using the lesser-known Nextpage quicktag. When you do, WordPress adds a set of navigation links to the bottom of the post (Figure 6-19).

To insert the Nextpage quicktag, switch to the HTML view (click the Text tab) and then add this code where you want to start a new page:
<!--nextpage-->
The Nextpage quicktag shows up in the visual editor, as a gray line with the words “Next Page” above it. You can’t customize the Nextpage quicktag, but you can create custom page links if you’re willing to edit your theme files, as described in Part 4. The trick is to master WordPress’s wp_link_pages() function, which is described at http://tinyurl.com/wplinkpages.
You can use the More and Nextpage quicktags in the same post. However, it’s generally a bad idea, because the page-navigation links will appear under the post teaser on the home page. This is likely to strike your readers as plain odd or utterly confusing.
Summarizing Posts with Excerpts
There’s another way to shorten posts on the home page: by using WordPress’s excerpts feature. Ordinarily, an excerpt is the first 50 or so words in a post (the exact number depends on the theme).
Before you can really understand excerpts, you need to know how WordPress uses them. The answer isn’t straightforward, because it depends on your theme. Some older themes may avoid excerpts altogether, while others use them prominently (as you’ll see shortly). But most themes use excerpts in at least one place: on the search results page. To take a look for yourself, type something into the search box and then press Enter (Figure 6-20).

So far, excerpts seem straightforward and automatic (and they are). However, the first few sentences of a post aren’t always a good reflection of its content. For that reason, you may want to write your own excerpt—in other words, explicitly provide a brief summary of the content in a post. You can do that from the Add New Post or Edit Post pages. First, choose Screen Options in the upper-right corner, and then turn on the checkbox next to Excerpt. A new box appears where you can write a custom description of your post.
Using Excerpts on Your Home Page
At this point, you might think that it’s not worth the trouble to write excerpts for all your posts. And you could be right, if you use a standard theme and you don’t think that your visitors are going to be searching for posts. However, there’s another factor to consider: Some themes use excerpts for other purposes.
For example, many themes use excerpts as the display text for posts on the home page. This way, the excerpt acts a bit like a teaser. The difference is that the standard WordPress teaser comes from the first part of a post, but you control the wording in an excerpt.
The Brightpage theme described earlier (Featured Images) uses this system. If you provide an excerpt for a post, that’s what shows up on your home page, not the post content. The Oxygen theme, available for both WordPress.com and self-hosted sites, does the same thing, as you can see in Figure 6-21.
Note
None of the year themes like Twenty Twelve make much use of the excerpts feature. They use them in searches (as shown in Figure 6-20), but not on the home page.
If you switch to a theme that makes heavy use of excerpts, you might find the summary so valuable that you want all your posts to use them, even the ones you’ve already created. WordPress has some plug-ins that can help. For example, the Excerpt Editor (http://tinyurl.com/csudedx) can give you a summary for every existing post, without you having to edit each one individually.

Post Formats
As you learned in Chapter 5, your choice of theme determines the basic appearance of every post on your site. Once you pick a theme, you can relax knowing that all your posts get the same font, color scheme, and spacing. Consistency reigns.
But some themes offer an underused feature called post formats, which display different types of posts in different ways. On paper, post formats sound pretty nifty. The idea is that you pick a format for each type of post you write, and your theme uses slightly different styling for each of those post types.
The problem is that WordPress limits themes to a small set of officially sanctioned formats. They’re mainly useful if you want to create a casual blog (sometimes called a microblog), where you throw together pictures, video clips, and post fragments, without worrying too much about organizing your content. In this scenario, post formats provide a structure that can help tame the chaos of your posts. But if you want to create your own post format to distinguish a group of posts that are particularly important to your site, you’re out of luck.
Note
Ambitious WordPress developers often complain that post formats don’t let them do what they really want to do: create their own post groupings and apply different formatting to each group. For example, you might want to take posts in a certain category and alter their formatting to make them stand out. (Imagine, for example, a news site that uses a bolder background to highlight violent crimes.) This technique is possible—and useful—but it’s not easy. You need to do all the work yourself, by adding style rules and code to your theme. (You can find an example starting on Delving into the Loop.) And you need to have a self-hosted site to use this technique, because WordPress.com doesn’t allow theme editing.
Applying a Post Format
If your theme supports post formats, you’ll see a Format box in the Add New Post and Edit Post pages. There, you’ll find a list of all the formats you can use with the theme. You can pick any of them for a post, but if you don’t make a choice, your post sticks with Standard.
Table 6-1 lists all the post formats that WordPress allows. Themes can pick and choose which of them they allow.
POST FORMAT | TYPE OF CONTENT |
Standard | Standard, ordinary posts. Every post starts out using the Standard format. |
Aside | A short snippet of text that doesn’t add up to a full post. Casual bloggers can use the Aside format to blurt out a quick thought, in much the same way that you might use a text message or a tweet on Twitter. Most themes don’t display a title for asides. |
Status | A short update about what you’re doing right now (“Chillin’ with my Missin’ Manual, about to build a brilliant WordPress site”). Similar to the status update feature on virtually every social media site. Most themes don’t display a title for status updates. |
Link | A link to another website, with little or no extra text. Most themes don’t display a title for links. |
Quote | A short snippet of text that quotes some words of wisdom you want to share. Most themes don’t display a title for quotes. |
Image | A post that contains a picture you uploaded. |
Gallery | A post that contains a picture gallery, like the kind you’ll create on Showing Groups of Pictures. |
Audio | A post that contains an audio recording. |
Video | A post that contains a video file. |
Chat | A snippet of a memorable conversation, offline or online. Usually looks like this: Joe: dude, why u ignorin me? |
You see these formats at work in the year themes (How Themes Work), from Twenty Eleven on. Each theme has its own way of styling the formats. Often, you’ll be hard-pressed to spot the minor changes between an ordinary post and one with a format applied. In many cases, the only difference you’ll notice is the lack of a title for many formats (like asides and status updates) and the addition of a small icon. The Twenty Thirteen theme applies the most dramatic post format styles, with background colors (Figure 6-22).

To get a better sense of what your theme’s post formats look like, create some test posts and look at them on the home page.
The Ephemera Widget
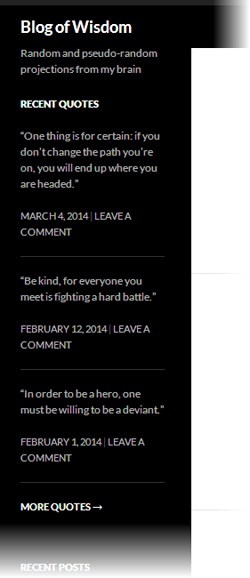
Some themes include a specialized widget to work with post formats. The most common example is the ephemera widget. Twenty Eleven and Twenty Fourteen both include one, named Twenty Eleven Ephemera and Twenty Fourteen Ephemera. The other year themes don’t include the ephemera widget at all.
As the name suggests, the ephemera widget is all about fleeting scraps of content that are useful for a short period of time, like asides, quotes, and status updates. The ephemera widget gathers these bits of microblog content and displays them in a small, self-contained strip that you can pop into a sidebar (Figure 6-23). The idea is to call attention to smaller scraps of information that might otherwise be swallowed up in the clutter of your blog.
To use the ephemera widget, choose Appearance→Widgets to visit the widget-designing section of the dashboard. Then, drag the widget to the spot on the page where you want it. Finally, customize it by supplying these three details:
A title that will appear above the widget.
The type of posts you want to show. You can choose any post format. However, the ephemera widget shows the full content of each post, so you’ll probably want to pick a short, microblog-style post format like Aside, Status, Quote, or Link.
Choose the number of posts that should appear in the widget. The Twenty Fourteen standard is two.
Tip
You can add more than one ephemera widget if you want to show different post formats. For example, one widget could show a list of links, a second could list status updates, and a third could show your most recent asides.
All in all, the ephemera widget offers an interesting way to extract bits of content from a loosely structured blog. However, most serious bloggers are better served by using Twitter for microblogging and integrating a Twitter feed into their sidebars, as described on Sharing Your Tweets on Your Site.