As in Windows, a window on the Mac is framed by an assortment of doodads and gizmos (Figure 1-8). You’ll need these to move a window, to close it, to resize it, to scroll it, and so on. But once you get to know the ones on a Macintosh, you’re likely to be pleased by the amount of thought those fussy perfectionists at Apple have put into their design.
Here’s an overview of the various OS X window-edge gizmos and what they do.

Figure 1-8. When Steve Jobs unveiled Mac OS X at Macworld Expo in 2000, he said his goal was to oversee the creation of an interface so attractive “you just want to lick it.” Desktop windows, with their juicy, fruit-flavored controls, are a good starting point.
When several windows are open, the darkened window name and colorful upper-left controls tell you which window is active (in front). Windows in the background have gray, dimmed lettering and gray upper-left control buttons. As in Windows, the title bar also acts as a handle that lets you move the entire window around on the screen.
Tip
Here’s a nifty keyboard shortcut with no Windows equivalent: You can cycle through the different open windows in one program without using the mouse. Just press ⌘-` (that’s the tilde key, to the left of the number 1 key). With each press, you bring a different window forward within the current program. It works both in the Finder and in your programs.
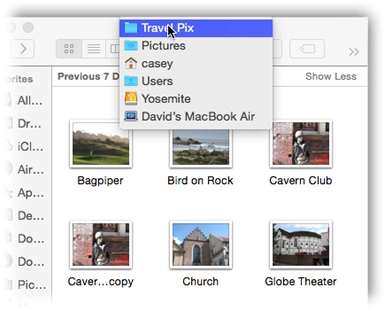
After you’ve opened one folder inside another, the title bar’s secret folder hierarchy menu is an efficient way to backtrack—to return to the enclosing window. See Figure 1-9.
One more title bar trick: By double-clicking the title bar, you minimize the window (see Minimize Button).
Virtually every Macintosh title bar features a small icon next to the window’s name (Figure 1-10), representing the open window’s actual folder or disk icon. In the Finder, dragging this tiny icon (technically called the folder proxy icon) lets you move or copy the folder to a different folder or disk, to the Trash, or into the Dock, without having to close the window first. (When clicking this proxy icon, hold down the mouse button for half a second, or until the icon darkens. Only then are you allowed to drag it.) It’s a handy little function with no Windows equivalent.
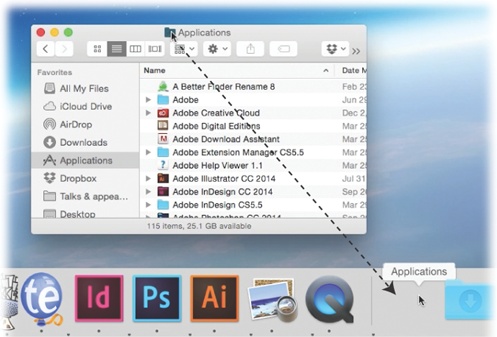
Figure 1-10. When you find yourself confronting a Finder window that contains useful stuff, consider dragging its proxy icon to the Dock. That will install its folder or disk icon there for future use. It’s not the same as minimizing the window, which puts the window icon into the Dock only temporarily. (Note: Most document windows also offer a proxy-icon feature, but usually only an alias is produced when you drag the proxy to a different folder or disk.)
As the tip of your cursor crosses the three buttons at the upper-left corner of a window, tiny symbols appear inside them:  ,
,  , and
, and  . The most important one is the Close button, the red button in the upper-left corner (see Figure 1-8). It closes the window, exactly like the
  button at the upper-right corner in Windows. Learning to reach for the upper-left corner instead of the upper-right will probably confound your muscle memory for the first week of using the Mac.
UP TO SPEED: All My Files
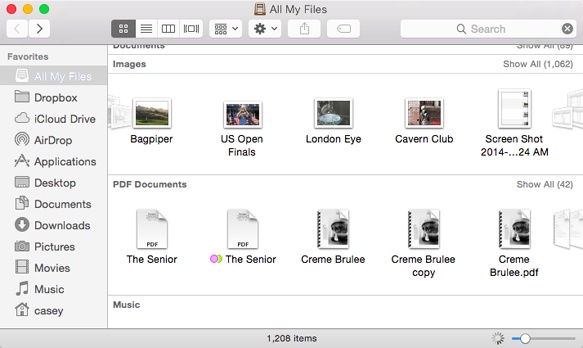
There it is, staring you in the face at the top of the Sidebar in every window: an icon called All My Files. What is this, some kind of geeked-out soap opera?
Nope. It’s a massive, searchable, sortable list, all in a single window, of every human-useful file on the computer. That is, pictures, movies, music, documents—no system files, preference files, or other detritus. No matter what folders they’re actually in, they appear here in a single window. You can summon it whenever you want, just by clicking the All My Files icon in the Sidebar.
When you first open All My Files, it has your files grouped by type: Contacts, Events & To Dos, Images, PDF Documents, Music, Movies, Presentations, Spreadsheets, Developer (which lists HTML Web site files and Xcode programming files), and Documents (meaning “everything else”). In icon view—the factory setting—each class of icons appears in a single scrolling row. Use a two-finger scroll (trackpad) or one-finger slide (Magic Mouse) to move through the horizontal list. (If you’d rather not have to scroll, click the tiny Show All button that appears at the right end of each row. Now you’re seeing all the icons of this type; click Show Less to return to the single-row effect.)
You can see how this sorting method—which is the new Arrange By command at work (Arrange By and Sort By)—might be useful. Suppose you’re looking for a certain PowerPoint or Keynote presentation, but you can’t remember what you called it or where you filed it. Open All My Files, make sure it’s arranged by Kind, and presto: You’re looking at a list of every presentation file on your Mac. Using Quick Look (Quick Look), you can breeze through them, inspecting them one at a time, until you find the one you want.
Apple thinks you’ll like All My Files as a starting point for standard file-fussing operations so much that All My Files is the window that appears automatically when you choose File→New Finder Window (or press ⌘-N). (Of course, you can change that in Finder→Preferences.)
If you can’t break the habit, then learn the keyboard shortcut: ⌘-W (for window)—an easier keystroke to type than the Windows version (Alt+F4), which for most people is a two-handed operation. If you get into the habit of dismissing windows with that deft flex of your left hand, you’ll find it far easier to close several windows in a row, because you won’t have to aim for successive Close buttons.
Click this yellow drop of gel to minimize any Mac window, sending it shrinking, with a genie-like animated effect, into the right end of the Dock, where it now appears as an icon. It’s exactly like minimizing a window in Windows, except that the window is now represented by a Dock icon rather than a taskbar button (Figure 1-11). To bring the window back to full size, click the newly created Dock icon. See Chapter 2 for more on the Dock.
In Yosemite, Apple changed the purpose of this third dot, the green one, on every window’s title bar (in most programs, anyway). A click here throws the window into Full Screen mode, in which the menu bars and window edges disappear, in the name of making your window fill your screen edge to edge. See Full Screen Mode for details.
As your cursor approaches this green dot, a little indicator appears inside it: . That’s the hint that you’re about to enter Full Screen mode.
And once you’re in Full Screen mode, that shape changes to this:  . That’s right: It’s the universal symbol for “Click me to leave Full Screen mode.”
In OS X versions before Yosemite, this button was called the Zoom button. It made a desktop window just large enough to reveal all the icons inside it (or, in programs, large enough to reveal all the text, graphics, or music). (The Window→Zoom command does the same thing, and so does double-clicking the title bar of a Finder window.)
If you would prefer that older behavior, just press the Option key as you click. The button sprouts a  button. Now you’ll get a zoomed window instead of a full-screen one. (A second Option-click restores the window to its previous size.)
The Sidebar (Figure 1-12) is the pane at the left side of every Finder window, unless you’ve hidden it. (It’s also at the left side of every Open dialog box and every full-size Save dialog box.) It has as many as three sections, each preceded by a collapsible heading.
Tip
If you point to a heading without clicking, a tiny Hide or Show button appears. Click it to collapse or expand that heading’s contents.
Here are the headings you’ll soon know and love:
Favorites. This primary section of the Sidebar is the place to stash things for easy access. You can stock this list with the icons of disks, files, programs, folders, and the virtual, self-updating folders called saved searches.
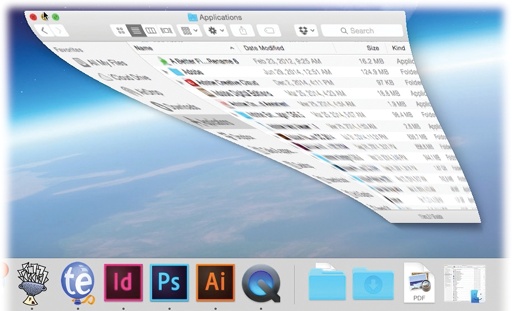
Each icon is a shortcut. For example, click the Applications icon to view the contents of your Applications folder in the main part of the window. And if you click the icon of a file or a program, it opens.
Here, too, you’ll find the icons for two recent Mac features: All My Files (see the box on All My Files) and AirDrop, the instant-file-sharing feature described on AirDrop.
Shared. Here’s a complete list of the other computers on your network whose owners have turned on File Sharing, ready for access (see Chapter 16 for details).
Devices. This section lists every storage device connected to, or installed inside, your Mac: hard drives, iPhones, iPads, iPods, CDs, DVDs, memory cards, USB flash drives, and so on. (Your main hard drive doesn’t usually appear here, but you can drag it here.) The removable ones (like CDs, DVDs, and i-gadgets) bear a little gray
 logo, which you can click to eject that disk.
Tags. This section lists all your Finder tags (color-coded keywords). See Broken Aliases for more on tags.
Note
If you remove everything listed under one of these headings, the heading itself disappears to save space. The heading reappears the next time you put something in its category back into the Sidebar.
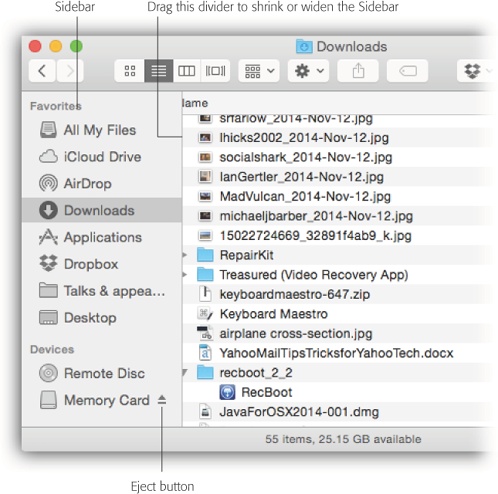
Figure 1-12. Good things to put in the Sidebar: favorite programs, disks on a network you often connect to, or a document you’re working on every day. You can drag a document onto a folder icon to file it there, drag a document onto a program’s icon to open it with the “wrong” program, and so on.
The beauty of this parking lot for containers is that it’s so easy to set up with your favorite places. For example:
Remove an icon by dragging it out of the Sidebar entirely. It vanishes with a puff of smoke (and even a little whoof sound effect). You haven’t actually removed anything from your Mac; you’ve just unhitched its alias from the Sidebar.
Rearrange the icons by dragging them up or down in the list. For example, hard drives don’t appear at the top of the Sidebar, but you’re free to drag them into those coveted spots. (You’re not allowed to rearrange the computers listed in the Shared section, though.)
Rearrange the sections by dragging them up or down. For example, you can drag Favorites to the bottom but promote the Shared category.
Install a new icon by dragging it off your desktop (or out of a window) into any spot in the Favorites list of the Sidebar. Press the ⌘ key after beginning the drag. You can’t drag icons into any section of the Sidebar—just Favorites.
Adjust the width of the Sidebar by dragging its right edge—either the skinny divider line or the extreme right edge of the vertical scroll bar, if there is one. You “feel” a snap at the point when the line covers up about half of each icon’s name. Any covered-up names sprout ellipses (…) to let you know there’s more (as in “Secret Salaries Spreadsh…”).
Hide the Sidebar by pressing ⌘-Option-S, which is the shortcut for the View→Hide Sidebar command. Bring the Sidebar back into view by pressing the same key combination (or by using the Show Sidebar command).
Tip
You can hide and show the Sidebar manually, too: To hide it, drag its right edge all the way to the left edge of the window. Unhide it by dragging the left edge of the window to the right again.
Then again, why would you ever want to hide the Sidebar? It’s one of the handiest navigation aids since the invention of the steering wheel. For example:
It takes a lot of pressure off the Dock. Instead of filling up your Dock with folder icons (all of which are frustratingly alike and unlabeled anyway), use the Sidebar to store them. You leave the Dock that much more room for programs and documents.
It’s better than the Dock. In some ways, the Sidebar is a lot like the Dock, in that you can stash favorite icons of any sort there. But the Sidebar reveals the names of these icons, and the Dock doesn’t until you use the mouse to point there.
You can drag onto its folders and disks. That is, you can drag icons onto Sidebar icons, exactly as though they were the real disks, folders, and programs they represent.
It simplifies connecting to networked disks. Park your other computers’ shared folder and disk icons here, as described in Chapter 16, to shave several steps off the usual connecting-via-network ritual.
OS X prefers to keep only one Finder window open at a time. That is, if a window called “United States” is filled with folders for the individual states, double-clicking the New York folder doesn’t open a second window. Instead, the New York window replaces the United States window, just as in Windows.
So what if you’ve now opened the New York folder, and you want to backtrack to the United States folder? In that case, just click the tiny  (Back) button or use one of these alternatives:

None of that helps you, however, if you want to copy a file from one folder into another, or to compare the contents of the two windows. In such cases, you’ll probably want to see both windows open at the same time.
You can open a second window using any of these techniques:
Choose File→New Finder Window (⌘-N).
Tip
The window that appears when you do this is the All My Files window (Close Button), but you can change that setting in Finder→Preferences→General.
Double-click a disk or folder icon.
Choose Finder→Preferences→General, and turn off “Open folders in tabs instead of new windows.” Now when you double-click a folder, it opens into a new window.
A scroll bar, of course, is the traditional window-edge slider that lets you move through a document that’s too big for the window. Without scroll bars in word processors, for example, you’d never be able to write a letter that’s taller than your screen.
Apple expects that you’ll do most of your scrolling on your trackpad, Magic Mouse top surface, or scroll ball/scroll wheel. You almost never use the antiquated method of dragging the scroll bar’s handle manually, with the mouse.
Tip
More reasons nobody uses the mouse to scroll: You can scroll using the keyboard. Your Page Up and Page Down keys let you scroll up and down, one screen at a time, without having to take your hands off the keyboard. The Home and End keys are generally useful for jumping directly to the top or bottom of your document (or Finder window). And if you’ve bought a mouse that has a scroll wheel on top, you can use it to scroll windows, without pressing any keys at all.
That’s a long-winded way of explaining why, in most programs, the scroll bars are hidden. See Figure 1-13 for details.
Note
If the missing scroll bars leave you jittery and disoriented, you can bring them back. Open System Preferences→General and then turn on “Show scroll bars: Always.”

Figure 1-13. Scroll bars don’t appear at all while you’re working (bottom); you have more screen area dedicated to your work. If you begin to scroll by sliding your fingers across the trackpad or Magic Mouse, the scroll-bar handle appears, so you know where you are (middle). But if you point to the scroll bar, it fattens up so you can grab it (top).
You can change the shape of a window by dragging its edges, just as in Windows. Move the mouse carefully to the exact top, bottom, left, or right edge; once its shape changes to a double-headed arrow, you can drag to move that window’s edge in or out.
Tip
If you press the Option key while dragging, you resize the opposite edge simultaneously. For example, if you Option-drag the bottom edge upward, the top edge simultaneously collapses downward.
If you press Shift as you drag, you resize the entire window, retaining its proportions.
And if you Shift-Option-drag, you resize the window around its center, rather than from its edges.
GEM IN THE ROUGH: Using the Scroll Bar with Your Mouse
If you are that rare, special individual who still prefers to operate the scroll bar by clicking it with the mouse, you can do that on a Mac, too.
For example: Ordinarily, when you click in the scroll bar track above or below the dark-gray handle bar, the window scrolls by one screenful. But another option awaits when you choose  →System Preferences→General and turn on “Jump to the spot that’s clicked.” Now when you click the scroll-bar track, the Mac considers the entire scroll bar a proportional map of the document and jumps precisely to the spot you clicked. That is, if you click the very bottom of the scroll-bar track, you see the very last page.
No matter which scrolling option you choose in the Appearance pane, you can always override your decision on a case-by-case basis by Option-clicking the scroll-bar track. In other words, if you’ve selected the “Jump to the spot that’s clicked” option, you can produce a “Jump to the next page” scroll by Option-clicking in the scroll-bar track.
This little item appears when you choose View→Show Path Bar. It’s a tiny map at the bottom of the window that shows where you are in the folder hierarchy. If it says Casey→Pictures→Picnic, well, then, you’re looking at the contents of the Picnic folder, which is inside Pictures, which is inside your Home folder (assuming your name is Casey).