By clicking an icon and then choosing File→Get Info, you open an important window like the one shown in Figure 3-11. It’s a collapsible, multipane screen that provides a wealth of information about a highlighted icon (much like the Properties box in Windows). For example:
For a document icon, you see when it was created and modified, and what programs it “belongs” to.
For an alias, you learn the location of the actual icon it refers to.
For a program, you can turn on Prevent App Nap (Menulets = Tray).
For a disk icon, you get statistics about its capacity and how much of it is full.
If nothing is selected, you get information about the desktop itself (or the open window), including the amount of disk space consumed by everything on or in it.
If you highlight so many icons simultaneously that their Get Info windows would overwhelm your screen, OS X thoughtfully tallies up their information into a single summary window. It shows you how many icons you highlighted, breaks them down by type (“23 documents, 3 folders,” for example), and adds up their file sizes. That’s a great opportunity to change certain file characteristics on numerous files simultaneously, such as locking or unlocking them, hiding or showing their file name suffixes, changing their ownership or permissions (Sharing Any Folder), and so on.
How many icons do you have to highlight to trigger this Multiple Item Info box? That depends on the size of your screen; bigger monitors can hold more Get Info boxes. If you highlight fewer than that magic number of icons, then OS X opens up individual Get Info windows for each one.
Tip
You can force the Multiple Item Info dialog box to appear, though, even if you’ve highlighted only a couple of icons. Just press Control-⌘-I. (The Option-⌘-I trick described next works for this purpose, too.)
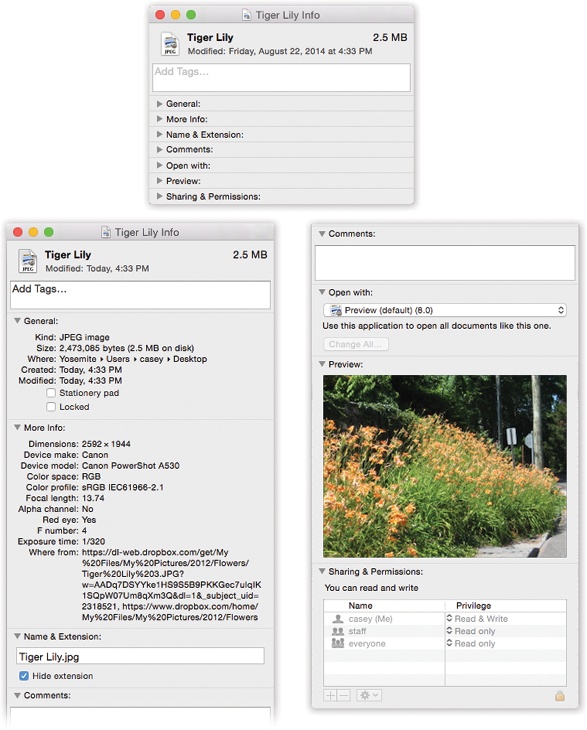
Figure 3-11. Top: The Get Info window can be as small as this, with all its information panes collapsed. Bottom: Or, if you click each flippy triangle to open its corresponding pane of information (or Option-click to expand or collapse them all at once), it can be as huge as this—shown here split in two because the book isn’t tall enough to show the whole thing. The resulting dialog box can easily grow taller than your screen, which is a good argument for either (a) closing the panes you don’t need at any given moment or (b) running out to buy a really gigantic monitor. And as long as you’re taking the trouble to read this caption, here’s a tasty bonus: There’s a secret command called Get Summary Info. Highlight a group of icons, press Control-⌘-I, and marvel at the special Get Info box that tallies up their sizes and other characteristics.
Apple built the Get Info window out of a series of collapsed “flippy triangles,” as shown in Figure 3-11. Click a triangle to expand a corresponding information pane.
Tip
The title-bar hierarchical menu shown on The Folder Proxy Icon works in the Get Info dialog box, too. That is, ⌘-click the Get Info window’s title bar to reveal where this icon is in your folder hierarchy.
Depending on whether you clicked a document, program, disk, alias, or whatever, the various panes may include the following:
Tags. Yes, here’s yet another place where you can add or delete tags for a file.
Spotlight Comments. Here you can type in comments for your own reference. Later, you can view these remarks in any list view if you display the Comments column—and you can find them when you conduct Spotlight searches (Spotlight).
General. Here’s where you can view the name of the icon and also see its size, creation date, most recent change date, locked status, and so on.
If you click a disk, this info window shows you its capacity and how full it is. If you click the Trash, you see how much stuff is in it. If you click an alias, this pane shows you a Select New Original button and reveals where the original file is. The General pane always opens the first time you summon the Get Info window.
More Info. Just as the name implies, here you’ll find more info, most often the dimensions and color format (graphics only) and when the icon was last opened. These morsels are also easily Spotlight-searchable.
Name & Extension. On this pane, you can read and edit the name of the icon in question. The “Hide extension” checkbox refers to the suffix on OS X file names (the last three letters of Letter to Congress.doc, for example).
Many OS X documents, behind the scenes, have file name extensions of this kind—but OS X comes factory-set to hide them. By turning off this checkbox, you can make the suffix reappear for an individual file. (Conversely, if you’ve elected to have OS X show all file name suffixes, then this checkbox lets you hide the extensions on individual icons.)
UP TO SPEED: Compressing, Zipping, and Archiving
OS X comes with a built-in command that compresses a file or folder down to a single, smaller icon—an archive—suitable for storing or emailing. It creates .zip files, the same compression format used in Windows. That means you can now send .zip files back and forth to PC owners without worrying that they won’t be able to open them.
To compress something, right-click (or two-finger click) a file or folder and choose “Compress [the icon’s name]” from the shortcut menu. (Of course, you can use the File menu or
 menu instead.)
OS X thoughtfully creates a .zip archive, but it leaves the original behind so you can continue working with it.
Opening a .zip file somebody sends you is equally easy: Just double-click it. Zip!—it opens.
Open with. This section is available for documents only. Use the controls on this screen to specify which program will open when you double-click this document, or any document of its type.
Preview. When you’re examining pictures, text files, PDF files, Microsoft Office files, sounds, clippings, and movies, you see a magnified thumbnail version of what’s actually in that document. This preview is like a tiny version of Quick Look (Chapter 2). A controller lets you play sounds and movies where appropriate.
Sharing & Permissions. This pane is available for all kinds of icons. If other people have access to your Mac (either from across the network or when logging in, in person), this pane lets you specify who is allowed to open or change this particular icon. See Chapter 16 for a complete discussion of this hairy topic.