
An M3 Lee crew takes a moment to resupply in an olive grove, Tunisia, 1943.
| 3 | North Africa and the Torch Landings |
IN 1942 THE ALLIES were considering landings on mainland Europe, which was very much the preferred option for the Americans. The German forces in Europe, however, were strong and the Allies needed more time to prepare. After much discussion, it was finally agreed to go ahead with landings in North Africa. Known as the Torch landings, these took place on 8 November 1942 and involved more than 100,000 British and American soldiers. The American forces were under the overall command of Dwight D. Eisenhower, together with Major General George S. Patton Jr (whose units will feature in this book more than once) and Major General Lloyd Fredendall. The British forces were commanded by General Kenneth Anderson and Admiral Andrew Cunningham.
The landings and the following campaign saw many units deployed for the first time in combat, including Vichy French units, who went over to the Allied side after negotiations, Rangers and Paratroopers, as well as certain American tanks.

An M3 Lee crew takes a moment to resupply in an olive grove, Tunisia, 1943.
The US Infantry that landed on the African coast during Operation Torch were unsure how the Vichy French forces they were to meet would react to them. They hoped the Vichy French would come over to the Allied side without conflict, but this was not the case and Vichy French forces put up resistance that lasted several days.
The uniform that was issued to Infantry units was largely the same as the HBT issued to the Army and Marines in the Pacific. The US Army thought that as the campaign was in Africa, the weather and climate would be warmer than indeed it really was (the same assumptions have been made in more recent times with other nations). In fact, the campaign took place during the winter and the weather was changeable and wet, with freezing nights. This left the troops gathering together sweaters and any warmer items of clothing they could find in an effort to keep warm.
A particular feature of this uniform was the wearing of a brassard – or armband – on the left arm. Displaying the stars and stripes, its purpose was to enable the easy identification of American troops from other Allied troops, and was used in other campaigns when American troops were to operate with Allied nations.
During the following campaign in North Africa the HBT uniform was steadily replaced by the M41 Spencer jacket, M37 wool trousers and the M37 woollen shirt, the uniform that is most closely associated with the GIs of WWII. No doubt this was warmly welcomed by those cold GIs who still wore HBT during the Torch landings.

The figures with the new paper brassard.

A grey primer has been applied.
These five 1:56 scale US infantry models will be painted wearing HBT and staged as if they were participating in the Torch landings in November 1942. They are highly detailed, hard plastic multi-part figures manufactured by Warlord Games in the UK. They require little preparation, other than a wash in mild soapy water, then on to construction.
Step 1. Build each figure from the bottom upwards: attach the lower torso and legs to the supplied base, then the upper torso, then head, and then attach the belt equipment. This example will construct four riflemen, an NCO with a rifle (up to 1944, the M1 Garand rifle was the main weapon issued to all ranks below lieutenant; the Thompson submachine gun was not as common at that time) and a fifth figure with a Browning Automatic Rifle (BAR). This helps to identify the relevant part for each figure.
Step 2. The next step is to deal with the models’ arms, as these are not attached until the brassard is added. Make the brassard from a thin strip of paper, then attach it to the left arm with diluted PVA glue and allow to dry. Once the brassard is dry, fit the arms ensuring that they are matched with the correct weapon so a realistic ‘action’ pose is achieved. Once you are satisfied with the placement of the arms and weapons, glue them in place and leave to dry for a few hours.
Step 3. Prime the figures with grey primer. When dry, add a little white to Vallejo 920 ‘German Uniform’ and brush this all over the figures with a broad brush.
When thoroughly dry, wash the figures with dark green ink as this adds depth to the uniform and helps achieve an effective overall end result. When the wash is dry, highlight with Vallejo ‘German Uniform’ to which a little white paint has been added. Allow plenty of time to do this carefully, in order to achieve a sense of depth and some much-needed definition to the uniform.
When the uniform has been painted, the webbing, belt equipment and backpack should then be painted with AK3072 ‘Green Ochre’.
Add some Vallejo 847 ‘Dark Sand’ to the ‘Green Ochre’ and use this to highlight the webbing, belt equipment and backpack. Add some more ‘Dark Sand’ to this mix and repeat the process, this time highlighting only the areas that are most prominent.
Step 4. Now proceed to paint the face and hands with Vallejo 818 ‘Red Leather’ as the basecoat. When this is dry, mix ‘Red Leather’ with Vallejo 955 ‘Flat Flesh’ in a ratio of 50:50 and use this to paint the raised areas of the face and hands, leaving some of the base colour exposed in creases, around the nose and between the figures. Add a little more ‘Flat Flesh’ to this mix and then highlight the previous work again. When dry, use a flesh-coloured ink wash over the areas of the face and hands, which will blend all the previous colours together for a natural look. When dry, highlight the raised areas of the face and hands for a final time.

Base coats have been applied.

The wash helps bring the uniform highlights together.

Wooden handles are painted together with any areas of gunmetal.

The brassard has been painted.
Step 5. Add a base coat of Vallejo 846 ‘Mahogany Brown’ to all the wooden parts on the figure, such as the rifle, spade and bayonet handle. Paint any metal work with Vallejo 898 ‘Dark Sea Blue’. Highlight the wooden parts with Vallejo 311 ‘New Wood’, then add a little ‘Flat Flesh’ to this to further highlight these areas on the rifle, spade handle and bayonet grip.
Pick out the buttons with 'Dark Grey' and highlight with 'Gunmetal'. Paint the chinstraps on the front of the helmet with 'Khaki', and those on the rear with 'Strap Red Brown'. (The M1 helmet had a liner that fitted into the outer shell, which explains the presence of the two tapes, with one at the front and the other at the rear.) Paint any camouflage netting with 'Khaki'.
Finally paint the brassard: first with a base coat of 'Light Grey', then a coat of white. Next paint the blue field 'Dark Blue', then the red stripes and finally the white stars.
This will provide an authentic looking figure of a GI as seen during the Torch landings in November 1942.

The finished models.
The early version of the M3 was manufactured by three companies: White Motor Company, Diamond T and Autocar. Some 15,000 standard M3s and more than 38,000 variants were produced during WWII. The troops who used the first M3s dubbed them ‘Purple Heart’ boxes. This nickname was derived from the lack of overhead protection as well as the thin armour, meaning that the occupants were at risk of receiving injuries even while inside (the Purple Heart is the medal awarded to recipients wounded in combat). General Omar Bradley investigated these claims and stated in his report that too much was being asked of the new half-track by troops who were unfamiliar with it. The M3 and the later model M3A1 continued in service and saw widespread use during the rest of the war. The difference between the M3 and M3A1 was the addition of a pulpit on the right-hand side of the driver position for the AA machine gun, while the M3 had just a pedestal mount. Through 1942–3 all M3s were slowly upgraded to the M3A1 specification.
Modelling the M3 half-track
This vehicle was used throughout the North African campaign but especially during Operation Torch in 1942 when the American-crewed tanks were the first in the war to engage in tank versus tank combat against the Vichy French R35s. It is a 1:72 scale Italeri kit that can be enhanced by the addition of a superb aftermarket accessory set made by S&S Models.
Step 1. Construct the kit as per the instructions, but leave the upper and lower halves of the kit separate until the glue is properly set and then join them together. Next, select the items required from the accessory set, such as the side stowage racks, rear stowage racks, a few boxes and rolled up tarps, and clean them with a fine file before attaching them to the M3 with cyanoacrylate glue.

The model now with metal stowage added.
Step 2. After priming the model with grey primer and allowing this to dry, apply a base coat of Vallejo 887 ‘Brown Violet’ with a brush.

Start to construct the kit but leave the upper and lower halves of the vehicle separate until the glue is properly set.

The model has been given an even coat of olive drab.

Highlights are applied with a lighter tone of paint. Do not overdo this stage, as too much will ruin the finish.
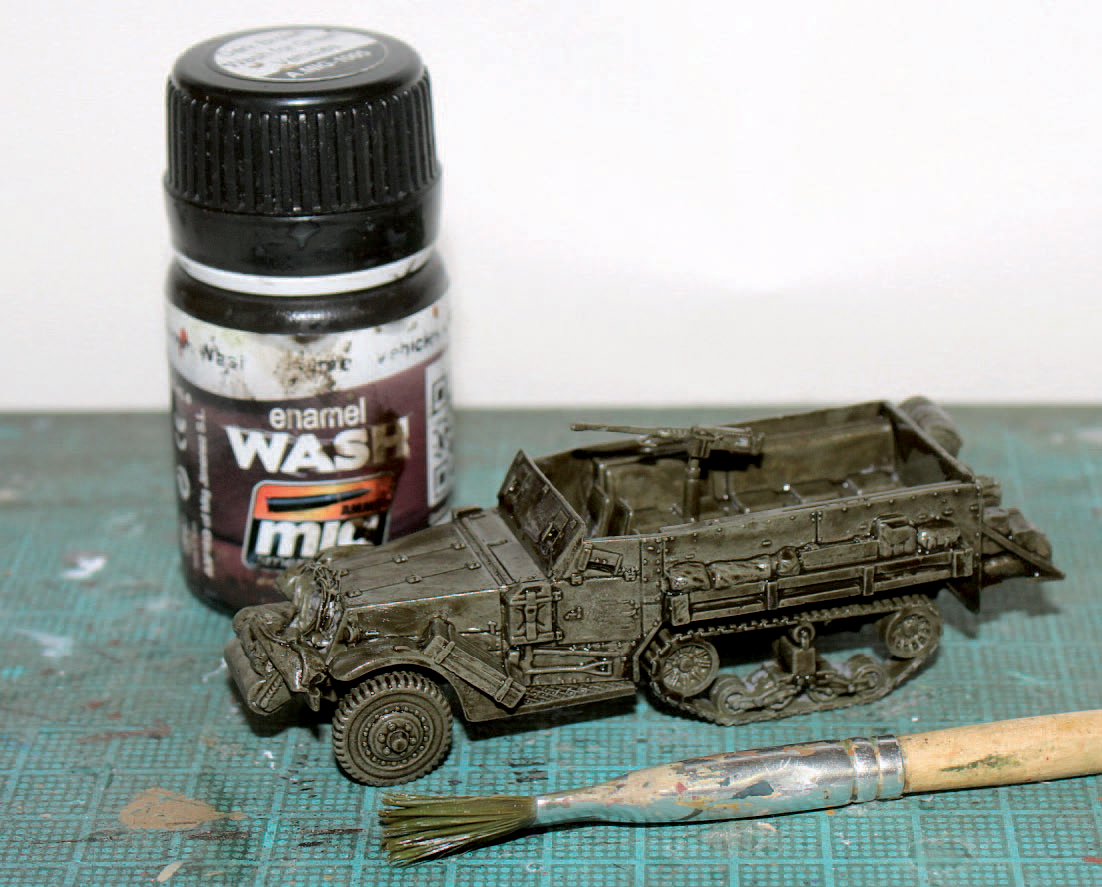
The wash has both toned down the original colour and helped to bring out the detail.
When dry add some white to the base coat and brush this lightly over the raised areas and panels. When dry, apply a wash of dark brown.
When the wash is dry, dry brush the vehicle again lightly with a mixture of ‘Brown Violet’ and a little white paint. Go over the whole vehicle paying particular attention to the areas that will catch the light. Be careful not to overdo this as a subtle effect is desired.
Step 3. Now paint the stowage and tools in appropriate subdued colours. Bright colours will be difficult to blend in later and will stand out too much. Highlight the stowage with the colours used before, but now mixed with a little Vallejo ‘Iraqi Sand’. Paint the .50 calibre heavy machine gun with gunmetal, and when dry, wash with two coats of black ink.
Wash over the wooden boxes, tool handles and other stowage with dark brown ink diluted 50:50 with water. This will darken these items.
Now paint the wheels and tracks with Vallejo 306 ‘Dark Rubber’. This is a good colour to use because the tracks on the M3 were made from two cables sandwiched between two lengths of rubber, then pressed together at high temperature, thus forming the tracks. They were non-metal tracks and so should be painted like rubber.
Step 4. When the model is dry apply a coat of satin varnish. When this is dry any decals can be applied. This is best done over a shiny surface, which is why satin varnish is ideal. For tips on the application of decals see the model of ‘Cobra King’ in Chapter 6. In this example some decals have been added from the Mirage Hobbies kit of the M3 Lee medium tank (see below).
The decals will be dry after around four to five hours in a warm room. Apply an even coat of matt varnish to the entire model. The varnish will both protect the decals and provide the perfect surface for weathering the model. MIG Pigments P038 ‘Africa Earth’ is used for the lower areas, such as the tracks, running gear and wheels, and MIG P037 ‘Gulf War Sand’ is used on the upper areas. Once the weathering has been completed, add any passengers.

Paint the stowage boxes in muted colours, such as olive green and shades of olive drab and brown.

Gunmetal was rather dark. A machine gun should not look too bright, but have just a hint of steel showing here and there.

Here the tracks have been painted dark grey.

The completed M3 with a 20mm crew added from AB Figures.
The campaign in North Africa saw the first use in combat of a new vehicle, the tank destroyer. Several types were produced as the war went on, but the first one was the T12 GMC or, as it was also known, the M3 75mm Gun Motor Carriage. This vehicle came about from the need to have an armoured tank destroyer. It followed the M6, which was a Dodge weapons carrier mounted with a 37mm anti-tank gun, but this design was unpopular as it was both under-gunned and lacked armour. The solution was to mount an M1897A4 75mm gun, which was the American version of the famous quick-firing French ‘75’, on an M3 half-track fitted with a shield. Eighty-six vehicles were produced in August and September 1941.
The T2 was first used in combat in the Philippines in early 1942 to provide fire support at Bataan, where there were few Japanese tanks deployed. Their first significant use was with the 601st Tank Destroyer Battalion, a mixed unit of T12s and M6s, during Operation Torch and the subsequent campaign in North Africa in 1942. In March 1943 the 601st TD Battalion went into action at El Guettar, where it held off a German attack by some 100 tanks and claimed to have knocked out about thirty, including two of the then new Tiger 1s, for the loss of roughly twenty T2s. This one engagement proved the worth of the T2 and helped start a line of American Tank Destroyers that arguably helped delay the advent of the heavy tank until late 1944. When correctly used the American tank destroyer was a formidable opponent.
Modelling the T12 GMC Tank Destroyer
From a wargaming perspective the modelling possibilities are varied as there are examples of the T12 in most ranges from resin to metal. The example used here is made by Italeri and comes in a box of two ‘Quick build’ kits that are easy to assemble. Adding a few tweaks here and there can bring the basic model up a notch or two.

Remove the plastic left over from the injection moulding process.
Step 1. Start by having a good look at the kit and read through the instructions.
Still attached to the body parts is the plastic sprue left over from the injection moulding process. This should be removed using a pair of strong cutters.
As the kit is to be glued, the two locating pins on the reverse side of the floor unit can be removed. Using a fine drill bit and pin vice, drill out a small portion of the barrel as this will give a much more realistic look.
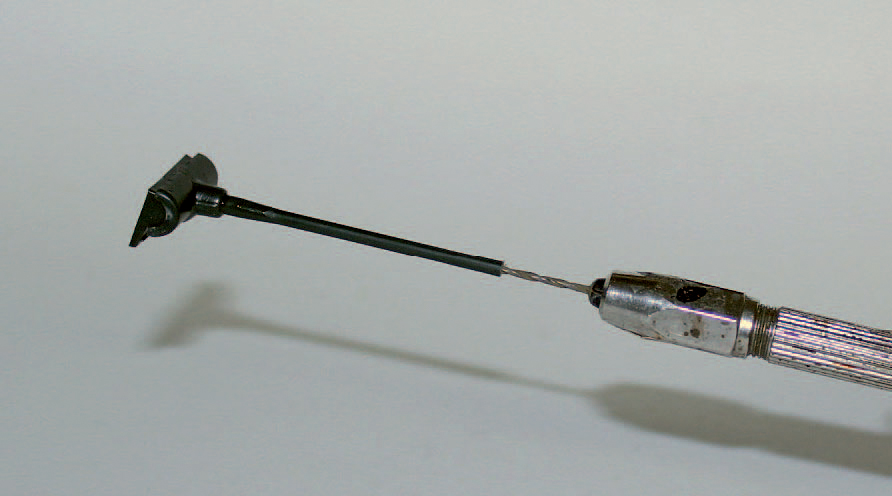
Drill a small portion of the barrel out to give a more realistic look. (This is a barrel from the M36 Jackson, but the process is the same.)

The pieces now cut to size.
Step 2. Assemble the rest of the kit following the instructions provided. It is easy to make the model more realistic by creating and adding some stowage, especially as, when in use, these vehicles were festooned with all sorts of items from bags to rolled-up tents.
The two lockers that were commonly located by the rear door on T12s are not included with this kit, but they can be easily scratch built using plastic card.
Starting with 30 thou plastic card, the outlines are scratched out directly using a blade. Two pieces 8 × 7mm are required, so mark these and then cut them. Side pieces, 3mm wide, are then required for the four sides of each locker, so eight pieces are needed altogether. Cut them to length to match each side, less 1mm for the top and bottom pieces (these should be 6mm long).
The pieces are then assembled. Each locker had three hinges and a lock. To make these, lightly scribe down the long side of each locker 1mm from the outer side. Then add the hinges from small pieces of plastic card along the scribed line. The lock is also a small piece of plastic card and should be positioned at the same height as the middle hinge, but on the opposite side of the locker.
Step 3. To paint the model, follow the steps for the M3 halftrack.

The T12 complete with the new lockers and stowage. This is a simple addition that adds an extra level of much needed detail to a good, but plain model.
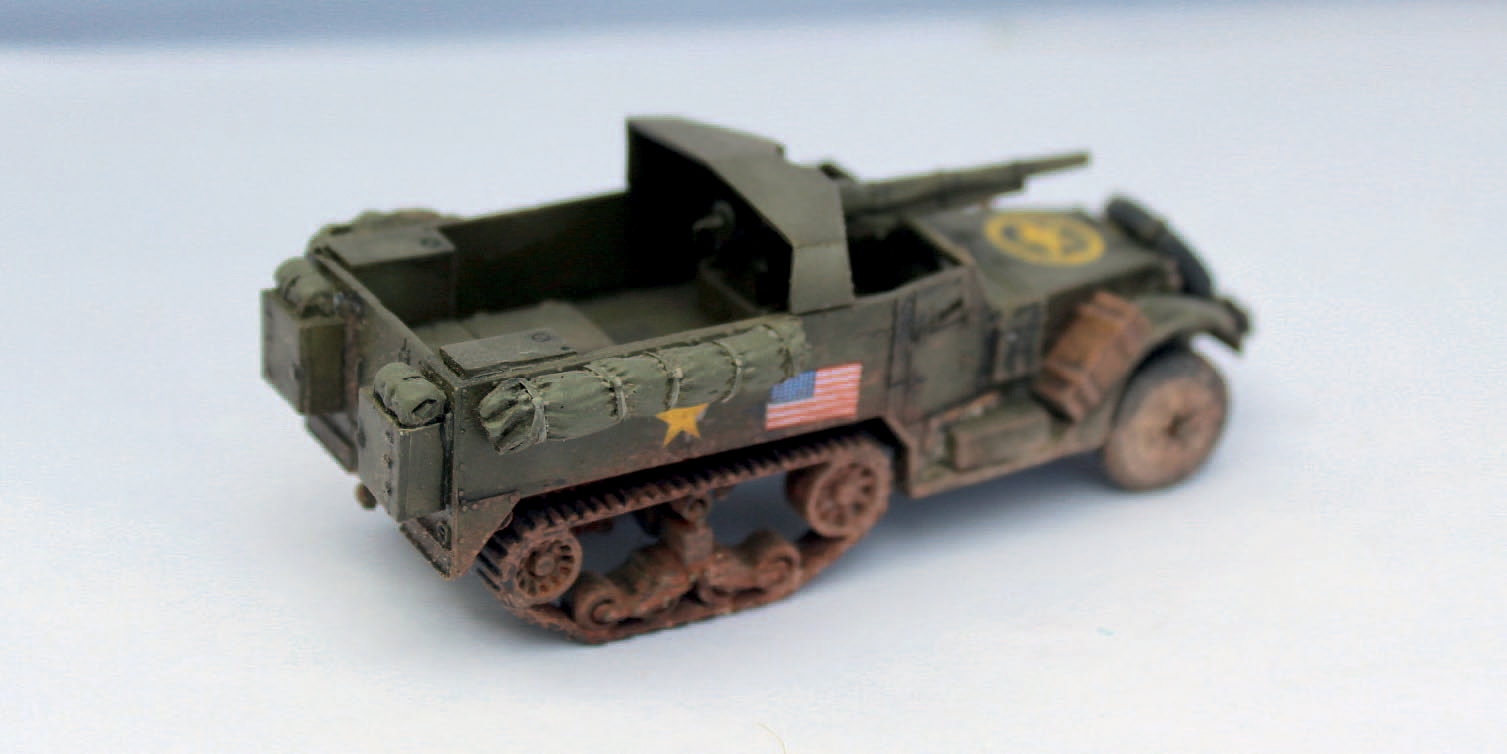
The finished model T12.
The M3 Lee medium tank became operational in late 1941. It was intended as a design that could be built as quickly as possible and was armed with a 75mm gun. It was also produced with a British pattern turret, in which form it was known as the Grant. The M3 was deployed in North Africa, including in Tunisia.
Modelling the M3 Lee Medium Tank
This 1:72 scale model is made by Mirage Hobbies. It comes with several options of main gun. For this example, which replicates a vehicle that fought at the Kasserine Pass in February 1943, a gun stabilizer will be added by placing a weight at the end of the 75mm gun.
Step 1. Before building the kit, take a good look at the plans and become familiar with the various steps of its construction.
Start with the lower hull and running gear, which are always assembled first. Leave the glue to cure overnight before moving on to the rest of the build. This is important as the superstructure is next and this will need a firm base on which to build.
Now start on the upper hull, taking care to dry fit the parts first before trying to glue them into place. This way any fine adjustments can be made without difficulty. Use a good quality sharp blade at all times as well as a pair of cutters.
Once completed, leave the upper hull to dry before moving on to the turret.

The M3 Lee kit.

Start to assemble the model. At this point you need to decide between an open or closed turret.

The assembled model. It is easier to add the tracks after the running gear and road wheels have been painted.

The primed model is now ready to have the stowage added.

An even coat of olive drab is applied.
Step 2. Before starting, it is necessary to decide if the finished model is to have an open or closed turret. This example will have an open turret so the crew can be placed inside. Take time to assemble the turret, as the parts are delicate and can easily be broken.
It may be that the exhaust mufflers are a better fit if the plating that covers them is assembled first.
Do not fit the tracks at this time, however, because leaving them until later will make it easier to paint the running gear and road wheels. The tracks can now be primed with grey primer.
Leave the model to dry out for a day to ensure that the glue is fully cured. Apply filler to any gaps and allow this to dry fully before sanding.

A dark brown wash is now applied.

The stowage items are now painted.
Step 2. Next add some stowage to make the model look ‘lived in’. Once done, prime the model with grey primer. Leave to dry overnight and then apply an even coat of MIG 926 ‘Olive Drab’ dark base.
To continue painting this model, follow the steps as described for the M18 (see Chapter 6). For advice on weathering, please follow the steps for the M4A2 Sherman (see Chapter 2). The pigment colours required for weathering are MIG P038 ‘Africa Earth’ for the lower areas and P030 ‘Beach Sand’ for the upper areas.

The completed M3 Lee. No American tank of the Operation Torch campaign would be complete without the yellow band, which is supplied as a decal with this kit.

The completed M3 Lee, now with its crew and base, taking a chance to refuel in an olive grove in Tunisia.
The M3A1 Light Tank was produced from May 1941 and was a much-improved model over the earlier M3. This had a riveted turret, which proved dangerous when the turret was hit as the rivets would ‘pop’ off with some force and injure the crew. The second difference was the addition of a gun stabilizer for the 37mm gun.
The M3A1 was also called the Stuart, named after the American Civil War General J.E.B. Stuart; its unofficial name was ‘Honey’, which was coined after a test driver called the light tank ‘a honey to drive’. The 1st and 2nd Armoured Divisions, both equipped with Stuarts, landed during the invasion of North Africa: the 1st Armoured Division had two battalions with both M3 and M3A1 Stuarts, while the 2nd Armoured Division had the new M5 Stuart.
The 1st Armoured Division landed at Oran on 8 November 1942. The next day the first armoured clash of the campaign began when they met a force of Vichy French R35 tanks outside Oran. During the fighting the French lost fourteen tanks, but the Americans came off lightly with damage to only one M3A1.
It was not until the Americans came up against German tanks that they quickly realized that M3A1 and M5 were no match for the Panzer Mk3 or the Mk4. Subsequently the lighter Stuarts were used as flank guards for the M4 Sherman battalions and for reconnaissance work, for which the fast and manoeuvrable tank was well suited.
Modelling the M3A1 Stuart Light Tank
This is a kit from The Plastic Soldier Company, whose products are purely designed with the wargamer in mind and as a result create a very robust model. Included in the kit are the parts for three variants of the M3 used in the Pacific (M3 early production), Tunisia or Italy (M3A1 mid-production), and by the British in North Africa, where the 8th Army used a very large number of the M3 ‘Honey’ (M3A1 late production). As the instructions provided need to cover the construction of the three variants, they can at times seem confusing. Read them through carefully before starting with the help of photos of the chosen variant. This will help identify the parts needed as well as such details as whether the model requires additional fuel tanks.
Step 1. Select the parts for the Tunisian version, the M3A1 mid-production, and follow the instructions given in the kit for the construction as they are very straightforward. Do be aware that the turret, once constructed, may be too large to fit into the hole provided in the hull. Using a very sharp craft knife, enlarge the hole very slightly so that it can accept the turret.
A modification worth considering for this model is the replacement of the kit-supplied 37mm gun barrel, which seems to be out of proportion, with a turned brass one from the Polish company RB Model, which has an English-language website. These replacement gun barrels are highly crafted and very reasonably priced, but they make a real difference.
Step 2. The only part of painting the M3A1 that differs from the previous vehicles covered in this chapter is the yellow band around the turret. This also features on the Lee and was a common feature of markings on early American tanks up to mid-1943.
Step 3. Finish the model in the same way as the other vehicles in this chapter. Remember, when using any weathering product, less is more.

Use a sharp blade and remove a small amount of plastic evenly from the inside of the turret ring.
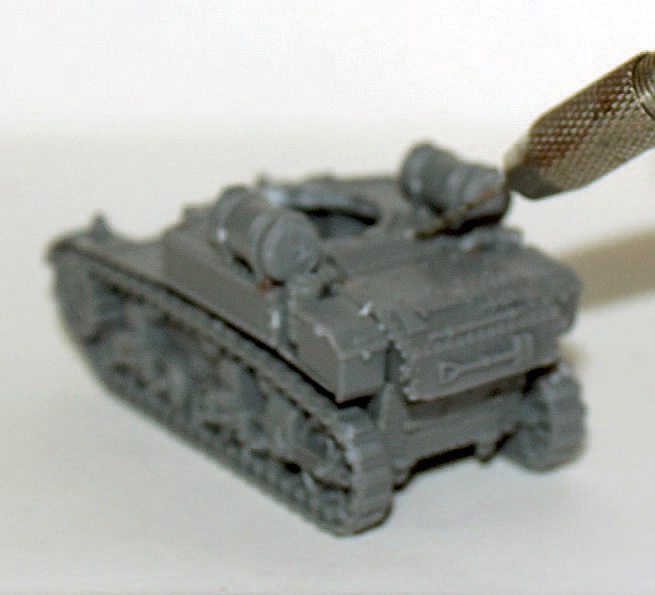
The aerial was fitted here using fine wire.

The M3A1 Stuart with a new brass barrel as well as an antenna.
A PAINTING BASE
When working on artillery pieces or on a gun, after they are built and primed it is a good idea to mount it on a base for painting. This makes it easier to handle and helps prevent any damage to the model. It is good practice to always base any models together with their crews. Weathering should be done after the base has been painted and scenery added. This will help the model blend into the base, as in real life the gun should be part of the scene and not look separate.
The M2A1 Howitzer must be one of the most well-known medium artillery pieces of WWII and an updated version is still in service in the US Army. The M2A1 has been used by many countries postwar.
The M2A1 started life as the M1 in the early 1920s. This became obsolete in 1935 and the M2 was developed by changing the chamber dimensions. It was standardized in 1940 after being redimensioned and having a new trigger shaft added: this was now the M2A1. It was a very useful and versatile gun and became the standard artillery piece used by the US Army in all theatres of the war. It was issued to both infantry and armoured divisions, for whom it was mounted on the chassis of an M4A3 Sherman and named the M7 or ‘Priest’. The range of the M2 was some 11,000m (12,205 yards). It could fire both 33HE shells and a 29.29lb HE-AT shell. The muzzle velocity was 1,450m/s (1,550 yards/s) and penetration was 115mm at all ranges.
Modelling the M2A1 Howitzer
The M2A1 is the gun that was issued to all infantry divisions from 1940 onwards. This is an all-metal kit available from S&S Models and no assembly instructions are included. Although it may look like a simple kit at first glance, there are several parts that need to be assembled in a certain way.
Step 1: As this is an all-metal kit, some patience is required when assembling it. Unlike a standard plastic kit, cyanoacrylate glue is required and this will take time to cure, typically about an hour to fully achieve a good strong bond. With this in mind, assemble the kit starting with the wheels and then gun trails.
Now fit the barrel and make sure it is a good fit. Once this is achieved, glue it into position and ensure that the parts are fully supported while the glue cures.
Step 2. Now assemble the gun shield. This is a two-part shield, unlike others used on pieces of this type. Glue the pieces together and support them while the glue cures. Consult good reference sources throughout the build as this will help you locate and attach the parts in the correct place.
Attach the shield to the gun using the glue and again ensure it is fully supported while the glue cures. Then fit the tow bar and hand spike to the end of each trail. Good reference sources, such as the internet and books, should be consulted to confirm that the pieces are correctly placed: the tow bar goes on the right and the hand spike on the left side when the model is viewed from the rear. The M2A1 is now ready for painting.

The parts required to build the N2A1 Howitzer.

The trails have been fitted.

Support the barrel while it dries. The other parts are ready to add.

The constructed model gun.

The M2A1 is now ready to paint.
Step 3. The standard colour for all US Army vehicles and guns was, of course, olive drab, so use Vallejo 889 ‘Olive Brown’, which is a very good match. Follow exactly the same process as for painting a vehicle. Paint the model first, then the tyres and follow by weathering and so on.
Step 4. Once the gun has been weathered, add the crew and then start the ground work of the base. When the ground work has dried and been painted, add a little grass and scrub (this topic will be covered in more detail in Chapter 8).

It is important to take time when painting tyres. Never use black as it is too harsh; dark grey is a much better choice.
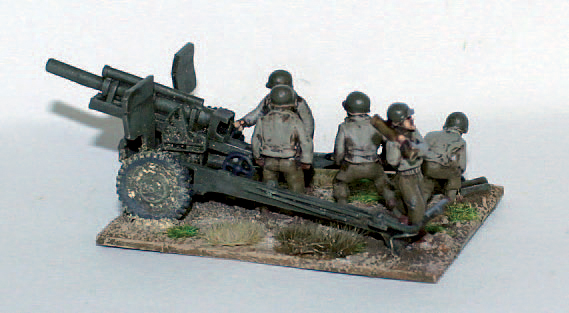
The completed gun with a 20mm crew from AB Figures.