In macOS, there are two ways to move or copy icons from one place to another: by dragging them and by using the Copy and Paste commands.
You can drag icons from one folder to another, from one drive to another, from a drive to a folder on another drive, and so on. (When you’ve selected several icons, drag any one of them; the others tag along.) As you drag, you see the ghostly images of all the selected icons moving with your cursor. And the cursor itself sprouts a circled number that reminds you how many files you’re moving.
Tip
You can tell that the copying is underway even if the progress bar is hidden. A tiny progress bar appears right on the icon of the copied material in its new home. You can cancel the process either by pressing  -period or by clicking the
  in the progress window.
Understanding when the Mac copies a dragged icon and when it moves it bewilders many a beginner. However, the scheme is fairly simple when you consider the following:
On a single disk, dragging from one folder to another moves the icon.
Dragging from one disk (or disk partition) to another copies the folder or file. (You can drag icons either into an open window or directly onto a disk or folder icon.)
If you press the Option key as you release an icon you’ve dragged, you copy the icon instead of moving it. Doing so within a single folder produces a duplicate of the file called “[Whatever its name was] copy.”
Frequently Asked Question: Dragging to Copy a Disk
Help! I’m trying to copy a CD onto my hard drive. When I drag it onto the hard drive icon, I get only an alias—not a copy of the CD.
Sure enough, dragging a disk onto a disk creates an alias. But producing a copy of the dragged icon is easy enough: Just press Option or
as you drag.Honestly, though: Why are you trying to copy a CD this way?
Using Disk Utility (Console) instead saves space, lets you assign a password, and usually fools whatever software was on the CD into thinking that it’s still on the original CD.
If you press the
key as you release an icon you’ve dragged from one disk to another, you move the file or folder, in the process deleting it from the original disk.
Note
This business of pressing Option or after you begin dragging is a tad awkward, but it has its charms. For example, it means you can change your mind about the purpose of your drag in mid-movement, without having to drag back and start over.
And if it turns out you just dragged something into the wrong window or folder, a quick -Z (the shortcut for Edit→Undo) puts it right back where it came from.
Dragging icons to copy or move them feels good because it’s so direct: You actually see your arrow cursor pushing the icons into the new location.
But you pay a price for this satisfying illusion. You may have to spend a moment or two fiddling with your windows to create a clear “line of drag” between the icon to be moved and the destination folder. (A background window will courteously pop to the foreground to accept your drag. But if it wasn’t open to begin with, you’re out of luck.)
There’s a better way. Use Copy and Paste to move icons from one window into another. The routine goes like this:
Highlight the icon or icons you want to move.
Use any of the techniques described starting in Figure 3-3.
Choose Edit→Copy.
Open the window where you want to put the icons. Choose Edit→Paste.
Once again, you may prefer to use the keyboard equivalent:
-V. And once again, you can also right-click (two-finger click) inside the window and then choose Paste from the shortcut menu that appears, or you can use the  menu.
menu.If you add the Option key—press Option-
-V—you move the icons to the new window instead of copying them. That is, the originals disappear after they appear in the new location. (This might make more sense if you use the menu way: If you open the Edit menu and press Option, you’ll see the Paste Items command change to say Move Items Here.)You can press
-period to interrupt the process. When the progress bar goes away, it means you’ve successfully transferred the icons, which now appear in the new window.
You may remember from Chapter 2 that the title bar of every Finder window harbors a secret pop-up menu. When you -click it, you’re shown a little folder ladder that delineates your current position in the folder hierarchy. You may also remember that the tiny icon just to the left of the window’s name is actually a handle that you can drag to move a folder into a different window.
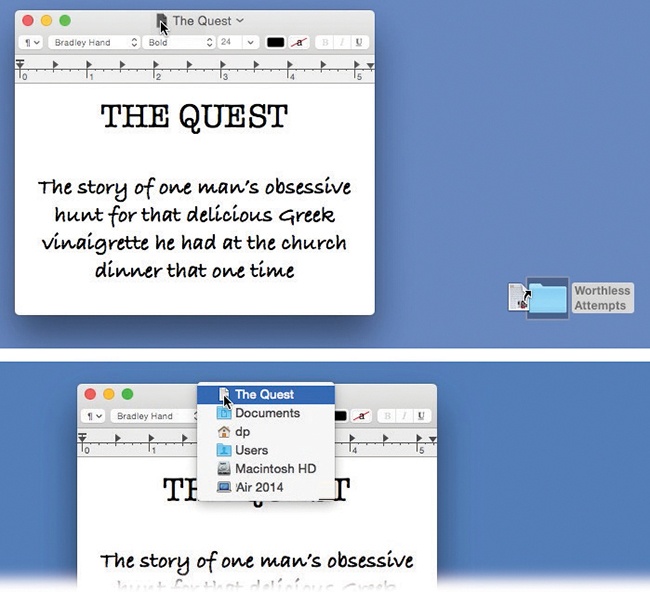
In many programs, you get the same features in document windows, as shown in Figure 3-6. For example, by dragging the tiny document icon next to the document’s name, you can perform these three interesting stunts:
Create an alias on the desktop or the Dock. By dragging this icon to the desktop or onto a folder or disk icon, you create an instant alias of the document you’re working on. (If you drag into the right end of the Dock, you can park the document’s icon there, too.) Before the Resume Windows feature came along, this was useful when, for example, you were about to knock off for the night and wanted easy access to the file you’d been working on when you returned the next day.
Attach a file to an email message. You can drag a document (using its proxy icon as a handle) onto the icon of an email program like Mail or Outlook. That process creates a new, outgoing message with the file you dragged already attached. (If an outgoing message is already open in that program, then you can drag the file directly into its window, too.) In either case, use the
-Tab switcher (Figure 6-6) in mid-drag to switch programs.Launch from a Dock icon. By dragging this title-bar icon onto another program’s Dock icon, you open your document in that other program. For example, if you’re in TextEdit working on a memo and you decide that you’ll need the full strength of Microsoft Word to dress it up, you can drag its title-bar icon directly onto the Word icon in the Dock. Word then launches and opens up the TextEdit document, ready for editing.
Note to struggling writers: Unfortunately, you can’t drag an open document directly into the Trash.
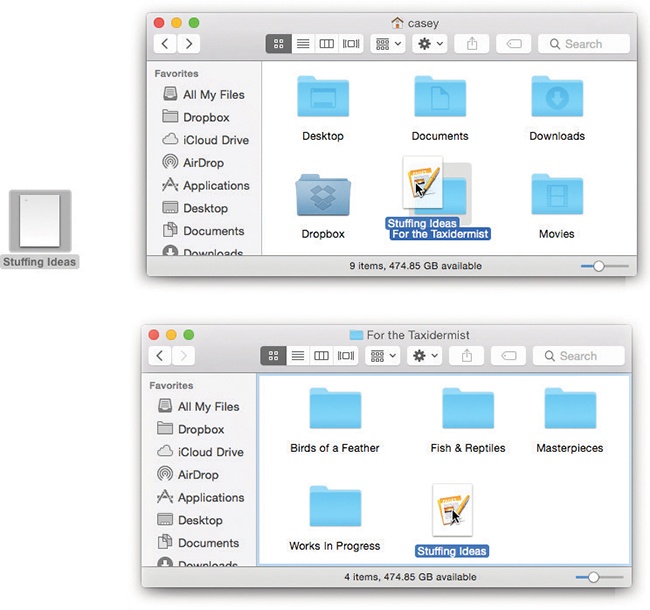
You want to drag an icon not just into a folder, but into a folder inside that folder. This challenge would ordinarily require you to open the folder, open the inner folder, drag the icon in, and then close both windows. As you can imagine, the process is even messier if you want to drag an icon into a sub-subfolder or a sub-sub-subfolder.
Instead of fiddling around with all those windows, you can instead use the spring-loaded folders feature. Figure 3-7 shows you how it’s done.
Tip
You can even drag icons onto disks or folders whose icons appear in the Sidebar (Chapter 2). When you do so, the main part of the window flashes to reveal the contents of the disk or folder you’ve dragged onto. When you let go of the mouse, the main window changes back to reveal the contents of the disk or folder where you started dragging.
In short, the Sidebar and spring-loaded folders make a terrific drag-and-drop way to file an icon from anywhere to anywhere—without having to open or close any windows at all.
Gem in the Rough: Icon’s Progress: The Least-Marketed Feature
Here’s an unsung little feature: When you’re copying a file or a folder, a tiny progress bar appears right on the icons as they sit in their new location. Animated and everything!
Doesn’t matter if it’s list view, icon view, or what—you’ll see the progress bar.

You’ll also see the little button at the top-left corner. That, of course, means “Click me to cancel this copying job, since you obviously don’t know about the -period keystroke.”
Think of it as a little bit of mistake-recovery insurance, finally on the Mac after almost 30 years.
Oh, and one more happy bit of news: If the Mac happens to get shut down before the copying is complete, the process resumes automatically when it comes to life again.
When you finally release the mouse, you’re left facing the final window. All the previous windows closed along the way. You’ve placed the icon into the depths of the nested folders.
That spring-loaded folder technique sounds good in theory, but it can be disconcerting in practice. For most people, the long wait before the first folder opens is almost enough wasted time to negate the value of the feature altogether. Furthermore, when the first window finally does open, you’re often caught by surprise. Suddenly your cursor—mouse button still down—is inside a window, sometimes directly on top of another folder you never intended to open.
Fortunately, you can regain control of spring-loaded folders using these tricks:
Choose System Preferences→Accessibility. In the Mouse & Trackpad pane, adjust the “Spring-loading delay” slider to a setting that drives you less crazy. For example, if the first folder takes too long to open, then drag the slider toward the Short setting.
You can turn off this feature entirely by choosing System Preferences→Accessibility→Mouse & Trackpad, and turning off the “Spring-loading delay” checkbox.
Tap the space bar to make the folder spring open at your command. That is, even with the slider set to the Long delay setting, you can force each folder to spring open when you are ready by tapping the space bar as you hold down the mouse button. True, you need two hands to master this one, but the control you regain is immeasurable.
Whenever a folder springs open into a window, twitch your mouse up to the newly opened window’s title bar or down to its information strip. Doing so ensures that your cursor won’t wind up hovering on, and accidentally opening, an inner folder. With the cursor parked on the gradient gray, you can take your time to survey the newly opened window’s contents, and plunge into an inner folder only after gaining your bearings.