No single element of the Macintosh interface is as recognizable or famous as the Trash can icon, which appears at the end of the Dock. (It’s actually a wastebasket, not a can.)
You can discard almost any icon by dragging it into the Trash can. When the tip of your arrow cursor touches the Trash icon, the little wastebasket turns black. When you release the mouse, you’re well on your way to discarding whatever it was you dragged. As a convenience, macOS even replaces the empty-wastebasket icon with a wastebasket-filled-with-crumpled-up-papers icon, to let you know there’s something in there.
It’s worth learning the keyboard alternative to dragging something into the Trash: Highlight the icon, and then press  -Delete (which corresponds to the File→Move to Trash command).
Or, if your Mac has a Touch Bar (The Complicated Story of the Function Keys), you can install a Move to Trash button on it, so that one tap there does the trick.
The keyboard and Touch Bar techniques are not only far faster than dragging, but also require far less precision. MacOS does all the Trash-targeting for you.
Note
If a file is locked, a message appears to let you know; it offers you the chance to fling it into the Trash anyway. That’s a better solution than in older versions of macOS, when you were forced to unlock the file before you could trash it.
File and folder icons sit in the Trash forever—or until you choose Finder→Empty Trash, whichever comes first.
If you haven’t yet emptied the Trash, you can open its window by clicking the wastebasket icon once. Now you can review its contents: icons that you’ve placed on the waiting list for extinction. If you change your mind, you can:
Use the Put Back command. This feature flings the trashed item back into whatever folder it came from, even if that was weeks ago.
You’ll find the Put Back command wherever fine shortcut menus are sold. For example, it appears when you two-finger click the icon, right-click it, or click the icon and then open the
 menu.
menu.Hit Undo. If dragging a file to the Trash was something you just did, you can press
-Z—the keyboard shortcut for the Edit→Undo command. (The Finder offers a five-level Undo, meaning that you can retrace your last five actions.)Undo not only removes a file from the Trash, but it also returns it to the folder from which it came. This trick works even if the Trash window isn’t open.
Drag it manually. Of course, you can also drag any icon out of the Trash with the mouse, which gives you the option of putting it somewhere new (as opposed to back in the folder it started from).
If you’re confident that the items in the Trash window are worth deleting, use any of these three options to empty it:
Choose Finder→Empty Trash.
Press Shift-
-Delete. Or, if you’d just as soon not bother with the “Are you sure?” message, then throw the Option key in there, too.Right-click the wastebasket icon (or two-finger click it, or just click it and hold the mouse button down for a moment); choose Empty Trash from the shortcut menu.
The Mac asks you to confirm your decision. (Figure 3-12 shows this message.) If you click Empty Trash (or press Return), macOS deletes those files from your hard drive.
New in macOS Sierra: The Mac can now empty the Trash automatically after 30 days, just as Windows has been able to do for years. (Well, technically, it removes individual items from the trash after each has sat there for 30 days.)
If you turn on this option in Finder→Preferences→Advanced (“Remove items from the Trash after 30 days”), you can forget about having to empty the Trash manually. You can just think of it as a 30-day safety net for things you’re pretty sure you want to ditch.
By highlighting a file or folder, choosing File→Get Info, and turning on the Locked checkbox, you protect that file or folder from accidental deletion (see Figure 3-12 at bottom). A little  icon appears on the corner of the full-size icon, also shown in Figure 3-12.
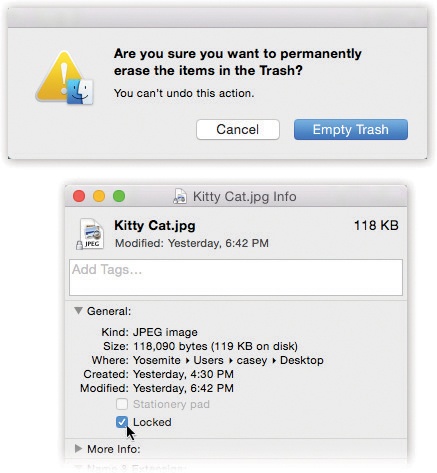
Bottom: The Get Info window for a locked file. Locking a file in this way isn’t military-level security by any stretch—any passing evildoer can unlock the file in the same way you locked it. But it does trigger a warning when you try to put it into the Trash, providing at least one layer of protection against losing or deleting it.
Figure 3-12. Top: Your last warning. MacOS doesn’t tell you how many items are in the Trash or how much disk space they take up.
Locked files these days behave quite differently than they did in early Mac versions:
Dragging the file into another folder makes a copy; the original stays put.
Putting the icon into the Trash produces a warning message: “Item ‘Shopping List’ is locked. Do you want to move it to the Trash anyway?” If so, click Continue.
Once a locked file is in the Trash, you don’t get any more warnings. When you empty the Trash, that item gets erased right along with everything else.
You can unlock files easily enough. Press Option--I (or press Option as you choose File→Show Inspector). Turn off the Locked checkbox in the resulting Info window. (Yes, you can lock or unlock a mass of files at once.)