Mission Control’s other star feature, Spaces, gives you up to 16 full-size monitors. Ordinarily, of course, attaching so many screens to a single computer would be a massively expensive proposition, not to mention detrimental to your living space and personal relationships.
Fortunately, Spaces monitors are virtual. They exist only in the Mac’s little head. You see only one at a time; you switch using Mission Control or a gesture.
But just because the Spaces screens are simulated doesn’t mean they’re not useful. You can dedicate each one to a different program or kind of program. Screen 1 might contain your email and chat windows, arranged just the way you like them. Screen 2 can hold Photoshop, with an open document and the palettes carefully arrayed. On Screen 3: your web browser in Full Screen mode.
You can also have the same program running on multiple screens—but with different documents or projects open on each one.
These desktops are also essential to macOS’s full-screen apps feature, because each full-screen app gets its own Spaces desktop.
Now, virtual screens aren’t a new idea—this sort of software has been available for years. But the Mac was the first to make it a standard feature of a consumer operating system.
It’s still what most people would consider an advanced feature, and it’s definitely confusing at first. But it’ll be here when you’re ready for it.
Mission Control generally starts you off with just one Space (or “desktop,” as it’s labeled)—the one you’ve been using all along. If you’ve clicked the  button in an app to make it full screen, it fills an additional desktop unto itself.
To create another desktop, enter Mission Control. At the top edge of the screen, the gray strip—the Spaces bar—is the command center for creating, deleting, rearranging, and configuring your virtual desktops.
Note
To save space, the Spaces bar starts out as a very thin strip bearing only the names of your desktops (Figure 6-13, top). Move your cursor into this strip to expand it vertically, so that you can now see the actual thumbnail images of your desktops (Figure 6-13, bottom).

Once you’re in Mission Control, you can proceed in either of two ways:
The long way. See Figure 6-13 for the step-by-steps of clicking the + button in the upper-right corner.
The short way. Drag one window thumbnail onto any blank spot on the Spaces bar. The Mac creates a new desktop to hold it.
Once you’ve got Spaces set up and turned on, the fun begins. Start by moving to the virtual screen you want; it’s like changing the channel. Here are some ways to do that:
Swipe horizontally on your trackpad with three fingers. (On the Magic Mouse, it’s two fingers.) If you have a trackpad or a Magic Mouse, this is definitely the method to learn; it’s fast, fluid, and happy.
You can change this gesture so that it requires an additional finger, if you like, in System Preferences→Trackpad (or Mouse)→More Gestures.
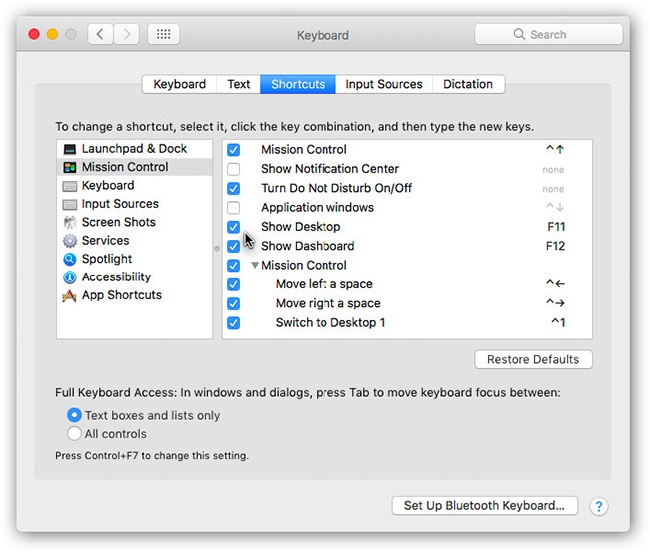
While pressing the Control key, type the number of the desktop you want. For example, hit Control-3 to jump to your third screen. (You have to turn on this feature first, though. See Figure 6-14.)
Enter Mission Control, and then click the desktop you want.
Figure 6-14. To control Spaces from the keyboard, open
 →System Preferences→Keyboard. Click Keyboard Shortcuts and then Mission Control. As shown here, Apple has preassigned keyboard shortcuts to your various Spaces—but they’re not turned on yet. Turn on the checkboxes for the shortcuts you want. (You can change those shortcuts here, too.)
Press Control-
 or Control-
 to rotate to the previous or next desktop.
When you make a switch, you see a flash of animation as one screen flies away and another appears. Now that you’re “on” the screen you want, open programs and arrange windows onto it as usual.
Tip
What if you’re using Spaces, and you want to drag something from one screen (like a photo in Photos) into a window that’s on a different screen (like an outgoing email message)?
There are two ways; take your pick. First, you can start dragging whatever it is—and then, in mid-drag, press the keystroke for Mission Control (usually fn-F9); complete the drag directly onto the other Space, and even into the relevant window in that Space.
Another approach: Start dragging. With the mouse button still down, press  -Tab to open the application switcher. Continue the drag onto the icon of the receiving program, and still keep the mouse button down. MacOS switches to the appropriate virtual screen automatically.
To delete a desktop, enter Mission Control. Point to one of the screen thumbnails without clicking until a  appears in its corner; click it. The desktop disappears, and whatever windows were on it get shoved onto your main desktop.
Tip
If you don’t have the 1½ seconds to wait for the to appear, then press Option as you point. The Close button appears instantly.
In apps using Full Screen mode, the symbol is different; instead of , it looks like this:  . When you click, the desktop flies off the Spaces bar into the main part of your screen. That app is now a plain-vanilla window thumbnail, just like all the others in Mission Control.
Yes, Spaces is an advanced feature. But there are actually advanced features within this advanced feature. For example:
Rearrange your Spaces. Open Mission Control, and then drag the Space thumbnails around horizontally.
Multiple monitors. If you have a second monitor connected to your Mac (or even several), each one can have its own set of Spaces.
If “Displays have separate Spaces” is turned on in the Mission Control panel of System Preferences (Figure 6-12), then each monitor has its own set of Spaces. When you use one of the gestures or keystrokes for switching Spaces, you affect the Spaces on only one monitor: the one that contains your cursor at the moment.
Move a window to a different Space. Of course, you can always move a window to a different Space by dragging its tiny icon within Mission Control. But there are two faster ways.
First, you can drag a window (using its title bar as a handle) all the way to the edge of the screen. Stay there with the mouse button still down. After about a second, the adjacent screen slides into view; you’ve just moved the window.
Second, switch to the new Space. Hold your mouse down on the app’s Dock icon; from the shortcut menu, choose Options→Assign To→This Desktop. The Mac whisks that app’s windows from whatever other screen they’re on to this screen.
Move a window to all Spaces. Usually, you slap each app (or each window) onto only one Spaces desktop. Your web browser on Space 1. Email on Space 2. And so on.
Sometimes, though, you might want one app’s windows on all your desktops—perhaps because you use it so often, you want it always with you. The Finder and System Preferences are great examples. Or maybe your calendar app, your browser, or your email program.
To do that, hold the mouse button down on the program’s Dock icon until the shortcut menu appears. From this menu, choose Options→Assign To→All Desktops.
Wallpaper for every desktop. Coolly enough, though, you can set a different wallpaper photo (desktop photo) to each Space. You might find it easier to get your bearings that way. When you restart the computer, the Mac will remember not just which Spaces you had open and what was on them, but also what pictures lay behind them.
You can go about assigning desktop pictures in two ways. First switch to the Space whose picture you want to change. Then either open System Preferences→Desktop & Screen Saver→Desktop, or right-click (or two-finger click) a blank spot on the existing desktop background, and choose Change Desktop Background.
Note
In both cases, you may have to move the System Preferences window onto your current Space. You can do that by popping into Mission Control.
Either way, you wind up in the Preferences panel for choosing desktop wallpaper. Click the backdrop you want for this screen. Then switch to the next Space and repeat.
In System Preferences→Mission Control, two settings govern the way Spaces works:
Automatically rearrange Spaces based on most recent use. If this option is turned on, then macOS will constantly rearrange your virtual desktops so that the most recently used ones are first. (The most recent one becomes Desktop #2, since Desktop #1 is always your main desktop.)
The point, of course, is to make it quick and easy to return to whatever you were doing most recently. But if you find it disorienting to have your desktops constantly changing their sequence, you can turn this option off.
When switching to an application, switch to a Space with open windows for the application. There must be some clearer way to write this checkbox.
In any case, it means that when you click the Dock icon for a running program, you jump to the Space that contains that program’s open windows already, instead of leaving you on the current Space.
For example, suppose you’re working in your browser on Desktop #3. Then you click the Mail icon on the Dock. If this option is turned on, you jump to Desktop #2 (or wherever you’ve been already working in Mail). If it’s not turned on, Mail jumps to the foreground, but you won’t see any windows—they’re stranded back on Desktop #2.