Preview is macOS’s scanning software, graphics viewer, fax viewer, and PDF reader. It’s always been teeming with features that most Mac owners never even knew were there—but it’s a flagship macOS program, offering all of Apple’s pet cutting-edge features like Auto Save, Versions, Full Screen mode, saving to iCloud (Tip), and a Share button ( ) that lets you send a document to somebody else (Notes on Disk Swapping).
Tip
Preview can even open Microsoft Office documents (Word, PowerPoint, Excel) and iWork documents (Pages, Numbers, Keynote). You can’t edit them in Preview, but you can read them, search them, and print them. No longer must you pay homage to Microsoft’s bottom line just to have a look at the documents people send you.
Preview can import pictures directly from a digital camera (or iPhone), meaning that there are now three macOS apps that can perform that duty. (Photos and Image Capture are the other two.) It’s sometimes handy to use Preview for this purpose, though, because it has some great tools for photos: color-correction controls, size/resolution options, format conversion, and so on.
The actual importing process, though, is exactly like using Image Capture. Connect your camera, choose File→Import from [your camera’s name], and carry on as described in Store tab.
Preview can also operate a scanner, auto-straighten the scanned images, and export them as PDF files, JPEG graphics, and so on.
This, too, is exactly like using Image Capture to operate your scanner. Only the first step is different. Open Preview, choose File→Import from Scanner→[your scanner’s name], and proceed as described in Note.
Clearly Apple saved some time by reusing some code.
One hallmark of Preview is its effortless handling of multiples: multiple fax pages, multiple PDF files, batches of photos, and so on. The key to understanding the possibilities is mastering the Sidebar, shown in Figure 12-32. The idea is that these thumbnails let you navigate pages or graphics without having to open a rat’s nest of individual windows.
Tip
You can drag these thumbnails from one Preview window’s Sidebar into another. That’s a great way to mix and match pages from different PDF documents into a single new one, for example.
To hide or show the Sidebar, choose one of these commands from the View menu:
Thumbnails. This standard view (Figure 12-32, left) offers a scrolling vertical list of miniature pages or photos. Click one to see it at full size in the main window. Make the thumbnails larger or smaller by dragging the window/Sidebar dividing line.
Highlights & Notes. Preview is a better PDF editor than ever. If you add comments and highlighting to a PDF document, as described later in this section, you can view all of them in this tidy list—and click one to jump to it.
Table of Contents. If you’re looking over photos, this option turns the Sidebar into a scrolling list of their names. If you’ve opened a group of PDFs all at once, you see a list of them. Or, if you have a PDF that contains chapter headings, you see them listed in the Sidebar as, yes, a table of contents.
Contact Sheet. When you choose this view, the main window scrolls away, leaving you with a full screen of thumbnail miniatures. It’s like a light table where you can look over all your photos or PDF pages at once. Make them bigger or smaller using the slider in the lower left.

Preview is surprisingly versatile. It can display and manipulate pictures saved in a wide variety of formats, including common graphics formats like JPEG, TIFF, PICT, and GIF; less commonly used formats like BMP, PNG, SGI, and TGA; and even Photoshop, EPS, and PDF graphics.
Tip
Don’t miss the Tools→Show Magnifier command. It gives you a loupe: a magnifying circle (or, in a PDF document, a magnifying rectangle) that lets you inspect part of your graphic or PDF file more closely.
If you highlight a group of image files in the Finder and open them all at once (for example, by pressing  -O), Preview opens the first one but lists the thumbnails of the whole group in the Sidebar. You can walk through them with the
  and
and  keys, or you can choose View→Slideshow (Shift--F) to open a full-screen slideshow.
To crop graphics in Preview, drag across the part of the graphic that you want to keep. To redraw, drag the round handles on the dotted rectangle; or, to proceed with the crop, choose Tools→Crop. (The keyboard shortcut is -K.)
Since Preview is an Auto Save program, you can always return to the original if you change your mind someday.
Preview is no Photoshop, but it’s getting closer every year:
Choose Tools→Show Inspector. A floating palette appears. Click the first tab to see the photo’s name, its pixel dimensions, and so on. Click the second one for even more geeky photo details, including camera settings like the lens type, ISO setting, focus mode, whether the flash was on, and so on. The third tab lets you add keywords, so you’ll be able to search for this image later using Spotlight. (The fourth is for PDF documents only, not photos; it lets you add annotations. A fifth tab appears only in PDF documents—for rotating, cropping, and resizing the file.)
Power Users’ Clinic: Scaling and Resampling
When you’re fooling around with a picture’s size and resolution in the Adjust Size dialog box, you might find that a couple of the options take a little explaining.
If “Scale proportionally” is turned on, then Preview changes the Height number when you change the Width number, and vice versa. In other words, it won’t let you change the shape of the photo; that’s why a little padlock icon appears to bracket the Height and Width boxes.
If “Resample image” is turned off, then Preview adjusts the image’s size by making the existing dots bigger or smaller—but never changes the number of dots. (That’s why a padlock bracket links all three boxes together. For example, you can make the image larger—but you’ll lower the number of dots per inch.)
If “Resample image” is turned on, then you’re giving Preview permission to add or subtract pixels as necessary to scale the photo up or down. Of course, it can’t create detail that wasn’t there in the original, but if you are scaling the picture up, it does a decent job of generating new pixels by averaging the colors of the neighboring ones.
Choose Tools→Adjust Color. A translucent, floating color-adjustment palette appears, teeming with sliders for brightness, contrast, exposure, saturation (color intensity), temperature and tint (color cast), sharpness, and more. See Figure 12-33.
Figure 12-33. Humble little Preview has grown up into a big, strong mini-Photoshop. You can really fix up a photo if you know what you’re doing, using these sliders. Or you can just click the Auto Levels button. It sets all the sliders for you, which generally does an amazing job of making almost any photo look better.
Choose Tools→Adjust Size. This command lets you adjust a photo’s resolution, which comes in handy a lot. For example, you can scale an unwieldy 10-megapixel, gazillion-by-gazillion-pixel shot down to a nice 640 × 480 JPEG that’s small enough to send by email. Or you can shrink a photo down so it fits within a desktop window, for use as a window background.
There’s not much to it. Type in the new print dimensions you want for the photo, in inches or whatever units you choose from the pop-up menu. If you like, you can also change the resolution (the number of pixels per inch) by editing the Resolution box.


Tip
Here’s a Photoshoppy feature you would never, ever expect to find in a simple viewer like Preview: You can extract a person (or anything, really) from the background. That’s handy when you want to clip yourself out of a group shot to use as your Messages portrait, when you want to paste somebody into a new background, or when you break up with someone and want him out of your photos. See the free PDF appendix to this chapter, “Cutting People from Photos with Preview.” It’s on this book’s “Missing CD” page at www.missingmanuals.com.
Preview doesn’t just open all these file formats—it can also convert among most of them. You can pop open some old Mac PICT files and turn them into BMP files for a Windows person, pry open a TIFF file from a scanner and turn it into a JPEG for use on your website, and so on.
Tip
What’s even cooler is that you can open raw PostScript files right into Preview, which converts them into PDF files on the spot. You no longer need a PostScript laser printer to print out high-end diagrams and page layouts that come to you as PostScript files. Thanks to Preview, even an inkjet printer can handle them.
All you have to do is open the file you want to convert and choose File→Export. In the dialog box that appears, choose the new format for the image using the Format pop-up menu (JPEG, TIFF, PNG, or Photoshop, for example); if you press the Option key, you’re offered even more file types. Finally, click Save to export the file.
Preview is a nearly full-blown equivalent of Adobe Reader, the free program used by millions to read PDF documents. It lets you search PDF documents, copy text out of them, add comments, fill in forms, click live hyperlinks, add highlighting, circle certain passages, type in notes—features that used to be available only in Adobe’s Acrobat Reader. You can even fill out PDF forms, typing into boxes on the electronic document.
Tip
Don’t forget that Preview is one of macOS’s certified full-screen apps, as described in Tip. You can also flip through the pages of a PDF using the “next page” gesture: a two-finger swipe on the trackpad.
Here are the basics:
Use the View menu commands to control how the PDF document appears: as two-page spreads; as single scrolling sheets of “paper towel”; with borders that indicate ends of pages; and so on.
Press the space bar to page through a document (add Shift to page upward. The Page Up and Page Down keys do the same thing.)
Tip
Some PDF documents include a table of contents, which you’ll see in Preview’s Sidebar, complete with flippy triangles that denote chapter headings. Use the
and keys to walk through these chapter headings, and then expand one that looks good by pressing the  key. Collapse it again with the
  key. In other words, you expand and collapse flippy triangles in Preview just as you do in a Finder list view. (The View→Sidebar submenu also includes Expand All and Collapse All commands.)
Bookmark your place by choosing Bookmarks→Add Bookmark (
-D); type a clever name. You’ll be able to return to that spot by choosing its name from the Bookmarks menu.These remain living, editable entities even after the document is saved and reopened. These are full-blown Acrobat annotations; they’ll show up when your PDF document is opened by Acrobat Reader or even on Windows PCs.
Turn smoothing on or off to improve readability. To find the on/off switch, choose Preview→Preferences, and click the PDF tab. Turn on “Smooth line art and text.” (Though antialiased text generally looks great, it’s sometimes easier to read very small type with antialiasing turned off. It’s a little jagged, but clearer nonetheless.)
If you want to copy material out of a PDF document—for pasting into a word processor, for example, where you can edit it—click the Text tool (the AaI on the toolbar) or choose Tools→Text Tool. Now you can drag through some text (and even graphics) and then choose Edit→Copy, just as though the PDF document were a web page. You can even drag across page boundaries.
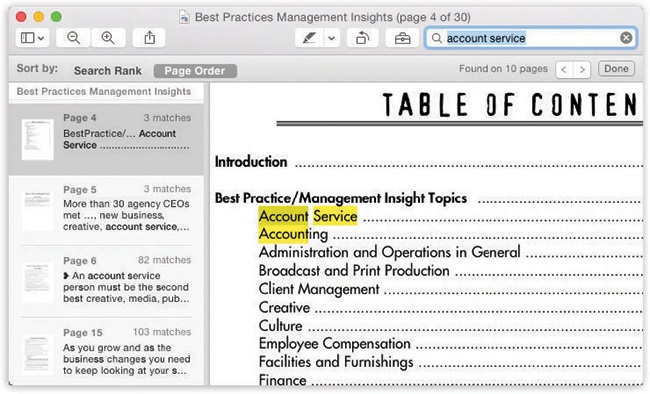
To find a word or phrase somewhere in a PDF document, press
-F (or choose File→Find) to open the Find box—or just type into the  box at the top of the Sidebar, if it’s open. Proceed as shown in Figure 12-34.
The search results show a snippet of the actual text surrounding each “find,” along with the number of matches per page, and even a thumbnail of the page itself. It’s all about context, baby.
You can save a single page from a PDF as a TIFF file to use it in other graphics, word-processing, or page-layout programs that might not directly recognize PDF.
To extract a page, use the usual File→Export command, making sure to choose the new file format from the pop-up menu. (If you choose a format like Photoshop or JPEG, Preview converts only the currently selected page of your PDF document. That’s because there’s no such thing as a multipage Photoshop or JPEG document. But you already knew that.)
Add keywords to a graphic or PDF (choose Tools→Show Inspector, click the
tab, click the + button). Later, you’ll be able to call up these documents with a quick Spotlight search for those details.
Preview has become the Godzilla of PDF editing programs. It is, in fact, a full-blown drawing program now, with a choice of shapes, colors, lines, arrows, and text boxes to dress up a PDF document. These are identical to the new drawing tools in Mail, so they’re worth getting to know.
You can type notes (in a box or a bubble), add clickable links (to web addresses or other spots in the document), or use circles, arrows, rectangles, strikethroughs, underlining, or colored highlighting to draw your PDF readers’ attention to certain sections. (You can dress up photos this way, too.) In fact, you can even use your laptop’s trackpad to draw on a document—or to sign one.
To highlight text in a PDF document, click the  button on the toolbar, and then drag across the text. Use the pop-up menu next to the to choose a different highlighter color, or to choose underlining or strikethrough styles.
For the more ambitious annotation styles, like signing a document or drawing on it, open the Markup toolbar, shown in Figure 12-35. To do that, click  on the toolbar.
At this point, the icons on the toolbar offer these features:
AaI,
 Text Selection, Rectangular Selection. These tools let you highlight text in a document (so that you can copy it, for example) or select a chunk of a graphic.
 Sketch. This remarkable tool lets you draw freehand in your document—and marvel as Preview cleans up your lines. For example, if you draw what’s more or less a diagonal line, Preview straightens it and makes it a perfect 45 degrees. If you draw what seems to be a box or a circle, Preview zaps it into perfection. Use the
  ,
,  , and
, and  buttons to specify the line thickness, add a colored border, or fill the interior with a background color. Figure 12-35 shows the process.
If you actually prefer your imperfect original, then you can click the original (or any other variation) from the little floating palette (shown at left in the middle illustration).
The Shapes pop-up menu (
 ) offers a range of fascinating drawing options. They include the classic Speech Bubble and the loupe, which produces a magnified view of one circular area (bottom).
While you’re editing a loupe, you see a tiny green dot. Drag it to adjust the magnification inside the circle; drag the blue one to change the circle’s size.
Figure 12-35. As you draw a freehand shape (top), macOS helpfully straightens your straight lines and makes your curved ones perfect (middle).
- Shapes. Use this pop-up menu to choose what kind of perfect shape you want to draw: line, arrow, circle, square, and so on. It will use whatever thickness and color you’ve chosen from the and pop-up menus.
Once you’ve selected a tool, drag diagonally on your document to place the shape.
The two icons at the bottom of this palette are unusual for a drawing program, but handy when you want to draw attention to some part of a document or photo.
At lower left in the Shapes pop-up menu, the Mask dims out the entire document except the rectangular portion you enclose. The one at lower right, the loupe, magnifies a circular area to draw the viewer’s eye to it (Figure 12-35, bottom). Whatever attention-flagging markings you enclose using these tools become part of the finished, exported PDF or graphic.
 Text. Click to place a text box on the image. You can drag it or reshape it—and, of course, you can replace the word “Text” inside it with much superior words of your own. Use the
  pop-up menu to choose a font, color, size, and style; use the and buttons to add a colored border or fill the interior with a background color.
 Note. Click to place a virtual Post-it note onto the document. As you type or paste into it, the note expands; you can’t otherwise control its size or shape. But when you click outside the note, it collapses down into a little square button. At this point, you can change the note’s background color (right-click or two-finger click; choose a color from the shortcut menu); drag the little square to move the note; or open the note back up by double-clicking.
Tip
Later, you can view a tidy list of all your notes and highlighted passages by choosing View→High-lighting and Notes. On the resulting panel, Preview ordinarily displays each text note with your name and the date. If you’d rather not have that info added, then choose Preview→Preferences, click PDF, and then turn off “Add name to annotations.”
- Shape Style. This palette governs the line thickness and line style of whatever line or shape you’re drawing (or that you’ve selected). There are some very cool options here, including dashed lines, shadowed ones, or chalky-looking ones—and ones with arrowheads.
- , Border Color, Fill Color. These palettes affect the border color (line color) and interior background color of whatever shape you’re drawing (or have selected).
- Text Style. Here are your font, size, and style commands for whatever text you’re about to type (or have selected).
Once you’ve made an annotation, you can drag it around, drag its blue control dots to change its shape, edit the text inside it, and so on.
Of macOS’s 47,000 features, few are quite as slick or useful as the PDF signature option (Figure 12-36). It lets your Mac memorize your signature, either by taking a picture of it—or by letting you sign with your finger on your laptop’s trackpad.
Once Preview has stored your signature, you can slap it into the PDF documents that will come through your life.

Figure 12-36. Top: Hold up your written signature page in front of your Mac’s camera. Make sure it’s big enough to fill the box on the left side—never mind that it appears backward—and position it so that it sits on the blue line, as shown here. After a moment, your isolated, beautifully photographed signature appears in the Preview box.
The first step is to teach Preview what your signature looks like. On the Markup toolbar, click the Signature pop-up menu,  , and choose Create Signature. In the resulting window, you’re offered two tabs:
Trackpad. If your Mac has a trackpad, this option lets you write out your signature with your finger! Click where it says “Click Here to Begin,” and then draw away.
Plan ahead; the width of the trackpad is all the space you’ve got. When you’re done, press any key and then click Done. The result may not look exactly like your pen-and-paper signature, but it’ll do for most purposes.
Camera. Sign your name on a piece of white paper; hold it up to your Mac’s camera, as shown in Figure 12-36. When the positioning looks good, click Done. You’ve just stored your signature. (You have to do this only once—per signature, anyway.)
Tip
As a handy bonus, whatever signatures you’ve saved this way also appear in Preview on all your other Macs. (At least those that are signed into the same iCloud account and are running Yosemite or later—and have iCloud Keychain turned on in Settings→iCloud.)
Now, then. When the time comes to sign a document, make the Markup toolbar visible. From the
pop-up menu, choose the signature’s name (Figure 12-36, middle.)The signature appears in its own graphics box. Drag it to a new position, or drag the blue handles to resize it (Figure 12-36, bottom).

Here’s a feature that could save a lot of trees: fill-inable PDF forms.
Lots and lots of PDF documents are forms that you’re supposed to fill out—from IRS tax forms to school permission slips. Preview is smart enough to recognize boxes to fill in, lines to type on, and checkboxes to click, meaning that you don’t have to print, fill out, and then scan these things anymore. And it manages to find those lines, text boxes, and checkboxes on any PDF document, not just those that were originally designed to be filled in by PDF form-filling software. See Figure 12-37.
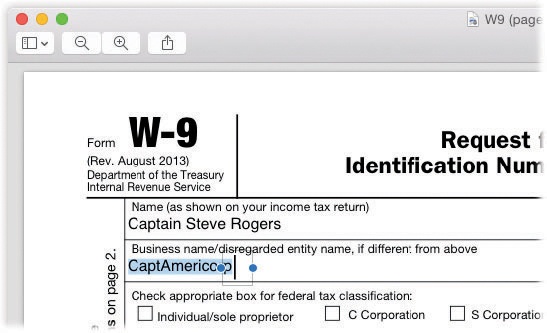
Figure 12-37. When you fill in a form, the cursor changes automatically into an insertion point when it detects a box or a line that you can fill in. And it turns into a pointing-finger icon when it’s over a checkbox. Click to put a checkmark in that box; click again to remove the checkmark. It’s hours of fun for the whole family!