
‘Slush cast’ bronze-filled polyester resin cast (L: 320mm; W: 110mm; H: 200mm).
‘Slush cast’ bronze-filled polyester resin cast (L: 320mm; W: 110mm; H: 200mm).
CHAPTER TWELVE
SLUSH CASTING
Slush casting can be a useful method of producing a hollow cast from a mould. The process involves introducing an amount of the chosen casting material into the mould and ‘slushing’ it around and over the mould surface to pick up the detail. This method can be used with any mould but is particularly useful on multiple-piece moulds that would otherwise require an application of casting material separately on each piece and would then have to be joined. It can also be used on completely sealed moulds with just a pouring hole for access.
Slush casting can be employed to produce either hollow casts or decorative gel-coated casts that are then backfilled to produce a solid casting. Slush casting methods can provide time-saving benefits as the application of gel coats can be achieved very quickly, rather than having to apply them slowly by brush.
Materials
Slush casting methods can use many different casting materials that are fluid enough to move around the inside of a mould to coat it.
■ Plaster Casting plasters of any sort can be used. Alpha plasters of high strength are preferable due to their strength even in thin sections, but any casting plaster built up to an appropriate thickness could be used.
■ Resins Many different types of resin systems are suitable for slush casting. Resin systems with fast setting times and low viscosities are preferable.
■ Gel coat resins Metal/stone-filled gel coat resins can be employed as long as they are fluid enough to move around the mould surface. In order to make metal-filled gel coats fluid enough it may be necessary to reduce the amount of filler addition. This can compromise the surface quality of castings, however, so batch testing prior to slush casting is essential.
■ Clear resins Bioresin and fast-cast polyurethane resins are suitable.
■ Wax Most types of casting wax are suitable.
■ Silicone rubber This can be used for slush casting but the consistency should be very liquid and it should be employed with fast catalysts.
Principal Casting Techniques
The principal technique could not be simpler: a fluid casting material is poured into the mould and the mould is rotated until the material coats the surface of the mould and sets. It is important to cover the mould surface as evenly as possible and several factors should to be taken into consideration to ensure good results.
Mould type
OPEN MOULDS
Open moulds – those with a wide opening that constitutes the base of the casting – are probably the easiest moulds to use, as it is possible to look into the mould as it is slushed to ensure an even coat has been applied.
1. Fill the mould to approximately a third full with casting material.
2. Rotate and tilt the mould to move material over the surface.
3. Ensure that the casting material covers right up to the lip of the mould. A brush can be used to get the casting material accurately up to the lip of the mould.
4. Maintain the rotating and tilting action until the casting material has set and stopped flowing.
SEALED MOULDS
Sealed moulds have only a pouring hole or very narrow point of access into the mould. This type of mould can be more difficult to slush as there is no visual confirmation that the casting material has completely covered the mould surface.
■ Consider your intended rotation pattern. When filling sealed moulds it is important to cover the mould surface evenly. A pre-planned rotational action that ensures casting material covers the inside of the mould, repeated consistently until the casting material has set, will assist this process.
■ A pouring hole plug for the mould should be constructed to plug the pouring hole and contain the casting material as it is setting. This can be constructed in the mouldmaking process or as a separate addition afterwards.
■ Fill the mould to approximately a third full with casting material.
■ Employ the rotation pattern repeatedly until the casting material has set and stopped flowing.
■ You will need to remove the mould plug and tip out the casting material a little to gauge whether it has set or not.
Mould Size
Size is a factor of obvious importance as the mould needs to be moved and rotated constantly until the casting material has set. Practical restrictions on the size of mould for employing slush casting methods is really dependent on the physical capabilities of the mouldmaker and the setting time of the casting material used. Remember that the mould will need to be kept moving until the casting material has set.
Machine ‘roto-dye’ systems can be employed to perform the rotational action of slush casting mechanically. It is possible to construct your own roto-dye machine, although time will need to be spent in research and testing.
Casting Material Consistency
This is important on a number of levels and will vary according to the casting material being used. Material consistency needs to have free-flowing capabilities, be thin enough to pick up mould detail and have maximum strength when set. These three factors may not be compatible, however. For instance, reducing the viscosity of some plasters to maintain free-flow may affect the physical properties of the set casting, and creating free-flowing metal/stone-filled resin gel coats may compromise the decorative surface finish. Clearly, some compromises may be necessary.
To maintain strength but accomplish a good pick up of detail a coat as thick as possible but thin enough to flow freely should be applied and then backed up with subsequently thicker coats. For metal/stone-filled gel coat resins as much filler as possible should be employed in the first coat while retaining a free-flowing consistency. This may require testing it in small amounts on the mould surface before casting to ensure an adequate surface finish. The dilemma is that a material that is too thick will not pick up detail and may contain air bubbles when set, and an appropriate consistency can only really be determined by testing.
Hollow Castings
It is possible to produce hollow castings using slush casting methods. These will need to be built up over several layers or coats of casting material to attain maximum strength.
How many coats to apply will wholly depend on the casting material being used. Adherence to casting material tolerances and specifications are important; testing on a small scale can determine these specifications with most accuracy.
Allow coats to set fully before applying the next coat. This is particularly important for the first coat because it will pick up mould detail and should not be disturbed until set. Subsequent coats should also be allowed to set before another coat is applied otherwise they will not cover properly.
When using pigmented, metal-filled or stone-filled gel coats the initial decorative coat can be backed up with subsequent coats of neat casting material. Back-up coats can be filled with inert fillers to reduce the casting costs. Filled back-up coats of casting material should be free flowing to ensure an even covering. To ensure good lamination do not allow the plaster to dry out between layers. (See Chapter 9 for an illustrated example of hollow slush casting.)
Solid Castings
Where solid castings are required a surface coat or decorative gel coat layer can be slush cast and allowed to set fully. Neat or filler addition casting material is then poured into the mould to fill it and back up the surface layer. This method has clear advantages in terms of time and cost savings.
PROJECT
Specification
A cold-cast bronze polyester resin gel coat and backfilled solid casting of a model lion on a base. From a silicone rubber ‘core’ mould (see Chapter 1). Size: 320mm (L), 110mm (W) and 200mm (H).
Time Required
This project takes about one hour, not including setting times.
Materials
■ General-purpose polyester resin (supplied by Alec Tiranti Ltd);
■ a medium-reactivity catalyst for polyester resin;
■ bronze powder filler;
■ Fillite® filler
■ petroleum jelly; and
■ clay.
Tools
■ Beakers for dispensing, mixing and pouring;
■ digital scales for weighing cast materials;
■ wooden spatulas for mixing;
■ a plaster mixing bowl;
■ a spirit level;
■ a container for pouring out excess casting material;
■ a brush; and
■ disposable rubber gloves.
Method
SET-UP AND PREPARATION
As with any project, careful preparation before the start of the job is crucial. Knowing the material quantities and tools needed, undertaking repairs to the original and setting-up the working area will all help to complete the job accurately and efficiently. (Tip: make sure you have enough materials to complete the job before you start. Running out of material halfway through the job is at least a waste of time and, at worst, a loss of previously executed work.)
RELEASE AGENT
It is a good idea to apply a release agent around all seams and flanges on multiple-piece moulds, to ensure the mould is thoroughly sealed.
1. Apply release agent thoroughly to any area of the mould opening where excess casting material may be poured out to ensure coverage.
APPLICATION OF THE GEL COAT
The gel coat layer of the casting is the most important layer because this picks up the detail of the mould and contains the surface treatment of the casting.
1. Make up enough gel coat mix to fill the mould a third full. The consistency should be pourable.
2. Fill the mould to a third full.
3. Rotate and tilt the mould in a pre-determined rotation pattern.
4. Ensure the casting material covers the whole interior surface of the mould as you do this.
5. It may be necessary to completely invert the mould, allowing a little casting material to be poured out around the mould opening to ensure coverage. Have a container available to pour out excess casting material.
6. If access allows, a brush may be used to bring casting material up to the mould opening.
7. Continue with the rotation pattern until the casting material has set.
8. It is usually a good idea to apply two gel coat layers to ensure good coverage of mould surface.
9. Allow the gel coats to set thoroughly.
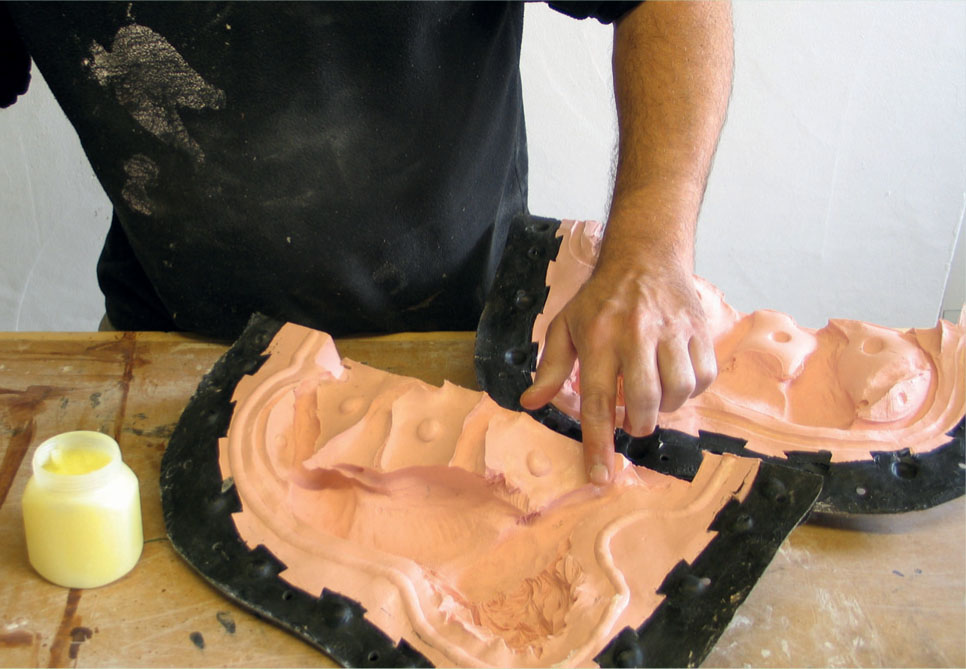
The silicone mould seam flanges are prepared with petroleum jelly.

The case flanges are prepared with wax spray release agent.
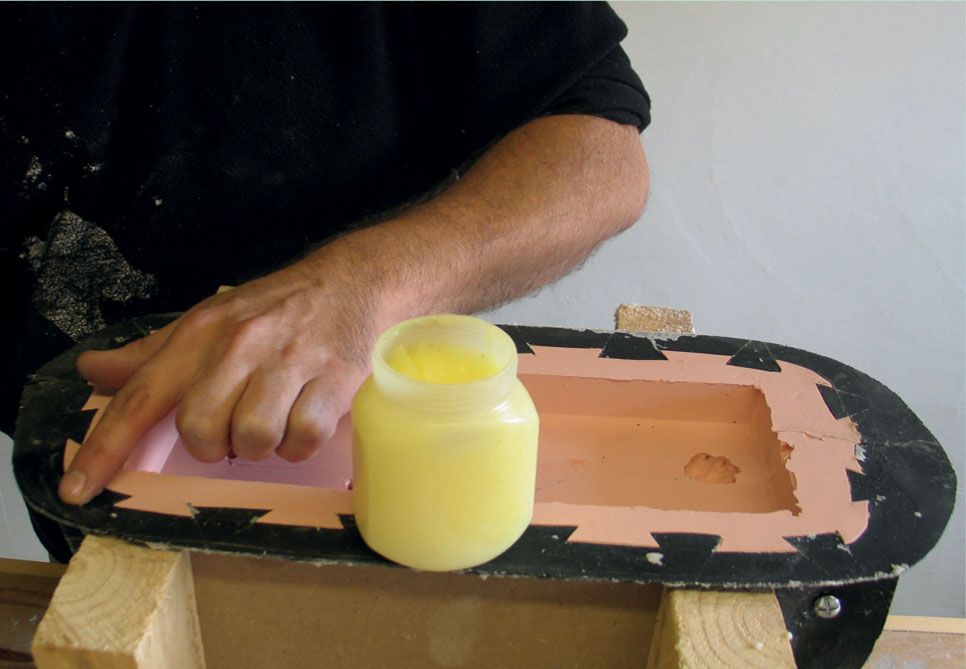
The mould case opening flange is prepared with release agent to prevent the casting material from sticking when poured over.
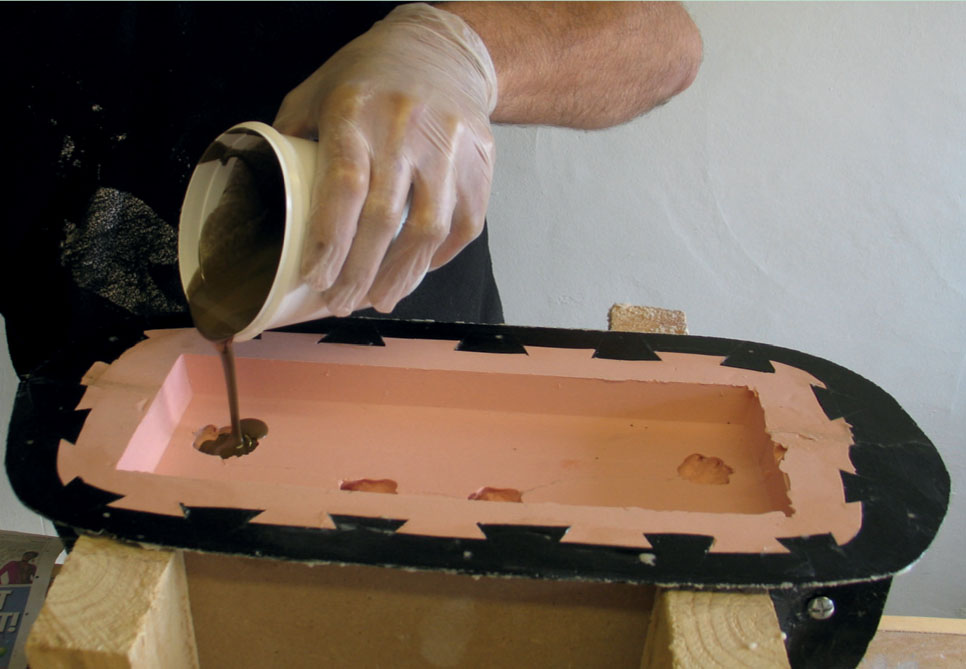
The mould is filled to one third with a bronze-filled polyester resin gel coat.
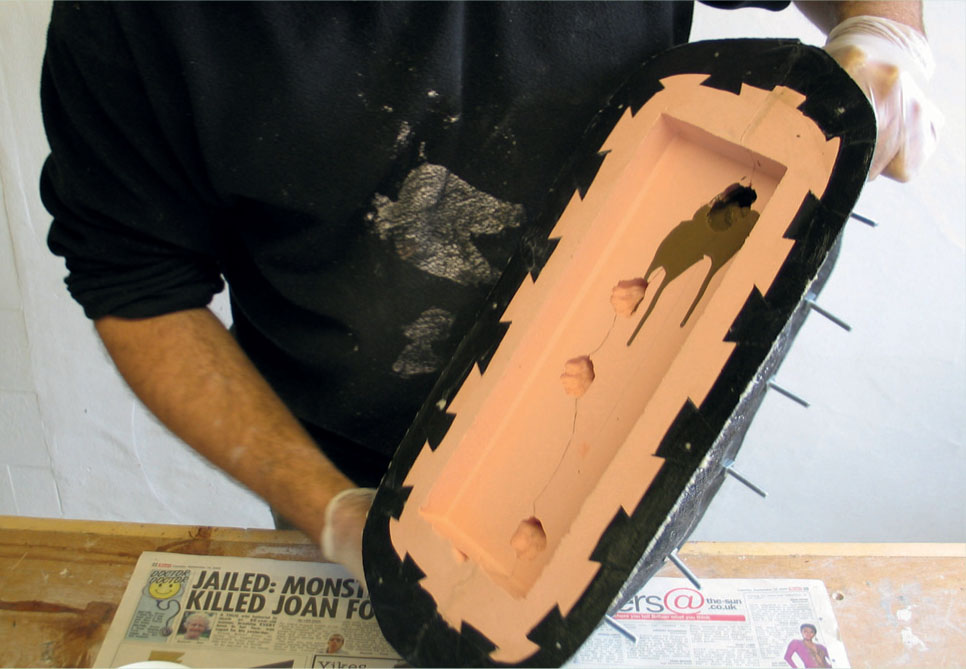
The mould is repeatedly tilted in a pattern to cover the inside of the mould surface with casting material.
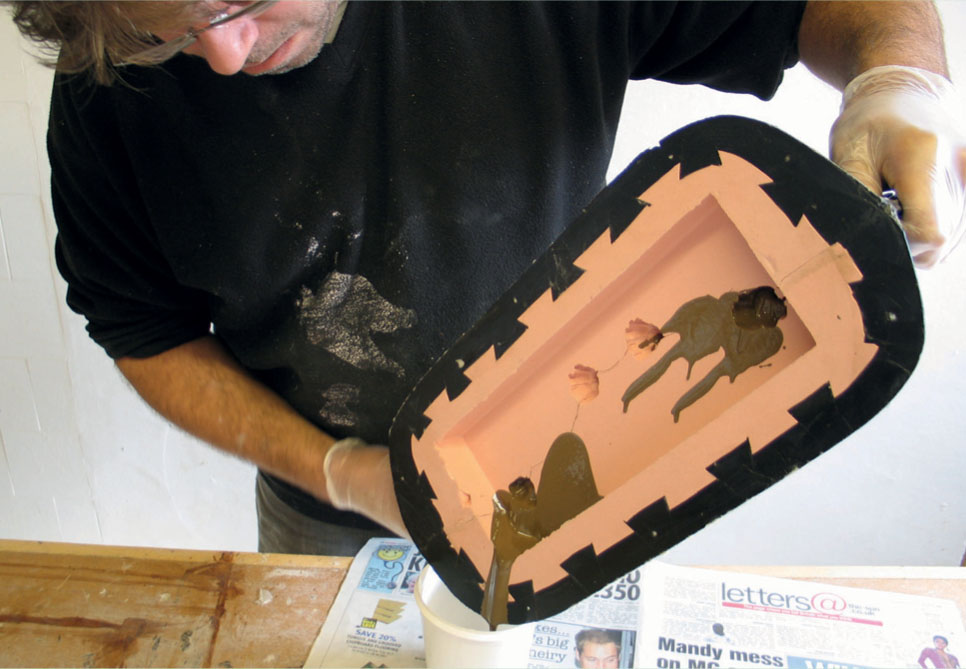
The mould is repeatedly tilted in a pattern to cover the inside of the mould surface with casting material.

The mould is repeatedly tilted in a pattern to cover the inside of the mould surface with casting material.

The mould may need to be inverted and some casting material poured out to ensure complete coverage inside.

The mould may need to be inverted and some casting material poured out to ensure complete coverage inside.

A brush can be used to ensure coverage up to the mould opening.

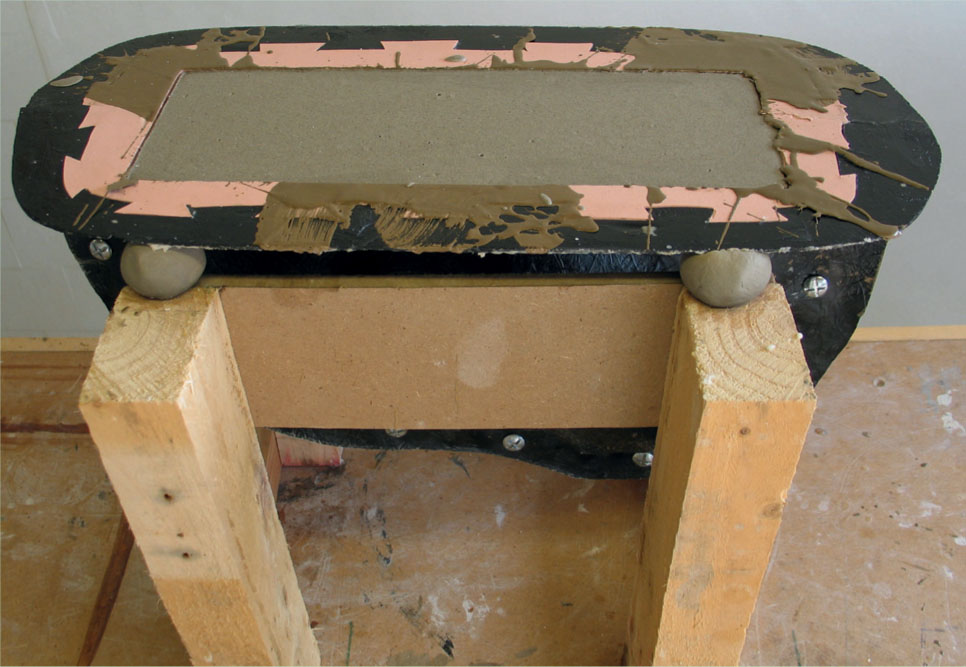
The gel coat is allowed to set fully, with the mould resting level on the support.
A filler addition resin is used to backfill the slushed gel coat.

The mould case is separated and removed.

The casting is demoulded from the silicone mould.
BACKFILLING
The gel coat layer will not have enough strength on its own and will need to be backfilled. Backfilling with filler addition in the casting material can cut down on cost.
Backfilling casting material will need to be of a consistency that can be poured.
Solid Castings
1. Backfilling material will be a pourable liquid and will therefore fill to a level, so the mould should be levelled. A good way to set a mould level is by placing four small balls of clay under the mould at each corner. With a spirit level set across the top of the mould, it can be pushed down into the clay balls to set a level. Remember to set the levels in two different directions.
2. Fill the mould with backfilling casting material from one point, allowing the level to rise and release air entrapment as it does.
3. Allow the backfilling material to set fully before demoulding.
Hollow Castings
1. Hollow backfilled castings can be achieved by pouring backfilling material into the gel coated mould to a third full.
2. Apply a pre-determined rotation pattern until the material has set.
3. Repeat until an acceptable thickness of material has built up.