
Bioresin sphere cast (700mm circumference).
Bioresin sphere cast (700mm circumference).
CHAPTER NINE
BIORESIN®
Developed as a non-toxic alternative to polyresin and epoxy resin systems, Bioresin® is a relatively new material available to the domestic mouldmaking and casting market.
The wide range of toxicological hazards present in polyresin and epoxy resin systems can render them extremely hazardous to work with, particularly in a small studio or workshop environment, where adequate protective systems may not always be available.
Although recognized as hazardous for some time, extensive research in the last ten years has shown that poly and epoxy resin systems contain a number of toxic components that can produce a wide range of toxicological effects, such as allergies, contact dermatitis (including skin lesions/ulceration/sensitization), blood and nerve damage, sensitization of the respiratory system and narcosis. Although it has been widely accepted that working with these potential hazards is a ‘containable risk’ with appropriate health and safety procedures in place, clearly a non-toxic resin system is a very attractive alternative option. Additionally, issues such as the negative environmental impact and sustainability of petrol-based resin systems cannot be ignored, particularly in the current climate of ecological awareness.
The Bioresin systems are formulated from plant-based derivatives such as sunflower seed oil, soya and several other proprietary natural additives. This means they do not require toxic labelling and are safe to use in the studio/workshop environment with minimal health and safety concerns.
Material Specifications
A wide range of Bioresin systems are available with working and production possibilities similar to other resin systems. These include:
■ variable Shore hardness (for an explanation of the Shore scale of hardness see Chapter 11);
■ variable pot life, setting and demould timings;
■ transparency and variable degrees of translucency;
■ pigmentation addition;
■ metal/stone-filled systems;
■ laminating;
■ embedding;
■ flexibility; and
■ being food-safe.
Note: Bioresins come in many varieties within the numbered system. Unless stated specifically, figures are for maximum and minimum times within the whole system. Maximum and minimum time figures are for the ‘individually’ numbered ‘system’, but should be checked against ‘individually‘ numbered ‘resin‘ within the system being used.
1775–1777 This is a range of resins suitable for multiple use. Their properties include:
■ transparency;
■ suitability for very small to large castings;
■ suitability for slush casting;
■ a pot life time of 2min–5hr;
■ a demould time of 8min–14hr;
■ an ultimate hardening time of 1hr–8 days;
■ a Shore hardness (see Chapter 11) from 72–78D;
■ a compressive strength of 110 N/mm2;
■ a mix ratio of 1:1.5;
■ a vacuum degas time of 1–5min;
■ heat resistance to 110–140°C;
■ suitability for polishing (certain systems only); and
■ UV stability.
■ 1777 is a clear flexible system.
1780 These comprise a variety of multiple-use resins with a higher Shore hardness range and longer pot life and demould times. Their properties include:
■ transparency and semi-translucency;
■ suitability for very small to very large castings (more than 50 litres);
■ suitability for slush casting;
■ a pot life time of 2min–8hr;
■ a demould time of 8min–3 days;
■ an ultimate hardening time of 1hr–14 days;
■ a Shore hardness of 78–88D;
■ a compressive strength of 110–140 N/mm2;
■ a mix ratio of 1:1.5;
■ a vacuum degas time of 1–5min;
■ heat resistance to 110–140°C;
■ suitability for polishing (certain systems only);
■ UV stability; and
■ low shrinkage.
1784–1786 This is a range of optically transparent resins that are particularly suitable for embedding, very hard and suitable for polishing. Properties include:
■ optical transparency;
■ suitability for very small to large (over 200mm) castings;
■ a pot life of 40min (1784/1785) or 5min–8hr (1786);
■ a demould time of 2–4hr (1784/1785) or 15min– 24hr (1786);
■ an ultimate hardening time of 6–8hr (1784/1785) or 2hr–3 days (1786);
■ a Shore hardness of 80–87D;
■ a compressive strength of 110–180 N/mm2;
■ a mix ratio of 1:2 (1784/1786) or 1:2.5 (1785);
■ a vacuum degas time of 2–5min;
■ heat resistance to 110–170°C;
■ suitability for polishing (all systems);
■ UV stability; and
■ low shrinkage.
611, 616, 625 This range of very hard and durable resins is suitable for metal/stone filling and laminating. Properties include:
■ translucency or being opal in appearance;
■ suitability for laminating and filling;
■ a pot life of 4–35min;
■ a demould time of 8min–3hr;
■ an ultimate hardening time of 1–8hr;
■ a Shore hardness of 83–87D;
■ a tensile strength of 124 N/mm2
■ a mix ratio of 1:1.5/1.8;
■ a vacuum degas time of 2min;
■ heat resistance to 170–190°C;
■ suitability for polishing (all systems); and
■ shrinkage of 1–2 per cent.
SHELF LIFE (ALL SYSTEMS)
Shelf life is 12 months in sealed original containers in dry conditions at temperatures of 15–30°C.
Fillers
Fillers can collectively be described as very fine mesh powders that are mixed into the resin. They can be broken down into three main groups.
■ Inert fillers (microballoons) These are very fine inert mineral powders that are mixed in equal parts with the resin. Mixing the resin with a filler reduces the amount of resin needed to fill a cast solid, which is useful for two reasons: one, to reduce exotherm (the heat generated during setting) and, two, to decrease casting costs. Calcium carbonate can be added to resin to produce a very white casting. Storage should be at moderate temperatures in dry conditions.
■ Metal fillers These are fine-mesh metal powders added to resins to produce castings with metallic finishes. Unlike metallic paint finishes the powders used are powders of the actual metal and once cut back with abrasives and polished they will appear as the metal itself – for instance, an iron-filled casting will start to rust if exposed to moisture. Storage should be at moderate temperatures in dry conditions.
■ Stone fillers These are powdered stone materials added to the resin to produce stone finishes. They are usually more granular than metal fillers. Storage should be at moderate temperatures in dry conditions.
Metal and stone fillers can be used as a gel coat and then painted or slushed (see Chapter 12) to a thickness of 2 or 3mm onto the surface of a mould, allowed to set and then backed up with resin or resin/inert filler mix to cut down on the cost of metal and stone fillers. To paint on gel coats systems with a slow setting (long pot life) should be used.
Tools and Equipment
Dispensing and Mixing
■ Waxed paper cups or white plastic containers For dispensing and mixing batches of resin. Plastic containers can be allowed to dry after use and the set resin cracked out for reuse.
■ Disposable wooden spatulas For combining resin parts and mixing pigments and fillers into batches.
■ Scales Accurate digital scales should be used to calculate weights and measures of system parts safely. Bioresins are a two-part system of resin and hardener that need to be combined at different ratios by weight.
■ A degasser Bioresins need to be degassed in a pressurized vacuum chamber, to remove air entrapment before mould application. Degassing times vary slightly for different Bioresin systems. Reducing degassing times will produce castings with trapped air bubbles. This can be quite attractive if controlled, but can affect the set strength.
Laminating
■ Brushes Brushes of various sizes are needed to paint gel coats onto a mould surface. Specially manufactured brushes are available that will withstand the materials involved and not lose bristles; however, ordinary decorating brushes of a good quality will last quite a long time.
■ Disposable wooden spatulas For mixing batches.
■ A plastic paint kettle For cleaning brushes and equipment in white spirit.
Trimming and Finishing
Trimming and finishing can really only be achieved effectively on the harder Bioresin systems.
■ Rasps and files These can be used for initial trimming of cured resin casts.
■ A hacksaw Used for initial trimming.
■ Tin snips and heavy-duty shears Used for initial trimming.
■ Powered jigsaws and multi-tools These can be very useful to take some of the hard work out of trimming. (Note: observe strict dust control measures.)
■ A power drill Holes can be drilled safely mechanically or by hand into set resins.
■ Powered abrasive tools For cutting back flashing on seams and exposing metal/stone-filled surfaces. Beware of cutting back filled casts mechanically as they can take too much away too quickly. (Note: observe strict dust control measures.)
■ Wet-and-dry abrasive paper For removing sharp edges after initial trimming and cutting back metal-filled casts prior to polishing.
■ Needle files For very fine and difficult-to-access trimming and cutting back.
■ Wire brushes For clearing tools clogged with material.
■ Polishing equipment For polishing castings after cutting back with abrasives. This can be done mechanically or by hand.
Safety and Good Studio Practice
■ Although they are non-toxic, Bioresin systems do emit fumes so your working area should be well ventilated.
■ Work surfaces can be protected with a heavy-gauge polythene that can be disposed of or replaced when necessary.
■ Overalls are a good idea as resins are extremely difficult to remove from clothing.
■ Working with any resins and their associated products can cause skin reactions, particularly if you have a sensitive skin type. Barrier creams provide a protective barrier between your skin and these materials and should always be employed, even for those without ‘sensitive’ skin. Disposable plastic or rubber gloves will provide further levels of hand protection. Specific proprietary hand cleaners are the only efficient and safe way to clean hands.
■ White spirit should be used to clean brushes and tools prior to washing with detergent.
■ Disposal of excess resins, empty storage and dispensing containers, solvents and any other associated materials should be carried out with regard to an understanding of flammability and environmental consequences. If possible follow the guidelines set out by manufacturers, which should be available through the retailer.
■ Safety data sheets for all materials should be requested from retailer if not supplied with the products. All health and safety labelling on materials should be understood and adhered to.
Principal Casting Techniques
Mix Ratios and Mixing
Bioresin systems are supplied as a two-part system of resin and hardener. Ensure the ratio of the parts is correct by weighing on digital scales. It is also important that both resin parts and the moulds are at room temperature. Your studio should be maintained at room temperature during setting and curing times. Mixing vessels and tools should be clean and dry.
When making up your resin combine both resin parts in a mixing vessel and stir vigorously for one minute, scraping the sides and bottom to ensure thorough mixing. Bioresin systems have a wide combination of mix ratios to allow for different requirements for pot life, setting and demould times (see the earlier section ‘Material Specifications’).
Exotherm
Bioresin will produce an exothermic (heat-generating) reaction when setting. Although the inherent problems associated with this are reduced considerably when using Bioresin as opposed to polyresin systems, an understanding of the effects of exotherm on resin castings should be understood (see Chapter 10). Consideration of the effects of exotherm should be given according to the nature of the casting; large-scale castings need to be allowed to set and cure very slowly, whereas small castings can be set and cured faster. Mix ratios and system specifications should to be considered according to the particular job at hand.
Degassing
Bioresin systems need to be degassed immediately after mixing using degassing equipment to eliminate air entrapment. The mixed batch should be introduced into the vacuum chamber and then vacuumed under pressure until bubbles start to appear and pop on the surface of the mix. When the bubbles start to subside the mix will be ready to use.
Degassing times vary between one and five minutes; adhere to the specifications of the specific system being used to ensure bubble-free castings. Immediately after degassing the mix can be poured or painted into the mould.
Pigment and Filler Addition
If you wish to use pigment or filler addition use a slower-setting system, specified for pigmented and filler addition castings, to allow for the additional mixing time. Mix both resin parts before introducing additions and ensure fillers are dry. Degas as described above.
COLOURED GEL COATS
To obtain castings with integral colour, pigments can be added to the resin to create a gel coat layer of the casting. These are not gel coats in the traditional polyester resin sense, as Bioresin is not thixotropic, but if worked with quickly enough the mix can be applied to a thickness of 2–3mm while setting to create a first layer to the casting. Specific Bioresin pigments have been developed that are raw earth pigments suspended in a resin binder. A gel coat resin is used to carry the pigment of the casting.
1. Dispense the amount of resin required to apply a layer approximately 2–3mm thick to the mould surface. If laying up large moulds be aware of the amount of resin that can be applied within the working time or pot life of a batch. If it will be necessary to lay up the mould with several batches of gel coat, it will be necessary to colour-match each batch. Add the pigment in small amounts until the required colour is obtained; be aware that only small amounts of pigment are needed to produce very vivid colours. Additions of approximately 2–5 per cent by weight of resin should be adequate, but in practice it is much easier to mix ‘by eye’.
2. Once mixed thoroughly the batch can be applied to the mould surface with a brush or can be slushed (see Chapter 12). Be aware that it will set very quickly and it will need to be kept moving over the surface of the mould in order to coat it evenly, about 2–3mm thick. Use batches of a size that can be used within the pot life.
3. It is sometimes a good idea to apply a second gel coat to moulds with a lot of detail, in this case allow the first gel coat to cure and dry before applying the second layer.
4. Allow the gel coat to set before backfilling with neat resin, or resin/inert filler mix, or laminating.
METAL/STONE-FILLED GEL COATS
Metal and stone effect castings can be obtained using very fine mesh (finely ground) metal and stone powders, known as fillers, mixed into the resin. A wide range of fillers is available, including:
■ bronze;
■ copper;
■ iron;
■ brass;
■ marble;
■ slate; or
■ stone.
Fillers are added to the resin to form a brushable gel coat that is applied to the mould surface and then backfilled with neat resin or a resin/inert filler mix. When calculating the amount of metal filler required a rough rule of thumb is equal quantities by volume of resin to filler.
1. Dispense the require amount of resin into a container and then dispense an equal quantity by volume of the filler required. Do not mix the resin and filler at this stage. For a gel coat mixture the quantity of resin and filler combined will need to cover the entire surface of the mould to a thickness of approximately 2–3mm, depending on the amount of detail. Moulds containing a combination of raised and deep, fine detail may need a second application of gel coat once the first has set.
2. Laying up a large mould will require several batches of gel coat in order to apply it within the pot life (working time). Colour matching of the metal and stone fillers needs to be considered when laying up several batches of gel coat.
3. Mix consistencies will depend on their intended use. Brush-applied gel coats should be brushable but thixotropic; that is, they can be painted onto the mould surface to a thickness of 2–3mm but will not run off. Slushed gel coats will need to be thinner in order to run on the mould surface. Equal quantities of resin and filler is only a rough guide, and where possible more filler should be used without compromising the required consistency. Less than 50 per cent filler will not produce good metal and stone effects.
4. Once mixed thoroughly the batch can be applied to the mould surface with a brush or can be slushed (see Chapter 12). Be aware that it will set very quickly and it will need to be kept moving over the surface of the mould in order to coat it evenly, to a thickness of around 2–3mm. Use batches of a size that can be used within the pot life.
5. Allow the gel coat to set before backfilling with neat resin, resin/inert filler mix or laminating.
Solid and Backfilled Castings
Bioresin systems can be pigmented or filled and poured in one solid casting or can be applied as a gel-coated layer and backfilled.
1. Set the mould levels in two directions. This is done easily using small balls of clay under each corner or opening flange of the mould and pushing the mould down into them to obtain a level (see illustration sequence for Project 1 in Chapter 8).
2. Estimate the amount of resin needed.
3. For solid-filled castings estimate the amount of pigment or filler needed (see previous section). Bear in mind that the mix needs to be pourable, so do not add too much filler.
4. Create your mix and stir very quickly but thoroughly for one minute and degas before pouring.
5. Fill the mould by pouring from one spot and allowing mix to rise, pushing out any air entrapment as it does. A little agitation of the mould will bring up any air bubbles and allow the mix to seep into the mould detail.
6. Allow to set thoroughly.
CLEAR CASTINGS
1. Follow the stages as described above.
2. Be aware that degassing becomes of particular importance with clear castings as any bubbles will be highly visible in the set casting.
3. Objects can be encapsulated or embedded in Bioresin at the casting stage if desired (see Chapter 10).

Embedded Bioresin (H: 80mm).
HOLLOW CASTINGS
1. Follow the directions for mixing, additions and pouring as described above.
2. Hollow castings can be achieved by slushing (see Chapter 12). Moulds should be filled approximately a third full and then constantly and evenly rotated until the resin sets. This is easiest with a mould ‘in-the-round’, where the pouring hole of the mould can be bunged and it can be rotated in all directions. However, tilting an open mould carefully to allow the resin to cover up to the edges is also possible.
3. Moulds may need several coats in this way, allowing time for the resin to set between coats, to achieve an adequate thickness of 3–5mm.
4. Allow to set thoroughly.
Laminating
It is possible to produce laminated hollow castings using certain Bioresin systems (primarily the 600 range). Fibreglass mat can be used in conjunction with Bioresin and the laminating processes to be employed are the same as for polyester resin systems (see Chapter 11 in Mouldmaking and Casting for further information).
Demoulding
The techniques for demoulding, removing the finished cast from the mould, will largely depend on what type of mould is being used.
■ Plaster one-piece Moulds can be tapped or levered out from the inside of the cast using a chisel. Soaking in hot soapy water can help to ease out difficult casts.
■ Plaster multi-piece Moulds should be eased apart piece by piece. Small moulds can usually be parted using a strong-bladed knife. Larger moulds may require a thin chisel to crack the seam initially until a wooden or plastic wedge can be driven in. On particularly long seams a series of wedges can be gradually driven in sequentially until parted.
■ A plaster waste mould See Chapter 4 of Mouldmaking and Casting for detail on chipping out plaster waste moulds.
■ Fibreglass As above, although there can be a certain degree of flexibility in a fibreglass mould depending on how thickly it has been made.
■ Flexible moulds (without a case) Demoulding from flexible moulds without a case is a combination of flexing and peeling the mould while easing out the cast.
■ Flexible moulds (with a case) First remove the case (this should be carried out as for plaster one-piece moulds) and then peel the mould away from the cast. It is possible to peel the mould away from the cast with these moulds as they are thinner and more flexible than flexible moulds without a case.
■ Gelflex moulds Resin casts from gelflex moulds should be allowed to cool down thoroughly after the setting process as the mould may soften slightly due to the high exotherm generated and will need time to reset.
Post-Curing After Demoulding
Many of the Bioresin systems either benefit from or require post-curing to achieve their full hardness and set strength. This can be done in a domestic oven or via an external heat source (careful control of constant temperatures should be observed). See the post-curing time specifications on individual systems.
Trimming and Cutting Back
Once the cast has been demoulded any excess cast and seam lines (flashing) can be trimmed back. Note that only the harder Bioresin systems are suitable for cutting back and polishing. Trimming with a scalpel or craft knife is possible on the softer systems.
1. Initially the extremities of any excess can be broken off carefully by hand or a pair of pliers, but be careful not to break off too much. Then a number of tools can be employed depending on the size of the cast and how much resin is to be removed (chisels, hacksaw blades, surforms, rasps and so on).
2. The initial trim should not be taken right back to the surface of the cast and should only be used to remove bulk excess.
3. Smaller and smaller tools should be used as you work closer to the cast surface.
4. Final cutting back to the surface of the cast should be achieved with increasingly finer grades of abrasive paper. Fine files including needle files can be useful for getting into difficult-to-access area of the cast (a fine brass or wire brush is also useful to clear clogged files).
5. Once excess flashing has been taken back to the surface, final cutting back and/or polishing of the entire cast surface can be tackled.
Surface Finishing and Polishing
Casts that have coloured gel coats and clear casting resins will usually come out of moulds with a matt surface finish; metal/ stone-filled gel coats will be matt and the base material not fully visible. To obtain the full effect of metal and stone, or to achieve gloss colours or glass-clear surfaces, castings will need to be cut back with abrasive papers and then polished.
CUTTING BACK WITH ABRASIVES
Wet-and-dry abrasive papers should be used to cut back cast surfaces and these should be used wet to avoid dust (which can be carcinogenic) and prevent paper from clogging. The papers are graded by the number of particles of grit per square inch of paper and a variety of grades should be used in sequence from coarse to fine. Depending on the job 100–600 grit paper (100 being coarsest and 600 finest) should be used in succession, with the very fine grades usually being reserved for clear casting resins.
1. Standard sheets of paper should be cut up into pieces that are suitable for the size of the job and laid out in sequence.
2. Initially use the coarsest grade just to take off the worst of any seam lines and to give the whole surface ‘bite’. With metal and stone surfaces this will just remove the surface layer of resin and expose the base material. Where there are smooth areas or areas that have little detail coarse papers should be used sparingly and it may be possible to start with a finer paper.
3. As the paper becomes clogged either rinse it under a running tap or in a large bowl of water.
4. Once the whole surface has been cut back with one grit size wash the cast, change your rinsing water and move on to the next grit size. In this way the whole surface of the cast is cut back progressively using finer and finer paper, with scratches created by the coarser grades being removed by the finer grades. Metal castings can also be cut back with progressive grades of wire wool. You will notice that the metals will become more and more visible as the abrasive exposes them. Clear resins will remain cloudy even after the finest grade and will not become clear until polished.
5. It is difficult to gauge whether casts have been thoroughly abraded enough until after polishing, but thorough and methodical abrading will produce better polished results. If the polished results are not good it will usually mean returning to abrasives before polishing again.
6. Once exposed, metal surfaces can be polished to a high shine or paginated using cold pagination processes.
POLISHING
Polishing can be done either mechanically or by hand using specifically designed polishing compounds. Polishing compounds come as either a hard waxy block or as a cream and are applied to the cast surface with a lint-free cloth or a mechanically spun polishing mop.
Cloth polishing mops for block compounds and sponge mops for cream compounds can be mounted, using the correct arbour, to a standard electric drill with variable speed control, or can be mounted in a dedicated polishing machine. Polishing machines are bench-mounted so this will restrict the size of the cast that can be polished mechanically. Electric drills can be used freehand or bench-mounted securely using a clamping system specific to the machine you are using. Care should be taken when using electric drills for polishing as they have no guards; goggles should always be worn whichever system of polishing is being used.
Polishing compounds are a very fine level of abrasive and come in grades of coarseness like the abrasive papers. They should be used in sequence from coarse to fine methodically over the entire surface of the cast. Compounds usually come in two or three grades and castings should be washed between grades of polish. Cold-cast metal castings can be given a final polish using a proprietary metal polish suitable to the base metal used.
If after polishing through the grades of compound the levels of gloss, brightness or clarity required have not been achieved it may be necessary to return to the abrasive papers to cut back more and then to repolish.
TIPS
■ See the ‘Tips’ section in Chapter 8.
FINISHING
■ Cold-cast bronze, copper and brass castings can be ‘paginated’ following the same methods as for full bronzes although pagination times may need to be reduced due to the smaller amounts of metals contained within the resin (for pagination techniques research other publications).
■ Casts can be wax-polished to retain brightness.
■ Metal shellacs can be used to create permanent seals.
■ Domestic metal polishes can be used to rejuvenate brightness on oxidized castings.
■ Iron-filled castings can be submerged in water to produce a ’rusted bloom’ on the surface.
■ Castings can be painted with oil-based paints and should be degreased thoroughly beforehand.
■ Castings can be drilled, sanded and machined.
Faults and Repairs
■ Small holes or cracks can be filled from the surface with additional mixes. A mix of resin and the appropriate metal powder combined at a ratio of one part resin to at least two parts powder produces a thick paste that is useful for filling and making repairs. Overfill, cut back any excess and finish in the usual way.
■ Broken-off cast pieces can be glued back with resin mix containing a little metal powder or colour.
■ Wax gilt crayons can be used to touch up minor blemishes.
PROJECT
Specification
A slush-cast transparent Bioresin sphere with reduced degassing time to create some bubble entrapment in the casting. From a five-piece Jesmonite mould. Size: 700mm circumference.
Time Required
This project consists of three slush-cast applications of Bioresin over approximately 90min, allowing for setting times.
Materials
■ 1775 Bioresin 1775 RSSS (supplied by Canonbury Arts Ltd). The two resins were combined at a ratio to produce a setting time of approximately 10min.
■ A combination release agent system for the mould.
Tools
■ Mixing beakers;
■ wooden spatulas for mixing;
■ digital scales; and
■ a degasser.
Method
This project was carried out using the five-piece Jesmonite mould from a ball produced by the project in Chapter 5. To create the cast follow the steps from the earlier section in this chapter from ‘Solid and Backfilled Castings’ for a hollow casting. See Chapter 12 for slush casting principles and methods.

A degasser for removing air from mixes of Bioresin.
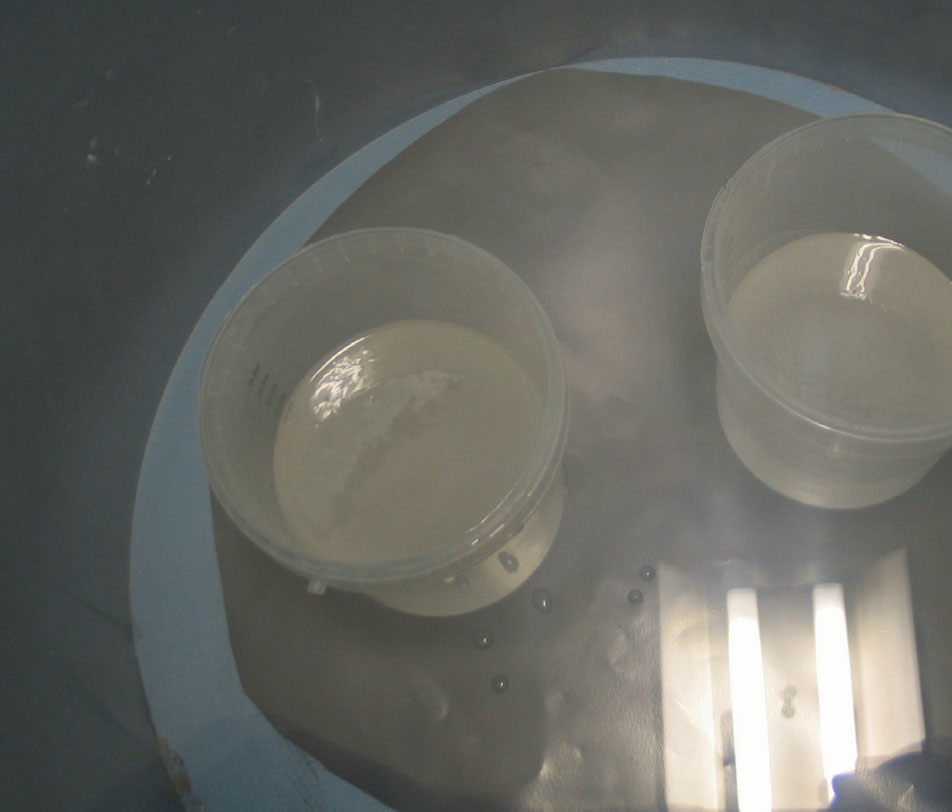
Cups of Bioresin are placed in the degasser and a vacuum is created.
Bubbles appear and burst on the surface of the Bioresin as the vacuum is increased.
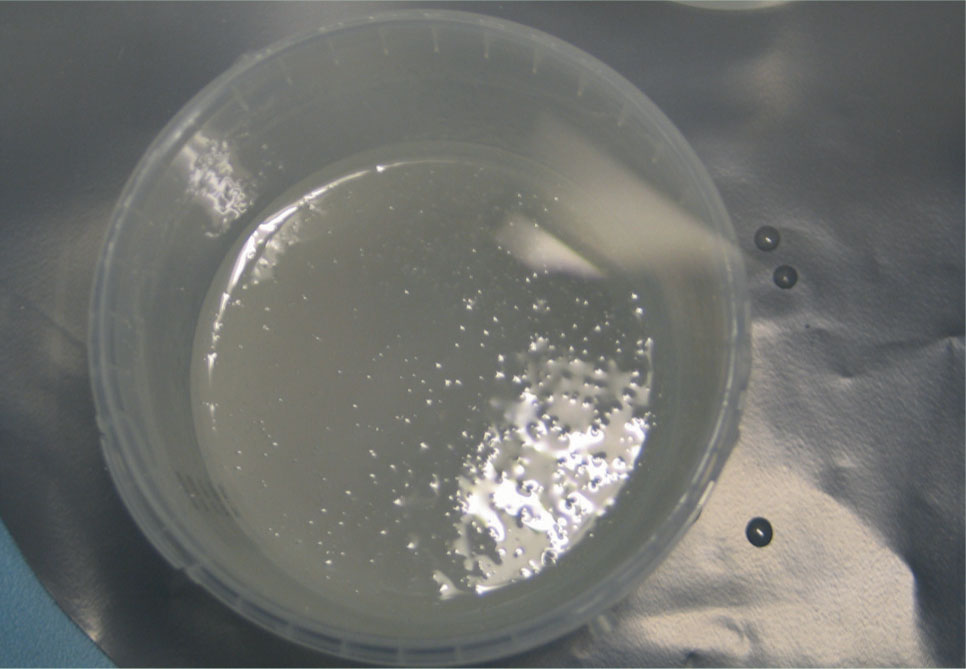
The degassed Bioresin is poured into the mould.

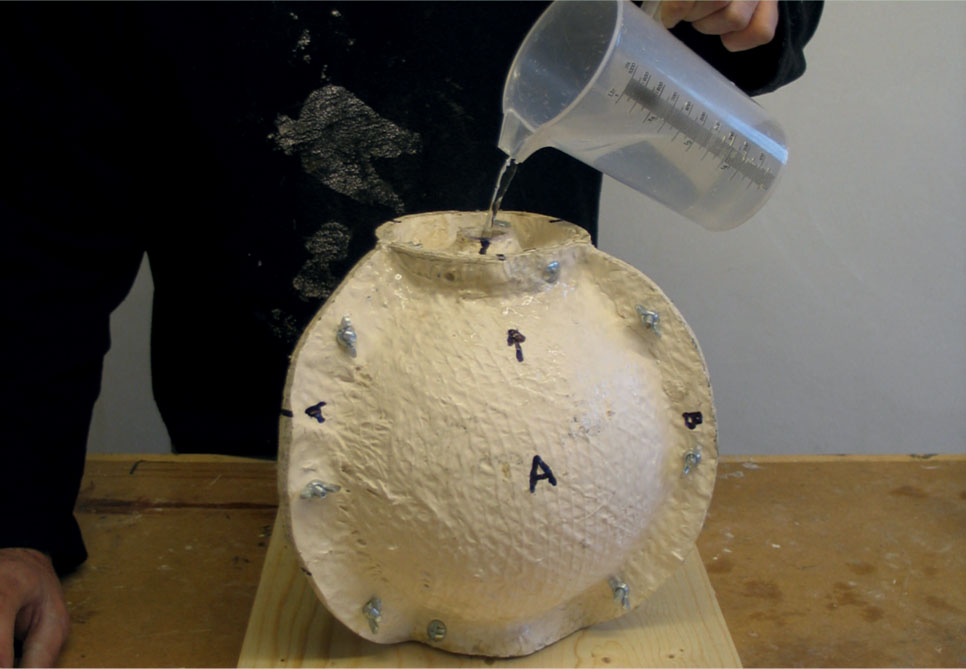
The mould is sealed with a silicone rubber bung.

A rotation pattern is employed to slush cast the Bioresin within the mould.
A rotation pattern is employed to slush cast the Bioresin within the mould.
A rotation pattern is employed to slush cast the Bioresin within the mould.

A rotation pattern is employed to slush cast the Bioresin within the mould.
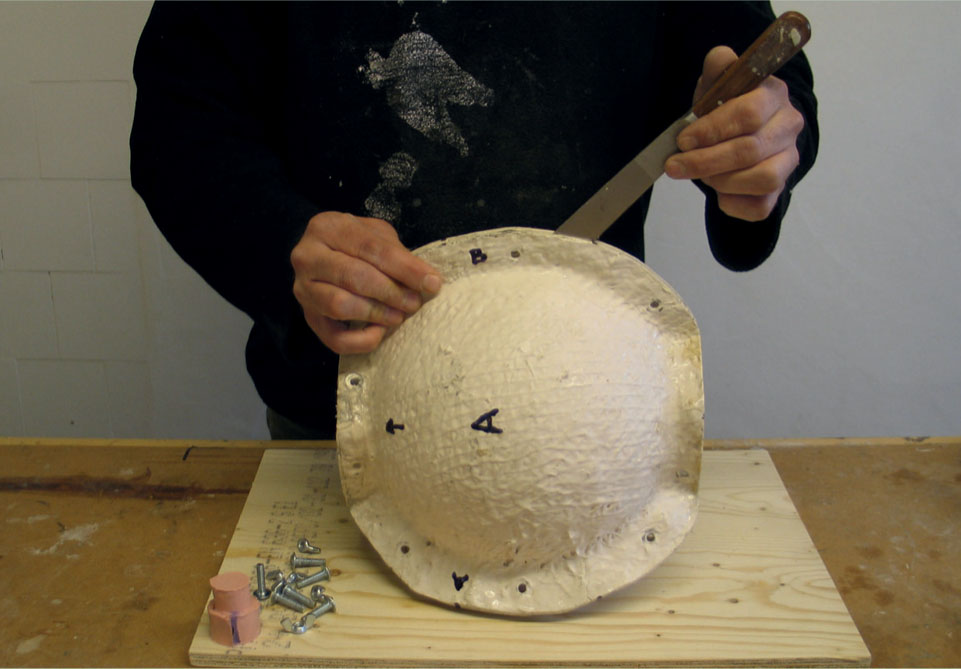
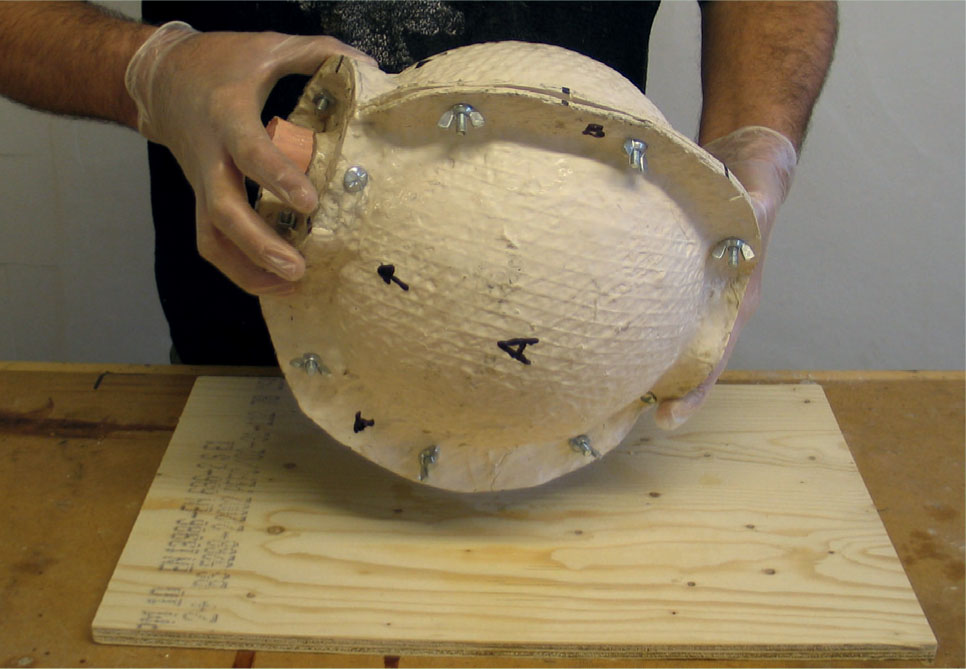
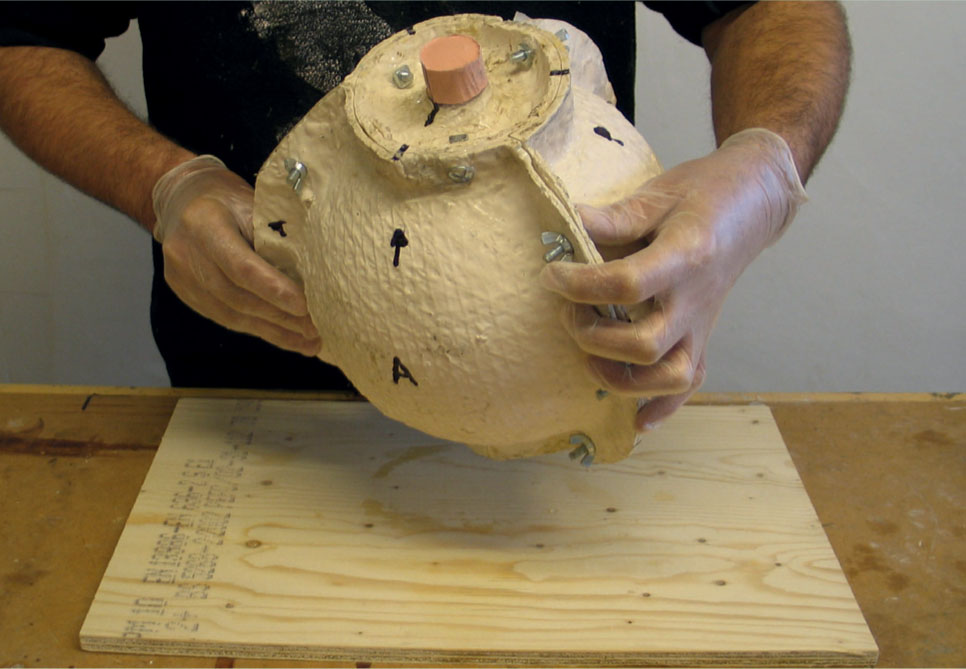
A knife is used to help the mould pieces apart once the Bioresin has set.
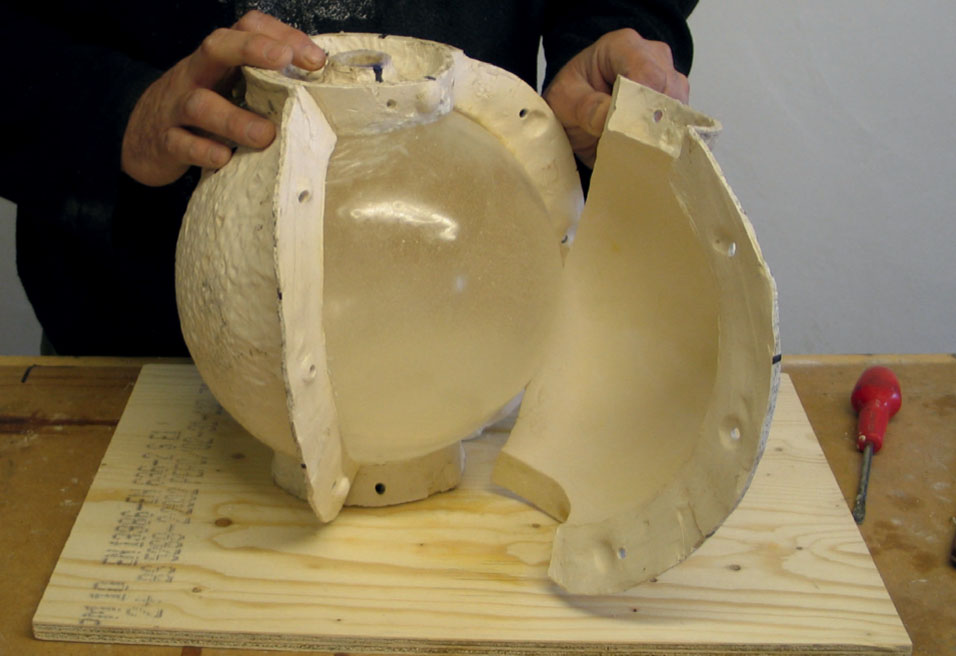
The mould pieces are removed carefully from the cast.

The mould pieces are removed carefully from the cast.
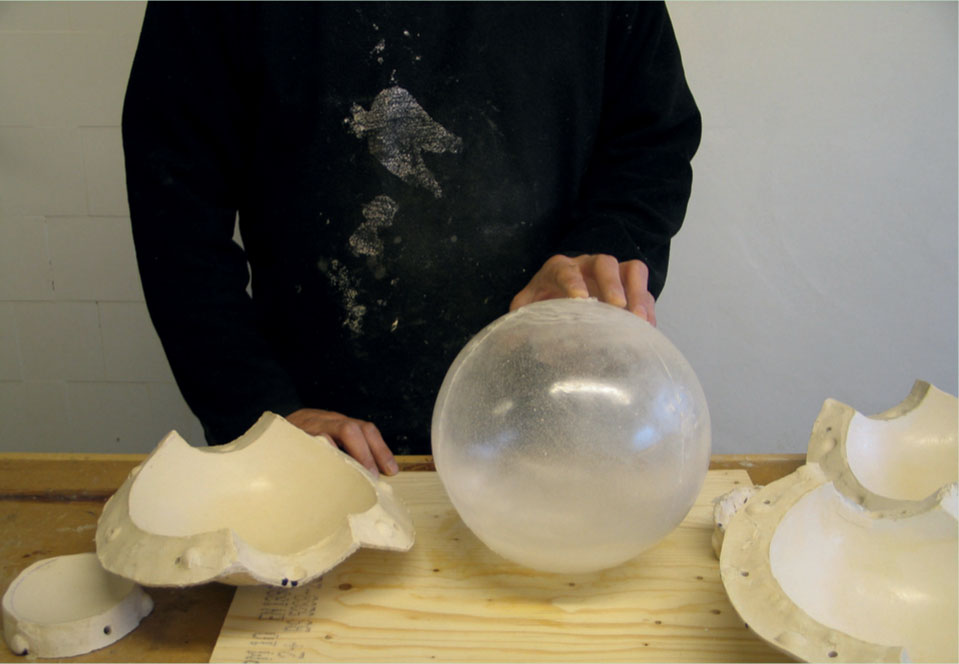
The mould pieces are removed carefully from the cast.
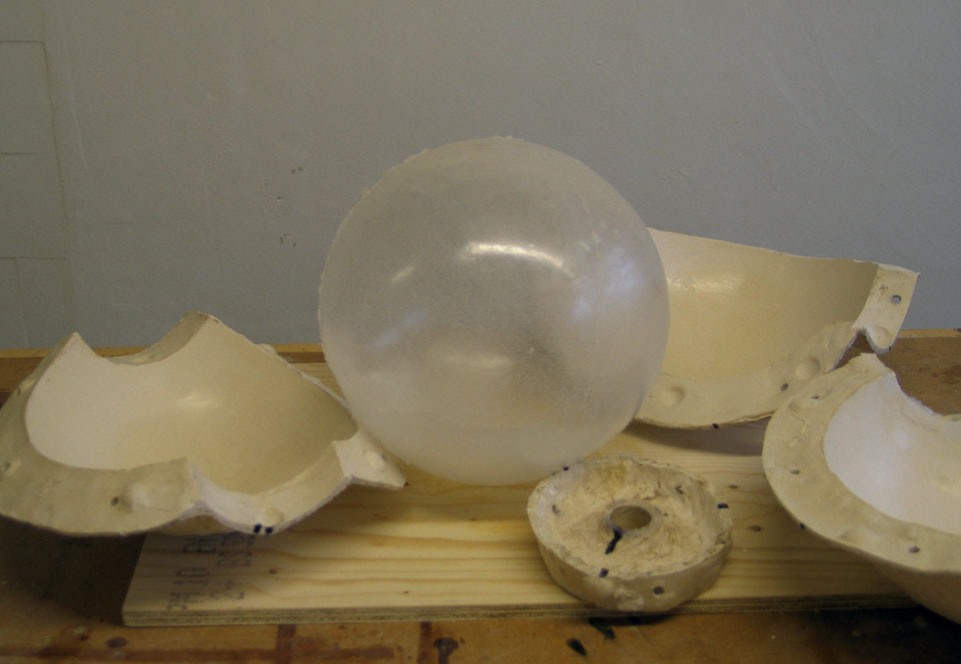
The mould pieces are removed carefully from the cast.