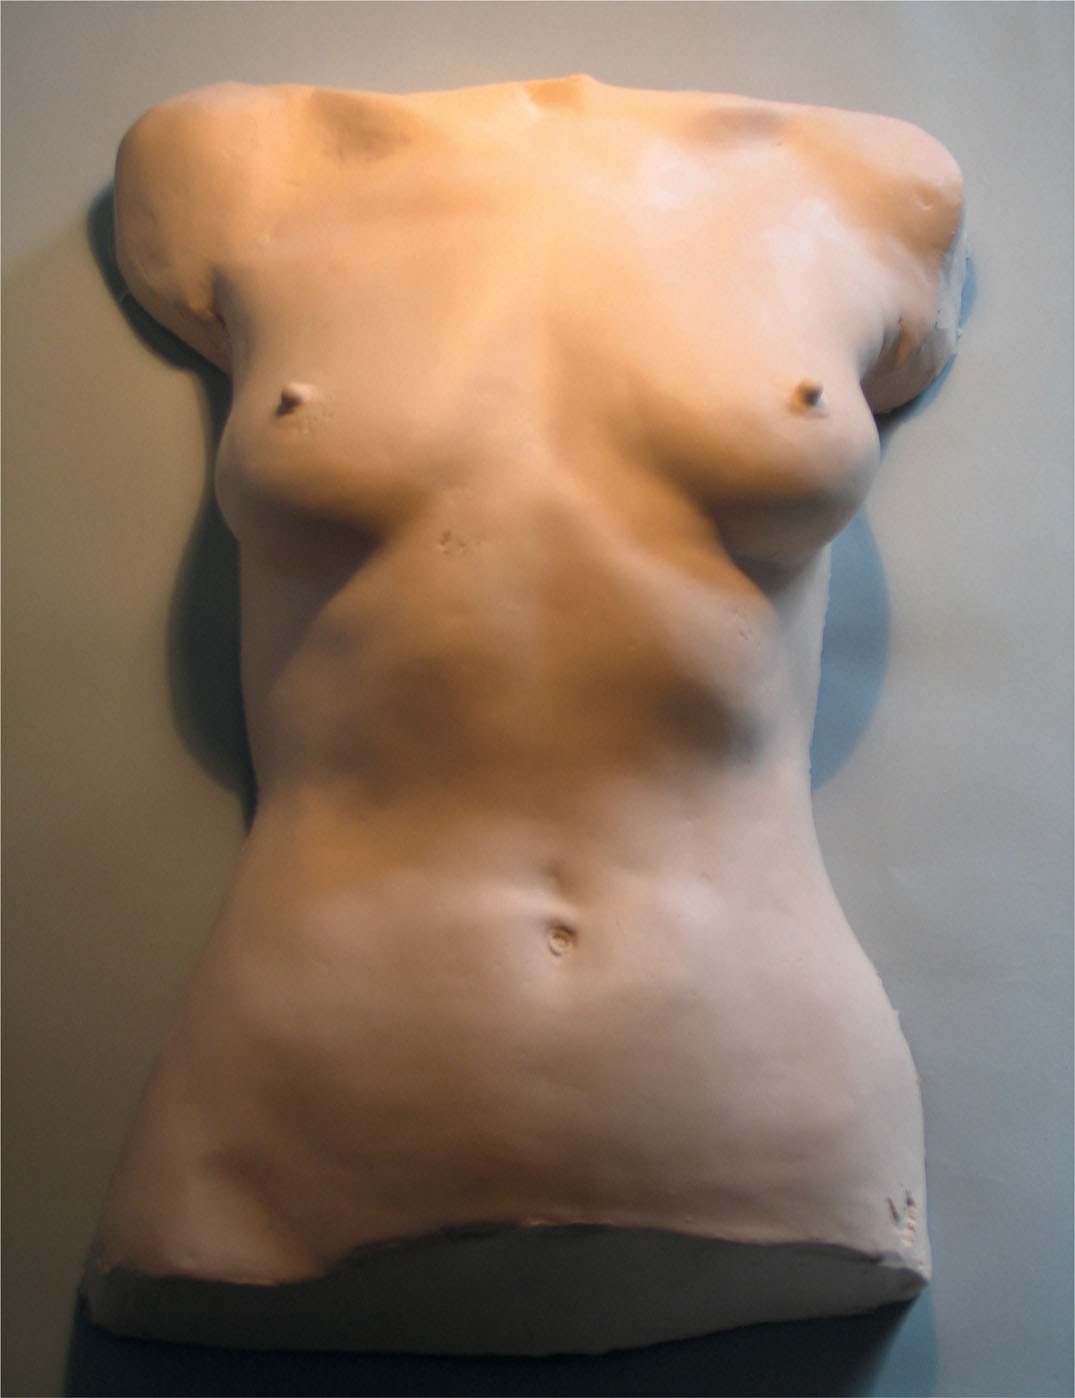
Silicone rubber life cast.
Silicone rubber life cast.
CHAPTER ELEVEN
SILICONE RUBBER
Although primarily used as a mouldmaking material, silicone rubber can be an attractive and versatile casting material in its own right. Silicone rubber can be pigmented to many colour specifications and is available in a multitude of different hardnesses, ranging from a very firm or hard rubber to an extremely soft jelly consistency.
Materials
Silicone rubber has a unique tactile quality and can have all sorts of casting applications, from creating skin-like prosthetics, for example, to producing a glass silicone that will shatter just like glass. The properties of silicone rubber include:
■ extreme flexibility;
■ excellent stretch capabilities;
■ being available with a clear or semi-translucent appearance;
■ ability to take surface colouring and/or integral pigmentation;
■ being food safe; and
■ suitability for solid or hollow casting.
To achieve interesting and attractive castings using silicone rubbers it is important to understand the capabilities and specifications of the wide range of silicone rubbers available.
Shore Hardness
‘Shore hardness’ is a scale used to determine the hardness of a material. Shore hardness is measured with a gauge that incorporates a sprung pin which is placed on a material and indented until it stops, producing a Shore hardness reading on a scale.
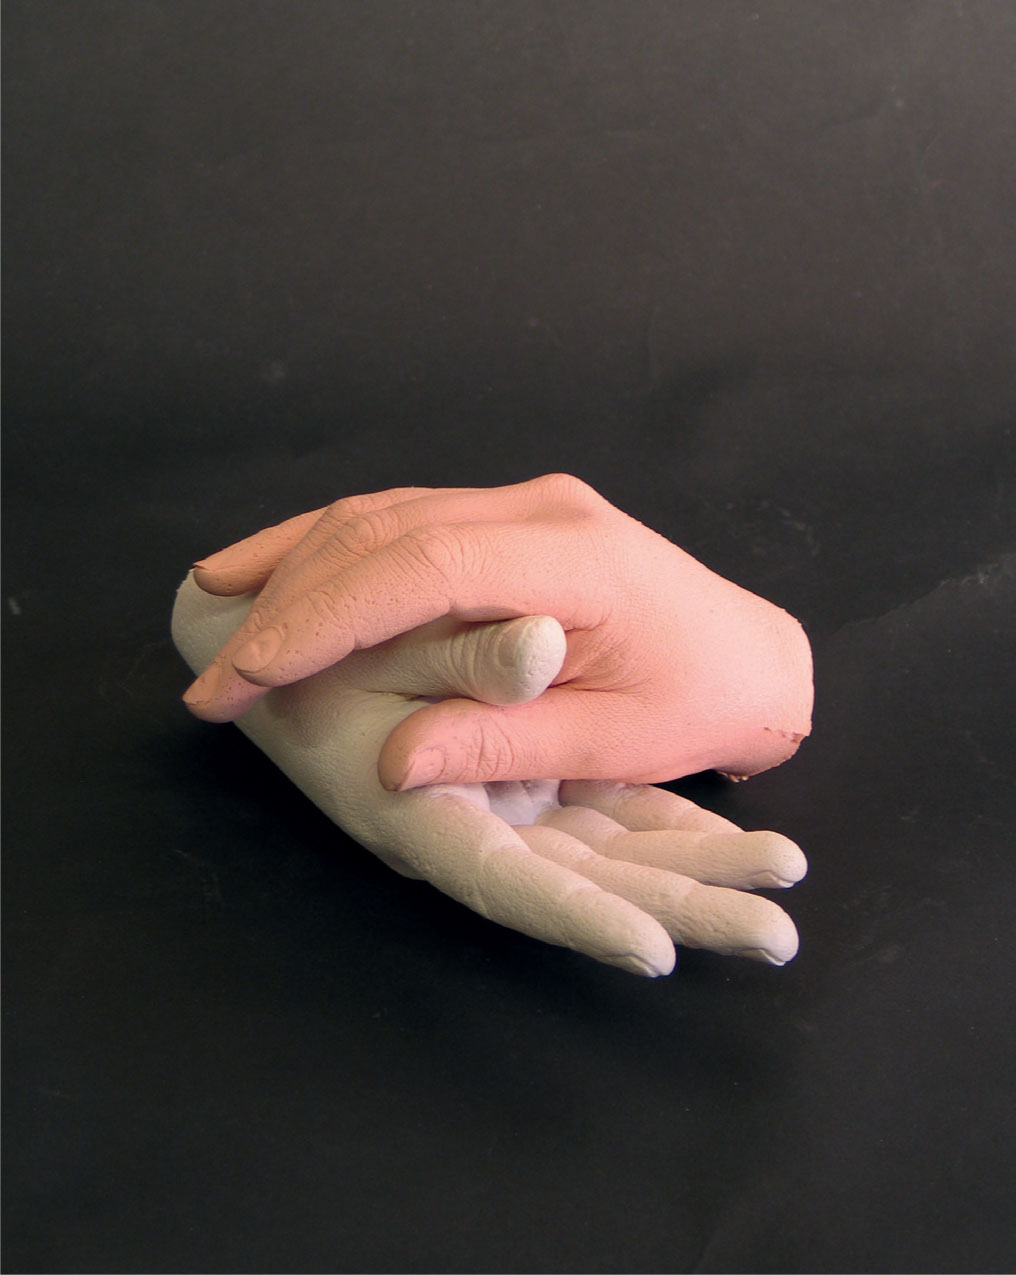
A silicone rubber life cast.
The hardness of a casting material will clearly have a tactile bearing on the physical properties of a casting. The Shore hardness of a rubber can have a significant correlation to its flexibility, stretch capability and tear strength.
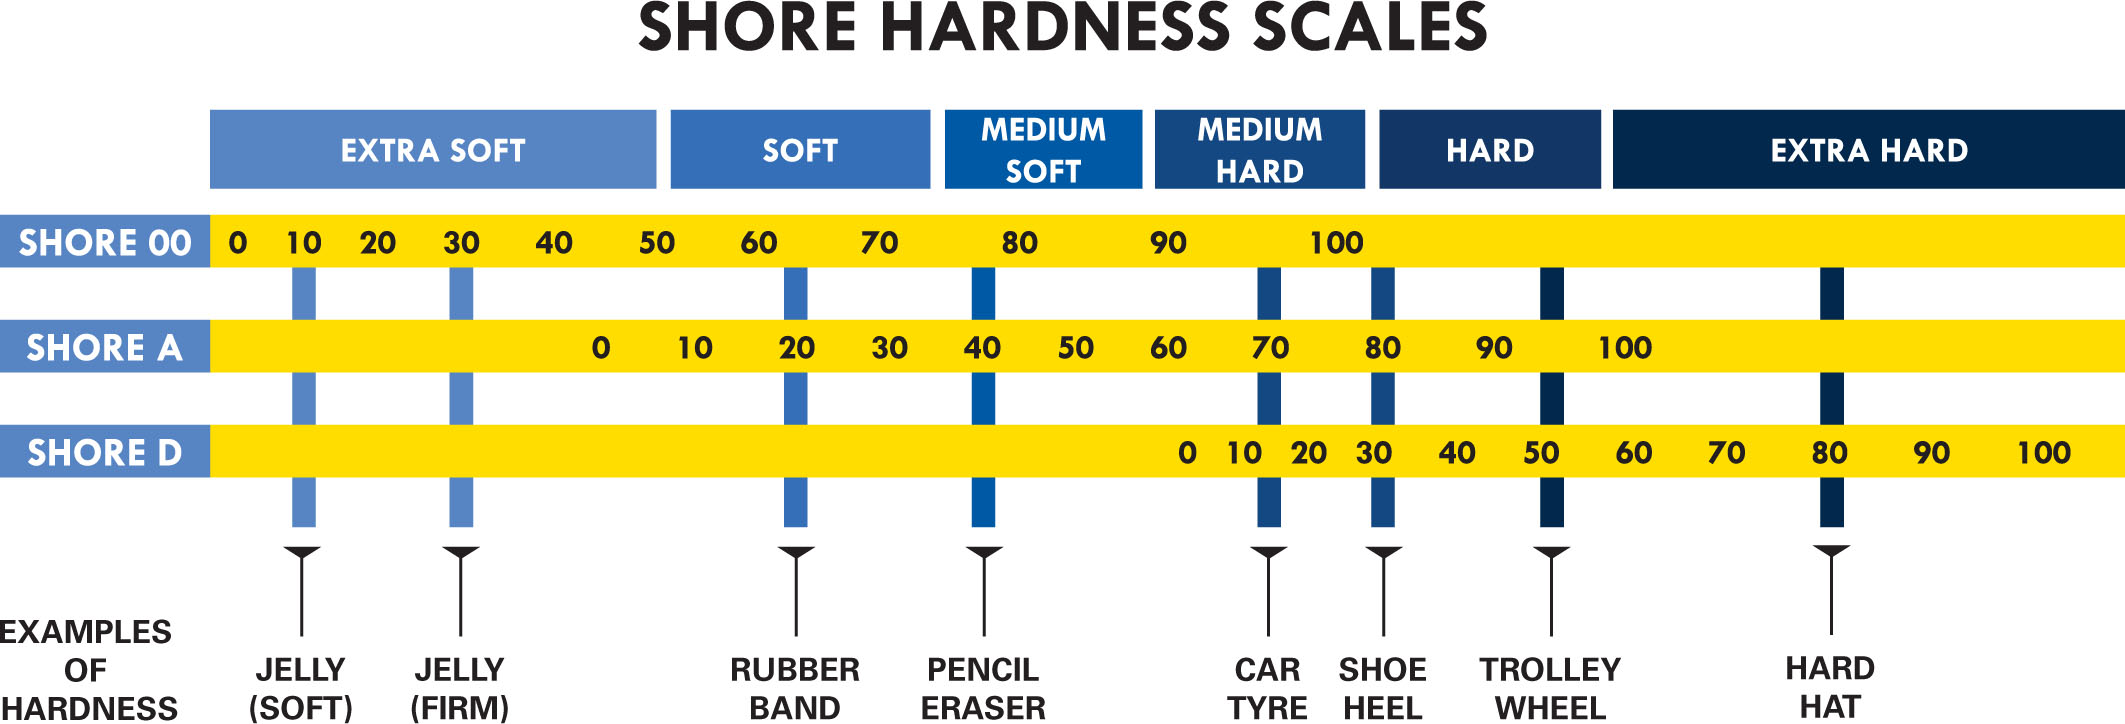
The Shore scale can be measured from 0–100 on three different sub-scales that overlap at certain points. These are:
■ Shore 00 A scale of rubbers and gels that are extra soft.
■ Shore A A scale of rubbers that range from very soft and flexible to medium and moderately flexible to hard with very little flexibility.
■ Shore D This measures the hardness of hard rubbers, semi-rigid plastics and hard plastics.
Silicone Rubber Categories
Silicone rubbers fall into two basic categories: tin or condensation cure and platinum or addition cure.
■ Tin cure These are two-part component silicones that cure at room temperature and set to a flexible rubber. They have variable degrees of flexibility and tear strength and lie within the Shore A hardness range.
■ Platinum cure These are two-part component silicone rubbers that are characterized by their very high tear strength and flexibility. These silicones are available at hardnesses in the very soft Shore 00 scale.
Additions
■ Catalysts and accelerators/boosters All silicone rubbers require a catalyst to enable them to set from a liquid to a solid. Some silicone systems have a range of different catalysts and accelerators/ boosters than can be used to adjust working, setting and demoulding times. Beware of working within pot life times when using extra-fast catalysts. Additions are added to the silicone as a ratio or percentage by weight and accurate digital scales should be used to dispense the correct amounts. Some silicone rubbers use a two-part system, which should be used according to specification.
■ Thixotropic additive This is added to silicones at variable percentages to create variable degrees of viscosity when applying them.
■ Silicone oil This is used to thin silicone to make it more fluid on application or pouring. It can also be used to lower the Shore hardness of some silicones, being added at amounts of up to 20 per cent by weight. Beware that excessive amounts may leach from set silicone.
■ Primers These promote the adhesion of silicone rubbers to other materials.
■ Deadeners/tactile mutators These materials are used in the production of prosthetics. They are added by volume of silicone and can vary the feel of the casting to make them more skin-like. They can be used to produce softer silicones with variable degrees of flex-and-return properties. Surface tackiness can also be adjusted to produce self-sticking silicone castings (useful for sticking prosthetic skin sections to the body). Gels can be produced that have an almost liquid quality to them, and can be layered with other grades of silicone to produce very effective prosthetic body parts.
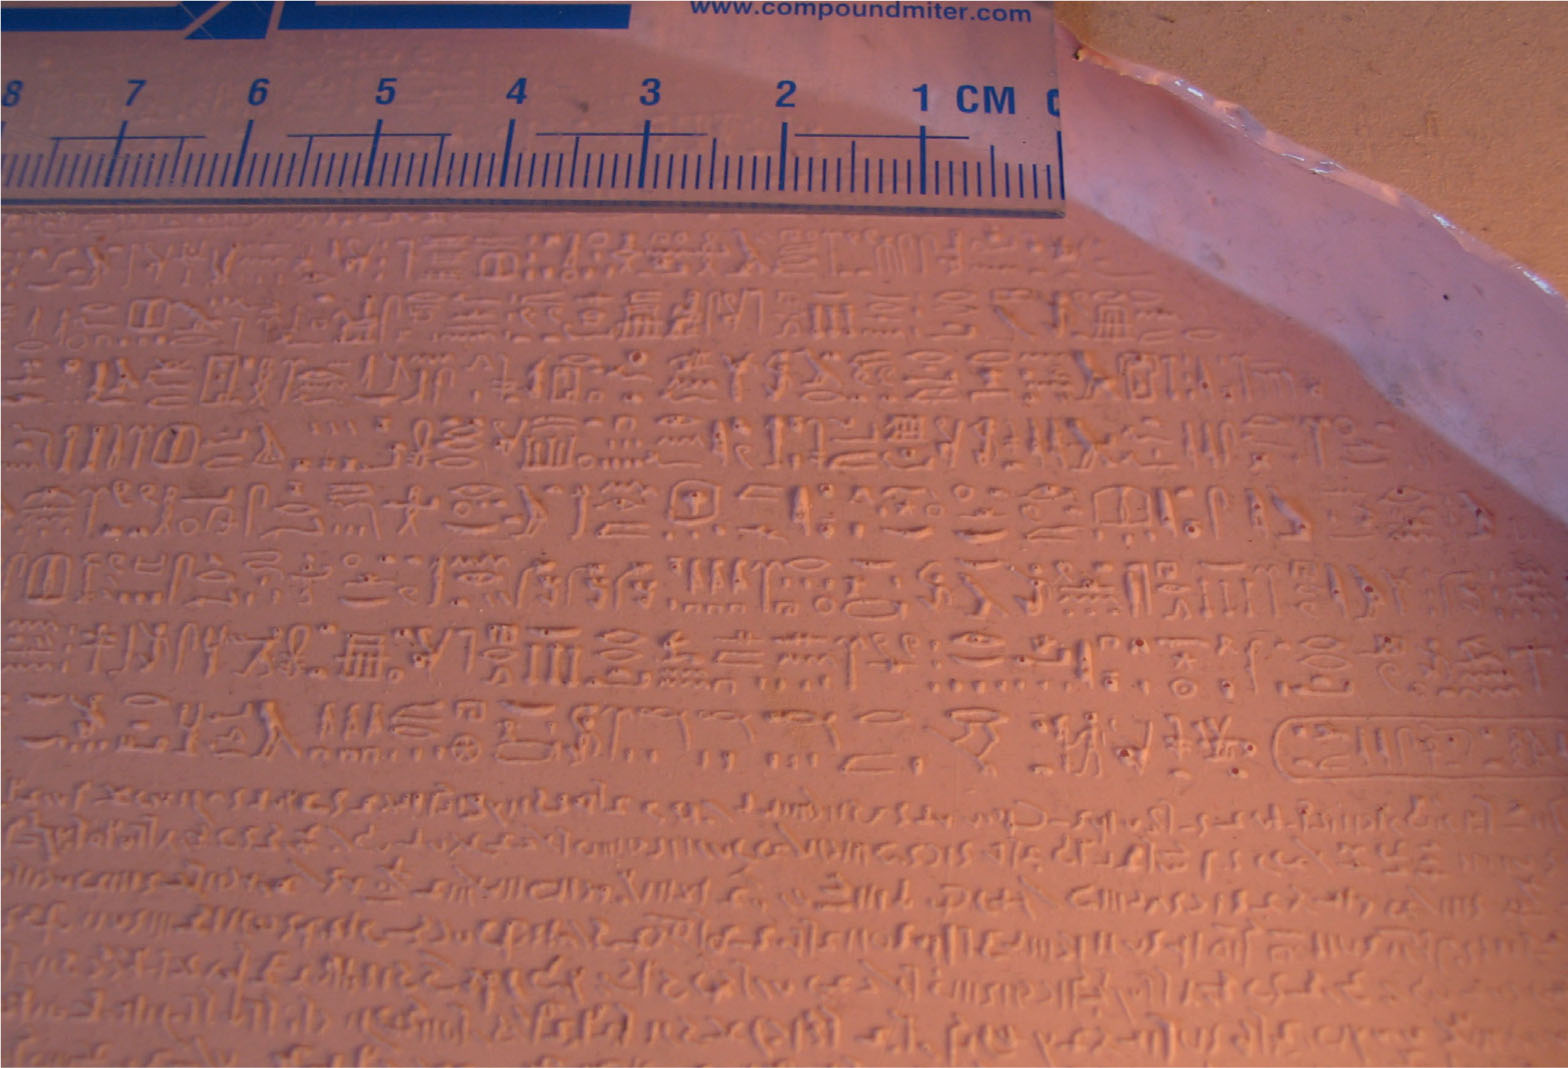
Detail of a silicone rubber ‘Rosetta stone’ mould.
Pigmentation and Colouring
There are specific pigments available for use with all silicone rubbers. Added to the rubber in its liquid state they will provide integral or surface colour to castings.
■ Translucent or clear silicones, usually found in the platinum cure range, will take pigmentation more readily.
■ Pre-mixed skin tone pigments are available in fair, mid and dark tones to produce background skin colour.
■ Post-cure surface colours can be painted onto set silicone to produce infinitely variable colour combinations to castings. The range is suitable for platinum cure silicones.
■ It is possible to colour some silicones with oil-based artists’ paints. Testing should be conducted.
■ Luminescent additive can be added to silicone castings and will give off a glow when exposed to UV light source.
Moulds and Release Agents
Silicone can be cast in most mould types, although various specifications and compatibility issues should be considered.
■ Silicone moulds need to be primed with non-silicone-based wax release agents. The spray systems are convenient and effective.
■ Some platinum cure silicones are only compatible with platinum cure moulds and vice versa.
■ Porous moulds should be sealed and primed with non-silicone-based wax release agent before use.
■ Multiple-piece moulds can sometimes be made with less undercutting consideration if casting in silicone. A silicone cast often has enough flexibility to bend past a certain amount of undercutting in a mould.
■ Consideration should be given to adequate tear strength of castings taken from deeply undercut moulds.

Rosetta stone copy, in pigmented polyester resin (H: 330mm).
Principal Techniques
Surface Coating
A decorative surface coat of silicone can be applied to a mould surface prior to filling or laminating with either neat silicone or other material. There are several reasons for using this method:
■ To ensure maximum pick-up of detail from the mould surface lamination can be employed by applying a surface coat of silicone to the mould surface before backing up with thixotropic addition silicone.
■ Decorative pigments can be applied via a surface coat and then backed up with neat silicone or other casting material as a method of being economical with the decorative pigment.
■ Platinum cure very soft Shore 00 silicones are relatively expensive. If very low shore hardness is just required on the surface of the cast an adequate layer of Shore 00 silicone can be built up initially and then it can be backed up with an economy silicone.
■ Prosthetic castings can benefit from having a neat surface layer of unpigmented translucent silicone applied before a pigmented layer.
■ Multiple-coloured layers can be built up to create depths of colour and different colours can be blended together on the surface of a mould. This can be particularly useful when trying to achieve realistic skin tones.
Solid and Backfilled Casting
Silicone rubber can simply be poured into a mould, with the appropriate release agents applied, to produce a solid casting. Alternatively surface-layered decorative silicones can be back-filled with other materials for economy.
■ When pouring silicone into a mould, pour from one spot and allow it to rise and fill the mould, pushing out any air entrapment as it does.
■ When pouring solid castings it may be necessary to degas some silicone rubbers to reduce air entrapment within the cast (see Chapter 9 for degassing information).
■ In theory any material could be used to backfill a previously applied decorative surface silicone. However, most materials will not adhere to silicone rubbers except other silicone rubbers. Where this is a problem a way of fixing the backfill material mechanically to the surface should be considered. The use of registration buttons or blocks is one way of anchoring a backfilling material to the surface silicone (see Project section).
■ If a hard backfilling material like plaster is to be used, consideration should be given to the flexibility and surface tactility of the finished casting. It may be necessary to lay up enough surface silicone to maintain surface tactility.
■ Expanding polyurethane foam rubbers can make an excellent lightweight backfilling material. Backfilling with expanding flexible foams can maintain cast flexibility. (See Project section and Chapter 8 for specifications.)
Laminated and Hollow Casting
Silicone rubbers can be cast hollow as well as poured solid. This is achieved by laminating or ‘laying up’ silicone in layers to an adequate thickness. This method can be useful for economy of casting material, when the desired surface can be achieved with minimal casting material and then backed up with a more economical reinforcing material.
■ After an application of decorative surface silicone, castings can be backed up with an economy thixotropic addition silicone for durability. If tactility is important it will be necessary to apply enough surface silicone to achieve the desired surface look and feel before backing up. Ensure the backfill silicone is compatible with the surface silicone used.
■ The thickness of the casting will depend on the specifications of the silicone being used and the specifications of the casting required.
■ Hessian jute or cotton scrim can be used to reinforce surface layer silicone. Ensure a good layer of silicone is applied underneath as well as on top of reinforcing scrims. Push out any air between layers to avoid air pockets within the casting.
■ It is possible to slush cast silicone. Silicones will need to be thinned to make them fluid and have fast setting times and a high tear strength. They may also need to be applied in several layers (see Chapter 12).
Specification
A laminated life-size torso, backfilled with flexible polyurethane foam. From a one-piece silicone rubber and Jesmonite case mould (see Chapter 5).
Time Required
The project was carried out over three and a half hours, not including setting times.
Materials
■ T20 tin cured silicone rubber (supplied by Alec Tiranti Ltd);
■ Mid-tone silicone flesh pigment (supplied by Notcutt Ltd);
■ Silastic 3498 tin-cured silicone rubber (supplied by Notcutt Ltd);
■ silicone oil;
■ hessian jute scrim;
■ self-skinning flexible polyurethane foam (supplied by Alec Tiranti Ltd);
■ non-silicone spray wax release agent; and
■ pre-made silicone registration buttons or blocks.
Tools
■ Dispensing and mixing containers;
■ wooden spatulas;
■ laminating brushes;
■ scissors;
■ clamps; and
■ disposable gloves.
Method
SET-UP AND PREPARATION
As with any project, careful preparation before the start of the job is crucial. Knowing the material quantities and tools needed, undertaking repairs to the original and setting-up the working area will all help to complete the job accurately and efficiently. (Tip: make sure you have enough materials to complete the job before you start. Running out of material halfway through the job is at least a waste of time and, at worst, a loss of previously executed work.)
1. Ensure all work surfaces are clean, clear and well lit. This may sound obvious, but preparation of this sort prior to casting will help greatly in production. It easy to miss parts of the mould surface when in a badly lit work space!
2. Clean and dry the mould surfaces.
3. Support the mould on a work surface. Make sure the mould is secure and will not move about during casting. Ensure there is adequate access all around the mould, particularly that you can reach all areas of the mould surface.
4. Apply spray wax release agent in three layers, allowing it to dry between layers.
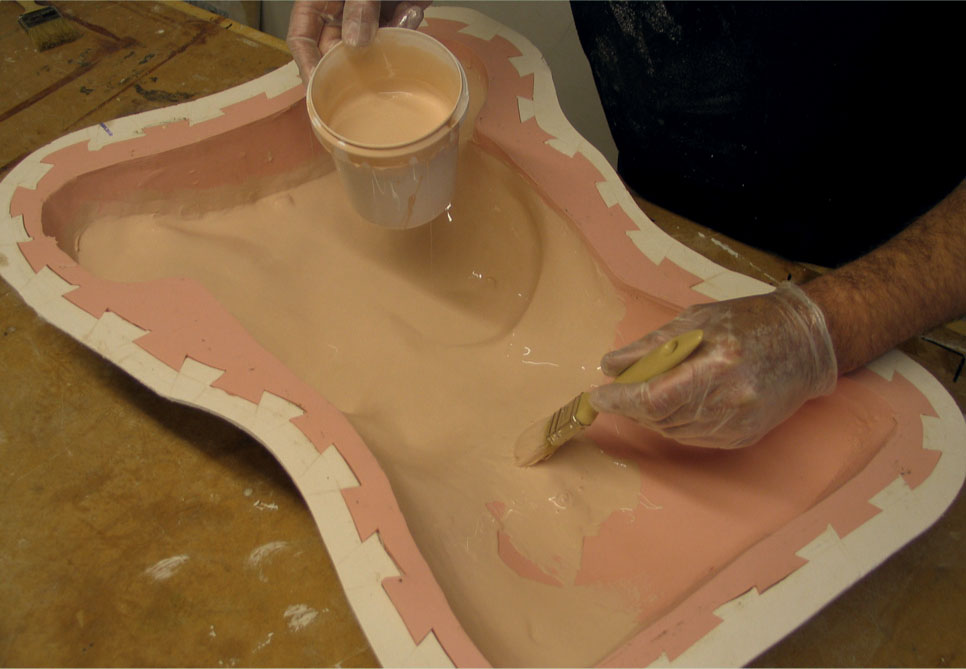
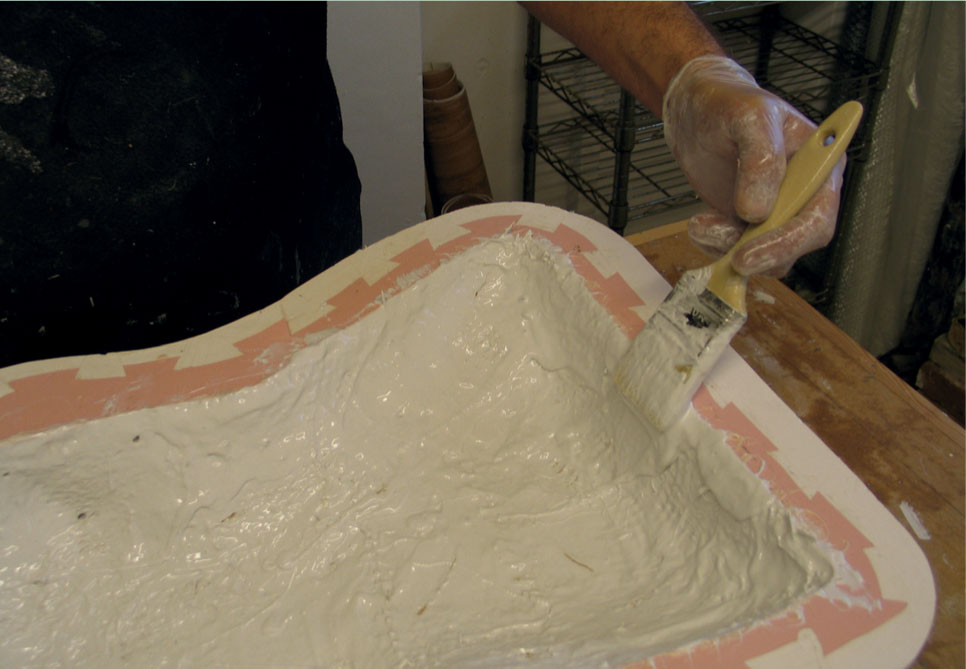
APPLICATION OF THE SURFACE COAT
1. Dispense a batch of silicone large enough to cover the whole mould surface.
2. Add silicone mid-tone skin pigment to the batch. Pigments are usually very concentrated, so add just a little at a time until the desired colour has been achieved. Mix very thoroughly, scraping the sides and the bottom of the container to ensure thorough pigment dispersion. To properly ensure thorough mixing decant the mix into a new container and mix again.
3. Add the required amount of catalyst and mix thoroughly.
4. With a soft brush paint the mixture onto the mould surface to a depth of 1–2mm. Without the addition of thixotropic additive this is about the maximum thickness of coverage that can be achieved.
5. Allow surface coat to set fully.
6. Moulds with fine surface detail can benefit from having several applications of surface coat in this way to ensure good detail pick-up. Allow the silicone to set between layers.
LAMINATED LAYERS
The surface layer on its own will not be adequate and this needs to be built up to an appropriate thickness with a further layer of silicone. In this case this layer does not necessarily have to be pigmented.
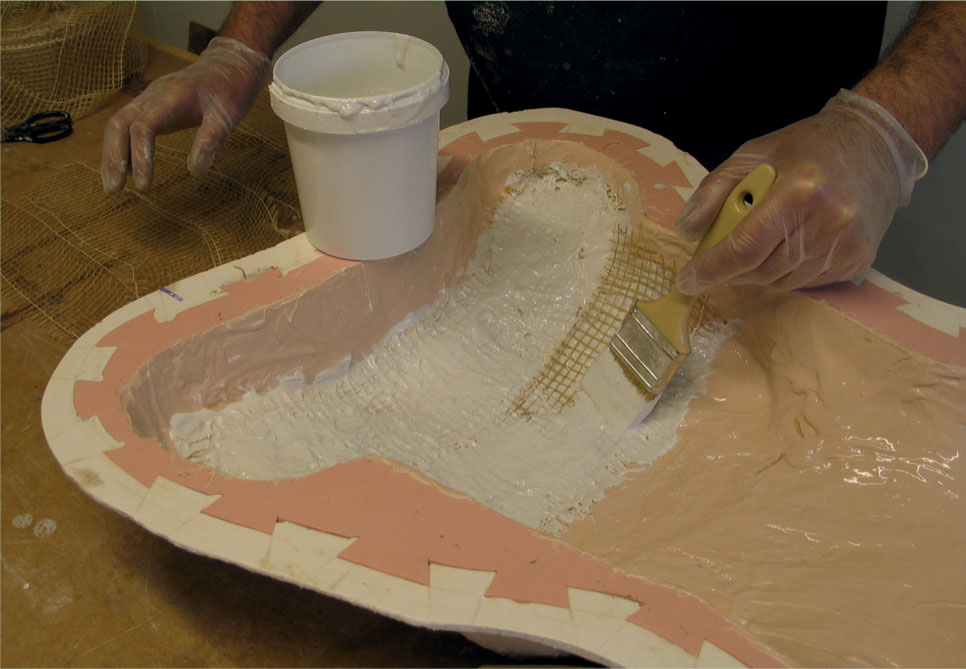
1. Mix batches of thixotropic addition silicone and build up the layer in the mould to an appropriate thickness. In this case the thickness only needs to be approximately 10mm as the cast is going to be backfilled with flexible foam.
2. Paint the thixotropic mix onto the surface of the pre-applied surface coat.
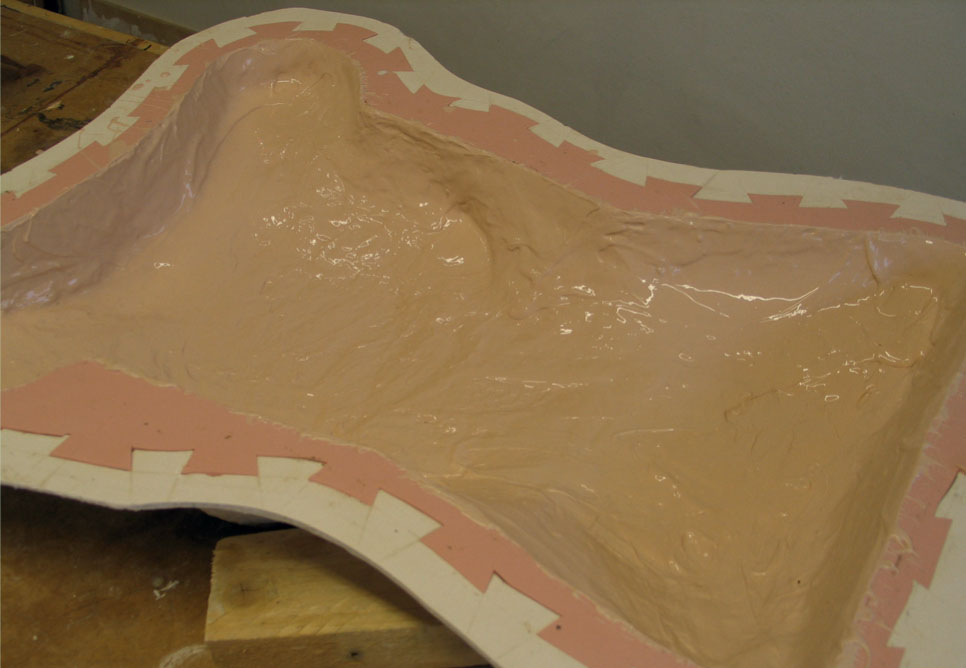
3. Hessian scrim can be used to increase durability and/or economize on the amount of silicone required to achieve cast thickness. Use non- thixotropic silicone when using the scrim to allow it to saturate into the fibres.
4. Once the full thickness of the cast has been achieved, before it sets, apply registration buttons or blocks to the unset surface. These will locate and secure the silicone cast into the foam backfill.
5. Allow all layers to set fully.
A thin coat of pigmented silicone is applied to pick up the mould detail.
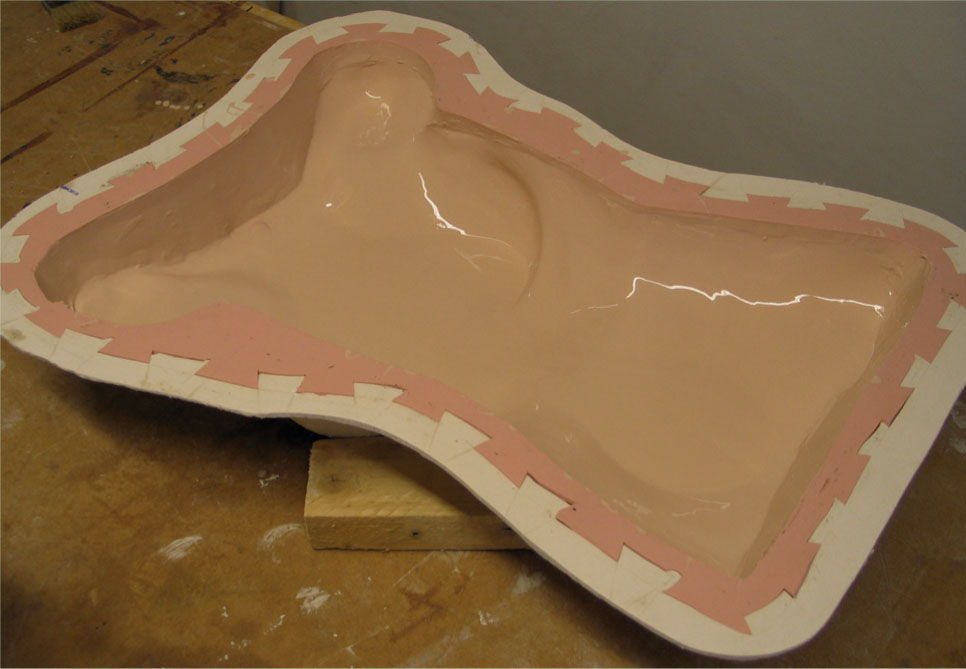
The detail coat is allowed to set fully.
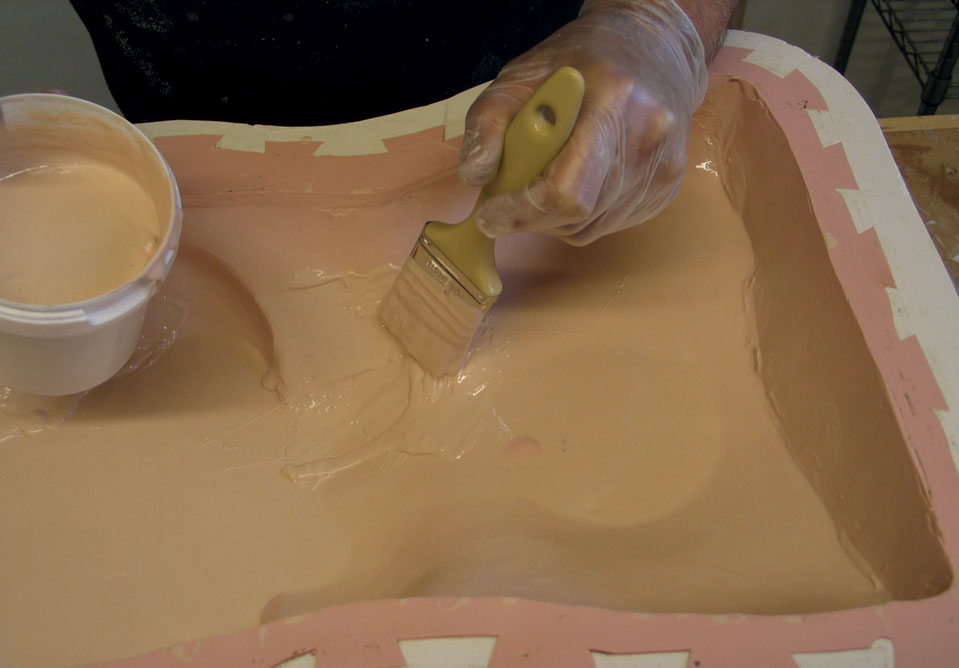
A second thin coat of silicone is applied to reinforce the detail cost.
An additional pigmented thixotropic coat of silicone is applied to build up the thickness.
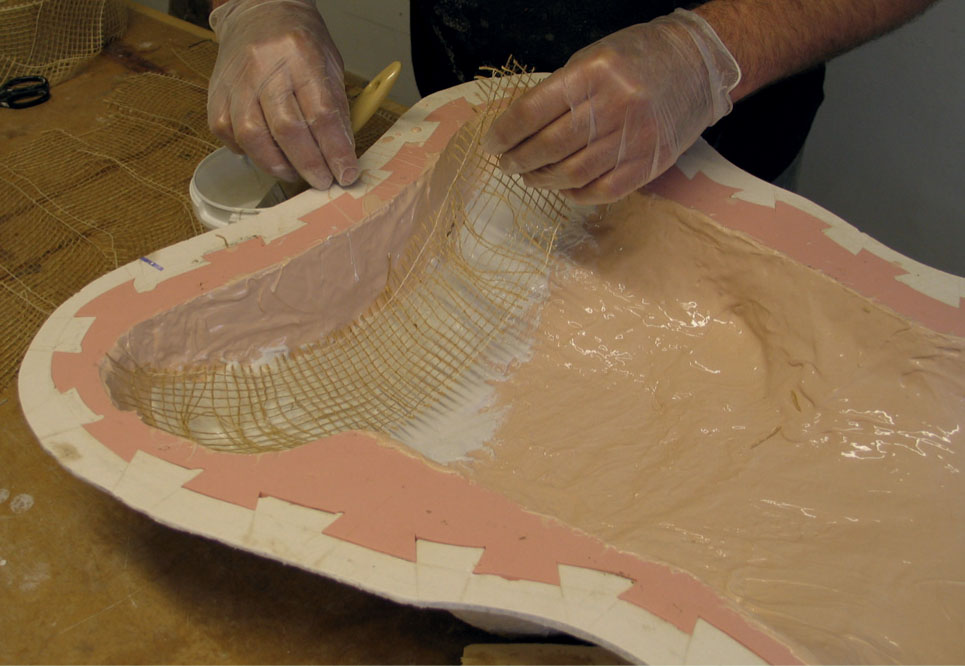
Hessian scrim and unpigmented silicone is applied to build the thickness further.
The hessian is saturated with silicone.
Extra hessian can be used on areas that need more reinforcement.
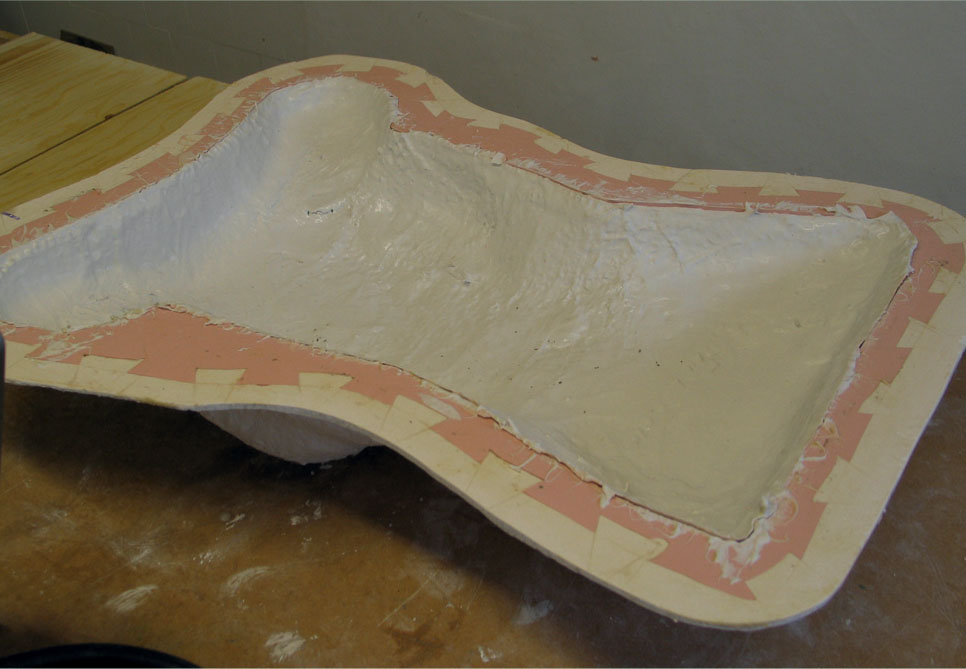
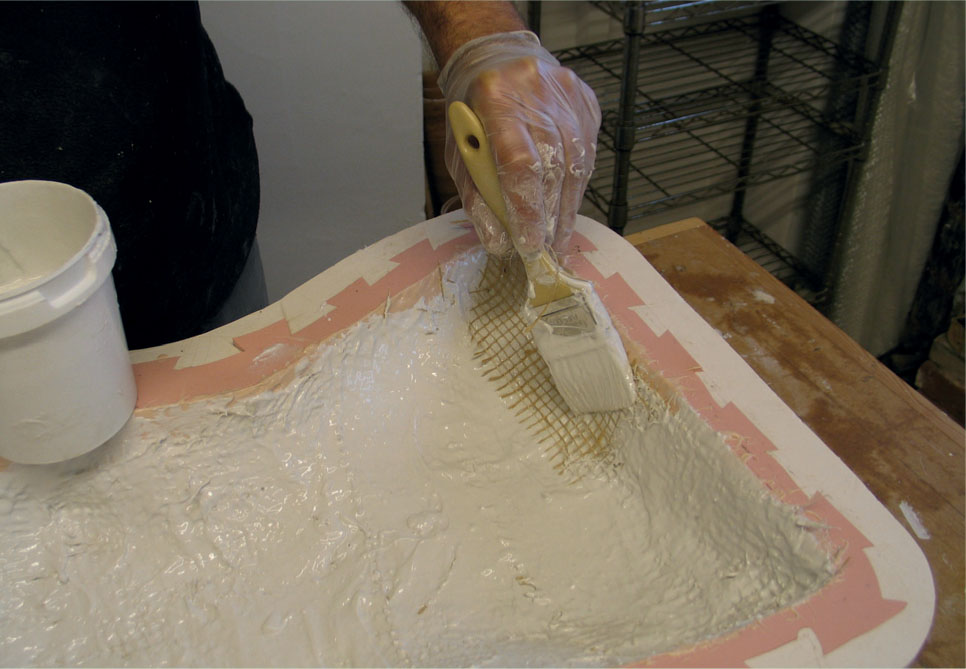
Once the desired thickness has been achieved the cast is allowed to set fully.
Additional thickness can be built up on cast edges for strength.
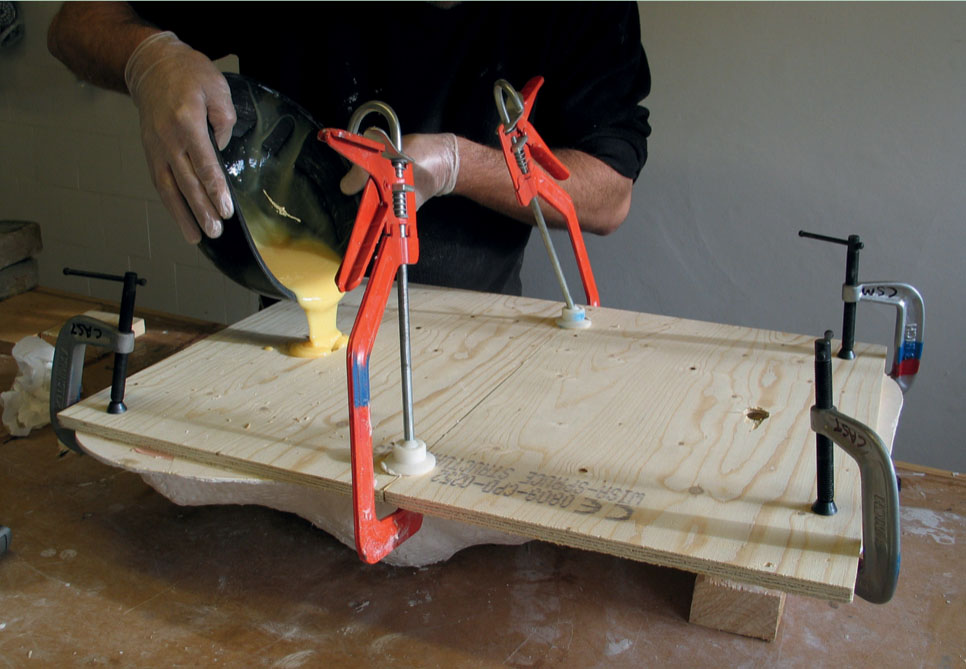
A top board with vent holes is clamped over the mould opening and polyurethane foam is poured into the mould.

The top board is removed to reveal the foam backfilled cast.
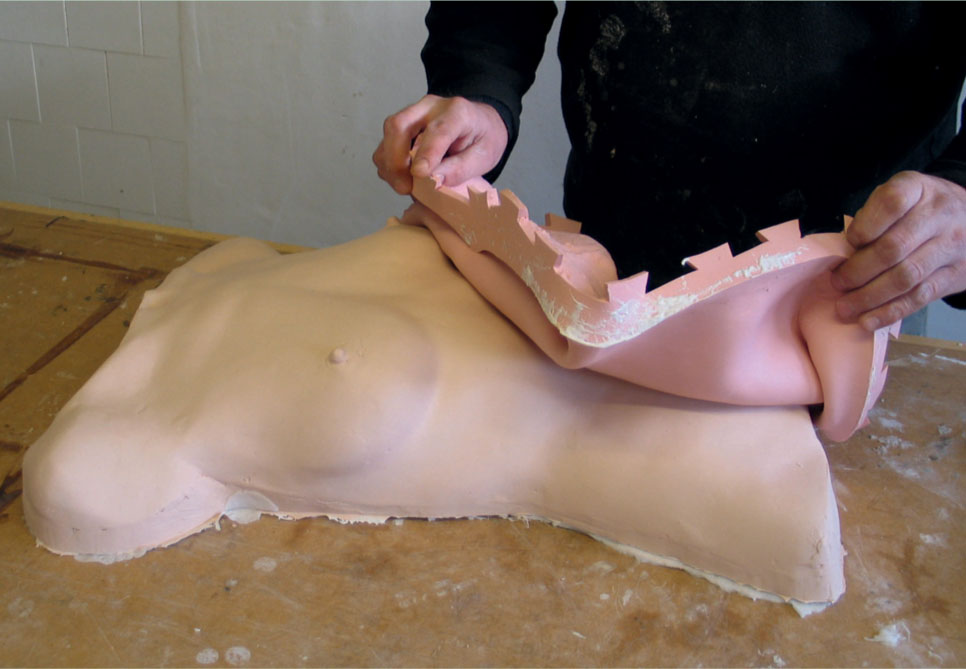
The cast is demoulded from the silicone mould.
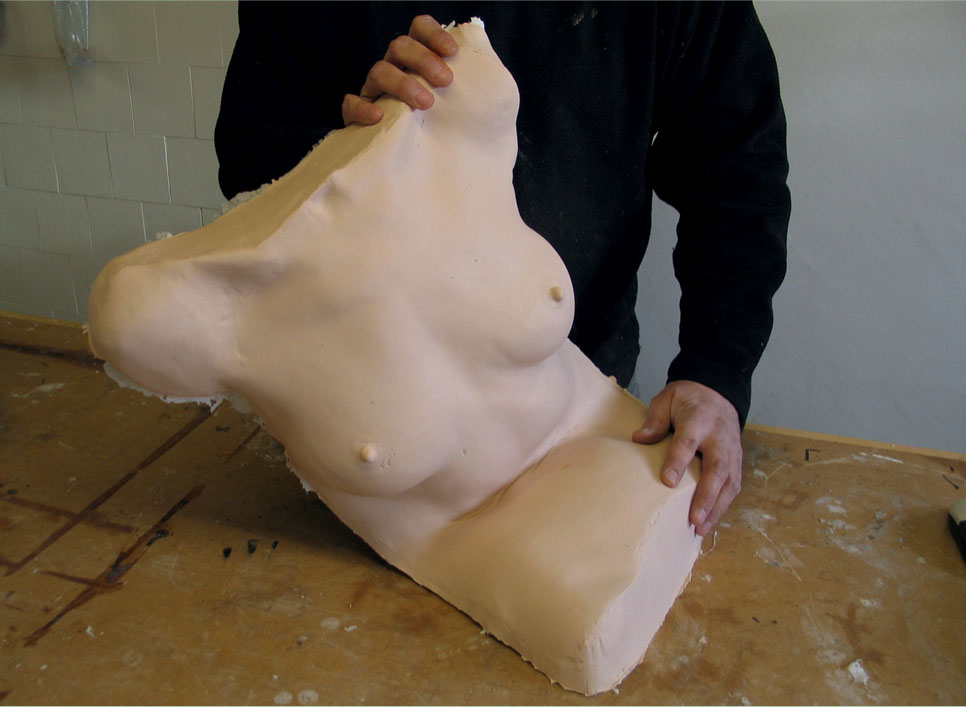
Showing the flexibility of the cast.
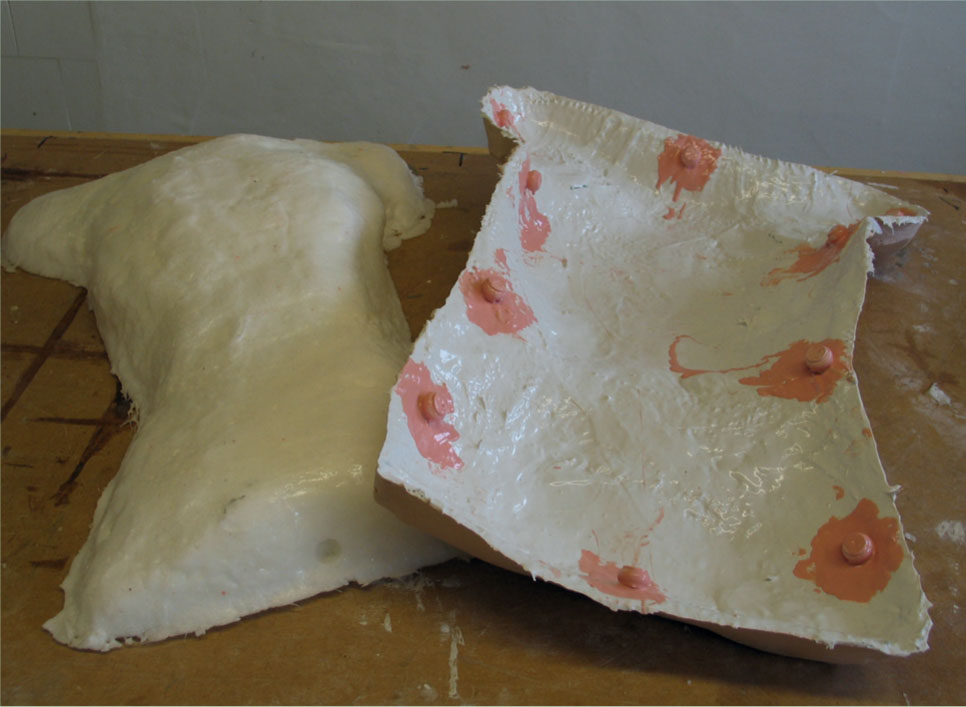
The silicone buttons inside the cast locate into holes in the foam backfiller.
BACKFILLING
For this project a flexible polyurethane foam is used to maintain the flexibility of the finished casting.
1. Trim any excess cast silicone protruding from the mould opening.
2. Secure a board, with two 20mm holes drilled at either end, to cover the mould opening. One hole will be the pouring hole for the foam rubber, the other will allow the air to escape as it expands.
3. Pour the required amount of foam to expand and fill the casting and allow to set fully (see Chapter 8 for specifications).
DEMOULDING
1. The same demoulding procedures should be employed as for other casting materials from different moulds.
2. Sometimes castings may need quite a bit of effort to peel them away from the mould surface; however, silicone rubber castings can have the advantage of flexibility to aid demoulding.
3. Ensure that full material specifications for silicones have been achieved before demoulding. Thin castings may tear if not allowed to fully cure, for example.
TRIMMING AND FINISHING
1. Once demoulded, silicone castings should be trimmed. The initial trimming can be done with a Stanley knife, craft knife or nail scissors, and secondary or fine trimming can be done with a scalpel or razor blade.
2. For the final trim flexible silicone castings can be stretched a little, with tweezers if necessary, cut, and then allowed to spring back to achieve a close-to-the-surface cut.
3. Once trimming has taken place, the cast can be surface painted using post-cure silicone colour systems. These can be airbrushed as well.
4. Talcum powder can be applied to sticky cast surfaces to remove tackiness.
5. Silicone polish can be used to achieve shiny cast surfaces. This is available from sex/fetish shops!
6. Silicone castings can be cleaned with mild washing-up detergent.