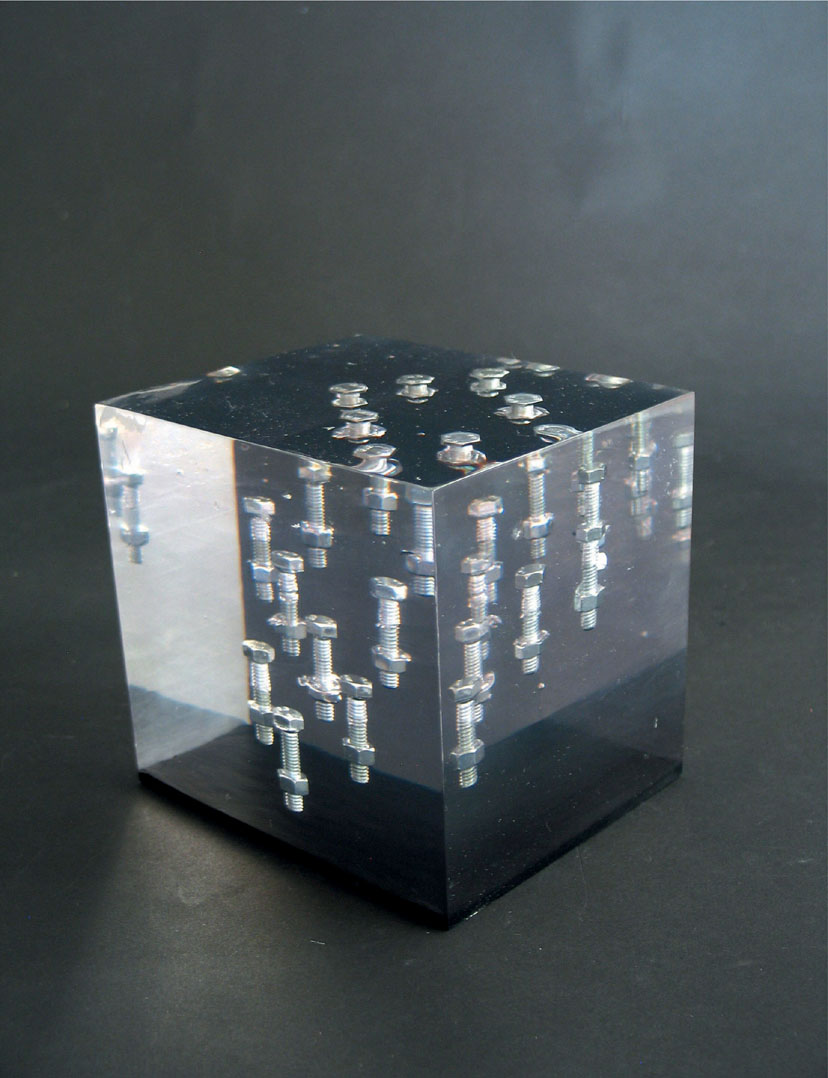
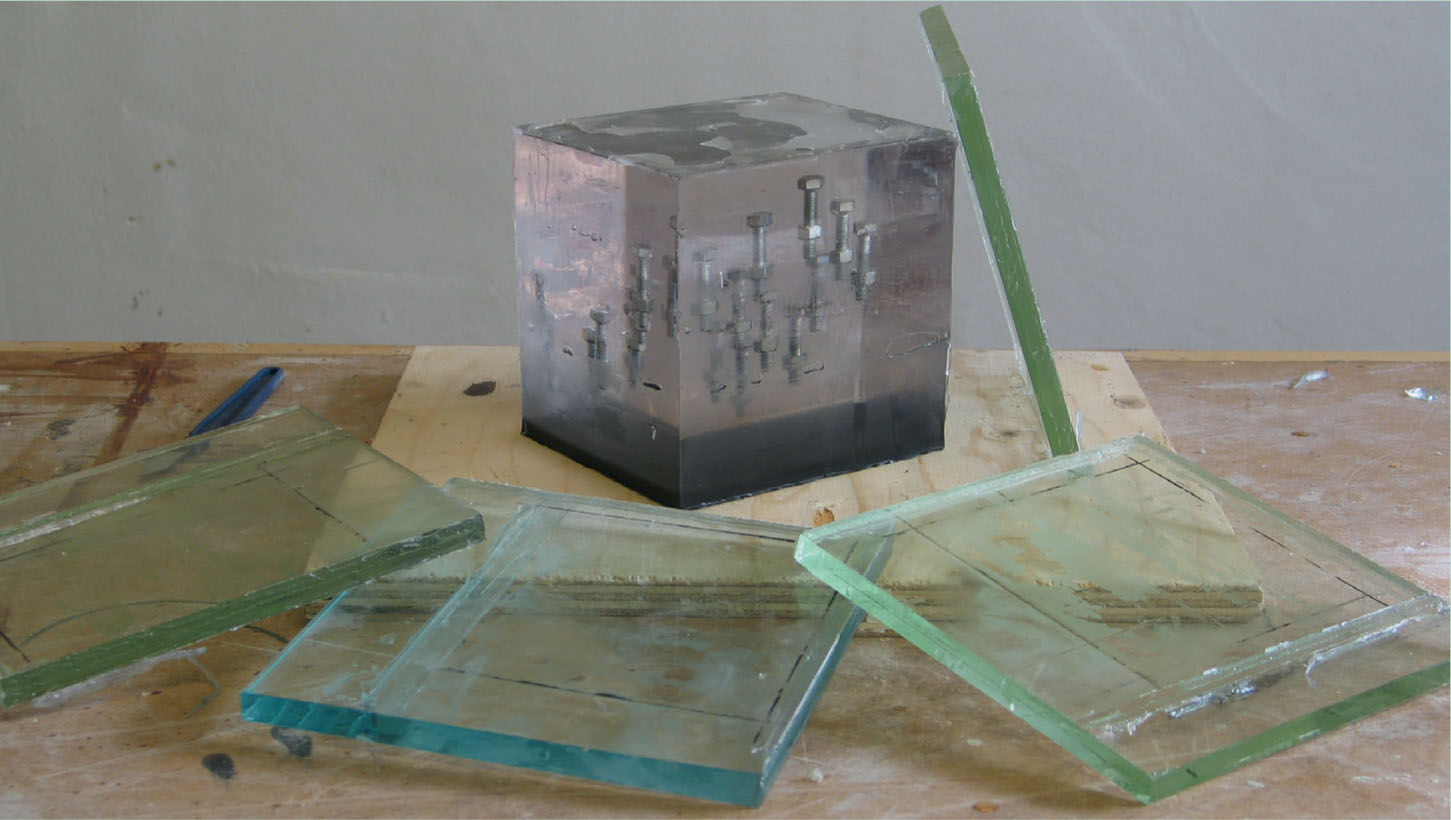
Embedded polyester resin cube (H: 115mm; W: 120mm; D: 95mm).
Embedded polyester resin cube (H: 115mm; W: 120mm; D: 95mm).
CHAPTER TEN
EMBEDDING IN CLEAR RESIN
There are number of resin systems that are capable of embedding objects within them in a liquid state and allowing them to set to a solid. The process is a relatively simple one but there are a number of potential difficulties that can produce unsatisfactory castings.
Virtually any mould type is suitable for the process, the only criteria being adequate access into the mould to embed the object and the use of appropriate release agent systems for the type of mould being used.
Another and very important consideration is the finishing time of the casting. Casting clear resins rarely produces a high-quality finish directly from the mould and usually requires substantial labour-intensive finishing processes to achieve good results.
Materials
Polyester
This traditional clear casting and embedding resin system has been around for years (see Chapter 11 in Mouldmaking and Casting for specification details).
■ Advantages Readily available and cheap.
■ Disadvantages Toxicity, size restriction, brittleness, high exotherm, long finishing times, shrinkage and slow setting times.
Polyurethane
Polyurethane is a slightly more versatile clear casting and embedding system. Some polyurethane systems provide a ‘pre-coat resin’ that is applied to the mould surface prior to the main casting and provides a practically finish-free cast surface. (See Chapter 8 for full specifications.)
■ Advantages A wide versatility of casting possibilities, high-impact resistance, the ability of some systems to produce a higher degree of finish straight from the mould, less toxicity and shrinkage than polyester systems, fast setting times, hollow slush casting possibilities.
■ Disadvantages More expensive.
Bioresin
Bioresin is a relatively new addition to the clear casting and embedding resin range. (See Chapter 9 for specifications.)
■ Advantages Very minimal toxicological concerns, low viscosity, high impact resistance, UV stability.
■ Disadvantages Availability, high cost, some restrictions on post-moulded surface finishing.
Pigments
Pigments can be added to all resins to produce varying degrees of translucent colour to castings.

Embedded polyester resin.
Principal Techniques and Problems
The different systems described in the previous section are all capable of embedding objects in their liquid state to produce set clear blocks of resin encapsulating an object.
Some principal techniques are common to all three.
Setting or Packing Objects in Single Poured Castings
It is possible to set single objects or multiple objects in blocks of resin in one pouring operation.
■ Will the object float or sink? An object that will float in the liquid resin will not fully embed, with some of the object potentially protruding from the surface of the casting. An object that will sink also may not embed properly, potentially protruding from the base of the casting. Pouring a thin layer of resin into the mould prior to the main pour can solve these problems.
■ For objects that may float this initial thin layer should be allowed to set to a point where it is still tacky. The object can then be introduced onto the surface of the thin layer. The thin layer is then allowed to set fully, sticking the object to it. The main pour is then performed.
■ Objects that may sink should be set upon a thin pre-poured layer that has been allowed to set, which will suspend it from the bottom of the casting when the main casting is poured.
■ These two principles should be applied when setting multiple objects in layers throughout a block casting.
■ Multiple objects can be embedded in high volumes, as far as the amount of resin required to hold the objects together will tolerate. This is a finite amount that will depend on the objects being embedded; in order to embed multiple objects there will need to be enough space between them for the resin to surround them and form a bond.
Suspending Objects
It is possible to suspend an object within a block of resin so that it appears to float in the set casting, or to suspend multiple objects set at different levels within a block.
■ Will the object float or sink? This consideration is similar to that described in the previous section but on a larger scale.
■ A layer of resin will need to be poured to the level at which the object is required to be set and either allowed to set sufficiently to stick down an object that will float or to suspend an object that will sink.
■ The next layer is then poured over the first set layer, embedding the object at the level of the first layer.
■ Multiple objects can continue to be set at different levels throughout a casting in the same way.
■ Note: In order to achieve the illusion of suspension it is important to maintain equal quantities, catalytic additions and setting temperatures for each layer of resin. If these amounts are not kept consistent and equal with each pour a line may be visible between layers. In practice this can be very difficult to achieve and, at certain angles of vision, lines between layers will inevitably be visible.
■ It is important to cover the mould while layers are setting to stop dust settling on the surface. This should be done with a sheet of paper to allow heat generated from the exothermic reaction of the setting resin to escape.
Exotherm and Shrinkage
Different resins will have different levels of exotherm (heat generation) and shrinkage when setting. Exotherm and shrinkage have inherent fundamental effects on the success of castings. If exotherm is excessive, cracks and warping can occur. Equally, shrinkage between layers of resin can produce compromised surfaces to castings.
■ Exotherm occurs when the catalytic reaction of the setting resin starts. The specifications of catalyst addition for the specific resin being used should be adhered to strictly. A general rule is that higher volumes of resin require less catalyst because they produce more exotherm, which in itself speeds up the setting of the resin.
■ A block or thick layer of resin will require less catalyst because of the large amount of exotherm generated. Likewise a very small block or thin layer of resin may require more catalyst because of the lack of exotherm it generates. Only specified maximum and minimum amounts of catalyst addition should be used, however. Too little and castings may not set or will remain sticky when remoulded; too much and warping or cracking may occur.
■ Moulds containing high-volume castings that are likely to generate large amounts of exotherm can be cooled while the reaction takes place. This can involve suspending the mould in water or air-cooling (with a domestic fan) until the exotherm subsides. If air-cooling be careful not to blow dust into the mould.
■ Shrinkage of some resins, particularly between layers, can be a problem. Once a layer has been poured it will start to shrink during the setting time, sometimes up to 5 per cent in total. If a layer is allowed to shrink away from the sides of a mould, it will produce a gap between the surface of the resin and the mould surface. The next layer poured will partially fill this gap, producing a fine layer of resin that seeps onto the surface of the first layer. When demoulded the excess seepage will need to be cut back to achieve a uniform surface on the casting.
■ Shrinkage cannot be avoided, but by pouring a second layer before the first has begun to shrink it can prevent or a least reduce seepage between layers.
■ Shrinkage should obviously be taken into consideration when considering the final dimensions of any clear resin casting.
Air and Moisture Entrapment
Air or moisture entrapment in a casting can occur in two ways. First, by the physical action of mixing and pouring the liquid resin into the mould and, second, by air or moisture being trapped in the object to be embedded and its subsequent release when the resin is poured over.
BUBBLES
Air entrapment from pouring will produce tiny bubbles in the body of the casting. These will naturally gravitate towards the surface of the casting and pop. This usually happens before it sets, thus not creating a problem. If small bubbles cannot escape, however, they will be trapped in the set resin. There are several methods for preventing this.
■ One way to reduce air entrapment is with a degasser. A degasser is a chamber that when pressurized creates a vacuum, forcing the air out. Filled moulds are placed in the chamber, pressurized and then depressurized to release the air from the mould. In the same way mixed batches of resin can be degassed before pouring into a mould.
■ The traditional methods of tapping the mould to bring up trapped air can be employed to some success.
■ Bubbles can also sometimes be teased up physically, by pushing them out with a pointed cane while the resin is still in a very liquid form. Do not do this when the resin starts to gel.
■ Low-viscosity resins can reduce air entrapment to a great extent.
SILVERING
When porous and therefore air-filled objects are embedded it can cause ‘silvering’. This is the appearance that the object has turned silver and is caused by an air bubbles tightly covering the form of the object and reflecting light back through the casting. Moisture can also cause silvering. This can be quite attractive, but in practice is difficult to control.
■ Moisture entrapment can cause setting failure or result in surface tackiness of the castings. Objects to be embedded should therefore be thoroughly dry. A mixture of silica gel and table salt can be used to dehydrate organic objects prior to embedding.
■ Porous objects can be pre-dipped in resin before embedding to reduce silvering.
■ Pre-dipping and allowing the resin covering an object to set before embedding can also reduce silvering.
■ Non-porous objects will sometimes trap air as they are embedded and cause silvering. The pre-dipping methods described can help to reduce the likelihood of this.
■ Degassing can be employed to reduce silvering.
■ Low-viscosity resins can reduce silvering.
Size and Volume
The size and volume of castings are important factors to consider when casting and embedding with clear resins.
■ There will be size restrictions on maximum volumes of specific resins that can be cast successfully in one pour. The amount of exotherm a particular resin produces during setting will have a direct result on the maximum size of casting that can be created. The larger the volume of resin poured, the larger the amount of exotherm created when the resin sets. When allowed to exceed appropriate limits, exotherm can potentially warp and crack a casting.
■ Adhere to maximum size and volume specifications according to the manufacturer’s instructions.
■ Adhere to catalytic addition specifications. There will be a range, given as a percentage, of catalyst addition which should be used with the resin. Generally speaking low percentages are for larger volumes and vice versa.
■ To create large castings over the specified maximum volumes of resin pour batches of resin as separate layers.
■ Hollow castings of very large size can be produced with fast-setting resins using slush casting methods (see Chapters 9 and 12).
Moulds
Virtually any mould type is suitable for use with clear resins, the only criteria being adequate access into the mould to embed the object and use of the appropriate release agent systems for the type of mould being used. However, the surface finish of castings can vary greatly depending on mould type.
■ Non-porous highly polished moulds such as glass, plastic or metal will produce castings that need very little surface treatment after demoulding, as will commercially available plastic moulds with very highly polished surfaces.
■ Porous moulds such as plaster or Jesmonite and prefabricated wooden moulds can produce castings with a frosted appearance that will need to be cut and polished back to clarity. These types of moulds will need a series of applications of release agents appropriate to the resin being used (usually the ‘combination’ system described in Chapter 3 of Mouldmaking and Casting).
■ Non-porous pre-fabricated moulds of metal, glass and plastic will help to minimize demould surface work to castings.
Trimming and Cutting Back
Once the cast has been demoulded any excess cast and seam lines (flashing) can be trimmed back.
1. Initially the extremities of any excess can be broken off carefully by hand or with a pair of pliers, but be careful not to break off too much. Then a number of tools can be employed depending on the size of the cast and how much resin is to be removed (chisels, hacksaw blades, surforms, rasps and so on).
2. The initial trim should not be taken right back to the surface of the cast and should only be used to remove bulk excess.
3. Smaller and smaller tools should be used as you work closer to the cast surface.
4. Final cutting back to the surface of the cast should be achieved with increasingly finer grades of abrasive paper. Fine files including needle files can be useful for getting into difficult-to-access area of the cast (a fine brass or wire brush is also useful to clear clogged files).
5. Once excess flashing has been taken back to the surface final cutting back and/or polishing of the entire cast surface can be tackled.
Surface Finishing and Polishing
Clear casting resins will usually come out of moulds with a matt surface finish. To obtain the full effect of glass clear surfaces, castings will need to be cut back with abrasive papers and then polished.
CUTTING BACK WITH ABRASIVES
Wet-and-dry abrasive papers should be used to cut back cast surfaces and these should be used wet to avoid dust (which can be carcinogenic) and prevent paper from clogging. The papers are graded by the number of particles of grit per square inch of paper and a variety of grades should be used in sequence from coarse to fine. Depending on the job 100–800/1200 grit paper (100 being coarsest and 1200 finest) should be used in succession.
1. Standard sheets of paper should be cut up into pieces that are suitable for the size of the job and laid out in sequence.
2. Initially use the coarsest grade just to take off the worst of any seam lines and to give the whole surface ‘bite’. Where there are smooth areas or areas that have little detail coarse papers should be used sparingly and it may be possible to start with a finer paper.
3. As the paper becomes clogged either rinse it under a running tap or in large bowl of water.
4. Once the whole surface has been cut back with one grit size wash the cast, change your rinsing water and move on to the next grit size. In this way the whole surface of the cast is cut back progressively using finer and finer paper, with scratches created by the coarser grades being removed by the finer grades.
5. Clear resins will remain cloudy even after the finest grade and will not become clear until polished unless pre-coated.
6. It is difficult to gauge whether casts have been thoroughly abraded enough until after polishing, but thorough and methodical abrading will produce better polished results. If polished results are not good it will usually mean returning to abrasives before polishing again.
POLISHING
Polishing can be done either mechanically or by hand using specifically designed polishing compounds. Polishing compounds come as either a hard waxy block or as a cream and are applied to the cast surface with a lint-free cloth or a mechanically spun polishing mop.
Cloth polishing mops for block compounds and sponge mops for cream compounds can be mounted, using the correct arbour, to a standard electric drill with variable speed control, or can be mounted in a dedicated polishing machine. Polishing machines are bench-mounted so this will restrict the size of the cast that can be polished mechanically. Electric drills can be used freehand or bench-mounted securely using a clamping system specific to the machine you are using. Care should be taken when using electric drills for polishing as they have no guards; goggles should always be worn whichever system of polishing is being used.
Polishing compounds are a very fine level of abrasive and come in grades of coarseness like the abrasive papers. They should be used in sequence from coarse to fine methodically over the entire surface of the cast. Compounds usually come in two or three grades and castings should be washed between grades of polish.
If after polishing through the grades of compound the levels of gloss, brightness or clarity required have not been achieved it may be necessary to return to the abrasive papers to cut back more and then to repolish.
TIPS
■ When cutting back any casting with abrasives the object is to remove the surface layer of scratches or frosting to allow for polishing back to clarity. On castings with very fine detail this process may remove some detail; there is no way round this so the balance of how far to cut back without losing too much should be considered carefully.
■ Castings with areas of high and low detail will produce areas that are clearer on the high points.
■ Different levels of clarity can be achieved by controlling the amounts of cutting back and polishing.
■ Toothpaste is an ultra fine abrasive polish and can be a good final polishing compound.
■ Note that some clear casting resins are not suitable for cutting back and polishing, so always check the specification of the resin used.
PROJECT
Specification
A polyester clear resin cube with eleven M6 × 30mm hex nuts and bolts set at ten 10mm layers throughout the casting. From a pre-fabricated glass mould. Size 115mm (H) × 120mm (W) × 95mm (D).
Time Required
Allowing for setting times this project can be carried out over approximately 5 hours.
Materials
MOULD
■ Pieces of 10mm plate glass × 5;
■ methylated spirit;
■ silicone sealant (building-grade mastic sealer);
■ 25mm masking tape;
■ acrylic sheet 115 × 120 × 4mm; and
■ a small amount of clay.
CAST
■ Polyester clear casting resin (supplied by Alec Tiranti Ltd)
■ polyester resin catalyst;
■ polyester resin pigment (to colour base of casting);
■ wax spray release agent; and
■ M6 × 30mm hex nuts and bolts × 11
Tools
■ A permanent marker;
■ mixing beakers;
■ wooden spatulas/sticks;
■ a spirit level;
■ digital scales;
■ a craft knife;
■ a thin-bladed filling knife or palette knife;
■ tweezers;
■ disposable rubber gloves; and
■ a sheet of A4 paper.
Method
SET-UP AND PREPARATION
As with any project, careful preparation before the start of the job is crucial. Knowing the material quantities and tools needed, undertaking repairs to the original and setting-up the working area will all help to complete the job accurately and efficiently. (Tip: make sure you have enough materials to complete the job before you start. Running out of material halfway through the job is at least a waste of time and, at worst, a loss of previously executed work.)
1. Ensure all work surfaces are clean, clear and well lit. This may sound obvious, but preparation of this sort prior to casting will help greatly in production. This is particularly important when casting with clear resin as airborne dust can contaminate castings.
PRE-FABRICATED MOULD
The pre-fabricated material of the mould in this case is five pre-cut pieces of 10mm thick glass. Ideally have the edges of each piece of glass ground to ensure a square edge.
If using glass or plastic to prefabricate a mould to cast resin the pieces need to be thick enough to maintain their shape while the exothermic heat is generated by the setting resin. If it is too thin it will shatter or warp with the heat generated by the chemical reaction of the setting resin.
1. Clean all pieces with methylated spirit to ensure a good bond with the silicone sealer.
2. Dispense a small bead of silicone sealer along one edge of one of the side pieces of glass.
3. Butt this up against the next side piece at right angles and secure temporarily with masking tape.
4. Continue with the next two sides to create the four sides of the mould.
5. Apply a bead of sealer along the top edge of the glass box.
6. Adhere the fifth piece of glass to create the base of the mould.
7. Secure the base to the walls with masking tape and turn the whole mould over onto a modelling board.
8. Apply a bead of silicone sealer to the outside joins of the mould to ensure it is watertight.
9. Allow the sealer to set fully.
10. With the acrylic sheet draw up a 10mm grid reference with the permanent marker. This will be placed on the outside of the mould as a guide when setting objects to be embedded.
11. When the silicone sealer has set fully use a craft knife to trim any excess silicone from the inside corners of the mould that may have been squeezed out when joining the mould pieces.
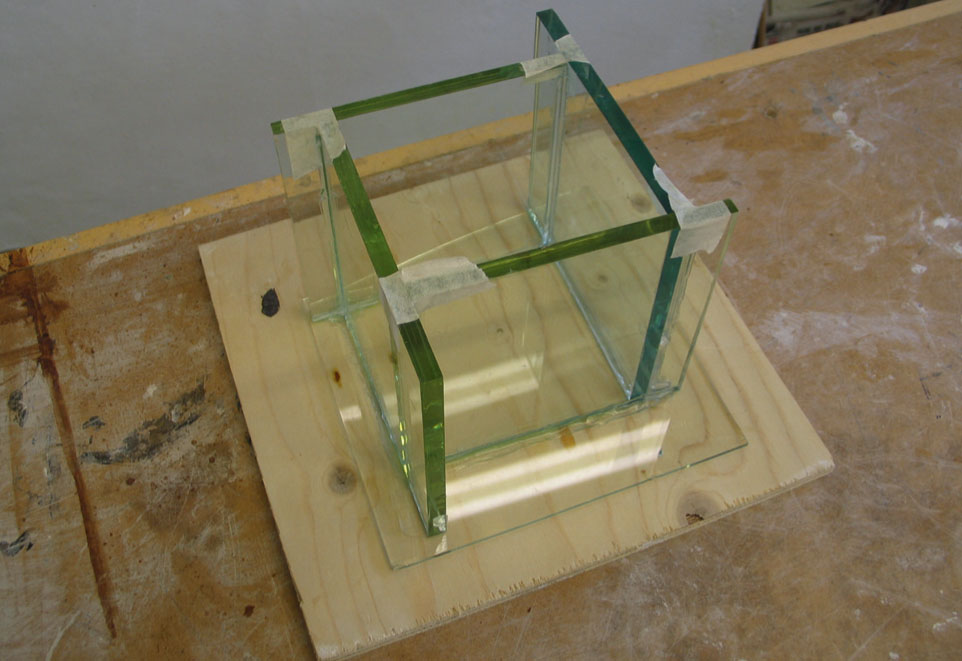
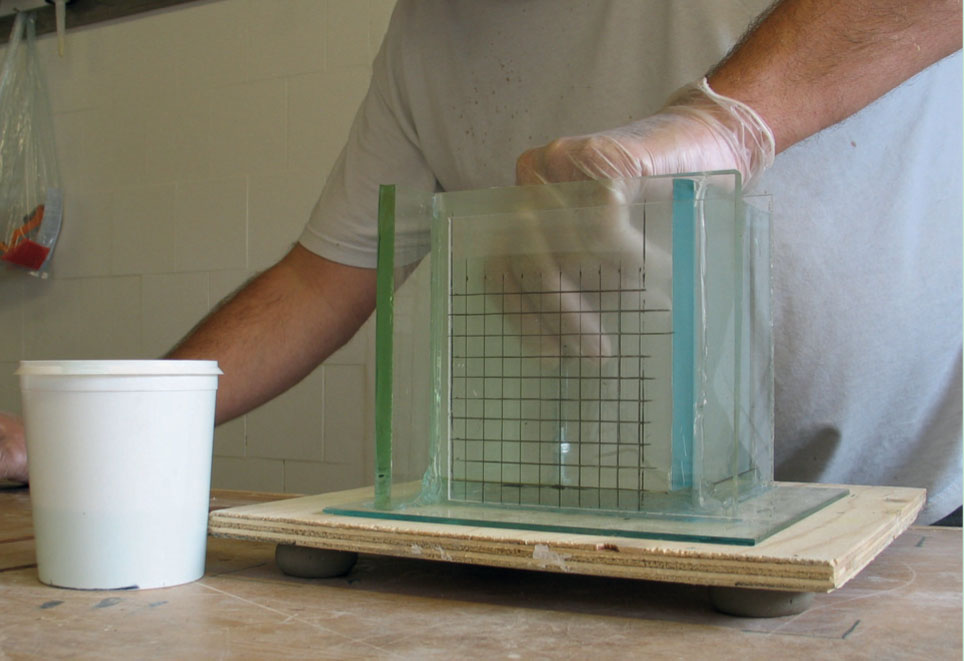
A prefabricated mould is created using plate glass.
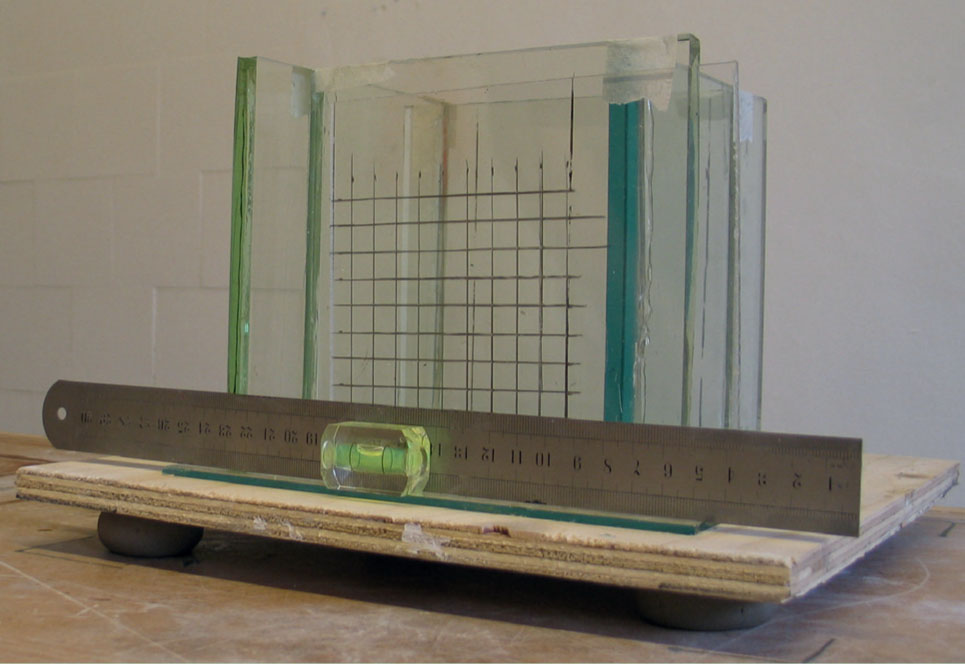
The mould is levelled and a grid drawn up on a separate piece of acrylic sheet, which is placed on the outside of the mould.

The first layer of resin is poured to a level on the grid and allowed to set.
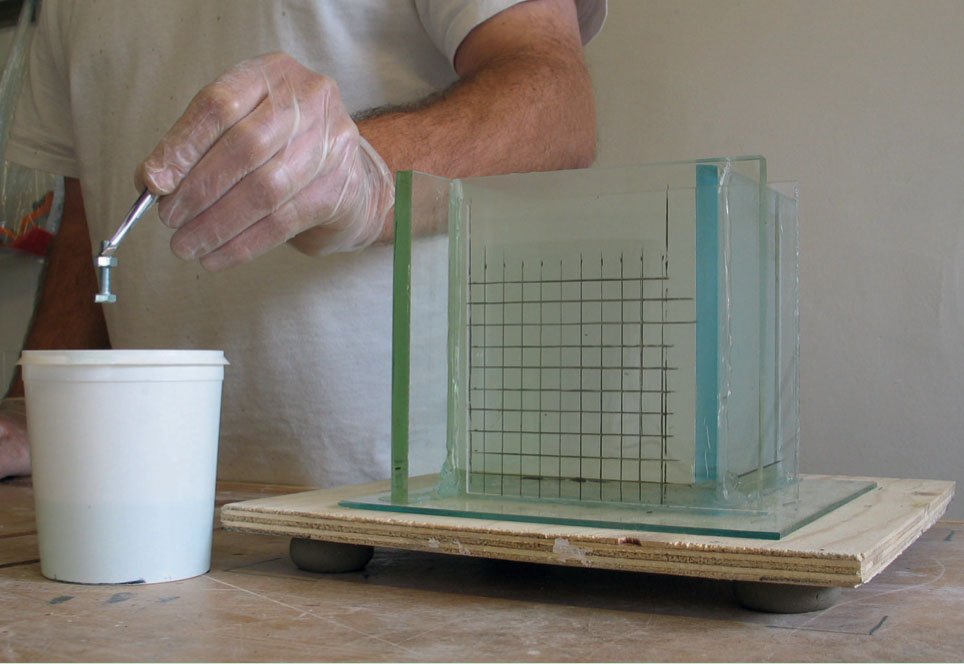
The first object is dipped in resin.
The first object is placed in position on the set first layer.
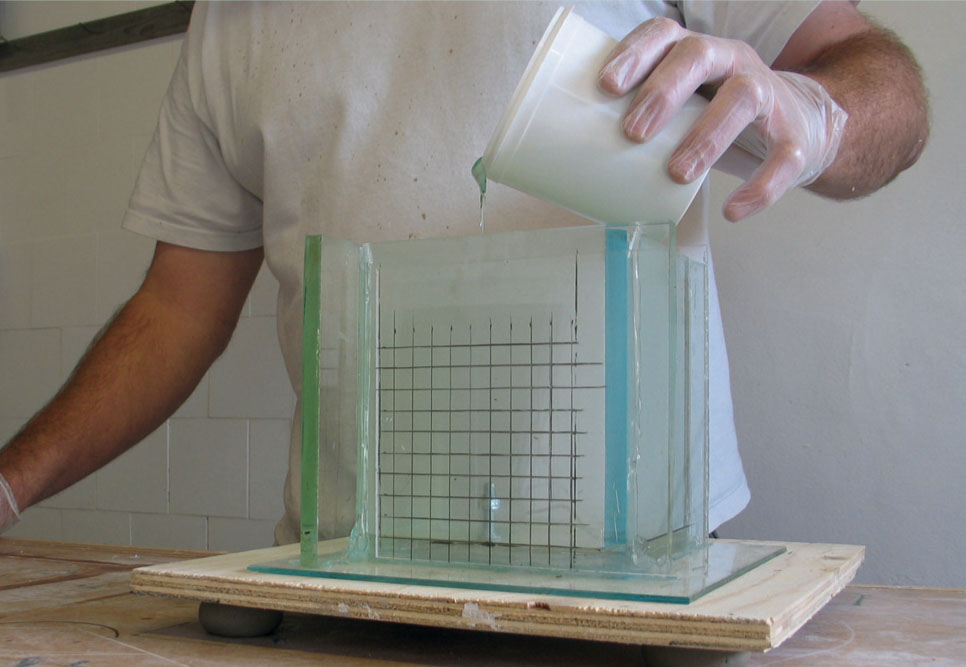
The second layer of resin is poured.
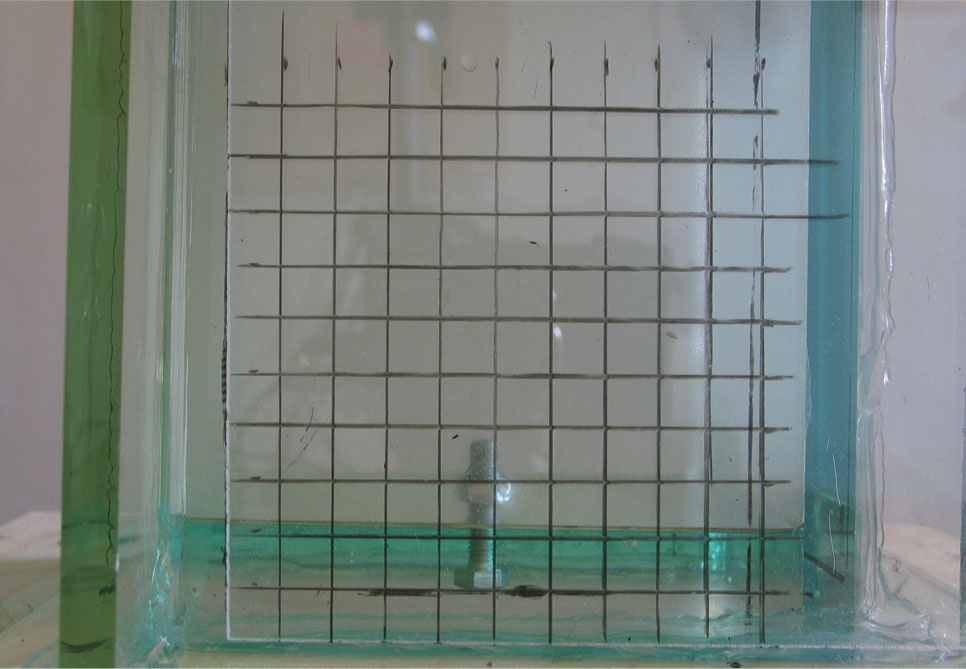
The object embedded in the second layer of resin.
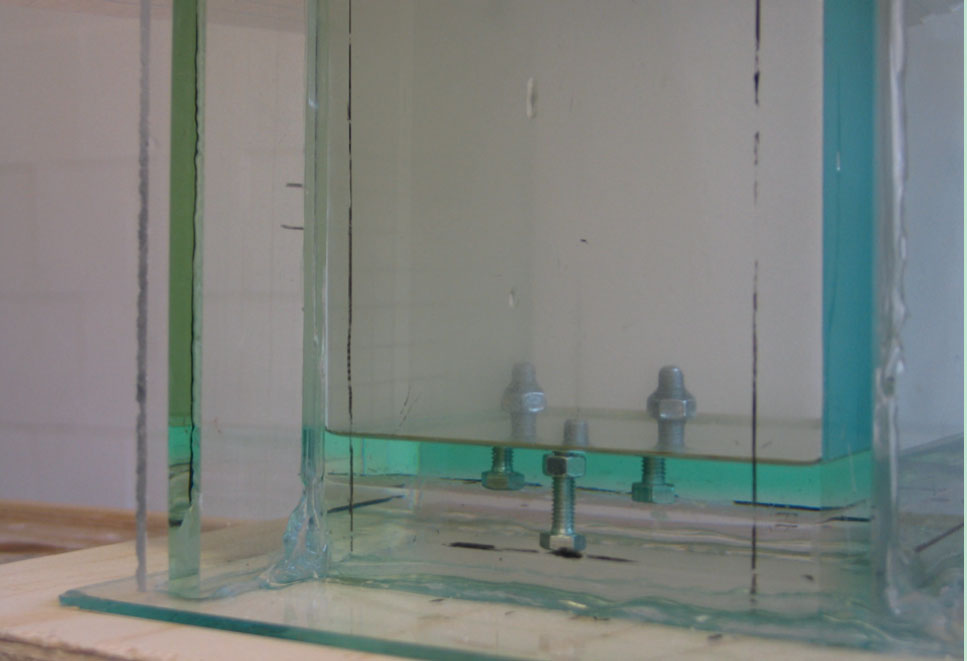
The second-layer objects are placed and a third resin layer is poured.
The second-layer objects are placed and a third resin layer is poured.

Silicone sealer is cut on the prefabricated mould seams.
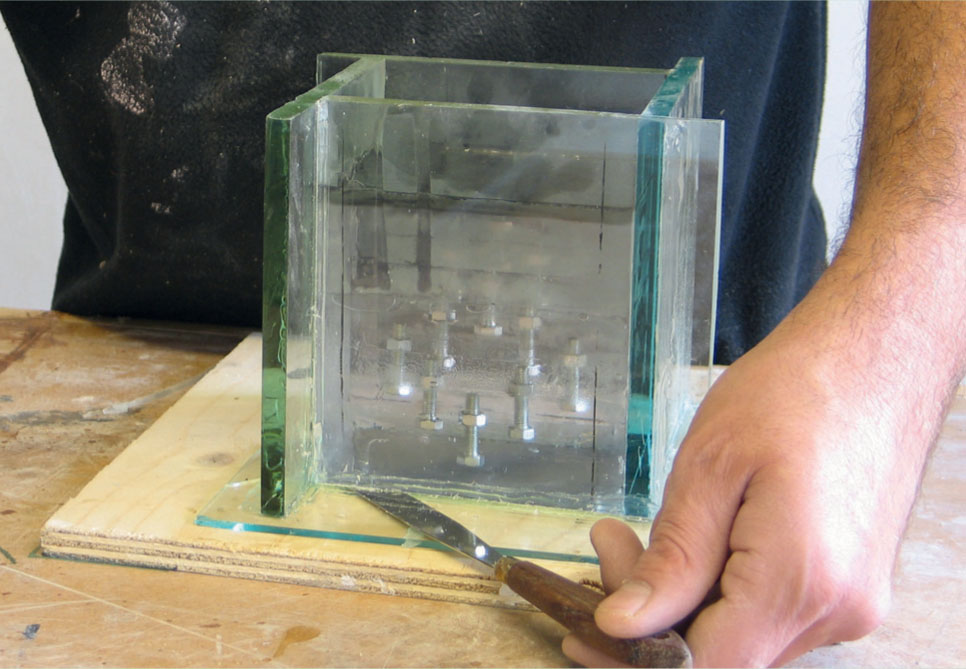
Silicone sealer is cut between the mould and the base.
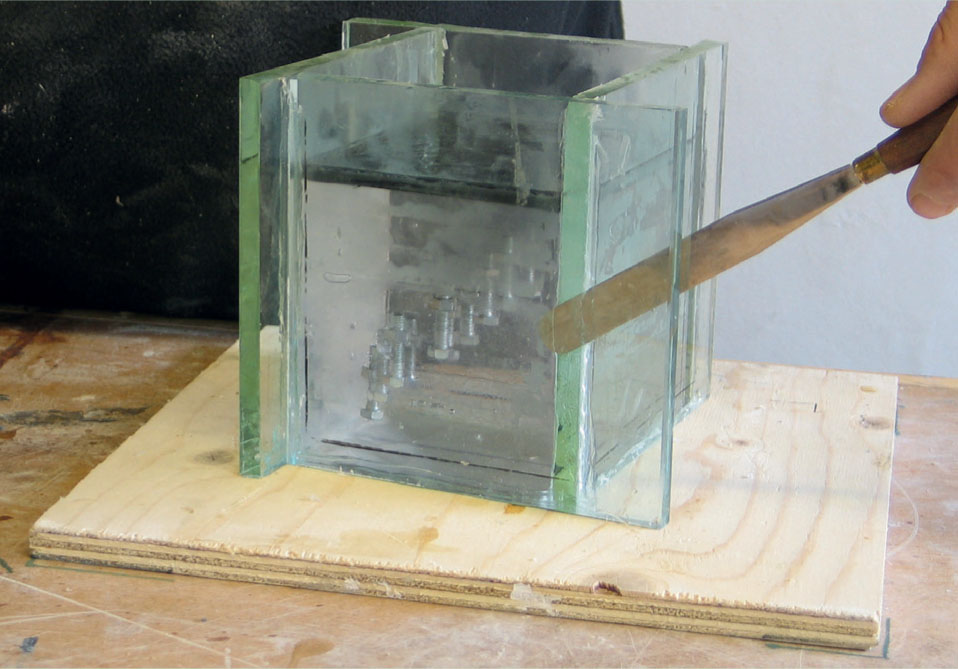
A palette knife is introduced between the cast and the mould wall.
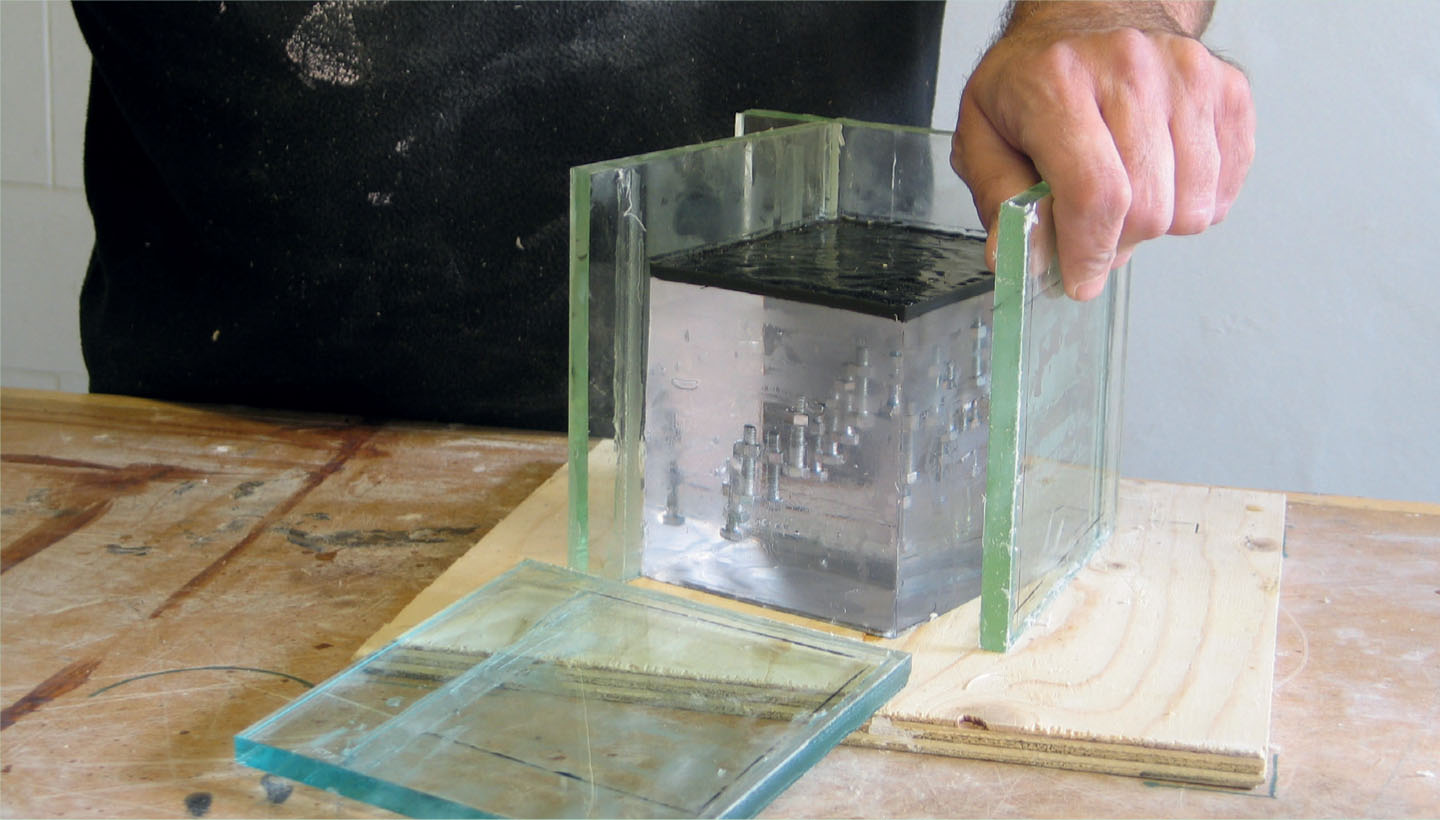
The mould walls are pulled way.
The cast demoulded.
CASTING
1. To determine the amount of resin to dispense for each layer of the casting, make a mark on the outside of the mould to the thickness of the layer and fill to that level with water. Pour the water into a clear mixing beaker and mark the level of the water. Dry the cup thoroughly and dispense resin to the level marked on the beaker. Weigh this amount of resin to determine how much resin to dispense for each layer of the casting. Thoroughly dry the mould.
2. Set the modelling board with the mould on it on top of four small balls of clay.
3. Use a spirit level to create an even level by pushing the modeling board down into the clay balls. Do this in two directions to ensure the whole mould is level. It may seem obvious but the resin is a liquid that will only settle to one level when poured into a mould.
4. Apply spray wax release agent.
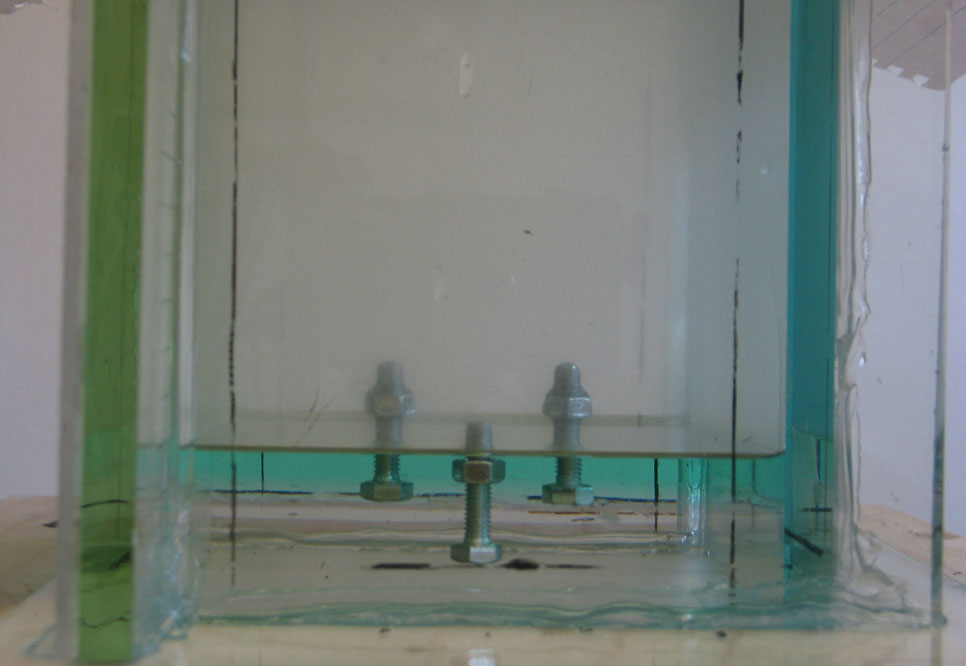
5. Because the nuts and bolts to be embedded within the casting have a wide stable head the cast is created upside down within the mould. The first layer is clear and the first nut and bolt is set in the second layer.
6. Dispense and catalyze the predetermined amount of resin for the first layer and pour from one point into the mould in an even and steady flow. Pouring from one point will reduce air entrapment.
7. Cover the mould with a sheet of paper to stop dust settling on the cast surface. Dust between layers of the casting will show up as lines.
8. Allow this layer to set to a point where it is firm enough to support the first nut and bolt. Do not allow it to set so much that it starts to shrink away from the sides of the mould, however. Check and if necessary test the setting times and shrinkage of the resin being used.
9. Set the acrylic sheet with the grid against the outside surface of the front of the mould. The grid is to guide the setting of the bolts evenly throughout the casting.
10. Dispense and catalyze the resin for the second layer. Before pouring, use the tweezers to dip the first nut and bolt into the resin and set at a predetermined point on the first layer of resin. Use the grid to set it in the desired position.
11. Pour the second layer of resin. The grid can be used to ensure the layer is equal to the first.
12. Repeat this process for the whole casting, ensuring the amounts of resin, levels, catalyst additions and setting times of each layer are equal.
13. Note: To cast a block of resin this big with one object embedded in the middle, the midway point of the casting may still need to be built up in layers to reduce exotherm and the chance of warping and cracking. Once the midway point is reached, the object can then be set and the second half of the casting built up in layers in the same way as the first.
14. Once all the layers have been poured and the objects embedded a last thin layer of pigmented resin can be poured to create a contrasting coloured base to the casting. Ensure that the pigmented layer is poured before the last clear layer starts to shrink back.
15. Allow to set fully, cool and cure before demoulding.
DEMOULDING
1. With a craft knife cut through the silicone seal between the mould walls. Be careful not to cut through to the cast.
2. Carefully lever the walls away from the casting, if necessary using a thin-bladed filling knife or palette knife between the cast and the mould wall. Be careful not to scratch the surface of the cast; if you do, scratches can be rubbed back with abrasives and repolished to clarity.
3. Once demoulded the casting can be washed and dried to remove any wax residue from the release agent before cutting back and polishing.
FINISHING
1. Follow the steps described earlier in this chapter for trimming and cutting back and surface finishing and polishing as necessary.